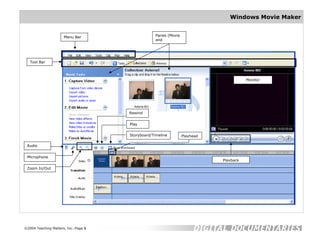
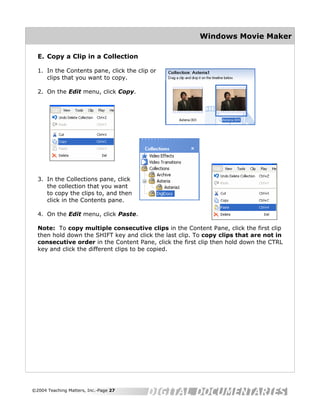
Windows Movie Maker allows users to import video footage from cameras, edit clips by removing unwanted footage, add narration, still images, titles, and audio/music. Key features include importing video using capture software, splitting clips, dragging items to the timeline, and editing options for narration, images, and titles.
This document provides instructions for using the Windows Movie Maker application to edit video clips. Some key functions covered include:
- Importing video from a camera and editing clips by splitting and deleting unwanted footage
- Adding narration, still images, titles, transitions, audio and effects to clips
- Saving the finished video project to a CD, computer hard drive, or DV tape
- Creating still images from video clips and managing the media collection
The steps are presented visually with screenshots and provide a concise guide to the basic features of Windows Movie Maker for editing home movies.
The document provides step-by-step instructions for creating movies using Windows Movie Maker. It covers downloading and installing Movie Maker, importing various media types like photos, slideshows and audio, editing video clips, adding transitions and effects, and outputting the finished movie. Specific instructions are given for creating a sample Civil War-themed movie project, including importing PowerPoint slides and saving them as image files, adding titles and overlay text, and adjusting clip lengths and audio.
The document provides step-by-step instructions for creating a movie using Movie Maker. It describes how to import video clips, photos, music and other media; edit the clips; add titles, transitions and visual effects; adjust audio levels; and save the finished movie in various formats. The instructions guide the user through all aspects of the movie creation process within Movie Maker.
The document provides instructions for setting up and using Windows Media Player and Movie Maker. It discusses how to open Media Player, set preferences, rip music from CDs, organize music files, burn CDs and playlists, and edit photos. It also explains how to capture video clips using a camera, add photos, music and transitions, and export finished movies. The instructions are broken into sections covering the different functions and provide step-by-step guidance.
This document provides instructions for editing video and audio using Ulead VideoStudio software. It outlines the basic steps to edit video, such as opening the software, loading video files, dragging files into the timeline, adding titles, and saving edited videos. It also describes how to edit audio, including loading audio files, recording voice clips, dragging files into the timeline, and saving edited audio. The overall goal is to teach students the essential skills for editing video and audio with Ulead VideoStudio.
This document provides instructions for using the basic functions of a Dell Media Center computer, including playing DVDs, viewing digital photos, watching and recording TV (if the computer has a TV tuner), and listening to music. It describes the buttons on the included remote control and how to navigate the Media Center interface using either the remote or mouse/keyboard. Notes are provided about input options and playback features for different media types.
Windows Movie Maker allows users to edit videos and add narration. It can import video files, photos, and audio. Users can rearrange and edit clips on the timeline or storyboard. Features include splitting and combining clips, adding narration, and adjusting volume. Movies can be saved to a computer or sent to a video hosting website to share online.
Windows Live Movie Maker is a free video editing program included with Windows 7 that allows users to combine video, photos, music and text to create movies. Key features include adding multimedia files, customizing movies with transitions and effects, previewing projects, and saving finished movies to a computer or burning to a DVD. The program provides various tools for formatting text, editing video and audio clips, and adding animations or visual effects.
This document provides an overview manual for using iMovie '09. It includes sections on the iMovie interface, importing video from a Flip camera, adding photos and titles, inserting transitions, editing audio, and sharing finished movies using QuickTime. The manual acknowledges those involved in its creation and provides step-by-step instructions on the basic functions of iMovie '09 to assist users in creating their own movies.
The document provides instructions for downloading and using Windows Movie Maker to create movies. It outlines five main sections: 1) Downloading Movie Maker, 2) Connecting a video camera, 3) Importing images, audio and video, 4) Editing the movie by adding titles, music, effects and transitions, and 5) Saving the finished movie. The document includes detailed steps for each section along with tips for using different Movie Maker features effectively. It concludes with sample lesson objectives and activities for using Movie Maker to augment classroom instruction.
This document provides instructions for creating a movie using Windows Movie Maker. It begins with an overview of the Movie Maker interface, including the menu bar, toolbar, movie tasks pane, collections pane, monitor, timeline, and storyboard. It then discusses how to import videos, photos, audio, and music into Movie Maker and capture video from an external device. The document also explains how to drag imported photos and videos to the storyboard or timeline to build the movie. Lastly, it describes how to move clips within the timeline or storyboard.
This document provides a quick reference guide for using Windows Movie Maker including:
1. An overview of the workshop goals for learning how to create movies using video, pictures, and sound as well as adding transitions and effects.
2. Instructions for importing video, pictures, and audio files and performing basic editing operations like splitting and trimming clips.
3. Directions for adding transitions, effects, titles, and credits to movies.
4. Steps for finalizing and saving completed movies.
5. A list of keyboard shortcuts for common Movie Maker tasks.
This document provides instructions for using the iKITMovie animation software. It includes explanations of the interface, timeline, editing tools, and sound/music features. The main sections covered are:
1. An overview of the iKITMovie interface and what each button does.
2. Instructions for capturing images from a webcam, importing images, and adding them to the timeline as frames of animation.
3. Guidance on editing frames, zooming and navigating the timeline, and adding/removing sound effects and music.
4. Directions for playing back animations, exporting finished movies, and uploading videos to YouTube.
The document provides step-by-step explanations to help users learn the basics
This document provides an overview and instructions for using Windows Movie Maker 2 (MM2) for basic digital video editing. It explains the MM2 interface and components, how to set up a project by selecting options and saving it, how to import video clips, photos, audio and music files, and how to capture new video from a connected device. The goal is to guide students and others through the basic movie making process in MM2 from start to finish.
This document provides an overview and instructions for using Microsoft Producer 2003. It discusses:
- What Producer 2003 is and how it can be used to integrate audio, video, and text into PowerPoint presentations.
- How to import, capture, and synchronize different media files using the application interface and various wizards.
- Methods for editing video files, including splitting clips automatically or manually setting in and out points.
- Additional features like adding video effects, transitions, customizing with templates, and publishing the final presentation.
The document provides instructions for editing videos using YouTube's video editor. It explains how to access the video editor, combine and trim clips, add transitions, music, effects, and text. Key steps include dragging clips onto the timeline, trimming clips by adjusting bars, and customizing titles. The summary also notes you can publish edited videos separately on YouTube.
The document discusses how to access and customize display properties in Windows. It describes how to change the screen resolution, screen colors, and set up a screen saver. It provides steps to access the display properties dialog box from the desktop context menu or control panel. It explains concepts like resolution, screen savers, and how to select different color schemes and resolutions.
Windows Movie Maker allows users to edit video clips, add titles and transitions, and publish movies. It provides panes to import and organize clips, a storyboard and timeline view to edit clips, and tools to add effects, trim clips, and preview projects. Users can publish finished movies to CDs or email them as attachments.
1. This chapter covers the basic features and tools in Frog such as preferences, file management, calendars, and resource booking.
2. It explains how to customize settings like changing the interface language and background, how to upload and organize files, and how to create, edit, and share calendar events and resource bookings.
3. Step-by-step instructions are provided for common tasks like changing passwords, adding widgets to the dashboard, and inviting other users to shared calendars.
This document provides a readme file for Age of Empires II that includes information on installing the game, starting the game, getting help, changes to formations, and troubleshooting various issues related to DirectX, gameplay, video, audio, and performance. It addresses compatibility and problems that may occur with specific hardware components and provides solutions and workarounds to common issues.
This presentation is intended to describe, how to
create a DVD video from still pictures with added
music to it, that can be played with any standalone DVD players.
This document provides instructions for adding different activity widgets to a Frog VLE site to create assignments for students:
1) Text, file drop, SCORM, and quiz widgets can be added to allow students to submit text responses, files, complete interactive modules, and take quizzes.
2) The widgets are dragged from the content panel into the site layout and their settings are configured, such as instructions, file visibility options, and searching for SCORM content.
3) Once assignments are created with the activity widgets, the site can be assigned to students and teachers can track submission, provide feedback, and message students from the notifications panel.
This document provides instructions for downloading and installing the BJ Image Slider 2 module and component. It describes how to download both the free and pro/dev versions from the Byjoomla website. It then explains how to install the component and module through the Joomla extension manager. Finally, it outlines how to configure the image slider through settings in the component, such as defining image and thumbnail sizes. It also details parameters for the free module, such as category selection, delay times, and caption options.
The document discusses various options for displaying video in Flash, including embedding video in the Flash file or linking to external video files. It provides steps for converting video files to the Flash Video (FLV/F4V) format using the Adobe Media Encoder, including adding files, setting encoding presets and options, and batch processing. It also covers importing encoded video files into Flash using playback components and controlling video playback through ActionScript.
The document provides step-by-step instructions for creating a digital story using Windows Movie Maker. It describes how to import pictures and audio, add them to the timeline, insert transitions and effects, record narration, and add titles/credits. The steps also cover saving the project, exporting the final movie file, and optionally adding background music to the completed digital story.
The document discusses best practices for digitization projects, including the importance of planning, standards, equipment needs, digital preservation, storage, promoting discoverability of digital collections, and ensuring technology supports user needs. Key steps in digitization include defining the scope and goals of the project, selecting equipment and standards, planning for digital preservation and storage, and promoting the collection to users.
The document discusses developing online research methods courses consisting of modular units that can accumulate up to 15 credits. For each module, requirements will be established, contents and activities written and peer reviewed, media created, and resources assembled. Modules will then undergo final review before blended delivery. The courses could benefit fields like pharmacy, medicine, dentistry, nursing, psychology, and more.
The document describes an adolescent reading program called "OnBoard" implemented at Chaffey Secondary College to help students who were not progressing as expected in literacy. The program involved professional learning for teachers, assigning students to the program, and running it for 20 weeks with support from literacy staff and funding. Initial outcomes showed higher reading progress on average for students in OnBoard compared to the original literacy program, and positive feedback from one student on feeling more confident in reading.
This document outlines the storyboard for a podcast about seasonal activities in New England. The podcast will focus on events that can be enjoyed during the fall season. Each episode will highlight a single fall activity, with the first episode featuring fall festivities. The storyboard describes 8 sections that will include text, photos, audio narration and short video clips to discuss local farms, apple picking, festivals and events happening during the fall in New England.
Project 4 Storyboard outlines Elisabeth Gabriel's final multimedia design project, which will be a website about books and reading. The website will have four sections - a book of the month audio podcast review, previews of movies based on books, and resources for finding audiobooks, including some aimed at providing accessibility. The project will utilize Flash, Audacity, a digital camera, Photoshop and iMovie. It will allow Gabriel to demonstrate skills in Flash website design, audio editing, video, and image editing.
The document provides instructions for using Windows Movie Maker to create movies from video clips, pictures, titles, and audio. It describes the four panes of the Movie Maker interface and the three tasks of capture/import, edit, and finish. It then outlines how to import media, add items to the timeline, add video effects and transitions, create titles and credits, import audio, trim clips and audio, and save the finished movie.
PowerPoint presentations can be an effective teaching tool when used properly. They allow teachers to engage students visually, manage time efficiently in lessons, and plan material ahead of time for reuse. Creating PowerPoints involves planning the content, layout, and use of visual elements like images, videos, and animations. When presented in the classroom, PowerPoints give teachers control and flexibility to cover material interactively while freeing them from traditional whiteboard-focused lectures.
The document provides a tutorial for creating a basic movie using iMovie HD. It shows how to import video footage, select clips, add titles and transitions, insert photos and a soundtrack. The 10 steps cover cropping and trimming clips, applying effects, adjusting audio, and sharing the finished movie. Background information is provided on the iMovie interface and finding additional help resources.
The document discusses preparing soil for planting by loosening and turning over the dirt. While the soil is ready, more work still needs to be done to properly aerate and mix the soil before seeds or plants can be added. The document encourages further working of the soil to ensure it is optimally prepared.
This document provides an overview of macroeconomics and key macroeconomic indicators and concepts. It discusses how macroeconomics examines the aggregate economy at a national level, looking at factors like GDP, inflation, economic growth, and unemployment. It also summarizes different approaches to calculating national income, including the income, expenditure, and output approaches. Key indicators discussed include GDP, GNP, NNP, personal income, and disposable income.
Adjectives é um documento para alunos de 6o ano da Escola del Mar para o ano letivo de 2011-2012. O documento provavelmente contém uma lista de adjetivos em espanhol com suas definições para ajudar os alunos a aprender novos vocábulos.
Operationalizing social media_mima_workshop_finalBolin Digital
This document summarizes a workshop on operationalizing social media programs. It discusses conducting an audit of audience conversations online, mapping goals to business objectives and audience value, creating a content calendar and response protocol, and measuring success beyond basic metrics. The presenters were Marcus Didion of Bolin Marketing and Kim Callaway of Freschetta Pizza, who aimed to provide practical steps for establishing and justifying a social media program to an organization. They provided worksheets and activities for participants to apply the concepts.
International opportunities for new librarians: With (or without) leaving homeblisspix
This document discusses opportunities for new librarians to gain international experience. It defines what an international librarian is, explores reasons to gain international experience such as learning from other cultures and expanding one's network, and provides suggestions on how to do so through options like working overseas, researching foreign library scenes, or taking a secondment in another country. The document also notes that gaining an international perspective can help when returning home and that cultural experiences abroad may involve culture shock or its reverse form.
This document provides numerous suggestions for making secondary classrooms more engaging and interactive. It recommends humanizing the classroom through regular check-ins with students, creating random groups to avoid cliques, using varied seating arrangements, and keeping a fast pace with multiple short activities per class. Gathering student feedback and involving parents are also encouraged. The document offers formats for review games, engaging multilingual learners, and generating deep thinking through discussions. It concludes with advice on assigning meaningful homework.
Synergistics Consulting provides transformational marketing strategies and brand building services to energize clients' growth. They assess knowledge, facilitate brainstorming, and focus organizations. If desired, they can also lead marketing strategy execution to ensure success. They have experience building world-class brands for companies like Kraft Foods, Disney, M&M/Mars, and helped launch new businesses and products. Their proven results include re-launching and growing brands 50%+, increasing leads by 60%, and successfully introducing clients to new markets.
This document provides instructions for using Windows Movie Maker to edit videos. It describes the key interface elements like the preview area, storyboard/timeline, and task pane. It then outlines the basic steps to edit a video, which include importing files, dragging clips to the storyboard, adding effects, transitions, titles, and audio. The document concludes by explaining how to save the finished movie in a file format like MP4 to view the completed video.
1. The document provides instructions for creating a book trailer using Windows Movie Maker. It involves importing 10 images related to a favorite book, applying animation and visual effects to the images, adding titles and music, and outputting the finished video as an MP4 file.
2. The instructions guide the user to search for images online, import them into Movie Maker, select images to apply animation and visual effects to, add titles throughout the video, import music from files or YouTube, and adjust the audio levels and fade.
3. The user is then instructed to watch the finished video, make any changes by reopening the project file, and save the video as an MP4 so it can be viewed independently on other
This lesson plan teaches students how to use Windows Movie Maker. It introduces the interface of the program, including the movie tasks, collections, viewer, and timeline areas. Students will learn how to import images, videos, and sounds. They will drag media clips into the storyboard and arrange them in the timeline. Students will also learn how to reorder and rearrange clips on the storyboard. The lesson explains how to adjust the duration of displayed pictures using the options menu. At the end, students will be able to describe the Movie Maker interface, identify its menus, and import and arrange various media types in a project.
This document provides step-by-step instructions for creating a documentary using Windows Movie Maker. It describes how to import videos, images, and audio clips, edit them together on a timeline or storyboard, add titles and effects, record narration, and export the finished movie. The key panels and views of the Movie Maker interface are also explained, including the collection pane, video preview pane, timeline view, and storyboard view.
This document provides step-by-step instructions for creating a documentary using Windows Movie Maker. It explains how to import videos, images, and audio clips, arrange them on the storyboard or timeline, add titles and effects, record narration, and export the finished movie. The various panes and views of the Movie Maker interface are also described, including the collection pane, video preview pane, storyboard view, and timeline view.
The document provides instructions for setting up and using Final Cut Pro video editing software. It includes steps for:
1. Creating a student folder and new project in Final Cut Pro.
2. Opening the software and understanding the interface which includes the browser, viewer, canvas, and timeline windows.
3. Setting preferences like the scratch disk location and project format.
4. Logging and capturing video clips from a camera into the browser.
5. Editing clips on the timeline using tools like the blade to cut and delete portions of footage.
6. Exporting the finished sequence as a QuickTime movie.
This document provides a tutorial for using Windows Live Movie Maker. It begins with an introduction and table of contents. It then discusses how to start the application, create and save a project, import digital videos and photos, prepare to capture video, capture video from a device, do basic editing like splitting clips and adding transitions/captions/titles, and export the final video for use in other applications like PowerPoint.
Windows Movie Maker is video editing software included with older versions of Windows. It allows users to import video clips, photos, and audio, arrange them on a timeline, and add titles, transitions and effects. The software supports common file formats and can export finished videos to share online or on devices.
This document provides instructions for creating a digital story using Windows Movie Maker. It outlines 8 parts to the process: importing images and audio, adding narration to the timeline, including effects and transitions, publishing the movie without and with music, inserting title and credits pages, and finally uploading the completed movie to a YouTube account provided for the class. The goal is to guide students through all of the basic functions of Movie Maker to assemble their digital stories.
This document provides instructions for creating a digital story using Windows Movie Maker. It outlines 8 parts to the process: importing images and audio, adding narration to the timeline, including effects and transitions, publishing the movie without and with music, inserting title and credits pages, and finally uploading the completed movie to YouTube. The goal is to guide students through each step of making their digital stories with this free software.
This document provides a tutorial for using Windows Live Movie Maker. It discusses how to create and save a project, import videos and photos, capture additional video, perform basic editing functions like splitting clips and adding transitions/captions, and export the final video for use in other applications like PowerPoint. The tutorial is broken into sections covering each step of the video creation process.
The document provides an overview of how to use Movie Maker 2 to create movies. It discusses importing media like photos, video clips, and audio into collections. It explains how to work with projects and clips, applying effects, transitions and titles. It covers trimming clips, placing items on the timeline, and saving the finished movie in different formats. The resources section lists several websites with additional Movie Maker tutorials and information.
This is How To document for teachers who are trying to improve their online and blended courses without purchasing complex software. Windows 10 arrives with the Photos Video Editor. It provides essential tools for teachers to edit their video for educational purposes.
This tutorial teaches how to create, edit, and finalize a video project using Windows Live Movie Maker (WLMM). It covers how to start WLMM, create and save a project, import videos and photos, capture additional video, do basic editing like splitting clips and adding transitions/captions/titles, and export the final video for use in other programs like PowerPoint.
Windows Live Movie Maker allows users to import videos and photos, edit video clips by splitting and deleting frames or inserting still images, and add audio, captions, transitions and credits. The software also enables users to create slideshows, share finished videos on sites like YouTube and Facebook, and save projects or export videos in different formats.
How to import videos, trim/make clips (excerpts) from long videos, use the storyboard, difference between project files (MWSMM files) and actual movie (WMV files)
This document provides instructions for creating a digital story using Windows Movie Maker. It outlines a 7 part process: 1) importing images and adding a title/credits, 2) adding narration, 3) adding effects and transitions, 4) publishing without music, 5) adding music, 6) republishing with music, and 7) uploading the final video to YouTube. The goal is to guide students through creating a simple digital story with visuals, narration, and music.
The document provides step-by-step instructions for creating digital stories and movies using Photo Story 3 and Windows Movie Maker. It describes how to import photos and videos, add titles and narration, edit clips, and save the finished project or export it as a video or movie file.
This document provides instructions for creating digital stories using PowerPoint and iMovie. It includes the following steps:
1. Import pictures into PowerPoint and add text to create slides. Save the slides as individual picture files.
2. Drag the picture files into iMovie to create a movie project. Adjust picture duration and effects.
3. Record voiceovers and add background music. Choose a theme. Export the finished movie by burning a DVD or compressing for online sharing.
4. Use the iSight camera to record video clips and add them to the iMovie project. Apply green screen and select backgrounds. Add text over backgrounds.
This document discusses using the social networking platform NING to create a professional learning community. It outlines how NING allows for membership-based communities, embedding documents and media for collaboration, providing secure forums and calendars. Examples are given of existing NING networks for education that provide resources, online learning management, tagging, and integrating other web tools.
1. The document outlines key competencies and essential questions for developing skills in students, including thinking, using language and texts, managing self, relating to others, and participating and contributing.
2. It provides strategies for teachers to focus on the key competencies in their everyday teaching, such as coding lessons according to the competencies and incorporating relevant teaching strategies.
3. The document emphasizes developing students' thinking skills and digital literacies to prepare them for the 21st century, and encourages teachers to enhance their own professional learning and dialogue.
The document discusses strategies for developing quality thinking in classrooms. It recommends:
1) Teaching self-talk and modeling thinking to develop metacognition.
2) Coding lessons and student thinking to assess the quality of thinking being facilitated.
3) Using a focus question to drive learning and inquiry for a study.
It also provides examples of thinking strategies and sequences that can be taught and used to resolve different types of issues.
This document provides instructions for using Windows Movie Maker to edit video clips, add titles, transitions and other effects. The key steps include importing video from a camera, capturing footage, trimming clips, adding narration, pictures and audio, applying transitions and effects, and saving the finished movie in various file formats. Instructions are provided for basic functions like creating and managing media collections, as well as advanced tasks such as taking screenshots and copying/pasting clips between projects.
This document provides guidance for students editing a movie project using Windows Movie Maker. It instructs students to save all project materials and edits to their group folder on the shared server. It then offers tips for improving video and audio quality, such as using consistent lighting, wearing appropriate clothing, and reducing ambient noise. Finally, it outlines the movie editing process in Movie Maker, including organizing clips, adding clips to the timeline, inserting transitions, and adding music.
This document provides a virtual tour of the Northern Tower at Paenga Tawhiti, listing various areas within the building including nucleus classrooms, breakout areas, a cafe, student kitchen and locker area, flexible learning spaces, a commercial teaching kitchen, and a reception area.
The document discusses using videogames in education and describes the author's experience playing and creating games. It provides background on the author's interest in games from a young age. He taught himself programming by playing games in arcades and on early home computers. Despite opposition from older generations, he continued developing his skills in game design and has now created games played by millions. The document advocates for using games in education and provides an example of planning an interactive fiction adventure game by mapping locations and encounters.
Introduction to AI for Nonprofits with Tapp NetworkTechSoup
Dive into the world of AI! Experts Jon Hill and Tareq Monaur will guide you through AI's role in enhancing nonprofit websites and basic marketing strategies, making it easy to understand and apply.
A Strategic Approach: GenAI in EducationPeter Windle
Artificial Intelligence (AI) technologies such as Generative AI, Image Generators and Large Language Models have had a dramatic impact on teaching, learning and assessment over the past 18 months. The most immediate threat AI posed was to Academic Integrity with Higher Education Institutes (HEIs) focusing their efforts on combating the use of GenAI in assessment. Guidelines were developed for staff and students, policies put in place too. Innovative educators have forged paths in the use of Generative AI for teaching, learning and assessments leading to pockets of transformation springing up across HEIs, often with little or no top-down guidance, support or direction.
This Gasta posits a strategic approach to integrating AI into HEIs to prepare staff, students and the curriculum for an evolving world and workplace. We will highlight the advantages of working with these technologies beyond the realm of teaching, learning and assessment by considering prompt engineering skills, industry impact, curriculum changes, and the need for staff upskilling. In contrast, not engaging strategically with Generative AI poses risks, including falling behind peers, missed opportunities and failing to ensure our graduates remain employable. The rapid evolution of AI technologies necessitates a proactive and strategic approach if we are to remain relevant.
This slide is special for master students (MIBS & MIFB) in UUM. Also useful for readers who are interested in the topic of contemporary Islamic banking.
How to Build a Module in Odoo 17 Using the Scaffold MethodCeline George
Odoo provides an option for creating a module by using a single line command. By using this command the user can make a whole structure of a module. It is very easy for a beginner to make a module. There is no need to make each file manually. This slide will show how to create a module using the scaffold method.
Executive Directors Chat Leveraging AI for Diversity, Equity, and InclusionTechSoup
Let’s explore the intersection of technology and equity in the final session of our DEI series. Discover how AI tools, like ChatGPT, can be used to support and enhance your nonprofit's DEI initiatives. Participants will gain insights into practical AI applications and get tips for leveraging technology to advance their DEI goals.