Movie Maker Manual
•
4 likes•1,424 views

This document provides instructions for using the Windows Movie Maker application to edit video clips. Some key functions covered include: - Importing video from a camera and editing clips by splitting and deleting unwanted footage - Adding narration, still images, titles, transitions, audio and effects to clips - Saving the finished video project to a CD, computer hard drive, or DV tape - Creating still images from video clips and managing the media collection The steps are presented visually with screenshots and provide a concise guide to the basic features of Windows Movie Maker for editing home movies.

More Related Content
What's hot
Similar to Movie Maker Manual
Similar to Movie Maker Manual (20)
More from bkind2animals
More from bkind2animals (20)
Recently uploaded
Recently uploaded (20)
Movie Maker Manual
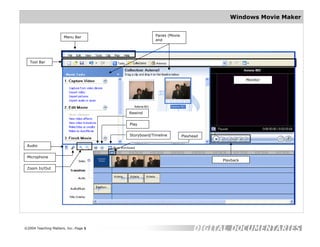
- 1. Windows Movie Maker Menu Bar Panes (Movie and Tool Bar Monitor Rewind Play Storyboard/Timeline Playhead Audio Microphone Playback Zoom In/Out ©2004 Teaching Matters, Inc.-Page 1
- 2. Windows Movie Maker Importing Video (Transfer the footage from the camera to the computer) 1. Plug-in the Battery Pack or AC Power Adaptor to the camcorder. 2. Connect the camcorder and the computer with a FireWire cable. 3. Set the camcorder to VCR or VTR mode. 4. Double-click on Windows Movie Maker. 5. Click on File and select Capture 5 Video. (Note: The Video Capture Wizard dialog box appears). 6. Type a file name for the captured video file in the Enter a file name for your captured video text box. 7. In Choose a Place to Save Your Captured Video, select a location where you want the video to be saved or click on Browse to select a 6 location. 8. Click Next. 7 ©2004 Teaching Matters, Inc.-Page 2
- 3. Windows Movie Maker 9. In the Video Setting page, select the video setting to capture the video and/or audio. 10.In Capture Method page, click Capture the entire tape automatically. (NOTE: The 10 tape in the DV camera rewinds. The capturing of the tape starts automatically and ends when the video tape ends). 11.Click Finish to close the Video Capture Wizard. The captured content is imported into a new collection. ©2004 Teaching Matters, Inc.-Page 3
- 4. Windows Movie Maker 12. Make a backup of the captured video. 12.1 12.1 Click Collections icon. 12.2 Select the Video collection to be copied. 12.3 Click Edit and select Copy, then, click Edit and Select Paste. (Note: The backup 12.2 video name remains the same). 12.3 13. Rename the backup file. 13.1 Click the back up video file name. 13.2 Click Edit and select Rename. (Note: Rename the project by adding version 1 in the original file name, for 13.1 example, “Asteria1”). 13.2 ©2004 Teaching Matters, Inc.-Page 4
- 5. Windows Movie Maker Editing the Video Clips (Removing Unwanted Footage) 1. Select a clip from the Collections Pane and drag it to the Video Timeline. 2. Play the clip. Use the space bar on the keyboard to start and stop the playback. 3. Position the Playhead between the end of the excess footage and the beginning of the desired footage. playhead Unwanted Desired footage footage 4. Click Clip menu and select Split. Before split After split 5. Select the clip with the unwanted footage and click the Delete key. 6. Repeat steps 1 to 4 until all the excess footages are deleted. 7. Write down the name and nature of the clip on a sheet of paper. 8. Sequence the clips by clicking and dragging the clips along the Video Timeline. ©2004 Teaching Matters, Inc.-Page 5
- 6. Windows Movie Maker Adding Narration (Voiceover) 1 1. Click View and select Timeline. 2. On the Timeline, move the playback indicator to an empty track where you want to begin the audio narration. 3. Click Tools and select Narrate Timeline or click the microphone on the Timeline. 3 5 6 4 2 4. Test the sound level and adjust the volume by moving the Input level slider. (Note: Select Mute Speakers to avoid unwanted audio from playing over the speakers). 5. Click Start Narration to start recording. 6. Click Stop Narration after completing the recording. 7. In the File name box, type a name for the captured audio narration and click Save. ©2004 Teaching Matters, Inc.-Page 6
- 7. Windows Movie Maker Adding Still Images (Picture Files) to the Collection 1. Click File and select Import into Collections. 2. Select the folder where the Picture Files are stored. (Example, My Pictures folder). 3. Click the picture file and click Import. (Note: The imported audio file is added to the Collections Pane). 1 2 3 3 ©2004 Teaching Matters, Inc.-Page 7
- 8. Windows Movie Maker Adding Still Images (Picture Files) to the Movie (To add a picture to your video timeline but keep the same voice from the original video clip). 1. Select the Timeline Viewer. 2. Select the video clip with narration where you want to add a still picture. 3. Drag the playhead to the start point where the picture would appear during the narration (ex. 0:00:06.07). 1 3 4. Move the mouse pointer to the end point where the picture will appear during the narration. Take note of the end time (ex. 2 0:00:07:60). 4 5. Click Clip menu and select Split. After the Split ©2004 Teaching Matters, Inc.-Page 8
- 9. Windows Movie Maker 6. Drag the audio clip where the picture would appear down to the Audio/Music Track. (Note: Once you drag the audio clip to the Audio/Music Track, the accompanying video clip is automatically deleted). Before After 7. From the Collections Pane, select the picture to be added to the timeline. 8. Drag the picture to the start point in the timeline where it will appear during the narration (ex. 0:00:06.07). 9. Drag the playhead to the end point where the picture will appear during the narration (ex. 0:00:07.60). ©2004 Teaching Matters, Inc.-Page 9
- 10. Windows Movie Maker 10.Click Clip menu and select Split. After the Split 11.Click Edit and select Cut or press the Delete key to remove the unwanted clip. ©2004 Teaching Matters, Inc.-Page 10
- 11. Windows Movie Maker Adding Text and Titles 1. Click Titles and Credits in the Tools Menu. 1 2. The add title page appears. In the list of Where do you want to add a title? Click the link that corresponds to where the title will be placed. 3. Type the title in Enter Text for Title box. 4. Click Change the text and font color. The Select Title Font and Color page appears. Select the options to change the font (Font style, color, size and alignment. 4 3 ©2004 Teaching Matters, Inc.-Page 11
- 12. Windows Movie Maker 5. Click Choose the title Animation and select the animation option for the title. 5 6 6. Click Done, add title to the movie. ©2004 Teaching Matters, Inc.-Page 12
- 13. Windows Movie Maker Adding Audio or Music Files to the Collection 1. Click File and select Import into Collections. 2. Select the folder where the Audio or Music Files are stored. (Example, My Music folder). 1 3. Click the audio file and click Import. (Note: The imported audio file is added to the Collections Pane). 2 3 3 ©2004 Teaching Matters, Inc.-Page 13
- 14. Windows Movie Maker Adding Audio or Music Files to the Movie 1. Select the Timeline Viewer. 2. Move the playback to the location where the audio will be added. 3. Select the audio file from the Collections Pane. 4. Click Clip and select Add to Timeline. (Note: The imported clip is added to the Audio/Music Timeline). 4 3 2 4 ©2004 Teaching Matters, Inc.-Page 14
- 15. Windows Movie Maker Adding Transitions 1. Click Tools and select Video Transitions. 2. On the Storyboard/Timeline move the playback to the space between two clips. 1 3. From the Collections Pane, click the video transition to be added to the timeline. 4. From the Clip menu, select Add to Timeline. 4 3 2 ©2004 Teaching Matters, Inc.-Page 15
- 16. Windows Movie Maker Adding Effects 1. Click Tools and select Video Effects. 2. From the storyboard/timeline, select the video clip to 1 add the effect to. 3. Drag the video effect onto the video clip in the storyboard/timeline and place it on top of the star in the lower left-hand corner of the clip. 3 2 ©2004 Teaching Matters, Inc.-Page 16
- 17. Windows Movie Maker Save a Movie to a CD-ROM 1. From File Menu, select Save Movie File. 2. On the Save Movie Wizard Page, select 1 Recordable CD and click Next. 2 3. Type a name for your movie in Enter a file name for your saved movie. 4. Type a name for the CD in Enter a name for the CD and click Next. 3 5. On the Movie Setting, select Best fit 4 for recordable CD (recommended). To use a different movie setting, click Show more choices. Click Next. 5 ©2004 Teaching Matters, Inc.-Page 17
- 18. Windows Movie Maker 6. The Saving Movie page appears showing the time remaining. Once completed, click Finish. If the CD is not ejected automatically from the recordable CD drive, 6 press the eject button on the recordable CD drive. ©2004 Teaching Matters, Inc.-Page 18
- 19. Windows Movie Maker Save a Movie to the Computer 1. From File Menu, select Save Movie File. 2. On the Save Movie Wizard Page, select My Computer and click Next. 1 2 3. Type a name for your movie in Enter a file name for your saved movie. 4. In Choose a place to save your movie box, click Next if the movie will be saved in My Videos (the default setting). If not, Browse to choose a new place click Next. 5. On the Movie Setting, select Best fit for recordable CD (recommended). To use a different movie setting, click Show 3 more choices. Click Next. 4 5 ©2004 Teaching Matters, Inc.-Page 19
- 20. Windows Movie Maker 6. The Saving Movie page appears showing the time remaining. Once completed, click Finish. 6 ©2004 Teaching Matters, Inc.-Page 20
- 21. Windows Movie Maker Save a Movie to the DV Tape 1. Connect the DV Camera to the computer. Switch the DV camera on and set to 2 playback mode or VCR mode. 2. From File Menu, select Save Movie File. 3. On the Save Movie Wizard Page, select DV Camera and click Next. 4. Follow the message in Cue Your Tape by rewinding or positioning the tape to where the recording would begin. Click Next. 4 3 5. Respond to the prompt that indicates whether you want the content of your tape to be overwritten and lost. ©2004 Teaching Matters, Inc.-Page 21
- 22. Windows Movie Maker 6. The Recording Movie to Tape page appears showing the time remaining. Once completed, click Finish. ©2004 Teaching Matters, Inc.-Page 22
- 23. Windows Movie Maker Create a Still Image from a Movie 1. In the Contents pane or on the storyboard/timeline, select the video clip you want to take a picture from. 1 2 3 2. On the monitor move the playback indicator to the frame of the video that you want to capture as picture. 3. Click the Tools menu and click Take Picture from Preview or click the Take Picture button on the monitor. (Note: The Save Picture as page automatically appears). 3 ©2004 Teaching Matters, Inc.-Page 23
- 24. Windows Movie Maker 4. In the File name box, enter a name for the picture file and click Save. The picture is added to the Collection Pane. ©2004 Teaching Matters, Inc.-Page 24
- 25. Windows Movie Maker Managing Media Collection A. Create a Collection 1. Switch the left frame/pane to Collections Pane. Click the collection folder you want to add your new collection to. 2. Click the Tools menu and select New Collection Folder. 3. Type the name of the new collection folder. B. Delete a Collection 1. Switch the left frame/pane to Collections pane and click the collection you want to delete. 2. On the Edit menu, click Delete. ©2004 Teaching Matters, Inc.-Page 25
- 26. Windows Movie Maker C. Rename a Collection 1. Switch the left frame/pane to Collections pane and click the collection you want to rename. 2. Click the Edit menu and select Rename. 3. Type a new name. D. Delete a Clip from a Collection 1. Switch the left frame/pane to Collections pane and click the collection that contains the clip you want to delete. 2. In the Contents pane, click the clip to be deleted. 3. On the Edit menu, click Delete. ©2004 Teaching Matters, Inc.-Page 26
- 27. Windows Movie Maker E. Copy a Clip in a Collection 1. In the Contents pane, click the clip or clips that you want to copy. 2. On the Edit menu, click Copy. 3. In the Collections pane, click the collection that you want to copy the clips to, and then click in the Contents pane. 4. On the Edit menu, click Paste. Note: To copy multiple consecutive clips in the Content Pane, click the first clip then hold down the SHIFT key and click the last clip. To copy clips that are not in consecutive order in the Content Pane, click the first clip then hold down the CTRL key and click the different clips to be copied. ©2004 Teaching Matters, Inc.-Page 27
- 28. Quick & Easy Guide to Create Clips from Existing Video Clip Select Video clip from Contents Pane ! Tools ! Create a Collection From Collections pane ! Click the folder to add Windows Movie Maker Create Clips new collection ! Tools ! New Collection Folder and type a name for the collection Switch the View of the Project View ! Storyboard Delete a Collection Create a New Project View ! Timeline From Collections pane ! Click the collection to File ! New Project be deleted ! Edit ! Delete Add Video Transitions Open a Project Select the clip on the storyboard/timeline ! Tools ! Delete a Clip from a Collection File ! Open Project ! File Name ! Open Video Transitions ! select the video transition in the From Collections pane ! Click the collection with Contents Pane ! Clip ! Add to Timeline or Add to clips to be deleted ! Switch to Contents pane ! Capture Entire Video from DV Camera Storyboard Click the clip ! Edit ! Delete Set Camera to Play ! File ! Capture Video ! DV Camera ! Enter a File Name ! Choose a Place to Remove Video Transition Copy a Clip in a Collection Save captured video ! Capture Method select On the storyboard, select the transition cell ! Edit From Contents pane ! Clip the clip to be copied Capture the Entire Tape Automatically ! Finish ! Delete or On the timeline, click the transition ! ! Edit ! Copy – Switch to Collections pane ! Edit ! Delete Click the collection you want to copy the clips to Add a Clip to a Project ! Click Contents pane ! Edit ! Paste Collection ! Contents ! Select the Clip ! Add a Title or Credit Clip –->Add to Storyboard or Add to Timeline Tools ! Titles and Credits ! Add Title, Animations Change the Clip View and Change Text Font and Color View ! Thumbnails (view the title and bitmap Remove a Clip from a Project image) or View ! Details (view properties of Click the clip in the Storyboard/Timeline ! Edit an Existing Title each clip) Edit ! Delete Select the title on the storyboard/timeline ! Edit ! Edit Title ! Type the new text, animation or text Arrange Clips in Contents Pane Preview a Project font and color From Collections pane –> Click the folder that Add clips to storyboard/timeline ! Rewind contains the clips ! View ! Arrange Icons By ! Storyboard ! Play Storyboard Remove the Title Choose the property to arrange the clips by Select the title on the storyboard/timeline ! Edit ! Trim a Clip Delete Play Video in Full-Screen Mode View ! Timeline ! Click the clip from the Select video on the storyboard/timeline ! View Collections/Contents pane ! Clip ! Add to Add Narration ! Full Screen Timeline, select the clip ! click the playback View –> Timeline ! Move playback indicator on the indicator, drag to the point to trim the clip timeline where you want to begin the audio Zoom In and Out on the Timeline narration View ! Timeline ! Zoom In (more detailed Preview a Clip view) or Zoom Out (less detailed view) Click clip from Contents Pane ! Play ! Play Clip Adjust Audio Levels Tools ! Audio Levels ! Increase Audio Level (Drag Fit the Timeline on the Screen Split a Video or Audio Clip slider bar towards Audio/Music) or Decrease Audio View ! Zoom to Fit In Contents Pane, click the clip ! Play ! Play Clip Level (Drag slider bar towards Audio from video) ! Pause Clip (point you want to split the clip) ! Saving a Movie to a CD-R or CD-RW Clip ! Split Add an Audio Effect File ! Save Movie File ! Recordable CD !Type Select audio clip from audio or audio music track of Name for CD ! Movie Setting(optional) ! Save Move a Clip on the Storyboard/Timeline the timeline ! Clip ! Audio ! Fade In (to fade in to CD Select the clip from the storyboard/timeline ! Edit the audio) or Clip ! Audio ! Fade Out (to fade out ! Cut ! Click empty shell on the storyboard ! Edit the audio) Record a Movie Back to Tape ! Paste Switch DV camera to Playback Mode (Rewind or Remove an Audio Effect Fast Forward Tape, if necessary) ! File ! Save Clear the Storyboard/Timeline Select audio clip from audio or audio music track of Movie File ! Click DV Camera ! Follow Wizard Edit ! Clear Timeline or Clear Storyboard the timeline ! Clip ! Audio ! Clear select effect ! Click Finish when completed ©2004 Teaching Matters, Inc.-Page 27
- 29. ©2004 Teaching Matters, Inc.-Page 27