Stress and Strain
• Stress analysis involves a determination of the stress distribution in
materials of various shapes and under different loading conditions.
• Experimental stress analysis is performed by measuring the
deformation of the piece under load and inferring from this
measurement the local stress which prevails.
• The measurement of deformation is only one facet of the overall
problem, and the analytical work that must be applied to the
experimental data in order to determine the local stresses is of equal
importance.
• Our concern in the following sections is with the methods that may
be employed for deformation measurements.
The unit axial strain a is defined by the relation
The ratio of the unit strain in the transverse direction to the unit strain in
the axial direction is defined as Poisson’s ratio and must be determined
experimentally for various materials.
A typical value for Poisson’s ratio for many materials is 0.3. If the material is in
the plastic state, the volume remains constant with the change in strain so that
Strain Measurements
• Any strain measurements must be made over a finite length of the
workpiece. The smaller this length, the more nearly the measurement
will approximate the unit strain at a point. The length over which the
average strain measurement is taken is called the base length.
• The deformation sensitivity is defined as the minimum deformation
that can be indicated by the appropriate gage.
• Strain sensitivity is the minimum deformation that can be indicated
by the gage per unit base length.
Methods used to measure strain:
1. Grid method (moire fringe)
2. Brittle coating
3. Electrical resistance strain gage.
Electrical-Resistance Strain Gages
• The electrical-resistance strain gage is the most widely used device for
strain measurement. Its operation is based on the principle that the
electrical resistance of a conductor changes when it is subjected to
mechanical deformation.
• electric conductor is bonded to the specimen with an insulating
cement under no-load conditions. A load is then applied, which
produces a deformation in both the specimen and the resistance
element.
• This deformation is indicated through a measurement of the change
in resistance of the element and a calculation procedure which is
described below.
• Let us now develop the basic relations for the resistance strain gage.
The resistance of the conductor is
Differentiating eqn (1) we get
(1)
The gage factor F is defined by
• We may thus express the local strain in terms of the gage factor, the
resistance of the gage, and the change in resistance with the strain:
• The value of the gage factor and the resistance are usually specified by the
manufacturer so that the user only needs to measure the value of R in
order to determine the local strain. For most gages the value of F is
constant over a rather wide range of strains. It is worthwhile, however, to
examine the influence of various physical properties of the resistance
material on the value of F. If the resistivity of the material does not vary
with the strain
• The dependence of resistivity on mechanical strain is called piezoresistance,
and may be expressed in terms of a piezoresistance coefficient, 𝜋1defined
by
LdL
ρdρ
E
1
π
m
1 
With this definition, the change in resistance may be expressed
)21( 1 mELdLRdR  
Gauge Factor
The change in resistance of a strain gauge is normally expressed in terms of an
empirically determined parameter called the gauge factor (GF). For a particular strain
gauge, the gauge factor is supplied by the manufacturer. The gauge factor is defined as
a
RR
F



The gauge factor represents the total change in resistance for a strain gauge, under a
calibration loading condition. The calibration loading condition generally creates a biaxial
strain field, and the lateral sensitivity of the gauge influences the measured result. Strictly
speaking then, the sensitivity to normal strain of the material used in the gauge and the
gauge factor are not the same. Generally gauge factors are measured in a biaxial strain field
that results from the deflection of a beam having a value of Poisson’s ratio of 0.285. Thus, for
any other strain field there is an error in strain indication due to the transverse sensitivity of
the strain gauge. The percentage error due to transverse sensitivity for a strain gauge
mounted on any material at any orientation in the strain field is
100
1
)(
X
K
K
e
t
aLt
L





Typical values of the transverse sensitivity for commercial strain gauges range from -0.19 to 0.05.
Figure 11.7 shows a plot of the percentage error for a strain gauge as a function of the ratio of
lateral loading to axial loading and the lateral sensitivity. It is possible to correct for the lateral
sensitivity effects
• Taking a typical value of μ as 0.3, we would obtain F =1.6. In this case the change in
resistance of the material results solely from the change in physical dimensions. If the
resistivity decreases with strain, the value of F will be less than 1.6. When the resistivity
increases with strain, F will be greater than 1.6. Gage factors for various materials have
been observed from−140 to+175.
• If the resistance material is strained to the point that it is operating in the plastic region,
μ = 0.5 and the resistivity remains essentially constant. Under these conditions the gage
factor approaches a value of 2.
• For most commercial strain gages the gage factor is the same for both compressive and
tensile strains. A high gage factor is desirable in practice because a larger change in
resistance ∆R is produced for a given strain input, thereby necessitating less sensitive
readout circuitry.
Determine the total resistance of a copper wire having a diameter of 1 mm and a length of 5 cm.
The resistivity of copper is 𝟏. 𝟕 ∗ 𝟏𝟎−𝟖 Ω m.
A very common material for the construction of strain gauges is the alloy constantan (55% copper
with 45% nickel), having a resistivity of 49 *𝟏𝟎−𝟖 Ω m. A typical strain gauge might have a
resistance of 120Ω. What length of constantan wire of diameter 0.025 mm would yield a resistance
of 120 Ω?
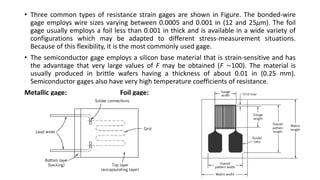
• Three common types of resistance strain gages are shown in Figure. The bonded-wire
gage employs wire sizes varying between 0.0005 and 0.001 in (12 and 25μm). The foil
gage usually employs a foil less than 0.001 in thick and is available in a wide variety of
configurations which may be adapted to different stress-measurement situations.
Because of this flexibility, it is the most commonly used gage.
• The semiconductor gage employs a silicon base material that is strain-sensitive and has
the advantage that very large values of F may be obtained (F ∼100). The material is
usually produced in brittle wafers having a thickness of about 0.01 in (0.25 mm).
Semiconductor gages also have very high temperature coefficients of resistance.
Metallic gage: Foil gage:
Construction of a typical metallic foil strain gauge:
Strain gauge consists of a metallic foil pattern that is formed in a manner similar to the
process used to produce printed circuits. This photoetched metal foil pattern is mounted
on a plastic backing material. The gauge length, as illustrated in Figure, is an important
specification for a particular application. Since strain is usually measured at the location
on a component where the stress is a maximum and the stress gradients are high, the
strain gauge averages the measured strain over the gauge length. Because the maximum
strain is the quantity of interest and the gauge length is the resolution, errors due to
averaging can result from improper choice of a gauge length.
The variety of conditions encountered in particular applications require special
construction and mounting techniques, including design variations in the backing
material, the grid configuration, bonding techniques, and total gauge electrical
resistance. The adhesives used in the bonding process and the mounting techniques for
a particular gauge and manufacturer vary according to the specific application. However,
there are some fundamental aspects that are common to all bonded resistance gauges.
Backing:
The strain gauge backing serves several important functions. It electrically isolates the
metallic gauge from the test specimen, and transmits the applied strain to the sensor. A
bonded resistance strain gauge must be appropriately mounted to the specimen for
which the strain is to be measured. The backing provides the surface used for bonding
with an appropriate adhesive. Backing materials are available that are useful over
temperatures that range from 270 to 𝟐𝟗𝟎 𝒐 C.
Adhesive bond:
The adhesive bond serves as a mechanical and thermal coupling between the metallic
gauge and the test specimen. As such, the strength of the adhesive should be sufficient to
accurately transmit the strain experienced by the test specimen, and should have thermal
conduction and expansion characteristics suitable for the application. If the adhesive
shrinks or expands during the curing process, apparent strain can be created in the gauge.
A wide array of adhesives are available for bonding strain gauges to a test specimen.
Among these are epoxies, cellulose nitrate cement, and ceramic-based cements.
• When strain gages are mounted on a specimen, two notes of caution
should be observed: (1) The surface must be absolutely clean.
Cleaning with an emery cloth followed by acetone is usually
satisfactory. (2) Sufficient time must be allowed for the cement to dry
and harden completely. Even though the cement is dry around the
edge of the gage, it may still be wet under the gage. If possible, 24 h
should be allowed for drying at room temperature. Drying time may
be reduced for higher temperatures.
• For low-temperature applications (−100 to +100◦C) Duco cement
(nitrocellulose) is normally employed with paper-covered gages and
Eastman 910 (cyanoacrylate) with foil gages mounted on epoxy.
• Problems associated with strain-gage installations generally fall into three
categories:
(1) temperature effects,
(2) moisture effects, and
(3) wiring problems. It is
• assumed that the gage is properly mounted. Temperature problems arise
because of differential thermal expansion between the resistance element
and the material to which it is bonded.
• Semiconductor gages offer the advantage that they have a lower expansion
coefficient than either wire or foil gages.
• In addition to the expansion problem, there is a change in resistance of the
gage with temperature, which must be adequately compensated for.
• Moisture absorption by the paper and cement can change the electrical
resistance between the gage and the ground potential and thus affect the
output-resistance readings.
• Wiring problems are those situations that arise because of faulty connections between
the gage-resistance element and the external readout circuit. These problems may
develop from poorly soldered connections or from inflexible wiring, which may pull the
gage loose from the test specimen or break the gage altogether.
• Electrical-resistance strain gages cannot be easily calibrated because once they are
attached to a calibration workpiece, removal cannot be made without destroying the
gage. In practice, then, the gage factor is taken as the value specified by the manufacturer
and a semi-calibration effected by checking the bridge measurement and readout system.
Semiconductor Strain Gauges
• When subjected to a load, a semiconductor material exhibits a
change in resistance, and therefore can be used for the measurement
of strain. Silicon crystals are the basic material for semiconductor
strain gauges; the crystals are sliced into very thin sections to form
strain gauges. Mounting such gauges in a transducer, such as a
pressure transducer, or on a test specimen requires backing and
adhesive techniques similar to those used for metallic gauges.
Because of the large piezoresistance coefficient, the semiconductor
gauge exhibits a very large gauge factor, as large as 200 for some
gauges. These gauges also exhibit higher resistance, longer fatigue
life, and lower hysteresis under some conditions than metallic gauges.
However, the output of the semiconductor strain gauge is nonlinear
with strain, and the strain sensitivity or gauge factor may be markedly
dependent on temperature.
Semiconductor materials for strain gauge applications have resistivity
ranging from 10−6 to 10−2 Ω-m. Semiconductor strain gauges may have a
relatively high or low density of charge carriers (3, 7). Semiconductor
strain gauges made of materials having a relatively high density of charge
carriers (~1020 carriers/𝑐𝑚3) exhibit little variation of their gauge factor
with strain or temperature. On the other hand, for the case where the
crystal contains a low number of charge carriers (<1017
carriers/𝑐𝑚3
), the
gauge factor may be approximated as
where GF0 is the gauge factor at the reference temperature T0, under
conditions of zero strain and C1 is a constant for a particular gauge. The
behavior with temperature of a high-resistivity P-type semiconductor is
shown in Figure
Semiconductor strain gauges find their primary application in the
construction of transducers, such as load cells and pressure transducers.
Because of the capability for producing small gauge lengths, silicon
semiconductor strain gauge technology provides for the construction of very
small transducers. For example, flush-mount pressure transducers having
diameters of less than 8 mm provide pressure measurements up to 15,000
psi, with excellent frequency response characteristics. However, silicone
diaphragm pressure transducers require special procedures for measuring in
liquid environments such as deposition of a thin film of next material over
the silicone diaphragm. Semiconductor strain gauges are somewhat limited
in the maximum strain that they can measure, approximately 5000 με for
tension, but larger in compression. Because of the possibility of an inherent
sensitivity to temperature, careful consideration must be given to each
application to provide appropriate temperature compensation or correction.
Temperature effects can result, for a particular measurement, in zero drift for
the duration of a measurement.
STRAIN GAUGE ELECTRICAL CIRCUITS:
A Wheatstone bridge is generally used to detect the small changes in
resistance that are the output of a strain gauge measurement circuit. A
typical strain gauge measuring installation on a steel specimen has a
sensitivity of 10−6Ω/( 𝑘𝑁 𝑚2). As such, a high-sensitivity device such
as a Wheatstone bridge is desirable for measuring resistance changes
for strain gauges.
Bridge Circuits:
A variety of bridge circuits have been devised for measuring
capacitance, inductance, and, most often, resistance. A purely resistive
bridge, called a Wheatstone bridge, provides a means for accurately
measuring resistance, and for detecting very small changes in
resistance.
Module ii

Module ii

  • 1.
    Stress and Strain •Stress analysis involves a determination of the stress distribution in materials of various shapes and under different loading conditions. • Experimental stress analysis is performed by measuring the deformation of the piece under load and inferring from this measurement the local stress which prevails. • The measurement of deformation is only one facet of the overall problem, and the analytical work that must be applied to the experimental data in order to determine the local stresses is of equal importance. • Our concern in the following sections is with the methods that may be employed for deformation measurements.
  • 2.
    The unit axialstrain a is defined by the relation The ratio of the unit strain in the transverse direction to the unit strain in the axial direction is defined as Poisson’s ratio and must be determined experimentally for various materials. A typical value for Poisson’s ratio for many materials is 0.3. If the material is in the plastic state, the volume remains constant with the change in strain so that
  • 3.
    Strain Measurements • Anystrain measurements must be made over a finite length of the workpiece. The smaller this length, the more nearly the measurement will approximate the unit strain at a point. The length over which the average strain measurement is taken is called the base length. • The deformation sensitivity is defined as the minimum deformation that can be indicated by the appropriate gage. • Strain sensitivity is the minimum deformation that can be indicated by the gage per unit base length. Methods used to measure strain: 1. Grid method (moire fringe) 2. Brittle coating 3. Electrical resistance strain gage.
  • 4.
    Electrical-Resistance Strain Gages •The electrical-resistance strain gage is the most widely used device for strain measurement. Its operation is based on the principle that the electrical resistance of a conductor changes when it is subjected to mechanical deformation. • electric conductor is bonded to the specimen with an insulating cement under no-load conditions. A load is then applied, which produces a deformation in both the specimen and the resistance element. • This deformation is indicated through a measurement of the change in resistance of the element and a calculation procedure which is described below.
  • 5.
    • Let usnow develop the basic relations for the resistance strain gage. The resistance of the conductor is Differentiating eqn (1) we get (1) The gage factor F is defined by
  • 6.
    • We maythus express the local strain in terms of the gage factor, the resistance of the gage, and the change in resistance with the strain: • The value of the gage factor and the resistance are usually specified by the manufacturer so that the user only needs to measure the value of R in order to determine the local strain. For most gages the value of F is constant over a rather wide range of strains. It is worthwhile, however, to examine the influence of various physical properties of the resistance material on the value of F. If the resistivity of the material does not vary with the strain • The dependence of resistivity on mechanical strain is called piezoresistance, and may be expressed in terms of a piezoresistance coefficient, 𝜋1defined by LdL ρdρ E 1 π m 1  With this definition, the change in resistance may be expressed )21( 1 mELdLRdR  
  • 7.
    Gauge Factor The changein resistance of a strain gauge is normally expressed in terms of an empirically determined parameter called the gauge factor (GF). For a particular strain gauge, the gauge factor is supplied by the manufacturer. The gauge factor is defined as a RR F    The gauge factor represents the total change in resistance for a strain gauge, under a calibration loading condition. The calibration loading condition generally creates a biaxial strain field, and the lateral sensitivity of the gauge influences the measured result. Strictly speaking then, the sensitivity to normal strain of the material used in the gauge and the gauge factor are not the same. Generally gauge factors are measured in a biaxial strain field that results from the deflection of a beam having a value of Poisson’s ratio of 0.285. Thus, for any other strain field there is an error in strain indication due to the transverse sensitivity of the strain gauge. The percentage error due to transverse sensitivity for a strain gauge mounted on any material at any orientation in the strain field is 100 1 )( X K K e t aLt L     
  • 8.
    Typical values ofthe transverse sensitivity for commercial strain gauges range from -0.19 to 0.05. Figure 11.7 shows a plot of the percentage error for a strain gauge as a function of the ratio of lateral loading to axial loading and the lateral sensitivity. It is possible to correct for the lateral sensitivity effects
  • 10.
    • Taking atypical value of μ as 0.3, we would obtain F =1.6. In this case the change in resistance of the material results solely from the change in physical dimensions. If the resistivity decreases with strain, the value of F will be less than 1.6. When the resistivity increases with strain, F will be greater than 1.6. Gage factors for various materials have been observed from−140 to+175. • If the resistance material is strained to the point that it is operating in the plastic region, μ = 0.5 and the resistivity remains essentially constant. Under these conditions the gage factor approaches a value of 2. • For most commercial strain gages the gage factor is the same for both compressive and tensile strains. A high gage factor is desirable in practice because a larger change in resistance ∆R is produced for a given strain input, thereby necessitating less sensitive readout circuitry. Determine the total resistance of a copper wire having a diameter of 1 mm and a length of 5 cm. The resistivity of copper is 𝟏. 𝟕 ∗ 𝟏𝟎−𝟖 Ω m. A very common material for the construction of strain gauges is the alloy constantan (55% copper with 45% nickel), having a resistivity of 49 *𝟏𝟎−𝟖 Ω m. A typical strain gauge might have a resistance of 120Ω. What length of constantan wire of diameter 0.025 mm would yield a resistance of 120 Ω?
  • 11.
    • Three commontypes of resistance strain gages are shown in Figure. The bonded-wire gage employs wire sizes varying between 0.0005 and 0.001 in (12 and 25μm). The foil gage usually employs a foil less than 0.001 in thick and is available in a wide variety of configurations which may be adapted to different stress-measurement situations. Because of this flexibility, it is the most commonly used gage. • The semiconductor gage employs a silicon base material that is strain-sensitive and has the advantage that very large values of F may be obtained (F ∼100). The material is usually produced in brittle wafers having a thickness of about 0.01 in (0.25 mm). Semiconductor gages also have very high temperature coefficients of resistance. Metallic gage: Foil gage:
  • 15.
    Construction of atypical metallic foil strain gauge: Strain gauge consists of a metallic foil pattern that is formed in a manner similar to the process used to produce printed circuits. This photoetched metal foil pattern is mounted on a plastic backing material. The gauge length, as illustrated in Figure, is an important specification for a particular application. Since strain is usually measured at the location on a component where the stress is a maximum and the stress gradients are high, the strain gauge averages the measured strain over the gauge length. Because the maximum strain is the quantity of interest and the gauge length is the resolution, errors due to averaging can result from improper choice of a gauge length. The variety of conditions encountered in particular applications require special construction and mounting techniques, including design variations in the backing material, the grid configuration, bonding techniques, and total gauge electrical resistance. The adhesives used in the bonding process and the mounting techniques for a particular gauge and manufacturer vary according to the specific application. However, there are some fundamental aspects that are common to all bonded resistance gauges. Backing: The strain gauge backing serves several important functions. It electrically isolates the metallic gauge from the test specimen, and transmits the applied strain to the sensor. A bonded resistance strain gauge must be appropriately mounted to the specimen for which the strain is to be measured. The backing provides the surface used for bonding with an appropriate adhesive. Backing materials are available that are useful over temperatures that range from 270 to 𝟐𝟗𝟎 𝒐 C.
  • 16.
    Adhesive bond: The adhesivebond serves as a mechanical and thermal coupling between the metallic gauge and the test specimen. As such, the strength of the adhesive should be sufficient to accurately transmit the strain experienced by the test specimen, and should have thermal conduction and expansion characteristics suitable for the application. If the adhesive shrinks or expands during the curing process, apparent strain can be created in the gauge. A wide array of adhesives are available for bonding strain gauges to a test specimen. Among these are epoxies, cellulose nitrate cement, and ceramic-based cements.
  • 17.
    • When straingages are mounted on a specimen, two notes of caution should be observed: (1) The surface must be absolutely clean. Cleaning with an emery cloth followed by acetone is usually satisfactory. (2) Sufficient time must be allowed for the cement to dry and harden completely. Even though the cement is dry around the edge of the gage, it may still be wet under the gage. If possible, 24 h should be allowed for drying at room temperature. Drying time may be reduced for higher temperatures.
  • 18.
    • For low-temperatureapplications (−100 to +100◦C) Duco cement (nitrocellulose) is normally employed with paper-covered gages and Eastman 910 (cyanoacrylate) with foil gages mounted on epoxy. • Problems associated with strain-gage installations generally fall into three categories: (1) temperature effects, (2) moisture effects, and (3) wiring problems. It is • assumed that the gage is properly mounted. Temperature problems arise because of differential thermal expansion between the resistance element and the material to which it is bonded. • Semiconductor gages offer the advantage that they have a lower expansion coefficient than either wire or foil gages. • In addition to the expansion problem, there is a change in resistance of the gage with temperature, which must be adequately compensated for. • Moisture absorption by the paper and cement can change the electrical resistance between the gage and the ground potential and thus affect the output-resistance readings.
  • 19.
    • Wiring problemsare those situations that arise because of faulty connections between the gage-resistance element and the external readout circuit. These problems may develop from poorly soldered connections or from inflexible wiring, which may pull the gage loose from the test specimen or break the gage altogether. • Electrical-resistance strain gages cannot be easily calibrated because once they are attached to a calibration workpiece, removal cannot be made without destroying the gage. In practice, then, the gage factor is taken as the value specified by the manufacturer and a semi-calibration effected by checking the bridge measurement and readout system.
  • 20.
    Semiconductor Strain Gauges •When subjected to a load, a semiconductor material exhibits a change in resistance, and therefore can be used for the measurement of strain. Silicon crystals are the basic material for semiconductor strain gauges; the crystals are sliced into very thin sections to form strain gauges. Mounting such gauges in a transducer, such as a pressure transducer, or on a test specimen requires backing and adhesive techniques similar to those used for metallic gauges. Because of the large piezoresistance coefficient, the semiconductor gauge exhibits a very large gauge factor, as large as 200 for some gauges. These gauges also exhibit higher resistance, longer fatigue life, and lower hysteresis under some conditions than metallic gauges. However, the output of the semiconductor strain gauge is nonlinear with strain, and the strain sensitivity or gauge factor may be markedly dependent on temperature.
  • 21.
    Semiconductor materials forstrain gauge applications have resistivity ranging from 10−6 to 10−2 Ω-m. Semiconductor strain gauges may have a relatively high or low density of charge carriers (3, 7). Semiconductor strain gauges made of materials having a relatively high density of charge carriers (~1020 carriers/𝑐𝑚3) exhibit little variation of their gauge factor with strain or temperature. On the other hand, for the case where the crystal contains a low number of charge carriers (<1017 carriers/𝑐𝑚3 ), the gauge factor may be approximated as where GF0 is the gauge factor at the reference temperature T0, under conditions of zero strain and C1 is a constant for a particular gauge. The behavior with temperature of a high-resistivity P-type semiconductor is shown in Figure
  • 23.
    Semiconductor strain gaugesfind their primary application in the construction of transducers, such as load cells and pressure transducers. Because of the capability for producing small gauge lengths, silicon semiconductor strain gauge technology provides for the construction of very small transducers. For example, flush-mount pressure transducers having diameters of less than 8 mm provide pressure measurements up to 15,000 psi, with excellent frequency response characteristics. However, silicone diaphragm pressure transducers require special procedures for measuring in liquid environments such as deposition of a thin film of next material over the silicone diaphragm. Semiconductor strain gauges are somewhat limited in the maximum strain that they can measure, approximately 5000 με for tension, but larger in compression. Because of the possibility of an inherent sensitivity to temperature, careful consideration must be given to each application to provide appropriate temperature compensation or correction. Temperature effects can result, for a particular measurement, in zero drift for the duration of a measurement.
  • 24.
    STRAIN GAUGE ELECTRICALCIRCUITS: A Wheatstone bridge is generally used to detect the small changes in resistance that are the output of a strain gauge measurement circuit. A typical strain gauge measuring installation on a steel specimen has a sensitivity of 10−6Ω/( 𝑘𝑁 𝑚2). As such, a high-sensitivity device such as a Wheatstone bridge is desirable for measuring resistance changes for strain gauges. Bridge Circuits: A variety of bridge circuits have been devised for measuring capacitance, inductance, and, most often, resistance. A purely resistive bridge, called a Wheatstone bridge, provides a means for accurately measuring resistance, and for detecting very small changes in resistance.