Download to read offline
![moment is the OnCreate method that will be called when our screen is created and
accessible to the user.
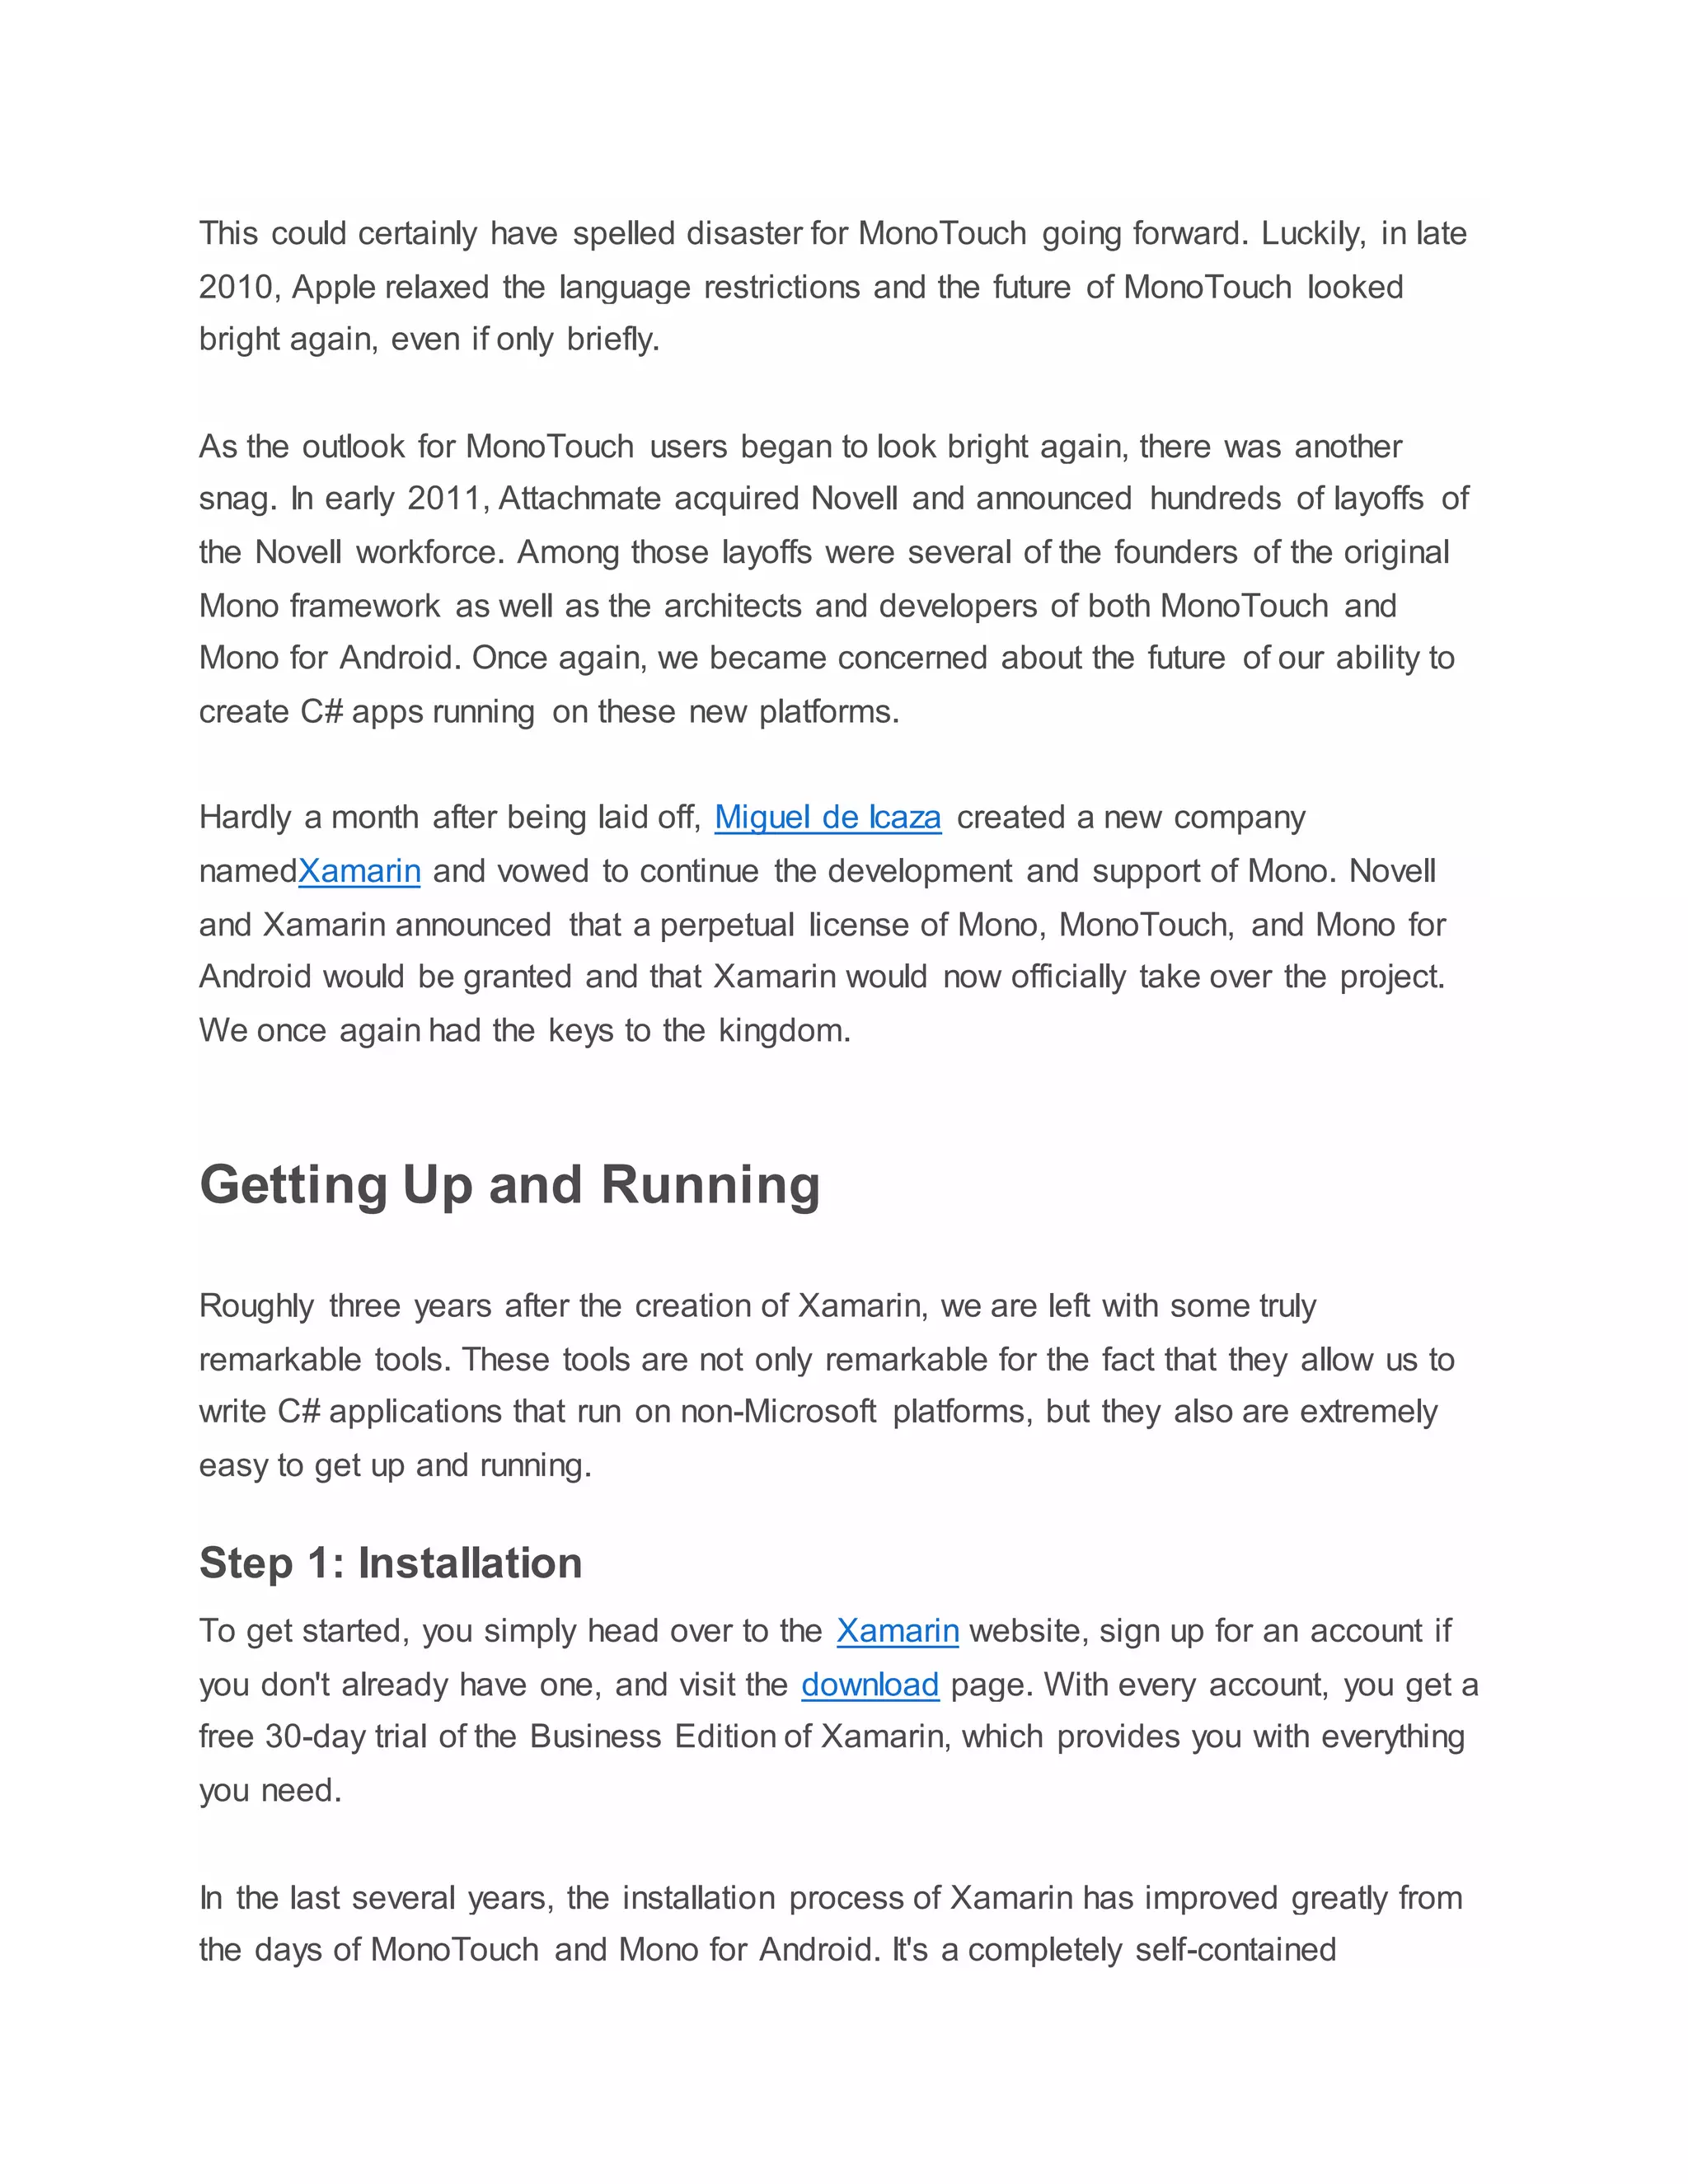
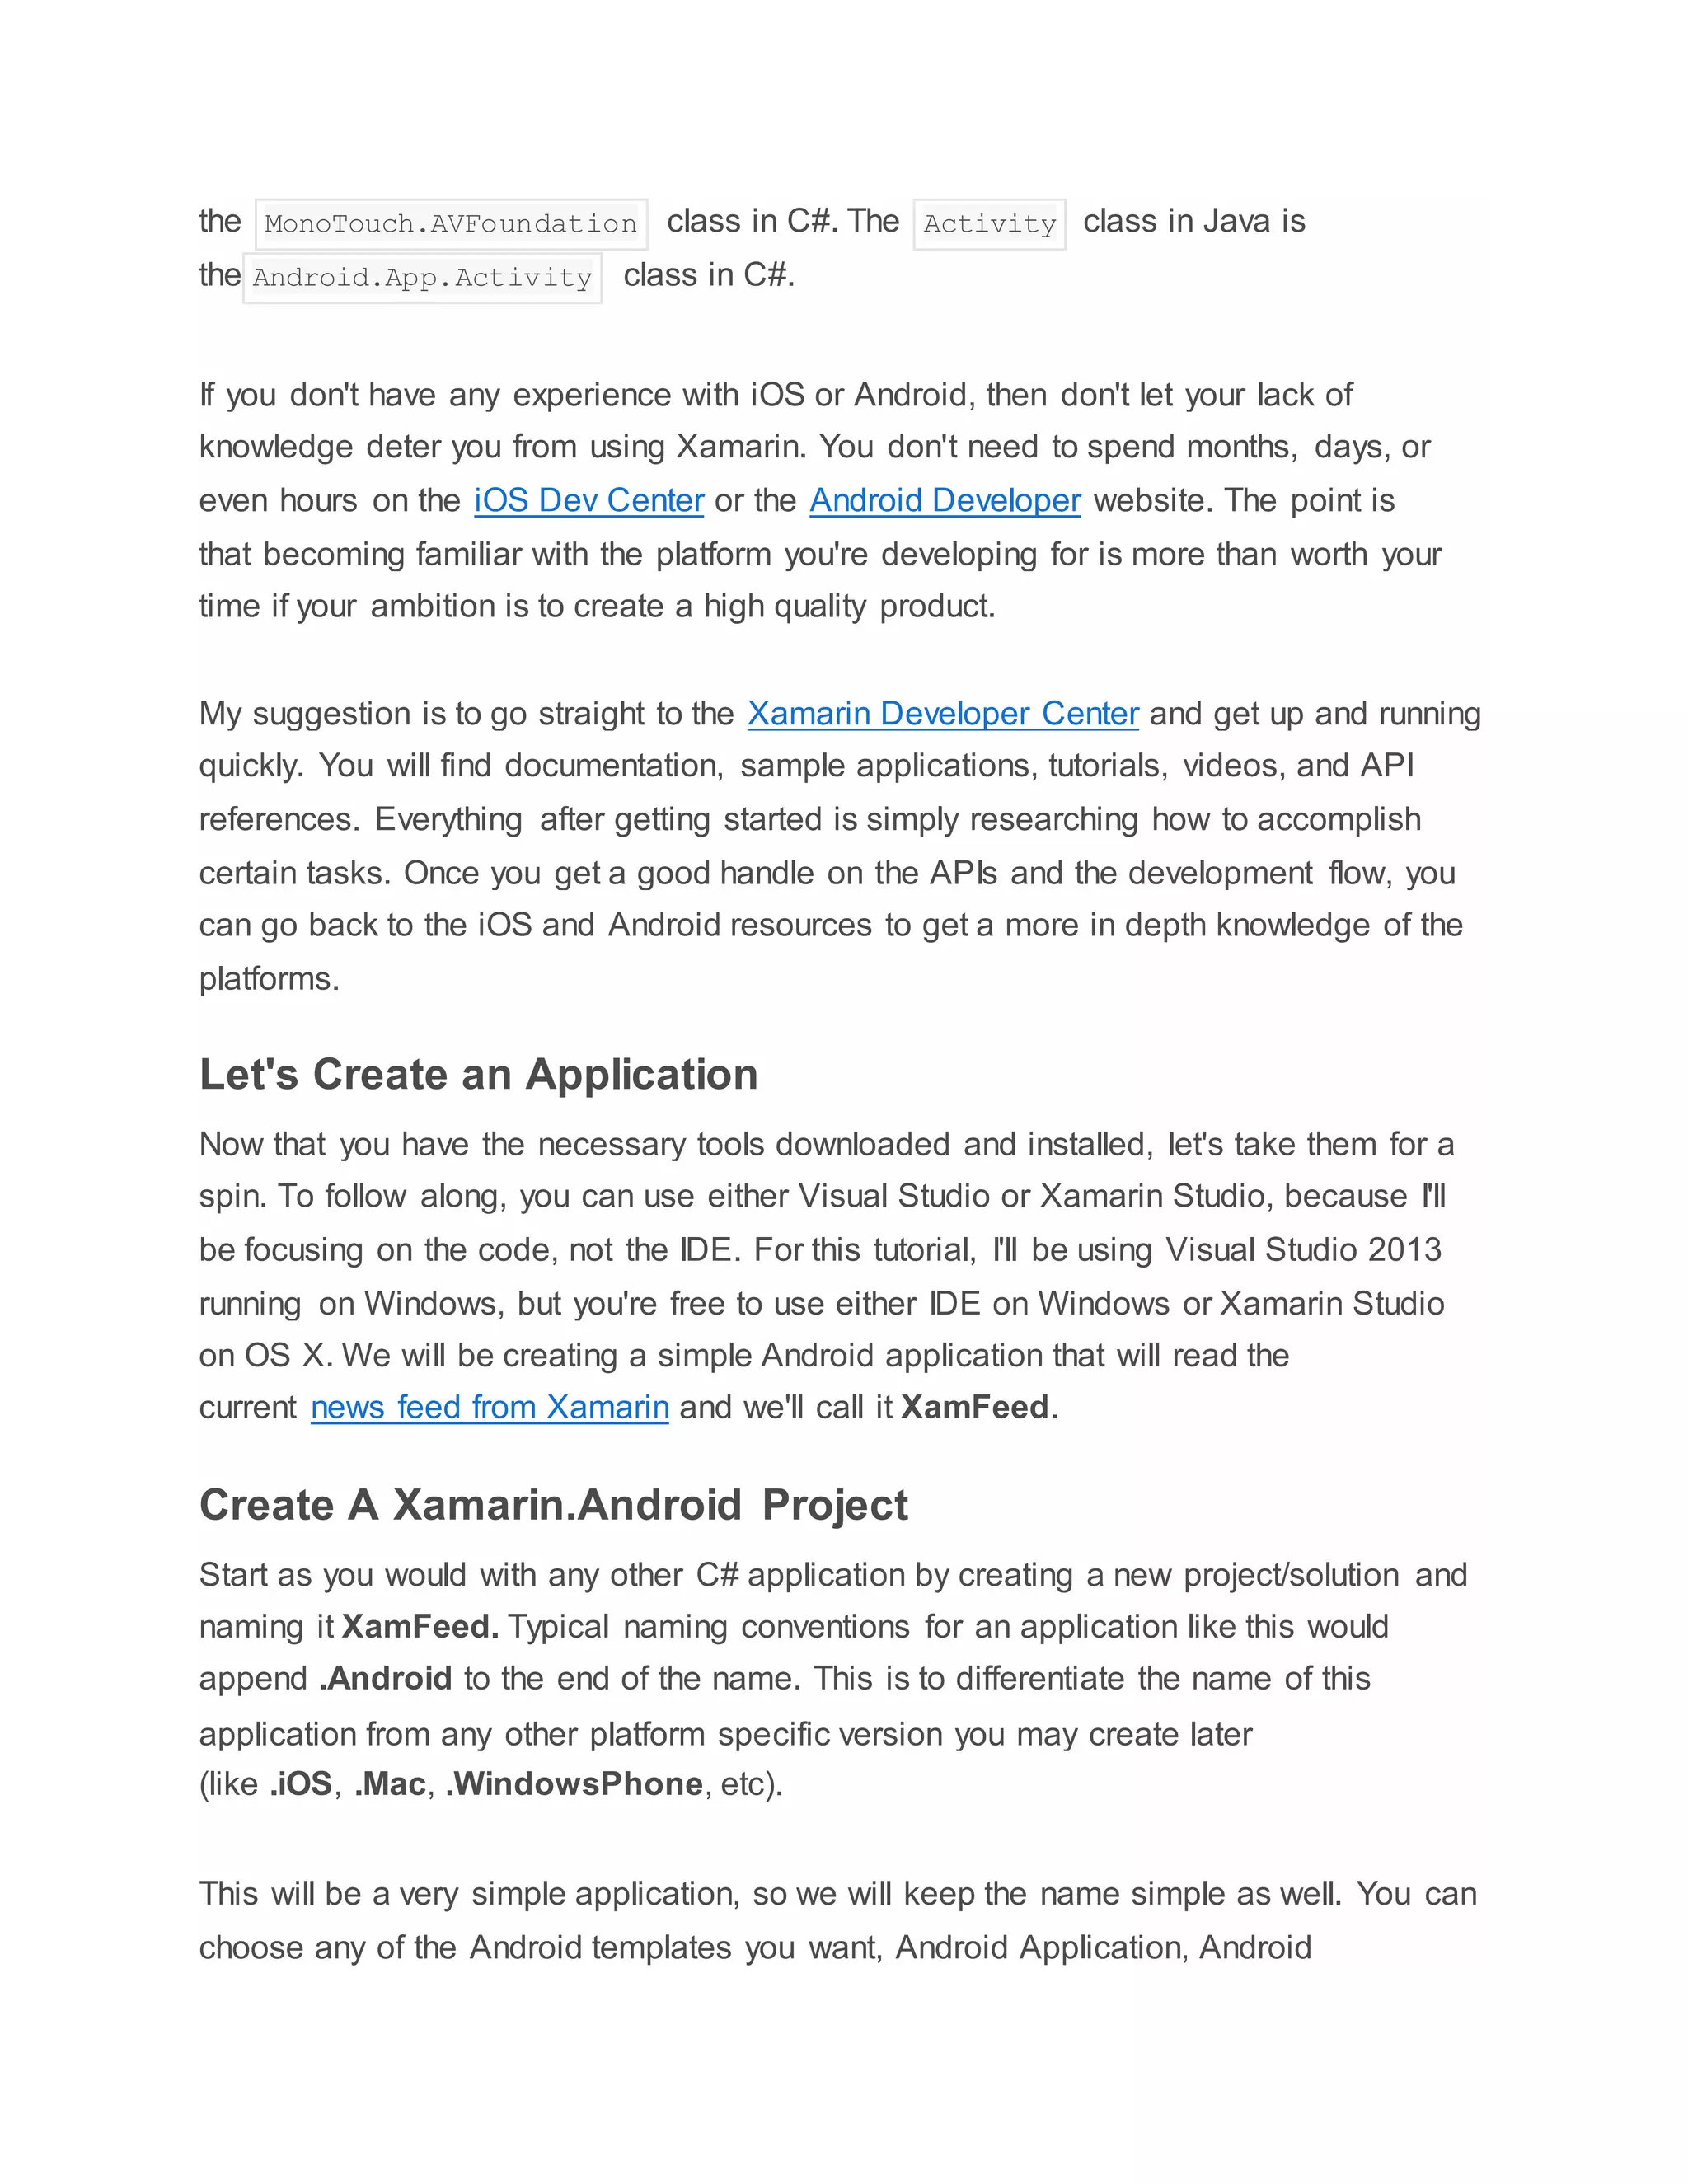
The first thing we'll do is create a new class that represents the feed. You can obviously
expand upon this, but all we need for now is the Title , PubDate , Creator ,
and Link to the item's content.
1
2
3
4
5
6
7
public class RssItem
{
public string Title { get; set; }
public string PubDate { get; set; }
public string Creator { get; set; }
public string Link { get; set; }
}
We can now change the implementation of the OnCreate method within
our MainActivity class to get the data from the Xamarin feed. Replace
the OnCreate implementation with the following:
01
02
03
04
05
06
07
08
09
10
11
12
13
14
15
16
17
18
19
20
21
22
23
24
25
[Activity(Label = "XamFeed", MainLauncher = true, Icon = "@drawable/icon")]
public class FeedActivity : ListActivity
{
private RssItem[] _items;
protected async override void OnCreate(Bundle bundle)
{
base.OnCreate(bundle);
using (var client = new HttpClient())
{
var xmlFeed = await client.GetStringAsync("http://blog.xamarin.com/feed/");
var doc = XDocument.Parse(xmlFeed);
XNamespace dc = "http://purl.org/dc/elements/1.1/";
_items = (from item in doc.Descendants("item")
select new RssItem
{
Title = item.Element("title").Value,
PubDate = item.Element("pubDate").Value,
Creator = item.Element(dc + "creator").Value,
Link = item.Element("link").Value
}).ToArray();
ListAdapter = new FeedAdapter(this, _items);
}
}
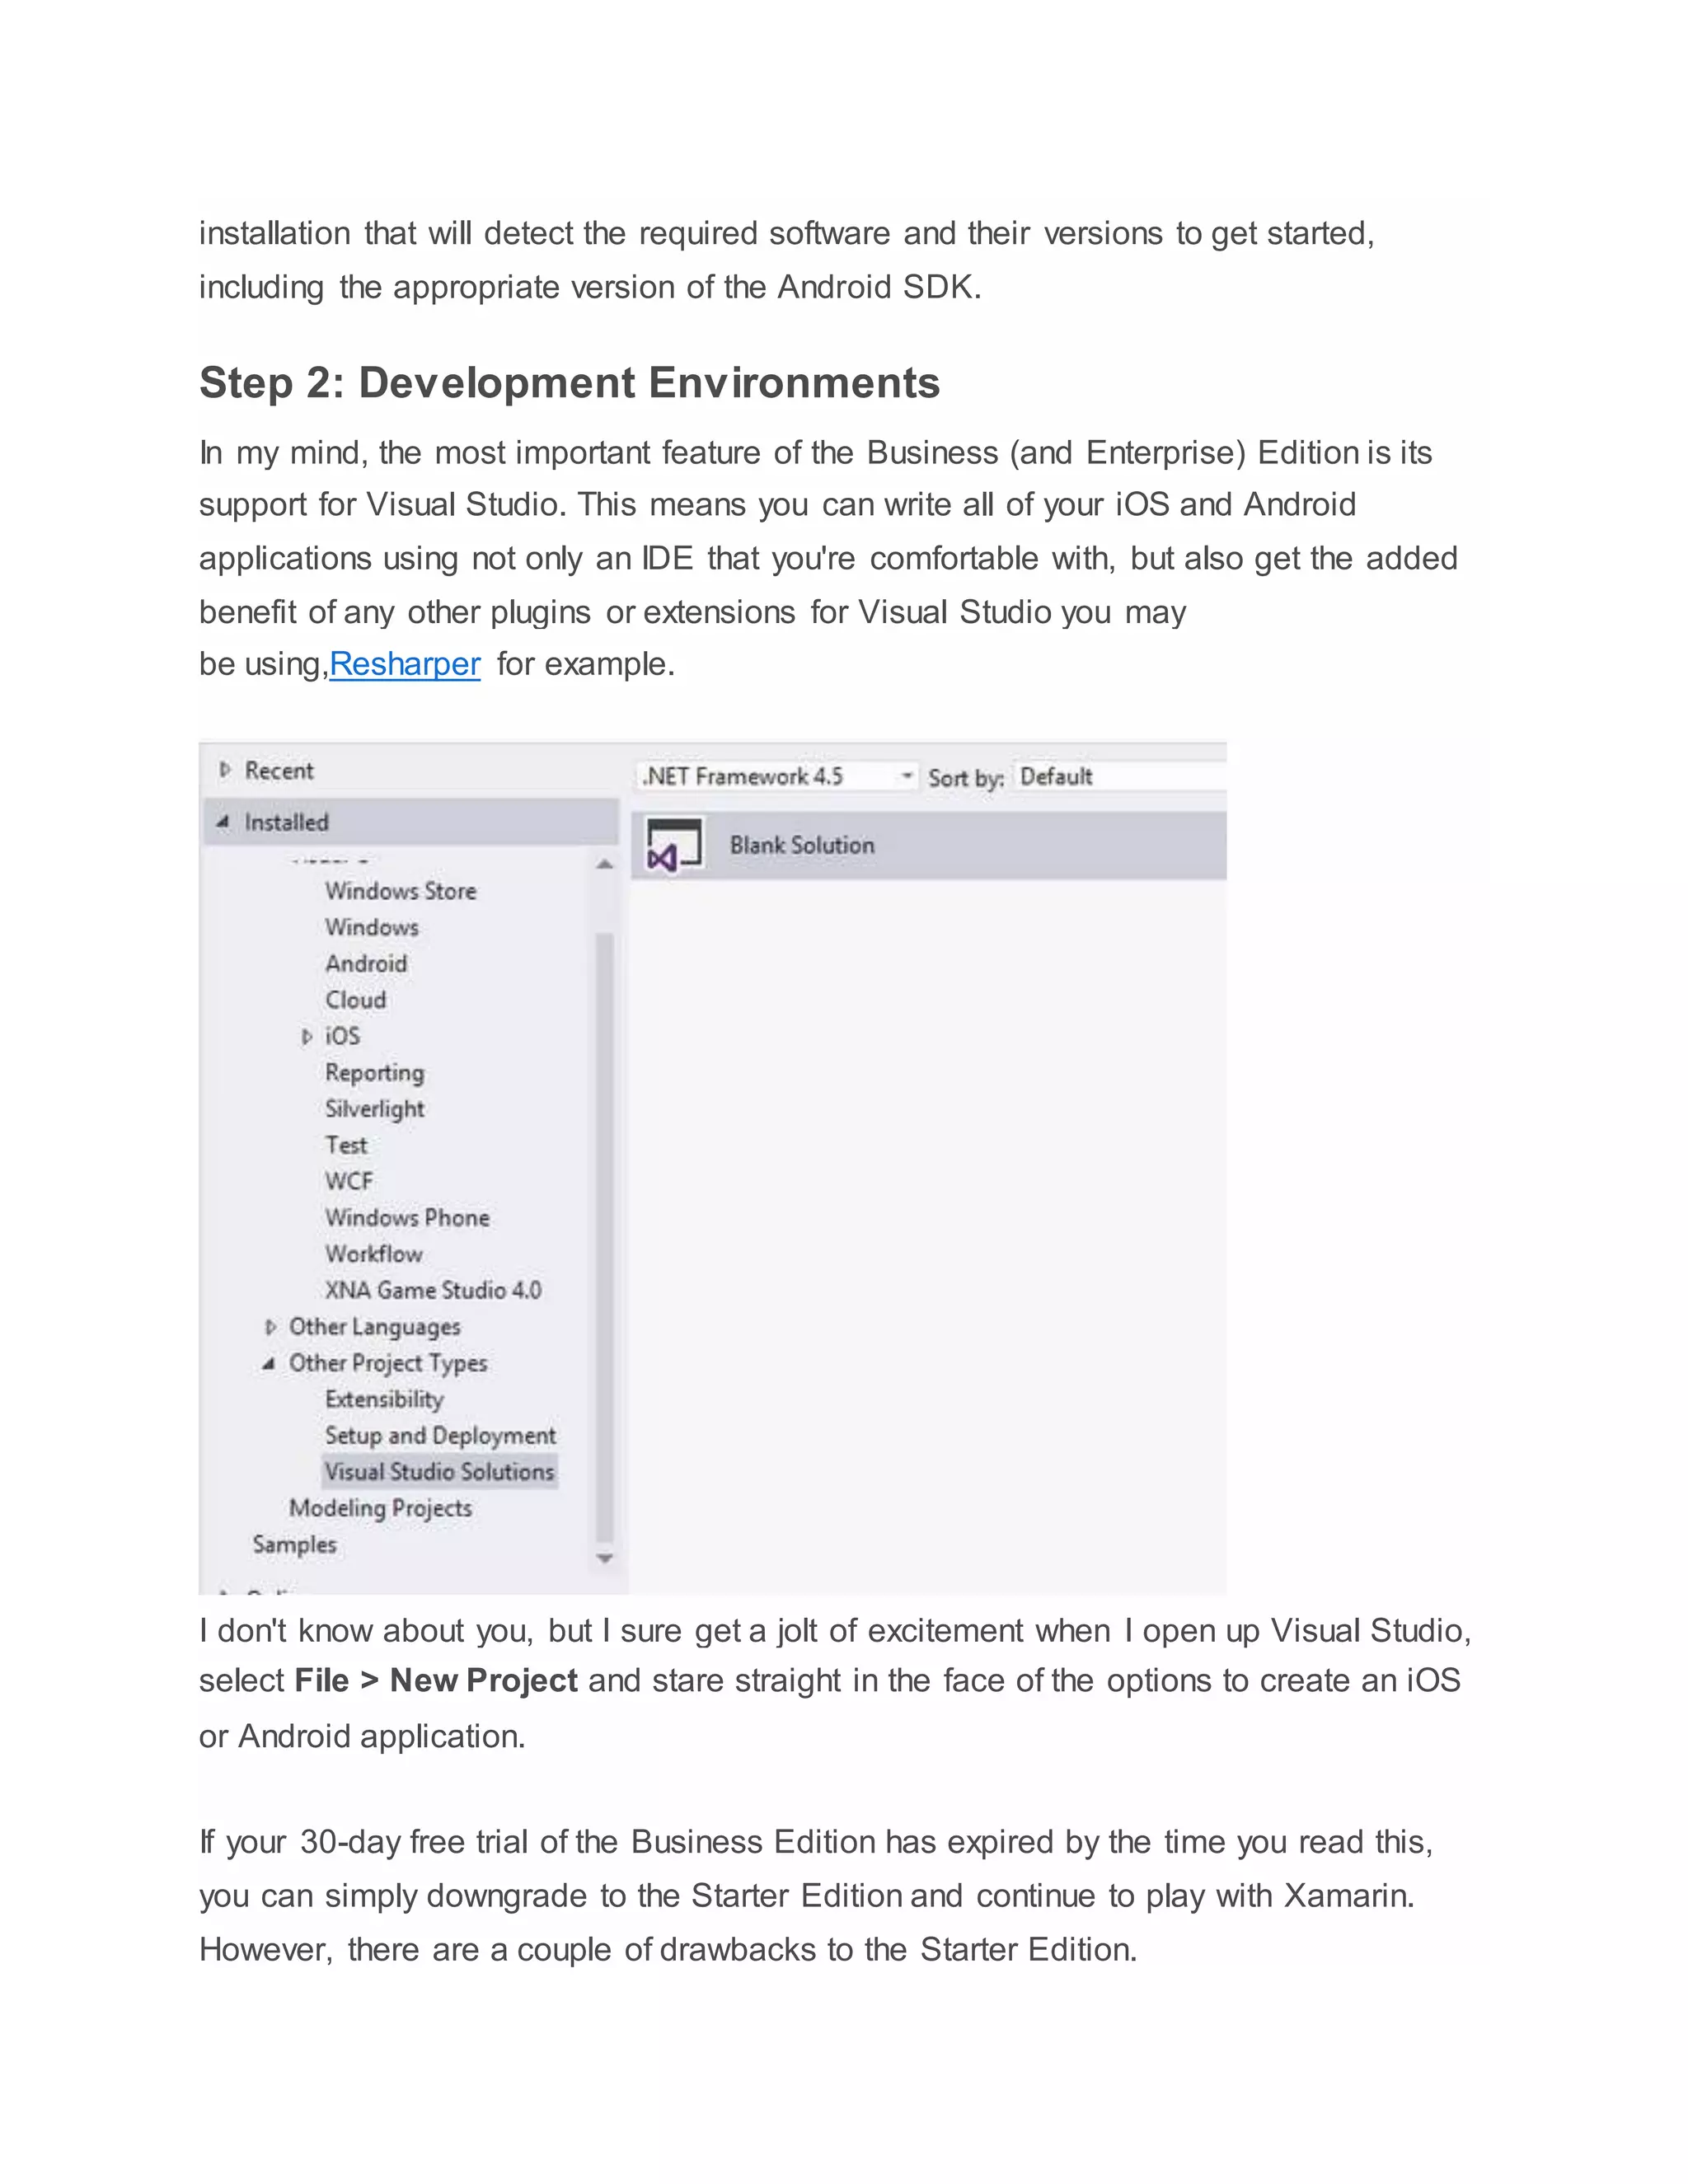
protected override void OnListItemClick(ListView l, View v, int position, long id)
{](https://image.slidesharecdn.com/mobiledevelopment-xamarain-160123171417/75/Mobile-development-xamarain-13-2048.jpg)
![26
27
28
29
30
31
32
33
34
35
36
37
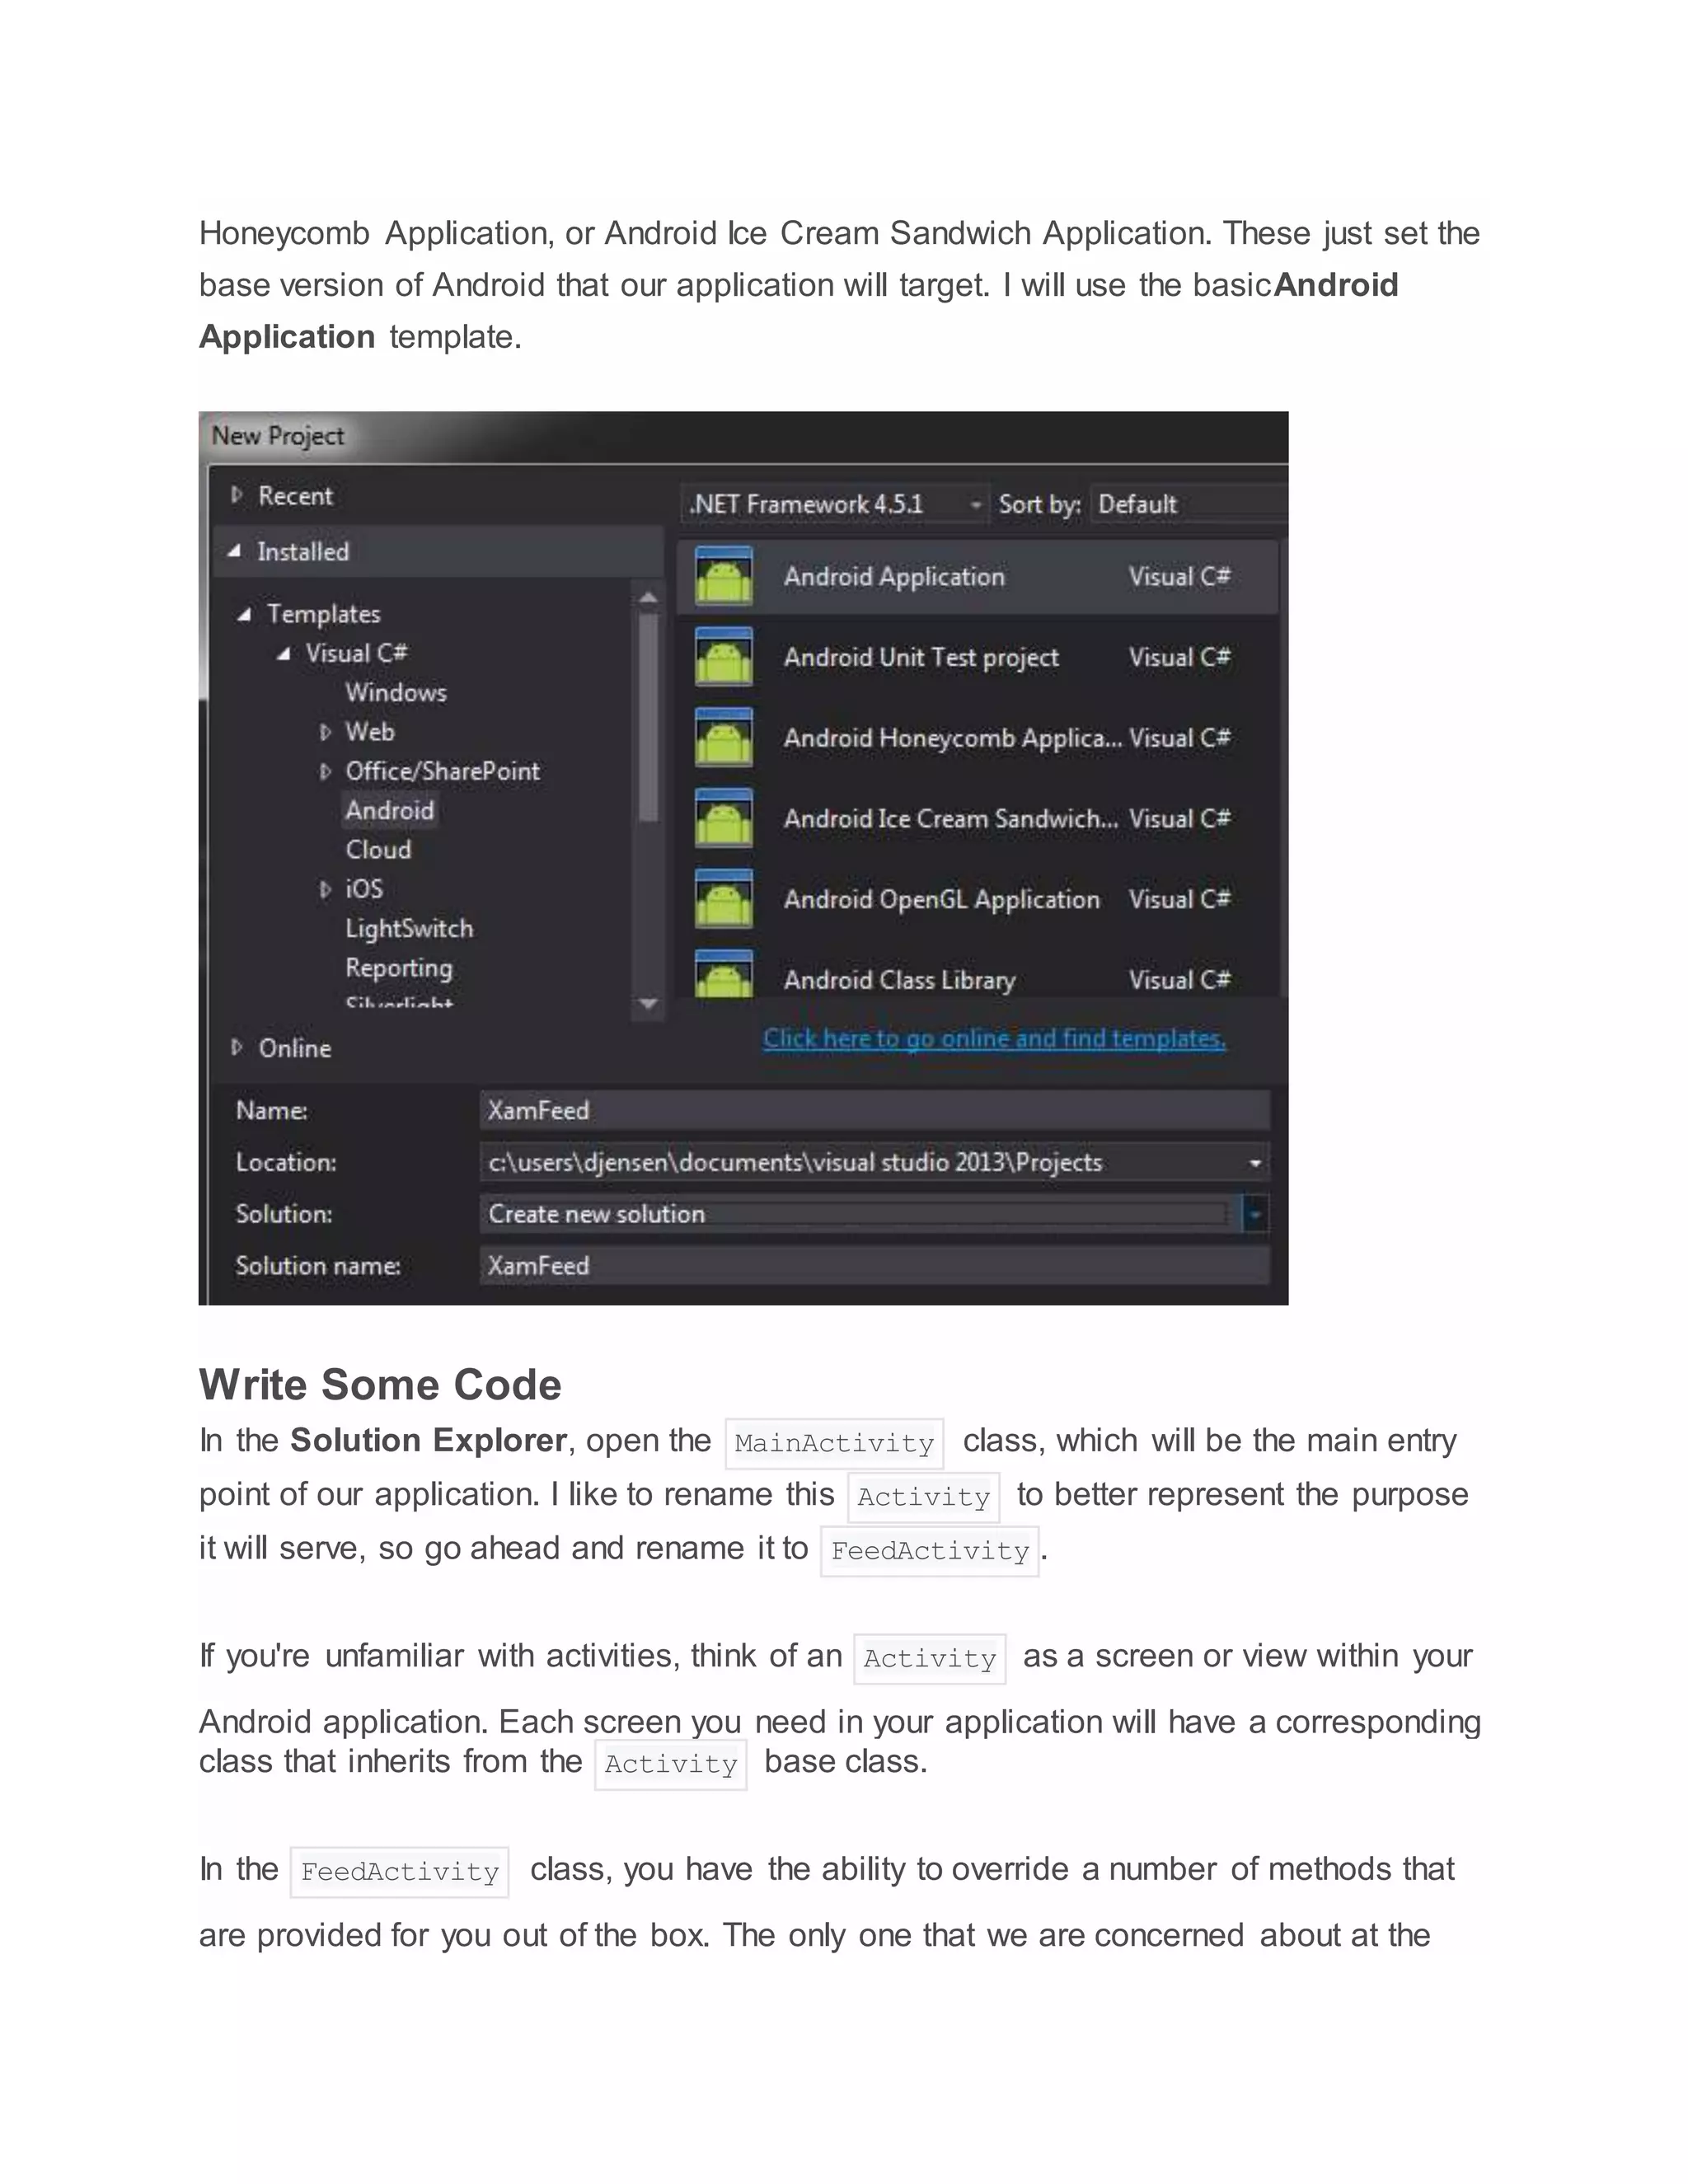
base.OnListItemClick(l, v, position, id);
var second = new Intent(this, typeof(WebActivity));
second.PutExtra("link", _items[position].Link);
StartActivity(second);
}
}
Let's walk through this code snippet line by line to see what's going on.
1 [Activity(Label = "XamFeed", MainLauncher = true, Icon = "@drawable/icon")]
The ActivityAttribute that decorates the FeedActivity class is the mechanism
that Xamarin.Android uses to let the target device or the emulator know that this is
an Activity (or screen) that is accessible within the application. This is required for
all Activity classes within your application.
1 private RssItem[] _items;
We are going to save all the feed items that we pull from the Xamarin website in a
variable to prevent us from constantly making HTTP requests. You may want to handle
this differently depending on whether or not you want to update this screen later with
new content. In our simple application, we won't do this.
1 protected async override void OnCreate(Bundle bundle)
Next, we override the OnCreate method that's exposed through the Activity base
class in our FeedActivity class. This method is called every time this Activity is
instantiated by the. As you can see, we can also use the new C#
5.0 async/await feature to make this method asynchronous.
1 base.OnCreate(bundle);
Make sure to call the base.OnCreate method on the base Activity class. This will
ensure that any processing the base class does during the OnCreate method will
continue to run.
1 using (var client = new HttpClient())](https://image.slidesharecdn.com/mobiledevelopment-xamarain-160123171417/75/Mobile-development-xamarain-14-2048.jpg)
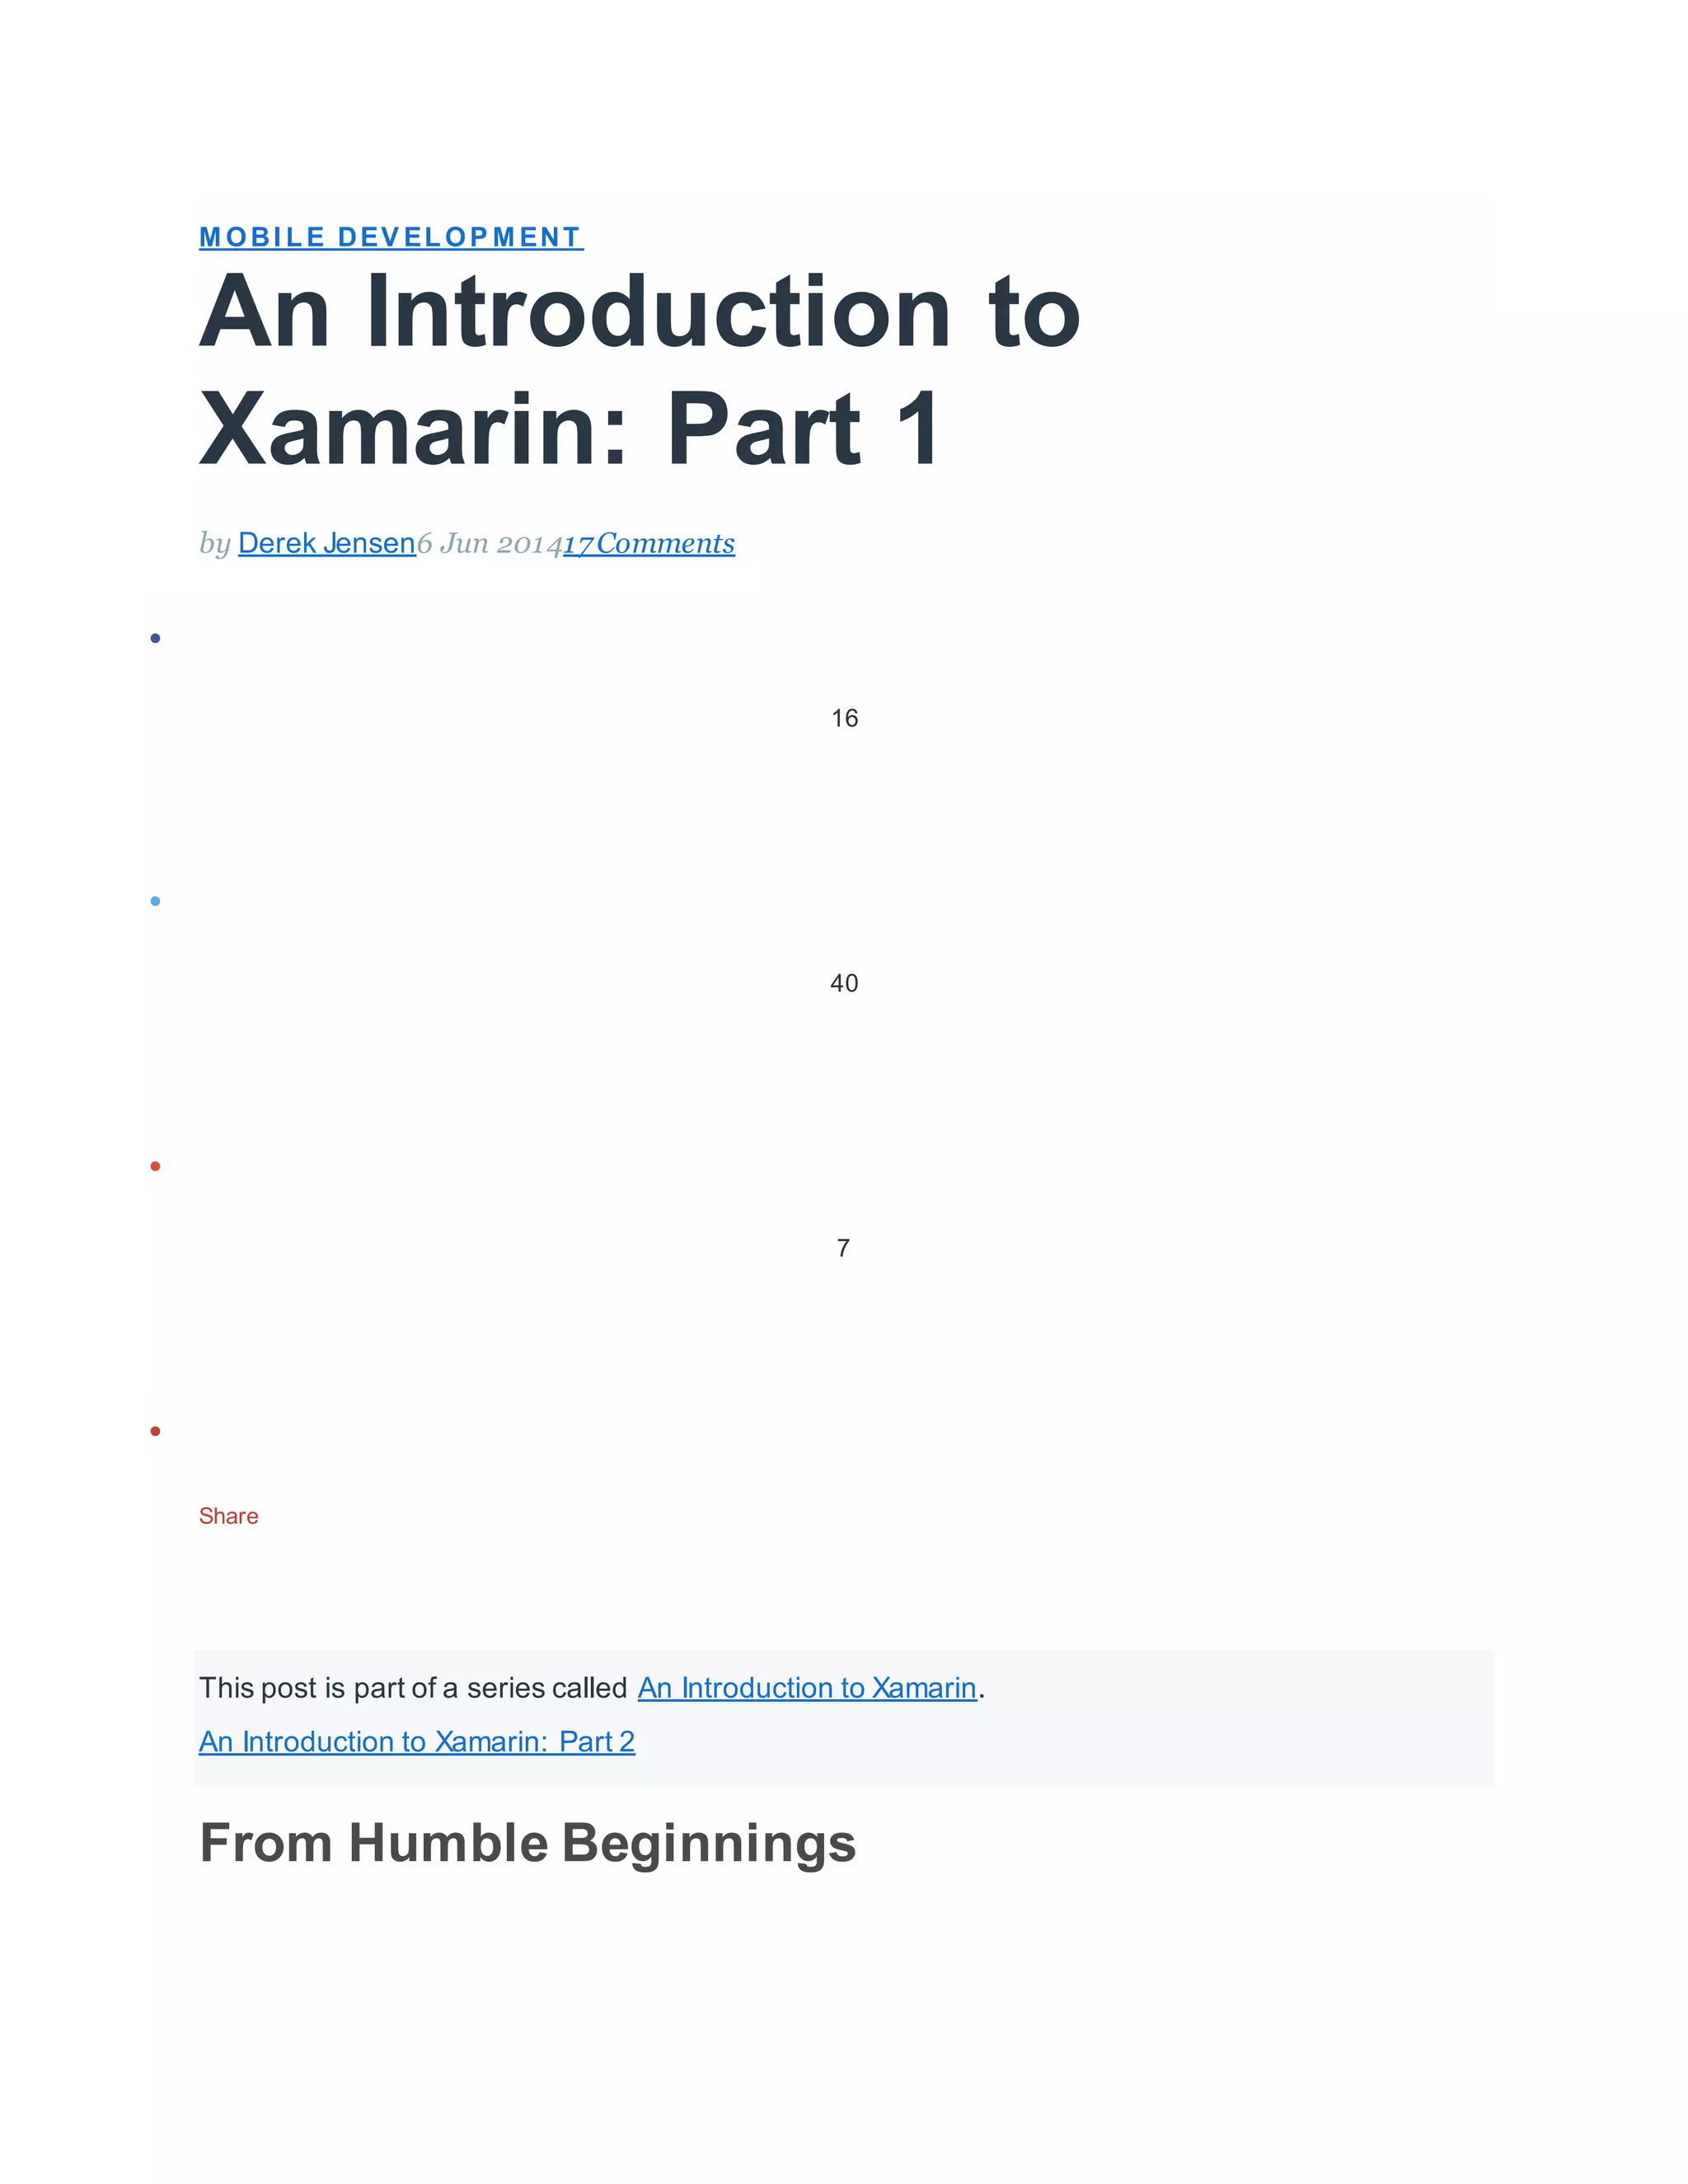
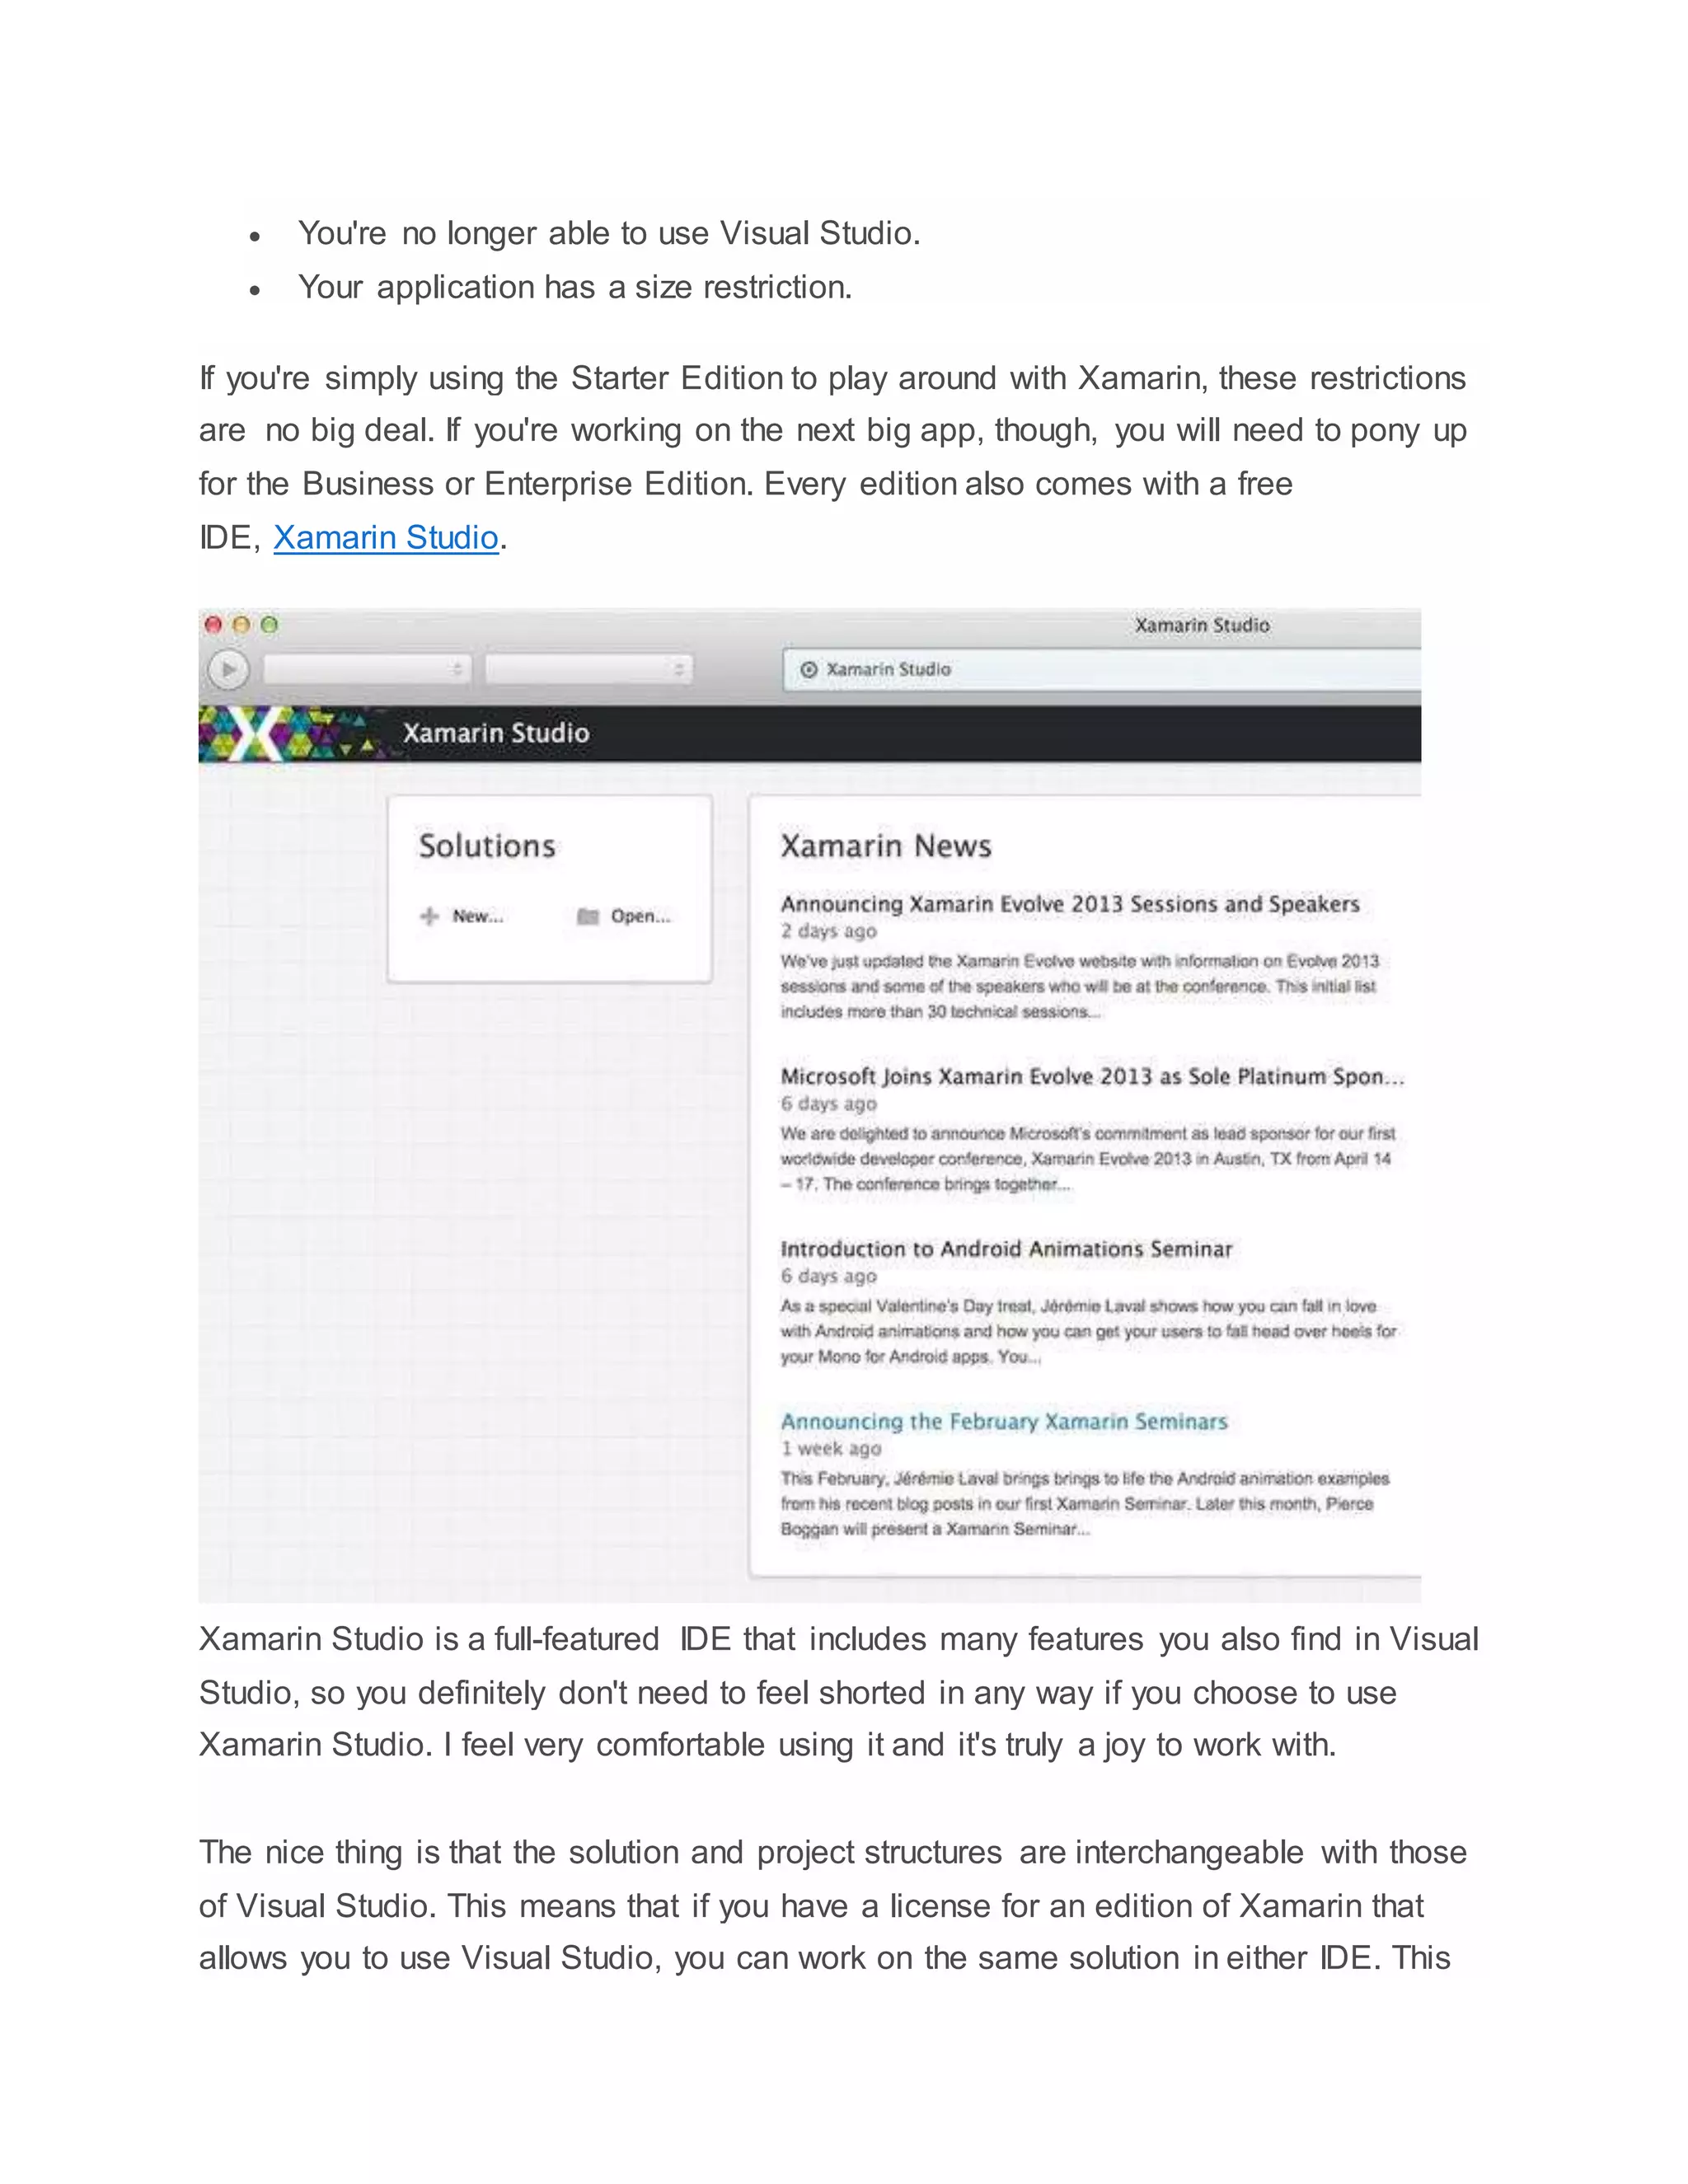
![1
2
3
var second = new Intent(this, typeof(WebActivity));
second.PutExtra("link", _items[position].Link);
StartActivity(second);
We now follow the Android design pattern for passing data to a new Activity . This
will become very familiar to you as you create more applications that involve multiple
screens. We create a new Intent object, which is the Android way of passing data to
a new Activity . We pass it two objects that represent the context of where the call is
originating, this , and the Type object to where it is going.
Once we have the new Intent object, we put things, typically strings, into it and pass
it on. In this case, we use the PutExtra method to add a key/value pair to
the Intent , and start the transition process to the WebActivity screen with
the StartActivity method.
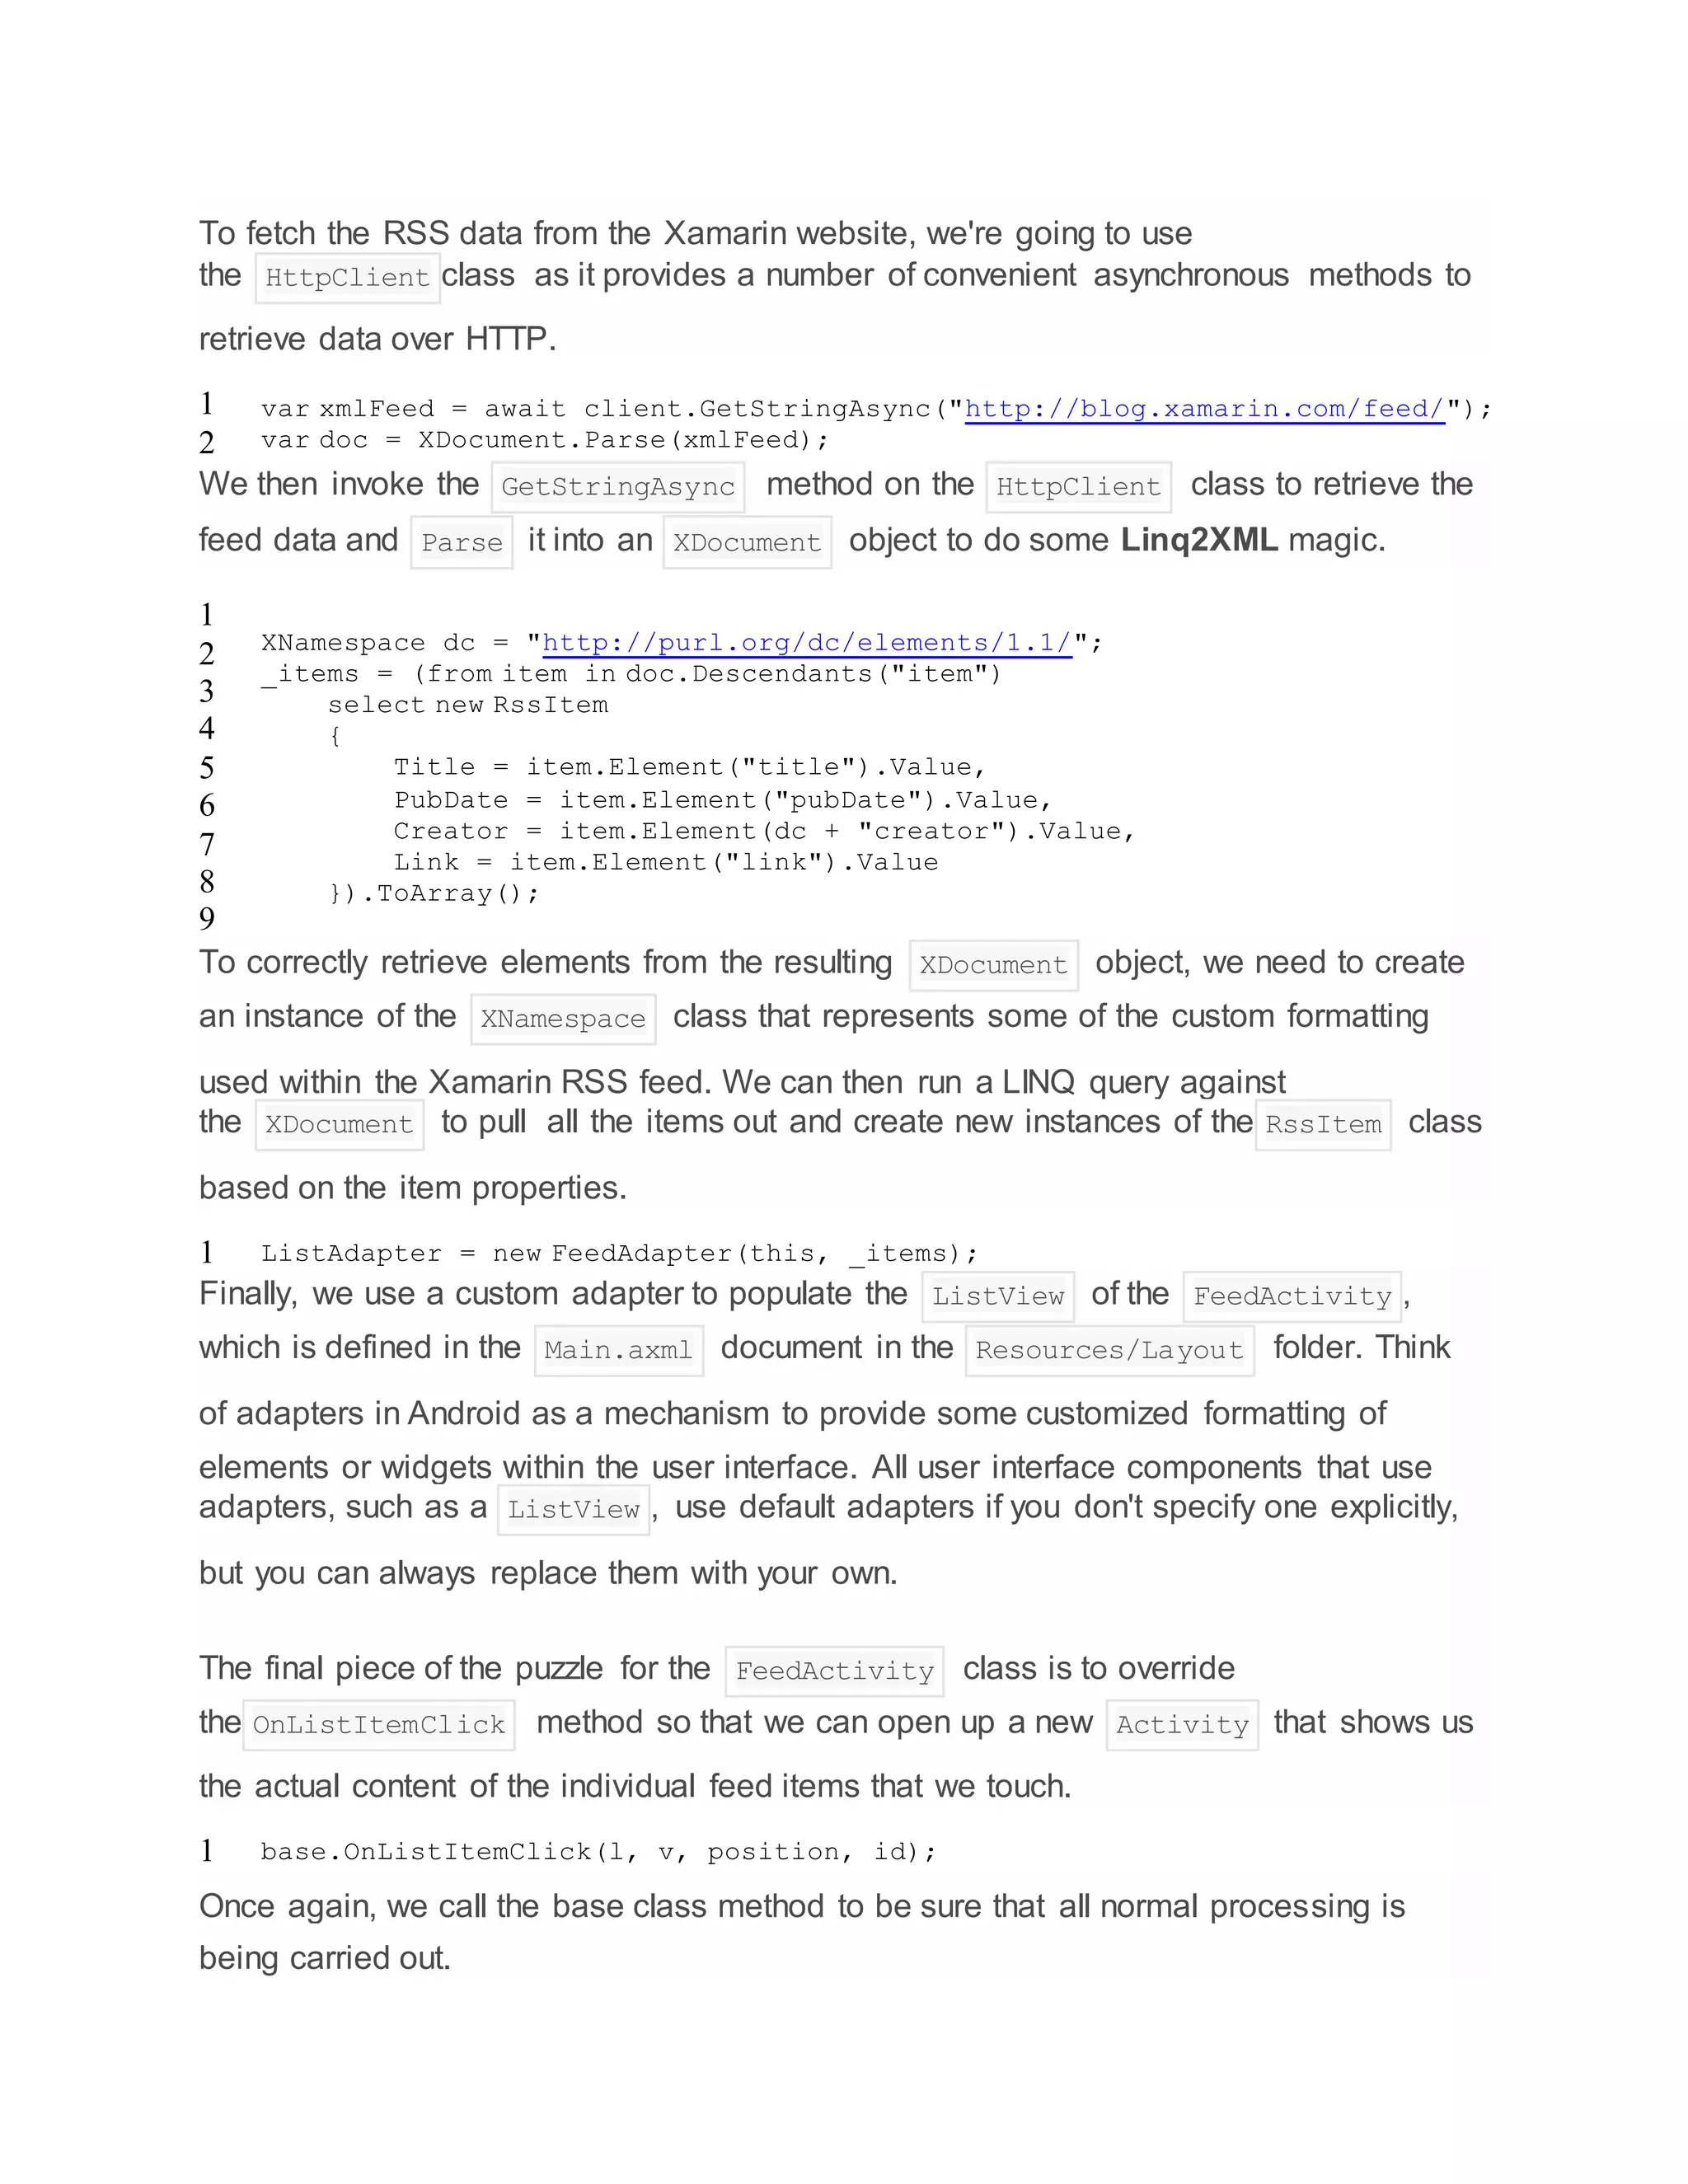
Based on the code involved in the creating of the FeedActivity screen, we now need
to create a FeedAdapter class that populates and formats the RssItem data into
our ListView and a WebActivity class to represent the next screen. Let's start with
the FeedAdapter class.
01
02
03
04
05
06
07
08
09
10
11
12
13
14
15
16
17
18
19
20
21
22
public class FeedAdapter : BaseAdapter<RssItem>
{
private RssItem[] _items;
private Activity _context;
public FeedAdapter( Activity context, RssItem[] items) : base()
{
_context = context;
_items = items;
}
public override RssItem this[int position]
{
get { return _items[position]; }
}
public override int Count
{
get { return _items.Count(); }
}
public override long GetItemId(int position)
{
return position;
}](https://image.slidesharecdn.com/mobiledevelopment-xamarain-160123171417/75/Mobile-development-xamarain-16-2048.jpg)
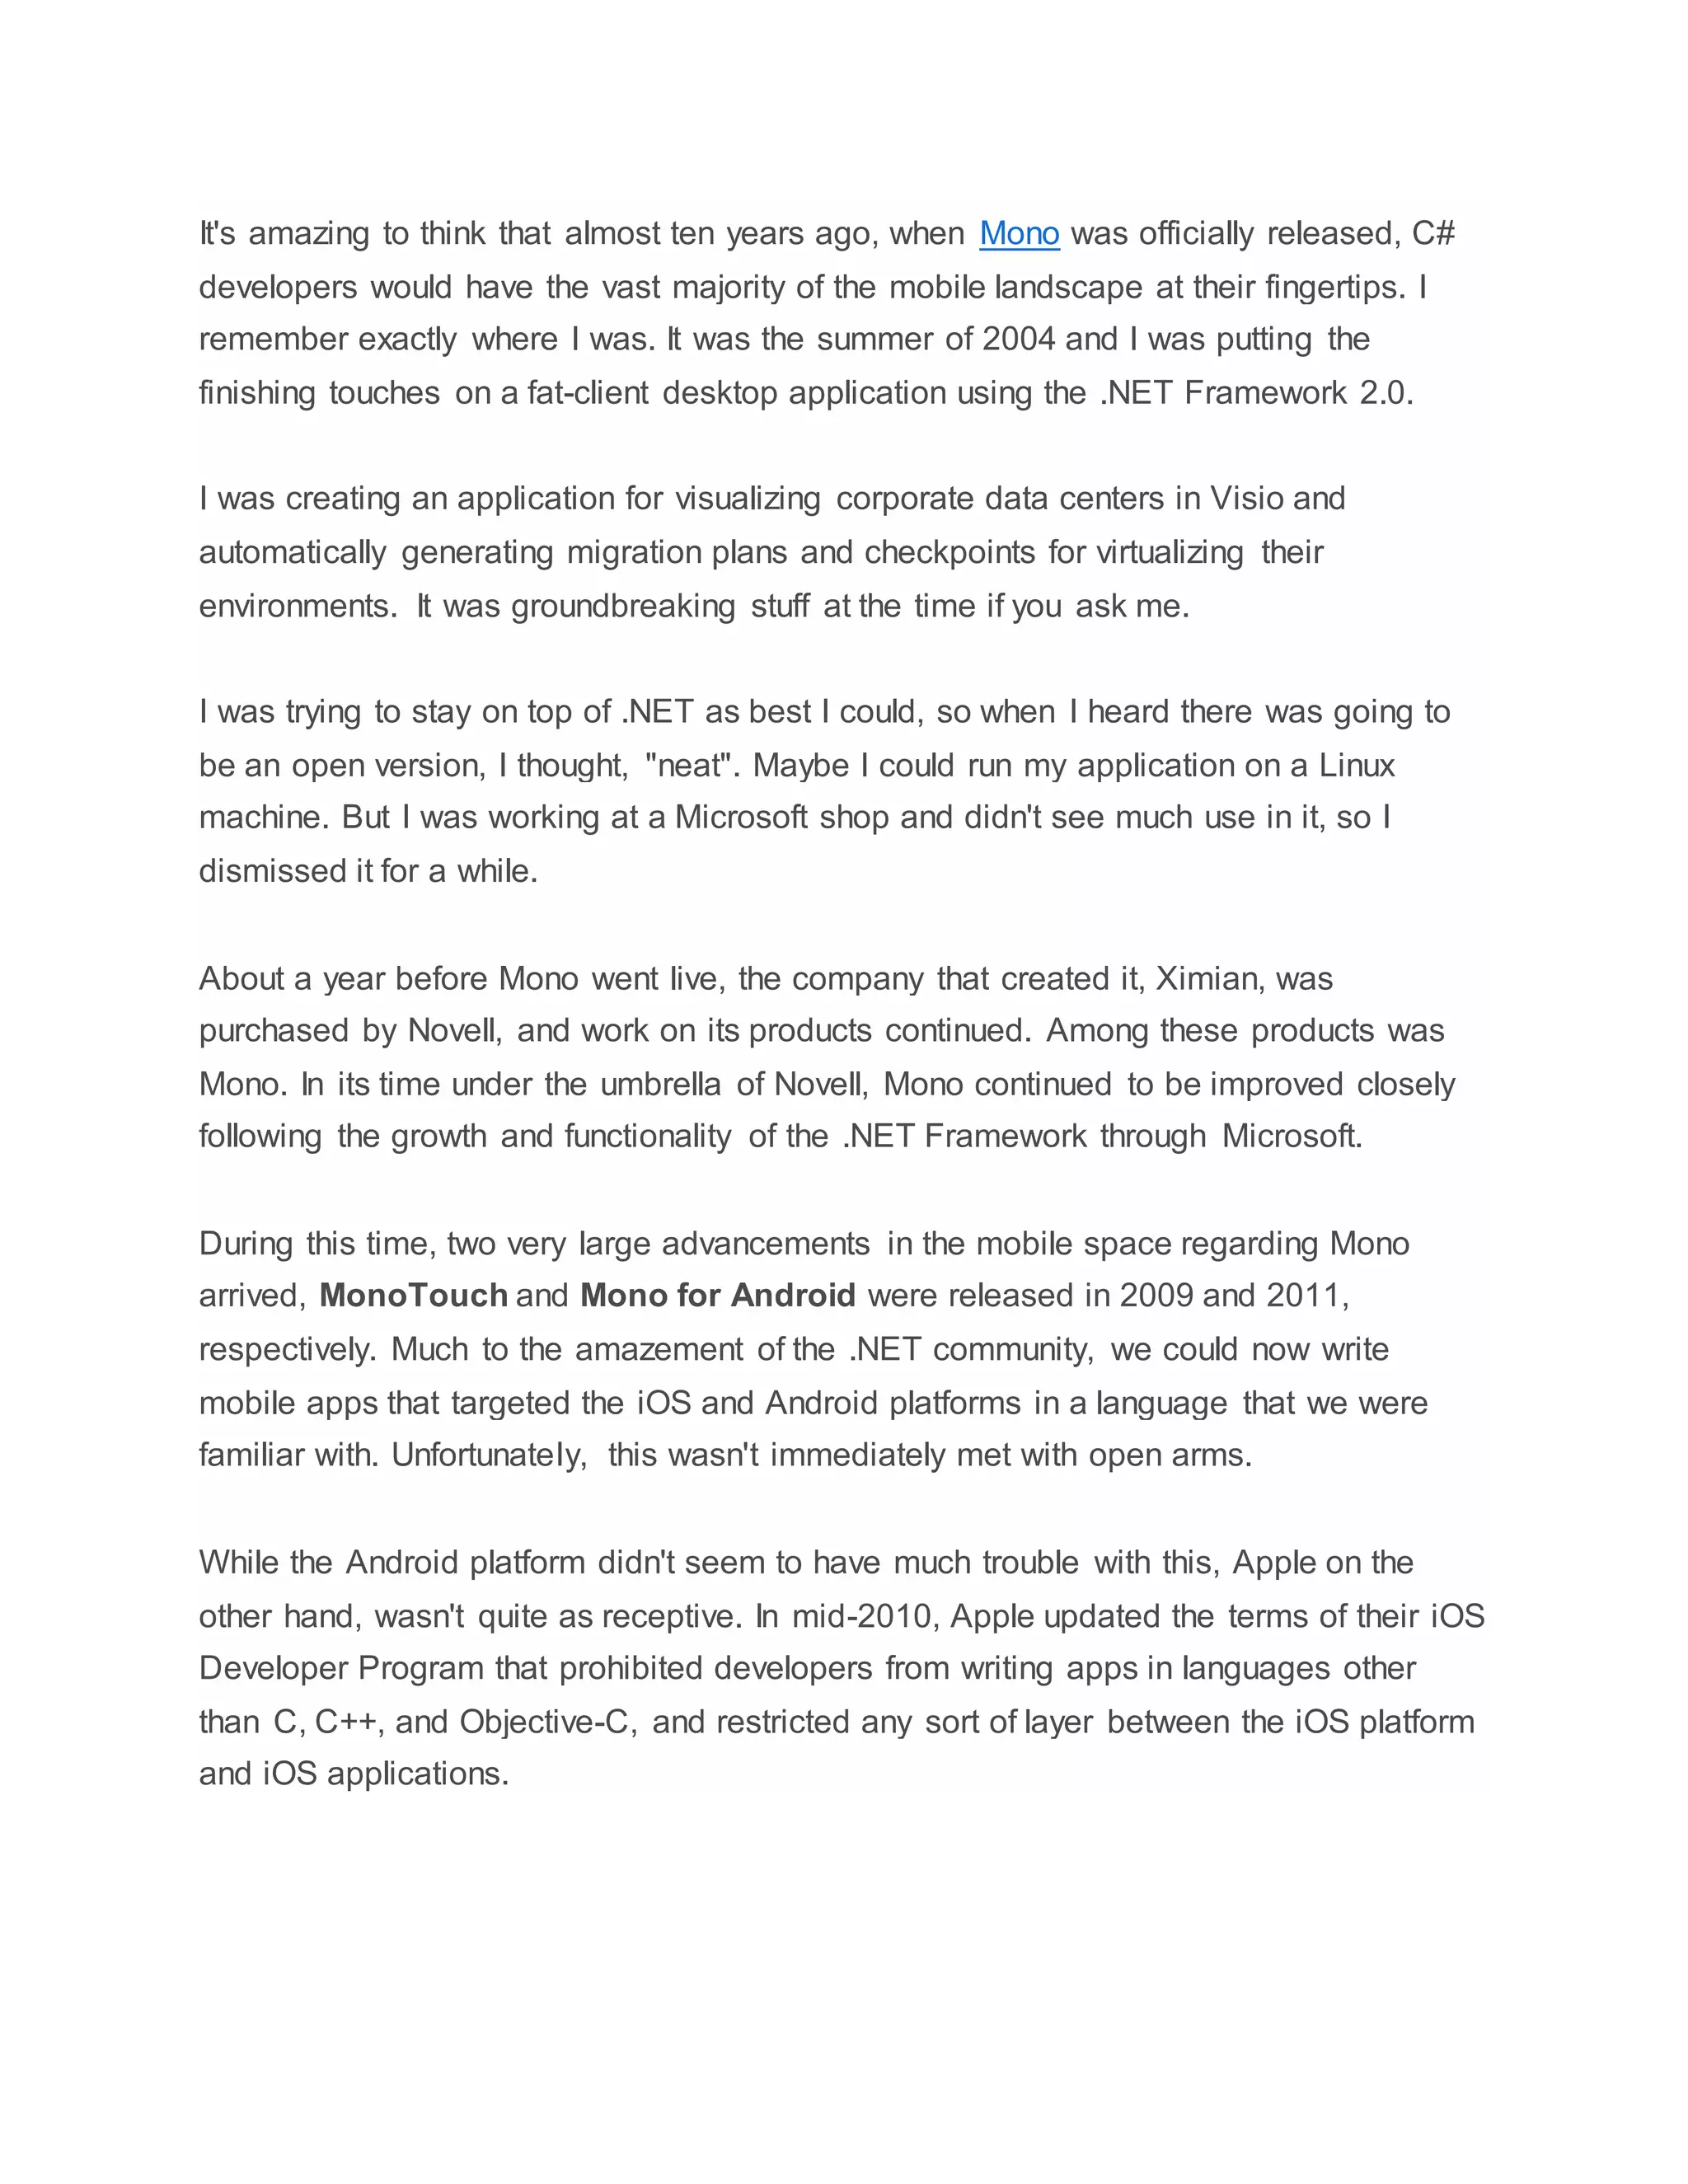
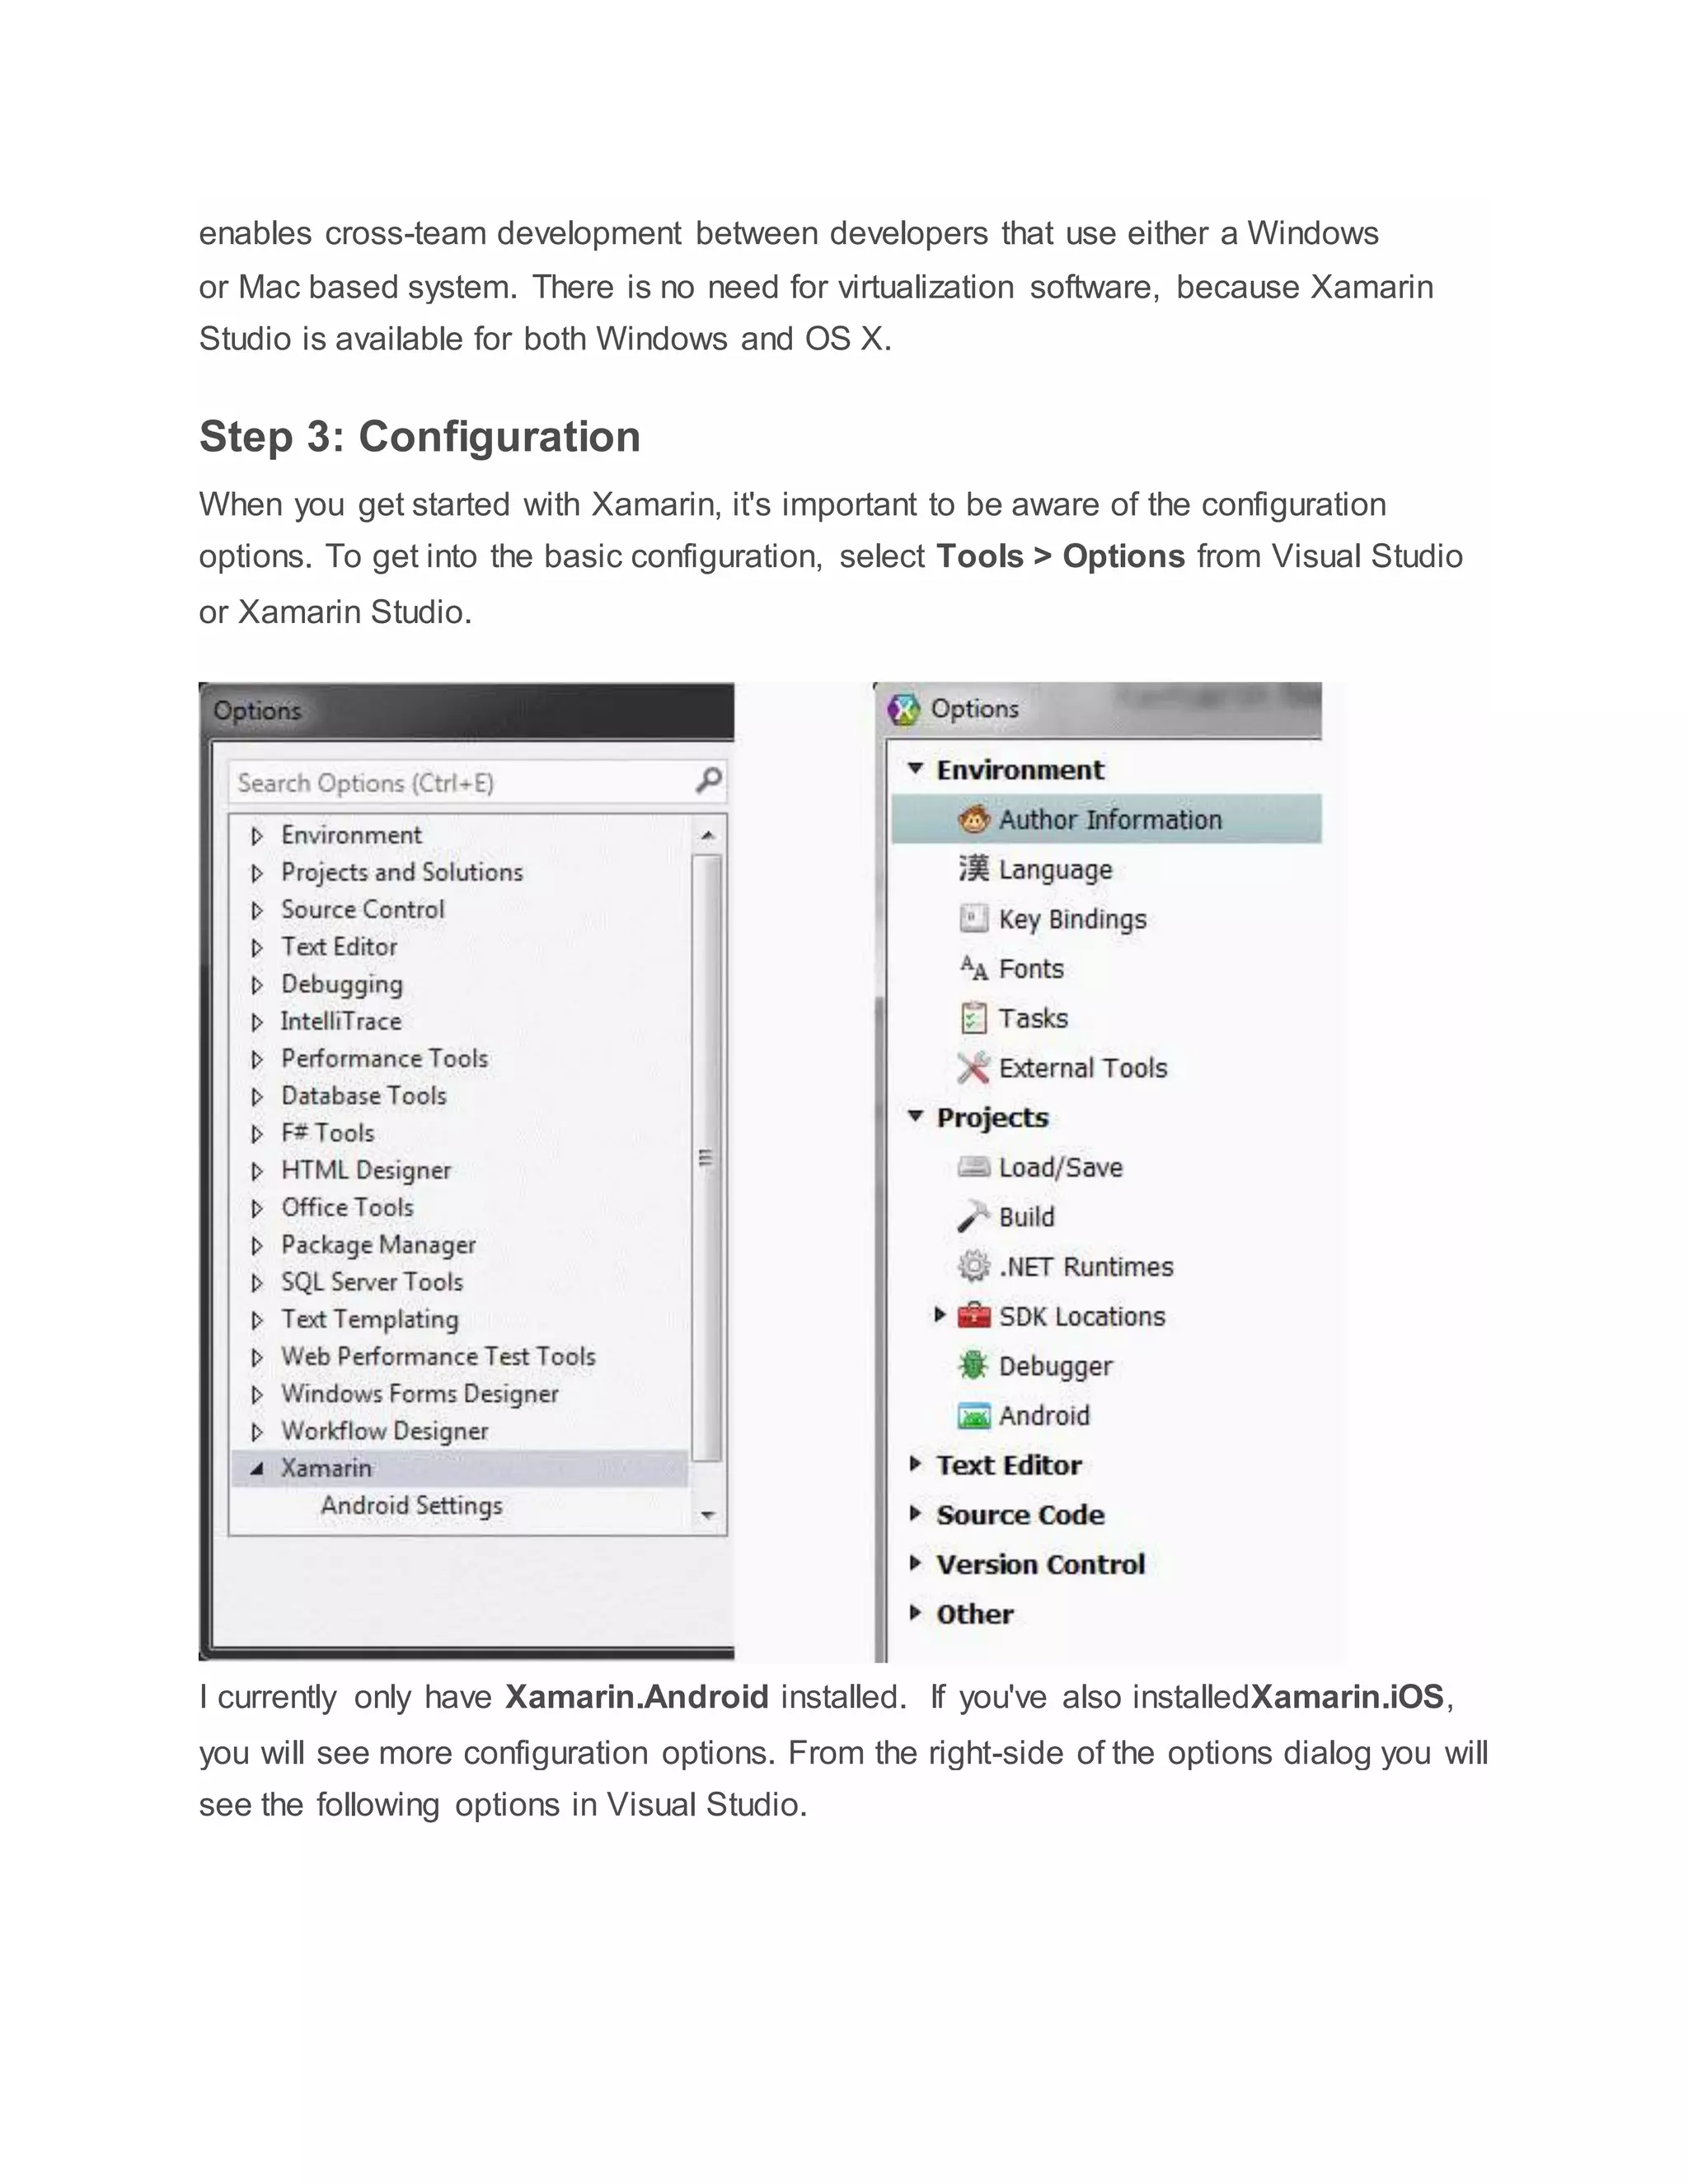
![23
24
25
26
27
28
29
30
31
32
33
34
35
36
37
38
39
40
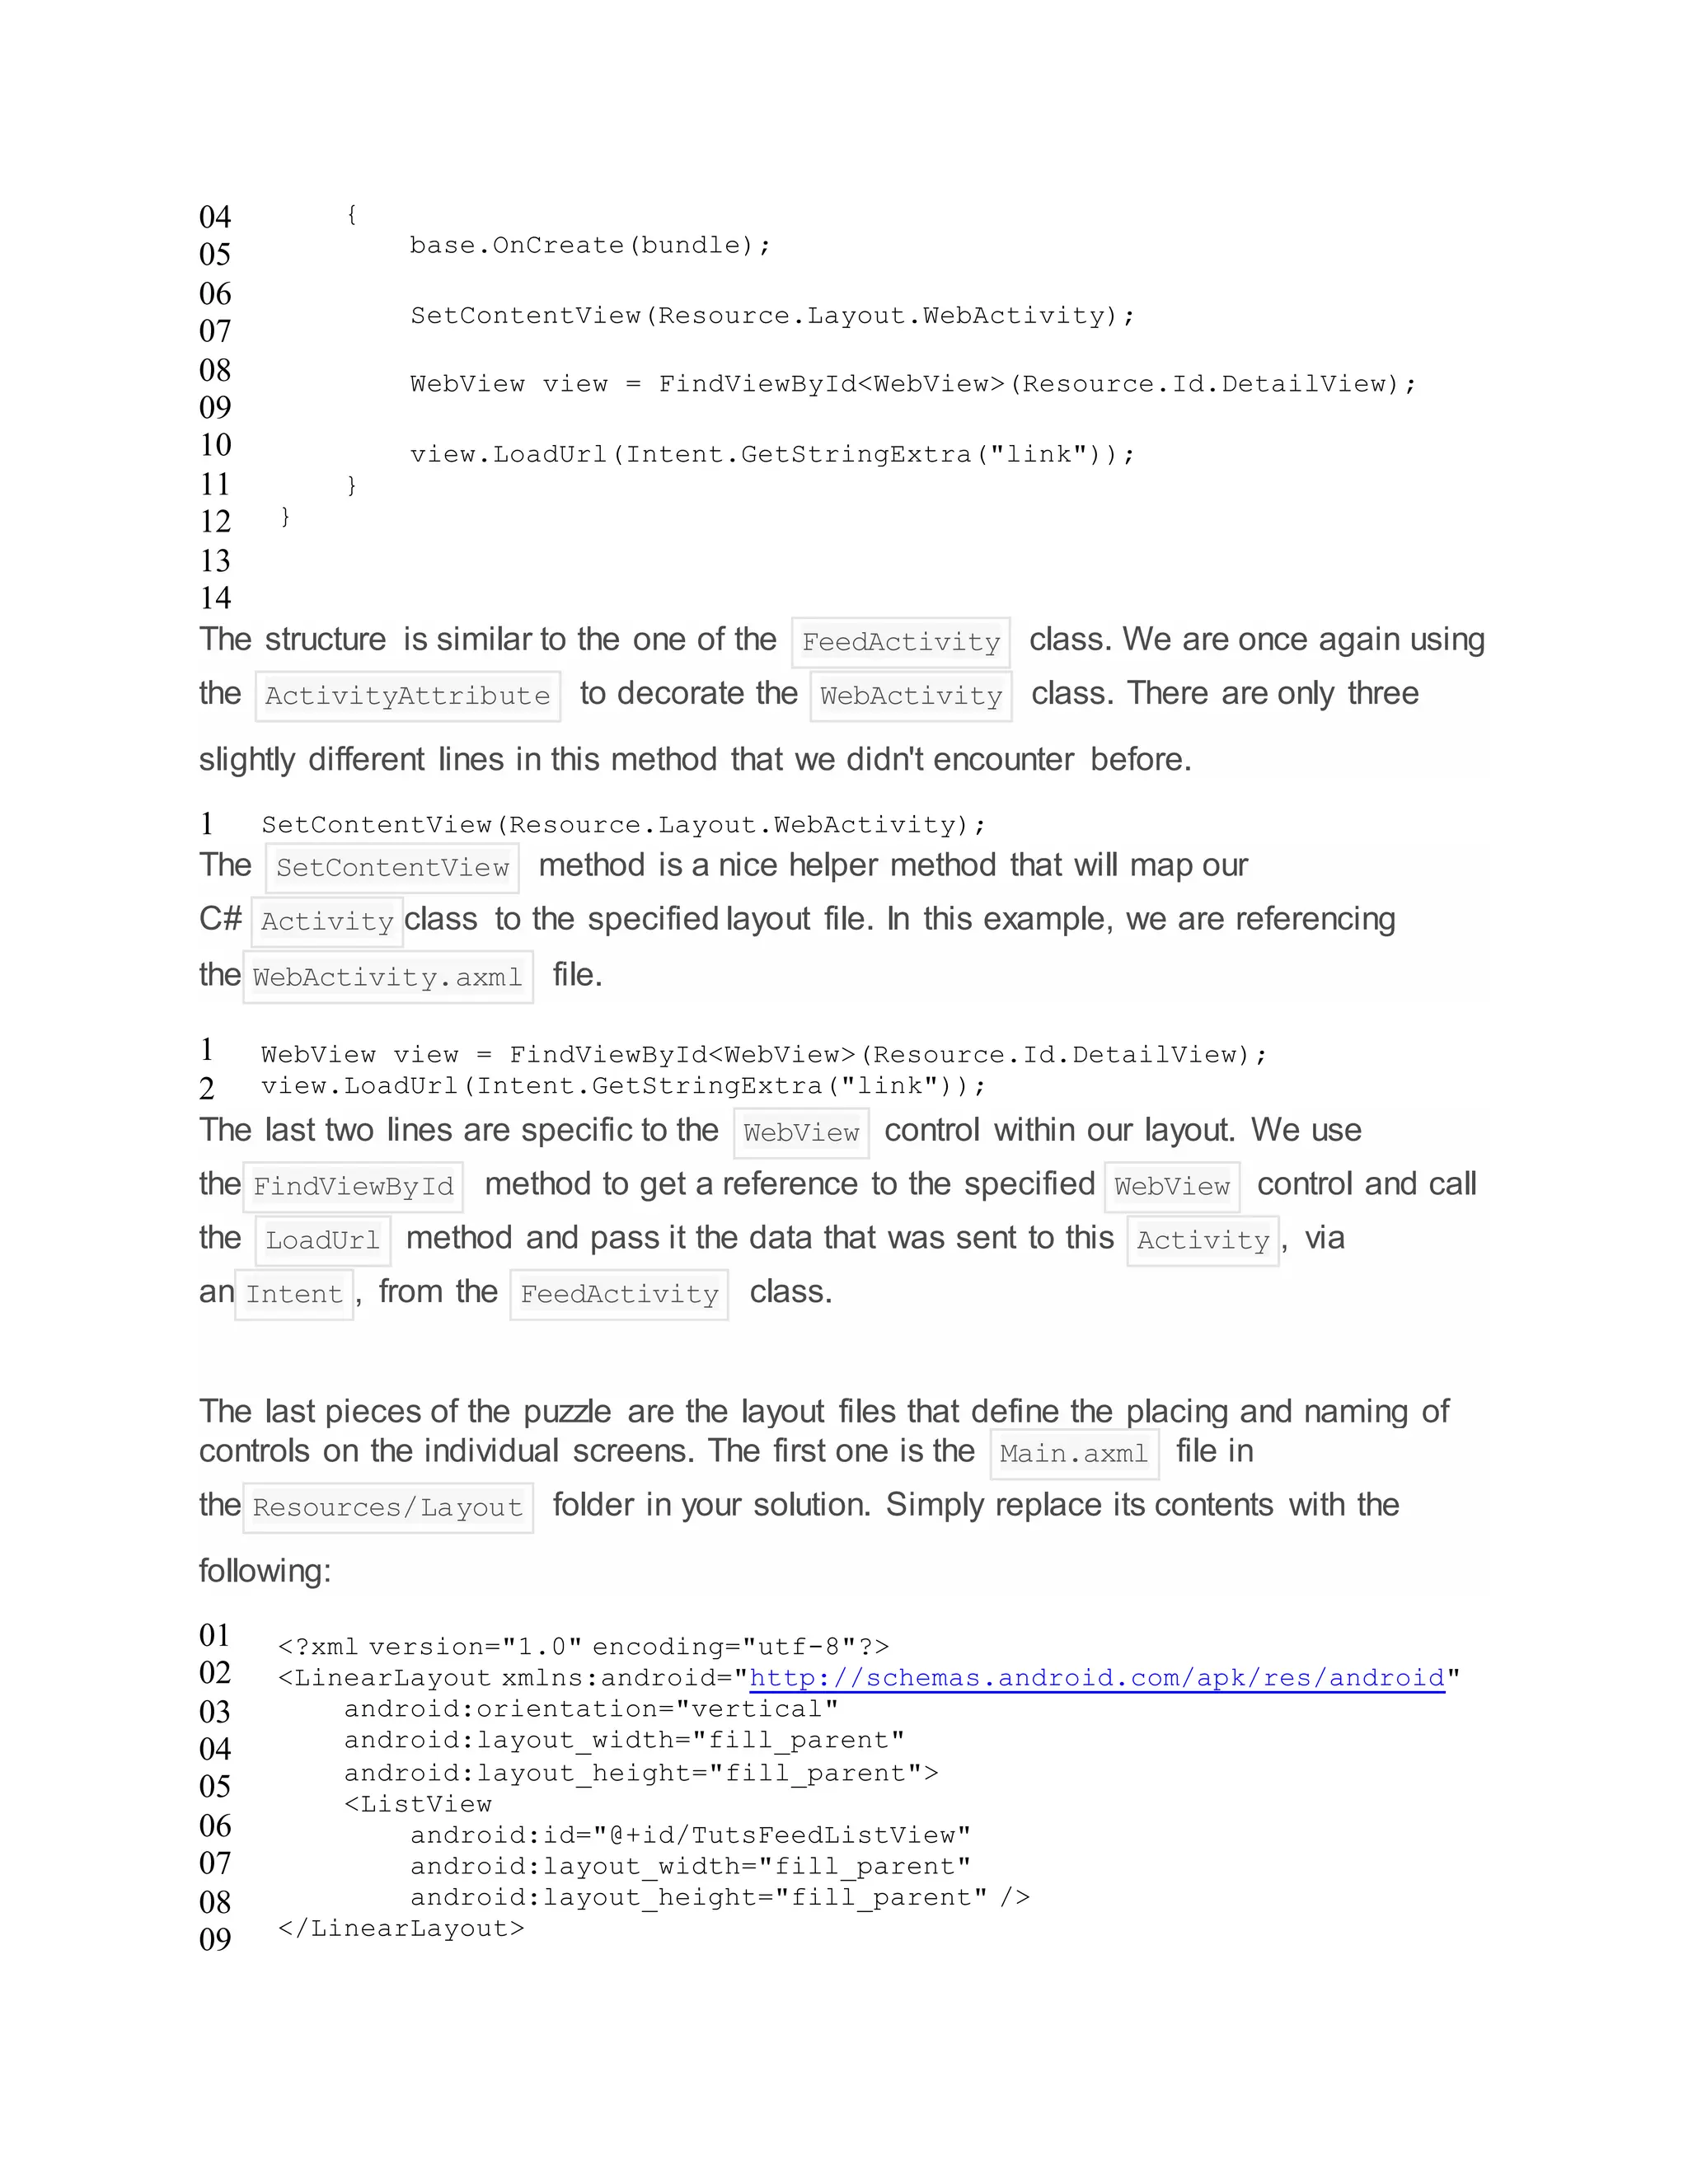
public override View GetView(int position, View convertView, ViewGroup parent)
{
var view = convertView;
if (view == null)
{
view = _context.LayoutInflater.Inflate(Android.Resource.Layout.SimpleListI
}
view.FindViewById<TextView>(Android.Resource.Id.Text1).Text = _items[position]
view.FindViewById<TextView>(Android.Resource.Id.Text2).Text = string.Format("{
_items[position].PubDate);
return view;
}
}
Yikes. That's a lot of code. It's actually fairly simple though. We need to override four
methods/properties on the base class, BaseAdapter . In our case, the generic
parameter is going to be our RssItem class. The first three are fairly self explanatory.
this[int position] returns an RssItem at the given position in the array.
Count returns the number of RssItem objects in the array.
GetItemId returns the Id of an RssItem at a given position, the position in
our example.
The last, and slightly more complicated, override is the GetView method. This method
gets an instance of the ListView within our Activity and Inflate it as
a SimpleListItem2 , which is a type of ListItem view within Android that allows two
rows of text in a single item. We then set the first row of text to
the RssItem.Title property and the second row of text to a concatenation of
the RssItem.Creator property and the RssItem.PubDate property.
With the adapter set, we can focus on the second screen of our
application, WebActivity .
01
02
03
[Activity(Label = "WebActivity")]
public class WebActivity : Activity
{
protected override void OnCreate(Bundle bundle)](https://image.slidesharecdn.com/mobiledevelopment-xamarain-160123171417/75/Mobile-development-xamarain-17-2048.jpg)


This document provides an overview and introduction to developing mobile applications using Xamarin. It summarizes the steps to get started which include downloading and installing Xamarin, setting up a development environment like Visual Studio or Xamarin Studio, and configuring some basic Xamarin settings. The document also discusses the different editions of Xamarin and limitations of the free Starter edition.


![Presentation[1]](https://cdn.slidesharecdn.com/ss_thumbnails/a079c96b-ce50-4b5a-809a-93d9f9d48071-150801075340-lva1-app6892-thumbnail.jpg?width=640&height=640&fit=bounds)