Downloaded 243 times


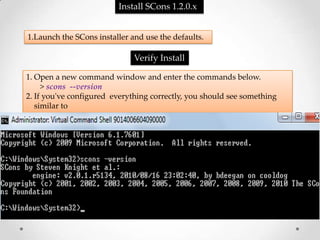
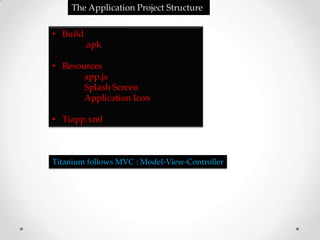

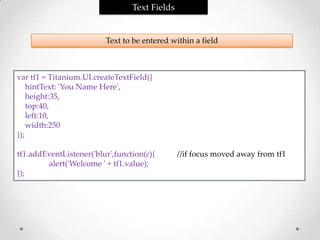

![Picker
Add Picker which functions as drop-down box
var picker = Titanium.UI.createPicker();
var data = [];
data[0]=Titanium.UI.createPickerRow({title:'Bananas'});
data[1]=Titanium.UI.createPickerRow({title:'Strawberries'});
data[2]=Titanium.UI.createPickerRow({title:'Mangoes'});
data[3]=Titanium.UI.createPickerRow({title:'Grapes'});
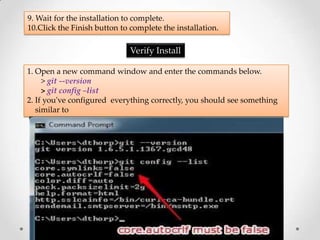
picker.add(data);
win.add(picker);
picker.addEventListener('change',function(e){ //if picker is changed
alert('You selected '+e.row);
});](https://image.slidesharecdn.com/presentation1-110926101633-phpapp01/85/Titanium-Appcelerator-Beginners-32-320.jpg)
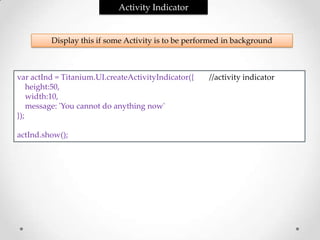
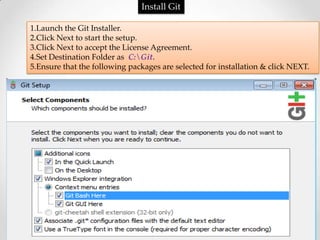
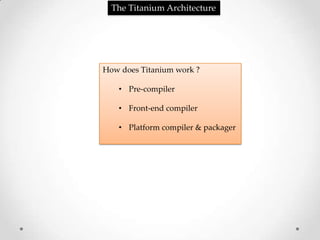
![Table View
Creation of static or dynamic Tables
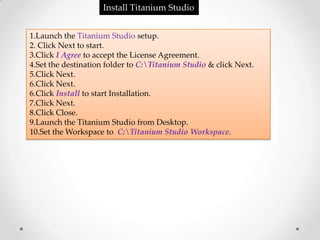
var data = [{title:"Row 1"},{title:"Row 2"}];
data.push({title:'Row 3'});
var table = Titanium.UI.createTableView({ //static creation of table
data:data,
backgroundColor: 'blue',
rowHeight: 20,
separatorColor: 'red'
});
table.appendRow({title:'Row 4'}); //dynamically add rows to table
table.addEventListener('click',function(e){
alert(e.rowData.title);
});](https://image.slidesharecdn.com/presentation1-110926101633-phpapp01/85/Titanium-Appcelerator-Beginners-37-320.jpg)


The document provides steps to set up the development environment for building mobile apps using Titanium, an open source framework. It discusses installing Java, Android SDK, Python, SCons, Git. It also explains concepts like windows, views and widgets in Titanium and provides code samples to create common UI elements like labels, text fields, buttons, pickers, images and tables.


![Titanium Studio [Updated - 18/12/2011]](https://cdn.slidesharecdn.com/ss_thumbnails/titanium-110713043027-phpapp01-thumbnail.jpg?width=640&height=640&fit=bounds)


