The document provides a comprehensive overview of construction project management and the use of Microsoft Project software for planning and scheduling. It outlines key concepts such as project characteristics, management processes, and the critical role of various factors like cost, time, and human resources in successful project execution. Additionally, it details the functionalities of Microsoft Project software, including scheduling, resource management, and budget tracking, along with practical steps for creating and managing a project schedule.

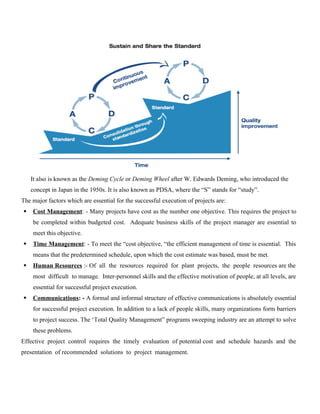
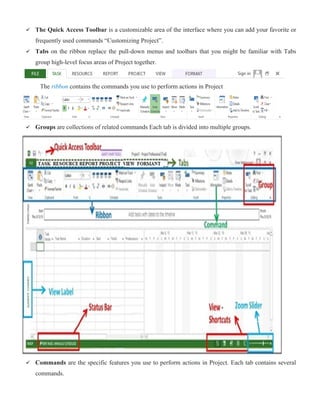
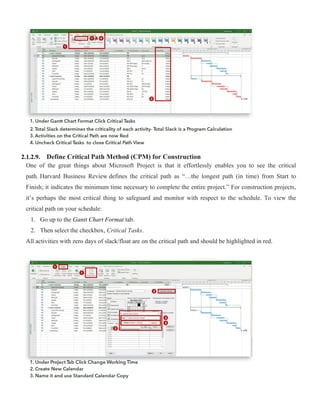
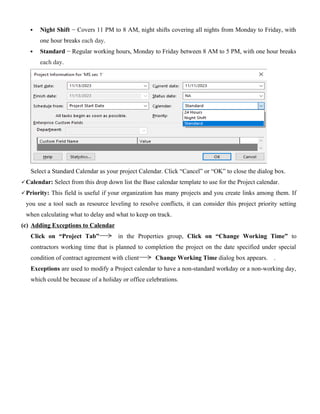
![ Calendar option: based on your project preference or company working environment
Week start on: Choose either “Sunday” or “Monday”
Fiscal Year start in: Choose either “September” or “January”
Default Start Time: Choose either “7:00 AM” or “8:00 AM”
Default End Time: Choose either “5:00 PM” or “”other”
Hours per day: 8 hours or if other
Hours per week: 40 hours or 39 hours (since on Friday morning session ends at 5:30 local time
and in the afternoon session starts 7:30) but the other working hours per day are 8 hours.
Days per month: the average days per month is computed by deducting non-working days in the
year from 365 days and dividing the result by 12 months. Non-working days in the year can be
computed taking in to consideration such as holidays in a year, Sundays (365/7=52 days),
Saturdays (365/7=52 days), rainy seasons, festival in a company, etc.
Days per month= [365-Non working days in a year]/12
For example:
a. Calendar holidays in the year
2016/01/01(Tue): Ethiopian New Year](https://image.slidesharecdn.com/microsoftproject2013-241108064155-3394da2e/85/Microsoft-Project-2013-training-manual-for-civil-engineering-docx-10-320.jpg)
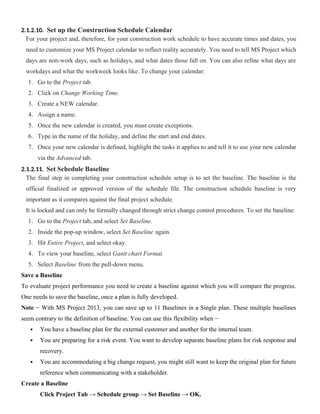
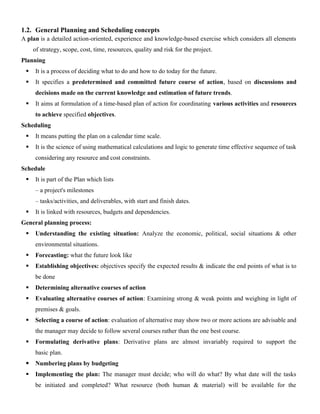
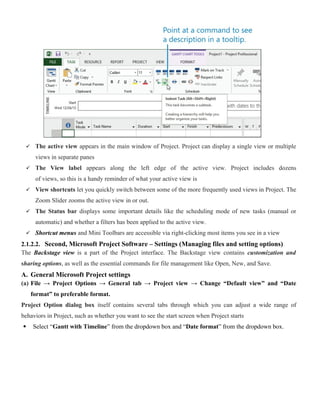
![ 2016/01/16(Wed): Birth Day of Prophet Mohammed (MAULID)
2016/01/17(Thu): Finding of the True cross (Meskel)
2016/04/28(Sun): Ethiopian Christmas
2016/05/11(Sat): Ethiopian Epiphany (Timqat)
2016/06/23(Sat): Victory of Adwa Command Day
2016/08/02(Wed): Id Al Faster(Ramadan)
2016/08/23(Wed): International Labour Day
2016/08/25(Fri): Good Friday
2016/08/27(Sun): Ethiopian Patriots Command Day
2016/09/20(Tue): Dawn Fall of the Dergue
2016/10/10(Mon): Id Al Adha (Arefa)
The holidays in the year 2016 E.C is 8 days which do not align with Sundays and Saturdays. In this
project environment Saturdays and Sundays considered as non-working days.
S.No. Non-working days in the year Number of days
1 Holidays 8
2 Saturdays 52
3 Sundays 52
Total 112
Days per month= [365-Non working days in a year]/12= [365-112]/12=253 days/12 month
=21.08 days per month
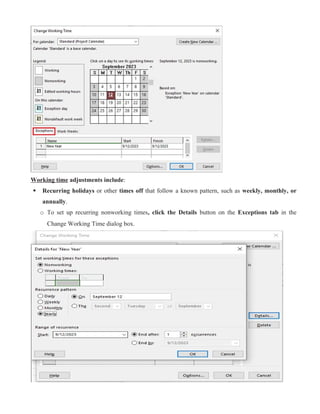
Show Assignment Units: Choose either “percentage” or “Decimal” from the dropdown box.
Assignment Unit in “Percentage” indicates that One daily laborer working 8 hours per day is
considered as “100%”
Assignment unit in “decimal” indicates that One daily laborer working 8 hours per day is
considered as “1”
New Tasks Created: Choose either “Manually Scheduled” or “Auto Scheduled” from the
dropdown box.
If you choose “Manually Scheduled” any new activity entered in the Microsoft project start date
and finish time is to be entered by the planner not by the software.
In case of “Auto Scheduled” the software will generate start date taking the predecessor’s
finishing date or project start date when there is no predecessor.
Auto Scheduled Tasks scheduled on: choose either “Project Start Date” or “Current Date” from
the dropdown box.](https://image.slidesharecdn.com/microsoftproject2013-241108064155-3394da2e/85/Microsoft-Project-2013-training-manual-for-civil-engineering-docx-11-320.jpg)


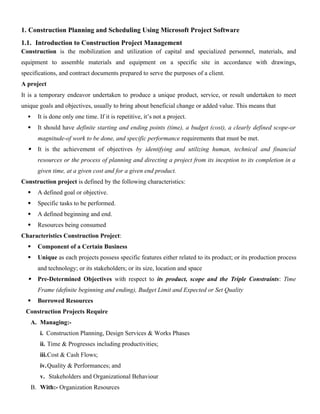
![formation) per day and machineries or equipment or tools) and crew productivity or output per
day.
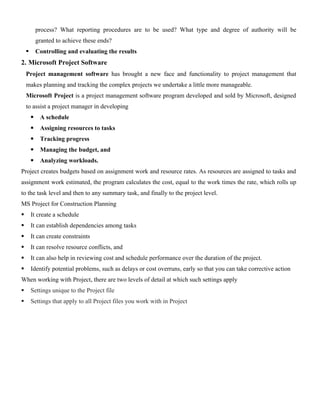
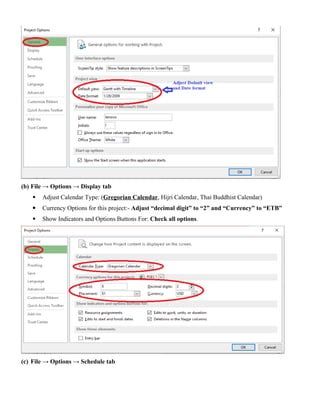
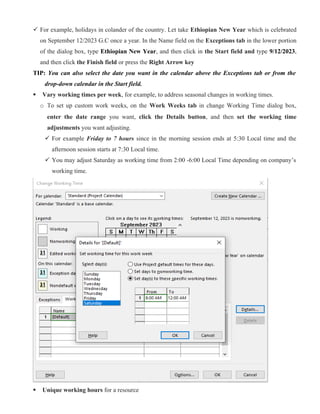
For example: Let us compute duration and Assign resource for “site Clearance” and “Bulk excavation” (a)
Assume the work is done using labor intensive and (b) Assume the work is done using Machine intensive
(using machines/ equipment and labor)
(a) Assume the work is done using labor intensive. In this assumption we use standard established in
Mekelle unit rate computation.
1. Site clearance
Remember the unit rate computed in table shown below is based on assumptions that the output per day
executed using one crew (in combination of Manpower and Equipment)
In this labor intensive site clearance work the crew is one daily laborer working full time while one Forman
that devote only 10% of his/ her effort working time per day.
A crew is taken as Forman [0.1] and Daily Labor [1] with Productivity 10 m2
/ day
Activity Description: Site Clearance Out Put per day = 10 m2
A .MATERIAL B.MANPOWER C.EQUIPMENT
TYPE
UNIT
QTY.
RATE
(BIRR)
COST
PER SKILL NO U,F
DAILY
RATE
DAIL
Y
COST TYPE NO U,F
Rental
rate/hr
Daily
cost
UNIT (BIRR) (BIRR) (birr / hr ) (birr)
D.labor 1.00 1.00 90.00 90.00
Forman 1.00 0.10 222.75 22.28
TOTAL ' A' (BIRR) TOTAL 'B' (BIRR) 112.28 TOTAL 'C' (BIRR)
1.MATERIAL TOTAL" A”
2. MANPOWER TOTAL " B " 11.23 3. EQUIPMENT TOTAL " C"
DAILY OUTPUT DAILY OUTPUT
Direct Cost : “1” + “2” + “3” = 11.23
Profit 7% 0.79
Overhead 17% 1.91
Total cost 13.92
If the site clearance to be executed is 100 m2
using 10 number of crew (Forman [0.1] and Daily Labor [1])
the duration is
Duration =
Quantityof Work
Number of crew x Output per day
=
100m 2
10x 10m2 per day
=1 day
Therefore, the planned resource is Forman [1] and Daily Labor [10]
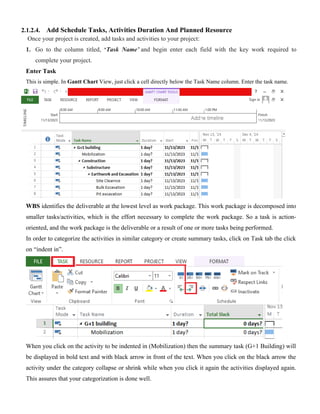
2. Bulk Excavation
Assume the work is done using Machine intensive (using machines/ equipment and labor)
In this labor intensive bulk excavation work the crew is one daily laborer working full time while one
Forman that devote only 10% of his/ her effort working time per day.](https://image.slidesharecdn.com/microsoftproject2013-241108064155-3394da2e/85/Microsoft-Project-2013-training-manual-for-civil-engineering-docx-19-320.jpg)
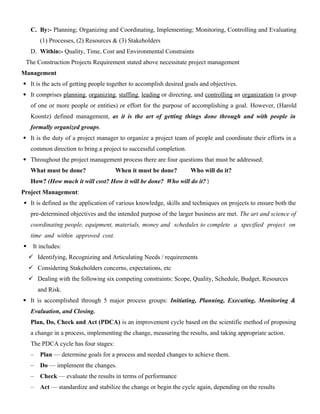
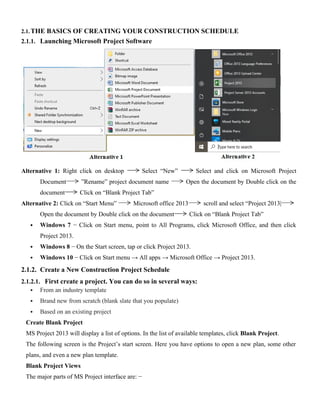
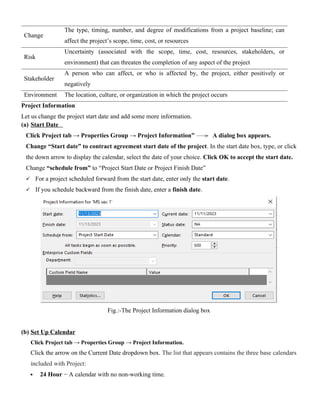
![A crew is taken as Forman [0.1] and Daily Labor [1] with Productivity 1.5 m3
/ day
Activity Description: Site Clearance Out Put per day = 10 m2
A .MATERIAL B.MANPOWER C.EQUIPMENT
TYPE
UNIT
QTY.
RATE
(BIRR)
COST
PER SKILL NO U,F
DAILY
RATE
DAILY
COST TYPE NO U,F
Rental
rate/hr
Daily
cost
UNIT (BIRR) (BIRR) (birr / hr ) (birr)
D.labor 1.00 1.00 90.00 90.00
Forman 1.00 0.10 222.75 22.28
TOTAL ' A' (BIRR) TOTAL 'B' (BIRR) 112.28 TOTAL 'C' (BIRR)
1.MATERIAL TOTAL" A”
2. MANPOWER TOTAL " B " 74.85 3. EQUIPMENT TOTAL " C"
DAILY OUTPUT DAILY OUTPUT
Direct Cost : “1” + “2” + “3” = 74.85
Profit 7% 5.24
Overhead 17% 12.72
Total cost 17.96
a2) If the bulk excavation to be executed is 150 m3
using 10 number of crew (Forman [0.1] and Daily Labor
[1]) the duration is
Duration =
Quantityof Work
Number of crew x Output per day
=
150m3
10x 1.5m3 per day
=10 days
Thus, the planned resource is Forman [1] and Daily Labor [10]
Summary:
S.No.
Activity
Description
Unit
Quantity
#
crew
Output
per
day
Calculated
Duration
(in
days)
Estimated
Duration
(in
days)
Expected
Output
per
day
Resource per crew Planned resource
1 Site Clearance m2
100 10 10 1 1 10 Forman [0.1]
Daily Labor[1]
Forman [1]
Daily Labor [10]
2 Bulk excavation m3
150 10 1.5 10 10 1.5 Forman [0.1]
Daily Labor [1]
Forman [1]
Daily Labor [10]
(b) If the bulk excavation of normal soil (4200 m3
) is done using machinery and labor in combination
one crew ( one Dozer , one Earth work Forman with 50% efficiency per crew, one Data Collector, two
Unskilled Daily Laborer) can produce 960 m3 per day.](https://image.slidesharecdn.com/microsoftproject2013-241108064155-3394da2e/85/Microsoft-Project-2013-training-manual-for-civil-engineering-docx-20-320.jpg)
![S.No.
Activity
Description
Unit
Quantity
#
crew
Output
per
day
Calculated
Duration
(in
days)
Estimated
Duration
(in
days)
Expected
Output
per
day
Resource per crew Planned resource
1 Bulk
Excavation
m3
4200 2 960 2.1875 2 1050
Dozer [1]
Earthwork Forman [0.5]
Data Collector [1]
Daily Labor [2]
Dozer [2]
Earthwork Forman [1]
Data Collector [2]
Daily Labor [4]
Therefore, planned resource to execute the activity with 2 days and 1050 expected daily output are
Dozer [2], Earthwork Forman [1], Data Collector [2], and Daily Labor [4]
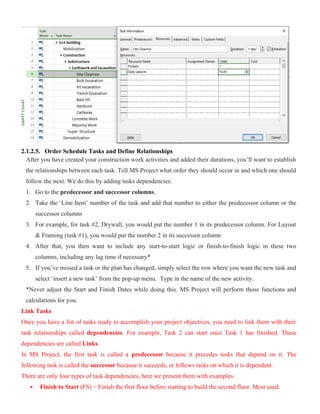
3. Next, go into the ‘Resource” column or double click on the column titled, “task name”. Add planned
resource required for each activity in project.
Go into the ‘Resource” column and click on “Site Clearance” row in the ‘Resource” column, then type
or add the planned resource (Forman [1], Daily Labor [10]).
Double click on the activity in consideration for example “Site Clearance” then “Task information dialog
box” appears. Type or assign the planned resource required (that is Forman [1], Daily Labor [10]
computed in the above example in site clearance work) by clicking on the resource box. In the resource
unit in this case is in “decimal” but it may be in “percent”. That is one resource expressed as 100%. When
you complete your data entry click “ok”.](https://image.slidesharecdn.com/microsoftproject2013-241108064155-3394da2e/85/Microsoft-Project-2013-training-manual-for-civil-engineering-docx-21-320.jpg)