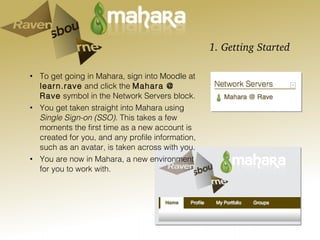
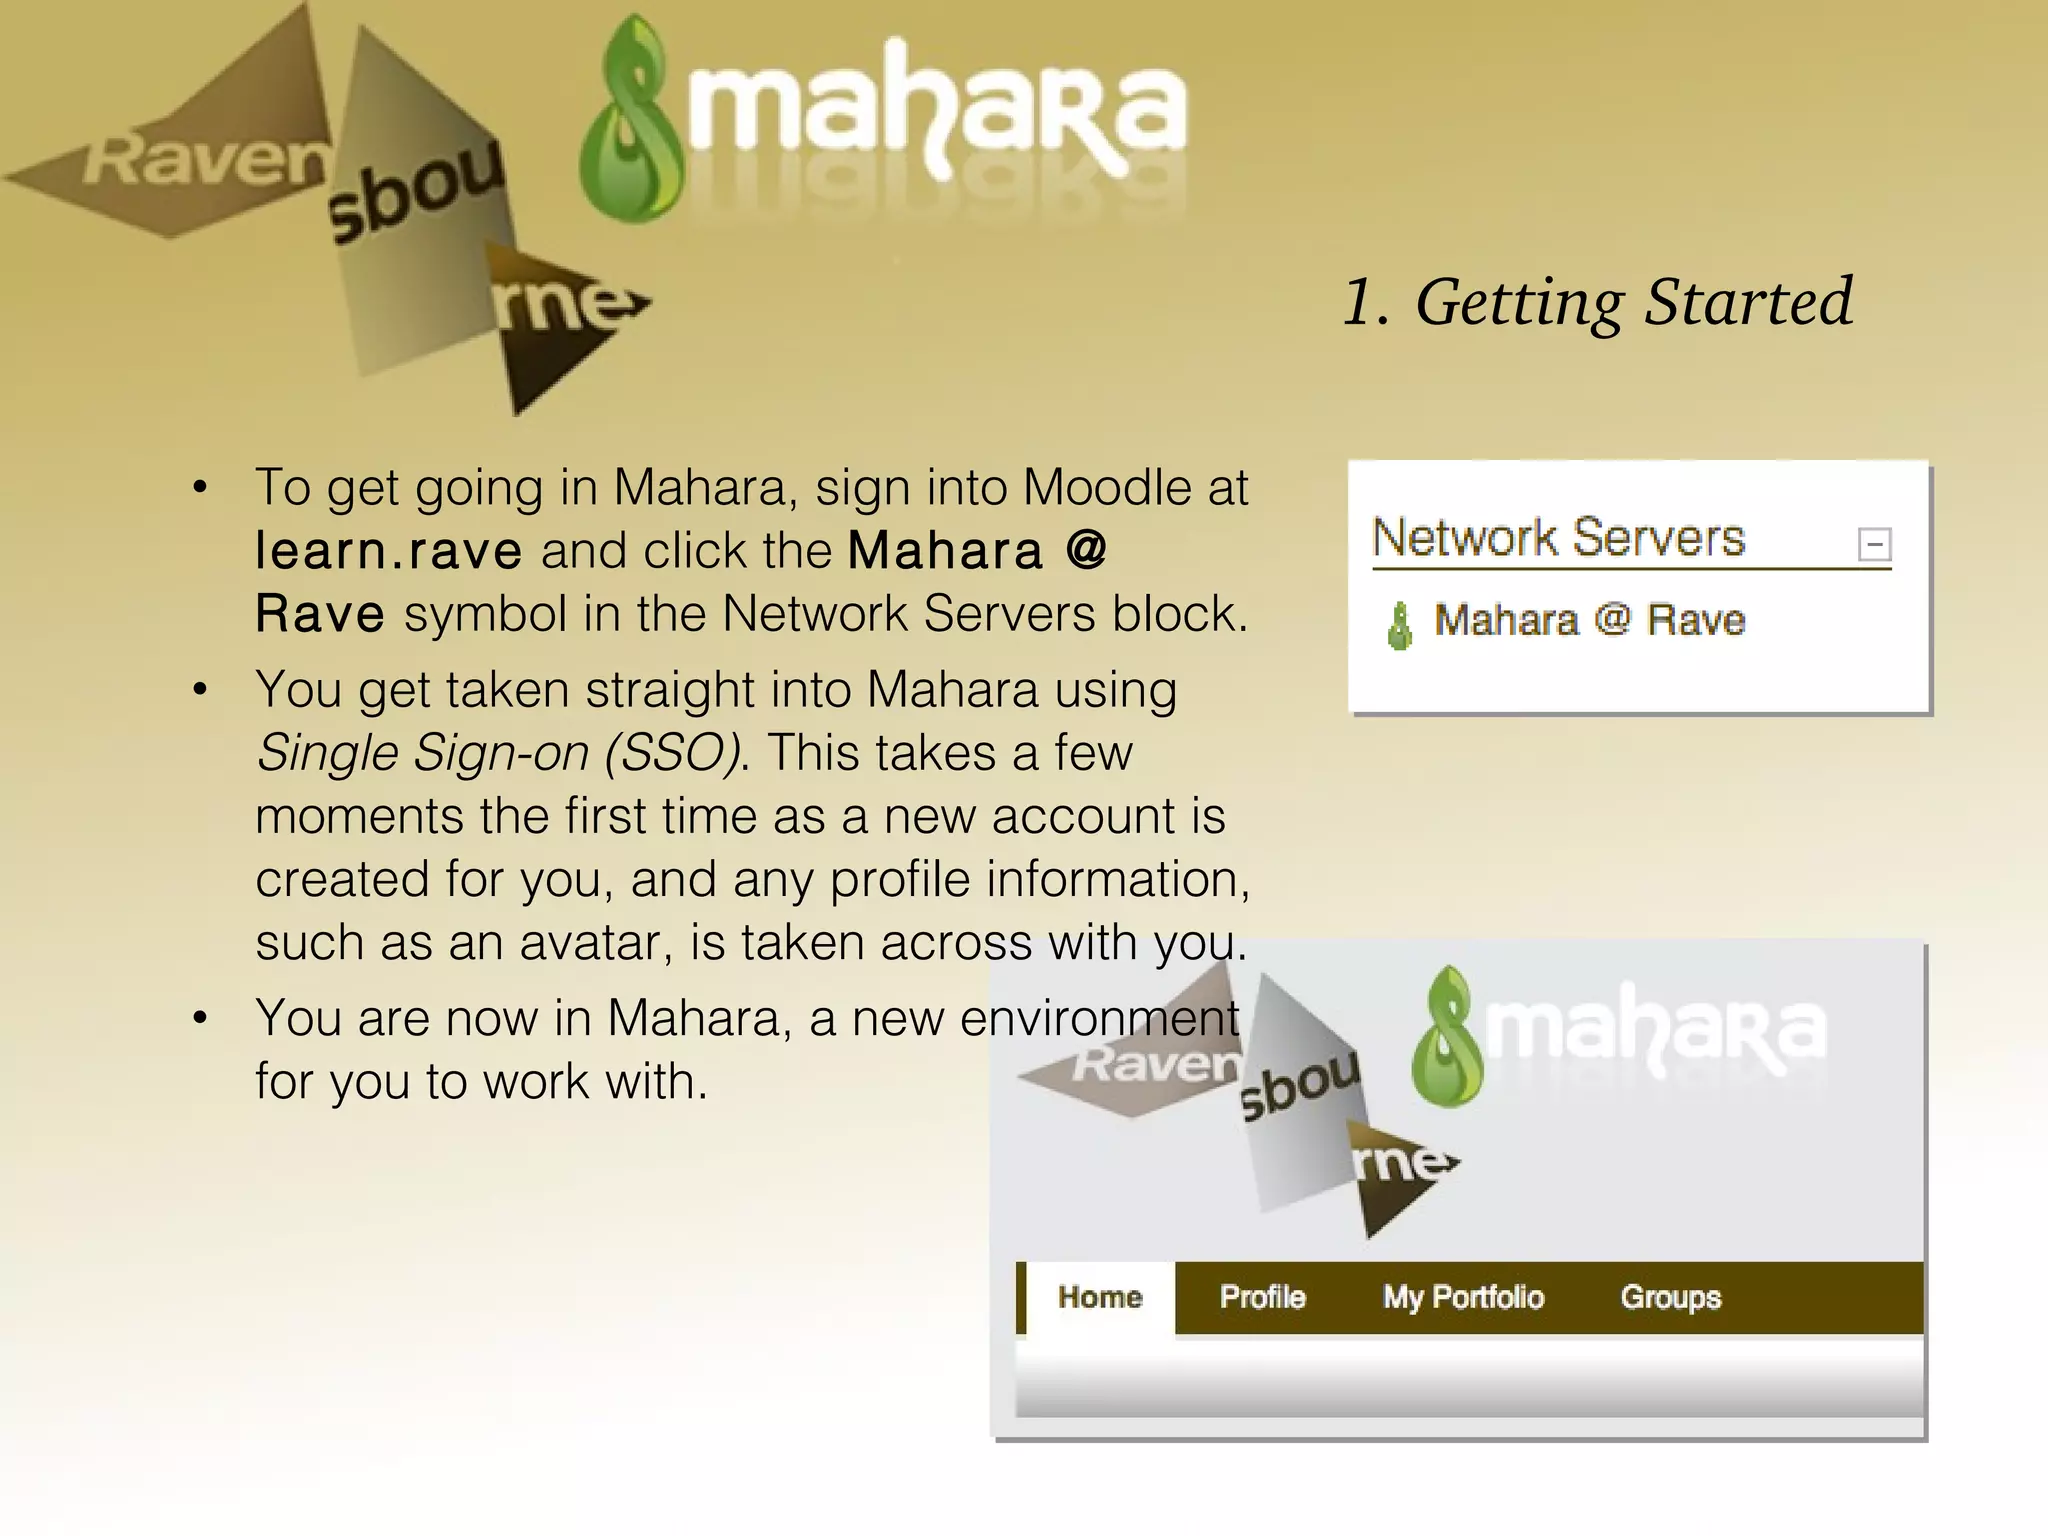
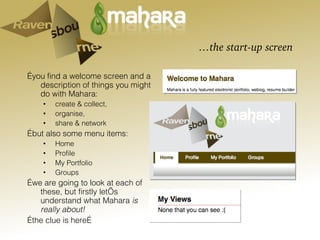
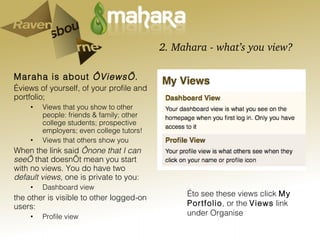
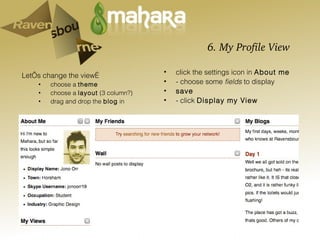
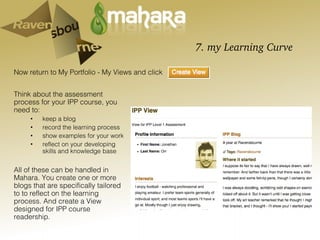
1. Getting Started  To get going in Mahara, sign into Moodle at  learn.rave  and click the  Mahara @ Rave  symbol in the Network Servers block. You get taken straight into Mahara using  Single Sign-on (SSO) . This takes a few moments the first time as a new account is created for you, and any profile information, such as an avatar, is taken across with you. You are now in Mahara, a new environment for you to work with.
… the start-up screen … you find a welcome screen and a description of things you might do with Mahara: create & collect,  organise,  share & network … but also some menu items: Home Profile My Portfolio Groups … we are going to look at each of these, but firstly let’s understand what Mahara  is really about!  … the clue is here…
2. Mahara - what’s you view? Maraha is about  ‘Views’ .   … views of yourself, of your profile and portfolio; Views that you show to other people: friends & family; other college students; prospective employers; even college tutors! Views that others show you When the link said  ‘none that I can see’  that doesn’t mean you start with no views. You do have two  default views,  one is private to you: Dashboard view the other is visible to other logged-on users: Profile view … to see these views click  My Portfolio , or the  Views  link under Organise
… clicking around these views Click on the  Profile View  link, and you get not-a-lot about yourself, as yet (note: this is quite different from clicking  ‘Edit content and layout’  - which we will go to shortly) Similarly, clicking the  Dashboard View  takes you back to where we where… in your ‘dashboard’. What happens if you click your username or avatar?  Other logged on uses can also click into your profile view this way, so what you put their says something about you. But you can keep some profile info private (such as your email address).   note: there is a  hidden  jump menu bar at the top of screen - move your mouse next to the rave / mahara icon!
3. My Profile - me, myself & I Click  Home then Profile (or use the fast links) to get into ‘Edit Profile’  Note: this is not the same as editing a  view , though some profile content you’ll choose to share in your profile view later. Fill in some information about yourself, click the other three tabs here and add in some info you think is appropriate. Don’t be caught out! Click Save Profile before moving from one tab to another or you lose the edits! If you click the blank ‘avatar’ you can upload one, in fact you can upload 5!
4. My résumé/CV - at my best Under Profile the third tab is  My Résumé , that is: My CV Here you could begin to build up a CV (Curriculum Vitae). Later this resource could greatly simplify the process of job applications! For now you might to type something into the Interests section.  Don’t forget to save changes before switching tabs! Now let’s go and see if all that editing has changed my  Profile View  (as logged-on users see me).  Click My Portfolio  , then  Profile View . No, not a dot! Lets do some more!
5. So Blog me! In My Portfolio we used only the first tab  My Views  but there’s must more, try  My Blogs Well that looks a bit sparse! Click  Settings  to get things sorted. Name this first blog and think how you might run more than one blog.  Add one or two posts to the blog You could also cut & paste into here from a Word document, or from wherever else you have been keeping a log / diary. The more content we have the easier it is to appreciate how Views work!
6. My Profile View  Let’s change the view… choose a  theme choose a  layout  (3 column?) drag and drop the  blog  in click the settings icon in  About me - choose some  fields  to display save - click  Display my View
7. my Learning Curve Think about the assessment process for your IPP course, you need to: keep a blog record the learning process show examples for your work reflect on your developing skills and knowledge base  All of these can be handled in Mahara. You create one or more blogs that are specifically tailored to to reflect on the learning process. And create a View designed for IPP course readership. Now return to My Portfolio - My Views and click
 

Mahara

  • 1.
    1. Getting Started To get going in Mahara, sign into Moodle at learn.rave and click the Mahara @ Rave symbol in the Network Servers block. You get taken straight into Mahara using Single Sign-on (SSO) . This takes a few moments the first time as a new account is created for you, and any profile information, such as an avatar, is taken across with you. You are now in Mahara, a new environment for you to work with.
  • 2.
    … the start-upscreen … you find a welcome screen and a description of things you might do with Mahara: create & collect, organise, share & network … but also some menu items: Home Profile My Portfolio Groups … we are going to look at each of these, but firstly let’s understand what Mahara is really about! … the clue is here…
  • 3.
    2. Mahara -what’s you view? Maraha is about ‘Views’ . … views of yourself, of your profile and portfolio; Views that you show to other people: friends & family; other college students; prospective employers; even college tutors! Views that others show you When the link said ‘none that I can see’ that doesn’t mean you start with no views. You do have two default views, one is private to you: Dashboard view the other is visible to other logged-on users: Profile view … to see these views click My Portfolio , or the Views link under Organise
  • 4.
    … clicking aroundthese views Click on the Profile View link, and you get not-a-lot about yourself, as yet (note: this is quite different from clicking ‘Edit content and layout’ - which we will go to shortly) Similarly, clicking the Dashboard View takes you back to where we where… in your ‘dashboard’. What happens if you click your username or avatar? Other logged on uses can also click into your profile view this way, so what you put their says something about you. But you can keep some profile info private (such as your email address). note: there is a hidden jump menu bar at the top of screen - move your mouse next to the rave / mahara icon!
  • 5.
    3. My Profile- me, myself & I Click Home then Profile (or use the fast links) to get into ‘Edit Profile’ Note: this is not the same as editing a view , though some profile content you’ll choose to share in your profile view later. Fill in some information about yourself, click the other three tabs here and add in some info you think is appropriate. Don’t be caught out! Click Save Profile before moving from one tab to another or you lose the edits! If you click the blank ‘avatar’ you can upload one, in fact you can upload 5!
  • 6.
    4. My résumé/CV- at my best Under Profile the third tab is My Résumé , that is: My CV Here you could begin to build up a CV (Curriculum Vitae). Later this resource could greatly simplify the process of job applications! For now you might to type something into the Interests section. Don’t forget to save changes before switching tabs! Now let’s go and see if all that editing has changed my Profile View (as logged-on users see me). Click My Portfolio , then Profile View . No, not a dot! Lets do some more!
  • 7.
    5. So Blogme! In My Portfolio we used only the first tab My Views but there’s must more, try My Blogs Well that looks a bit sparse! Click Settings to get things sorted. Name this first blog and think how you might run more than one blog. Add one or two posts to the blog You could also cut & paste into here from a Word document, or from wherever else you have been keeping a log / diary. The more content we have the easier it is to appreciate how Views work!
  • 8.
    6. My ProfileView Let’s change the view… choose a theme choose a layout (3 column?) drag and drop the blog in click the settings icon in About me - choose some fields to display save - click Display my View
  • 9.
    7. my LearningCurve Think about the assessment process for your IPP course, you need to: keep a blog record the learning process show examples for your work reflect on your developing skills and knowledge base All of these can be handled in Mahara. You create one or more blogs that are specifically tailored to to reflect on the learning process. And create a View designed for IPP course readership. Now return to My Portfolio - My Views and click
  • 10.