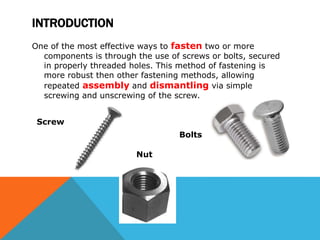
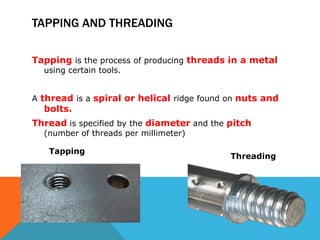
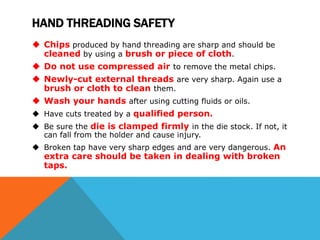
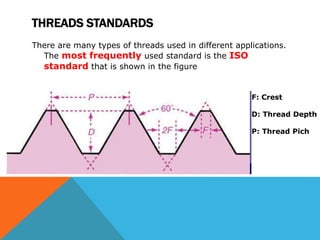
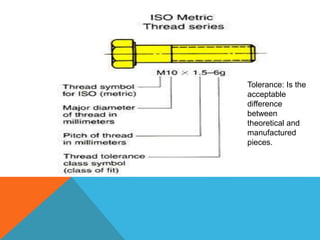
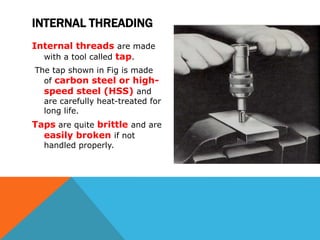
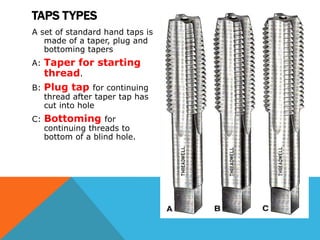
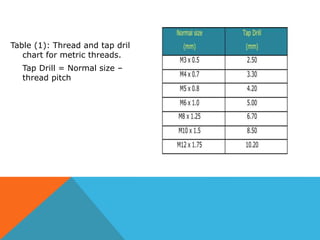
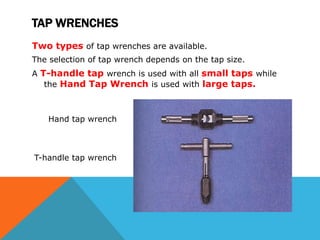
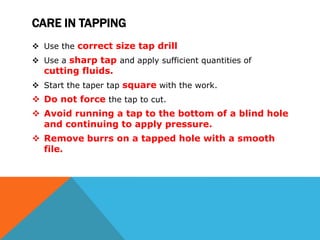
MODULE OBJECTIVES
After the completion of this module, student should be able to:
 Explain the tapping process.
 Explain the threading process.
 Differentiate between thread classes
 Identify the tap types.
 Explain the tapping and threading procedure.
 Use the tapping and threading tools to create a tap and a thread.
INTRODUCTION
One of the most effective ways to fasten two or more
components is through the use of screws or bolts, secured
in properly threaded holes. This method of fastening is
more robust then other fastening methods, allowing
repeated assembly and dismantling via simple
screwing and unscrewing of the screw.
Screw
Bolts
Nut
TAPPING AND THREADING
Tapping is the process of producing threads in a metal
using certain tools.
A thread is a spiral or helical ridge found on nuts and
bolts.
Thread is specified by the diameter and the pitch
(number of threads per millimeter)
Tapping
Threading
HAND THREADING SAFETY
 Chips produced by hand threading are sharp and should be
cleaned by using a brush or piece of cloth.
 Do not use compressed air to remove the metal chips.
 Newly-cut external threads are very sharp. Again use a
brush or cloth to clean them.
 Wash your hands after using cutting fluids or oils.
 Have cuts treated by a qualified person.
 Be sure the die is clamped firmly in the die stock. If not, it
can fall from the holder and cause injury.
 Broken tap have very sharp edges and are very dangerous. An
extra care should be taken in dealing with broken
taps.
THREADS STANDARDS
There are many types of threads used in different applications.
The most frequently used standard is the ISO
standard that is shown in the figure
F: Crest
D: Thread Depth
P: Thread Pich
Tolerance: Is the
acceptable
difference
between
theoretical and
manufactured
pieces.
INTERNAL THREADING
Internal threads are made
with a tool called tap.
The tap shown in Fig is made
of carbon steel or high-
speed steel (HSS) and
are carefully heat-treated for
long life.
Taps are quite brittle and are
easily broken if not
handled properly.
TAPS TYPES
A set of standard hand taps is
made of a taper, plug and
bottoming tapers
A: Taper for starting
thread.
B: Plug tap for continuing
thread after taper tap has
cut into hole
C: Bottoming for
continuing threads to
bottom of a blind hole.
TAP TYPES
Threads are started with a taper tap.
Then the plug tap is used after the taper tap has cut threads
as far into the hole as possible.
Finally threads are cut to the bottom of a blind hole (one
that does not go through the part) with a bottoming tap. It is
necessary to use the full set of taps, only when a blind
hole is to be made.
A: Open or through hole.
B: Blind hole that is drilled deeper than desired threads
C: Blind hole with threads tapped to bottom.
TAP DRILL
The drill used to make the hole prior to tapping is called a
tap drill.
Theoretically, it should be equal in diameter to the
minor diameter of the screw that will be fitted into
the tapped hole.
Table (1) below shoes the relationship between the thread
normal size (diameter) and the its proper tap drill diameter.
Table (1): Thread and tap drill
chart for metric threads.
Tap Drill = Normal size –
thread pitch
TAP WRENCHES
Two types of tap wrenches are available.
The selection of tap wrench depends on the tap size.
A T-handle tap wrench is used with all small taps while
the Hand Tap Wrench is used with large taps.
Hand tap wrench
T-handle tap wrench
CARE IN TAPPING
 Use the correct size tap drill
 Use a sharp tap and apply sufficient quantities of
cutting fluids.
 Start the taper tap square with the work.
 Do not force the tap to cut.
 Avoid running a tap to the bottom of a blind hole
and continuing to apply pressure.
 Remove burrs on a tapped hole with a smooth
file.

M7 Tapping and Threading.ppt

  • 2.
    MODULE OBJECTIVES After thecompletion of this module, student should be able to:  Explain the tapping process.  Explain the threading process.  Differentiate between thread classes  Identify the tap types.  Explain the tapping and threading procedure.  Use the tapping and threading tools to create a tap and a thread.
  • 3.
    INTRODUCTION One of themost effective ways to fasten two or more components is through the use of screws or bolts, secured in properly threaded holes. This method of fastening is more robust then other fastening methods, allowing repeated assembly and dismantling via simple screwing and unscrewing of the screw. Screw Bolts Nut
  • 4.
    TAPPING AND THREADING Tappingis the process of producing threads in a metal using certain tools. A thread is a spiral or helical ridge found on nuts and bolts. Thread is specified by the diameter and the pitch (number of threads per millimeter) Tapping Threading
  • 5.
    HAND THREADING SAFETY Chips produced by hand threading are sharp and should be cleaned by using a brush or piece of cloth.  Do not use compressed air to remove the metal chips.  Newly-cut external threads are very sharp. Again use a brush or cloth to clean them.  Wash your hands after using cutting fluids or oils.  Have cuts treated by a qualified person.  Be sure the die is clamped firmly in the die stock. If not, it can fall from the holder and cause injury.  Broken tap have very sharp edges and are very dangerous. An extra care should be taken in dealing with broken taps.
  • 6.
    THREADS STANDARDS There aremany types of threads used in different applications. The most frequently used standard is the ISO standard that is shown in the figure F: Crest D: Thread Depth P: Thread Pich
  • 7.
  • 8.
    INTERNAL THREADING Internal threadsare made with a tool called tap. The tap shown in Fig is made of carbon steel or high- speed steel (HSS) and are carefully heat-treated for long life. Taps are quite brittle and are easily broken if not handled properly.
  • 9.
    TAPS TYPES A setof standard hand taps is made of a taper, plug and bottoming tapers A: Taper for starting thread. B: Plug tap for continuing thread after taper tap has cut into hole C: Bottoming for continuing threads to bottom of a blind hole.
  • 10.
    TAP TYPES Threads arestarted with a taper tap. Then the plug tap is used after the taper tap has cut threads as far into the hole as possible. Finally threads are cut to the bottom of a blind hole (one that does not go through the part) with a bottoming tap. It is necessary to use the full set of taps, only when a blind hole is to be made. A: Open or through hole. B: Blind hole that is drilled deeper than desired threads C: Blind hole with threads tapped to bottom.
  • 11.
    TAP DRILL The drillused to make the hole prior to tapping is called a tap drill. Theoretically, it should be equal in diameter to the minor diameter of the screw that will be fitted into the tapped hole. Table (1) below shoes the relationship between the thread normal size (diameter) and the its proper tap drill diameter.
  • 13.
    Table (1): Threadand tap drill chart for metric threads. Tap Drill = Normal size – thread pitch
  • 14.
    TAP WRENCHES Two typesof tap wrenches are available. The selection of tap wrench depends on the tap size. A T-handle tap wrench is used with all small taps while the Hand Tap Wrench is used with large taps. Hand tap wrench T-handle tap wrench
  • 15.
    CARE IN TAPPING Use the correct size tap drill  Use a sharp tap and apply sufficient quantities of cutting fluids.  Start the taper tap square with the work.  Do not force the tap to cut.  Avoid running a tap to the bottom of a blind hole and continuing to apply pressure.  Remove burrs on a tapped hole with a smooth file.

Editor's Notes

  • #10 A: tapered from the end approximately 6 threads and used to start a thread easily B: tapered for approximately 3 threads and used to thread a hole going through a work piece. C: not tapered but chamfered from the end for one thread