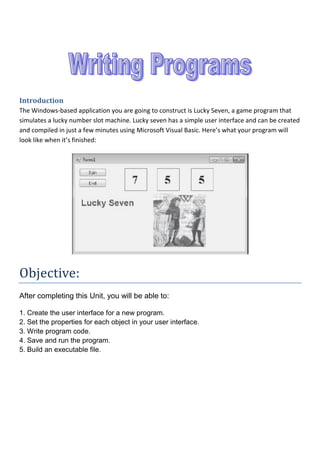
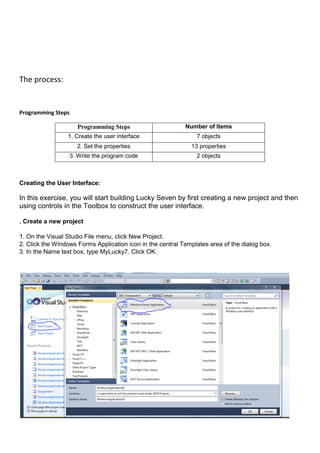
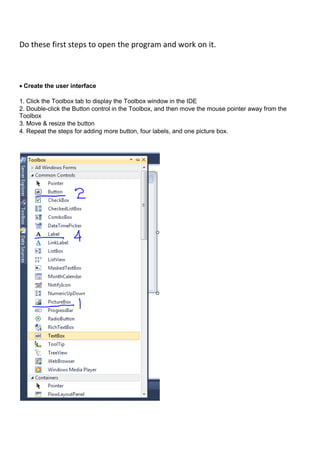
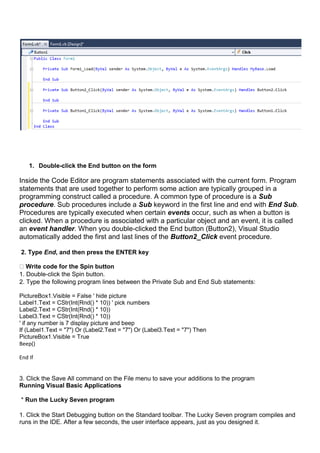
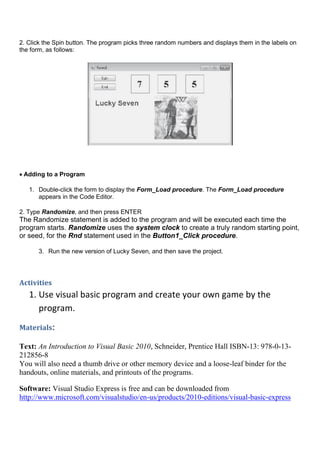
Introduction
The Windows-based application you are going to construct is Lucky Seven, a game program that
simulates a lucky number slot machine. Lucky seven has a simple user interface and can be created
and compiled in just a few minutes using Microsoft Visual Basic. Here’s what your program will
look like when it’s finished:

Objective:
After completing this Unit, you will be able to:
1. Create the user interface for a new program.
2. Set the properties for each object in your user interface.
3. Write program code.
4. Save and run the program.
5. Build an executable file.
The process:

Programming Steps
Programming Steps

Number of Items

1. Create the user interface

7 objects

2. Set the properties

13 properties

3. Write the program code

2 objects

Creating the User Interface:

In this exercise, you will start building Lucky Seven by first creating a new project and then
using controls in the Toolbox to construct the user interface.
. Create a new project
1. On the Visual Studio File menu, click New Project.
2. Click the Windows Forms Application icon in the central Templates area of the dialog box.
3. In the Name text box, type MyLucky7. Click OK.
Do these first steps to open the program and work on it.


Create the user interface
1. Click the Toolbox tab to display the Toolbox window in the IDE
2. Double-click the Button control in the Toolbox, and then move the mouse pointer away from the
Toolbox
3. Move & resize the button
4. Repeat the steps for adding more button, four labels, and one picture box.
The numbers and types of controls are written above in the picture. That will
don after clicking in toolbox.

Arrange the form like this form in the picture below.

. You can set the properties by using this properties box as you see in the
picture below.
So these properties you should set it of the control which are created in the
form.

The Picture Box Properties
1. Click the picture box object on the form
2. Click the SizeMode property in the Properties window, and then click StretchImage
3. Click the Image property in the Properties window, and then click the ellipsis button in the second
column.
4. Click the Local Resource radio button, and then click the Import button.
5. In the Open dialog box, navigate to the folder that contains the digital photo PayCoins.jpg.
6. Select PayCoins.jpg, and then click Open
7. Click the Visible property in the Behavior category of the Properties window, and then click the
arrow in the second column.
8. Click False to make the picture invisible when the program starts.
9. Set the properties of other controls so that they appear as in the screen shoot above.

Object
Button1
Button2
Label1, Label2, Label3

Label4

Property
Text
Text
Auto Size
Border Style
Font
Text
Text Align
Text
Font
For Color

Setting
Spin
End
False
Fixed Single
Times New Roman, Bold, 24-point
“0”
Middle Center
Lucky Seven”
Arial, Bold, 18-point
Purple

Writing the Code


Use the Code Editor

When you double click at the control you will see this form come out.
1. Double-click the End button on the form

Inside the Code Editor are program statements associated with the current form. Program
statements that are used together to perform some action are typically grouped in a
programming construct called a procedure. A common type of procedure is a Sub
procedure. Sub procedures include a Sub keyword in the first line and end with End Sub.
Procedures are typically executed when certain events occur, such as when a button is
clicked. When a procedure is associated with a particular object and an event, it is called
an event handler. When you double-clicked the End button (Button2), Visual Studio
automatically added the first and last lines of the Button2_Click event procedure.
2. Type End, and then press the ENTER key
Write code for the Spin button
1. Double-click the Spin button.
2. Type the following program lines between the Private Sub and End Sub statements:
PictureBox1.Visible = False ' hide picture
Label1.Text = CStr(Int(Rnd() * 10)) ' pick numbers
Label2.Text = CStr(Int(Rnd() * 10))
Label3.Text = CStr(Int(Rnd() * 10))
' if any number is 7 display picture and beep
If (Label1.Text = "7") Or (Label2.Text = "7") Or (Label3.Text = "7") Then
PictureBox1.Visible = True
Beep()
End If

3. Click the Save All command on the File menu to save your additions to the program
Running Visual Basic Applications
* Run the Lucky Seven program
1. Click the Start Debugging button on the Standard toolbar. The Lucky Seven program compiles and
runs in the IDE. After a few seconds, the user interface appears, just as you designed it.
2. Click the Spin button. The program picks three random numbers and displays them in the labels on
the form, as follows:



Adding to a Program
1. Double-click the form to display the Form_Load procedure. The Form_Load procedure
appears in the Code Editor.
2. Type Randomize, and then press ENTER

The Randomize statement is added to the program and will be executed each time the
program starts. Randomize uses the system clock to create a truly random starting point,
or seed, for the Rnd statement used in the Button1_Click procedure.
3. Run the new version of Lucky Seven, and then save the project.

Activities

1. Use visual basic program and create your own game by the
program.
Materials:
Text: An Introduction to Visual Basic 2010, Schneider, Prentice Hall ISBN-13: 978-0-13212856-8
You will also need a thumb drive or other memory device and a loose-leaf binder for the
handouts, online materials, and printouts of the programs.
Software: Visual Studio Express is free and can be downloaded from
http://www.microsoft.com/visualstudio/en-us/products/2010-editions/visual-basic-express
Introduction

Introduction

  • 1.
    Introduction The Windows-based applicationyou are going to construct is Lucky Seven, a game program that simulates a lucky number slot machine. Lucky seven has a simple user interface and can be created and compiled in just a few minutes using Microsoft Visual Basic. Here’s what your program will look like when it’s finished: Objective: After completing this Unit, you will be able to: 1. Create the user interface for a new program. 2. Set the properties for each object in your user interface. 3. Write program code. 4. Save and run the program. 5. Build an executable file.
  • 2.
    The process: Programming Steps ProgrammingSteps Number of Items 1. Create the user interface 7 objects 2. Set the properties 13 properties 3. Write the program code 2 objects Creating the User Interface: In this exercise, you will start building Lucky Seven by first creating a new project and then using controls in the Toolbox to construct the user interface. . Create a new project 1. On the Visual Studio File menu, click New Project. 2. Click the Windows Forms Application icon in the central Templates area of the dialog box. 3. In the Name text box, type MyLucky7. Click OK.
  • 3.
    Do these firststeps to open the program and work on it.  Create the user interface 1. Click the Toolbox tab to display the Toolbox window in the IDE 2. Double-click the Button control in the Toolbox, and then move the mouse pointer away from the Toolbox 3. Move & resize the button 4. Repeat the steps for adding more button, four labels, and one picture box.
  • 4.
    The numbers andtypes of controls are written above in the picture. That will don after clicking in toolbox. Arrange the form like this form in the picture below. . You can set the properties by using this properties box as you see in the picture below.
  • 5.
    So these propertiesyou should set it of the control which are created in the form.  The Picture Box Properties 1. Click the picture box object on the form 2. Click the SizeMode property in the Properties window, and then click StretchImage 3. Click the Image property in the Properties window, and then click the ellipsis button in the second column. 4. Click the Local Resource radio button, and then click the Import button. 5. In the Open dialog box, navigate to the folder that contains the digital photo PayCoins.jpg. 6. Select PayCoins.jpg, and then click Open 7. Click the Visible property in the Behavior category of the Properties window, and then click the arrow in the second column. 8. Click False to make the picture invisible when the program starts. 9. Set the properties of other controls so that they appear as in the screen shoot above. Object Button1 Button2 Label1, Label2, Label3 Label4 Property Text Text Auto Size Border Style Font Text Text Align Text Font For Color Setting Spin End False Fixed Single Times New Roman, Bold, 24-point “0” Middle Center Lucky Seven” Arial, Bold, 18-point Purple Writing the Code  Use the Code Editor When you double click at the control you will see this form come out.
  • 6.
    1. Double-click theEnd button on the form Inside the Code Editor are program statements associated with the current form. Program statements that are used together to perform some action are typically grouped in a programming construct called a procedure. A common type of procedure is a Sub procedure. Sub procedures include a Sub keyword in the first line and end with End Sub. Procedures are typically executed when certain events occur, such as when a button is clicked. When a procedure is associated with a particular object and an event, it is called an event handler. When you double-clicked the End button (Button2), Visual Studio automatically added the first and last lines of the Button2_Click event procedure. 2. Type End, and then press the ENTER key Write code for the Spin button 1. Double-click the Spin button. 2. Type the following program lines between the Private Sub and End Sub statements: PictureBox1.Visible = False ' hide picture Label1.Text = CStr(Int(Rnd() * 10)) ' pick numbers Label2.Text = CStr(Int(Rnd() * 10)) Label3.Text = CStr(Int(Rnd() * 10)) ' if any number is 7 display picture and beep If (Label1.Text = "7") Or (Label2.Text = "7") Or (Label3.Text = "7") Then PictureBox1.Visible = True Beep() End If 3. Click the Save All command on the File menu to save your additions to the program Running Visual Basic Applications * Run the Lucky Seven program 1. Click the Start Debugging button on the Standard toolbar. The Lucky Seven program compiles and runs in the IDE. After a few seconds, the user interface appears, just as you designed it.
  • 7.
    2. Click theSpin button. The program picks three random numbers and displays them in the labels on the form, as follows:   Adding to a Program 1. Double-click the form to display the Form_Load procedure. The Form_Load procedure appears in the Code Editor. 2. Type Randomize, and then press ENTER The Randomize statement is added to the program and will be executed each time the program starts. Randomize uses the system clock to create a truly random starting point, or seed, for the Rnd statement used in the Button1_Click procedure. 3. Run the new version of Lucky Seven, and then save the project. Activities 1. Use visual basic program and create your own game by the program. Materials: Text: An Introduction to Visual Basic 2010, Schneider, Prentice Hall ISBN-13: 978-0-13212856-8 You will also need a thumb drive or other memory device and a loose-leaf binder for the handouts, online materials, and printouts of the programs. Software: Visual Studio Express is free and can be downloaded from http://www.microsoft.com/visualstudio/en-us/products/2010-editions/visual-basic-express