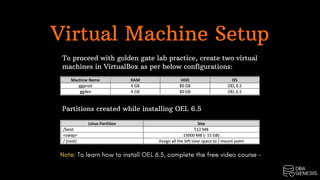
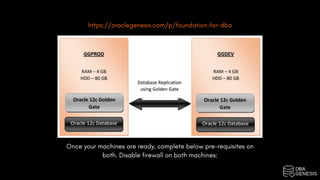
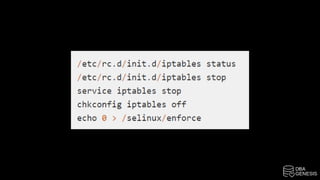
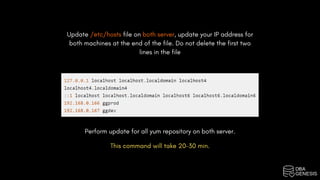
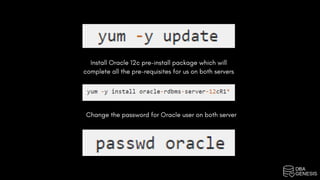
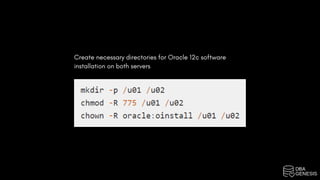
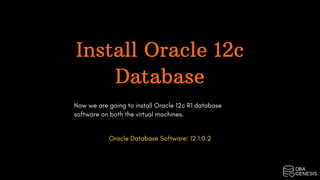
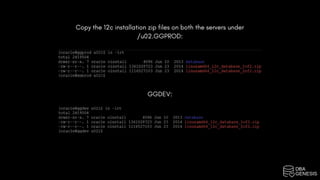
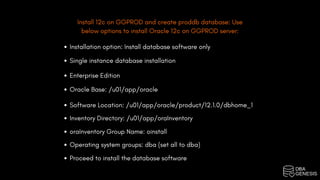
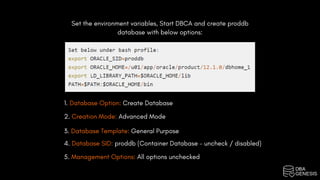
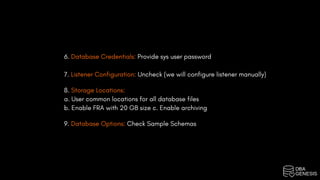
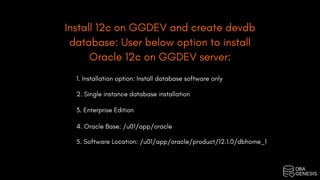
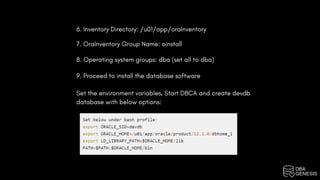
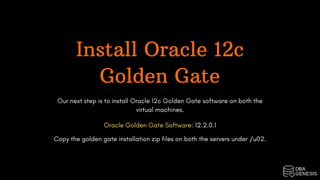
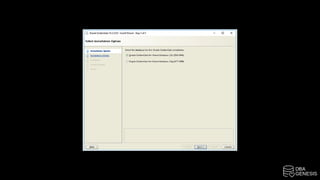
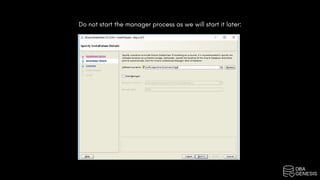
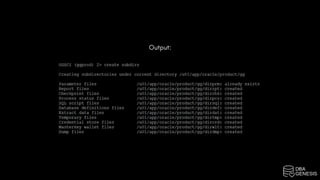
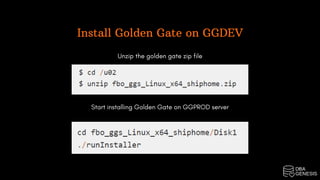
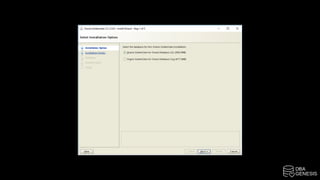
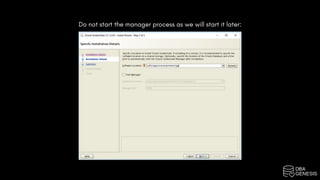
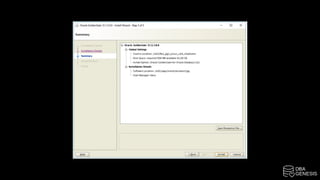
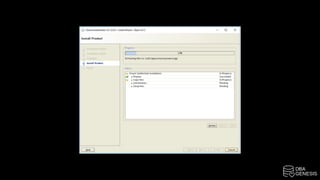
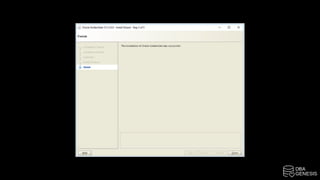
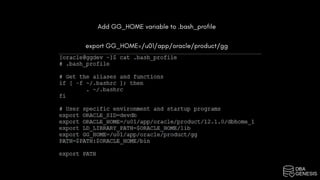
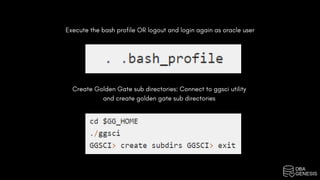
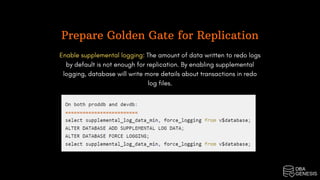
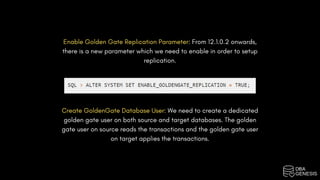
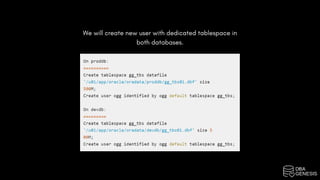
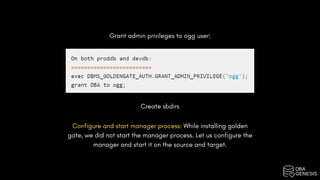
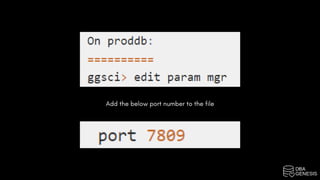
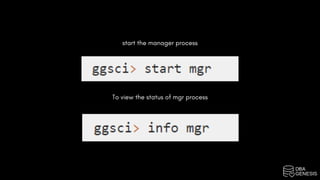
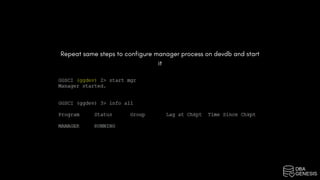
INSTALL ORACLE
12C GOLDEN GATE
ON ORACLE LINUX
Virtual Machine Setup
To proceed with golden gate lab practice, create two virtual
machines in VirtualBox as per below configurations:
Partitions created while installing OEL 6.5
Note: To learn how to install OEL 6.5, complete the free video course –
https://oraclegenesis.com/p/foundation-for-dba
Once your machines are ready, complete below pre-requisites on
both. Disable firewall on both machines:
Update /etc/hosts file on both server, update your IP address for
both machines at the end of the file. Do not delete the first two
lines in the file
Perform update for all yum repository on both server.
This command will take 20-30 min.
Install Oracle 12c pre-install package which will
complete all the pre-requisites for us on both servers
Change the password for Oracle user on both server
Create necessary directories for Oracle 12c software
installation on both servers
Install Oracle 12c
Database
Now we are going to install Oracle 12c R1 database
software on both the virtual machines.
Oracle Database Software: 12.1.0.2
Copy the 12c installation zip files on both the servers under
/u02.GGPROD:
GGDEV:
Install 12c on GGPROD and create proddb database: Use
below options to install Oracle 12c on GGPROD server:
Installation option: Install database software only
Single instance database installation
Enterprise Edition
Oracle Base: /u01/app/oracle
Software Location: /u01/app/oracle/product/12.1.0/dbhome_1
Inventory Directory: /u01/app/oraInventory
oraInventory Group Name: oinstall
Operating system groups: dba (set all to dba)
Proceed to install the database software
Set the environment variables, Start DBCA and create proddb
database with below options:
1. Database Option: Create Database
2. Creation Mode: Advanced Mode
3. Database Template: General Purpose
4. Database SID: proddb (Container Database – uncheck / disabled)
5. Management Options: All options unchecked
6. Database Credentials: Provide sys user password
7. Listener Configuration: Uncheck (we will configure listener manually)
8. Storage Locations:
a. User common locations for all database files
b. Enable FRA with 20 GB size c. Enable archiving
9. Database Options: Check Sample Schemas
Install 12c on GGDEV and create devdb
database: User below option to install
Oracle 12c on GGDEV server:
1. Installation option: Install database software only
2. Single instance database installation
3. Enterprise Edition
4. Oracle Base: /u01/app/oracle
5. Software Location: /u01/app/oracle/product/12.1.0/dbhome_1
6. Inventory Directory: /u01/app/oraInventory
7. OraInventory Group Name: oinstall
8. Operating system groups: dba (set all to dba)
9. Proceed to install the database software
Set the environment variables, Start DBCA and create devdb
database with below options:
Install Oracle 12c
Golden Gate
Our next step is to install Oracle 12c Golden Gate software on both the
virtual machines.
Oracle Golden Gate Software: 12.2.0.1
Copy the golden gate installation zip files on both the servers under /u02.
Install Golden Gate on GGPROD
Unzip the golden gate zip file
Start installing Golden Gate on GGPROD server
Do not start the manager process as we will start it later:
Add GG_HOME variable to .bash_profile
export GG_HOME=/u01/app/oracle/product/gg
Execute the bash profile OR logout and login again as oracle user
Create Golden Gate sub directories: Connect to ggsci utility and
create golden gate sub directories
Output:
Install Golden Gate on GGDEV
Unzip the golden gate zip file
Start installing Golden Gate on GGPROD server
Do not start the manager process as we will start it later:
Add GG_HOME variable to .bash_profile
export GG_HOME=/u01/app/oracle/product/gg
Execute the bash profile OR logout and login again as oracle user
Create Golden Gate sub directories: Connect to ggsci utility
and create golden gate sub directories
Output:
Prepare Golden Gate for Replication
Enable supplemental logging: The amount of data written to redo logs
by default is not enough for replication. By enabling supplemental
logging, database will write more details about transactions in redo
log files.
Enable Golden Gate Replication Parameter: From 12.1.0.2 onwards,
there is a new parameter which we need to enable in order to setup
replication.
Create GoldenGate Database User: We need to create a dedicated
golden gate user on both source and target databases. The golden
gate user on source reads the transactions and the golden gate user
on target applies the transactions.
We will create new user with dedicated tablespace in
both databases.
Grant admin privileges to ogg user:
Create sbdirs
Configure and start manager process: While installing golden
gate, we did not start the manager process. Let us configure the
manager and start it on the source and target.
Add the below port number to the file
start the manager process
To view the status of mgr process
Repeat same steps to configure manager process on devdb and start
it
Courses | Projects | Bootcamps

Install Oracle 12c Golden Gate On Oracle Linux

  • 1.
    INSTALL ORACLE 12C GOLDENGATE ON ORACLE LINUX
  • 2.
    Virtual Machine Setup Toproceed with golden gate lab practice, create two virtual machines in VirtualBox as per below configurations: Partitions created while installing OEL 6.5 Note: To learn how to install OEL 6.5, complete the free video course –
  • 3.
    https://oraclegenesis.com/p/foundation-for-dba Once your machinesare ready, complete below pre-requisites on both. Disable firewall on both machines:
  • 5.
    Update /etc/hosts fileon both server, update your IP address for both machines at the end of the file. Do not delete the first two lines in the file Perform update for all yum repository on both server. This command will take 20-30 min.
  • 6.
    Install Oracle 12cpre-install package which will complete all the pre-requisites for us on both servers Change the password for Oracle user on both server
  • 7.
    Create necessary directoriesfor Oracle 12c software installation on both servers
  • 8.
    Install Oracle 12c Database Nowwe are going to install Oracle 12c R1 database software on both the virtual machines. Oracle Database Software: 12.1.0.2
  • 9.
    Copy the 12cinstallation zip files on both the servers under /u02.GGPROD: GGDEV:
  • 10.
    Install 12c onGGPROD and create proddb database: Use below options to install Oracle 12c on GGPROD server: Installation option: Install database software only Single instance database installation Enterprise Edition Oracle Base: /u01/app/oracle Software Location: /u01/app/oracle/product/12.1.0/dbhome_1 Inventory Directory: /u01/app/oraInventory oraInventory Group Name: oinstall Operating system groups: dba (set all to dba) Proceed to install the database software
  • 11.
    Set the environmentvariables, Start DBCA and create proddb database with below options: 1. Database Option: Create Database 2. Creation Mode: Advanced Mode 3. Database Template: General Purpose 4. Database SID: proddb (Container Database – uncheck / disabled) 5. Management Options: All options unchecked
  • 12.
    6. Database Credentials:Provide sys user password 7. Listener Configuration: Uncheck (we will configure listener manually) 8. Storage Locations: a. User common locations for all database files b. Enable FRA with 20 GB size c. Enable archiving 9. Database Options: Check Sample Schemas
  • 13.
    Install 12c onGGDEV and create devdb database: User below option to install Oracle 12c on GGDEV server: 1. Installation option: Install database software only 2. Single instance database installation 3. Enterprise Edition 4. Oracle Base: /u01/app/oracle 5. Software Location: /u01/app/oracle/product/12.1.0/dbhome_1
  • 14.
    6. Inventory Directory:/u01/app/oraInventory 7. OraInventory Group Name: oinstall 8. Operating system groups: dba (set all to dba) 9. Proceed to install the database software Set the environment variables, Start DBCA and create devdb database with below options:
  • 15.
    Install Oracle 12c GoldenGate Our next step is to install Oracle 12c Golden Gate software on both the virtual machines. Oracle Golden Gate Software: 12.2.0.1 Copy the golden gate installation zip files on both the servers under /u02.
  • 16.
    Install Golden Gateon GGPROD Unzip the golden gate zip file Start installing Golden Gate on GGPROD server
  • 18.
    Do not startthe manager process as we will start it later:
  • 22.
    Add GG_HOME variableto .bash_profile export GG_HOME=/u01/app/oracle/product/gg
  • 23.
    Execute the bashprofile OR logout and login again as oracle user Create Golden Gate sub directories: Connect to ggsci utility and create golden gate sub directories
  • 24.
  • 25.
    Install Golden Gateon GGDEV Unzip the golden gate zip file Start installing Golden Gate on GGPROD server
  • 27.
    Do not startthe manager process as we will start it later:
  • 31.
    Add GG_HOME variableto .bash_profile export GG_HOME=/u01/app/oracle/product/gg
  • 32.
    Execute the bashprofile OR logout and login again as oracle user Create Golden Gate sub directories: Connect to ggsci utility and create golden gate sub directories
  • 33.
  • 34.
    Prepare Golden Gatefor Replication Enable supplemental logging: The amount of data written to redo logs by default is not enough for replication. By enabling supplemental logging, database will write more details about transactions in redo log files.
  • 35.
    Enable Golden GateReplication Parameter: From 12.1.0.2 onwards, there is a new parameter which we need to enable in order to setup replication. Create GoldenGate Database User: We need to create a dedicated golden gate user on both source and target databases. The golden gate user on source reads the transactions and the golden gate user on target applies the transactions.
  • 36.
    We will createnew user with dedicated tablespace in both databases.
  • 37.
    Grant admin privilegesto ogg user: Create sbdirs Configure and start manager process: While installing golden gate, we did not start the manager process. Let us configure the manager and start it on the source and target.
  • 38.
    Add the belowport number to the file
  • 39.
    start the managerprocess To view the status of mgr process
  • 40.
    Repeat same stepsto configure manager process on devdb and start it
  • 41.
    Courses | Projects| Bootcamps