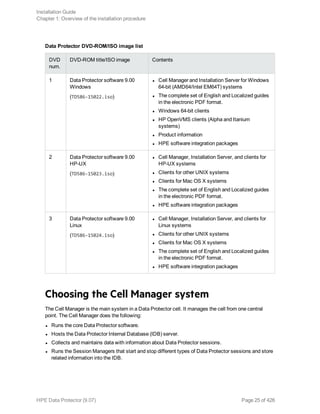
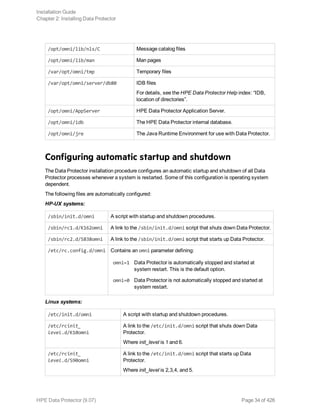
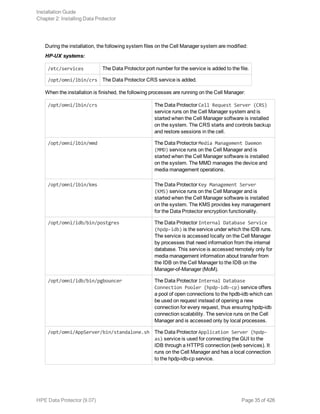
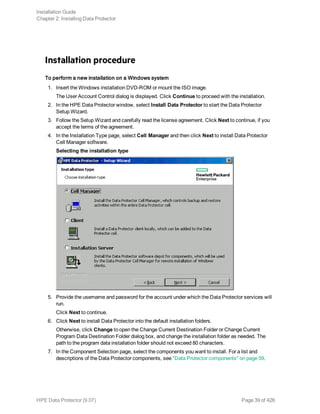
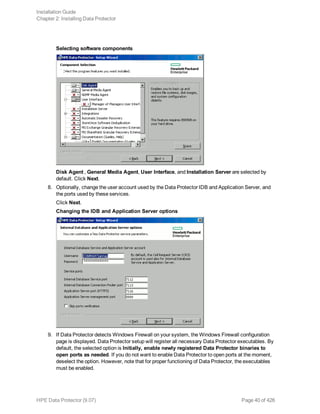
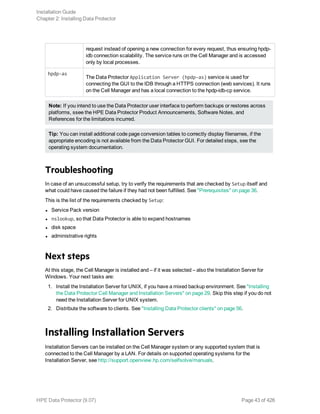
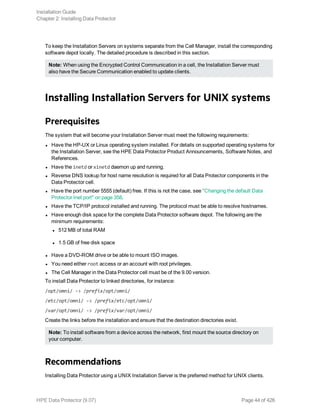
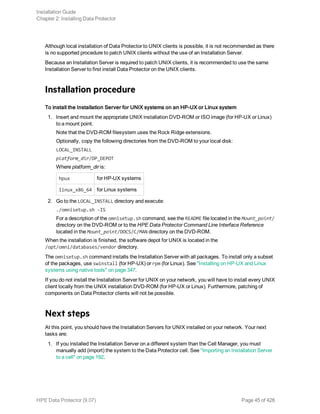
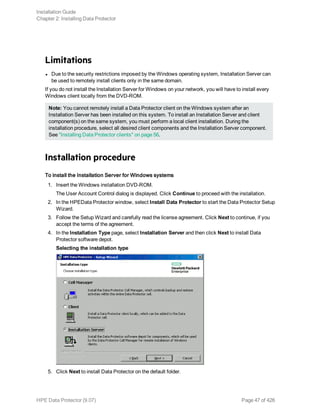
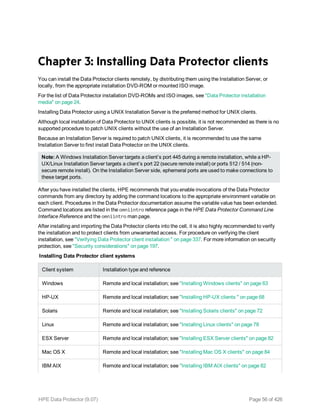
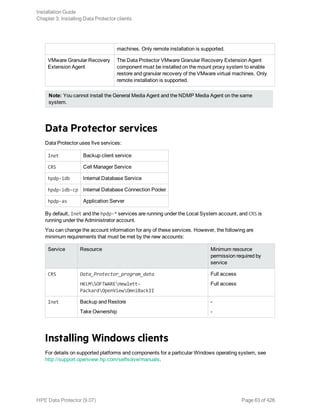
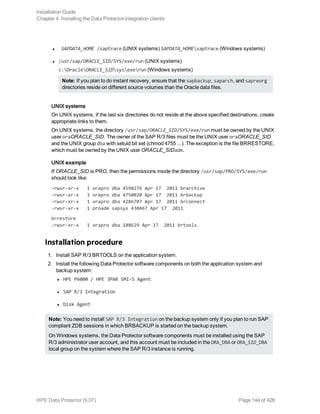
This document provides an installation guide for HPE Data Protector 9.07. It describes how to install the Data Protector Cell Manager, clients, and various integration options. The guide covers installations on Windows, UNIX, Linux and other platforms. It also provides instructions for cluster-aware installations and maintaining the Data Protector installation.


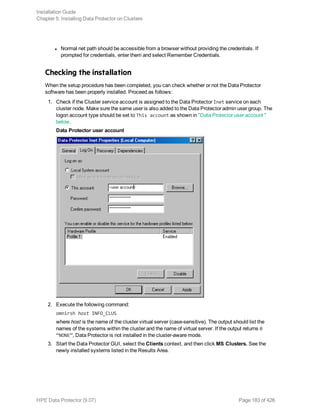
![For all other devices, check the st.conf.templ template (located in /opt/omni/spt) for required
entries in the st.conf file. This is only a template file and is not meant as a replacement for the
st.conf file.
l For each tape device you want to use, check if the following line is present in the file
/kernel/drv/st.conf and add it if necessary. Replace the ID placeholder with the address of the
device:
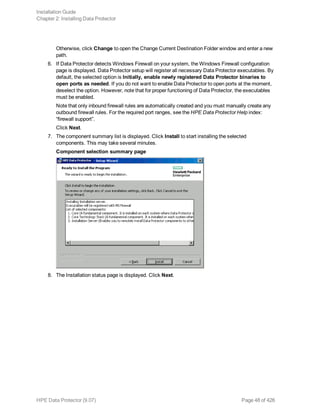
SCSI devices:
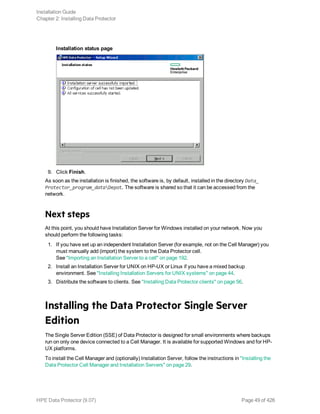
name="st" class="scsi" target=ID lun=0;
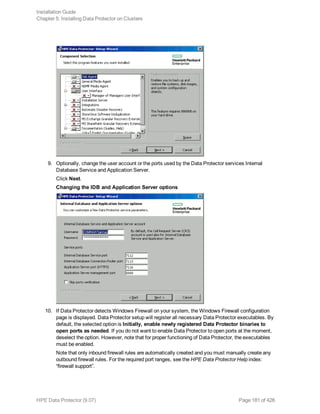
Fibre channel devices:
name="st" parent="fp" target=ID
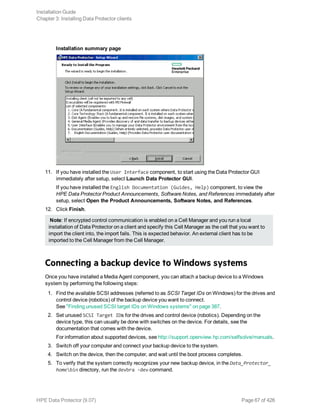
Note that the value for the parent parameter may differ for your tape device. For more information,
see your tape device documentation.
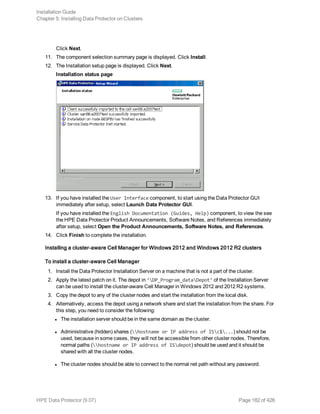
l To enable controlling the SCSI Exchanger devices on Solaris 9 and earlier Solaris versions, you
have to install the SCSI Pass-Through driver first, and then install the SCSI device.
Install the SCSI Pass-Through driver using the following steps:
a. Copy the sst module into the /usr/kernel/drv/sparcv9 directory and the sst.conf
configuration file into the /usr/kernel/drv directory:
32-bit Solaris systems:
$cp /opt/omni/spt/sst /usr/kernel/drv/sst
$cp /opt/omni/spt/sst.conf /usr/kernel/drv/sst.conf
64-bit Solaris systems:
$cp /opt/omni/spt/sst.64bit /usr/kernel/drv/sparcv9 /sst
$cp /opt/omni/spt/sst.conf /usr/kernel/drv/sst.conf
b. Add the following line to the /etc/devlink.tab file:
When editing the /etc/devlink.tab file, do not use [space] characters. Use only [TAB]
characters.
“type=ddi_pseudo;name=sst;minor=character rsstA1”
This will cause devlinks (1M) to create link(s) to devices with names of the /dev/rsstX form,
where X is the SCSI target number.
c. For each SCSI Exchanger device that you want to control, check if the following line is present
in the file /kernel/drv/sst.conf and add it if necessary. Replace the ID placeholder with the
address of the device:
SCSI devices:
name="sst" class="scsi" target=ID lun=0;
Fibre channel devices:
name="sst" parent=”lpfc” class="scsi" target=ID lun=0;
Note that the value for the parent parameter may differ for your tape device. For more
information, see your tape device documentation.
d. Install the driver on the system by entering the following command:
add_drv sst
e. At this stage, you are ready to install the SCSI device. Before the installation, you must assign
Installation Guide
Chapter 3: Installing Data Protector clients
HPE Data Protector (9.07) Page 75 of 426](https://image.slidesharecdn.com/hpemandp9-160823082229/85/Hpe-Data-Protector-installation-guide-75-320.jpg)

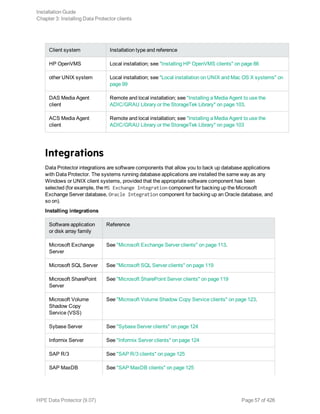
![instructions, see "Installing Data Protector clients" on page 56.
As soon as the client components have been installed, the target system automatically becomes a
member of the Data Protector cell.
Installing HP OpenVMS clients
The installation procedure for OpenVMS clients has to be performed locally on a supported OpenVMS
system. Remote installation is not supported.
You can install the Data Protector Disk Agent, General Media Agent, and the User Interface
(command-line interface only) on systems running OpenVMS 7.3-2/IA64 8.2-1. You can also install the
Oracle Integration component on systems running OpenVMS 7.3-2 or later. For information on Data
Protector components, see "Data Protector components" on page 59.
For information on supported devices, OpenVMS platform versions, as well as for limitations, known
problems and workarounds, see the HPE Data Protector Product Announcements, Software Notes,
and References.
For more OpenVMS specific information, see the OpenVMS Release Notes located in the default help
document directory on OpenVMS, for example: SYS$COMMON:[SYSHLP]DPA0800.RELEASE_NOTES.
Prerequisites
Before you install a Data Protector client on the OpenVMS platform, check the following:
l Make sure the HPE TCP/IP transport protocol is installed and running.
l Set the TIMEZONE features of your system by executing the command SYS$MANAGER:UTC$TIME_
SETUP.COM.
l Log in to the SYSTEM account of the OpenVMS system. Note that you must have appropriate
permissions.
l Make sure that you have access to the Data Protector installation DVD-ROM or ISO image
containing the HP OpenVMS client installation package.
l Reverse DNS lookup for host name resolution is required for all Data Protector components in the
Data Protector cell.
Installation Procedure
The installation procedure can be performed from the Data Protector Windows installation DVD-ROM
or ISO image.
To install a Data Protector client on an OpenVMS system
1. If you already have the PCSI installation file go to "Installing Data Protector clients" on page 56.
To get the PCSI installation file, mount the installation DVD-ROM or ISO image on an OpenVMS
Server and copy it to the desired location. You may also ftp the PCSI file from a Windows system.
2. Run the following command:
Installation Guide
Chapter 3: Installing Data Protector clients
HPE Data Protector (9.07) Page 86 of 426](https://image.slidesharecdn.com/hpemandp9-160823082229/85/Hpe-Data-Protector-installation-guide-86-320.jpg)
![$ PRODUCT INSTALL DP /SOURCE=device:[directory]
where device:[directory] is the location of the .PCSI installation file.
3. Verify the version of the kit by responding YES to the prompt:
The following product has been selected: HPE AXPVMS DP A08.00-xx Layered
Product Do you want to continue? [YES]
4. Choose the software components you wish to install. Take the defaults and the Disk Agent,
General Media Agent, and User Interface will be installed. You may also select each component
individually.
You will be asked to choose options, if any, for each selected product and for any product that may
be installed to satisfy software dependency requirements.
Example
HP IA64VMS DP A08.00-xx: HP OpenVMS IA64 Data Protector V8.00
COPYRIGHT HEWLETT-PACKARD COMPANY 2013
Do you want the defaults for all options? [YES] NO
Do you wish to install Disk Agent for this client node?
[YES] YES
Do you wish to install Media Agent for this client node?
[YES] YES
Do you wish to install Command Language Interface for this client node?
[YES] YES
Do you wish to install Oracle Integration Agent for this client node?
[YES] YES
Do you want to review the options?
[NO] YES
HP IA64VMS DP X08.00-xx: HP OpenVMS IA64 Data Protector V8.00 [Installed]
Do you wish to install Disk Agent for this client node?
YES
Do you wish to install Media Agent for this client node?
YES
Do you wish to install Command Language Interface for this client node?
YES
Do you wish to install Oracle Integration Agent for this client node?
[YES] YES
Are you satisfied with these options?
[YES] YES
The default and only location for the Data Protector directories and files is:
SYS$SYSDEVICE:[VMS$COMMON.OMNI]
Installation Guide
Chapter 3: Installing Data Protector clients
HPE Data Protector (9.07) Page 87 of 426](https://image.slidesharecdn.com/hpemandp9-160823082229/85/Hpe-Data-Protector-installation-guide-87-320.jpg)
![The directory structure will be created automatically and the files will be placed in this directory
tree.
The Data Protector startup and shutdown command procedures will be placed in
SYS$SYSDEVICE:[VMS$COMMON.SYS$STARTUP]
There are four files that are always present for an OpenVMS client and a fifth file that only exists if
you chose the CLI option. The five files concerned are:
l SYS$STARTUP:OMNI$STARTUP.COM This is the command procedure that starts Data Protector
on this node.
l SYS$STARTUP:OMNI$SYSTARTUP.COM This is the command procedure that defines the
OMNI$ROOT logical name. Any other logical names required by this client may be added to this
command procedure.
l SYS$STARTUP:OMNI$SHUTDOWN.COM This is the command procedure that shuts down Data
Protector on this node.
l OMNI$ROOT:[BIN]OMNI$STARTUP_INET.COM This is the command procedure that is used to
start the TCP/IP INET process, which then executes the commands sent by the Cell Manager.
l OMNI$ROOT:[BIN]OMNI$CLI_SETUP.COM This is the command procedure that defines the
symbols needed to invoke the Data Protector CLI. It will only exist on the system if you chose
the CLI option during installation.
Execute this command procedure from the login.com procedures for all users who will use the
CLI interface. Several logical names are defined in this procedure which are necessary to
execute the CLI commands correctly.
5. Insert the following line in SYS$MANAGER:SYSTARTUP_VMS.COM:
@sys$startup:omni$startup.com
6. Insert the following line in SYS$MANAGER:SYSHUTDWN.COM:
@sys$startup:omni$shutdown.com
7. Ensure that you can connect from the OpenVMS client to all possible TCP/IP aliases for the Cell
Manager.
8. Import the OpenVMS client to the Data Protector cell using the Data Protector graphical user
interface as described in "Importing clients to a cell " on page 190.
An account with the name OMNIADMIN gets created during the installation. The OMNI service runs under
this account.
The login directory for this account is OMNI$ROOT:[LOG] and it holds the log file OMNI$STARTUP_
INET.LOG for each startup of a Data Protector component. This log file contains the name of the
process executing the request, the name of Data Protector image used and the options for the request.
Any unexpected errors are logged in the DEBUG.LOG in this directory.
Note: On OpenVMS 8.3 and later, the Data Protector installation displays the following message:
%PCSI-I-CANNOTVAL, cannot validate [PATH]HP-AXPVMS-DP-A0800
-XXX-1.PCSI;1 -PCSI-I-NOTSIGNED, product kit
Installation Guide
Chapter 3: Installing Data Protector clients
HPE Data Protector (9.07) Page 88 of 426](https://image.slidesharecdn.com/hpemandp9-160823082229/85/Hpe-Data-Protector-installation-guide-88-320.jpg)
![is not signed and therefore has no manifest file
To avoid the warning being issued, run the product install command using /OPTION=NOVALIDATE_
KIT.
Installation in a cluster environment
If you use a common system disk, the client software needs to be installed only once. However, the
OMNI$STARTUP.COM procedure needs to be executed for each node to be usable as a Data Protector
client. If you do not use a common system disk the client software needs to be installed on each client.
If you use a cluster TCP/IP alias name, you can define a client for the alias name as well if you are
using a cluster common system disk. With the alias client defined you do not have to configure the
individual client nodes. You can choose either client definition or alias definition to run your backups
and restores in a cluster. Depending on your configuration, the save or restore may or may not use a
direct path to your tape device or tape library.
Disk Agent configuration
The Data Protector Disk Agent on OpenVMS supports mounted FILES-11 ODS-2 and ODS-5 disk
volumes. There is no need to configure the OpenVMS Disk Agent. There are, however, some points to
bear in mind when setting up a backup specification that will use it. These are described below:
l The file specifications entered into the GUI or passed to the CLI must be in UNIX style syntax, for
instance:
/disk/directory1/directory2/.../filename.ext.n
l The string must begin with a slash, followed by the disk, directories and filename, separated by
slashes.
l Do not place a colon after the disk name.
l A period should be used before the version number instead of a semi-colon.
l File specifications for OpenVMS files are case-insensitive, except for the files residing on ODS-5
disks.
Example
An OpenVMS file specification of:
$1$DGA100:[USERS.DOE]LOGIN.COM;1
must be specified to Data Protector in the form:
/$1$DGA100/USERS/DOE/LOGIN.COM.1
Note: There is no implicit version number. You must always specify a version number and only the
file version specified for the backup will be backed up.
For some options which allow wildcards the version number can be replaced with an asterisk '*'.
Installation Guide
Chapter 3: Installing Data Protector clients
HPE Data Protector (9.07) Page 89 of 426](https://image.slidesharecdn.com/hpemandp9-160823082229/85/Hpe-Data-Protector-installation-guide-89-320.jpg)
![on node B using TZ89_B the OpenVMS MSCP server moves the data from node B to the device on
node A.
Note: For MSCP served tape devices in a cluster, for all tape devices connected via an HSx
controller and for all tape devices connected via Fibre Channel, follow the guidelines for SAN
configurations in the HPE Data Protector Help index: “SAN, configuring devices in”.
Command-line interface
Before you can use the Data Protector command-line interface on OpenVMS you must run the CLI
command setup procedure, as follows:
$ @OMNI$ROOT:[BIN]OMNI$CLI_SETUP.COM
For a description of the available CLI commands, see the HPE Data Protector Command Line Interface
Reference.
Oracle integration
After you installed the Oracle integration and configured it as described in the HPE Data Protector
Integration Guide, verify that the -key Oracle8 entry is present in OMNI$ROOT:[CONFIG.CLIENT]
omni_info, for example:
-key oracle8 -desc “Oracle Integration” -nlsset 159 -nlsId 12172 -flags 0x7 -ntpath
““ -uxpath ““ -version 9.00
If the entry is not present, copy it from OMNI$ROOT:[CONFIG.CLIENT]omni_format. Otherwise, the
Oracle integration will not be shown as installed on the OpenVMS client.
Next steps
For information on additional configuration tasks, see the HPE Data Protector Help index: “HP
OpenVMS”.
Remote installation
This section describes the procedure for distributing the Data Protector software to clients using the
Installation Server (remote installation or upgrade).
Distribute the software to clients using the Data Protector user interface. Cross-platform client
installation is supported.
Prerequisites
l For prerequisites and recommendations on the installation, see the section that describes the
installation procedure for that particular client. The references are listed in " Installing Data Protector
client systems " on page 56 and in "Installing integrations" on page 57.
l For the information on supported platforms, Data Protector components, and for disk space
Installation Guide
Chapter 3: Installing Data Protector clients
HPE Data Protector (9.07) Page 91 of 426](https://image.slidesharecdn.com/hpemandp9-160823082229/85/Hpe-Data-Protector-installation-guide-91-320.jpg)


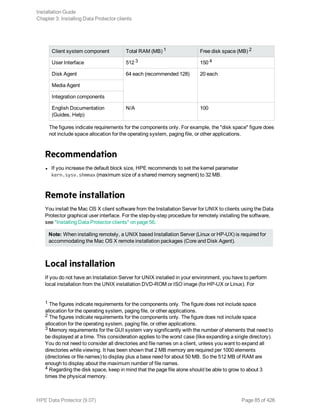
![Prerequisites
l For system requirements, disk space requirements, supported platforms, processors, and Data
Protector components, see the HPE Data Protector Product Announcements, Software Notes, and
References.
l You must have root permissions on every target system.
l A POSIX shell (sh) must be used for the installation.
Note: You can also use the following procedure to upgrade the UNIX clients locally. The script will
detect a previous installation and will prompt you to perform the upgrade.
Installation Procedure
To install UNIX and Mac OS X clients locally
1. Insert and mount the UNIX installation DVD-ROM or ISO image (for HP-UX or Linux).
Note that the DVD-ROM filesystem uses the Rock Ridge extensions.
2. From the MountPoint/LOCAL_INSTALL directory execute the omnisetup.sh command.
The syntax of the command is as follows:
omnisetup.sh [-source directory] [-server name] [-install component_list]
where:
l directory is the location where the installation DVD-ROM or ISO image is mounted. If not
specified, the current directory is used.
l name is a full hostname of the Cell Manager of the cell to which you want to import the client. If
not specified, the client will not be automatically imported to the cell.
Note: In case of upgrading the client that resides on the Cell Manager or Installation
Server, you do not need to specify -install component_list. In this case, the setup will
select the same components that were installed on the system before the upgrade without
issuing a prompt.
l component_list is a comma-separated list of component codes to be installed. No spaces are
allowed. If the -install parameter is not specified, Setup will prompt you separately about
installing each available component on the system.
Note: In case of upgrading the client, the setup will select the same components that were
installed on the system before the upgrade started, without issuing a prompt.
The list of the components is presented in the table below. The exact list of the components is
subject to the availability on the particular system. For the description of the components, see
"Data Protector components" on page 59.
Installation Guide
Chapter 3: Installing Data Protector clients
HPE Data Protector (9.07) Page 100 of 426](https://image.slidesharecdn.com/hpemandp9-160823082229/85/Hpe-Data-Protector-installation-guide-100-320.jpg)
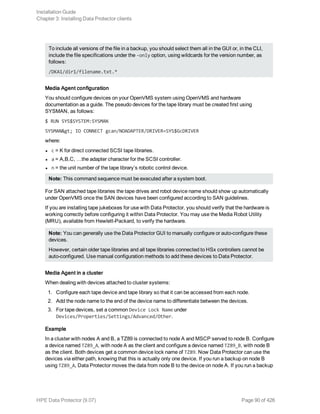
![Component code Component
netapp NetApp Storage Provider
StoreOnceSoftware StoreOnce Software Deduplication
autodr Automatic Disaster Recovery
docs English Documentation (Guides, Help)
Example
The example below shows how you can install the Disk Agent, General Media Agent, User
Interface, and Informix Integration components on a client that will be automatically
imported to the cell with the Cell Managercomputer.company.com:
./omnisetup.sh -server computer.company.com -installda,ma,cc,informix
3. Setup informs you if the installation was completed and if the client was imported to the Data
Protector cell.
The CORE component is installed the first time any software component is selected for installation.
The CORE-INTEG component is installed the first time any integration software component is
selected for installation or reinstallation.
Running the installation from the hard disk
To copy the installation DVD-ROM image to your computer and run the installation or upgrade of UNIX
and Mac OS X clients from the hard disk, copy at least the hpux/DP_DEPOT and the LOCAL_INSTALL
directories.
Note: The Linux depot does not support local installation. You must copy the HP-UX depot, even
on Linux systems.
For example, if you copy installation packages to /var/dp80, the directories must be a subdirectory of
/var/dp62:
# pwd
/var/dp80
# ls
DP_DEPOT
LOCAL_INSTALL
After you have copied this to the hard disk, change to the LOCAL_INSTALL directory and execute the
following command:
omnisetup.sh [-server name] [-install component_list]
For example:
./omnisetup.sh -install da
Installation Guide
Chapter 3: Installing Data Protector clients
HPE Data Protector (9.07) Page 102 of 426](https://image.slidesharecdn.com/hpemandp9-160823082229/85/Hpe-Data-Protector-installation-guide-102-320.jpg)


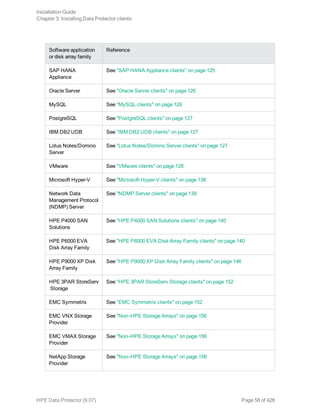
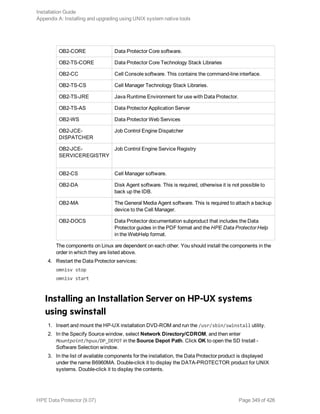
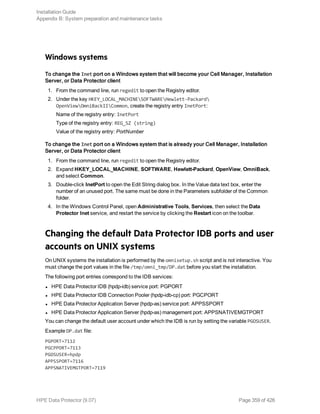
![l SAP HANA Integration
This component enables integrated backup of a complete SAP HANA database and the SAP HANA
redo logs.
l Disk Agent
This component enables non-integrated backup of the SAP HANA configuration files using the Data
Protector filesystem backup functionality. After a disaster, having a backup image of the SAP
HANA configuration files available helps you more easily identify and restore your changes.
In case of a distributed SAP HANA environment, install the above components on each SAP HANA
system that constitutes such environment.
Oracle Server clients
It is assumed that your Oracle Server is up and running.
To be able to back up the Oracle database, you need to select the Oracle Integration component
during the installation procedure.
HP OpenVMS
On HP OpenVMS, after you installed the Oracle integration and configured it as described in the HPE
Data Protector Integration Guide, verify that the -key Oracle8 entry is present in OMNI$ROOT:
[CONFIG.CLIENT]omni_info, for example:
-key oracle8 -desc “Oracle Integration” -nlsset 159 -nlsId 12172 -flags 0x7 -ntpath
““ -uxpath ““ -version 9.07
If the entry is not present, copy it from OMNI$ROOT:[CONFIG.CLIENT]omni_format. Otherwise, the
Oracle integration will not be shown as installed on the OpenVMS client.
MySQL clients
To integrate Data Protector with your MySQL database management system and to be able to back up
the MySQL instances and data, install the following Data Protector components on the MySQL host:
l MySQL Integration
This component enables integrated backup and restore of MySQL databases.
l Disk Agent
This component enables backup of MySQL binary logs as well as restore of binary logs as a
precondition for MySQL database recovery. It can also be used for non-integrated backup of MySQL
data for the purpose of solving problems with the Data Protector client where MySQL is installed.
Installation Guide
Chapter 4: Installing the Data Protector integration clients
HPE Data Protector (9.07) Page 126 of 426](https://image.slidesharecdn.com/hpemandp9-160823082229/85/Hpe-Data-Protector-installation-guide-126-320.jpg)


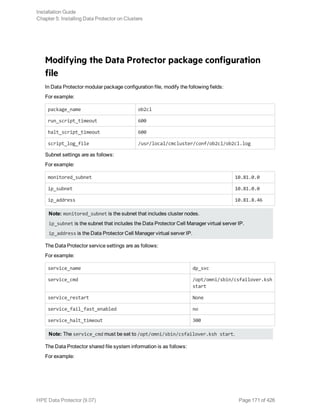
![vg DP
fs_name /dev/DP/vol
fs_directory /DPCLUS
fs_type ext3
fs_mount_opt -o rw
fs_umount_opt ""
fs_fsck_opt ""
In Data Protector legacy package configuration file, modify the following fields:
PACKAGE_NAME
NODE_NAME
RUN_SCRIPT (Is the same as the Data Protector package control file.)
HALT_SCRIPT (Is the same as the Data Protector package control file.)
MONITORED_SUBNET
SERVICE_NAME (You can enter any name but you must use the same name in the control file as well.)
SERVICE_FAIL_FAST_ENABLED
SERVICE_HALT_TIMEOUT
For example:
PACKAGE_NAME ob2cl
NODE_NAME onca
NODE_NAME pardus
RUN_SCRIPT /etc/cmcluster/ob2cl/ob2cl.cntl
HALT_SCRIPT /etc/cmcluster/ob2cl/ob2cl.cntl
MONITORED_SUBNET 10.17.0.0
SERVICE_NAME omni_sv
SERVICE_FAIL_FAST_ENABLED NO
SERVICE_HALT_TIMEOUT 300
Modifying the Data Protector package control file
In the Data Protector legacy package control file, modify the following fields:
VG [n]
Installation Guide
Chapter 5: Installing Data Protector on Clusters
HPE Data Protector (9.07) Page 172 of 426](https://image.slidesharecdn.com/hpemandp9-160823082229/85/Hpe-Data-Protector-installation-guide-172-320.jpg)
![LV [n]
FS [n]
FS_MOUNT_OPT [n]
IP
SUBNET
SERVICE_NAME (Is the same as used in the configuration file.)
SERVICE_CMD (Must be: /opt/omni/sbin/csfailover.ksh start)
For example:
VG[0] vg_dp
LV[0] /dev/vg_dp/dp_share
FS[0] /DP_SHARE
FS_MOUNT_OPT[0] -o rw
FS_TYPE[0] vxfs
IP[0] 10.17.17.69
SUBNET[0] 10.17.0.0
SERVICE_NAME[0] omni_sv
SERVICE_CMD[0] /opt/omni/sbin/csfailover.ksh
start
Installing Data Protector on a Symantec Veritas
Cluster Server
Data Protector supports Symantec Veritas Cluster Server (VCS) for Linux. For details on supported
operating system versions, see the latest Data Protector Platform and Integration Support Matrix.
Note: If you have configured the Data Protector service group IP, use this IP for licensing. If you
have configured the Data Protector service group without the IP address, use the Veritas Cluster
IP for licensing.
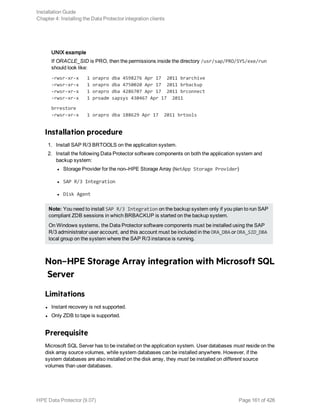
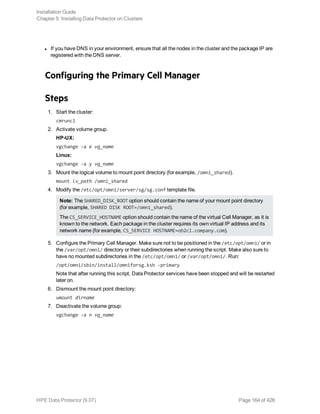
Configuration phases
1. Configuring the Primary Cell Manager
2. Configuring the Secondary Cell Manager
3. Configuring the Cell Manager Cluster Service Group
Installation Guide
Chapter 5: Installing Data Protector on Clusters
HPE Data Protector (9.07) Page 173 of 426](https://image.slidesharecdn.com/hpemandp9-160823082229/85/Hpe-Data-Protector-installation-guide-173-320.jpg)
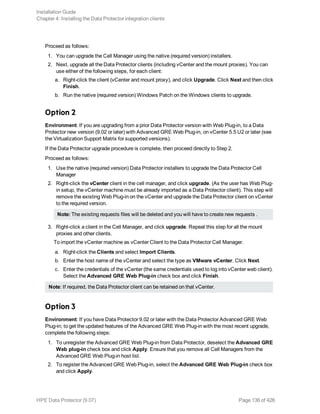
![Chapter 6: Maintaining the installation
This chapter describes the procedures most frequently performed to modify the configuration of your backup
environment. The following sections provide information about:
l How and when to use maintenance mode
l How to import clients to a cell using the graphical user interface
l How to import an Installation Server to a cell using the graphical user interface
l How to import clusters/virtual servers using the graphical user interface
l How to export clients using the graphical user interface
l How to ensure security using the graphical user interface
l How to configure LDAP for user authentication in Data Protector
l How and when to use the Certificate Generation Utility
l How to manage Data Protector patch bundles and identify the installed Data Protector patches
l How to uninstall Data Protector software
l How to add or remove Data Protector software components
Data Protector maintenance mode
Maintenance tasks on Cell Manager, during which the write operations to the Internal Database should be
prevented, require Data Protector to enter maintenance mode. Such tasks include upgrading the Data
Protector installation, installing patches and critical fixes, upgrading hardware or the operating system.
Maintenance mode is required only for certain procedures described in this chapter, but is as well applicable
for tasks described elsewhere throughout the documentation.
The process of entering maintenance mode automatically initiates a series of tasks, such as stopping the
scheduler, renaming the backup specification directories, aborting the running processes and freeing up
locked resources. Maintenance mode is supported in individual cells, as well as in MoM and cluster
environments.
Initiating maintenance mode
Maintenance mode can be initiated by the users with administrative rights via the command line interface. To
initiate the maintenance mode, execute:
In an individual cell:
omnisv -maintenance [GracefulTime]
In a MoM environment:
omnisv -maintenance -mom
Running sessions are instructed by the Cell Manager to stop all at once, while the cells in a MoM environment
enter the maintenance mode one by one.
HPE Data Protector (9.07) Page 188 of 426](https://image.slidesharecdn.com/hpemandp9-160823082229/85/Hpe-Data-Protector-installation-guide-188-320.jpg)
![To customize the way Cell Manager enters the maintenance mode, modify the appropriate global
options. The MaintenanceModeGracefulTime option reflects the seconds given to the Data Protector
services to abort the running sessions, while the MaintenanceModeShutdownTime option reflects the
seconds to wait for the sessions to abort. The default value for both options is 300. If the GracefulTime
option is used, it overrides the MaintenanceModeGracefulTime global option. In case a restore
session is still running after this option is exceeded, maintenance mode initiation fails.
In case any cell in MoM environment fails to enter the maintenance, the mode is reverted.
To check if Data Protector is running in maintenance mode, see the status of CRS service by
executing omnisv -status, or check the GUI status bar. Note that the GUI can only reliably indicate
the maintenance mode when connecting to the Cell Manager, which may sometimes result in the
status bar indicating the maintenance mode even after the Cell Manager has been switched back to
normal mode.
During the maintenance mode, Cell Manager rejects all operations that write data to the Internal
Database, such as creating new devices, backup and restore sessions or their previews, purge, copy
and consolidation sessions.
In cluster environments, only manual cluster related activities can be performed while the maintenance
mode is active, such as shutting down cluster packages, stopping the Data Protector services, or
manual volume mounting.
All read-only IDB operations are allowed while the maintenance mode is active. Data Protector
services are all up and running. Only users with administrative Data Protector user rights can connect
to the cell or MoM while the Cell Manager is in maintenance mode.
Quitting maintenance mode
To quit the maintenance mode on Cell Manager using the CLI, execute:
l In an individual cell:
omnisv -maintenance -stop
l In a MoM environment:
omnisv -maintenance –mom_stop
While in a MoM environment, an individual cell cannot quit the maintenance mode. MoM maintenance
can only be invoked from MoM Server.
To quit maintenance mode using the GUI:
1. In the Context List select Clients.
2. In the Actions menu click Stop Maintenance Mode.
After the normal mode is resumed, you can restart aborted and rejected sessions, as they have been
logged in the maintenance.log file, located at the default Data Protector log files directory.
The following two examples show maintenance.log entries for aborted and rejected sessions:
10.5.2013 10:52:45 OMNISV.2492.9936
["/cli/omnisv/omnisv.c $Rev: 22709 $ $Date:: 2013-03-22 18:00:03":247] X.99.01 b2
Session was aborted - graceful period expired!
session id: 2013/05/10-8
session type: 0
Installation Guide
Chapter 6: Maintaining the installation
HPE Data Protector (9.07) Page 189 of 426](https://image.slidesharecdn.com/hpemandp9-160823082229/85/Hpe-Data-Protector-installation-guide-189-320.jpg)
![datalist: large_backup
start date: 2013-05-10 10:52:45
owned by: JOHN.JOHNSON@company.com
10.5.2013 10:48:45 CRS.7620.3308 ["/cs/mcrs/sessions.c $Rev: 22709 $ $Date:: 2013-
03-22 18:00:03":142] X.99.01 b2
CRS is in maintenance mode - session rejected
session id: R-2013/05/10-200
session type: dbsm
session desc: Database
start date: 2013-05-10 10:48:45
owned by: .@ pid=0
Sessions are logged as aborted when they attempted to start while the maintenance mode was active.
To run aborted sessions afterwards:
1. In the Context List, click Internal Database
2. In the Scoping Pane, expand Sessions.
3. Right-click a session, and select Restart Failed Objects from the context menu
Sessions are logged as rejected when they attempted to start while the Cell Manager was entering the
maintenance mode. To run rejected session afterwards, restart each session manually.
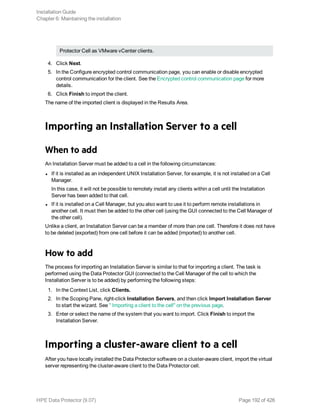
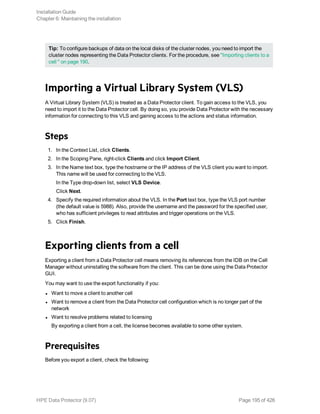
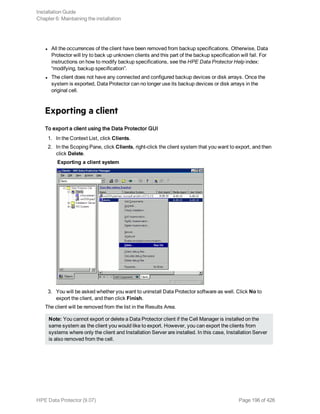
Importing clients to a cell
When you distribute Data Protector software to clients using the Installation Server, the client systems
are automatically added to the cell. As soon as the remote installation has finished, the client becomes
a member of the cell.
Importing means manually adding a system to a cell after the Data Protector software has been
installed. When added to a Data Protector cell, the system becomes a Data Protector client. Once the
system is a member of the cell, information about the new client is written to the IDB, which is located
on the Cell Manager.
When to import
Some of the clients, such as HP OpenVMS and Windows XP Home Edition, that were installed locally
from the installation DVD-ROM or ISO image must be imported to the cell after the installation.
A client can only be a member of one cell. If you wish to move a client to a different cell, you first export
it from its current cell and then import it to the new cell. For the procedure on how to export clients, see
"Exporting clients from a cell" on page 195.
After you have installed Data Protector clients and imported them to a cell, it is highly recommended to
protect the clients from access by unwanted cell authorities. See "Securing clients" on page 199.
Installation Guide
Chapter 6: Maintaining the installation
HPE Data Protector (9.07) Page 190 of 426](https://image.slidesharecdn.com/hpemandp9-160823082229/85/Hpe-Data-Protector-installation-guide-190-320.jpg)
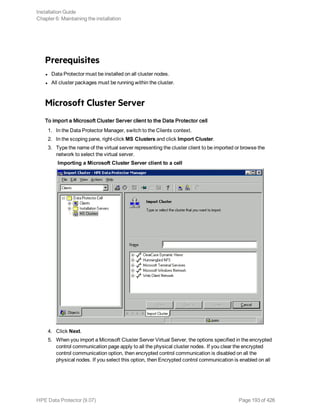

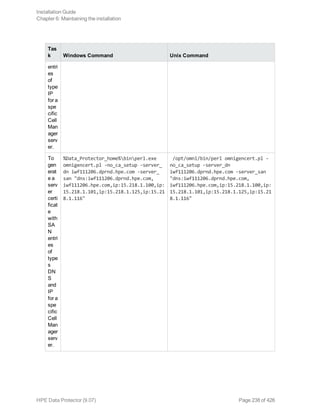
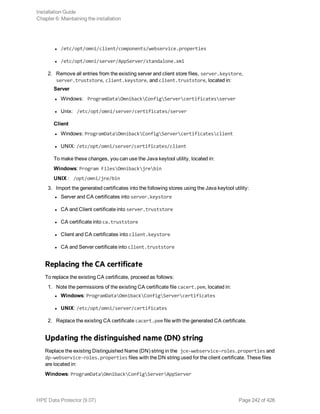
![1. Get the CA certificate for MoM server.
a. On the MoM server, open the MoM server trusted certificates file Data_Protector_program_
data/config/client/config and find the line trusted_certificates_file=
For example, trusted_certificates_
file='C:ProgramDataOmniBackconfigclientcertificates<CMhostname>_
cacert.pem';
b. Open the file clientcertificates<CMhostname>_cacert.pem' file in a text editor (unless
it has been modified, the standard file name format is <CMhostname>_cacert.pem ) and copy
its contents (MoM server CA certificate).
2. Get the CA certificate for server1.
a. On server 1 open the server 1 trusted certificates file Data_Protector_program_
data/config/client/config and find the line trusted_certificates_file=
For example, trusted_certificates_
file='C:ProgramDataOmniBackconfigclientcertificates<CMhostname>_
cacert.pem'
b. Open the file clientcertificates<CMhostname>_cacert.pem' file in a text editor (unless
it has been modified, the standard file name format is <CMhostname>_cacert.pem ) and copy
its contents (server 1 CA certificate).
3. Edit both trusted certificate files ‘<CMhostname>_cacert.pem' to include all the certificates that
exist on each server that needs to be trusted. In this example, the MoM Server and Server1 need
to establish trust with each other.
a. On the MoM server, open the MoM server trusted certificates file and include the server 1 CA
certificate to the file.
b. On server 1, open the server 1 trusted certificates file and include the MoM server CA
certificate to the file.
4. If there are more servers (server 2) and so on. Repeat steps 2 and 3 for every server, to be added
to the MoM environment.
The Cell Manager trusted certificate file is initially a copy of Data_Protector_program_
data/config/server/certificates/<CMhostname>_cacert.pem
To enable encrypted control communication, in the MoM environment run omnicc -encryption -
enable_mom{CSHostname1 [CSHostName2...] |-all} [-recreate_cert]
For more details, see the omnicc command in the HPE Data Protector Command Line Interface
Reference.
Enabling encrypted control communication for all clients in the cell, using the GUI:
1. In the Context List, click Clients.
2. In the Scoping Pane, expand Data Protector Cell and then Clients. All clients are displayed.
3. Right-click the client that you want to modify and select Enable encrypted control
communication. In case of multiple clients, select one or more clients for which you want to
enable encrypted control communication.
Note: If you select enable encrypted communication option for a client whose Cell Manager is
not yet encrypted, you are prompted with a message “You can change encrypted
Installation Guide
Chapter 6: Maintaining the installation
HPE Data Protector (9.07) Page 209 of 426](https://image.slidesharecdn.com/hpemandp9-160823082229/85/Hpe-Data-Protector-installation-guide-209-320.jpg)
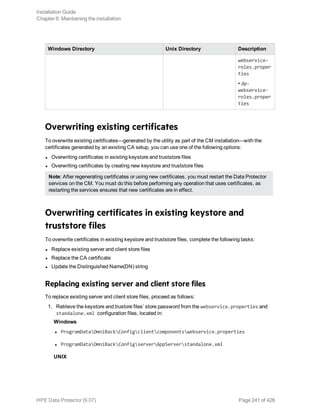
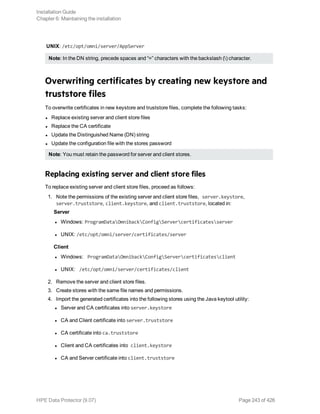
![l It is recommended to use the generated keys and certificates instead of the HPE Data Protector
certificate hpdpcert.pem.
l Remote clients must consider the manual steps for distribution of certificates and keys, instead
of enabling encrypted control communication from the Data Protector GUI or CLI.
l Restart the StoreOnce Software service after replacing certificates.
Encrypted control communication with user-created certificates
This section is applicable for users who want to generate the certificates themselves.
Encrypted control communication with certificates created manually
The earlier versions of Data Protector did not create certificates automatically, you had to create the
certificates and point Data Protector to the certificate files.
If you generate the certificates manually, then you have to place the certificates in the following
certificates directory on the Cell Manager :
Windows: Data_Protector_program_dataOmnibackConfigServercertificates ;
UNIX: /etc/opt/omni/server/certificates directory.
In addition, the certificates have to comply with the following naming convention.
<computer.company.com>_cert.pem for the certificate
<computer.company.com >_key.pem for the private key
<CellManager.company.com>_cacert.pem for the trusted certificate
When you enable encryption (while adding / importing / editing properties of a client or a Cell Manager),
these certificates are used by Data Protector. When encryption is enabled, ensure that you select the
Use existing certificates option from the Data Protector GUI otherwise the existing certificates will
get overwritten.
Note that you can also generate the certificates to be used for encrypted control communication, using
the script omnigencert.pl and then select Use existing certificates option from the Data Protector
GUI. This enables faster encryption of the clients.
To create the certificates for encrypted control communication use the script omnigencert.pl, and
run:
omnigencert.pl -pem_client -user_id <computer.company.com> [-recreate]
The -recreate option overwrites the existing certificates, if they exist.
Note: The omnigencert.pl script can also be used for generating certificates for other purposes.
Encrypted control communication with certificates created automatically
If you need to generate certificates automatically, and as per your specification, then you can create a
Perl script file gencert.pl and place it in the following location:
ws: %Data_Protector_home%bin
UNIX:/opt/omni/lbin
Installation Guide
Chapter 6: Maintaining the installation
HPE Data Protector (9.07) Page 213 of 426](https://image.slidesharecdn.com/hpemandp9-160823082229/85/Hpe-Data-Protector-installation-guide-213-320.jpg)
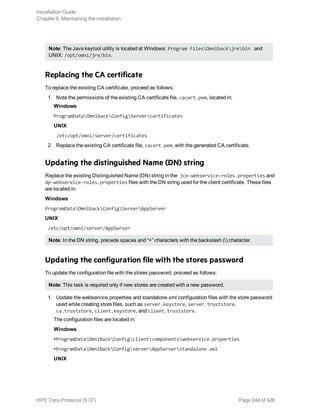
![Data Protector starts using the gencert.pl instead of the omnigencert.pl script after it is added to
the specified folder. You can enable encryption using the Data Protector GUI or CLI. This gencert.pl
script must comply with the following certificate naming conventions:
<computer.company.com>_cert.pem for the certificate
<computer.company.com >_key.pem for the private key
<CellManager.company.com>_cacert.pem for the trusted certificate
The gencert.pl script should be able to accept the following parameters:
gencert.pl-pem_client -user_id <computer.company.com> [-recreate]
Replacing CA certificates in an encrypted control communication environment
It is possible to replace certificates with the ones signed by a different CA. If you need to replace the
CA and the certificates in the cell you must perform the following steps:
1. Concatenate the CA certificates:
Copy the new CA certificate to the following path:
l Windows - Data_Protector_program_dataOmnibackConfigServercertificates and
l UNIX - /etc/opt/omni/server/certificates
To update all the clients in the cell to also trust this new CA, run the following command:
omnicc -encryption -update_trust -all -trust newCA.pem
2. Recreate the certificates:
You can recreate the certificates either manually or use Data Protector to trigger certificate
generation. Data Protector triggers omnigencert.pl or gencert.pl (if it exists) for creating
certificates when you run the following command:
omnicc –encryption –enable –all –recreate_cert
3. Update the clients to trust only the new CA:
omnicc -encryption -update_trust -all -trust newCA.pem –replace
Selecting TLS version
To configure the TLS versions, execute the following omnicc command:
omnicc -encryption -encr_param <hosts> -tls_min <min_ver> -tls_max <max_ver>
This command specifies both minimum and maximum versions of TLS. The default range after the
installation is TLSv1 to TLSv1.1.
By default, Data Protector uses TLSv1.1 for Encrypted Control Communication. TLSv1 is the default
minimum version supported to support communication with previous versions of Data Protector
binaries. Binaries prior to version 9.07 supported only TLSv1.
When setting the range of minimum and maximum TLS versions, ensure that a common version is
available for all the pairs of systems and Data Protector processes that communicate. If there is no
overlap between the two clients, then the connection between them cannot be established.
Installation Guide
Chapter 6: Maintaining the installation
HPE Data Protector (9.07) Page 214 of 426](https://image.slidesharecdn.com/hpemandp9-160823082229/85/Hpe-Data-Protector-installation-guide-214-320.jpg)
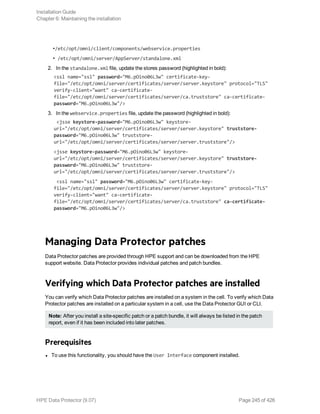
![The maximum version of TLS is TLS1.2. To enable TLS1.2 for a host, use the following command:
omnicc -encyption -encr_param <hostname> -tls_max TLS1.2
Note: The file hpdpcert.pem is not suitable for TLS1.2 version.
When using the hpdpcert.pem or similar short certificate, update the encryption before setting TLS1.2.
It is recommended to switch to the Data Protector generated certificates. This can be done by disabling
the old encrypted control communication and enabling it again. This causes the certificates to be newly
generated by Data Protector.
The <ssl /> element with protocol attribute defines the allowed versions of TLS protocol. The default
value is comma-separated list of three versions:
protocol = TLSv1,TLSv1.1,TLSv1.2
For Windows:
c:ProgramDataOmniBackConfigServerAppServerstandalone.xml
For Linux:
/etc/opt/omni/server/AppServer/standalone.xml
Disabling encrypted control communication
You can disable encrypted control communication:
l In a cell: This includes the Cell Manager and clients
l In a MoM environment: This includes all Cell Managers in a MoM environment.
Note: You can change encrypted communication configuration only from a client with encrypted
communication enabled or from the Cell Manager.
Disabling encrypted control communication, using the CLI:
l In a cell, run: omnicc -encryption -disable -all
l In a MoM environment, run: omnicc -encryption -disable_mom -all
l On a specific client, run: omnicc -encryption -disable <client_name>
l On multiple clients, run: omnicc -encryption -disable{Hostname1 [HostName2 ...] | -all}
For more details, see the omnicc man page or the HPE Data Protector Command Line Interface
Reference.
Disabling encrypted control communication for multiple clients, using the GUI:
1. In the Clients context, select a client or multiple clients.
2. Right-click the selection and select Disable Encrypted Communication.
The Disable encrypted control communication page appears. All the clients are selected.
3. Click Finish to disable encrypted control communication for the clients.
Installation Guide
Chapter 6: Maintaining the installation
HPE Data Protector (9.07) Page 215 of 426](https://image.slidesharecdn.com/hpemandp9-160823082229/85/Hpe-Data-Protector-installation-guide-215-320.jpg)
![Option 1
Remove the encryption from the entire cell and enable encryption in the cell in the new way
(recommended). See Enabling encrypted control communication.
Option 2
Keep the existing certificates on the clients and maintain the environment using the omnicc command:
omnicc -encryption -enable {Hostname1 [HostName2 ...] | -all} [-cert Cert [-key
Key]] [-trust TrustedCerts]
In this method, it is not possible to configure encrypted control communication using the GUI. Also, the
clients will not be encrypted automatically after import. You can encrypt the clients after importing them
using the CLI.
For details, see the omnicc man page or the HPE Data Protector Command Line Interface Reference.
Note: With the earlier method of enabling encrypted control communication, if certificates were not
specified, then using the command line omnicc -encryption -enable defaulted to
hpdpcert.pem. With the new approach, the default mechanism is for Data Protector to generate
the certificates. To enable encrypted control communication with hpdpcert.pem, the certificate
has to be specified: omnicc -encryption -enable <host> -cert hpdpcert.pem -key
hpdpcert.pem -trust hpdpcert.pem
What happens
Encrypted control communication is enabled on a per-client basis, which means that encryption control
communication is either enabled or disabled for all control communication with the selected client.
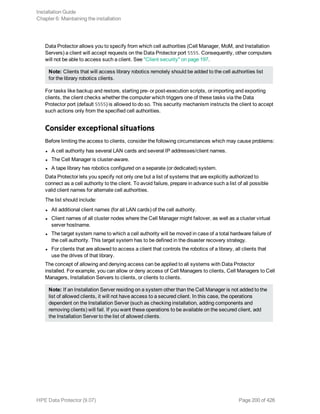
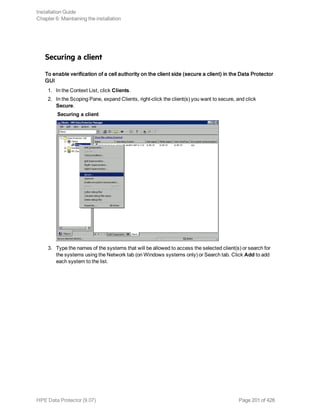
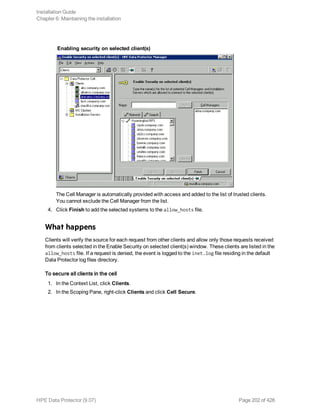
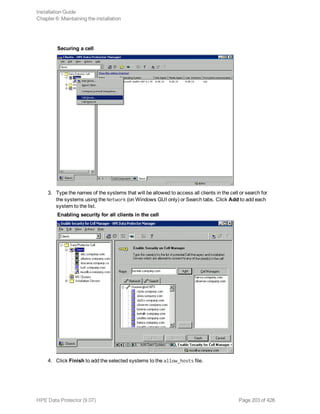
How to add a client to the Security Exceptions list
Clients that for some reason are not supposed to communicate confidentially can be placed in a Cell
Manager exception list, which allows particular clients to communicate in non-encrypted mode.
To add a client to the Security Exceptions list
1. In the Context List, click Clients.
2. In the Scoping Pane, expand Data Protector Cell and then Clients. All clients are displayed.
3. Click the Cell Manager that you want to modify.
4. Type the names of the systems that will be will be added to the Security Exceptions list in the cell
or search for systems using the Network (on Windows GUI only) or Search tabs.
5. Click Add to add systems to the list, then click Apply to save the changes.
The server configuration file
The clients that are accepted in a plain text mode are written to the server configuration file,
located on the Cell Manager in the directory:
Windows systems:Data_Protector_program_dataConfigserverconfig
HP-UX and Linux systems:/etc/opt/omni/server/config
Installation Guide
Chapter 6: Maintaining the installation
HPE Data Protector (9.07) Page 218 of 426](https://image.slidesharecdn.com/hpemandp9-160823082229/85/Hpe-Data-Protector-installation-guide-218-320.jpg)

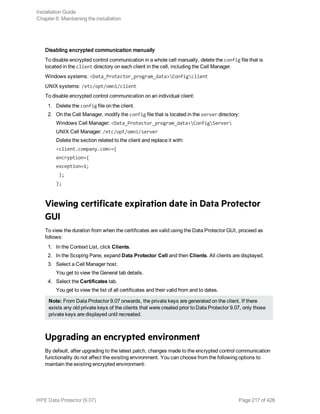
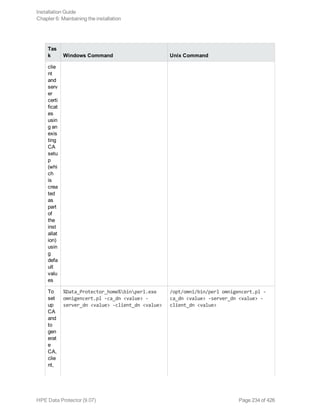
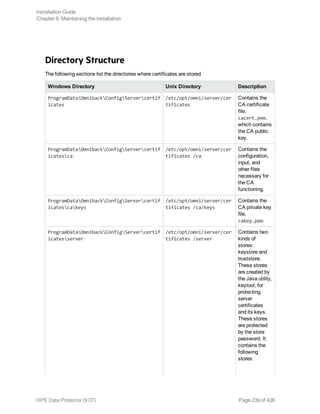
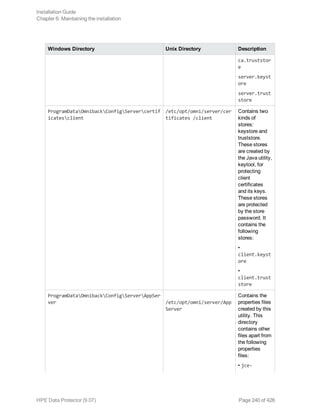
![Certificate Generation Utility
The X.509 certificate generation utility—omnigencert.pl—generates the Certificate Authority (CA),
server, and client certificates. It is responsible for the following tasks:
l Setting up a single-level root CA
l Generating CA, server, and client certificates
l Creating the necessary directory structure for storing keys, certificates, configuration, and keystore
files
l Storing the generated certificates in predefined locations on the CM
l Generating the properties files of web service roles
Note: The omnigencert.pl utility can be run only by the Administrator user (Windows) or the root
user (UNIX).
The omnigencert.pl utility is developed as a script and gets installed along with the Cell Manager
(CM) installation kit. As part of the CM installation, the script is run for the first time, and the certificates
are generated and stored in predefined locations.
The omnigencert.pl script exists in the following location:
Windows: %Data_Protector_home%bin
Unix:/opt/omni/sbin
If required, the Data Protector administrators can run this utility any time after the installation to
regenerate certificates using the new keys pair or the new CA setup. However, it is not mandatory to
use the certificates generated by this utility for the certificate-based authentication. Instead, you can
use an existing CA setup for generating the necessary certificates.
Syntax
This utility is executed initially by the installer as part of Cell Manager installation and the necessary
certificates are generated and stored at predefined locations.
The use of this utility is restricted to administrators and is also used to regenerate certificates using
new keys pair even including new CA setup. The ‘Administrator’ user on Windows platform and ‘root’
user on UNIX platform can execute this script.
The omnigencert.pl script exists in the following location:
Windows: %Data_Protector_home%bin
Unix: /opt/omni/sbin
You can run the omnigencert.pl utility using the following syntax and options:
Usage
[-no_ca_setup]
[-server_id ServerIdentityName]
Installation Guide
Chapter 6: Maintaining the installation
HPE Data Protector (9.07) Page 228 of 426](https://image.slidesharecdn.com/hpemandp9-160823082229/85/Hpe-Data-Protector-installation-guide-228-320.jpg)
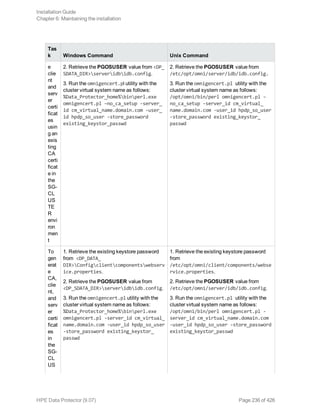
![[-user_ID UserIdentityName]
[-store_password KeystorePassword]
[-cert_expire CertificateExpireInDays]
[-ca_dn CertificateAuthorityDistinguishedName]
[-server_dn ServerDistinguishedName]
[-client_dn ClientDistinguishedName]
[-server_san]
The omnigencert.pl utility supports multiple options, which provide flexibility while generating
certificates. If no options are specified, the utility uses default values for generating the certificates.
The omnigencert.pl utility supports the following options:
Option Description
-no_ca_setup Generates the client and server certificates for an
existing CA setup. This option is invalid if a CA
setup does not exist.
-server_id Specifies the value for the Common Name (CN)
entity in the Distinguished Name (DN) section of
the server certificate. The default value for this
option is the CM Fully Qualified Domain Name
(FQDN).
-user_id Specifies the value for the CN entity in the DN
section of the client certificate. The default value
for this option is WebService User.
-store_password Defines the password for the keystore or
truststore, where the server and client certificates,
including their keys, are stored. If this option is not
provided, the default password is used for creating
stores.
-cert_expire Defines the expiry of the generated certificate in
days. The default value for this option is 8760 days
(24 years).
-ca_dn Defines the DN string for the CA. The DN format is
as follows: “CN=<value>, O=<value>,
ST=<value>, C=<value>” CN = Common Name,
O=Organization Name, ST=Sate Name,
C=Country Name. The default values for the O,
ST, and C parameters are as follows: CN = CA
<FDQN name of CM server> O = HEWLETT-
PACKARD ST = CA C= US
Installation Guide
Chapter 6: Maintaining the installation
HPE Data Protector (9.07) Page 229 of 426](https://image.slidesharecdn.com/hpemandp9-160823082229/85/Hpe-Data-Protector-installation-guide-229-320.jpg)

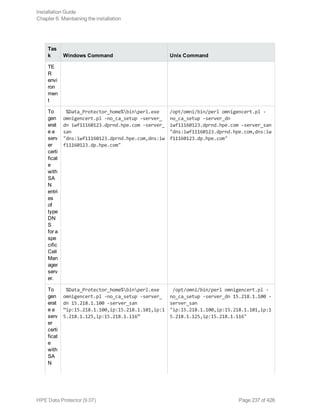


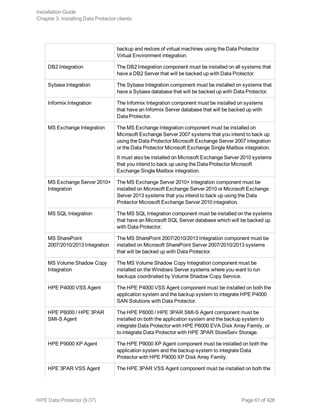
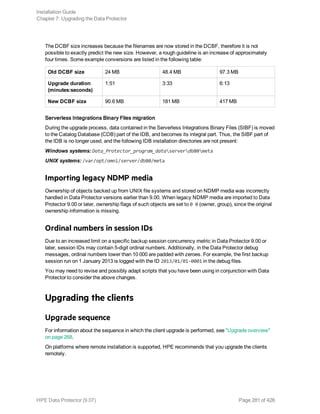
![Migrating the Detail Catalog Binary Files (DCBF)
After the upgrade, Data Protector is fully operational. However, all objects whose catalogs are still
protected and were backed up prior to the upgrade still have their catalogs stored in the old format.
When catalogs expire, the old DC Binary Files are automatically deleted (through daily maintenance
tasks). Old database files are however kept as long as there are any filenames in any of the old
catalogs files which are protected and continue to occupy disk space.
Data Protector helps you to identify the protected media, objects, and sessions that still need the old
DC Binary Files and IDB files, and the amount of space they occupy, and writes a report (warning) to
the Event log. You can also execute the report manually from the CLI:
omnimigrate.pl -report_old_catalog [media | sessions | objects]
Catalogs for permanently protected objects, media, and sessions will not expire and must be migrated
manually.
Tip: The migration process can take a significant amount of time. Therefore, HPE recommends
that you wait until most of your old media expire and you trigger the migration only for permanently
protected media.
To migrate the catalog files, execute:
omnimigrate.pl -start_catalog_migration
Note: Once the full catalog migration is done (after there are no old catalogs), change the global
variable SupportOldDCBF to 0.
For the conversion duration and space requirement estimates, see "IDB conversion duration and
changes in IDB size and structure" below.
After you finish the upgrade, back up the IDB. The old IDB backups cannot be used with Data Protector
9.00 and later.
IDB conversion duration and changes in IDB size and structure
During the upgrade process, the IDB is converted to the new format. The conversion duration depends
on the size and complexity of the existing database as well as on the performance of your hardware.
Note that the examples given below may differ in your environment.
IDB size after IDB migration
The size of the new IDB depends on the size of the original IDB and its structure; therefore it is not
possible to exactly predict the new size. During tests, 1 GB tended to be sufficient for medium sized
databases. The installation will check for an additional 1 GB of available space and display a warning if
this space is not available. If you are migrating large databases, you will likely need more free space.
Detailed Catalog Binary Files migration
The DCBF format is changed and the DCBFs now contain the file version information. Additionally, the
space requirements for the new DCBFs change as well.
Installation Guide
Chapter 7: Upgrading the Data Protector
HPE Data Protector (9.07) Page 280 of 426](https://image.slidesharecdn.com/hpemandp9-160823082229/85/Hpe-Data-Protector-installation-guide-280-320.jpg)

![i. Select Restore to original location.
Note: Ensure that the Restore configuration files option is checked.
ii. Select Keep most recent from the File conflict handling list.
On UNIX system:
See "IDB restore fails at the end of a restore process" on page 298
c. Click Restore to start the restore of the IDB.
During restore, you might see the following error message along with few others; which can be
ignored:
[Major] From: OB2BAR_POSTGRES_BAR@mrou77.usa.hp.com "DPIDB" Time: 10/9/2014
10:35:29 PM The OS reported error while accessing
C:/ProgramData/OmniBack/config/server/certificates: [80] The file exists.
d. When the restore has completed, stop and start the Data Protector services.
omnisrv -stop
omnisrv -start
Note: If you encounter any issues after completing the IDB restore session, see Troubleshooting.
Post Restore Tasks
Perform the following post-restore tasks.
1. Run omnidbutil -show_db_files to ensure that the restored files exist in the directory created in
Step 3 of "Importing the IDB" on the previous page.
2. Add the NEW_SERVER as the Cell Manager. See "Adding the NEW_SERVER as the Cell
Manager" below
3. Optionally, change the Cell Manager name in the IDB. See "Changing the Cell Manager Name in
the IDB" on the next page.
4. Run omnidbcheck -extended to verify the consistency of the restored IDB. See "Running an
extended database consistency check " on page 292.
Adding the NEW_SERVER as the Cell Manager
To add the NEW_SERVER as the Cell Manager
1. In the Data Protector GUI Context List, click Clients.
2. Delete the OLD_SERVER item.
3. Import the NEW_SERVER and ensure that it is shown as the Cell Manager.
If the steps above do not work
1. In a text editor, open the cell_info file that you saved in "Preparing for migration" on page 291.
2. Copy the line containing the host name of the NEW_SERVER to your paste buffer.
Installation Guide
Chapter 7: Upgrading the Data Protector
HPE Data Protector (9.07) Page 294 of 426](https://image.slidesharecdn.com/hpemandp9-160823082229/85/Hpe-Data-Protector-installation-guide-294-320.jpg)
![3. Edit the cell_info file.
a. Add the entry for the NEW_SERVER from your paste buffer.
b. Remove the entry for the OLD_SERVER and save the cell_info file.
4. Restart the GUI.
Changing the Cell Manager Name in the IDB
If the NEW_SERVER has a different host name than the OLD_SERVER, you must change the Cell
Manager name in the IDB.
For example, the OLD_SERVER name is oldcm.company.com and the NEW_SERVER name is
newcm.company.com.
On the NEW_SERVER
1. Run omnidbutil -show_cell_name to display which Cell Manager owns the IDB.
For example
> omnidbutil -show_cell_name
Catalog database owner: "oldcm.company.com"
2. Run -change_cell_name OldHost to change the ownership of the IDB to the NEW_SERVER.
For example
> omnidbutil -change_cell_name oldcm.company.com
This action will change ownership of libraries, devices, media pools and media.
Are you sure [y/n]? y
DONE!
Next Steps
1. Migrate your clients to the NEW_SERVER by running the omnicc command.
Run the omnicc -update_all -force_cs command to update the version and installed
components information in the NEW_SERVER cell_info configuration file for all clients in the cell.
For a description of the omnicc commands, see the HPE Data Protector Command Line Interface
Reference.
2. Create a new IDB backup specification for the NEW_SERVER because the original one is
configured to use the OLD_SERVER.
For more information, see the HPE Data Protector Help.
3. Navigate to the Internal Database and check, if any sessions are in running state. If any, run the
omnidbutil -clear command.
4. Stop and start the Data Protector services.
omnisrv -stop
omnisrv -start
Installation Guide
Chapter 7: Upgrading the Data Protector
HPE Data Protector (9.07) Page 295 of 426](https://image.slidesharecdn.com/hpemandp9-160823082229/85/Hpe-Data-Protector-installation-guide-295-320.jpg)

![Problem
During an IDB backup, the IDB cannot be put into backup mode and fails
During an IDB backup, the Session Messages display an error:
[Critical] From: OB2BAR_POSTGRES_BAR@oldcm.company.com "DPIDB" Time: 10/10/2014
12:19:51 PM
Putting the Internal Database into the backup mode failed
Action
1. Navigate to C:ProgramDataOmniBackConfigServeridb and made a copy of the
idb.config file as a backup.
2. In a text editor, open the idb.config file and search for PGOSUSER.
For example
PGOSUSER='OLD_SERVERAdministrator';
3. If the server name is not correct, edit it to the NEW_SERVER name.
For example
PGOSUSER='NEW_SERVERAdministrator';
4. Stop and start the Data Protector services.
omnisrv -stop
omnisrv -start
5. Attempt the IDB backup again.
Problem
IDB restore fails at the end of a restore process
IDB restore fails at the end of restore process with the message:
cannot execute omnidbutil -clear command
Action
This could happen under the following circumstances in a HP-UX cell manager: When restoring to a
different cell manager or on the same cell manager, but postgres passwords have changed after the
backup session was restored or after a fresh cell manager installation.
Note: In a Linux environment, restore will complete successfully. This is because Linux mostly
uses Operating System authentication on databases in contrast to HP-UX, which uses password
authorization and in this case passwords files are not restored correctly. However, the workaround
should be applied in the Linux environment too, to have the correct password files.
1. Restore only the configuration files to another location <restore-conf> up to the point in time you
are planning to restore the whole IDB.
Installation Guide
Chapter 7: Upgrading the Data Protector
HPE Data Protector (9.07) Page 298 of 426](https://image.slidesharecdn.com/hpemandp9-160823082229/85/Hpe-Data-Protector-installation-guide-298-320.jpg)
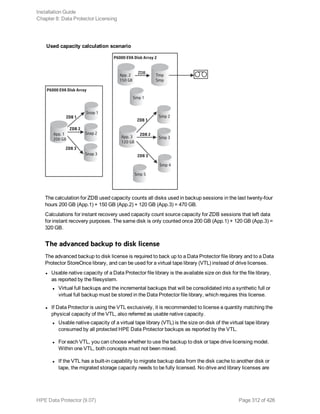
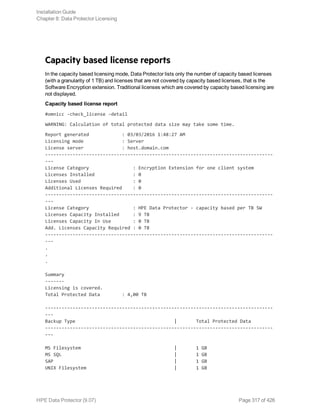
![-----------------------------------------------------------------------------------
The Total Protected Data is defined as the aggregate amount of data being backed up from all systems.
The Total Protected Data for each system is measured as the sum of the following:
l Sum of the largest full backup of each object for the file system (including synthetic backups) and
virtual environment backups.
l Sum of the largest full backup of each data set for each of the application integration backups.
Note: The unique object for each of the file systems and virtual environments is the actual object
created at the time of backup. The actual object can be either: mount point, virtual machine, or
virtual machine’s disk.
The unique data set for each of the application integrations is identified differently, usually this is
the database instance or server name.
Limitations
l When backing up the same data with multiple different agents, the backup is calculated multiple
times. Few such examples of double calculations are as follows:
l File system backup of database using VSS and application integration agent backup of the same
database.
l Virtual environment integration backup of virtual host and file system agent backup run inside the
virtual machine (host).
Note: It is recommended to backup unique objects to overcome double calculations.
l When the Oracle backup object name format is externally reconfigured, this could result in the
database name not being resolved from the new object names. Such object sizes could be
incorrectly handled while calculating the total protected data.
Note: It is essential for a reconfigured format to still include the Oracle database name defined
as <DBID_*.dbf for correctly adding Oracle objects in the total protected data size calculation.
Producing a license report on demand
To produce a report about licensing related information from the cell, execute:
omnicc -check_licenses [-detail]
If the -detail option is specified, a detailed report is produced. The license checker returns the
following information for every license in the cell: license name, licenses installed, licenses used, the
total TB of data under protection, and additional licenses (capacity) required.
If the -detail option is not specified, the command returns information on whether the Data Protector
licensing is covered or not. The following information is returned: the time when the report was
generated, the licensing mode, the license server and the total TB of data under protection.
Installation Guide
Chapter 8: Data Protector Licensing
HPE Data Protector (9.07) Page 318 of 426](https://image.slidesharecdn.com/hpemandp9-160823082229/85/Hpe-Data-Protector-installation-guide-318-320.jpg)


![Verifying DNS connections within Data
Protector cell
DNS (Domain Name System) is a name service for TCP/IP hosts. The DNS is configured with a list of
host names and IP addresses, enabling users to specify remote systems by host names rather than by
IP addresses. DNS ensures proper communication among the members of the Data Protector cell.
If DNS is not configured properly, name resolution problems may occur in the Data Protector cell and
the members will not be able communicate with each other.
Data Protector provides the omnicheck command to verify the DNS connections among the members
of the Data Protector cell. Although all possible connections in the cell can be checked with this
command, it is enough to verify the following connections, which are essential in the Data Protector
cell:
l Cell Manager to any other member of the cell and the other way round
l Media Agent to any other member of the cell and the other way round
Using the omnicheck command
Limitations
l The command verifies connections among the cell members only; it does not verify DNS
connections in general.
The synopsis of the omnicheck command is:
omnicheck -dns [-host Client | -full] [-verbose]
You can verify the following DNS connections in the Data Protector cell using different options:
l To check that the Cell Manager and every Media Agent in the cell resolve DNS connections to every
Data Protector client in the cell properly and the other way round, execute:
omnicheck -dns [-verbose]
l To check that a particular Data Protector client resolves DNS connections to every Data Protector
client in the cell properly and the other way round, execute:
omnicheck -dns -host client [-verbose]
where client is the name Data Protector client checked.
l To check all possible DNS connections in the cell, execute:
omnicheck -dns -full [-verbose]
When the [-verbose] option is specified, the command returns all the messages. If this option is not
set (default), only the messages that are the result of failed checks are returned.
For more information, see the omnicheck man page.
Installation Guide
Chapter 9: Troubleshooting installation and upgrade
HPE Data Protector (9.07) Page 328 of 426](https://image.slidesharecdn.com/hpemandp9-160823082229/85/Hpe-Data-Protector-installation-guide-328-320.jpg)

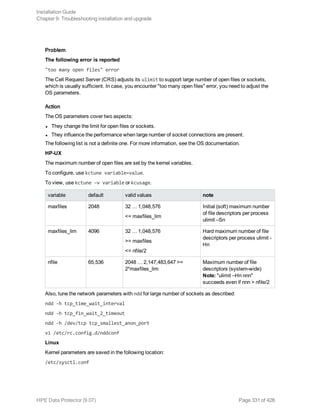
![Access denied to root at to start agent on registered depot /tmp/omni_tmp/packet.
No insert permission on host.
Action
Stop the swagent daemon and restart it by either killing the process and then restarting it by running the
/opt/omni/sbin/swagentd command, or by running the /opt/omni/sbin/swagentd -r command.
Ensure that you have a local host, loopback entry in the hosts file (/etc/hosts).
Problem
Problems with the installation of a Mac OS X client
When adding a Mac OS X client to a Data Protector cell, the com.hp.omni process is not started.
Action
On Mac OS X, launchd is used to start the com.hp.omni process.
To start the service, go to:
cd /usr/omni/newconfig/System/Library/LaunchDaemons
Execute:
launchctl load com.hp.omni
Problem
Inet process cannot be started after installing the UNIX Cell Manager
When starting the Cell Manager, the following error is displayed:
ERROR: Cannot start "omniinet" service, system error: [1053] Unknown error 1053.
Action
Check if the inetd or xinetd service is running:
HP-UX systems: ps -ef | grep inetd
Linux systems: ps -ef | grep xinetd
To start the service, execute:
HP-UX systems: /usr/sbin/inetd
Linux systems: rcxinetd start
Troubleshooting installation on Red Hat 7
systems
Problem
Installation of Data Protector 9.00 on Red Hat 7 systems fails
Installation Guide
Chapter 9: Troubleshooting installation and upgrade
HPE Data Protector (9.07) Page 333 of 426](https://image.slidesharecdn.com/hpemandp9-160823082229/85/Hpe-Data-Protector-installation-guide-333-320.jpg)
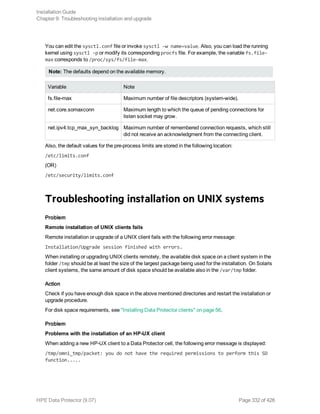
![While installing the Data Protector 9.00 MR Cell Manager, the installation of Cell Server packet fails
with the following output:
Installing OB2-CS packet
Preparing... ################################# [100%]
Updating / installing...
1:OB2-CS-A.09.00-1 ################################# [100%]
NOTE: No Data Protector A.09.00 Internal Database found. Initializing...
Configuring and starting up Internal Database... Done!
Configuring and starting up Internal Database Connection Pool... Done!
Initializing Internal Database version A.09.00... Done!
Configuring and starting up Application Server...
ERROR: Unable to reload Application Server (Return code = 1)
For more detail please refer to /var/opt/omni/server/log/DPIDBsetup_14124.log
warning: %post(OB2-CS-A.09.00-1.x86_64) scriptlet failed, exit status 3
Action
After a failed Data Protector 9.00MR Cell Manager installation, follow these steps to make the Cell
Manager fully operational:
1. Stop all Data Protector services:
omnisv -stop
Note: Ensure that no Data Protector processes are left running by executing: ps –ef | grep
omni command and stop any running processes, if found.
2. Replace the omnigencert.pl script. Perform the following:
l Create temporary folder and change the current path to the created folder:
mkdir /tmp/omni_tmp
cd /tmp/omni_tmp
l Download 9.05 (or newer) Cell Server patch to /tmp/omni_tmp.
l Extract omnigencert.pl script from the Cell Server patch:
rpm2cpio DPLNX_00417.rpm| cpio -id ./opt/omni/sbin/omnigencert.pl
l Replace existing omnigencert.pl with the extracted one:
cp /tmp/omni_tmp/opt/omni/sbin/omnigencert.pl /opt/omni/sbin/
3. Execute IDBSetup.sh:
/opt/omni/sbin/IDBsetup.sh
4. Update /etc/opt/omni/client/omni_info with cs component:
/opt/omni/bin/omnicc -put_component_str cs client/omni_format client/omni_info
A.09.00
Installation Guide
Chapter 9: Troubleshooting installation and upgrade
HPE Data Protector (9.07) Page 334 of 426](https://image.slidesharecdn.com/hpemandp9-160823082229/85/Hpe-Data-Protector-installation-guide-334-320.jpg)
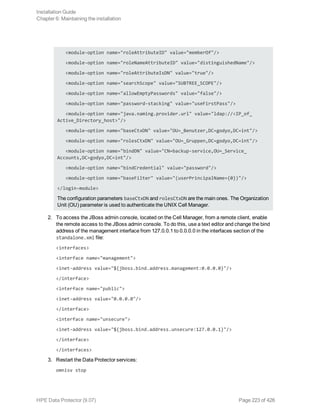
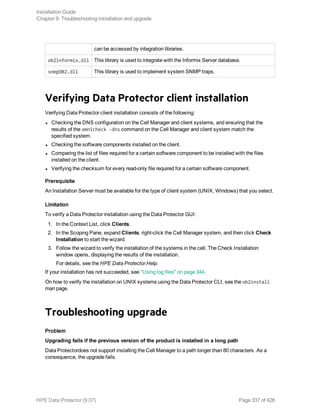
![5. Re-import the Cell Manager host and Installation Server(if installed) to the cell:
omnicc -import_host cm_hostname
omnicc -import_is cm_hostname
6. Continue with the normal procedure for applying the latest patches.
Troubleshooting installation on Windows
systems
Problem
Remote installation of Windows clients fails
Remote installation of a Data Protector client to a Windows system fails and reports the following error
message:
[Normal] Connecting to client computer.company.com...
[Normal] Done.
[Normal] Installing the Data Protector bootstrap service on client
computer.company.com...
[Critical] Cannot connect to the SCM (Service Control Manager) on client
computer.company.com: [5] Access is denied.
Action
1. On the Installation Server system, execute the following command to mark a user account from
the local operating system Administrators user group to be used by the Installation Server during
remote installation:
omniinetpasswd –inst_srv_user User@Domain
Note that the user account must already be added to the local Inet configuration. For details, see
the omniinetpasswd command description in the HPE Data Protector Command Line Interface
Reference.
2. Start remote installation of the Data Protector client once again.
Problem
Remote installation of Windows clients fails (Windows XP)
When a Windows XP system is a member of a workgroup and the Simple File Sharing security policy
setting is turned on, users attempting to access this system through the network are forced to use the
Guest account. During remote installation of a Data Protector client, Data Protector repeatedly asks for
a valid username and password because administrator rights are required for the remote installation.
Action
Turn off Simple File Sharing: in Windows XP, open Windows Explorer or My Computer, click the
Tools menu, click Folder Options, click the View tab, then clear the Use simple file sharing
Installation Guide
Chapter 9: Troubleshooting installation and upgrade
HPE Data Protector (9.07) Page 335 of 426](https://image.slidesharecdn.com/hpemandp9-160823082229/85/Hpe-Data-Protector-installation-guide-335-320.jpg)
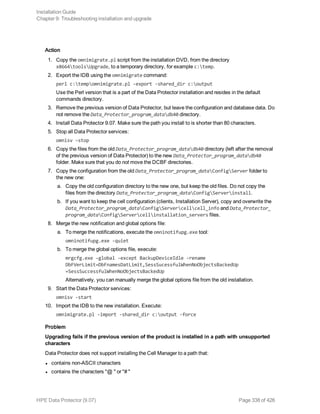
![(Recommended) check box.
The Simple File Sharing policy is ignored:
l when the computer is a member of a domain
l when the Network access: Sharing and security model for local accounts security policy
setting is set to Classic: Local users authenticate as themselves
Problem
Digital signature verification might fail, if Windows 7 or Windows 2008 R2 systems are
disconnected.
Digital signature verification fails with the following error message:
[Critical] <computer.company.com> [70:32] Digital Signature verification of the
install kit failed.
Action
Perform either one of the following:
l Enable internet connection and wait until the proper certificates are imported into the trusted root and
intermediate certificate authorities automatically.
(Or)
l Refer to the following articles to understand how to update the trusted root certificates on
disconnected systems:
https://support.microsoft.com/en-us/kb/3004394
https://support.microsoft.com/en-us/kb/2813430
Problem
When installing a Cell Manager, the Application Server service fails to start
The Application Server service fails to start with the message
Timeout reached before Data Protector Application Server started.
The following error is logged to the installation summary log file:
Caused by: org.jboss.as.cli.
CommandLineException: The controller is not available at localhost:9999
The installation process cannot access various utilities because the PATH system environment
variable does not contain the directory %SystemRoot%system32.
Action
Add the %SystemRoot%system32 directory to the PATH variable.
Note: The following files are placed (depending on the components selected) in the
%SystemRoot%system32 folder on Windows systems:
BrandChgUni.dll This is a resource library. It is used only internally; however, it also contains the
path to registry settings, so it must be located in a well-known location where it
Installation Guide
Chapter 9: Troubleshooting installation and upgrade
HPE Data Protector (9.07) Page 336 of 426](https://image.slidesharecdn.com/hpemandp9-160823082229/85/Hpe-Data-Protector-installation-guide-336-320.jpg)

![Problem
After upgrading to Data Protector 9.07, when you perform a restore operation, a DCBF error message
appears. In the Data Protector GUI, Restore context, when you select an object and try to browse files,
the following message appears:
[12:10907] Invalid format of detail catalog binary file.
However, the omnidbcheck –dc reports NO errors, as the DCBF files are NOT really corrupt. This
happens because of a version mismatch as two files of different versions are read.
Action
Option 1: Go to the Restore Sessions context and try restoring single files.
Option 2: Export/import the medium, the DCBF catalog is recreated. For more information, see the
"Importing Media" and "Exporting a Media" sections of the HPE Data Protector Help.
Option 3: Catalog migration. perl omnimigrate.pl –start_catalog_migration
Note: Once the full catalog migration is done (after there are no old catalogs), change the global
variable SupportOldDCBF to 0.
Problem
After upgrading to Data Protector 9.07 or later versions, if you select an individual disk, which is backed
up using Data Protector 7.03, for restore, then the Data Protector GUI displays the following error
messages:
Object scsi0:<disk number> does not have version information. Most probably backup
of this object was not completed - restore will not be possible.
There is a problem with restore object '<VCenter host> Virtual Environment [<Data
center>]'. It might not have any version information or there is some other
conflict. Restore was aborted.
Action
Select the complete virtual machine for restore.
Troubleshooting remote upgrade on Windows systems
Problem
Error starting setup process
When using Data Protector remote installation functionality to upgrade Windows clients, you get the
following error:
Error starting setup process, err=[1326] Logon failure: unknown user name or bad
password.
The problem is that the Data Protector Inet service on the remote computer is running under a user
account that does not have access to the OmniBack share on the Installation Server computer. This is
most probably a local user.
Installation Guide
Chapter 9: Troubleshooting installation and upgrade
HPE Data Protector (9.07) Page 343 of 426](https://image.slidesharecdn.com/hpemandp9-160823082229/85/Hpe-Data-Protector-installation-guide-343-320.jpg)


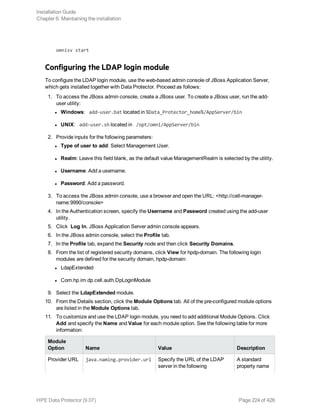
![3. Run the following command so that the NIS server reads the file and updates the configuration.
cd /var/yp; make
Note: In the NIS environment, the nsswitch.conf file defines the order in which different
configuration files will be used. For example, you can define whether the /etc/inetd.conf file
will be used on the local machine or from the NIS server. You can also insert a sentence in the file,
stating that the nsswitch.conf file controls where the names are kept. See the man pages for
detailed information.
If you have already installed Data Protector, you must prepare the NIS server, and then restart the
inet service by killing the process concerned, using the command kill -HUP pid on every NIS
client that is also a Data Protector client.
Troubleshooting
l If the Data Protector Inet service does not start after you have installed Data Protector in your
NIS environment, check the /etc/nsswitch.conf file.
If you find the following line:
services: nis [NOTFOUND=RETURN] files
replace the line with:
services: nis [NOTFOUND=CONTINUE] files
Changing the Cell Manager name
When Data Protector is installed it uses the current hostname for the Cell Manager name. If you
change the hostname of your Cell Manager, you need to update the Data Protector files manually.
It is necessary to update the client information about the Cell Manager name. Before changing the
hostname of your Cell Manager, export the clients from the cell. For the procedure, see "Exporting
clients from a cell" on page 195. After you have changed the hostname, import the clients back to the
cell. For the procedure, see "Importing clients to a cell " on page 190.
Note: Any devices and backup specifications that were configured using the old Cell Manager
name must be modified to reflect the correct name.
On UNIX systems
On a UNIX Cell Manager, do the following:
1. Change the computer or domain name.
Note: Ensure that the new hostname is resolved by DNS by all members and in both
directions. Do not continue this procedure, if the name resolution does not work.
2. Execute the following command:
Installation Guide
Appendix B: System preparation and maintenance tasks
HPE Data Protector (9.07) Page 363 of 426](https://image.slidesharecdn.com/hpemandp9-160823082229/85/Hpe-Data-Protector-installation-guide-363-320.jpg)
![omnisv stop
Note: Ensure that no instances of the old hostname exists in the following file:
/etc/opt/omni/client/components
You can execute the following command:
"grep -rn /etc/opt/omni/client/components -e "<OLD_HOSTNAME_FQDN>""
3. Change the Cell Manager hostname entries in the following files:
/etc/opt/omni/client/cell_server
/etc/opt/omni/server/cell/cell_info
/etc/opt/omni/server/config
/etc/opt/omni/server/cell/installation_servers
/etc/opt/omni/server/users/UserList
4. Regenerate the certificate by executing the following command:
# perl -CA /opt/omni/sbin/omnigencert.pl -server_id <NEW_HOSTNAME_FQDN> -
server_san dns:<short_hostname>,dns:< NEW_HOSTNAME_FQDN > -user_id hpdp -store_
password <STORE_PASSWORD>
Note: You can find the keystorepassword by executing the following command:
# grep keystorePassword
/etc/opt/omni/client/components/webservice.properties
5. Execute the following command:
omnisv start
6. Change the Cell Manager name in the IDB by executing:
omnidbutil -change_cell_name
7. Connect to the Cell Manger using the Data Protector GUI and accept the new certificate
8. If a tape device is connected to the Cell Manager, navigate to Devices and Media, and change
the hostname in the properties of the tape device.
9. In case of a configured file device:
a. To view the configured devices, use the following:
"omnidownload -list_libraries [-detail]" and "omnidownload -dev_info"
b. To modify the hostname in the Library, navigate to # omnidownload -library <LIBRARY_
NAME> >/tmp/file_lib.txt and edit the file_lib.txt file as follows:
# omniupload -modify_library <LIBRARY_NAME> -file /tmp/file_lib.txt
c. To modify the hostname in Devices, navigate to # omnidownload -device <DRIVE_NAME>
>/tmp/writer_0.txt and edit the writer_0.txt file as follows:
# omniupload -modify_device <DRIVE_NAME> -file /tmp/writer_0.txt
10. Delete the backup specification in the Data Protector IDB and recreate a new one.
11. Change the other backup specifications that are affected by the hostname change.
12. Update the UNIX or LINUX clients for the Cell Server hostname change in the following:
Installation Guide
Appendix B: System preparation and maintenance tasks
HPE Data Protector (9.07) Page 364 of 426](https://image.slidesharecdn.com/hpemandp9-160823082229/85/Hpe-Data-Protector-installation-guide-364-320.jpg)
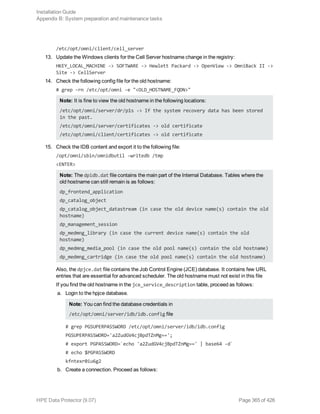
![Note: You can find the keystorepassword from the following location:
Data_Protector_program_dataConfigclientcomponentswebservice.properties
7. Execute the following command:
omnisv start
8. Change the Cell Manager name in the IDB by executing:
omnidbutil -change_cell_name
9. Connect to the Cell Manger using the Data Protector GUI and accept the new certificate.
10. If a tape device is connected to the Cell Manager, navigate to Devices and Media, and change
the hostname in the properties of the tape device.
11. In case of a configured file device:
a. To view the configured devices, use the following:
"omnidownload -list_libraries [-detail]" and "omnidownload -dev_info"
b. To modify the hostname in the Library, navigate to "omnidownload -library <LIBRARY_
NAME> > c:tempfile_lib.txt" and edit the file_lib.txt file as follows:
omniupload -modify_library <LIBRARY_NAME> -file c:tempfile_lib.txt
c. To modify the hostname in Devices, navigate to "omnidownload -device <Device Name> >
c:tempdevice.txt" and edit the device.txt file as follows:
omniupload -modify_device <Device Name> -file c:tempdevice.txt
12. Delete the backup specification in the Data Protector IDB and recreate a new one.
13. Change the other backup specifications that are affected by the hostname change.
14. Update the UNIX or LINUX clients for the Cell Server hostname change in the following:
/etc/opt/omni/client/cell_server
15. Update the Windows clients for the Cell Server hostname change in the registry:
HKEY_LOCAL_MACHINE -> SOFTWARE -> Hewlett Packard -> OpenView -> OmniBack II ->
Site -> CellServer
16. Check the following config file using the Windows "find in file" function to search the old
hostname:
Data_Protector_program_dataConfig
Note: It is fine to view the old hostname in the following locations:
Data_Protector_program_dataConfigServerdr -> If system recovery has been stored
in the past.
Data_Protector_program_dataConfigServercertificates -> old certificate
Data_Protector_program_dataConfigclientcertificates -> old certificate
17. Check the IDB content and export it to the following file:
omnidbutil -writedb e:idb_export
<ENTER>
Note: The dpidb.dat file contains the main part of the Internal Database. Tables where the
Installation Guide
Appendix B: System preparation and maintenance tasks
HPE Data Protector (9.07) Page 367 of 426](https://image.slidesharecdn.com/hpemandp9-160823082229/85/Hpe-Data-Protector-installation-guide-367-320.jpg)
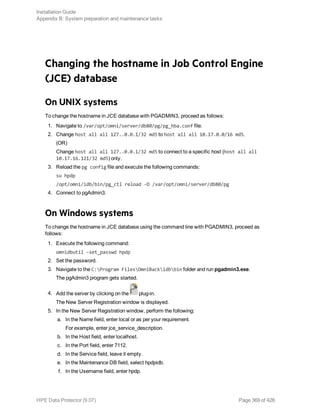

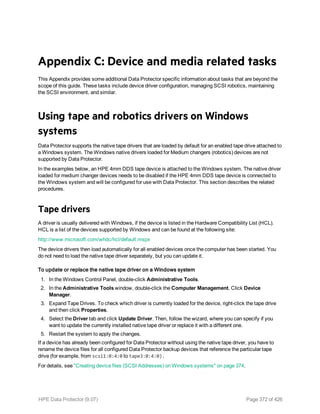
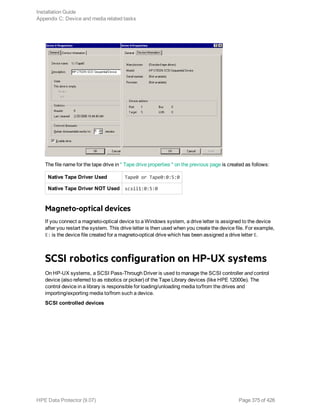
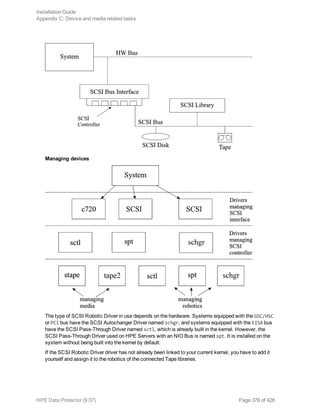
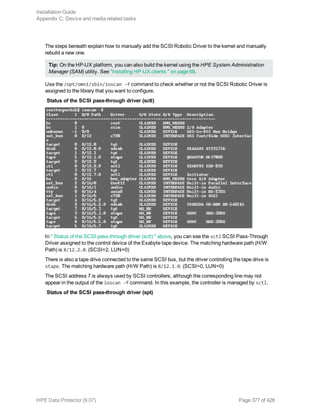
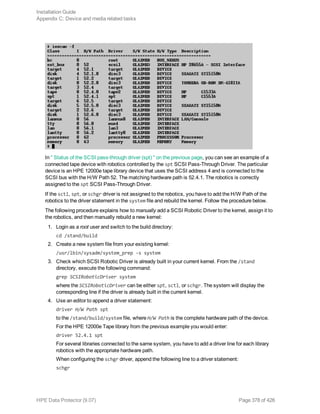
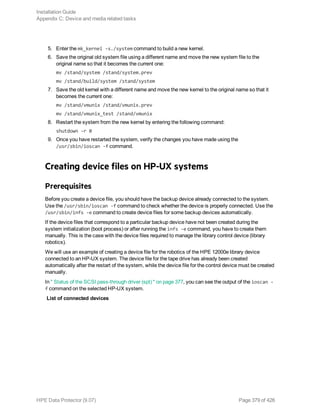
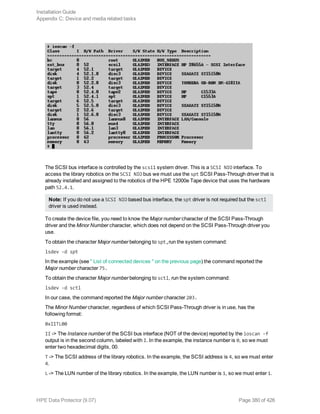
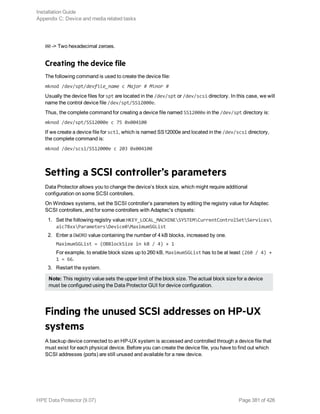
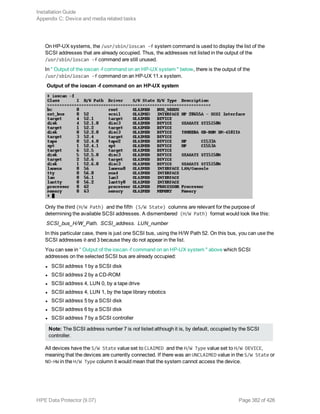
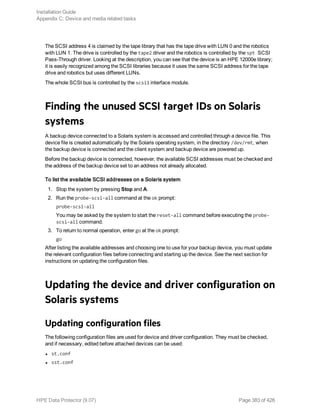
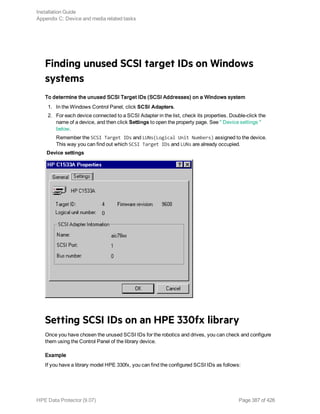
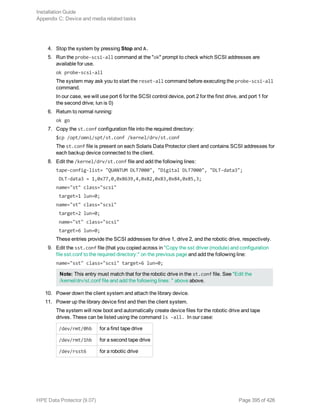
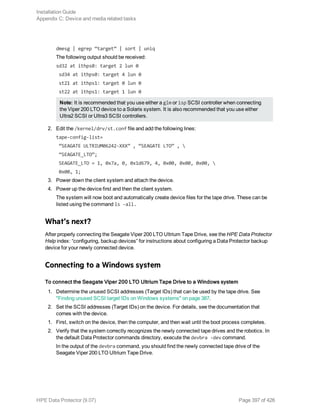

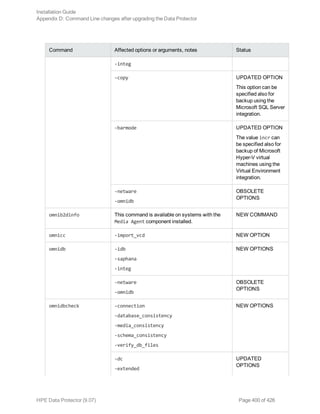
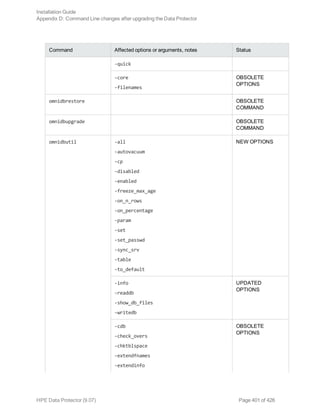
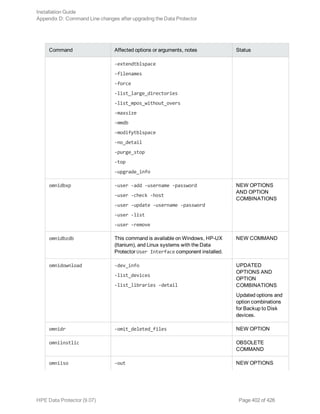
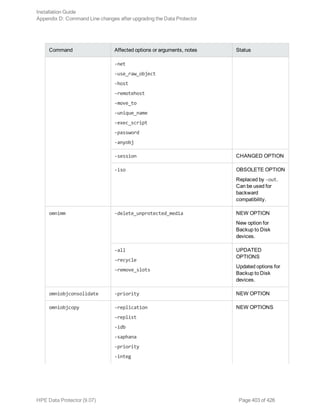
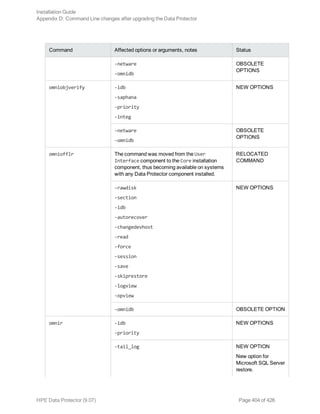
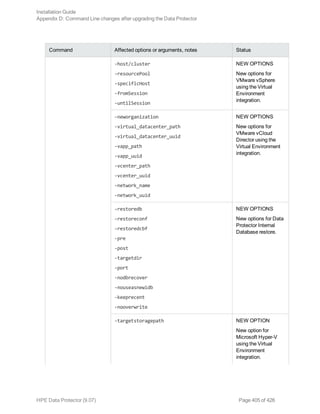
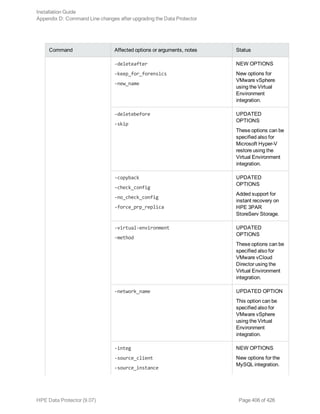

![Command Affected options or arguments, notes Status
omnisrdupdate -use_raw_object NEW OPTION
-session CHANGED OPTION
-anyobj NEW OPTION
omni -anyobj NEW OPTION
omnisv -maintenance
-mom
-mom_stop
NEW OPTIONS
util_cmd -putopt[ion] UPDATED OPTION
These options can be
specified also for the
MySQL integration.
vepa_util.exe --list-organizations NEW OPTION
New option for
VMware vCloud
Director using the
Virtual Environment
integration.
--check-config
--config
--configvm
--virtual-environment
UPDATED
OPTIONS
These options can be
specified also for
VMware vCloud
Director using the
Virtual Environment
integration.
--show-incremental-flag
--enable-incremental
--disable-incremental
--list-vms
NEW OPTIONS
New options for
Microsoft Hyper-V
using the Virtual
Environment
integration.
winomnimigrate.pl OBSOLETE
COMMAND
Installation Guide
Appendix D: Command Line changes after upgrading the Data Protector
HPE Data Protector (9.07) Page 408 of 426](https://image.slidesharecdn.com/hpemandp9-160823082229/85/Hpe-Data-Protector-installation-guide-408-320.jpg)
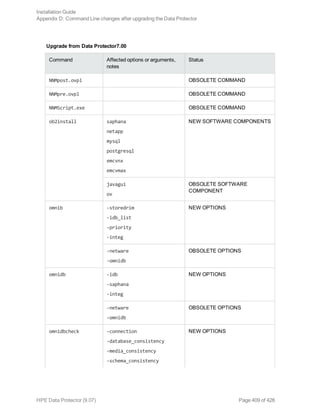
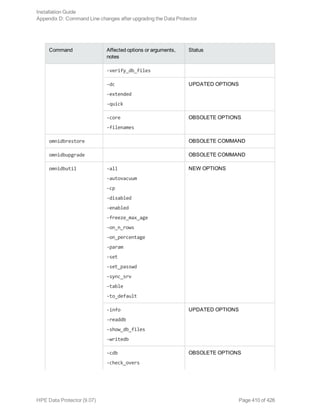
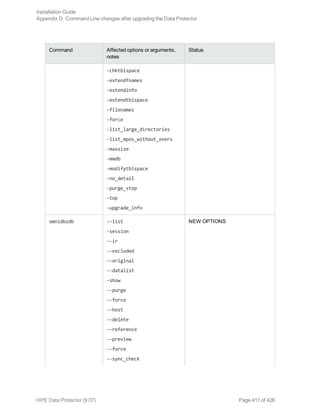

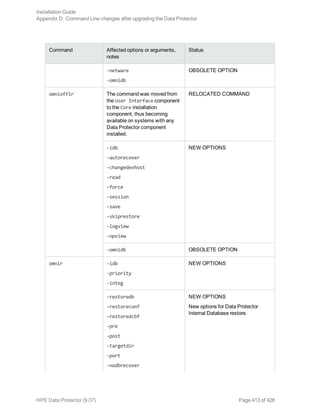
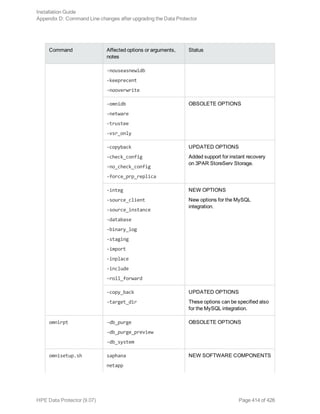
![Command Affected options or arguments,
notes
Status
mysql
postgresql
emcvnx
emcvmax
javagui
ov
OBSOLETE SOFTWARE
COMPONENT
omnisrdupdate -session CHANGED OPTION
-anyobj NEW OPTION
omnisv -maintenance
-mom
-mom_stop
NEW OPTIONS
util_cmd -putopt[ion] UPDATED OPTION
These options can be specified also
for the MySQL integration.
winomnimigrate.pl OBSOLETE COMMAND
Upgrade from Data Protector8.00 and later
Command Affected options or arguments, notes Status
ob2install netapp
mysql
postgresql
emcvnx
emcvmax
NEW SOFTWARE COMPONENT
omnib -integ NEW OPTION
omnidb -integ NEW OPTION
omnidbzdb --list
-session
--ir
NEW OPTIONS
Installation Guide
Appendix D: Command Line changes after upgrading the Data Protector
HPE Data Protector (9.07) Page 415 of 426](https://image.slidesharecdn.com/hpemandp9-160823082229/85/Hpe-Data-Protector-installation-guide-415-320.jpg)
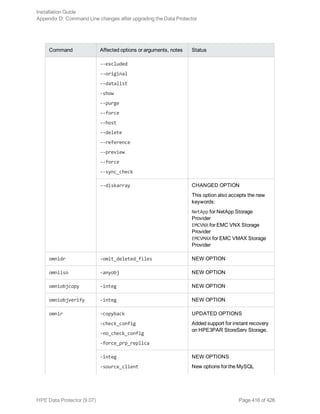
![Command Affected options or arguments, notes Status
-source_instance
-database
-binary_log
-staging
-import
-inplace
-include
-roll_forward
integration.
-copy_back
-target_dir
UPDATED OPTIONS
These options can be specified
also for the MySQL integration.
omnisetup.sh netapp
mysql
postgresql
emcvnx
emcvmax
NEW SOFTWARE COMPONENT
omnisrdupdate -anyobj NEW OPTION
util_cmd -putopt[ion] UPDATED OPTION
These options can be specified
also for the MySQL integration.
Installation Guide
Appendix D: Command Line changes after upgrading the Data Protector
HPE Data Protector (9.07) Page 417 of 426](https://image.slidesharecdn.com/hpemandp9-160823082229/85/Hpe-Data-Protector-installation-guide-417-320.jpg)
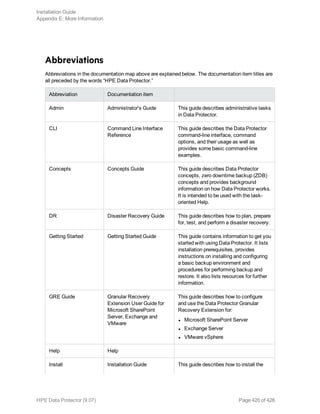
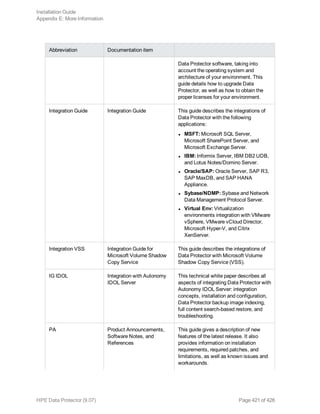
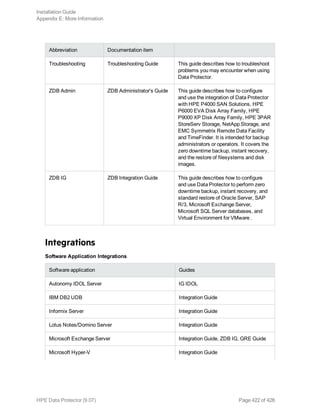
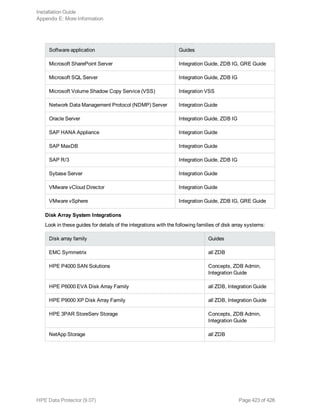
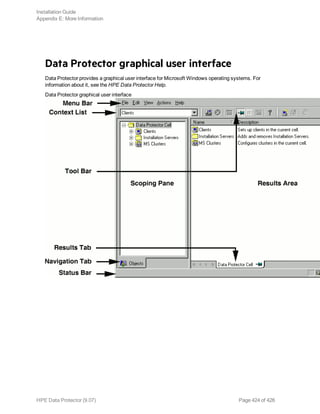


![제 23회 보아즈(BOAZ) 빅데이터 컨퍼런스 - [MBOAX] : ABSA를 활용한 소비자 반응 분석 기반 운영 효율화 대시보드 설계](https://cdn.slidesharecdn.com/ss_thumbnails/3-1boaz23rdconferencemboax-260203102709-9d519923-thumbnail.jpg?width=640&height=640&fit=bounds)


