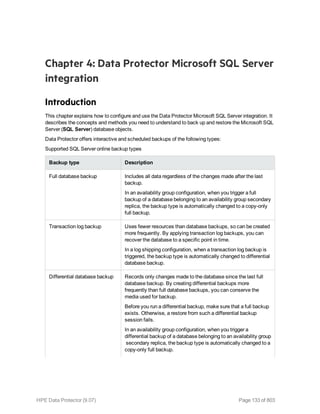
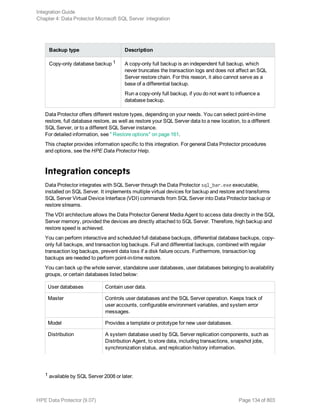
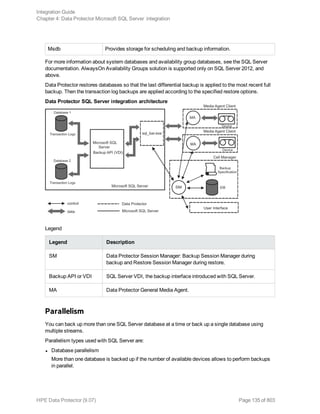
The HPE Data Protector Software version 9.07 Integration Guide provides comprehensive details about integrating various applications, including IBM Informix, DB2, Microsoft SQL Server, Exchange, and Oracle. It includes information on configuration, backup and restore processes, troubleshooting, and accessing support resources. The guide emphasizes the need for valid licenses and offers links for user registration and product support.


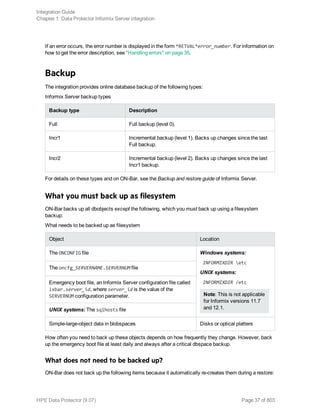

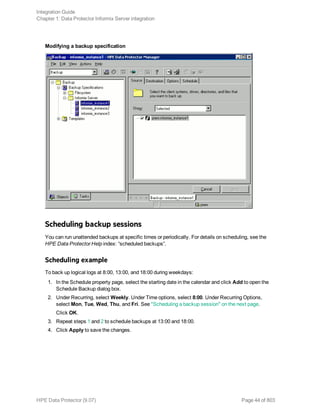

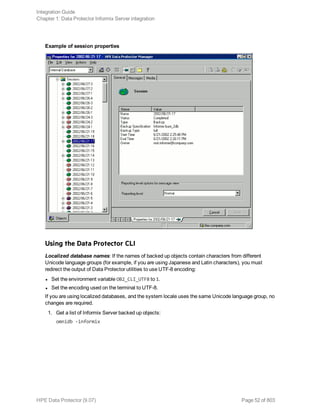
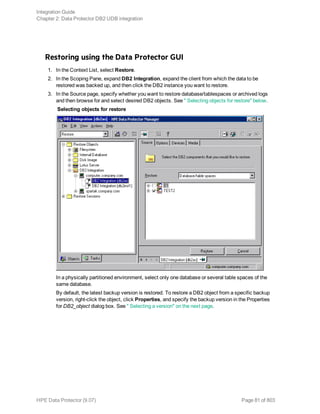
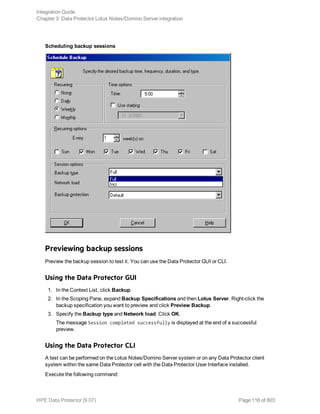
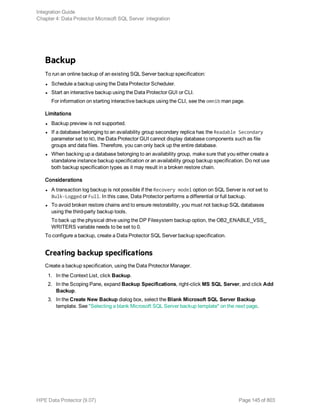
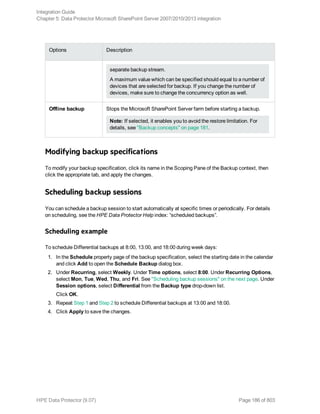
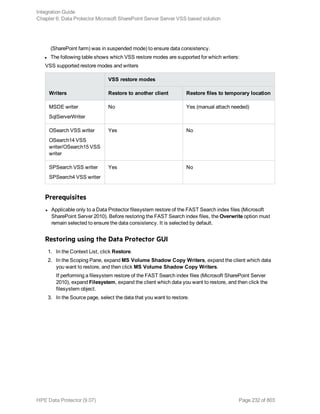
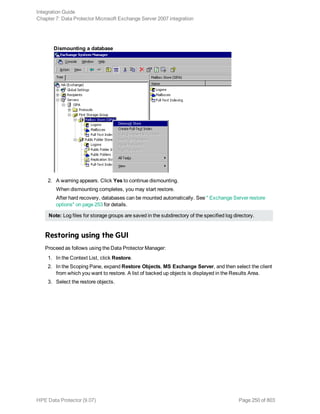
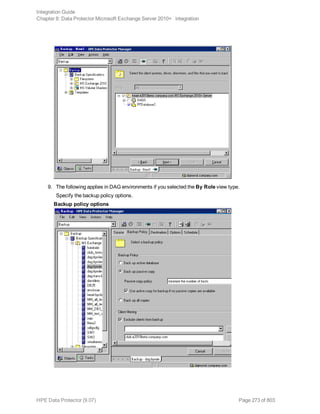
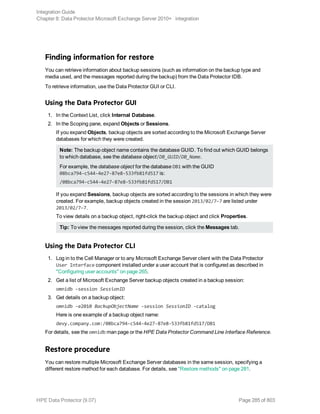
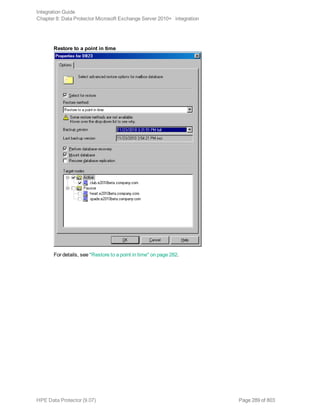
![Using the Data Protector GUI
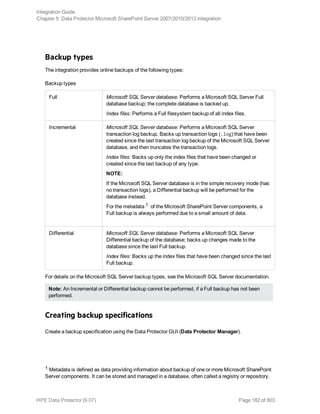
1. In the Context List, click Backup.
2. In the Scoping Pane, expand Backup Specifications, and then Informix Server. Right-click the
backup specification you want to use and click Start Backup.
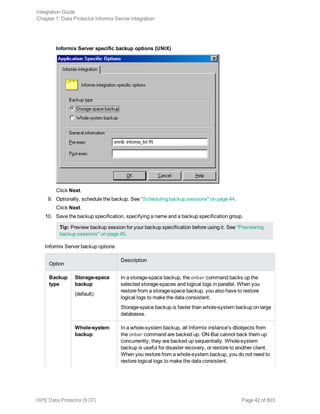
3. Select the Backup type and Network load. Click OK.
The message Session completed successfully is displayed at the end of a successful backup
session.
Using the Data Protector CLI
Execute the following command:
omnib -informix_list backup_specification_name [-barmode InformixMode] [List_
options]
where InformixMode is one of the following:
full|inf_incr1|inf_incr2
Note: Data Protector terms full, inf_incr1, and inf_incr2 backup are equivalent to Informix
Server terms level-0, level-1, and level-2 backup, respectively.
For List_options, see the omnib man page.
Examples
To start a full backup using the Informix Server backup specification InformixWhole, execute:
omnib -informix_list InformixWhole -barmode full
To start an incremental backup (level 1) of the Informix Server backup specification InformixIncr,
execute:
omnib -informix_list InformixIncr -barmode inf_incr1
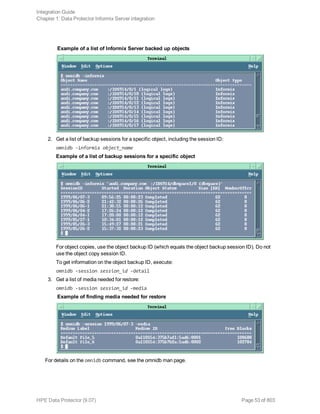
Using Informix Server commands
Use the Informix Server onbar command to start a backup of dbobjects from the Informix Server
system where the relevant Informix instance is located.
Before the backup:
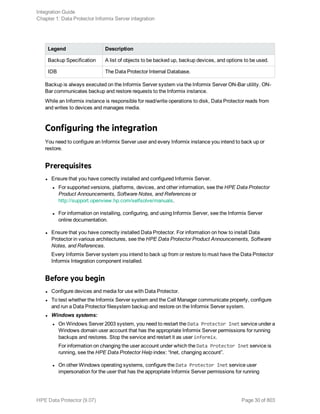
l Log in to the Informix Server system as user informix.
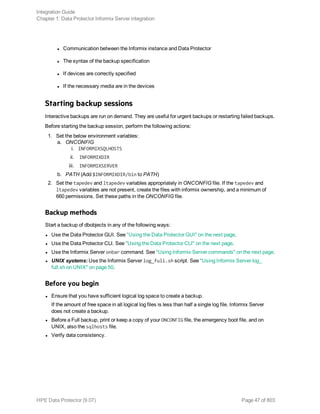
l Set the following variables:
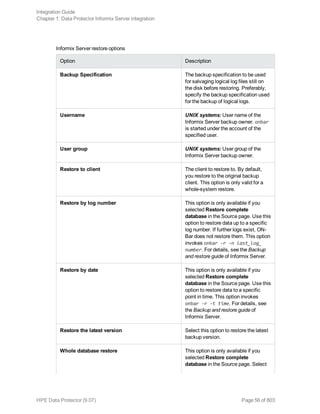
Data Protector and Informix Server variables
Variable Description
ONCONFIG Name of the Informix instance ONCONFIG file.
Integration Guide
Chapter 1: Data Protector Informix Server integration
HPE Data Protector (9.07) Page 48 of 803](https://image.slidesharecdn.com/hpemandp9-160823080054/85/Hpe-Data-Protector-integration-guide-48-320.jpg)
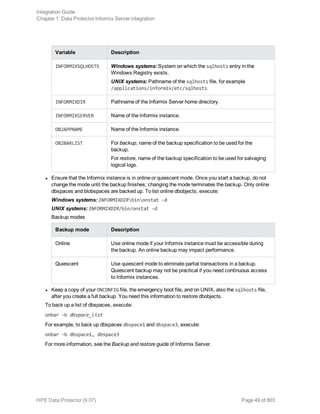
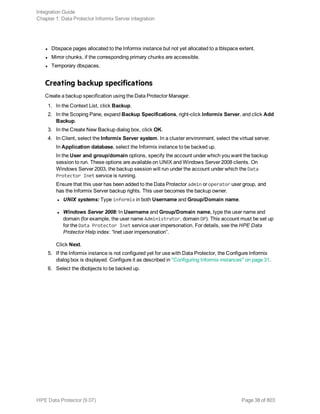
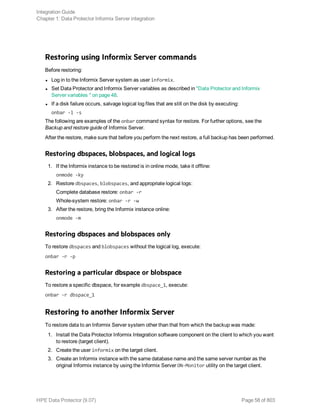
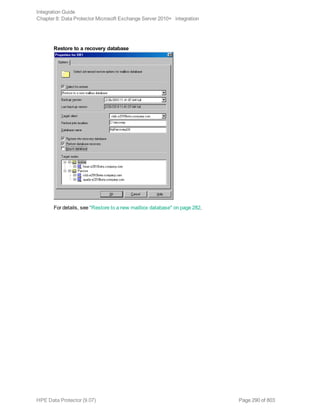
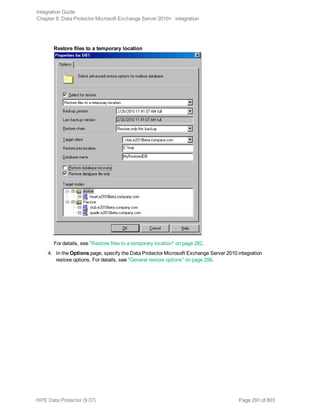
![Option Description
this option to perform a whole-system
restore. Only use this option when
restoring from a whole-system
backup. Data Protector does not
automatically detect if a whole-
system backup exists.
Data Protector searches for the last
whole-system backup and restores
from that. This option invokes onbar
-r -w. For details, see the Backup
and restore guide of Informix Server.
After the restore, make sure that before you perform the next restore, a full backup has been performed.
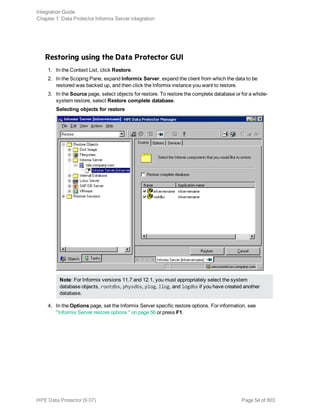
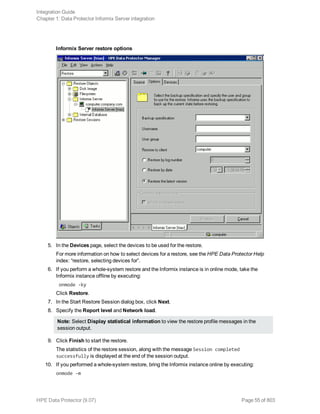
Restoring using the Data Protector CLI
Before you begin the restore procedure, set the OB2BARLIST environment variable as described in “Data
Protector and Informix Server variables” (page 32)"Backup" on page 37. For example:
set OB2BARLIST=dbspace5
Run the following command:
omnir -informix -barhost ClientName -barcmnd ob2onbar.pl -user User:Group -appname
INFORMIXSERVER -bararg OnBarRestoreArguments [INFORMIX_OPTIONS]
ClientName Name of the Informix Server system. In a cluster environment, name of
the virtual server.
INFORMIXSERVER Name of the Informix instance.
User, Group UNIX systems: The user name and its group name.
OnBarRestoreArguments ON-Bar restore arguments. Put each argument in double quotes.
INFORMIX_OPTIONS A subset of general restore options. For information, see the omnir man
page.
After the restore, make sure that before you perform the next restore, a full backup has been performed.
Example
To restore the Informix instance informix_instance1 on the UNIX system computer with the bar
argument -r rootdbs, execute:
omnir -informix -barhost computer -barcmnd ob2onbar.pl -user informix:informix -
appname informix_instance1 -bararg "-r rootdbs"
Integration Guide
Chapter 1: Data Protector Informix Server integration
HPE Data Protector (9.07) Page 57 of 803](https://image.slidesharecdn.com/hpemandp9-160823080054/85/Hpe-Data-Protector-integration-guide-57-320.jpg)
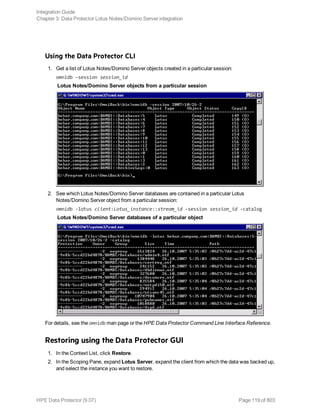
![In this example, the user has all the necessary rights for the backup specification named
InformixWhole.
If the user informix on the Informix Server system computer.hp.com does not have the necessary
rights, an error similar to the following will be displayed:
[Critical] From: OB2BAR@computer.hp.com "" Time: 08/06/2011
17:51:41[131:53]
User "informix.users@computer.hp.com" is not allowed
to perform a restore.
l In a cluster environment, ensure that the environment variable OB2BARHOSTNAME is set to the virtual
server name before performing procedures from the Data Protector CLI. When the Data Protector
GUI is used, this is not required.
Additionally, if your configuration or backup failed:
l Ensure that the Informix instance is online.
Additionally, if your backup failed:
l Check the configuration of the Informix instance as described in "Checking the configuration" on
page 36.
l Test the backup specification as described in "Previewing backup sessions" on page 45.
l If this fails, check if the Informix Server part of the test failed:
Execute the onbar -b -F command. If the test fails, see the Informix Server documentation for
further instructions.
l If the Data Protector part of the test failed, create an Informix Server backup specification to back
up to a null or file device.
If the backup succeeds, the problem is probably related to devices. For information on
troubleshooting devices, see the HPE Data Protector Help.
l If the test succeeds, start the backup directly from the Informix Server system using Informix
Server commands. For information, see "Using Informix Server commands" on page 48.
If this backup succeeds, the problem may be that the client on which the Data Protector User
Interface is running does not have enough memory, disk space, or other operating system
resources.
Additionally, if your backup or restore failed:
l Test the Data Protector data transfer using the testbar utility. Log in to the Informix Server system
as user informix. From the directory:
Windows systems: Data_Protector_homebin
HP-UX and Solaris systems: /opt/omni/bin/utilns
Other UNIX systems: /usr/omni/bin/utilns
l if your backup failed, execute:
testbar -type:Informix -appname:INFORMIXSERVER -bar: backup_specification_name
-perform:backup
where INFORMIXSERVER is the name of the Informix instance.
Integration Guide
Chapter 1: Data Protector Informix Server integration
HPE Data Protector (9.07) Page 62 of 803](https://image.slidesharecdn.com/hpemandp9-160823080054/85/Hpe-Data-Protector-integration-guide-62-320.jpg)

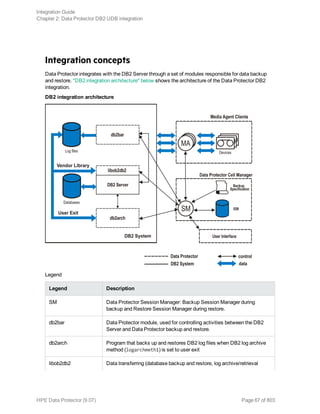
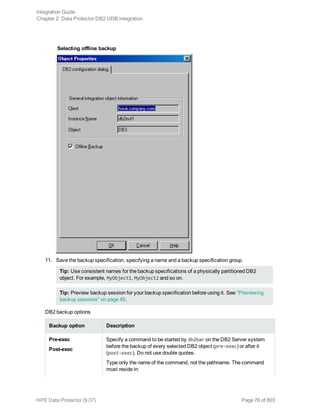
![Specifying a DB2 instance
Click OK.
5. Click Next. The Configure DB2 dialog box is displayed.
6. Type the name of the DB2 user and its password. This user must be configured as described in
"Configuring DB2 users" on page 69.
In a partitioned environment, select DB2 EEE and specify the pathname of the DB2 instance
home directory.
7. The DB2 instance is configured. Exit the GUI or proceed with creating a backup specification at
Step 6.
Using the Data Protector CLI
Execute the following command:
util_db2 -CONFIG DB2_instance username password [DB2 _instance_home]
Parameter description
DB2_instance Name of the DB2 instance.
username DB2 user.
password DB2 user password.
Integration Guide
Chapter 2: Data Protector DB2 UDB integration
HPE Data Protector (9.07) Page 71 of 803](https://image.slidesharecdn.com/hpemandp9-160823080054/85/Hpe-Data-Protector-integration-guide-71-320.jpg)
![Using the Data Protector CLI
Execute the following command:
omnib -db2_list backup_specification_name [-barmode db2_mode] [options] [-preview]
Parameter description
db2_mode Backup type: {-full | -incr | -delta}
options For information, see the omnib man page.
Example
To perform a full DB2 backup, using the backup specification MyObjects, and to set data protection to
10 weeks, execute:
omnib -db2_list MyObjects -barmode -full -protect weeks 10
Starting backups of physically partitioned DB2 objects
1. Run the backup specification for the part of DB2 objects residing on the system with the catalog
node. Use the Data Protector GUI or CLI.
2. Run the backup specifications for the other parts of the DB2 objects in any order.
The order in which you run the backup specifications is only important if the object resides on the
catalog node.
Tip: To the first backup specification, add a post-exec script that will automatically run the other
backup specifications. For more information, see the HPE Data Protector Help index: “pre- and
post-exec commands for backup specifications”.
Restore
Restore DB2 objects using the Data Protector GUI or CLI.
Databases are restored offline.
Table spaces are restored online. Only table spaces that are not being restored are available for use.
A dropped table space can only be restored from a full database backup.
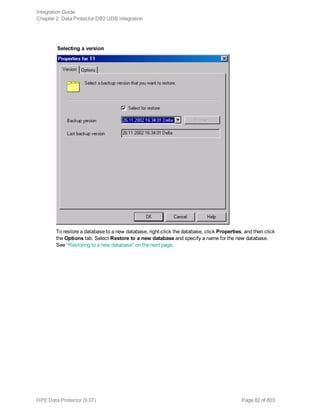
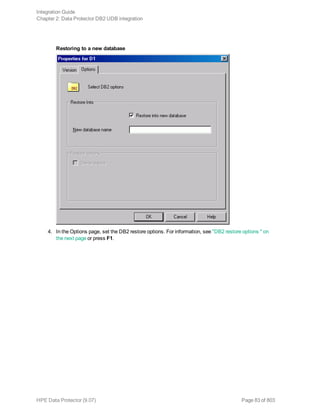
For information on how to restore a DB2 database to a new database, see "Restoring to a new
database or another DB2 instance" on page 87.
For information on how to restore partitioned DB2 objects, see "Restore in a partitioned environment"
on page 90.
Integration Guide
Chapter 2: Data Protector DB2 UDB integration
HPE Data Protector (9.07) Page 80 of 803](https://image.slidesharecdn.com/hpemandp9-160823080054/85/Hpe-Data-Protector-integration-guide-80-320.jpg)
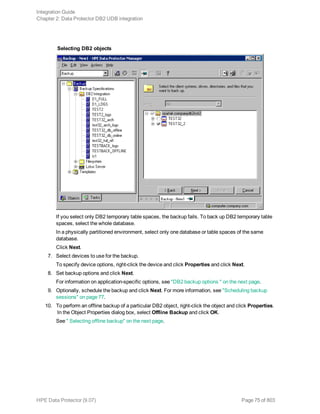
![Restoring using the Data Protector CLI
Execute the following command:
omnir -db2 -barhost source_client [-destination target_client] -instance target_
instance -dbname source_db [-session BackupID] [-newdbname new_db] [-frominstance
source_instance] -tsname table_space [-session BackupID] -logfile log_file [-logdir
log_path] [-rollforward [-time YYYY-MM-DD.hh.mm.ss]]
Parameter description
Parameter Description
source_client The DB2 Server system from which DB2 objects were backed up. In a cluster
environment, the name of the virtual server.
target_client The target DB2 Server system (only if you are not restoring to the source client).
source_
instance
The DB2 instance whose DB2 objects were backed up.
target_
instance
The target DB2 instance.
source_db The database you want to restore.
new_db The target database (specify only if not the source database).
table_space The table space you want to restore.
log_file The log file you want to restore.
BackupID Specifies from which backup data to restore, for example, 2011/10/09–2.
A backup ID is a point in time. All objects (backup data) created in a backup
session have the same backup ID, which is the same as the session ID of the
backup session.
Mirrored objects and objects created in an object copy session have the same
backup ID as objects created in the original backup session. Suppose the media
set created in the original backup session no longer exists, but the media set
created in an object copy session still exists. To restore the objects, you must
specify the session ID of the original backup session (that is, the backup ID)
and not the session ID of the object copy session.
The omnir syntax does not let you specify from which object copy to restore if
several copies of the same object exist. This is only possible using the Data
Protector GUI by setting the media allocation priority list.
log_path The directory to which the log file is restored. Use this option only when the log
is archived with the logarchmeth1 is set to vendor.
For more information, see the omnir man page.
Integration Guide
Chapter 2: Data Protector DB2 UDB integration
HPE Data Protector (9.07) Page 86 of 803](https://image.slidesharecdn.com/hpemandp9-160823080054/85/Hpe-Data-Protector-integration-guide-86-320.jpg)
![l In a non-partitioned environment, run:
db2 rollforward db db_name stop
l In a partitioned environment, run:
db2 terminate
export DB2NODE=catalog_node_number
db2 rollforward db db_name stop
If you have restored from an online backup, restored the archived logs using the User Exit option,
using the Data Protector GUI, and then perform a rollforward recovery, using DB2 tools:
a. Log in to the source instance. If you have used User Exit method of archive log handling,
follow the next 2 steps, else go to step e if you are using the Vendor Library option.
b. Ensure that you have permissions to write to the archived logs directory and restore the
archived logs, using the Data Protector GUI.
The archived logs are restored to the same directory from which they were backed up.
c. Copy the archived and redo logs of the source database to the corresponding log path
directories of the new database (in a partitioned environment, to every node of the target
instance).
If the SQLLPATH.TAG file exists in the target log file directory, delete it to avoid possible
database inconsistencies.
d. If you are restoring to another instance, grant the ownership of the copied logs to the DB2 user
of the target instance and log in to the target instance.
e. Perform a rollforward recovery using DB2 tools:
o In a non-partitioned environment, run:
db2 rollforward db db_name [to time | to end of logs] [and complete]
o In a partitioned environment, run:
db2 terminate
export DB2NODE=catalog_node_number
db2 rollforward db db_name [to time | to end of logs] [and complete]
f. Set the environment variables in the omnirc file before restoring to a DB2 database using the
automatic Roll forward:
o On the DB2 client, set the following environment variables in the omnirc file:
l OB2APPNAME = “source_Instance_name”
l OB2BARHOSTNAME=”Source_client_name”
l OB2APPDATABASE = “source_database_name”
Note: This is valid for all DB2 log backups using the Vendor library and not required
for the User-Exit mode.
In the omnirc file, delete the above mentioned three variables after the Roll forward of
the DB2 database. This ensures that the other DB2 instances running on the same
system are not influenced by these environment variables during backup.
o Execute the DB2 Roll forward command.
The following examples are from a non-partitioned environment.
Integration Guide
Chapter 2: Data Protector DB2 UDB integration
HPE Data Protector (9.07) Page 88 of 803](https://image.slidesharecdn.com/hpemandp9-160823080054/85/Hpe-Data-Protector-integration-guide-88-320.jpg)
![Example 1
To restore the database db2db_old to the database db2db_new from an online backup (both databases
reside in the instance db2inst, the log files of db2db_old are located in the /db2_
db/db2inst/NODE0000/SQL00003/SQLLOGDIR directory, and "/tmp/db2cont1" is the container for
one of the table spaces:
1. Define a new container, "/tmp/db2cont2", for the table space, using the Data Protector CLI:
util_cmd -putopt DB2 db2inst "/tmp/db2cont1" "tmp/db2cont2" -sublist
Redirection/db2db_old
2. Restore the database db2db_old to the database db2db_new, using the Data Protector CLI:
omnir -db2 -barhost source_client -instance db2inst -dbname db2db_old -
newdbname db2db_new
If you are using the User Exit option for the log backup, execute step 3 and 4.
3. Restore all archived logs needed for rollforward recovery using the Data Protector GUI.
4. Copy the archived and redo logs of the source database to the corresponding log path directories
of the new database.
5. Perform a rollforward recovery to the end of logs, using the DB2 CLI:
db2 rollforward db db2db_new to end of logs
6. Set the environment variables in the omnirc file before restoring to a DB2 database using the
automatic Roll forward:
l On the DB2 client, set the following environment variables in the omnirc file:
o OB2APPNAME = “source_Instance_name”
o OB2BARHOSTNAME=”Source_client_name”
o OB2APPDATABASE = “source_database_name”
Note: This is valid for all DB2 log backups using the Vendor library and not required for the
User-Exit mode.
In the omnirc file, delete the above mentioned three variables after the Roll forward of the
DB2 database. This ensures that the other DB2 instances running on the same system are
not influenced by these environment variables during backup.
l Execute the DB2 Roll forward command.
Example 2
To restore the database db2db from the instance inst1 to the database db2db in the instance inst2:
1. Define a new container /tmp/db2cont2 for the table space, using the Data Protector CLI:
util_cmd -putopt DB2 inst2 "/tmp/db2cont1" "/tmp/db2cont2" -sublist
Redirection/db2db
2. Restore the database db2db to the instance inst2, using the Data Protector CLI:
omnir -db2 -barhost source_client [-destination target_client] -instance inst2
-dbname db2db -frominstance inst1
Integration Guide
Chapter 2: Data Protector DB2 UDB integration
HPE Data Protector (9.07) Page 89 of 803](https://image.slidesharecdn.com/hpemandp9-160823080054/85/Hpe-Data-Protector-integration-guide-89-320.jpg)
![Restoring to the original database
Corrupt database
To restore a corrupt database:
1. Connect to the node that was the catalog node of the corrupt database.
2. Create a new database with the same name.
3. Continue with the restore as described in "Restoring to a new database or another DB2 instance"
on page 87.
Physically partitioned environment
To restore a physically partitioned DB2 object (residing on more than one system):
1. Restore the part of the DB2 object that resided on the system with the catalog node, without
specifying rollforward recovery. Use the Data Protector GUI or CLI.
2. Restore all other parts of the DB2 object to the corresponding systems in any order, without
specifying rollforward recovery.
3. Connect to the catalog node and perform a rollforward recovery, using DB2 tools:
db2 terminate
export DB2NODE=catalog_node_number
db2 rollforward db db_name [[stop]|[to time|to end of logs] [and complete]]
Note: The order in which you restore the parts of a DB2 object is only important if the object
resides on the catalog node.
Logically partitioned environment
To restore a logically partitioned DB2 object (residing on only one system):
l For a version recovery:
a. Restore the object, without specifying rollforward recovery. Use the Data Protector GUI or CLI.
b. Connect to the catalog node and perform a rollforward:
db2 terminate
export DB2NODE=catalog_node_number
db2 rollforward db db_name stop
l For a rollforward recovery, restore the object, specifying rollforward. Use the Data Protector GUI or
CLI.
Restoring to a new database or another instance
To restore a database to a new database in the original DB2 instance, see "Restoring to a new
database or another DB2 instance" on page 87.
To restore a database to a new database in another DB2 instance:
Integration Guide
Chapter 2: Data Protector DB2 UDB integration
HPE Data Protector (9.07) Page 91 of 803](https://image.slidesharecdn.com/hpemandp9-160823080054/85/Hpe-Data-Protector-integration-guide-91-320.jpg)
![Online backup is not allowed because either logretain or userexit for roll-forward
is not activated, or a backup pending condition is in effect for the database.
Action
After configuring the DB2 database for rollforward recovery, and setting the logarchmeth1 to either
User Exit or Vendor, first back up the database offline. If online backup is started first, the above error
is reported.
Problem
Offline backup fails
When performing an offline backup, the session fails with an error similar to the following:
[Major] From: OB2BAR_DB2BAR@ DB2ClientName InstanceName Time: DateTime
DB2 returned error:
SQL1035N The database is currently in use. SQLSTATE=57019
Action
The error implies that there are still some existing connections to the database. Execute:
db2 force application all
Note: This command disconnects all users and aborts all existing transactions.
Alternatively, you can disconnect individual users or applications. To get a list of all applications,
execute:
db2 list applications
To disconnect the user that is identified with the application handle number AppNum, execute:
db2 force application AppNum
Tip: You can create a pre-exec script to execute the command. Note that the command returns the
status completed before the operation is actually finished. Therefore, provide extra time for the
operation to complete by adding the sleep command to the script.
Problem
Offline backup of one or several tablespaces is not allowed
When backing up DB2 tablespaces (not the whole database) offline, DB2 reports that offline backup is
not allowed because the DB2 logretain option is not activated or that a backup pending condition is in
effect for the database.
Action
Set the DB2 logretain option to ON.
Problem
Archived logs are not backed up
Integration Guide
Chapter 2: Data Protector DB2 UDB integration
HPE Data Protector (9.07) Page 95 of 803](https://image.slidesharecdn.com/hpemandp9-160823080054/85/Hpe-Data-Protector-integration-guide-95-320.jpg)
![Data Protector reports:
Cannot list table spaces.
Action
l Ensure that the database is not in a backup/restore/rollforward pending state.
l Ensure that user root (UNIX only) and the DB2 user are in both the DB2 and Data Protector admin
groups.
Problem
Restore session for restoring data from an object copy gets blocked
Action
Before restarting the restore:
l Increase the number of Disk Agent buffers for the device used for the restore.
l If all objects of the backup are recorded in the IDB:
a. In the Internal Database context of the Data Protector GUI, search for all objects of the backup.
The objects are identified by the same backup ID.
b. Copy each object in a separate object copy session to a separate device, for example a file
library. For each object, use a separate medium with the non-appendable media policy.
c. Set the highest media location priority for the newly created copies.
Problem
Restore finishes successfully, but rollforward fails
When performing a rollforward recovery from an online backup, restore finishes successfully, but
rollforward fails.
Action
Ensure that the archived logs are available. If they are not, restore them from the last backup. If the
logs are archived by setting the logarchmeth1 to vendor, execute the db2 rollforward db db_name
[to time | to end of logs] [and complete] command for the DB2 database manager to retrieve
the logs and apply it.
Problem
Rollforward fails in the HP-UX environment when the DB2 rollforward command is executed
from the DB2 CLI or from the Data Protector GUI
In the HP-UX environment, if you execute the DB2 rollforward command db2 rollforward db
<database> to end of logs and complete, or when the rollforward is triggered from the Data
Protector GUI, you may encounter the following error message:
<SQL error code> Rollforward recovery processing has stopped because of the error <SQL error
no> while retrieving log file <archive log> for database <database> on the database partition
<partition number> and log stream "".
Integration Guide
Chapter 2: Data Protector DB2 UDB integration
HPE Data Protector (9.07) Page 97 of 803](https://image.slidesharecdn.com/hpemandp9-160823080054/85/Hpe-Data-Protector-integration-guide-97-320.jpg)
![Action
l For the Data Protector GUI: Execute the DB2 rollforward from the DB2 CLI.
l For the DB2 CLI: Re-execute the same command.
Example: db2 rollforward db db_name [[stop]|[to time|to end of logs] [and
complete]]
Integration Guide
Chapter 2: Data Protector DB2 UDB integration
HPE Data Protector (9.07) Page 98 of 803](https://image.slidesharecdn.com/hpemandp9-160823080054/85/Hpe-Data-Protector-integration-guide-98-320.jpg)


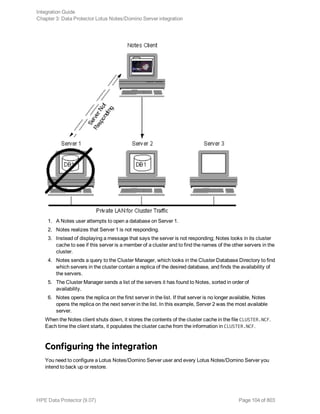
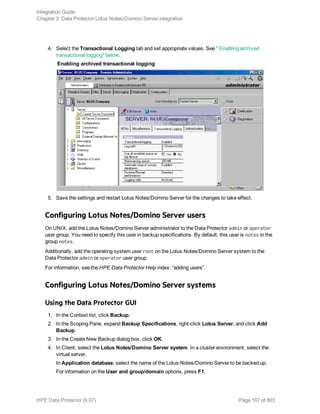
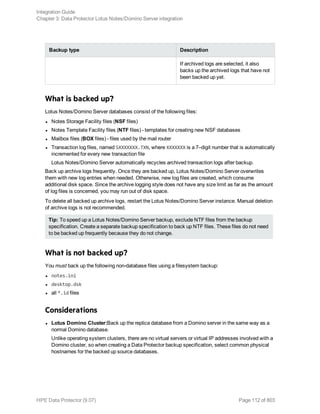
![Specifying Lotus Notes/Domino Server data
Click OK.
If an error occurs, click Details or see "Troubleshooting" on page 125.
6. The integration is configured. Exit the GUI or proceed with creating the backup specification at
Step 6.
Using the Data Protector CLI
On the Lotus Notes/Domino Server system, execute:
Windows systems:
Data_Protector_homebinutil_notes.exe -CONFIG -SERVER:SRV_NAME -INI:notes.ini_file
Solaris systems:
/opt/omni/lbin/util_notes.exe -CONFIG -SERVER:SRV_NAME -INI:notes.ini_file [-
HOMEDIR:Lotus_home_directory] [-DATADIR:Domino_data_directory] [-EXECDIR:Domino_
executables_directory]
AIX systems:
/usr/omni/bin/util_notes.exe -CONFIG -SERVER:SRV_NAME -INI:notes.ini_file [-
HOMEDIR:Lotus_home_directory] [-DATADIR:Domino_data_directory] [-EXECDIR:Domino_
executables_directory]
Parameter description
Integration Guide
Chapter 3: Data Protector Lotus Notes/Domino Server integration
HPE Data Protector (9.07) Page 109 of 803](https://image.slidesharecdn.com/hpemandp9-160823080054/85/Hpe-Data-Protector-integration-guide-109-320.jpg)
![l A different location.
Select this to keep the original database intact.
Recovery to a different client system is not possible.
To restore Lotus Notes/Domino Server databases, use the Data Protector GUI or CLI.
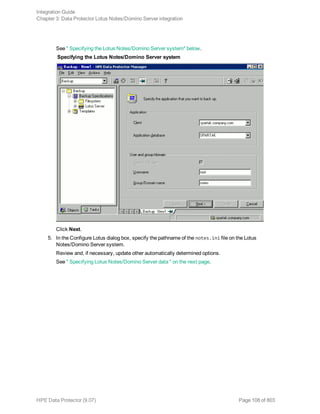
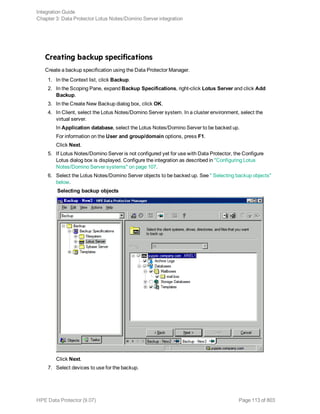
Finding information for restore
You can find details on backup sessions and the media used in the Data Protector IDB. Use the Data
Protector GUI or CLI.
Using the Data Protector GUI
In the Internal Database context, expand Objects or Sessions. To view details on a session, right-
click the session and click Properties.
Example of session properties
Tip: To see which files are contained in the backup object, click the Messages tab. Backup
objects with the same name (for example, ARIEL:Databases:1 [Lotus]), created in different
sessions, may contain different files.
Integration Guide
Chapter 3: Data Protector Lotus Notes/Domino Server integration
HPE Data Protector (9.07) Page 118 of 803](https://image.slidesharecdn.com/hpemandp9-160823080054/85/Hpe-Data-Protector-integration-guide-118-320.jpg)

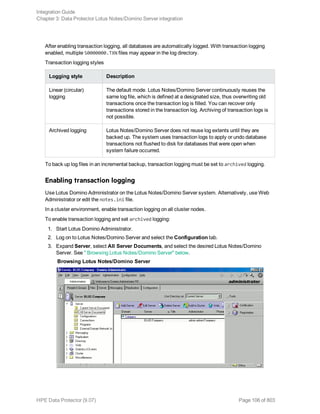
![Before you begin
l Ensure that the latest official Data Protector patches are installed. For information on how to verify
this, see the HPE Data Protector Help index: “patches”.
l For general Data Protector limitations, as well as recognized issues and workarounds, see the HPE
Data Protector Product Announcements, Software Notes, and References.
l For an up-to-date list of supported versions, platforms, and other information, see
http://support.openview.hp.com/selfsolve/manuals.
Checking the Lotus Notes/Domino Server side
If you encounter errors when performing the following checks, contact Lotus Notes/Domino Server
support. For more information on these procedures, see the Lotus Notes/Domino Server
documentation.
Windows systems:
l Check if the nNotes.dll library is linked. Execute:
Data_Protector_homebinutil_notes.exe -chkconf
Checks and verifications
If your configuration, backup, restore, or recovery failed:
l Examine system errors reported in the debug.log file on the Lotus Notes/Domino Server system,
located in the directory:
Windows systems: Data_Protector_homelog
Solaris systems: /var/opt/omni/log/
AIX systems: /usr/omni/log/
l Verify that the Data Protector software has been installed properly.
For details, see “Verifying Data Protector Client Installation” in the HPE Data Protector Installation
Guide.
l Check whether the Data Protector Lotus Integration Agent ldbar.exe is installed on the system.
l Windows systems: Verify the inet startup parameters on the Lotus Notes/Domino Server system.
Make sure the Data Protector Inet service is running under a user that is a member of the Data
Protector admin user group. For information, see the HPE Data Protector Help index: “Inet, changing
account”.
l Check the omnirc environment settings.
For information on how to use the omnirc file, see the HPE Data Protector Troubleshooting Guide.
l Check errors during the backup or restore session.
Error related to Lotus Notes/Domino Server takes the following form:
Lotus ERROR [error #]: Error description
Examine the error description and take appropriate actions.
Additionally, if your backup failed:
Integration Guide
Chapter 3: Data Protector Lotus Notes/Domino Server integration
HPE Data Protector (9.07) Page 126 of 803](https://image.slidesharecdn.com/hpemandp9-160823080054/85/Hpe-Data-Protector-integration-guide-126-320.jpg)
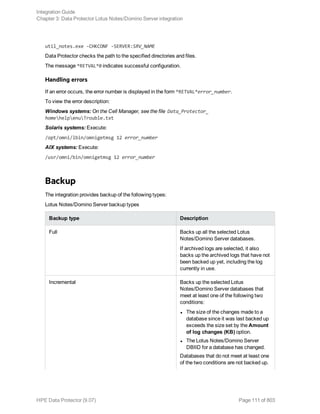
![l Check your Lotus Notes/Domino Server configuration as described in "Checking the configuration"
on page 110.
l Perform a filesystem backup of the Lotus Notes/Domino Server system.
Observe session messages and examine system errors reported in the debug.log file on the
l Data Protector Lotus Notes/Domino Server client if the Lotus Notes/Domino Server part of the
filesystem backup fails.
l Data Protector Cell Manager system if the Data Protector part of the filesystem backup fails.
l Verify Data Protector internal data transfer using the testbar utility.
a. From the directory:
Windows systems: Data_Protector_homebin
Solaris systems: /opt/omni/bin/utilns
AIX systems: /usr/omni/bin/utilns
execute:
testbar -type:Lotus -appname:SRV_NAME -bar:backup_specification_name -
perform:backup
b. Create a Lotus Notes/Domino Server backup specification to back up to a null device or file. If
the backup succeeds, the problem may be related to the backup devices.
l Start a backup session using ldbar.exe.
You can start a backup of a single database using the Data Protector CLI, specifying backup options
as ldbar.exe command line options.
On the Data Protector Lotus Notes/Domino Server client, from the directory:
Windows systems: Data_Protector_homebin
Solaris systems: /opt/omni/bin
AIX systems: /usr/omni/bin
execute:
Windows systems:
ldbar.exe -perform:backup -db: DB_NAME -server: SRV_NAME [-ini:Path_to_notes.ini_
file] -bar: backup_specification_name
UNIX systems:
ldbar.exe -perform:backup -db:DB_NAME -server:SRV_NAME [-ini:Path_to_Notes.ini_
file] -bar:backup_specification_name [-homedir:PathToLotusHome] [-datadir:path to
Domino data] [-execdir:PathToDominoExecutables]
The -bar option is mandatory because ldbar.exe reads the device options from the backup
specification as opposed to other options in the backup specification, which are ignored. Command
line options are used instead.
For other ldbar.exe parameters, execute ldbar.exe -help.
l Windows systems: When Lotus Notes/Domino Server and Windows Terminal Services coexist on
the same system and Lotus Notes/Domino Server is started from the terminal client program, Lotus
Notes/Domino Server backup cannot be performed.
Integration Guide
Chapter 3: Data Protector Lotus Notes/Domino Server integration
HPE Data Protector (9.07) Page 127 of 803](https://image.slidesharecdn.com/hpemandp9-160823080054/85/Hpe-Data-Protector-integration-guide-127-320.jpg)

![During a restore session, some of the selected Lotus/Notes Domino Server databases are not
restored, for which Data Protector reports an error similar to the following:
[Major] From: OB2BAR@ice.company.com "BLUE" Time: 8/22/2011 4:07:09 PM
Lotus Notes C API 'NSFTakeDatabaseOffline' returned error 5098:
The database is in use and cannot be taken offline.
Action
1. Disconnect all users that are accessing the databases you want to restore.
2. Restart the restore.
Problem
Recovery of restored Lotus Notes/Domino Server NSF database fails
During recovery, the following error message is displayed:
[Critical] From: OB2BAR@ice.company.com "BLUE" Time: 19.10.11 17:24:23
Lotus Notes C API 'NSFGetTransLogStyle' returned error 5114:Recovery Manager:
Recovery only supported for Backup Files.
This indicates that at least one database from the restore list was accessed before the recovery ended,
either by Lotus Notes/Domino Server, a user, or a process.
Action
1. Restart the Lotus Notes/Domino Server system and perform the restore again.
2. Restore the failed database to a location other than the one it was backed up from.
Integration Guide
Chapter 3: Data Protector Lotus Notes/Domino Server integration
HPE Data Protector (9.07) Page 130 of 803](https://image.slidesharecdn.com/hpemandp9-160823080054/85/Hpe-Data-Protector-integration-guide-130-320.jpg)

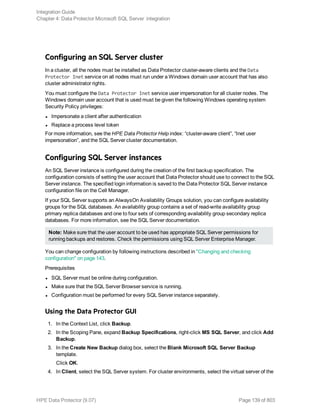
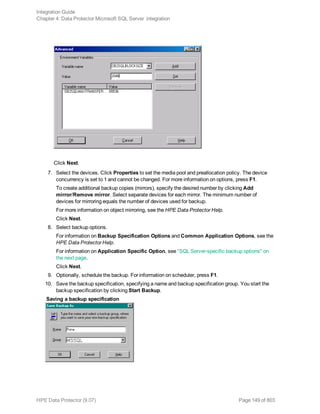
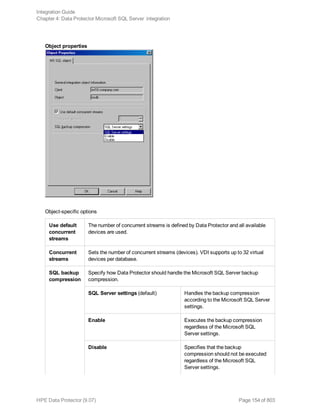
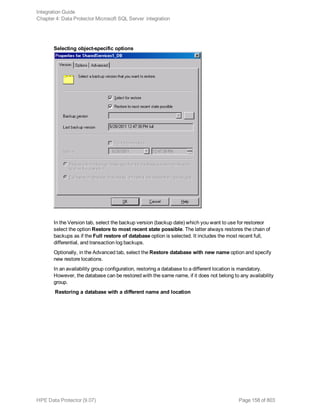
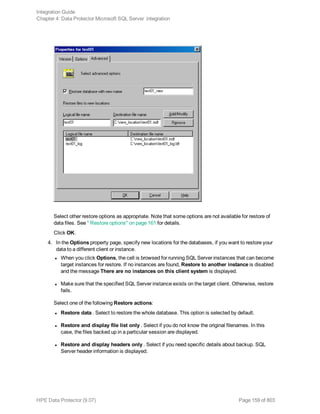
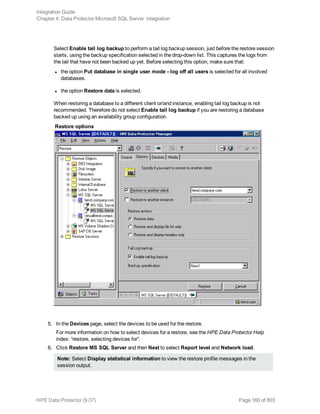
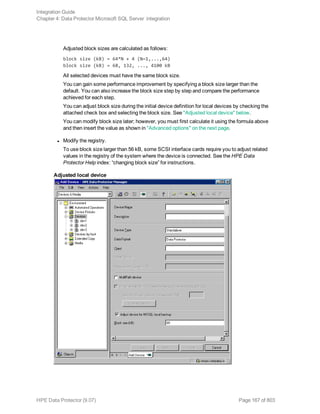
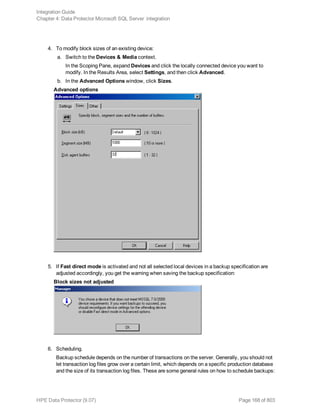
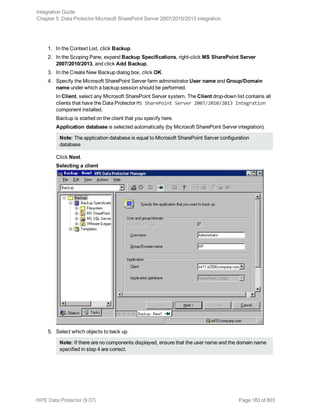
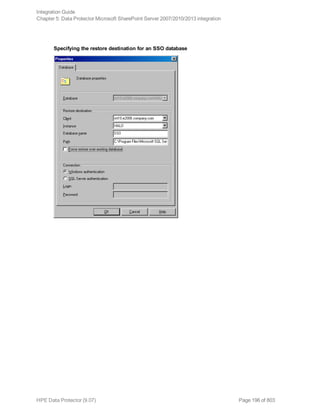
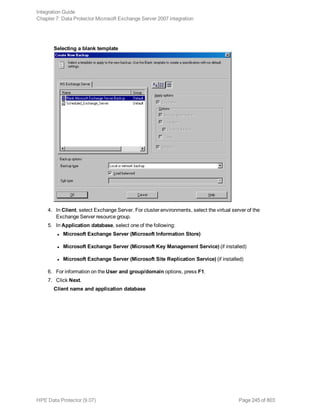
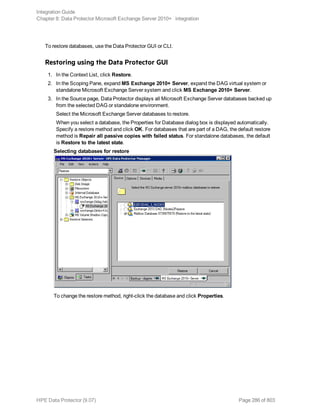
![Note: It is recommended that the SQL Server system administrator configures the integration.
For details about security, see the SQL Server documentation.
Click OK to confirm the configuration.
6. The SQL Server instance is configured. Exit the GUI or proceed with creating the backup
specification at "Creating backup specifications" on page 145.
Using the Data Protector CLI
Execute:
l For a standalone instance configuration:
sql_bar config [-appsrv:SQLServerClient] [-instance:InstanceName] [-
dbuser:SQLServerUser -password:password | -dbuser:WindowsUser -password:password
-domain:domain]
l For an availability group configuration:
sql_bar econfig [-appsrv:ListenerName] [-ag:AGname] [-dbuser:SQLServerUser -
password:password | -dbuser:WindowsUser -password:password -domain:domain]-
port:PortNumber
Parameter description
Integration Guide
Chapter 4: Data Protector Microsoft SQL Server integration
HPE Data Protector (9.07) Page 142 of 803](https://image.slidesharecdn.com/hpemandp9-160823080054/85/Hpe-Data-Protector-integration-guide-142-320.jpg)
![Checking configuration
Using the Data Protector CLI
To change the configuration, execute the command for configuring SQL Server instances again,
entering different data. In an availability group configuration, execute the command for configuring SQL
Server availability groups, entering different data.
To check configurationfor a standalone instance, execute:
sql_bar chkconf [-instance:InstanceName]
If the optional parameter -instance:InstanceName is not specified, the default instance is checked.
To check configuration for an availability group, execute:
sql_bar chkconf -ag agname –appsrv:ListenerName
If the integration is not properly configured, the command returns:
*RETVAL*8523
To get the information about the existing configuration for a standalone instance, execute:
sql_bar getconf [-instance:InstanceName]
If -instance:InstanceName is not specified, Data Protector returns configuration for the default
instance.
To get the information about the existing configuration for an availability group, execute:
sql_bar getconf -ag agname –appsrv ListenerName
Integration Guide
Chapter 4: Data Protector Microsoft SQL Server integration
HPE Data Protector (9.07) Page 144 of 803](https://image.slidesharecdn.com/hpemandp9-160823080054/85/Hpe-Data-Protector-integration-guide-144-320.jpg)
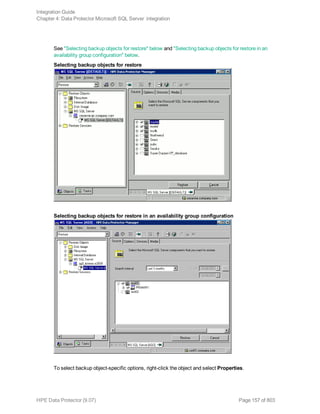
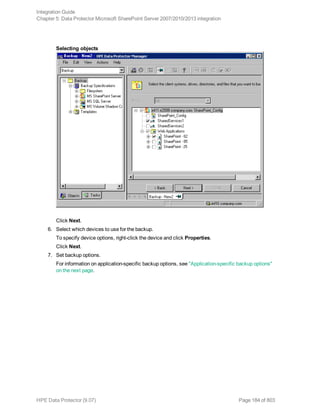
![Selecting backup objects — standalone instance backup
In an SQL Server availability group environment, when you are creating a standalone instance
backup specification, Data Protector displays the name of the database together with the
availability group name and its availability group replica role. For example, in the Data Protector
GUI, the database named DB1 belonging to the availability group primary replica named AG1 is
displayed as DB1 [AG1 primary]. Note that the name of the database together with the availability
group name and its availability group replica role is visible only during the creation of the backup
specification and not after it has already been saved.
Selecting backup objects — availability group backup
Integration Guide
Chapter 4: Data Protector Microsoft SQL Server integration
HPE Data Protector (9.07) Page 147 of 803](https://image.slidesharecdn.com/hpemandp9-160823080054/85/Hpe-Data-Protector-integration-guide-147-320.jpg)
![l Both SQL Servers must have the same local settings (code page and sort order). This information is
displayed in the session monitor for each backup.
l The target SQL Server must be configured and reside in the same Data Protector cell as the original
SQL Server.
For the configuration procedure, see "Creating backup specifications" on page 145.
Procedure
1. Select the databases you want to restore and their versions.
2. Select the following:
l To restore to a different SQL Server client, select Restore to another client and the target
client from the drop-down list.
l To restore to a different SQL Server instance, select Restore to another instance. If there are
no instances in the drop-down list, enter the instance name by yourself.
Make sure that the specified SQL Server instance exists on the target client. Otherwise,
restore fails.
3. Specify new database locations.
4. Start restore. See "Restore" on page 156.
Restoring using the Data Protector CLI
Execute:
omnir -mssql -barhost ClientName [-destination ClientName] [-instance
SourceInstanceName] [-destinstance DestinationInstanceName] {—base DBName [—session
BackupID] [MSSQL_OPTIONS]... | —base DBName —datafile GroupName/DataFileName —
session BackupID [DATAFILE_OPTIONS]...}
MSSQL_OPTIONS
-asbase NewDBName {-file LogicalFileName1PhysicalFileName1 [-file
LogicalFileName2PhysicalFileName2]...}
-replace
-nochain
-recovery {rec | norec}
-standby File
-tail_log BackupSpecificationName
DATAFILE_OPTIONS
-replace
-nochain
-recovery {rec | norec}
Note:
Integration Guide
Chapter 4: Data Protector Microsoft SQL Server integration
HPE Data Protector (9.07) Page 163 of 803](https://image.slidesharecdn.com/hpemandp9-160823080054/85/Hpe-Data-Protector-integration-guide-163-320.jpg)
![Additionally, check errorlog and VDI.log files in the MSSQLlog directory.
l Make a test filesystem backup and restore of the problematic client. For information, see the HPE
Data Protector Help.
l Check that every SQL Server used with Data Protector has the MS SQL Integration component
installed.
l Connect to SQL Server via SQL Server Enterprise Manager using the same login ID as you
specified in the Data Protector Configuration dialog box.
l Perform a database backup using SQL Server Enterprise Manager. If the backup fails, fix any SQL
Server problems, and then perform a backup using Data Protector.
Additionally, if your backup failed:
l Verify the configuration file to check if the Cell Manager is correctly set on SQL Server.
l If you do not see the SQL Server instance as the application database when creating a backup
specification, enter the instance name yourself. When “not-named instance” is not displayed, insert
the DEFAULT string.
l If Data Protector reports that the integration is properly configured, verify that the SQL Server user
has appropriate rights to access the required databases.
During master database restore, the following error occurs when executing an SQL statement:
Error has occurred while executing an SQL statement.
Error message: 'SQLSTATE:[42000] CODE:(3108) MESSAGE:[Microsoft]
[ODBC SQL Server Driver][SQL Server]To restore the master database,
the server must be running in single user mode. For information on
starting in single user mode, see "How to: Start an Instance of SQL
Server (sqlservr.exe)" in Books Online.
Note that this behavior is expected when the master database is not restored in single user mode.
Problems
Problem
The integration is properly configured but the database backup fails after a timeout
l With an error similar to:
[Warning] From: OB2BAR@computer.company.com "SQLSRV"
Time: 7/29/2011 8:19:22 PM
Error has occurred while executing SQL statement.
[Microsoft][ODBC SQL Server Driver][SQL Server]Backup or restore
operation terminating abnormally.'
[Critical] From: OB2BAR@computer.company.com "SQLSRV"
Time: 7/29/11 8:19:24 PM
Received ABORT request from SM => aborting
l SQL Server error log contains an entry similar to:
2011-07-29 20:19:21.62 kernel
BackupVirtualDeviceSet::Initialize: Open failure on backup
Integration Guide
Chapter 4: Data Protector Microsoft SQL Server integration
HPE Data Protector (9.07) Page 170 of 803](https://image.slidesharecdn.com/hpemandp9-160823080054/85/Hpe-Data-Protector-integration-guide-170-320.jpg)
![device 'Data_Protector_master'.
Operating system error -2147024891(Access is denied.).
l SQL Server VDI.LOG file contains an entry similar to:
2011/07/30 13:19:31 pid(2112)
Error at BuildSecurityAttributes: SetSecurityDescriptorDacl
Status Code: 1338, x53A Explanation: The security descriptor
structure is invalid.
SQL Server service and Data Protector Inet are running under different accounts. The integration
cannot access SQL Server due to security problems.
Action
Restart the Data Protector Inet service under the same account as the SQL Server service is
running.
Problem
Backup fails with "The object was not open"
When backing up Microsoft SQL Server databases, the session fails with an error similar to the
following:
[Critical]From : OB2BAR_Main@wemaoldb2dr "Aolins" Time:11/12/2011 02:01:34 AM
Microsoft SQL Server reported the following error during login : The object was not
open
The error may appear if the SQL Server Browser service is not running.
Action
Proceed as follows:
1. Start the SQL Server Browser service.
2. Start a new backup session.
Problem
Backup fails if concurrency is set to more than one and one of the devices fails or is not
started at all
This can happen because of a medium error.
Action
Set the device concurrency to one or replace the invalid media.
Problem
Restore from an object copy fails
When you try to restore an SQL Server database from an object copy session, the restore fails.
An SQL Server database backed up using multiple streams (the Concurrent streams option set to
more than 1) can only be restored if the backup objects created by the streams reside on separate
Integration Guide
Chapter 4: Data Protector Microsoft SQL Server integration
HPE Data Protector (9.07) Page 171 of 803](https://image.slidesharecdn.com/hpemandp9-160823080054/85/Hpe-Data-Protector-integration-guide-171-320.jpg)
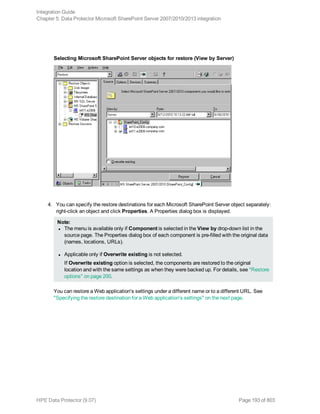
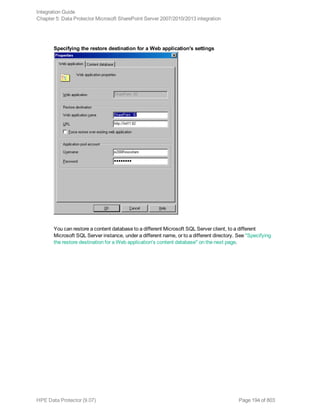
![9. Click Add/Set.
10. In the Version and Options property pages, specify the appropriate options. For details, see
"Restoring using the Data Protector GUI" on page 156.
11. Click OK to close the Properties window.
12. In the Options, Devices, and Media property pages, specify the appropriate options. For details,
see "Restoring using the Data Protector GUI" on page 156.
13. Click Restore and then Next to select the Report level and Network load.
14. Click Finish to start the restore session.
Problem
Database restore fails
The restore session aborts with a major error similar to:
Error has occurred while executing a SQL statement.Error message: 'SQLSTATE:[42000]
CODE:(3159) MESSAGE:[Microsoft][ODBC SQL Server Driver][SQL Server]The tail of the
log for the database "test2" has not been backed up. Use BACKUP LOG WITH NORECOVERY
to backup the log if it contains work you do not want to lose. Use the WITH REPLACE
or WITH STOPAT clause of the RESTORE statement to just overwrite the contents of
the log. SQLSTATE:[42000] CODE:(3013) MESSAGE:[Microsoft][ODBC SQL Server Driver]
[SQL Server]RESTORE DATABASE is terminating abnormally.
Action
To solve the problem , perform one of the following before restarting the restore session:
l Select the restore option Enable tail log backup (recommended).
l Perform a transaction log backup to obtain the most recent transaction logs.
Problem
Restore of a database in a log shipping configuration with the tail log backup enabled fails
In a Microsoft SQL Server log shipping configuration, Data Protector performs differential database
backup instead of transaction log backup when the latter is run. The automatic backup type switch
takes place also with tail log backup. In these circumstances, the database backup chain does not
contain most recent transactions from the tail of the log. If tail of the log of the target database has not
been backed up yet, Microsoft SQL Server does not allow restoring over this database.
Action
Perform one of the following and restart the restore session:
l Disable Microsoft SQL Server log shipping.
l Enable the option Force restore over existing database for all involved databases.
Caution: Tails of the logs of all involved databases will be lost.
Integration Guide
Chapter 4: Data Protector Microsoft SQL Server integration
HPE Data Protector (9.07) Page 174 of 803](https://image.slidesharecdn.com/hpemandp9-160823080054/85/Hpe-Data-Protector-integration-guide-174-320.jpg)
![What happens during the preview?
The following are tested:
l Communication between the Microsoft SharePoint Server system on which the backup session is
started and the Data Protector Cell Manager
l If devices are correctly specified
l If necessary media are in the devices
l The syntax of the backup specification
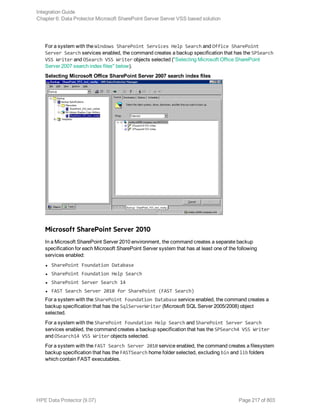
Starting backup sessions
Interactive backups are run on demand. They are useful for urgent backups or restarting failed backups.
To start a backup, use the Data Protector GUI or CLI.
Before you begin
l Ensure that the Microsoft SharePoint Server and Microsoft SQL Server instances are online.
Using the Data Protector GUI
1. In the Context List, click Backup.
2. In the Scoping Pane, expand Backup Specifications, and then MS SharePoint Server
2007/2010/2013. Right-click the backup specification you want to use and click Start Backup.
3. Specify Backup type and Network load. Click OK.
The message Session completed successfully is displayed at the end of a successful backup
session.
Using the Data Protector CLI
1. Log in to the Cell Manager or to any client with the Data Protector User Interface component
installed under a user account that is configured as described in "Configuring the integration" on
page 179.
2. Execute:
omnib -mssharepoint_list BackupSpecificationName [-barmode MSSharePointMode]
[ListOptions]
where MSSharePointMode is one of the following backup types:
full|diff|incr
If the -barmode option is not specified, a Full backup is performed.
For ListOptions, see the omnib man page or the HPE Data Protector Command Line Interface
Reference.
Integration Guide
Chapter 5: Data Protector Microsoft SharePoint Server 2007/2010/2013 integration
HPE Data Protector (9.07) Page 188 of 803](https://image.slidesharecdn.com/hpemandp9-160823080054/85/Hpe-Data-Protector-integration-guide-188-320.jpg)
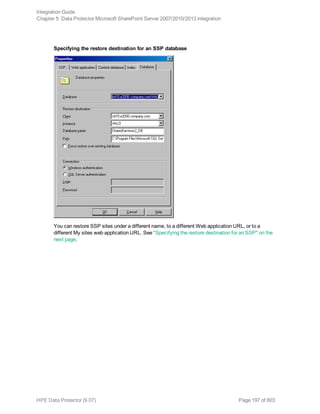
![Before you begin
l Ensure that the Microsoft SharePoint Server and the Microsoft SQL Server instances are online and
that the Microsoft SharePoint Server services run under the Microsoft SharePoint Server farm
administrator account.
l If you plan to restore Microsoft SQL Server databases to another location:
l Ensure that the destination Microsoft SQL Server system is part of the Microsoft SharePoint
Server environment and has the MS SQL Integration component installed.
l Ensure that the destination Microsoft SQL Server instance exists, and is online.
l If you use the encryption key for the single sign-on service, note that the single sign-on database
cannot be restored without the original encryption key.
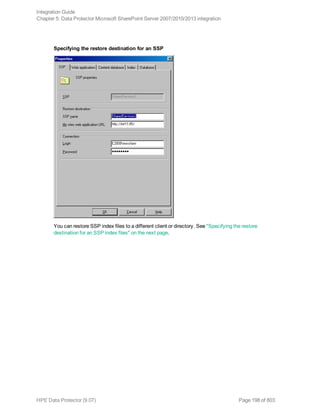
Restoring using the Data Protector GUI
1. In the Context List, click Restore.
2. In the Scoping Pane, expand Restore Objects, MS SharePoint Server 2007/2010/2013, select
the Microsoft SharePoint Server client that served as an entry point to the Microsoft SharePoint
Server farm during backup, and then click MS SharePoint Server 2007/2010/2013 [Microsoft
SharePoint Server 2007/2010/2013].
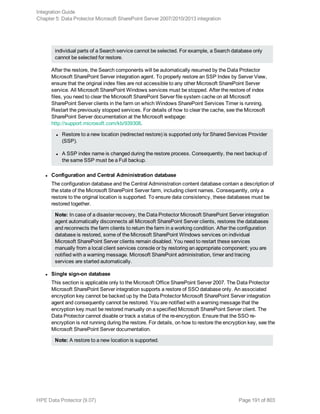
3. In the Source page, select which Microsoft SharePoint Server objects to restore. You can view
the objects by Component or by Server in a specified time interval.
The From field must always be a FULL session of the source, while the To field can be a FULL /
DIFF / INCR session of the source.
Selecting Microsoft SharePoint Server objects for restore (View by Component)
Integration Guide
Chapter 5: Data Protector Microsoft SharePoint Server 2007/2010/2013 integration
HPE Data Protector (9.07) Page 192 of 803](https://image.slidesharecdn.com/hpemandp9-160823080054/85/Hpe-Data-Protector-integration-guide-192-320.jpg)
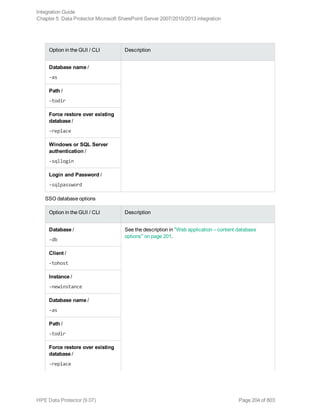
![Option in the GUI / CLI Description
Windows or SQL Server
authentication /
-sqllogin
Login and Password /
-sqlpassword
Restoring using the Data Protector CLI
1. Log in to the Cell Manager or to any client with the Data Protector User Interface component
installed under a user account that has been added to the Data Protector admin or operator user
group.
2. Execute:
omnir -mssharepoint
-barhost HostName
[-destination RestoreClientName]
-user User:Group
[-session BackupID]
[-replace]
[-byserver ServerName [-byserver ServerName...]]
-farmname FarmName
[Component [Component...]]
[GENERAL_OPTIONS]
Component
-configdb |
-webapplication WebApplicationName
[WEB_APPLICATION_OPTIONS]
[ContentDatabase [ContentDatabase...]] |
-ssp SSPName [SSP_OPTIONS]
[-index [INDEX_OPTIONS]]
[Database [Database...]]
[-webapp WebApplicationName
[WEB_APPLICATION_OPTIONS]
[ContentDatabase [ContentDatabase...]]] |
-wsssearch [Database] |
-ssodb [DB_OPTIONS]
ContentDatabase
-db DBName -host DBHostName [-unlink] [DB_OPTIONS]
Database
-db DBName -host DBHostName [DB_OPTIONS]
Integration Guide
Chapter 5: Data Protector Microsoft SharePoint Server 2007/2010/2013 integration
HPE Data Protector (9.07) Page 205 of 803](https://image.slidesharecdn.com/hpemandp9-160823080054/85/Hpe-Data-Protector-integration-guide-205-320.jpg)
![WEB_APPLICATION_OPTIONS
-as WebApplicationName
-url WebApplicationURL
-poolusername Username [-poolpassword Password]
-replace
DB_OPTIONS
-sqllogin Username [-sqlpassword Password]
-instance SourceInstanceName
-as NewDBName
-tohost DBHostName
-newinstance DestinationInstanceName
-todir NewDirectoryName
-replace
SSP_OPTIONS
-ssplogin Username [-ssppassword Password]
-as SSPName
-mysiteurl MySiteWebAppURL INDEX_OPTIONS
-tohost IndexServerHostName
-todir NewDirectoryName
For a brief description of the options, see "Restore options" on page 200. For details, see the omnir
man page or the HPE Data Protector Command Line Interface Reference.
Note: A backup ID is a point in time. All objects (backup data) created in a backup session have
the same backup ID, which is the same as the session ID of the backup session.
Mirrored objects and objects created in an object copy session have the same backup ID as
objects created in the original backup session. Suppose the media set created in the original
backup session no longer exists, but the media set created in an object copy session still exists.
To restore the objects, you must specify the session ID of the original backup session (that is, the
backup ID) and not the session ID of the object copy session.
The omnir syntax does not let you specify from which object copy to restore if several copies of the
same object exist. This is only possible using the Data Protector GUI by setting the media
allocation priority list.
Example
To restore a Web application content database from the latest session to another location, changing its
name, a Microsoft SQL Server system, instance, and a data file path, execute:
omnir –mssharepoint –barhost wfe1.domain.com –webapplication "SharePoint - 2224" –
db "WSS_Content_2224" –as "WSS_new_DB" –tohost mosssql2.domain.com –newinstance
moss1 –todir "f:program filesSQLdata"
Integration Guide
Chapter 5: Data Protector Microsoft SharePoint Server 2007/2010/2013 integration
HPE Data Protector (9.07) Page 206 of 803](https://image.slidesharecdn.com/hpemandp9-160823080054/85/Hpe-Data-Protector-integration-guide-206-320.jpg)
![Action
Set the global option SmWaitForFirstRestoreClient to the appropriate value or upgrade the
resources of the farm clients.
Problem
Backup fails with “MS SQL integration not installed” message
When Microsoft SQL Server systems are configured with alias names and Microsoft SharePoint Server
configuration uses the SQL Server system alias names, a backup session fails with an error similar to
the following:
[Critical] From: OB2BAR_SHAREPOINT@Domain Database Time: Date Time 'MS SQL'
integration not installed on ''.
Action
1. Make sure that the Microsoft SQL Server Management Objects (SMO) is installed on each
Microsoft SharePoint Server system.
2. Install the Data Protector Microsoft SharePoint Server integration DPWIN_00574 or later patch on
each Microsoft SharePoint Server system.
Problem
Backup fails with “Required privilege not held by the client” message
A backup session fails with an error similar to the following:
[70:24] A system error occurred when starting the target script or an agent module.
The system error code reported is 1314 and the message resolves to '[1314] A
required privilege is not held by the client.'.
Action
1. Go to:
Control Panel > Administrative Tools > Local Security Policy
2. Expand Local Policies and select User Rights Assignment.
3. The Windows domain user under which the Data Protector Inet service starts the backup (that is,
the farm administrator) must be granted the Replace a process level token user right.
Integration Guide
Chapter 5: Data Protector Microsoft SharePoint Server 2007/2010/2013 integration
HPE Data Protector (9.07) Page 209 of 803](https://image.slidesharecdn.com/hpemandp9-160823080054/85/Hpe-Data-Protector-integration-guide-209-320.jpg)


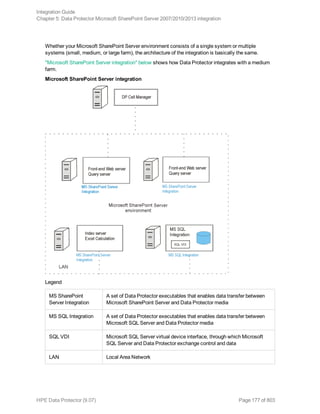
![Microsoft SharePoint Server 2013
In a Microsoft SharePoint Server 2013 environment, the command creates a separate backup
specification for each Microsoft SharePoint Server system that has at least one of the following
services enabled:
l SharePoint Foundation Database
l SharePoint Server Search 15
For a system with the SharePoint Foundation Database service enabled, the command creates a
backup specification that has the SqlServerWriter (Microsoft SQL Server 2008/2012) object
selected.
For a system with the SharePoint Server Search services enabled, the command creates a backup
specification that has the OSearch15 VSS Writer objects selected.
Considerations
l Microsoft Office SharePoint Server 2007: If the Office SharePoint Server Search service is
enabled on two separate Microsoft SharePoint Server systems so that one is assigned the Query
and the other the Indexing role, the command creates a backup specification only for the system
with the Indexing role. It is not created for the one with the Query role. To restore index files on the
Query system, copy the files from the Indexing system to the Query system after the restore. For
details, see the section "Restoring index files on the Query system" on page 235”.
l The command options enable you to split the process into two parts: first you create the backup
specifications and then you start backup sessions. In this way, you can manually modify the newly-
created backup specifications in the Data Protector GUI before the backup is actually started.
l If Microsoft SQL Server instances are used not only by Microsoft SharePoint Server but also by
other database applications, modify the backup specifications so that only the databases that
belong to Microsoft SharePoint Server are selected for backup. See the section "Modifying backup
specifications" on page 224.
l If you have Microsoft SQL Server database mirroring enabled, a failover can occur and so a different
Microsoft SQL Server system becomes active. Since the command creates backup specifications
only for the currently active Microsoft SQL Server systems, it is advisable to update (recreate) the
backup specifications before the backup is started.
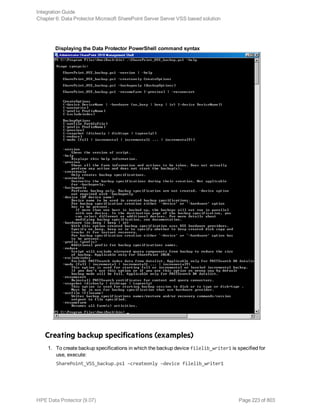
The command syntax
SharePoint_VSS_backup.ps1 –help |-version
SharePoint_VSS_backup.ps1 –createonly CreateOptions
SharePoint_VSS_backup.ps1 –backuponly BackupOptions
SharePoint_VSS_backup.ps1 –resumefarm [-preview] | -resumecert
CreateOptions
-device DevName
[-overwrite]
[-prefix PrefixName]
Integration Guide
Chapter 6: Data Protector Microsoft SharePoint Server Server VSS based solution
HPE Data Protector (9.07) Page 218 of 803](https://image.slidesharecdn.com/hpemandp9-160823080054/85/Hpe-Data-Protector-integration-guide-218-320.jpg)
![[-excludeindex]
BackupOptions
[-outfile PathToFile]
[-prefix PrefixName]
[-preview]
[-reduce]
[-mode {full | incremental | incremental1 ... | incremental9}]
[-timeout Timeout]
l The command must be executed from the Data_Protector_homebin directory on the front-end
Web Server system. Ensure that you are logged in under a user account that is configured as
described in "Configuring user accounts" on page 214 and that you open the command prompt with
administrative rights.
l Do not close the PowerShell console while the backup session is in progress. If you close the
console during the backup, some actions are not performed: the backup sessions started do finish,
but the farm does not resume the original state. To resume the farm, first execute the command with
the –resumefarm option and then unquiesce the farm manually using the Microsoft SharePoint
Server Central Administration or stsadm.
Option description
-help Displays the SharePoint_VSS_
backup.ps1 command usage.
-version Displays the SharePoint_VSS_
backup.ps1 version.
–createonly If this option is specified, Data
Protector only creates backup
specifications. Backup is not started.
–backuponly If this option is specified, Data
Protector only starts backup sessions
using the existing backup
specifications. The -device option is
not required.
-deviceDevName Specifies which Data Protector device
to use for backup. You can specify only
one device.
If only one device is used to back up a
multi-system farm, the corresponding
backup sessions cannot run in parallel.
This prolongs the time during which the
farm is in read-only mode. Specifically,
the farm is in read-only mode from the
moment when the backup sessions are
started up until all VSS snapshots are
Integration Guide
Chapter 6: Data Protector Microsoft SharePoint Server Server VSS based solution
HPE Data Protector (9.07) Page 219 of 803](https://image.slidesharecdn.com/hpemandp9-160823080054/85/Hpe-Data-Protector-integration-guide-219-320.jpg)
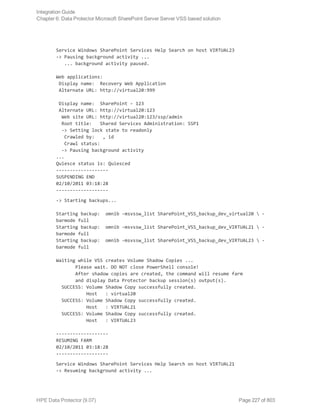
![Scheduling a backup session using the Windows scheduler
In the Run text box, enter:
Windows_PowerShell_home powershell.exe SharePoint_VSS_backup.ps1[Options]
For details on Options, see "The command syntax" on page 218.
In the Start in text box, enter:
Data_Protector_home bin
In the Run as text box, enter a Windows domain user account DOMAINUserName that is configured as
described in "Configuring user accounts" on page 214.
Restore
To restore Microsoft SharePoint Server data:
l Stop Microsoft SharePoint Server services
l Restore the data.
l Return the farm to a working state.
For details, see the following sections.
Integration Guide
Chapter 6: Data Protector Microsoft SharePoint Server Server VSS based solution
HPE Data Protector (9.07) Page 229 of 803](https://image.slidesharecdn.com/hpemandp9-160823080054/85/Hpe-Data-Protector-integration-guide-229-320.jpg)


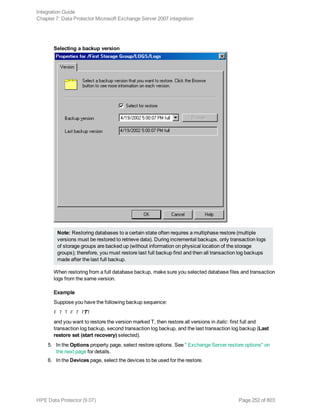

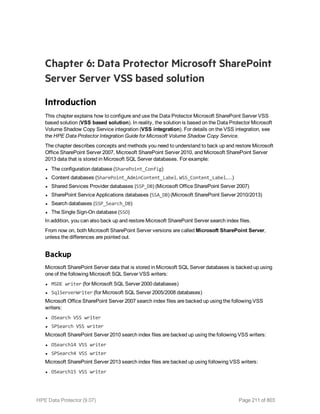
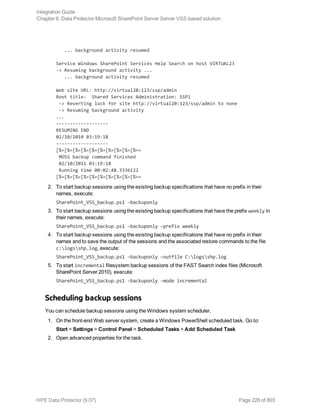
![See " Exchange Server restore options" on page 253 for details.
6. Restore all subsequent incremental backups and specify the same directory for temporary log files
on the target client as for the restore of the last full backup.
When restoring the last incremental backup, select Last restore set (start recovery)to
initiate automatic hard recovery of the Exchange Server database. If this option is not set, start
recovery manually by running eseutil /cc /t from the temporary log files directory.
If hard recovery is initiated after restore of the last set of files (Last restore set (start
recovery)selected), temporary log files are deleted after recovery.
Restoring using the CLI
To perform a restore using CLI, execute the following command:
omnir -msese
-barhost ClientName [-destination ClientName]
-appname full_application_name {-base DBName -session BackupID}...
-logpath Path [-last [-mount] [-consistent]]
Note: A backup ID is a point in time. All objects (backup data) created in a backup session have
the same backup ID, which is the same as the session ID of the backup session.
Mirrored objects and objects created in an object copy session have the same backup ID as
objects created in the original backup session. Suppose the media set created in the original
backup session no longer exists, but the media set created in an object copy session still exists.
To restore the objects, you must specify the session ID of the original backup session (that is, the
backup ID) and not the session ID of the object copy session.
The omnir syntax does not let you specify from which object copy to restore if several copies of the
same object exist. This is only possible using the Data Protector GUI by setting the media
allocation priority list.
For the description of options, see the omnir man page.
Example
To restore Information Store with the /First Storage Group/STORE/Public Folder Store store
and /First Storage Group/LOGS/Logs logs to computer.company.com (where it was backed up),
using the backup ID 2010/07/07-13, plus restore log files to c:temp, perform hard recovery after
restore and mount the database after hard recovery, execute:
omnir -msese -barhost computer.company.com -appname "Microsoft Exchange Server
(Microsoft Information Store)" -base "/First Storage Group/LOGS/Logs" -session
"2010/07/07-13" -base "/First Storage Group/STORE/Public Folder Store" -session
"2010/07/07-13" -logpath c:temp -last -mount
Integration Guide
Chapter 7: Data Protector Microsoft Exchange Server 2007 integration
HPE Data Protector (9.07) Page 255 of 803](https://image.slidesharecdn.com/hpemandp9-160823080054/85/Hpe-Data-Protector-integration-guide-255-320.jpg)
![l Try to restart the Microsoft Exchange Server and start the backup again.
l Check that the Exchange_homebin directory is added to the Windows Path environment variable.
For details, see "Configuring the integration" on page 242.
l When performing incremental backups, ensure that circular logging is disabled by starting Exchange
System Manager and selecting Properties from the storage group you are backing up.
l If you cannot mount the storage after a successful restore, check that LOGS storage on the same
storage group is also restored.
l Define a directory for temporary log files in the Restore context. Check if the specified directory
exists. If it does not, create it or specify another existing directory.
l To restore to another system, make sure Exchange Server is installed on that system and has the
same organization and site names as the restored server.
Problems
Problem
Restore session fails
During the restore session, the following error is displayed:
[Critical]
Target Instance, specified for restore, is not found or log files
do not match the backup set logs.
The problem occurs when there is a gap in the sequence of the restored and the current log files.
Action
Open the command prompt window and execute the eseutil command from the directory with
temporary log files of the corresponding storage group:
l If the storage group name consists only of the ASCII characters A-Z, a-z, 0-9, and space, execute
the following command from Storage_group_name:
eseutil /cc /t
l If the storage group name consists of Unicode characters, proceed as follows:
a. One of the subdirectories in the temporary log file directory contains an empty file whose
filename equals the name of the storage group you are restoring. Identify the subdirectory where
the file is located. The subdirectory name conforms to the following template:
Storage Group Number
b. Execute the following commands:
Drive_letter :
cd "Temporary_log_files_directory_pathStorage Group Number"
eseutil /cc /t
Problem
Restore of a database fails
Restore of an Exchange Server 2007 database ends abnormally after reporting the following error:
Integration Guide
Chapter 7: Data Protector Microsoft Exchange Server 2007 integration
HPE Data Protector (9.07) Page 257 of 803](https://image.slidesharecdn.com/hpemandp9-160823080054/85/Hpe-Data-Protector-integration-guide-257-320.jpg)
![[Critical] From: OB2BAR_main@Hostname "Microsoft Exchange Server
(Microsoft Information Store)" Time: DateTime
[151:214] Recovery SG 'RSG_name' is configured on the Microsoft
Exchange Server.
The problem occurs in two cases:
l If you try to restore the database to its original location when the Recovery Storage Group (RSG)
exists on the Exchange Server system.
The RSG may have been created manually or using the VSS integration agent for restoring a store to
the RSG. Under such circumstances, Exchange Server redirects the restore of the database to the
RSG instead of restoring the database to the original storage group.
l If you try to restore the database to the RSG when the omnirc option OB2MSESE_CHECK_RSG is set to
1.
Action
To enable the restore of the database to the original storage group, perform one of the following:
l Using Exchange Management Console or Windows PowerShell, remove the RSG from the
Exchange Server system.
l Add a registry key which will override redirection of restore to the RSG:
a. Start Windows Registry Editor.
b. In Registry Editor, expand the folder:
HKEY_LOCAL_MACHINESYSTEMCurrentControlSetServices
MSExchangeISParametersSystem
c. Create a new DWORD value Recovery SG Override and set its value to 1.
To enable the restore of the database to the RSG, set the omnirc option OB2MSESE_CHECK_RSG to 0.
Problem
Restore of a database to the Recovery Storage Group (RSG) fails
Restore of an Exchange Server 2007 database to the RSG ends abnormally after reporting the
following error:
ESE subsystem or operating system reported error for Mailbox:
0xc7fe1f42: Database not found.
The problem occurs when the database being restored is not properly linked to the RSG.
Action
To enable the restore of the database to the RSG, using Exchange Management Console or Windows
PowerShell appropriately link the database to the RSG.
Problem
Restore of a database to the Recovery Storage Group (RSG) fails
Restore of an Exchange Server 2007 database to the RSG ends abnormally after reporting the
following error:
Integration Guide
Chapter 7: Data Protector Microsoft Exchange Server 2007 integration
HPE Data Protector (9.07) Page 258 of 803](https://image.slidesharecdn.com/hpemandp9-160823080054/85/Hpe-Data-Protector-integration-guide-258-320.jpg)

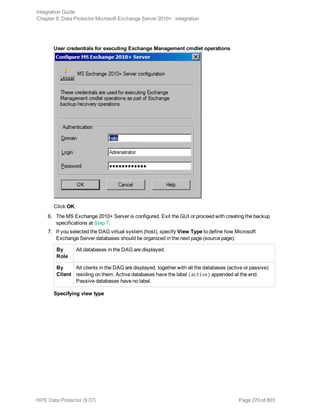

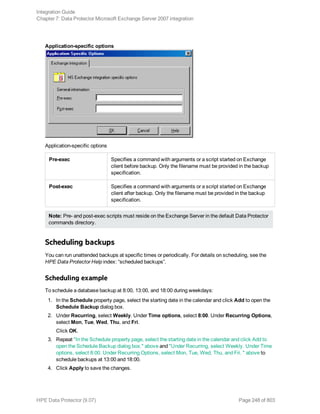
![Options Description
Exclude
clients
from
backup
Creates a list of clients. The database copies that reside on these clients are not
backed up.
Application-specific backup options
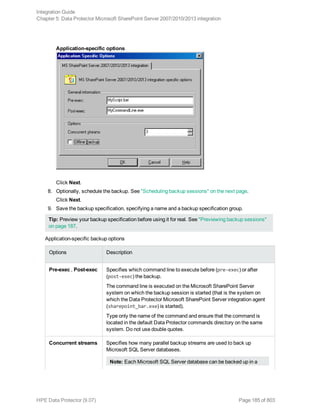
Options Description
Pre-exec , Post-exec Specifies which command line to run on a Microsoft
Exchange Server system before (pre-exec) or after
(post-exec) the backup.
The command line is executed only on the Microsoft
Exchange Server system on which the backup session is
started (that is the system on which the Data Protector
Microsoft Exchange Server integration agent e2010_
bar.exe is started).
Type only the name of the command and ensure that the
command is located in the default Data Protector
commands directory on the same system. Do not use
double quotes.
DAG environments: If you selected the DAG virtual
system (host) in the Application system option, ensure
that the command is located on the currently active node.
To find out which Microsoft Exchange Server node is
currently active, see "Restore" on page 280.
Perform consistency check
[-exch_check
[-exch_throttle Value ] |
-exch_checklogs]
If this option is selected, Microsoft Exchange Server
checks the consistency of a database's backup data. If
this option is not selected, the session finishes earlier, but
the backup data consistency is not guaranteed.
The check is performed on the backup media after the
backup data is created. If the data is found corrupt, itis
discarded and the database backup fails.
Default: selected
If the Check log files only option is selected, only the
backup data of the log files is checked, which is enough
for Microsoft Exchange Server to guarantee data
consistency.
Default: selected
By default, the consistency check is I/O intensive, which
Integration Guide
Chapter 8: Data Protector Microsoft Exchange Server 2010+ integration
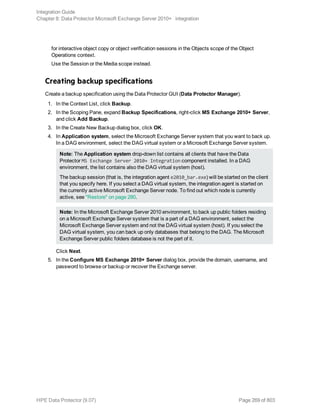
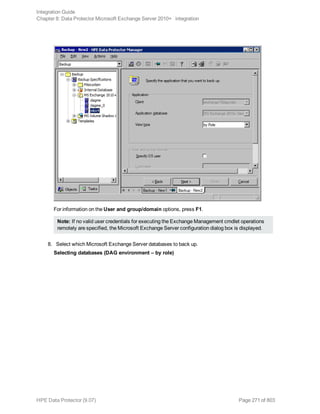
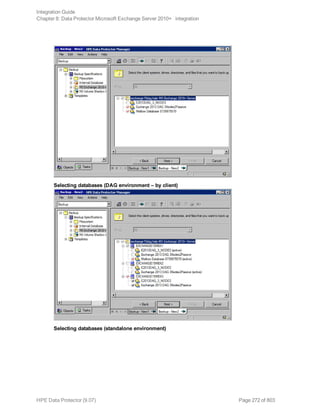
HPE Data Protector (9.07) Page 276 of 803](https://image.slidesharecdn.com/hpemandp9-160823080054/85/Hpe-Data-Protector-integration-guide-276-320.jpg)
![page 265.
2. Execute the following command:
omnib -e2010_list BackupSpecificationName -test_bar
What happens during the preview?
The following are tested:
l Communication between the Microsoft Exchange Server system on which the backup session is
started and the Cell Manager
l If each selected database has at least one copy available for backup after the Backup policy
options and Client filtering options have been applied (this applies to backup specifications that
contain backup policy options)
l If the selected databases are ready to be backed up (that is, they should not be dismounted,
suspended, or in a failed state)
Starting backup sessions
Interactive backups are run on demand. They are useful for urgent backups or restarting failed backups.
To start a backup, use the Data Protector GUI or CLI.
Using the Data Protector GUI
1. In the Context List, click Backup.
2. In the Scoping Pane, expand Backup Specifications, and then MS Exchange 2010+ Server.
Right-click the backup specification you want to use and click Start Backup.
3. Specify Backup type and Network load. Click OK.
The message Session completed successfully is displayed at the end of a successful backup
session.
Using the Data Protector CLI
1. Log in to the Cell Manager or to any client that has the Data Protector User Interface
component installed under a user account that is configured as described in "Configuring user
accounts" on page 265.
2. Execute the following command:
omnib -e2010_list BackupSpecificationName [-barmode E2010Mode] [LIST_OPTIONS]
where E2010Mode is one of the following:
full|copy|incr|diff
The default is full.
For ListOptions, see the omnib man page or the HPE Data Protector Command Line Interface
Reference.
Integration Guide
Chapter 8: Data Protector Microsoft Exchange Server 2010+ integration
HPE Data Protector (9.07) Page 279 of 803](https://image.slidesharecdn.com/hpemandp9-160823080054/85/Hpe-Data-Protector-integration-guide-279-320.jpg)
![Examples
To start a Full backup using the backup specification MyDatabases, execute:
omnib -e2010_list MyDatabases -barmode full
To start a Differential backup using the same backup specification, execute:
omnib -e2010_list MyDatabases -barmode diff
Backup objects
For each database (copy), Data Protector creates the following backup objects:
l Database file object
l ClientName :/Microsoft Exchange Writer (Exchange Information Store)/Microsoft
Information Store/DBID/File [MSVSSW-APP]
(standalone database or active copy)
l ClientName :/Microsoft Exchange Writer (Exchange Replication Service)
/Microsoft Information Store/DBID/File [MSVSSW-APP]
(passive copy)
l Log file object
l ClientName :/Microsoft Exchange Writer (Exchange Information Store)/Microsoft
Information Store/DBID/Logs [MSVSSW-APP]
(standalone database or active copy)
l ClientName :/Microsoft Exchange Writer (Exchange Replication Service)
/Microsoft Information Store/DBID/Logs [MSVSSW-APP]
(passive copy)
l Database object
ClientName :/DBID/DBName [E2010]
The database object contains information needed to construct the restore chain. For details on
restore chains, see "Restore chain" on page 284.
l VSS metadata object
/BackupSession/Metadata [MSVSSW-APP]
Information on whether the objects were successfully backed up or not is saved in the Data Protector
IDB. On how to retrieve the information from the IDB, see "Finding information for restore" on page 285.
Restore
You can restore Microsoft Exchange Server data by performing a standard restore session.
For details, "Restore procedure" on page 285.
After you have restored a database, start a Full backup session for the database. Otherwise, the
Integration Guide
Chapter 8: Data Protector Microsoft Exchange Server 2010+ integration
HPE Data Protector (9.07) Page 280 of 803](https://image.slidesharecdn.com/hpemandp9-160823080054/85/Hpe-Data-Protector-integration-guide-280-320.jpg)
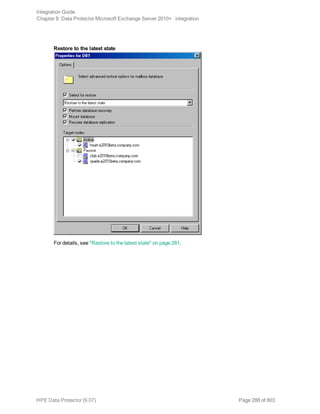
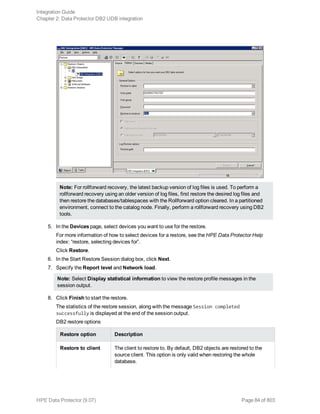
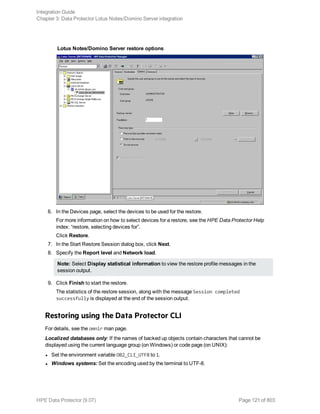
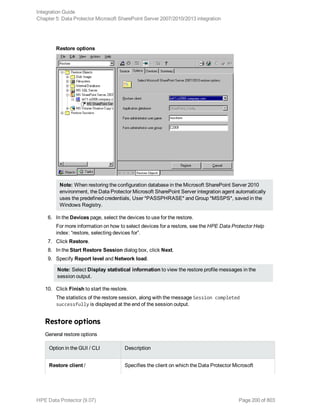
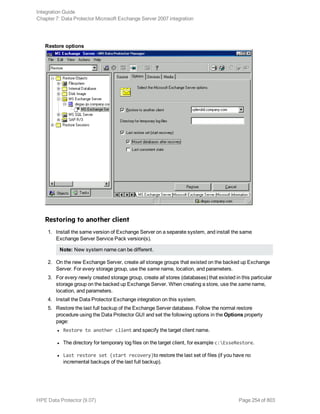
![Restore options
5. In the Devices page, select the devices to use for restore.
For details on how to select devices to be used for restore, see the HPE Data Protector Help
index: “restore, selecting devices for”.
6. Click Restore.
7. In the Start Restore Session dialog box, click Next.
8. Specify Report level and Network load.
Note: Select Display statistical information to view the restore profile messages in the
session output.
9. Click Finish to start the restore.
The statistics of the restore session, along with the message Session completed
successfully is displayed at the end of the session output.
Restoring using the Data Protector CLI
1. Log in to the Cell Manager or to any Microsoft Exchange Server client with the User Interface
component installed under a user account that is configured as described in "Configuring user
accounts" on page 265.
2. Execute the following:
omnir -e2010
-barhost ClientName
[VSS_EXCHANGE_SPECIFIC_OPTIONS]
Database [Database …]
[-user User:Domain]
[GENERAL_OPTIONS]
Integration Guide
Chapter 8: Data Protector Microsoft Exchange Server 2010+ integration
HPE Data Protector (9.07) Page 292 of 803](https://image.slidesharecdn.com/hpemandp9-160823080054/85/Hpe-Data-Protector-integration-guide-292-320.jpg)
![Database
{-db_name SourceDatabaseName | -db_guid SourceDatabaseGUID }
[-source SourceClientName]
{-repair | -latest | -pit | -new | -temp} E2010_METHOD_OPTIONS E2010_REPAIR_
METHOD_OPTIONS
[–no_resume_replication]
E2010_LATEST_METHOD_OPTIONS
[-node TargetNode … | -all]
[–no_resume_replication]
[–no_recover]
[–no_mount]
E2010_PIT_METHOD_OPTIONS
-session BackupID
[-node TargetNode … | -all]
[–no_resume_replication]
[–no_recover]
[–no_mount]
E2010_NEW_METHOD_OPTIONS
-session BackupID
-client TargetClientName
-location TargetDatabasePath
-name TargetDatabaseName
[-recoverydb]
[–no_recover]
[–no_mount]
E2010_TEMP_METHOD_OPTIONS
-session BackupID
-client TargetClientName
-location TargetDatabasePath
[–no_chain]
[–edb_only]
[–no_recover]
For a brief description of the options, see "Restore options" on page 295. For details, see the
omnir man page or the HPE Data Protector Command Line Interface Reference.
Note: A backup ID is a point in time. All objects (backup data) created in a backup session
have the same backup ID, which is the same as the session ID of the backup session.
Mirrored objects and objects created in an object copy session have the same backup ID as
objects created in the original backup session. Suppose the media set created in the original
backup session no longer exists, but the media set created in an object copy session still
exists. To restore the objects, you must specify the session ID of the original backup session
(that is, the backup ID) and not the session ID of the object copy session.
Integration Guide
Chapter 8: Data Protector Microsoft Exchange Server 2010+ integration
HPE Data Protector (9.07) Page 293 of 803](https://image.slidesharecdn.com/hpemandp9-160823080054/85/Hpe-Data-Protector-integration-guide-293-320.jpg)
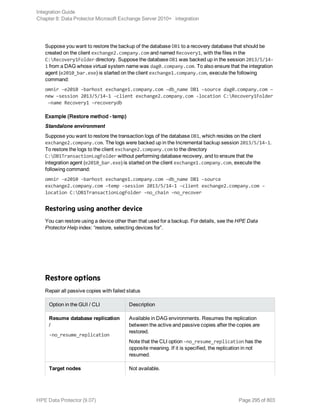
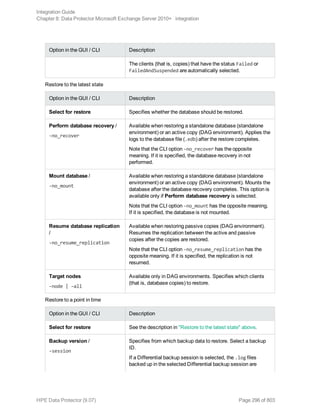
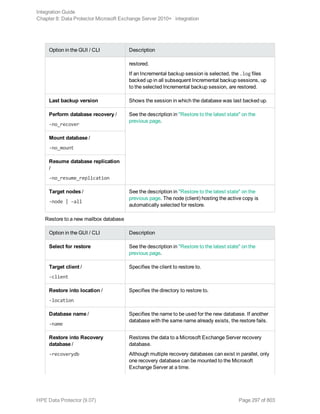
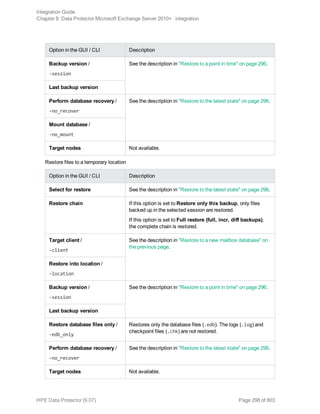
![General restore options
Option in the GUI / CLI Description
Startup client /
-barhost
Specifies the client on which the integration agent (e2010_
bar.exe) should be started. If the DAG virtual client (host) is
selected, the integration agent is started on the currently active
node. To find out which node is currently active, see "Restore"
on page 280.
Default: The same client that was specified for the backup
session. If the DAG virtual client was specified, this client is
now selected. However, note that the integration agent may not
be started on the same physical node as during the backup
session; it depends which node is currently active.
Username
Group/Domain name /
-user
Specifies which Windows domain user account to use for the
restore session. Ensure that the user is configured as described
in "Configuring user accounts" on page 265.
If these options are not specified, the restore session is started
under the user account under which the Data Protector Inet
service is running.
Perform consistency check /
[-exch_check
[-exch_throttle Value ] |
-exch_checklogs]
If this option is selected, Microsoft Exchange Server checks
the consistency of a database's backup data. If this option is
not selected, the session finishes earlier, but the backup data
consistency is not guaranteed.
The check is performed at the target locationon the source
storage volumes after the backup data is restored. You do not
need to perform the consistency check if it was already
performed at the time of backup.
Default: not selected
If the Check log files only option is selected, only the log file
backup data is checked, which is enough for Microsoft
Exchange Server to guarantee data consistency.
Default: not selected
By default, the consistency check is I/O intensive, which can
negatively affect disk performance. The Throttle check for 1
second option throttles down the consistency check of the
database file .edb to lessen impact on the disk performance.
Specify after how many input/output operations the check
should stop for one second.
This option is not available if only the log files are checked.
Default: not selected
Integration Guide
Chapter 8: Data Protector Microsoft Exchange Server 2010+ integration
HPE Data Protector (9.07) Page 299 of 803](https://image.slidesharecdn.com/hpemandp9-160823080054/85/Hpe-Data-Protector-integration-guide-299-320.jpg)
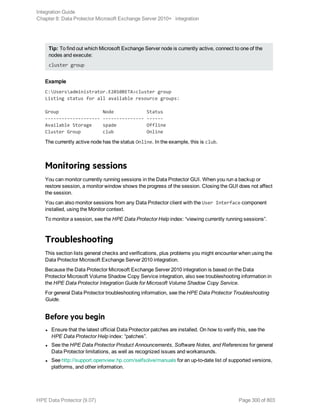
![Checks and verifications
If your browsing, backup, or restore failed:
l Examine system errors reported in the debug.log file.
l Check if you can do a filesystem backup and restore on the problematic client. For information, see
the HPE Data Protector Help.
Problems
Problem
It takes a long time to display Microsoft Exchange Server topology in the Data Protector GUI
When you open the Data Protector GUI and try to display the source page, either in the Backup or
Restore context, you must wait a long time.
This may happen if there is an unresponsive system in the same domain (for example, a system that is
shut down). The problem occurs even if the unresponsive system is not part of your backup
environment. This is due to Microsoft Exchange Server problems with execution of Microsoft
Exchange Server Shell commands.
Action
Remove the system from the domain or fix the problem.
Problem
A database backup cannot be performed
When you start a backup session for a database, the database is not backed up, appearing to be locked
by other session, though there are no other backup sessions currently running. A message similar to
the following is displayed:
[Minor] From: OB2BAR_E2010_BAR@exch03.e2010.company.com "MS Exchange
Server" Time: 1/17/2013 3:07:13 PM
[170:313] One or more copies of database DEMAR are already being
backed up in a different session.
This may happen if the integration agent (e2010_bar.exe) was terminated by force while a previous
backup session was in progress, either because the Microsoft Exchange Server system was restarted
or for some other reason, so the lock remains.
Action
Execute the following command:
omnidbutil –free_cell_resources
Note: This command line removes all existing locks, so ensure that none of the existing locks is
still needed.
Integration Guide
Chapter 8: Data Protector Microsoft Exchange Server 2010+ integration
HPE Data Protector (9.07) Page 301 of 803](https://image.slidesharecdn.com/hpemandp9-160823080054/85/Hpe-Data-Protector-integration-guide-301-320.jpg)
![Problem
Restore fails
When you try to restore a database, the session fails.
This may happen if a database has been restored before (probably unsuccessfully), and during that
previous restore session, the Microsoft Exchange Server created an .env file in the database directory.
This file now prevents the database from being restored again.
Action
Delete the .env file and start a new restore session.
Problem
Restore from an object copy fails in a DAG environment
When restoring a database from a media set created in an object copy session, as the media set
created in the original backup session no longer exists, the session fails with an error similar to the
following:
[Critical] From: OB2BAR_E2010_BAR@computer1.company.com "MS Exchange 2010 Server"
Time: 28/02/2013 16:08:12 No mailbox database copy can be selected for
restore/instant recovery.
Action
1. Verify that the media set created in the object copy session still exists.
2. On all Microsoft Exchange Server system nodes, set the environment variable OB2BARHOSTNAME
to the name of the DAG virtual system and restart the Data Protector Inet service.
3. Start a new restore session.
Problem
Restore to the latest state fails
When you try to restore a database all of whose log files were lost, using the restore method Restore
to the latest state with the Perform database recovery option selected, the database recovery fails.
This may happen if a database is restored from a Full backup (that is, the restore chain consists of only
the Full backup session). Since in the Restore to the latest state session, only the .edb file is
restored from the Full backup (see "Restore chain" on page 284), when the database recovery is
started, there are no logs to be applied to the database file, and the database recovery fails.
Action
Restore the database using the restore method Restore to a point in time. For details, see "Restore
to a point in time" on page 282.
Problem
After instant recovery to a point in time, passive copies remain in the Failed state
When you start an instant recovery session in a DAG environment to restore active and passive copies
of the same database, using the restore method Restore to a point in time, the data is successfully
Integration Guide
Chapter 8: Data Protector Microsoft Exchange Server 2010+ integration
HPE Data Protector (9.07) Page 302 of 803](https://image.slidesharecdn.com/hpemandp9-160823080054/85/Hpe-Data-Protector-integration-guide-302-320.jpg)
![restored, but the synchronization between the active copy and passive copies fails, leaving the passive
copies in the Failed state.
This problem occurs if, after the data is restored, the passive copy has extra log files, which are not
present at the active copy side, and so synchronization cannot be established. This can happen if,
during a Full backup session, multiple copies of a database are selected for backup. Data Protector
first performs a Full backup of the passive copy that has the fewest logs applied to the database file,
and then performs a Copy backup of all the remaining copies, with the active copy being backed up
last. While the backup session is in progress, a new log may be created at the active copy side, so
when the active copy is backed up, the newly created log is also backed up. If, further on in time, a
failover occurs (one of the passive copies becomes the active copy) and you perform a Restore to a
point in time instant recovery, each copy is restored from its own replica storage volumes. This
results in the active copy (which was passive at the time of backup) having fewer logs than the passive
copy (which was active at the time of backup). Consequently, synchronization cannot be established.
Action
Perform a full reseed for all Failed passive copies.
Problem
In a DAG, a copy-back instant recovery fails when restoring a non-original database copy
Suppose you backed up a database copy by creating a snapclone replica (HPE P6000 EVA Disk Array
Family). Using the copy-back method, this replica can be used to restore the original database copy
and/or the related database copies that reside on different Microsoft Exchange Server systems in the
DAG. If the size of the source storage volumes on those Microsoft Exchange Server systems differs
from the size of the source storage volumes that were backed up, the instant recovery session fails.
If the Retain source for forensics option is selected, a message similar to the following is displayed:
[Warning] From: SMISA@dizzy.e2008.company.com "SMISA" Time:
1/17/2013 2:51:08 PM
[236:8001] This pair of source and target storage volumes are
not the same size.
Source storage volume : 50014380025B4860Virtual DisksVSS
FizzyDizzyDAGdizzydizzy-DB1-dataACTIVE
Source size : 4 GB
Target storage volume : 50014380025B4860Virtual DisksVSS
FizzyDizzyDAGfizzyhpVSS-LUN-06Jul10 02.23.27ACTIVE
Target size : 3 GB
[Major] From: OB2BAR_VSSBAR@dizzy.e2008.company.com "MS Exchange
Server" Time: 1/17/2013 3:11:16 PM
The system failed to refresh symbolic links in kernel object namespace.
If the Retain source for forensics option is not selected, a message similar to the following is
displayed:
[Major] From: SMISA@dizzy.e2008.company.com "SMISA" Time:
1/17/2013 2:51:08 PM
[236:8001] This pair of source and target storage volumes are not
the same size.
Integration Guide
Chapter 8: Data Protector Microsoft Exchange Server 2010+ integration
HPE Data Protector (9.07) Page 303 of 803](https://image.slidesharecdn.com/hpemandp9-160823080054/85/Hpe-Data-Protector-integration-guide-303-320.jpg)
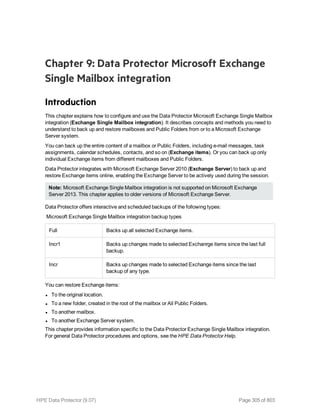
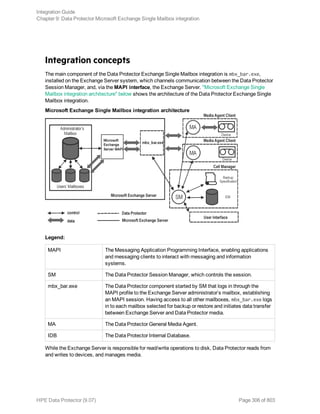


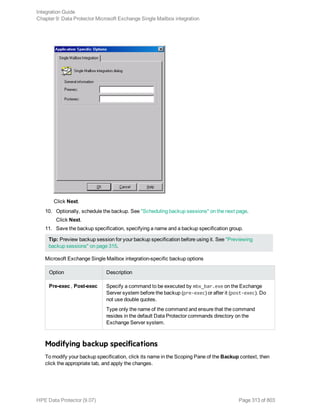
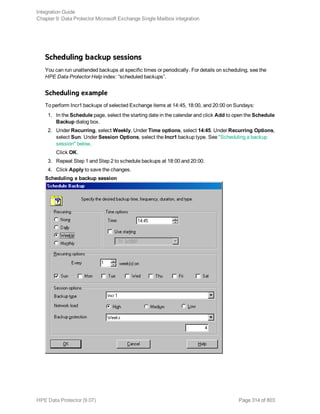
![Using the Data Protector CLI
On the Exchange Server system, execute:
omnib -mbx_list backup_specification_name [-barmode mailbox_mode][list_options]
where mailbox_mode is one of the following:
{-full|-incr|-incr1}
For list_options, see the omnib man page.
Example
To start an incremental backup using the backup specification FIRST and to set data protection to 5
days, execute:
omnib -mbx_list FIRST -barmode —incr -protect 5
Restore
Restore Exchange items using the Data Protector GUI or CLI.
Before you begin
l If you intend to restore Exchange items to another mailbox, ensure that the destination mailbox
exists on the destination Exchange Server.
l If you intend to restore Exchange items to another Exchange Server system, ensure that the
destination Exchange Server system has the MS Exchange 2007 Integration component
installed and that the Exchange Server is configured for use with Data Protector.
Restoring using the Data Protector GUI
1. In the Context List, click Restore.
2. In the Scoping Pane, expand MS Exchange Single Mailboxes, the client from which the data to
be restored was backed up, and then click MS Exchange Single Mailboxes.
3. In the Source page, browse for and select Exchange items to restore.
To restore all mailboxes and Public Folders, select Mailboxes and Public Folders. You can also
browse for and select individual mailboxes and Public Folders or individual Exchange items from
different mailboxes and Public Folders.
To restore the data from the root mailbox folder, select Top of Information Store under the
appropriate user mailbox.
Mailboxes are organized alphabetically. For example, mailboxes starting with the letter S are
collected under the S folder.
See "Selecting Exchange Server items for restore" on the next page.
Integration Guide
Chapter 9: Data Protector Microsoft Exchange Single Mailbox integration
HPE Data Protector (9.07) Page 316 of 803](https://image.slidesharecdn.com/hpemandp9-160823080054/85/Hpe-Data-Protector-integration-guide-316-320.jpg)
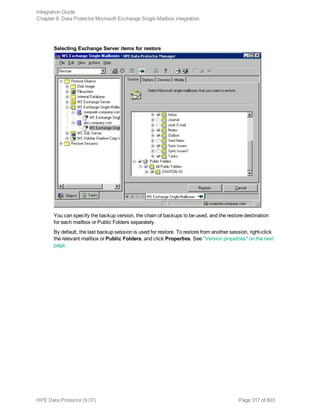

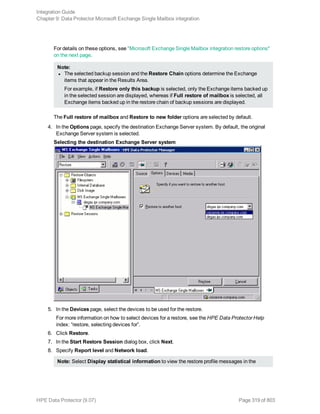
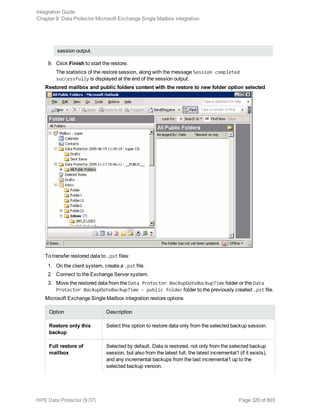
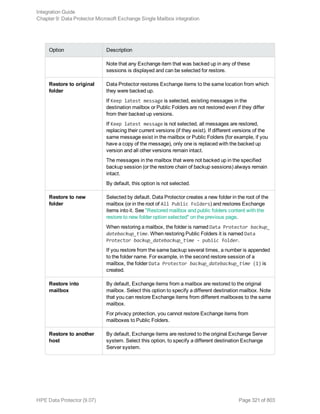
![Restoring using the Data Protector CLI
On the Exchange Server system, execute:
omnir -mbx
-barhost ClientName
[-destination DestClientName]
-mailbox MailboxName -session BackupID [MAILBOX_OPTIONS]
-public -session BackupID [PUBLIC_FOLDERS_OPTIONS]
[GENERAL_OPTIONS]
MAILBOX_OPTIONS
-destmailbox DestMailboxName
-folder Folder
-exclude ExFolder
-originalfolder {-keep_msg | -overwrite_msg}
-chain
PUBLIC_FOLDERS_OPTIONS
-folder Folder
-exclude ExFolder
-originalfolder {-keep_msg | -overwrite_msg}
-chain
Note: To restore multiple mailboxes, repeat the options —mailbox MailboxName -session
BackupID [MAILBOX_OPTIONS].
To restore or exclude from restore multiple folders, repeat the options -folder Folder and -
exclude ExFolder.
Parameter description
ClientName Original Exchange Server system, from which Exchange items to be restored
were backed up.
DestClientName Destination Exchange Server system, to which the Exchange items will be
restored (needed only if you are not restoring to the original Exchange Server
system).
BackupID A backup ID is a point in time. All objects (backup data) created in a backup
session have the same backup ID, which is the same as the session ID of the
backup session.
Mirrored objects and objects created in an object copy session have the same
backup ID as objects created in the original backup session. Suppose the
media set created in the original backup session no longer exists, but the media
set created in an object copy session still exists. To restore the objects, you
must specify the session ID of the original backup session (that is, the backup
ID) and not the session ID of the object copy session.
Integration Guide
Chapter 9: Data Protector Microsoft Exchange Single Mailbox integration
HPE Data Protector (9.07) Page 322 of 803](https://image.slidesharecdn.com/hpemandp9-160823080054/85/Hpe-Data-Protector-integration-guide-322-320.jpg)
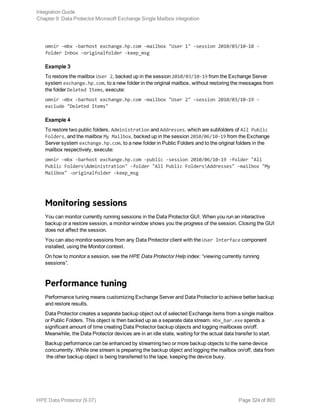

![Problems
Problem
You do not have permissions to log in to the system
debug.log on the Exchange Server contains one of the following messages:
Error = 596
Logon failure: the user has not been granted the requested logon type to
this computer.
or:
[MBX_ImpersonateUser] A required privilege is not held by the client.
Action
Check if the Domain Controller system has domain-level policy settings defined. Go to:
Start > Settings > Control Panel > Administrative Tools > Domain Security Policy >
Local Policies > User Rights Assignment
and check if the Act as part of the operating system and Log on as a service user rights are set to
Defined.
If domain-level policy settings are defined:
1. On the Domain Controller system:
a. Go to:
Start > Settings > Control Panel > Administrative Tools > Domain Security
Policy > Local Policies > User Rights Assignment.
b. Set Act as part of the operating system and Log on as a service user rights for the
Exchange Server administrator.
c. Execute:
secedit /refreshpolicy machine_policy /enforce
2. On the Exchange Server system:
a. Log off from the system and log in again under the same user account.
b. Go to:
Start > Settings > Control Panel > Administrative Tools > Local Security Policy
> Local Policies > User Rights Assignment.
c. Ensure that Act as part of the operating system and Log on as a service user
rights are set for the Exchange Server administrator in both Local Setting and Effective
Setting columns.
d. Restart the Data Protector Inet service.
If domain-level policy settings are not defined:
1. Log in to the Exchange Server system.
2. Go to:
Integration Guide
Chapter 9: Data Protector Microsoft Exchange Single Mailbox integration
HPE Data Protector (9.07) Page 327 of 803](https://image.slidesharecdn.com/hpemandp9-160823080054/85/Hpe-Data-Protector-integration-guide-327-320.jpg)

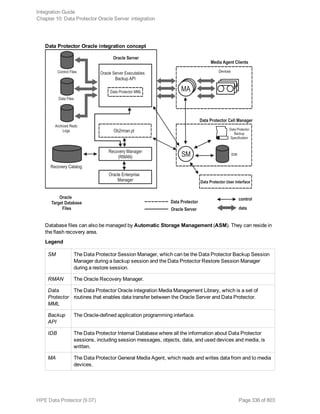
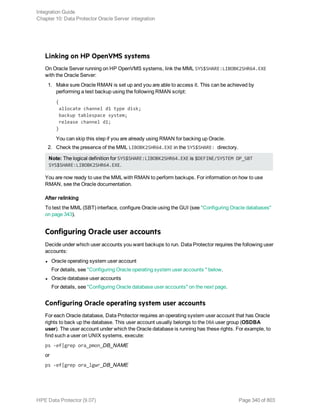
![Oracle database user accounts
User Description
Primary database
user
Required to log in to the primary database.
Recovery catalog
user
The owner of the recovery catalog (for example, rman). Required to log in
to the catalog database. Needed if you use the recovery catalog.
If you are using Oracle 11g R2 or later, ensure that the owner of the Oracle
recovery catalog:
l is granted the CREATE ANY DIRECTORY and the DROP ANY
DIRECTORY system privileges, which are required to use the Data
Pump Export (expdp) and the Data Pump Import (impdp) utilities.
l has SELECT permissions on sys.v$instance view. Start SQL*Plus
and type:
grant select on v_$instance to recovery_catatalog_user;
Standby database
user
Required to log in to the standby database. Applicable only in Oracle Data
Guard environments. Needed to back up the standby database.
Configuring user accounts on HP OpenVMS systems
To configure an Oracle user on an HP OpenVMS system, proceed as follows:
1. Modify the location of ORAUSER.COM and ORATAB files as instructed in OMNI$ROOT:[LOG]
LOGIN.COM based on the Oracle version used.
For example:
l $PIPE@DKA0:[ORACLE]ORAUSER.COM > NLA0:
Suppose ORAUSER.COM is located in DKC0:[ORACLE10g], then change and uncomment the
above statement to $PIPE@DKC0:[ORACLE10g]ORAUSER.COM > NLA0:.
l $DEFINE/NOLOG/JOB ORATAB_LOC DKA0:[ORACLE]ORATAB
Suppose ORATAB is located in DKC0:[ORACLE10g], then change and uncomment the above
statement to $DEFINE/NOLOG/JOB ORATAB_LOC DKCF0:[ORACLE10g]ORATAB.
2. Uncomment the following lines in OMNI$ROOT:[LOG]LOGIN.COM:
$@OMNI$ROOT:[BIN]OMNI$CLI_SETUP.COM
$@OMNI$ROOT:[BIN.PERLl]PERL_SETUP.COM
$DEFINE /NOLOG /PROCESS PERL_ENV_TABLES "LNM$PROCESS", "LNM$JOB", "LNM$SERVER",
"LNM$GROUP", "LNM$SYSTEM"
3. Uncomment the following line:
$@OMNI$ROOT:[BIN]OMNI$ORA_OCI_SETUP.COM
4. If you run the Media Agent and Data Protector Oracle integration agents on the same HP
Integration Guide
Chapter 10: Data Protector Oracle Server integration
HPE Data Protector (9.07) Page 342 of 803](https://image.slidesharecdn.com/hpemandp9-160823080054/85/Hpe-Data-Protector-integration-guide-342-320.jpg)
![OpenVMS system, modify the group ID of the omniadmin user as DBA using the MCR AUTHORIZE
utility:
a. Log in as a privileged user.
b. Execute:
$set def sys$system
$mcr authorize
UAF> show omniadmin
UAF> show oracle_user
c. Compare the accounts for Oracle and omniadmin users. If the accounts are different,
execute:
UAF> modify omniadmin /UIC=[Group_ID_of_Oracle_user, User_ID]
d. Verify the changes of the group ID.
5. If you use CLI commands for Oracle integration agents, execute OMNI$ROOT:[LOG]LOGIN.COM.
Tip: To determine the status of processes (OMNI$I*) and subprocesses (OMNI$ADMIN_*) on your
HP OpenVMS system, use the following command procedure:
$@OMNI$ROOT:[BIN}OMNI$DIAGNOSE.COM
This command procedure displays the active parent processes, the session of job name, and the
logfile name.
Configuring Oracle databases
Configuration of an Oracle database consists of providing Data Protector with the following data:
l Oracle Server home directory
l Login information to the target database
l Optionally, login information to the recovery catalog database
l Optionally, login information to the standby database
During the configuration, the util_oracle8.pl command, which is started on the Oracle server
system, saves the specified parameters in the Data Protector Oracle database specific configuration
file on the Cell Manager.
If a recovery catalog has been created and the Oracle target database has not yet been registered in the
recovery catalog database, this will occur during configuration. Information about the Oracle database’s
structure is transferred to the recovery catalog from the Oracle database’s control files.
Ensure that the database is open during the configuration procedure and that you are able to connect to
the database.
To configure an Oracle database, you can use the Data Protector GUI or the Data Protector CLI.
Tip: In large environments with multiple Oracle databases, consider using the configuration
procedure described in "Configuring multiple Oracle databases simultaneously " on page 348.
However, note that this procedure cannot be used to configure standby databases.
Integration Guide
Chapter 10: Data Protector Oracle Server integration
HPE Data Protector (9.07) Page 343 of 803](https://image.slidesharecdn.com/hpemandp9-160823080054/85/Hpe-Data-Protector-integration-guide-343-320.jpg)
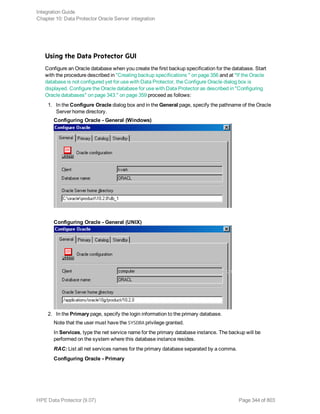
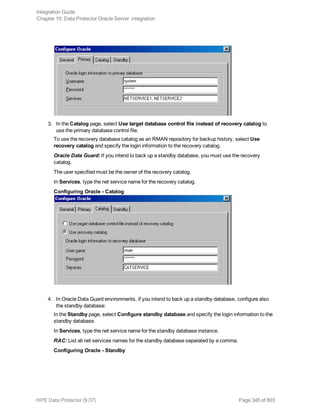
![5. Click OK.
The Oracle database is configured. Exit the GUI or proceed with creating the backup specification at
"Select the Oracle database objects to be backed up." on page 359.
Using the Data Protector CLI
Note: On HP OpenVMS, to invoke the Data Protector CLI, execute: $@OMNI$ROOT:[BIN]
OMNI$CLI_SETUP.COM
1. On UNIX systems, log on to the Oracle Server system with an OSDBA user account.
2. On the Oracle Server system, execute:
Windows systems:
perl -I..libperl util_oracle8.pl -config -dbname DB_NAME -orahome ORACLE_HOME
PRIMARY_DB_LOGIN [CATALOG_DB_LOGIN] [STANDBY_DB_LOGIN] [-client CLIENT_NAME]
UNIX systems:
util_oracle8.pl -config -dbname DB_NAME -orahome ORACLE_HOME PRIMARY_DB_LOGIN
[CATALOG_DB_LOGIN] [STANDBY_DB_LOGIN] [-client CLIENT_NAME]
HP OpenVMS systems:
util_oracle8 -config -dbname DB_NAME -orahome ORACLE_HOME PRIMARY_DB_LOGIN
[CATALOG_DB_LOGIN] [STANDBY_DB_LOGIN] [-client CLIENT_NAME]
where:
PRIMARY_DB_LOGIN is:
-prmuser PRIMARY_USERNAME
-prmpasswd PRIMARY_PASSWORD
-prmservice PRIMARY_NET_SERVICE_NAME_1[,PRIMARY_NET_SERVICE_NAME_2 ...]
CATALOG_DB_LOGIN is:
-rcuser CATALOG_USERNAME
-rcpasswd CATALOG_PASSWORD
-rcservice CATALOG_NET_SERVICE_NAME
STANDBY_DB_LOGIN is:
Integration Guide
Chapter 10: Data Protector Oracle Server integration
HPE Data Protector (9.07) Page 346 of 803](https://image.slidesharecdn.com/hpemandp9-160823080054/85/Hpe-Data-Protector-integration-guide-346-320.jpg)
![-stbuser STANDBY_USERNAME
-stbpasswd STANDBY_PASSWORD
-stbservice STANDBY_NET_SERVICE_NAME_1[,STANDBY_NET_SERVICE_NAME_2 ...]
Oracle Data Guard:If you intend to back up a standby database, you must provide the STANDBY_DB_
LOGIN information. For standby database backup, a recovery catalog must be used. Therefore, you
must also provide the CATALOG_DB_LOGIN information.
Parameter description
CLIENT_NAME Name of the Oracle Server system with the database to be
configured. It must be specified in a cluster environment.
RAC: The virtual server of the Oracle resource group.
Oracle Data Guard: Name of either a primary system or secondary
(standby) system.
DB_NAME Name of the database to be configured.
ORACLE_HOME Pathname of the Oracle Server home directory.
PRIMARY_USERNAME
PRIMARY_PASSWORD
Username and password for login to the target or primary database.
Note that the user must have the SYSDBA privilege granted.
PRIMARY_NET_SERVICE_
NAME_1 [,PRIMARY_NET_
SERVICE_NAME_2, ...]
Net services names for the primary database.
RAC: Each net service name must resolve into a specific database
instance.
CATALOG_USERNAME
CATALOG_PASSWORD
Username and password for login to the recovery catalog. This is
optional and is used only if you use the recovery catalog database as
an RMAN repository for backup history.
CATALOG_NET_SERVICE_
NAME
Net service name for the recovery catalog.
STANDBY_USERNAME
STANDBY_PASSWORD
This is used in Oracle Data Guard environment for backing up a
standby database. Username and password for login to the standby
database.
STANDBY_NET_SERVICE_
NAME_1 [,STANDBY_NET_
SERVICE_NAME_2, ...]
Net services names for the standby database.
The message *RETVAL*0 indicates successful configuration, even if followed by additional messages.
Note: If you need to export some variables before starting SQL*Plus, listener, or RMAN, these
variables must be defined in the Environment section of the Data Protector Oracle global
configuration file or using the Data Protector GUI.
Integration Guide
Chapter 10: Data Protector Oracle Server integration
HPE Data Protector (9.07) Page 347 of 803](https://image.slidesharecdn.com/hpemandp9-160823080054/85/Hpe-Data-Protector-integration-guide-347-320.jpg)
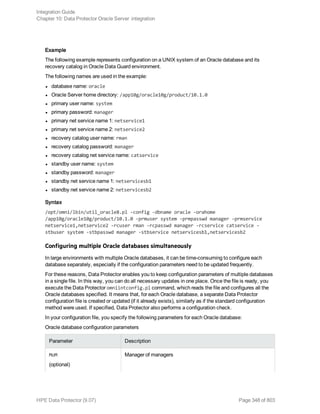
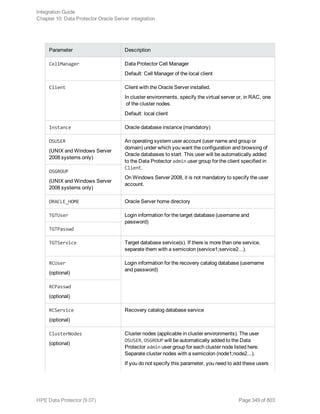
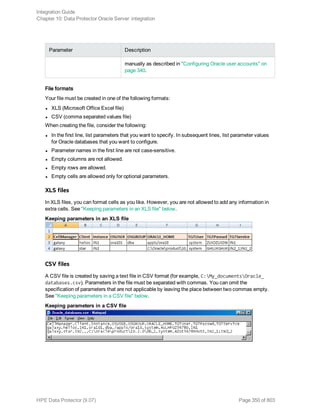
![Encoding passwords
Data Protector requires that passwords in Data Protector Oracle database configuration files are
encoded. You can achieve this in two different ways:
l Encode the passwords before you save them in your XLS or CSV file, using the Data Protector
util_cmd command. For example, to encode the password BlueMoon, execute:
util_cmd –encode BlueMoon
Encoding a password
Once you receive the encoded password, copy it to your file. "Keeping parameters in an XLS file" on
the previous page shows an example of a file in which all the passwords are encoded.
If you keep your passwords encoded, you do not need to specify the –encode option when you
execute the omniintconfig.pl command.
l If your passwords are not encoded, specify the –encode option when you execute the
omniintconfig.pl command.
Ensure that the passwords in your XLS or CSV file are either all encoded or all plain-text.
omniintconfig.pl command syntax
Note: The omniintconfig.pl command can be run on any Data Protector client that has the User
Interface component installed.
1. Log on to the client system under an operating system user account that is added to the Data
Protector admin user group (actually, it suffices if the user has the Data Protector User
configuration and See private objects user rights).
2. Go to the following default Data Protector administrative commands directory.
3. Execute:
Windows systems: perl omniintconfig.pl Options
UNIX systems: omniintconfig.pl Options
where Options are:
[-encode]
[-chkconf]
[-force]
{-passwordfile FileName|Param=Value [Param=Value...]}
For the options description, see the omniintconfig.pl man page or the HPE Data Protector
Command Line Interface Reference.
Examples
Integration Guide
Chapter 10: Data Protector Oracle Server integration
HPE Data Protector (9.07) Page 351 of 803](https://image.slidesharecdn.com/hpemandp9-160823080054/85/Hpe-Data-Protector-integration-guide-351-320.jpg)
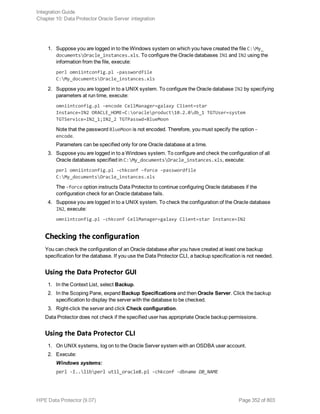
![UNIX systems:
util_oracle8.pl -chkconf -dbname DB_NAME
HP OpenVMS systems:
util_oracle8 -chkconf -dbname DB_NAME
Handling errors
If an error occurs, the error number is displayed in the form *RETVAL*error_number.
To get the error description, on the Cell Manager, execute:
Windows systems: Data_Protector_homebinomnigetmsg 12 error_number
HP-UX and Linux systems: /opt/omni/lbin/omnigetmsg 12 error_number
Other UNIX systems: /usr/omni/bin/omnigetmsg 12 error_number
HP OpenVMS systems:
Set up the Data Protector CLI environment by executing:
$@OMNI$ROOT:[BIN]OMNI$CLI_SETUP.COM
Execute:
$OMNIGETMSG 12 error_number
On UNIX systems, it is possible that although you receive *RETVAL*0, backup still fails because Data
Protector does not check if the specified user has appropriate Oracle backup permissions.
Setting environment variables
Use environment variables to modify backup environment to suit your needs. Environment variables
are Oracle database specific. It means that they can be set differently for different Oracle databases.
Once specified, they are saved to related Data Protector Oracle database configuration files.
For details of how environment variables affect your environment, see "Environment variables " below.
Note: Environment variables are not supported on HP OpenVMS systems.
Environment variables
Environment variable Default
value
Description
OB2_RMAN_COMMAND_TIMEOUT 300 s This variable is applicable when Data Protector
tries to connect to a target or catalog database. It
specifies how long (in seconds) Data Protector
waits for RMAN to respond that the connection
succeeded. If RMAN does not respond within the
specified time, Data Protector aborts the current
session.
Integration Guide
Chapter 10: Data Protector Oracle Server integration
HPE Data Protector (9.07) Page 353 of 803](https://image.slidesharecdn.com/hpemandp9-160823080054/85/Hpe-Data-Protector-integration-guide-353-320.jpg)
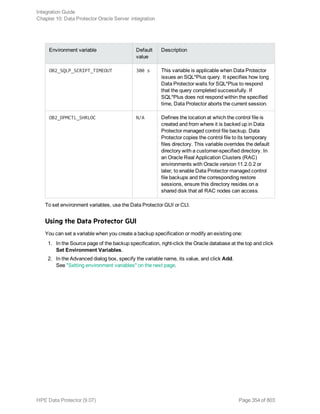
![1. Configure the devices you plan to use for a backup. For instructions, see the HPE Data Protector
Help index: “configuring devices”.
2. Configure media pools and media for a backup. For instructions, see the HPE Data Protector Help
index: “creating media pools”.
3. Ensure you are able to connect to the database.
4. Create a Data Protector Oracle backup specification.
See "Creating backup specifications " below.
HP OpenVMS systems
On HP OpenVMS systems, before performing Data Protector tasks using the CLI, execute:
$@OMNI$ROOT:[BIN]OMNI$CLI_SETUP.COM
This command procedure defines the symbols needed to invoke the Data Protector CLI. It gets
installed when you chose the CLI option during the installation. Execute this command procedure from
LOGIN.COM for all CLI users.
Creating new templates
You can use backup templates to apply the same set of options to a number of backup specifications.
By creating your own template, you can specify the options exactly as you want them to be.
This allows you to apply all the options to a backup specification with a few mouse clicks, rather than
having to specify all the options over and over again. This task is optional, as you can use one of the
default templates as well.
If you prefer using predefined templates, see "Creating backup specifications " below for a detailed
explanation.
To create a new backup template, proceed as follows:
1. In the Data Protector Manager, switch to the Backup context.
2. In the Scoping Pane, expand Backup and then Templates, and then right-click Oracle Server.
3. Click Add Template. Follow the wizard to define the appropriate backup options in your template.
Creating backup specifications
Cluster-aware systems
Before you perform an offline backup in a cluster environment, take the Oracle Database resource
offline and bring it back online after the backup. This can be done using the Oracle fscmd command line
interface commands in the Pre-exec and Post-exec commands for the client system in a particular
backup specification, or by using the Cluster Administrator.
Procedure
To create an Oracle backup specification:
1. In the Context List, click Backup.
2. In the Scoping Pane, expand Backup Specifications, right-click Oracle Server, and click Add
Integration Guide
Chapter 10: Data Protector Oracle Server integration
HPE Data Protector (9.07) Page 356 of 803](https://image.slidesharecdn.com/hpemandp9-160823080054/85/Hpe-Data-Protector-integration-guide-356-320.jpg)
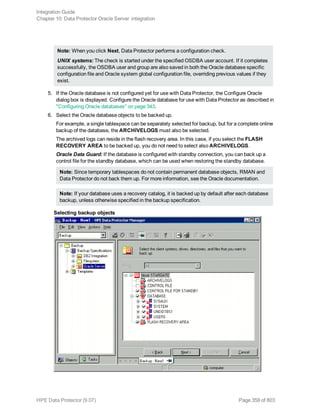
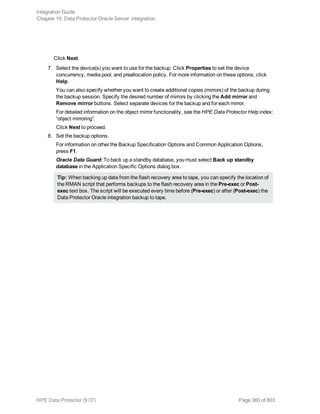
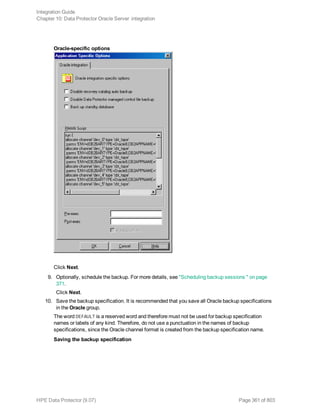
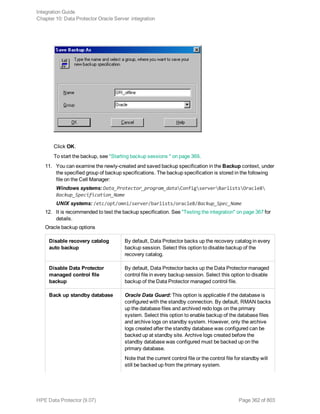
![RMAN Script You can edit the Oracle RMAN script section of the Data
Protector Oracle backup specification. The script is created by
Data Protector during the creation of a backup specification and
reflects the backup specification’s selections and settings. You
can edit the script only after the backup specification has been
saved. For information on how to edit the RMAN script section,
see "Editing the Oracle RMAN script " on the next page.
Pre-exec, Post-exec Specify a command or RMAN script that will be started by
ob2rman.pl on the Oracle Server system before the backup
(pre-exec) or after it (post-exec). RMAN scripts must have the
.rman extension. Do not use double quotes.
For example, you can provide scripts to shut down and start up an
Oracle instance. For examples of shut-downing and starting an
Oracle instance on a UNIX system, see "Examples of pre-exec
and post-exec scripts on UNIX systems " below.
Provide the pathname of the command or RMAN script.
HP OpenVMS systems : Provide the pathname of the command
(OMNI$ROOT:[BIN]).
Examples of pre-exec and post-exec scripts on UNIX systems
Pre-exec example
The following is an example of a script that shuts down an Oracle instance:
#!/bin/sh
export ORACLE_HOME=$2
export ORACLE_SQLNET_NAME=$1
if [ -f $ORACLE_HOME/bin/sqlplus ]; then
$ORACLE_HOME/bin/sqlplus << EOF
connect sys/manager@$ORACLE_SQLNET_NAME as sysdba
shutdown
EOF
echo "Oracle database "$DB_NAME" shut down."
exit 0
else
echo "Cannot find Oracle SQLPLUS ($ORACLE_HOME/bin/sqlplus)."
exit 1
fi
Post-exec example
The following is an example of a script that starts an Oracle instance:
#!/bin/sh
export ORACLE_HOME=$2
export ORACLE_SQLNET_NAME=$1
Integration Guide
Chapter 10: Data Protector Oracle Server integration
HPE Data Protector (9.07) Page 363 of 803](https://image.slidesharecdn.com/hpemandp9-160823080054/85/Hpe-Data-Protector-integration-guide-363-320.jpg)
![if [ -f $ORACLE_HOME/bin/sqlplus ]; then
$ORACLE_HOME/bin/sqlplus << EOF
connect sys/manager@$ORACLE_SQLNET_NAME as sysdba
startup
EOF
echo "Oracle database "$DB_NAME" started."
exit 0
else
echo "Cannot find Oracle SQLPLUS ($ORACLE_HOME/bin/sqlplus)."
exit 1
fi
Editing the Oracle RMAN script
The RMAN script is used when the Data Protector backup specification is started to perform a backup
of the Oracle objects.
The RMAN script section is not written to the backup specification until the backup specification is
either saved or manually edited by clicking the Edit button.
You can edit the RMAN script section of only after the Data Protector Oracle backup specification has
been saved.
Limitations
When editing the RMAN script sections of the Data Protector backup specifications, consider the
following limitations:
l The Oracle manual configuration convention must be used and not the Oracle automatic
configuration convention.
l Double quotes (") must not be used - single quotes should be used instead.
l By default, RMAN scripts created by Data Protector contain instructions for backing up one or more
of the following objects:
l Databases, tablespaces, or datafiles (the first backup command)
l Archive logs (the second backup command)
l Flash recovery area (the third backup command)
l Control files (the last backup command)
The RMAN scripts with all combinations of the above listed backup objects are recognized by Data
Protector as its own scripts and it is possible to modify the selection of objects that will be backed
up in the Source tab of the Results Area.
If the RMAN script contains additional manually entered backup commands, for example a second
backup command for backing up a database that is already listed in the first backup command, the
object selection is disabled and it is only possible to browse the Source tab.
Integration Guide
Chapter 10: Data Protector Oracle Server integration
HPE Data Protector (9.07) Page 364 of 803](https://image.slidesharecdn.com/hpemandp9-160823080054/85/Hpe-Data-Protector-integration-guide-364-320.jpg)
![1. In the Data Protector Manager, switch to the Backup context.
2. In the Scoping Pane, expand Backup, then Backup Specifications. Expand Oracle Server and
right-click the backup specification you want to preview.
3. Click Preview Backup.
Previewing a backup
Testing using the CLI
A test can be executed from the command line on the Oracle Server system or on any Data Protector
client system within the same Data Protector cell, provided that the system has the Data Protector
User Interface installed.
Note: On HP OpenVMS systems, to invoke the Data Protector CLI, execute: $@OMNI$ROOT:[BIN]
OMNI$CLI_SETUP.COM
Execute the omnib command with the -test_bar option as follows:
Windows systems: Data_Protector_homebinomnib -oracle8_list backup_specification_
name -test_bar
HP-UX, Solaris, and Linux systems: /opt/omni/bin/omnib -oracle8_list bimbackup_
specification_name -test_bar
Other UNIX systems: /usr/omni/bin/omnib -oracle8_list backup_specification_name -
test_bar
HP OpenVMS systems: $omnib -oracle8_list backup_specification_name -test_bar
Integration Guide
Chapter 10: Data Protector Oracle Server integration
HPE Data Protector (9.07) Page 368 of 803](https://image.slidesharecdn.com/hpemandp9-160823080054/85/Hpe-Data-Protector-integration-guide-368-320.jpg)
![Starting an interactive backup
Starting a backup using the CLI
1. On an Oracle Server, switch to the default Data Protector user commands directory.
HP OpenVMS systems: To set up the CLI, execute:
$@OMNI$ROOT:[BIN]OMNI$CLI_SETUP.COM
2. Execute:
omnib -oracle8_list backup_specification_name [-barmode Oracle8Mode][list_
options]
You can select among the followinglist_options:
-protect {none | weeks n | days n | until date | permanent}
-load {low | medium | high}
-crc
-no_monitor
Oracle8Mode = {-full | -incr1 | -incr2 | -incr3 | -incr4}
See the omnib man page for details.
Example
To start a backup using an Oracle backup specification called RONA, execute the following command:
omnib -oracle8_list RONA
Integration Guide
Chapter 10: Data Protector Oracle Server integration
HPE Data Protector (9.07) Page 373 of 803](https://image.slidesharecdn.com/hpemandp9-160823080054/85/Hpe-Data-Protector-integration-guide-373-320.jpg)
![Starting Oracle backup using RMAN
To start an Oracle backup using RMAN, an Oracle backup specification must be created.
For information on how to create an Oracle backup specification, see "Backup " on page 355.
To start an Oracle backup using RMAN:
1. Connect to the Oracle target database specified in the backup specification:
If you use the recovery catalog, execute:
Windows systems: ORACLE_HOMEbinrman target Target_Database_Login catalog
Recovery_Catalog_Login
UNIX systems: ORACLE_HOME/bin/rman target Target_Database_Login catalog
Recovery_Catalog_Login
HP OpenVMS systems:
a. Execute ORAUSER.COM using $@OMNI$ROOT:[LOG]LOGIN.COM.
b. Execute $rman target target_connect_string catalog catalog_connect_string.
Target database login
The format of the target database login is user_name/password@service,
where:
user_name is the name by which a user is known to Oracle Server and to other users. Every
user name is associated with a password and both have to be entered to connect to an Oracle
target database. This user must have been granted Oracle SYSDBA or SYSOPER rights.
password must be the same as the password specified in the Oracle password file (orapwd),
which is used for authentication of users performing database administration.
service is the name used to identify an SQL*Net server process for the target database.
Recovery catalog login
The format of the Recovery Catalog Database login is user_name/password@service,
where the description of the user name and password is the same as for the login information to
the target database. Note that the Oracle user specified here has to be the owner of the Oracle
Recovery Catalog.
service is the name used to identify SQL*Net server process for the Recovery Catalog
Database.
2. Allocate the Oracle channels.
Allocating a channel tells RMAN to initiate an Oracle Server process for backup, restore, or
recovery on the Oracle target database. For example:
allocate channel 'dev_0' type 'disk';
or
allocate channel 'dev_1' type 'sbt_tape';
where you specify the backup directly to disk in the first case and directly to tape in the second
case.
Integration Guide
Chapter 10: Data Protector Oracle Server integration
HPE Data Protector (9.07) Page 374 of 803](https://image.slidesharecdn.com/hpemandp9-160823080054/85/Hpe-Data-Protector-integration-guide-374-320.jpg)
![For example, if you have created and saved a backup specification named bspec1 for backing up
an Oracle database identified by the Oracle instance called inst1, you would enter the following
string:
format 'bspec1<inst1_%s:%t:%p>.dbf'
For information on substitution variables, see the Oracle Recovery Manager User’s Guide and
References. The Oracle channel format specifies which Oracle backup specification to use for the
backup.
5. Optionally, specify backup incremental level.
Note that a Data Protector full backup performs the same operation as an incremental level 0
backup type in the Oracle RMAN scripts. They both back up all the blocks that have ever been
used.
This option is required if you want to use the backup as a base for subsequent incremental
backups.
To run a backup using RMAN, start RMAN by executing the following command from the ORACLE_HOME
directory (if you use the recovery catalog):
Windows systems: binrman target Target_Database_Login catalog Recovery_Catalog_
Login
UNIX systems: bin/rman target Target_Database_Login catalog Recovery_Catalog_Login
HP OpenVMS systems:
1. Execute ORAUSER.COM using $@OMNI$ROOT:[LOG]LOGIN.COM.
2. Execute $rman target target_connect_string catalog catalog_connect_string.
Examples of the RMAN scripts
Some examples of RMAN scripts that must be executed from the RMAN> prompt are listed below:
Note: In the following examples, the SBT_LIBRARY parameter is set to
/opt/omni/lib/libob2oracle8.so, which is the correct path for 32–bit Solaris systems.
Backing up a single channel
To back up the Oracle instance ORACL , using a backup specification named ora1, enter the following
command sequence:
run {
allocate channel 'dev_0' type 'sbt_tape' parms
'SBT_LIBRARY=/opt/omni/lib/libob2oracle8.so,
ENV=(OB2BARTYPE=Oracle8,OB2APPNAME=ORACL,OB2BARLIST=ora1)';
backup
incremental level 0
format 'oracl1<ORACL_%s:%t>.dbf' database;
}
Integration Guide
Chapter 10: Data Protector Oracle Server integration
HPE Data Protector (9.07) Page 376 of 803](https://image.slidesharecdn.com/hpemandp9-160823080054/85/Hpe-Data-Protector-integration-guide-376-320.jpg)
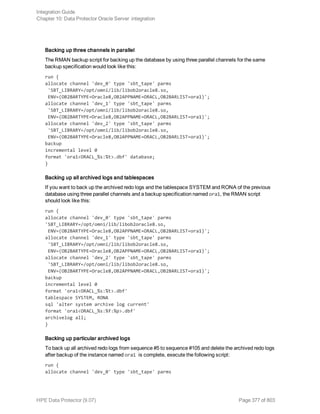
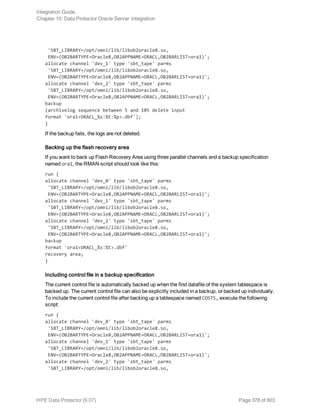
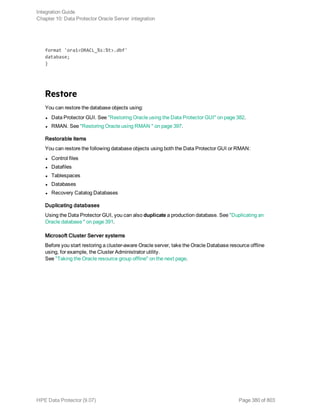
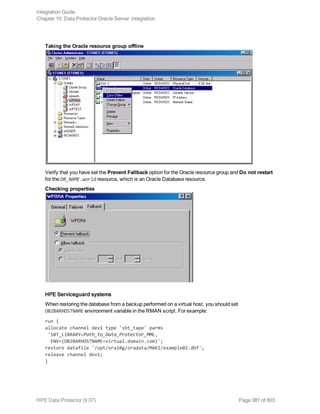
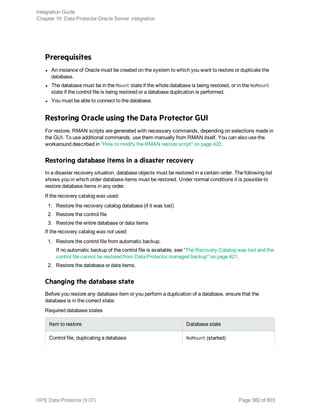

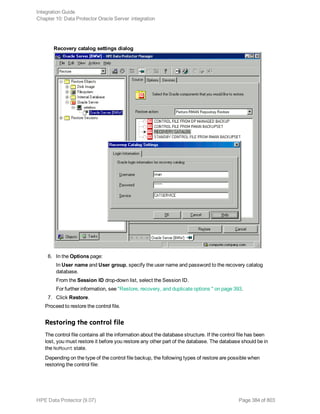
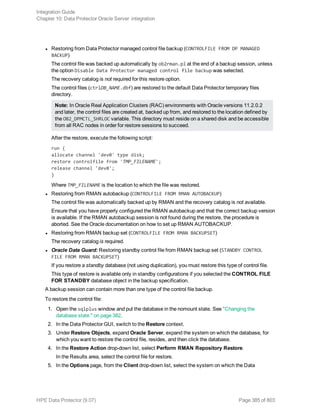
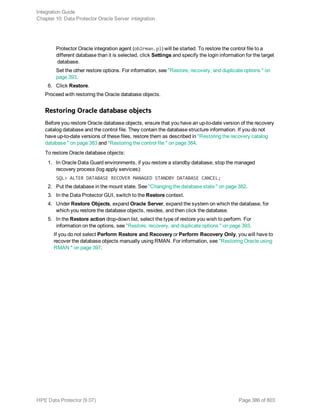
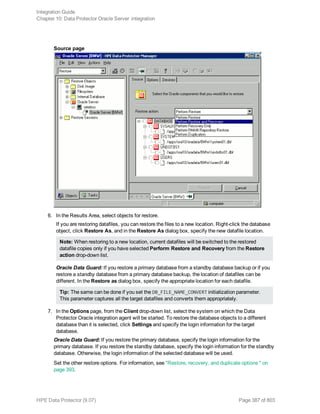
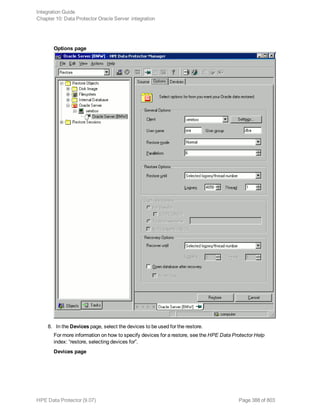
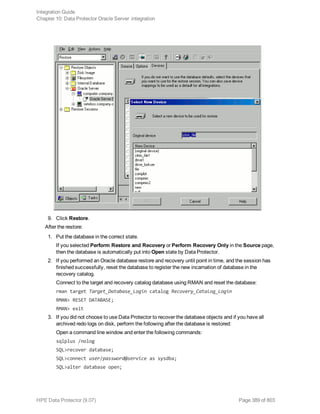
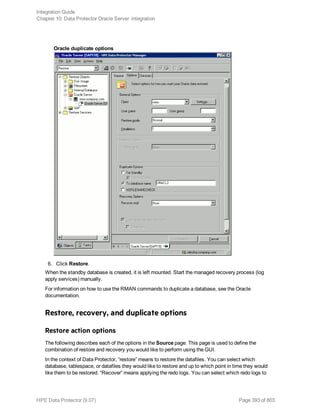
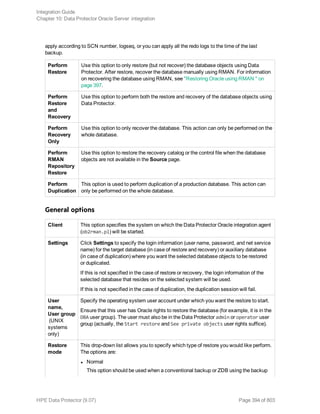
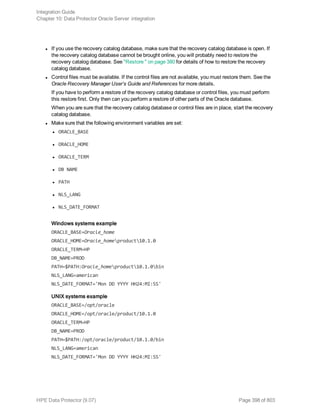
![HP OpenVMS systems example
ORACLE_HOME=DKA400:[ORACLE10G]
ORACLE_TERM=HP
DB_NAME=PROD
l Check that the /etc/oratab file has the following line:
Windows systems: PROD:Oracle_homeproduct10.1.0:N
UNIX systems: PROD:/opt/oracle/product/10.1.0:N
HP OpenVMS systems with Oracle 10g:
Oracle_home /oratab
TEST:/DKA400/ORACLE10G:N CAT:/DKA400/ORACLE10G:N
The last letter determines whether the database will automatically start upon boot-up (Y) or not (N).
Connection strings used in the examples
In the examples below, the following connection strings are used:
l Target connection string for target database:
sys/manager@PROD
where sys is the username, manager is the password and PROD is a net service name.
l Recovery catalog connection string for recovery catalog database:
rman/rman@CATAL
where rman is the username and password and CATAL is a net service name.
SBT_LIBRARY parameter
On Windows and UNIX systems, set the SBT_LIBRARY RMAN script parameter to point to the correct
platform-specific Data Protector MML. The parameter must be specified for each RMAN channel
separately. For details on the Data Protector MML location, see "Specify the parms operand: " on page
375.
In the following examples, the SBT_LIBRARY parameter is set to /opt/omni/lib/libob2oracle8.so,
which is the correct path for 32-bit Solaris systems.
Example of full database restore and recovery
To perform a full database restore and recovery, you also need to restore and apply all the archive logs.
To perform a full database restore and recovery:
1. Log in to the Oracle RMAN:
If you use the recovery catalog database, execute:
Windows systems: ORACLE_HOMEbinrman target sys/manager@PROD catalog
rman/rman@CATAL
Integration Guide
Chapter 10: Data Protector Oracle Server integration
HPE Data Protector (9.07) Page 399 of 803](https://image.slidesharecdn.com/hpemandp9-160823080054/85/Hpe-Data-Protector-integration-guide-399-320.jpg)
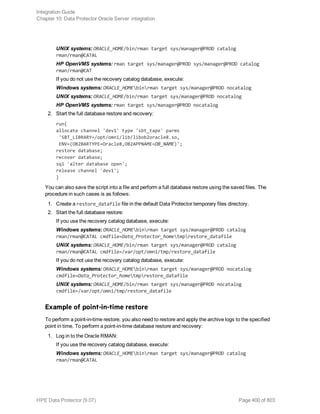
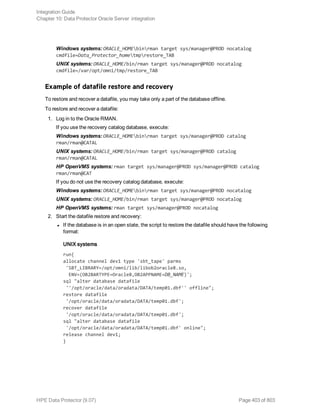

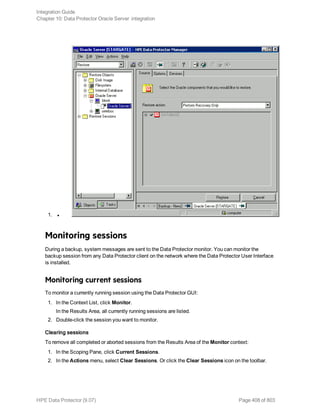
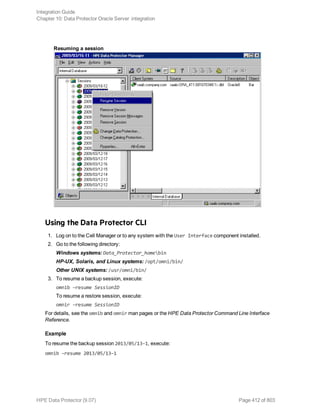
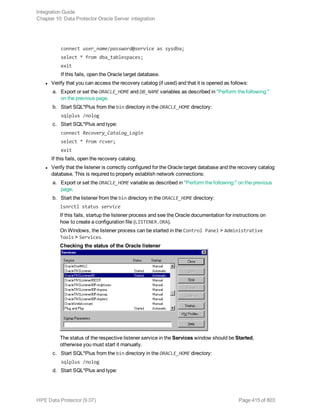
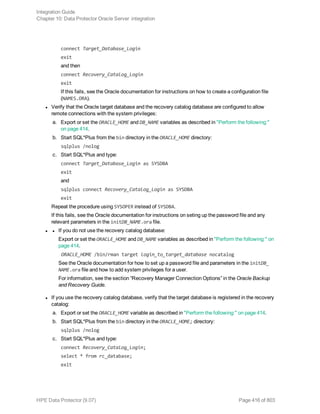

![Problem
Data Protector reports errors when calling SYS.LT_EXPORT_PKG.schema_inf_exp during
Oracle backup
The following errors are listed in the Data Protector monitor:
EXP-00008: ORACLE error 6550 encountered
ORA-06550: line 1, column 13:
PLS-00201: identifier 'SYS.LT_EXPORT_PKG' must be declared
ORA-06550: line 1, column 7:
PL/SQL: Statement ignored
EXP-00083: The previous problem occurred when calling
SYS.LT_EXPORT_PKG.schema_info_exp
. exporting statistics
Export terminated successfully with warnings.
[Major] From: ob2rman.pl@machine "MAKI" Time: 10/01/01 16:07:53
Export of the Recovery Catalog Database failed.
Action
Start SQL*Plus and grant the execute permission to the LT_EXPORT_PKG as follows (make sure that the
user sys has the SYSDBA privilege granted beforehand):
sqlplus 'sys/password@CDB as sysdba'
SQL> grant execute on sys.lt_export_pkg to public;
Restart the failed backup session.
Problem
On a UNIX system, Data Protector reports “Cannot allocate/attach shared memory”
Backup fails and the following error message is displayed:
Cannot allocate/attach shared
memory (IPC Cannot Allocate Shared Memory Segment)
System error: [13] Permission denied) => aborting
Action
Set the OB2SHMEM_IPCGLOBAL omnirc option to 1 to use the memory windowing properly, and restart the
failed backup session. See the HPE Data Protector Troubleshooting Guide for details on using the
omnirc file.
Problem
Backup fails after a point in time restore and recovery
The following error is displayed:
RMAN-06004: ORACLE error from recovery catalog database: RMAN-20003: target
database incarnation not found in recovery catalog
Integration Guide
Chapter 10: Data Protector Oracle Server integration
HPE Data Protector (9.07) Page 420 of 803](https://image.slidesharecdn.com/hpemandp9-160823080054/85/Hpe-Data-Protector-integration-guide-420-320.jpg)

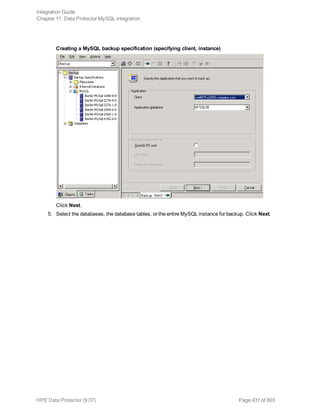
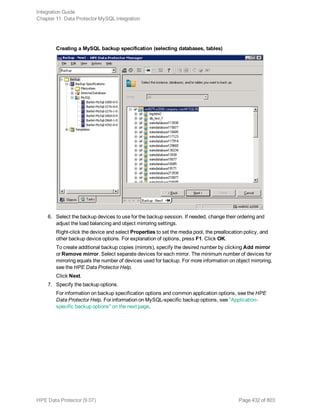
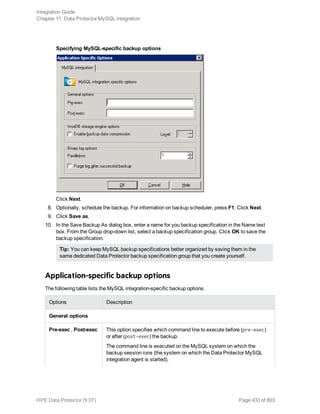
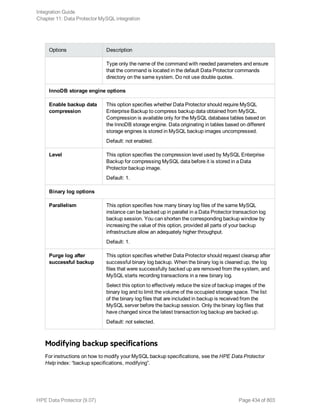
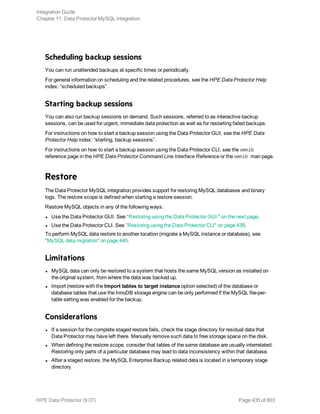
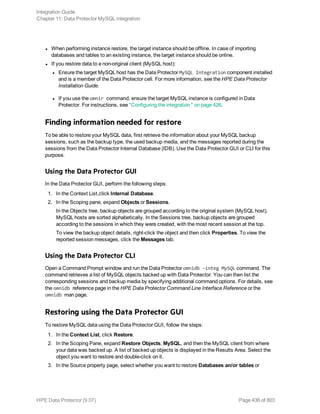
![MySQL restore options
6. View the media and devices needed for the restore and verify their availability.
7. Click Restore.
8. In the Start Restore Session dialog box, click Next.
9. Specify the Report level and Network load.
Note: Select the Display statistical information option to view the restore profile messages
in the session output.
10. Click Finish to start the restore.
The session statistics and the message Session completed successfully is displayed at the
end of the session.
Restoring using the Data Protector CLI
To restore MySQL instance, database, database table, or both, run the following command on a
system that has the Data Protector User Interface component installed:
omnir SESSION_OPTIONS [-noexpand] -integ MySQL -barhost TargetMySQLHostname
-appname TargetInstanceName [-user Username:GroupName] -options -source_client
SourceMySQLHostname -source_database SourceInstanceName -database -session
Integration Guide
Chapter 11: Data Protector MySQL integration
HPE Data Protector (9.07) Page 439 of 803](https://image.slidesharecdn.com/hpemandp9-160823080054/85/Hpe-Data-Protector-integration-guide-439-320.jpg)
![SessionID {-staging [CustomStagePath] [-copy_back [-target_dir
NonOriginalTargetPath] | -import] | -inplace [-target_dir NonOriginalTargetPath] }
[-include {DatabaseName | DatabaseName.TableName} ...] [-roll_forward
[EndDateTime]] [GENERAL_OPTIONS]
To restore one or more MySQL binary log files, run the following command on a system that has the
Data Protector User Interface component installed:
omnir SESSION_OPTIONS [-noexpand] -integ MySQL -barhost TargetMySQLHostname
-appname TargetInstanceName -user Username:GroupName -options -source_client
SourceMySQLHostname -source_database SourceInstanceName -binary_log {-include
BinaryLogFilename ...} [-target_dir NonOriginalTargetPath] [GENERAL_OPTIONS]
For option descriptions and command invocation examples, as well as complete omnir command
reference, see the omnir reference page in the HPE Data Protector Command Line Interface
Reference or the omnir man page.
MySQL data migration
You can migrate the entire MySQL instance, individual MySQL databases, or database tables to
another MySQL instance that resides on the same or a different client. You should follow the standard
restore procedure with the following migration -related specifics:
l If you migrate the entire instance, select the Restore as instance and Use non-original target
directory options. The target instance should be offline during the restore session.
l If you migrate MySQL databases or database tables, select the Import tables to target instance
option. The target MySQL instance should be online during the restore session and should not
contain database tables with the same name as the original.
MySQL restore options
The following are the MySQL integration-specific restore options.
To restore the selected MySQL object to the same MySQL database and instance, leave the restore-
specific options as they are.
General options
Restore to client This option specifies the Data Protector client to restore data to.
You can specify any client that hosts MySQL database
management system and has the Data Protector MySQL
Integration component installed. On this client, the Data
Protector MySQL integration agent is started at the beginning of
the restore session.
Default: Fully qualified domain name of the source client.
Restore as instance This option specifies the name of the MySQL instance you want to
restore data to. If the instance does not exist yet, Data Protector
automatically creates and starts it at the end of the restore
session. If the target instance is not started (in-place or copy-back
Integration Guide
Chapter 11: Data Protector MySQL integration
HPE Data Protector (9.07) Page 440 of 803](https://image.slidesharecdn.com/hpemandp9-160823080054/85/Hpe-Data-Protector-integration-guide-440-320.jpg)

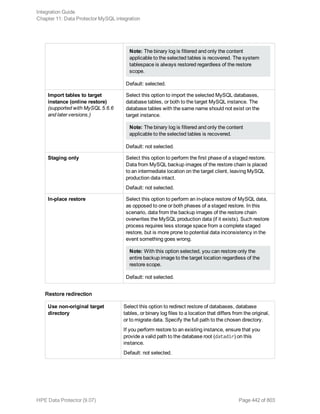


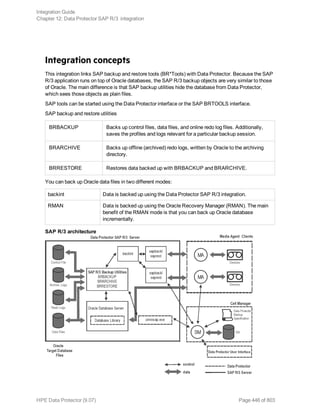
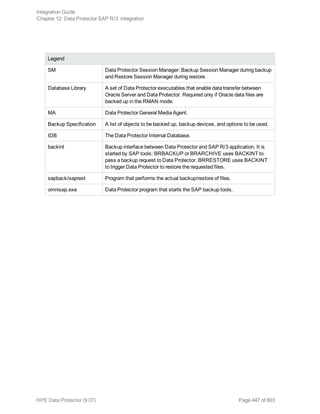
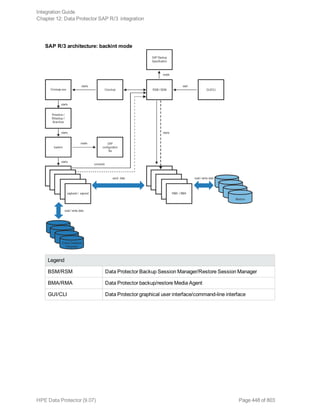
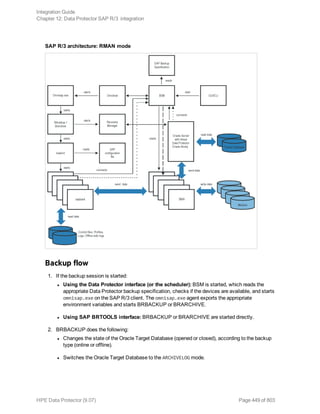
![Syntax
The syntax of the Data Protector SAP R/3 configuration file is as follows:
ORACLE_HOME='ORACLE_HOME';
ConnStr='ENCODED_CONNECTION_STRING_TO_THE_TARGET_DATABASE';
BR_directory='BRTOOLS_HOME';
SAPDATA_HOME='SAPDATA_HOME';
ORA_NLS_CHARACTERSET='CHARACTER_SET';
OSUSER='USER_NAME';
OSGROUP='USER_GROUP';
Environment={
[ENV_var1='value1';]
[ENV_var2='value2';
...]
}
SAP_Parameters={backup_spec_name=('-concurrency #_of_concurrency
' | '-time_balance' | '-load_balance' | '-manual_balance' | '-channels
#_of_RMAN_channels');
}
speed={
AVERAGE=1;
'filename'=#_of_seconds_needed_to_back_up_this_file;
}
compression={'filename'=size_of_the_file_in_bytes_after_the
_compression;
}
manual_balance={backup_specification_name={
'filename'=device_number;
}
}
The ORA_NLS_CHARACTERSET parameter is set automatically by Data Protector during SAP R/3
database configuration. For details of how to configure SAP R/3 database for use with Data Protector,
see "Configuring SAP R/3 databases" on page 461.
Example
This is an example of the file:
ORACLE_HOME='/app/oracle805/product';
ConnStr='EIBBKIBBEIBBFIBBGHBBOHBB
QDBBOFBBCFBBPFBBCFBBIFBBGFBBDGBBBFBBCFBBDFBBCFBB';
BR_directory='/usr/sap/ABA/SYS/exe/run';
SAPDATA_HOME='/sap';
ORA_NLS_CHARACTERSET='USASCII7';
OSUSER='orasid';
OSGROUP='dba';
Environment={ }
Integration Guide
Chapter 12: Data Protector SAP R/3 integration
HPE Data Protector (9.07) Page 452 of 803](https://image.slidesharecdn.com/hpemandp9-160823080054/85/Hpe-Data-Protector-integration-guide-452-320.jpg)
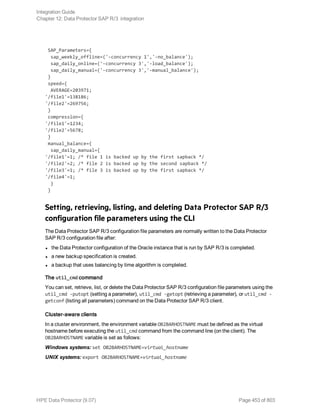
![The util_cmd synopsis
The syntax of the util_cmd command is as follows:
util_cmd -getconf[ig] SAP oracle_instance [-local filename]
util_cmd -getopt[ion] [SAP oracle_instance] option_name [-sub[list] sublist_name]
[-local filename]
util_cmd -putopt[ion] [SAP oracle_instance] option_name [option_value] [-sub[list]
sublist_name] [-local filename]
where:
option_name is the name of the parameter
option_value is the value for the parameter
[-sub[list] sublist_name] specifies the sublist in the configuration file to which a parameter is
written to or taken from.
[-local filename] specifies one of the following:
l When it is used with the -getconf[ig] option, it specifies the filename for the output of the
command to be written to. If the -local option is not specified, the output is written to the standard
output.
l When it is used with the -getopt[ion], it specifies the filename of the file from which the parameter
and its value are to be taken and then written to the standard output. If the -local option is not
specified, the parameter and its value are taken from the Data Protector SAP R/3 configuration file
and then written to the standard output.
l When it is used with the -putopt[ion] option, it specifies the filename for the output of the
command to be written to. If the -local option is not specified, the output is written to the Data
Protector SAP R/3 configuration file.
Note: If you are setting the option_value parameter as a number, the number must be put in
single quotes, surrounded by double quotes.
Return values
The util_cmd command displays a short status message after each operation (writes it to the standard
error):
l Configuration read/write operation successful.
This message is displayed when all the requested operations have been completed successfully.
l Configuration option/file not found.
This message is displayed when either an option with the specified name does not exist in the
configuration, or the file specified as the -local parameter does not exist.
l Configuration read/write operation failed.
This message is displayed if any fatal errors occurred, for example: the Cell Manager is unavailable,
the Data Protector SAP R/3 configuration file is missing on the Cell Manager, and so on.
Integration Guide
Chapter 12: Data Protector SAP R/3 integration
HPE Data Protector (9.07) Page 454 of 803](https://image.slidesharecdn.com/hpemandp9-160823080054/85/Hpe-Data-Protector-integration-guide-454-320.jpg)
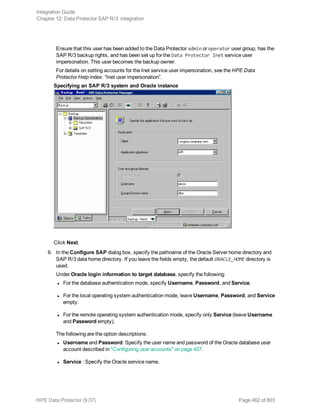
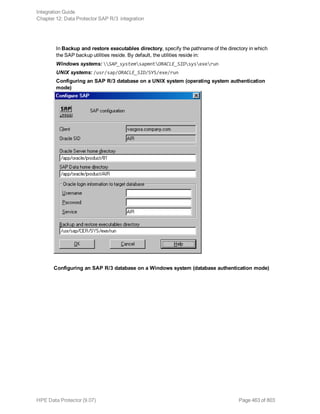
![Click OK.
7. The SAP R/3 database is configured. Exit the GUI or proceed with creating the backup
specification at "Select SAP R/3 objects to be backed up. You can select individual tablespaces,
data files, or archived logs." on page 470.
Using the Data Protector CLI
1. Log in to the SAP R/3 system using the Oracle operating system user account.
2. At the command prompt, change current directory to the following directory:
Windows systems: Data_Protector_homebin
HP-UX, Solaris, and Linux systems: /opt/omni/lbin
Other UNIX systems: /usr/omni/bin/
3. Execute:
util_sap.exe -CONFIG ORACLE_SIDORACLE_HOMEtargetdb_connection_stringSAPTOOLS_
DIR [SAPDATA_HOME][SQL_PATH]
Parameter description
ORACLE_SID Oracle instance name.
Integration Guide
Chapter 12: Data Protector SAP R/3 integration
HPE Data Protector (9.07) Page 464 of 803](https://image.slidesharecdn.com/hpemandp9-160823080054/85/Hpe-Data-Protector-integration-guide-464-320.jpg)
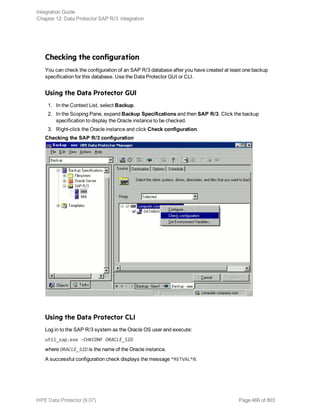
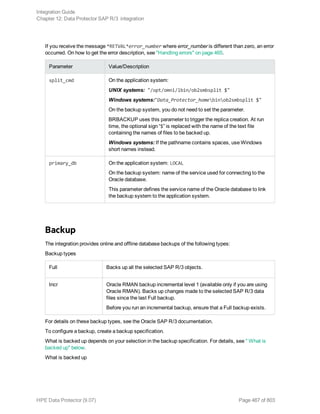


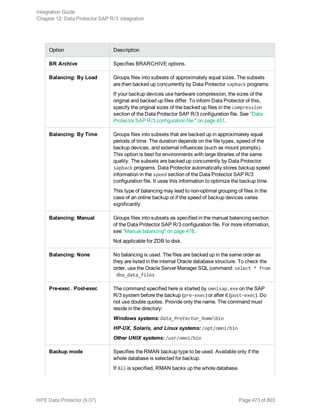
![l Communication between the Oracle instance and Data Protector (only if RMAN is used)
l The syntax of the backup specification
l If devices are correctly specified
l If the necessary media are in the devices
Starting backup sessions
Interactive backups are run on demand. They are useful for urgent backups or restarting failed backups.
Backup methods
Start a backup of SAP R/3 objects in any of the following ways:
l Using the Data Protector GUI.
l Using the Data Protector CLI.
l Using the SAP BR*Tools.
Using the Data Protector GUI
1. In the Context List, click Backup.
2. In the Scoping Pane, expand Backup Specifications, and then SAP R/3. Right-click the backup
specification you want to use and click Start Backup.
3. Specify Backup type and Network load. Click OK.
The message Session completed successfully is displayed at the end of a successful backup
session.
Using the Data Protector CLI
Execute:
omnib -sap_list backup_specification_name [-barmode SAP_mode][List_options]
where SAP_mode is one of the following:
full|incr
For details, see the omnib man page or the HPE Data Protector Command Line Interface Reference.
Example
To start a full backup using the SAP R/3 backup specification RONA, execute:
omnib -sap_list RONA -barmode full
Using the SAP BRTOOLS
1. Log in to the SAP R/3 system as the Oracle OS user.
2. Export/set the following environment variables:
Integration Guide
Chapter 12: Data Protector SAP R/3 integration
HPE Data Protector (9.07) Page 476 of 803](https://image.slidesharecdn.com/hpemandp9-160823080054/85/Hpe-Data-Protector-integration-guide-476-320.jpg)
![ORACLE_SID=SAP_
instance_name
ORACLE_
HOME=Oracle_
software_home_
directory
[SAPBACKUP_
TYPE=OFFLINE]
Default is ONLINE.
SAPDATA_
HOME=database_
files_directory
SAPBACKUP=
BRTOOLS_logs_
and_control_
file_copy_
directory
SAPREORG=
BRSPACE_logs_
directory
OB2BARLIST=
backup_
specification_
name
The backup specification is needed only to specify which Data Protector
devices should be used for backup. Other information from the backup
specification, like SAP R/3 objects to be backed up or the BRBACKUP
options, is ignored and has to be specified manually at run time.
[OB2_3RD_PARTY_
BACKINT=1]
[OB2BARHOSTNAME=
application_
system_name]
Optional if you want to specify a virtual server name in cluster
environments.
Alternatively, these variables can be specified in the backint parameter file. If this is required, the
location of the file must be specified in the SAP configuration file using the util_par_file
parameter:
util_par_file = pathfilename
If you do not supply the path, the system searches for the parameter file in the directory:
Windows systems: SAPDATA_HOMEdatabase
UNIX systems: ORACLE_HOME/dbs
3. If you plan to do backups in the RMAN mode, ensure that the SBT_LIBRARY parameter in the
initSAP_instance.sap file points to the correct platform–specific Data Protector MML. For
details on the Data Protector MML location, see "Specify the parms operand: " on page 375.
4. Execute the BRBACKUP command.
brbackup -t {online_split | offline_split | online_mirror | offline_mirror}
[–q split] -d util_file -m all -c -u user/password
Integration Guide
Chapter 12: Data Protector SAP R/3 integration
HPE Data Protector (9.07) Page 477 of 803](https://image.slidesharecdn.com/hpemandp9-160823080054/85/Hpe-Data-Protector-integration-guide-477-320.jpg)
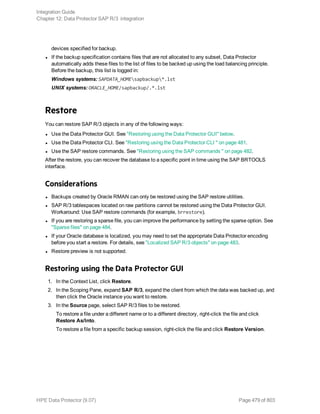
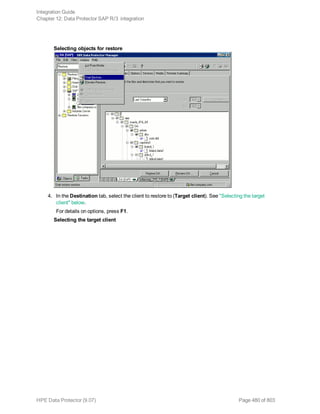
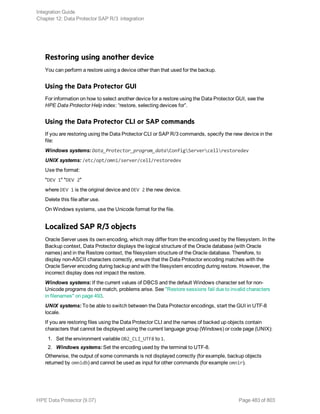
![System messages generated during backups are sent to both the SAP R/3 and the Data Protector
monitor. However, mount requests are sent only to the Data Protector monitor.
Troubleshooting
This section lists general checks and verifications plus problems you might encounter when using the
Data Protector SAP R/3 integration.
For general Data Protector troubleshooting information, see the HPE Data Protector Troubleshooting
Guide.
Before you begin
l Ensure that the latest official Data Protector patches are installed. See the HPE Data Protector Help
index: “patches” on how to verify this.
l See the HPE Data Protector Product Announcements, Software Notes, and References for general
Data Protector limitations, as well as recognized issues and workarounds.
l For an up-to-date list of supported versions, platforms, and other information, see the latest support
matrices at http://support.openview.hp.com/selfsolve/manuals.
General troubleshooting
Problem
Configuration fails due to a database operation failure
During configuration of an SAP R/3 database, Data Protector reports the following error:
Integration cannot be configured.
The database reported error while performing requested operation.
Action
Review user group membership for the user account which is used in Oracle database access
authentication. For details, see "Configuring user accounts" on page 457.
Problem
Restore session that uses object copies fails
A restore session for a Data Protector SAP R/3 backup object which spans multiple backup media fails
and reports the following error:
[Major] From: RSM@CMSystemName "" Time: DateTime
[61:9001] Could not find the object ObjectName named "SAP" in the database.
Database error reported is: "Object version not found."
This problem occurs only with SAP R/3 backup objects that were copied and when not all original
media have been recycled and exported before the session. For such restore sessions, Data Protector
Integration Guide
Chapter 12: Data Protector SAP R/3 integration
HPE Data Protector (9.07) Page 485 of 803](https://image.slidesharecdn.com/hpemandp9-160823080054/85/Hpe-Data-Protector-integration-guide-485-320.jpg)

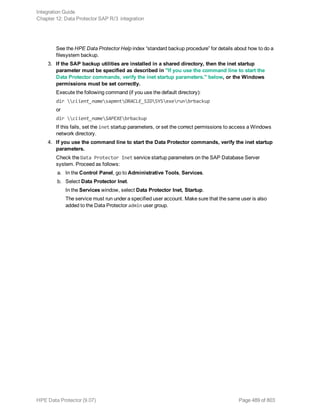
![Restore problems
At this stage, you should have performed all the verification steps described in the previous sections.
After this, proceed as follows:
1. Verify that a backup object exists on the backup media and in the IDB:
This can be done by executing the command
omnidb -sap "object_name" -session "Session_ID" -media
on the SAP Database Server system.
The output of the command lists detailed information about the specified backup object, session
IDs of the backup sessions containing this object, and a list of the media used.
For detailed syntax of the omnidb command, execute:
omnidb -help
You can also do this using the SAP tools:
Use backint, so that SAP tools also use this command to query:
Data_Protector_homebinbackint.exe -f inquiry -u ORACLE_SID -i input_file
where the specified input_file is queried.
If this fails, check if the backup session was performed successfully and if the query was started
under the appropriate user account.
Backint anticipates a list of files of the following format:
backup_ID_1 pathName_1 [targetDirectory_1]
backup_ID_2 pathName_2 [targetDirectory_2]
backup_ID_3 pathName_3 [targetDirectory_3]
To retrieve the backup_ID numbers, enter the following command:
echo #NULL #NULL | backint –f inquiry –u ORACLE_SID
or, alternatively, you can just specify #NULL as backup_ID_1 in the input_file. In this case, the
latest backup session for the file is used for the restore.
2. Verify the restore using the Data Protector User Interface
This test is possible if the objects have been backed up by backint.
If this fails, check if the backup session was performed successfully and if the query was started
under the appropriate user account.
3. Simulate a Restore Session
Once you know the information about the object to be restored, you can simulate a restore using
the Data Protector testbar2 utility.
Before you execute testbar2, verify that the Cell Manager name is correctly defined on the SAP
Database Server.
In the default Data Protector client configuration directory, check the cell_server file, which
contains the name of the Cell Manager system.
Then, test the Data Protector internal data transfer using the testbar2 utility:
Data_Protector_homebintestbar2 -type:SAP
Integration Guide
Chapter 12: Data Protector SAP R/3 integration
HPE Data Protector (9.07) Page 492 of 803](https://image.slidesharecdn.com/hpemandp9-160823080054/85/Hpe-Data-Protector-integration-guide-492-320.jpg)
![-appname:ORACLE_SID
-perform:restore
-object:object_name
-version:object_version
-bar:backup_specification_name
You should see only NORMAL messages displayed on your screen, otherwise examine the errors
reported by the testbar2 utility by clicking the Details button in the Data Protector Monitor
context.
4. Verify the restore using backint
Execute the following command:
Data_Protector_homebinbackint.exe -f restore -u ORACLE_SID -i input_file
where the contents of the input_file will be restored.
If this fails, check if the session was performed successfully and if the restore was started under
the appropriate user account.
Backint anticipates a list of files in the following format:backup_ID_1pathName_1
[targetDirectory_1]backup_ID_2pathName_2 [targetDirectory_2]backup_ID_
3pathName_3 [targetDirectory_3]
To retrieve the backup_ID numbers, enter the following command:
echo "#NULL #NULL" | backint –f inquiry –u ORACLE_SID
Problem
Restore sessions fail due to invalid characters in filenames
On Windows systems, where the Oracle Database Character Set (DBCS) is not set to the same value
as the default Windows character set for non-Unicode programs, and where SAP tools are used to
create Oracle datafiles, restore fails if the datafiles contain non-ASCII or non-Latin 1 characters.
Actions
Use any of the following solutions:
l For new Oracle installations, set the DBCS to UTF-8.
l If you do not use other non-Unicode programs, set the language for non-Unicode programs to the
same value as DBCS.
l Do not use non-ASCII or non-Latin 1 characters for filenames.
Troubleshooting on UNIX systems
Prerequisites concerning the Oracle side of the integration
The following steps should be performed to verify that Oracle is installed as required for the integration
to work. These steps do not include verifying Data Protector components.
Integration Guide
Chapter 12: Data Protector SAP R/3 integration
HPE Data Protector (9.07) Page 493 of 803](https://image.slidesharecdn.com/hpemandp9-160823080054/85/Hpe-Data-Protector-integration-guide-493-320.jpg)
![/usr/omni/bin/backint -f backup -t file -u ORACLE_SID -i input_file(other UNIX
systems)
where input_file is a file with a list of full pathnames for backup.
Backint expects the list of files in the following format:pathName_1pathName_2pathName_3
Problem
Util_File_Online SAP backup fails with “semop() error”
When the util_file_online option is used with BRBACKUP (for example, if you select the
Brbackup_Util_File_Online template), the tablespaces are switched into/from backup mode
individually. As there can be only one process communicating with BRBACKUP, several sapback
processes are using a semaphore to synchronize their interaction with BRBACKUP.
The number of sapback processes is calculated as the sum of concurrencies of all devices used for
backup. With a large number of sapback processes, the maximum number of processes that can have
undo operations pending on any given IPC semaphore on the system may be exceeded. In such case,
several sapback agents will fail with the following error:
[28] No space left on device.
Action
Perform any of the following actions to resolve the problem:
l Reduce the number of backup devices or their concurrency.
l Increase the value of the semmnu kernel parameter. After you increase the value, rebuild the kernel
and restart the system.
Problem
Backup fails with “Connect to database instance failed”
If you start a backup while the database instance is in the unmount or mount mode, the session fails
with a message similar to the following:
BR0301E SQL error -1033 at location BrDbConnect-2
ORA-01033: ORACLE initialization or shutdown in progress
BR0310E Connect to database instance HOOHOO failed
Action
Before you start a backup, ensure that the database instance is in the open or shutdown mode.
Restore problems
At this stage, you should have performed all the verification steps described in the previous sections.
After this, proceed as follows:
1. Verify a user for the restore:
Verify that user specified for the restore session is the user of backup session and that he/she
belongs to the Data Protector operator or admin group.
Integration Guide
Chapter 12: Data Protector SAP R/3 integration
HPE Data Protector (9.07) Page 499 of 803](https://image.slidesharecdn.com/hpemandp9-160823080054/85/Hpe-Data-Protector-integration-guide-499-320.jpg)
![See "Configuring user accounts" on page 457.
2. Verify that a backup object exists on the backup media and in the IDB:
This can be done by executing the command
omnidb -sap "object_name" -session "Session_ID" -media (HP-UX, Solaris, and Linux
systems) or
omnidb -sap "object_name" -session "Session_ID" -media (other UNIX systems)
on the SAP Database Server system.
The output of the command lists detailed information about the specified backup object, session
IDs of the backup sessions containing this object, and a list of the media used.
For detailed syntax of the omnidb command, execute:
omnidb -help (HP-UX, Solaris, and Linux systems)
omnidb -help (other UNIX systems)
You can also do this using the SAP tools:
Use backint, so that SAP tools will also use this command to query:
/opt/omni/lbin/backint -f inquiry -u ORACLE_SID -i input_file (HP-UX, Solaris, and
Linux systems)
/usr/omni/bin/backint -f inquiry -u ORACLE_SID -i input_file(other UNIX systems)
where the specified input_file is queried.
If this fails, check if the backup session was performed successfully and if the query was started
under the appropriate user account.
Backint anticipates a list of files of the following format:
backup_ID_1 pathName_1 [targetDirectory_1]
backup_ID_2 pathName_2 [targetDirectory_2]
backup_ID_3 pathName_3 [targetDirectory_3]
To retrieve the backup_ID numbers, enter the following command:
echo "#NULL #NULL" | backint –f inquiry –u ORACLE_SID
or, alternatively, you can just specify #NULL as backup_ID_1 in the input_file. In this case, the
latest backup session for the file is used for the restore.
3. Verify the restore using the Data Protector user interface
This test is possible if the objects have been backed up by backint.
If this fails, check if the backup session was performed successfully and if the query was started
under the appropriate user account.
4. Simulate a restore session
Once you know the information about the object to be restored, you can simulate a restore using
the Data Protector testbar2 utility.
Before you run testbar2, verify that the Cell Manager name is correctly defined on the SAP
Database Server.
Check the /etc/opt/omni/client/cell_server (HP-UX, Solaris, and Linux systems) or
/usr/omni/config/cell/cell_server (other UNIX systems) file, which contains the name of
the Cell Manager system.
Integration Guide
Chapter 12: Data Protector SAP R/3 integration
HPE Data Protector (9.07) Page 500 of 803](https://image.slidesharecdn.com/hpemandp9-160823080054/85/Hpe-Data-Protector-integration-guide-500-320.jpg)
![Then, test the Data Protector internal data transfer using the testbar2 utility:
/opt/omni/bin/utilns/testbar2 -type:SAP
-appname:ORACLE_SID
-perform:restore
-object:object_name
-version:object_version
-bar:backup_specification_name (HP-UX, Solaris, and Linux systems) or
/usr/omni/bin/utilns/testbar2 -type:SAP
-appname:ORACLE_SID
-perform:restore
-object:object_name
-version:object_version
-bar:backup_specification_name (other UNIX systems)
You should see only NORMAL messages displayed on your screen, otherwise examine the errors
reported by the testbar2 utility by clicking the Details button in the Data Protector Monitor
context.
5. Verify the restore using backint
Execute the following command:
HP-UX, Solaris, and Linux systems: /opt/omni/lbin/backint -f restore -u ORACLE_SID
-i input_file
Other UNIX systems: /usr/omni/bin/backint -f restore -u ORACLE_SID -i input_file
where the contents of the input_file will be restored.
If this fails, check if the session was performed successfully and if the restore was started under
the appropriate user account.
Backint anticipates a list of files in the following format:backup_ID_1pathName_1
[targetDirectory_1]backup_ID_2pathName_2 [targetDirectory_2]backup_ID_3pathName_3
[targetDirectory_3]
To retrieve the backup_ID numbers, enter the following command:
echo #NULL #NULL | backint –f inquiry –u ORACLE_SID
Problem
Restore of SAP R/3 tablespaces located on raw partitions fails
When restoring SAP tablespaces that are located on raw partitions using the Data Protector GUI, the
restore fails with a message similar to the following:
[Major] From: VRDA@joca.company.com "SAP" Time: 5/9/06 3:33:51 PM
/dev/sapdata/rsapdata Cannot restore -> rawdisk section !
[Warning] From: VRDA@joca.company.com "SAP"
Time: 5/9/06 3:42:45 PM Nothing restored.
Action
Use SAP commands (for example, brrestore) to restore these tablespaces.
Integration Guide
Chapter 12: Data Protector SAP R/3 integration
HPE Data Protector (9.07) Page 501 of 803](https://image.slidesharecdn.com/hpemandp9-160823080054/85/Hpe-Data-Protector-integration-guide-501-320.jpg)

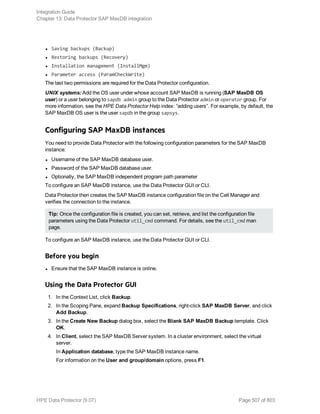
![Click OK.
6. The SAP MaxDB instance is configured. Exit the GUI or proceed with creating the backup
specification at "In the Source page, select objects for restore." on page 522.
Using the Data Protector CLI
Log on to the SAP MaxDB Server system as the SAP MaxDB OS user and execute:
util_sapdb [-homedir SAPMaxDB_independent_program_directory] -config Instance
Nameusernamepassword
Parameter description
SAPMaxDB_
independent_
program_
directory
The SAP MaxDB independent program path parameter. This parameter is the
independent program path directory specified during the installation of the SAP
MaxDB application on the SAP MaxDB Server.
This parameter is optional. If it is not specified, the directory is detected
automatically.
Instance_Name The name of the SAP MaxDB instance to be configured.
username The username of the SAP MaxDB database user created or identified as
described in "Configuring SAP MaxDB users" on page 506.
Integration Guide
Chapter 13: Data Protector SAP MaxDB integration
HPE Data Protector (9.07) Page 509 of 803](https://image.slidesharecdn.com/hpemandp9-160823080054/85/Hpe-Data-Protector-integration-guide-509-320.jpg)
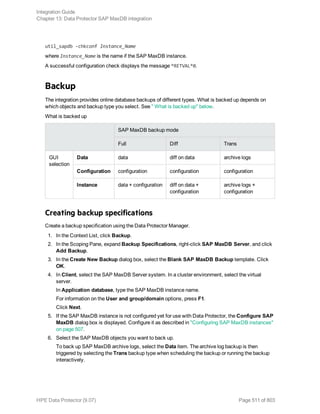
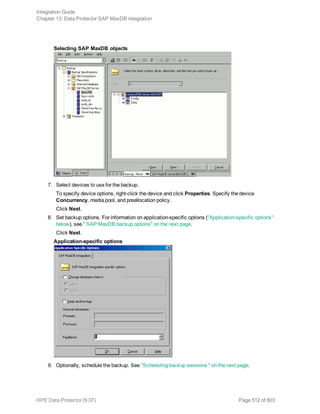
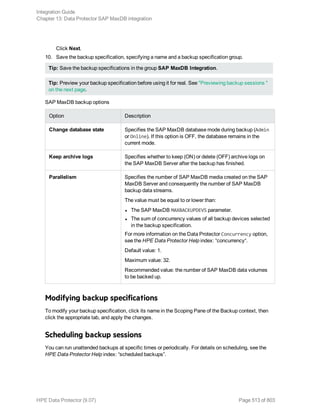
![Using the Data Protector GUI
1. In the Context List, click Backup.
2. In the Scoping Pane, expand Backup Specifications, and then SAP MaxDB Integration. Right-
click the backup specification you want to use and click Start Backup.
3. Select the Backup type and Network load. Click OK.
The message Session completed successfully is displayed at the end of a successful backup
session.
Using the Data Protector CLI
Log on to the SAP MaxDB Server system as the SAP MaxDB OS user and execute the following
command:
omnib -sapdb_list ListName [-barmode sapdbmode] [ list_options ] [-preview]
ListName is the name of the backup specification.
sapdbmode specifies the backup type. You can select full, diff, or trans.
For List_options, see the omnib man page.
Example
To start a full backup using an existing SAP MaxDB backup specification called TEST, and to set data
protection to 10 weeks, execute:
omnib -sapdb_list TEST -barmode full -protect weeks 10
Using SAP MaxDB utilities
For a description of the variables listed below, see " Parameter description" on page 518.
1. Create the bsi_env file on the SAP MaxDB Server system.
UNIX systems: Grant the SAP MaxDB OS user read permission for this file.
The file must contain the following lines:
Windows systems:
BACKINT Data_Protector_homebinsapdb_backint
INPUT Data_Protector_program_datatmpinst_name.bsi_in
OUTPUT Data_Protector_program_datatmpinst_name.bsi_out
ERROROUTPUT Data_Protector_program_datatmpinst_name.bsi_err
PARAMETERFILE name_of_backup_spec
TIMEOUT_SUCCESS 900
TIMEOUT_FAILURE 30
UNIX systems:
BACKINT /opt/omni/bin/sapdb_backint
INPUT /var/opt/omni/tmp/inst_name.bsi_in
Integration Guide
Chapter 13: Data Protector SAP MaxDB integration
HPE Data Protector (9.07) Page 516 of 803](https://image.slidesharecdn.com/hpemandp9-160823080054/85/Hpe-Data-Protector-integration-guide-516-320.jpg)
![OUTPUT /var/opt/omni/tmp/inst_name.bsi_out
ERROROUTPUT /var/opt/omni/tmp/inst_name.bsi_err
PARAMETERFILE SAPDB_PARAMETER
TIMEOUT_SUCCESS 900
TIMEOUT_FAILURE 30
The SAPDB_PARAMETER file should contain the following lines:
OB2BARLIST=name_of_backup_spec
OB2APPNAME=inst_name
OB2BARHOSTNAME=FQDN
2. Log in to the SAP MaxDB database manager as the SAP MaxDB database user by executing:
dbmcli -d inst_name -u username,password
3. In the SAP MaxDB database manager, register the location of the bsi_env file created in "Create
the bsi_env file on the SAP MaxDB Server system." on the previous page of this procedure by
executing:
Windows systems:
dbm_configset -raw BSI_ENV locationinst_name.bsi_env
UNIX systems:
dbm_configset -raw BSI_ENV location/inst_name.bsi_env
4. Create SAP MaxDB media, grouping them under the same name (media_group_name). The
number of created media should equal the parallelism you plan to use for backup. To create a
medium medium_name, execute the following command, depending on the SAP MaxDB version:
l For SAP MaxDB version 7.6:
medium_put media_group_name/medium_namepipe_nametypebackup_type [size [block_
size [overwrite [autoloader [os_command [tool_type]]]]]]
l For other SAP MaxDB versions:
medium_put media_group_name/medium_namepipe_namemedium_typebackup_type
backup_type can be one of the following:
l DATA for full backup
l PAGES for differential backup
l LOG for log backup
tool_type must be the following:
l "BACK" for backup with Backint for SAP MaxDB
When creating SAP MaxDB media for the purpose of a Data Protector backup and restore, the
media group name must begin with the "BACK" string.
Example
The commands below create two media and two pipes (parallelism = 2) in the media group
BACKDP-Data[2].
Integration Guide
Chapter 13: Data Protector SAP MaxDB integration
HPE Data Protector (9.07) Page 517 of 803](https://image.slidesharecdn.com/hpemandp9-160823080054/85/Hpe-Data-Protector-integration-guide-517-320.jpg)
![Windows systems, SAP MaxDB version 7.6:
medium_put BACKDP-Data[2]/1
.Pipeinst_name.BACKDP_Data[2].1 PIPE DATA 0 8
NO NO " " "BACK"
medium_put BACKDP-Data[2]/2
.Pipeinst_name.BACKDP_Data[2].2 PIPE DATA 0 8
NO NO " " "BACK"
UNIX systems, SAP MaxDB version 7.6:
medium_put BACKDP-Data[2]/1
/var/opt/omni/tmp/inst_name.BACKDP_Data[2].1 PIPE
DATA 0 8 NO NO " " "BACK"
medium_put BACKDP-Data[2]/2
/var/opt/omni/tmp/inst_name.BACKDP_Data[2].2 PIPE
DATA 0 8 NO NO " " "BACK"
Windows systems, other SAP MaxDB versions:
medium_put BACKDP-Data[2]/1
.Pipeinst_name.BACKDP_Data[2].1 PIPE DATA
medium_put BACKDP-Data[2]/2
.Pipeinst_name.BACKDP_Data[2].2 PIPE DATA
UNIX systems, other SAP MaxDB versions:
medium_put BACKDP-Data[2]/1
/var/opt/omni/tmp/inst_name.BACKDP_Data[2].1 PIPE DATA
medium_put BACKDP-Data[2]/2
/var/opt/omni/tmp/inst_name.BACKDP_Data[2].2 PIPE DATA
5. Start the SAP MaxDB utility session by executing:
util_connect
6. Start the backup. The following exemplary command starts the full backup for the media created in
"Create SAP MaxDB media, grouping them under the same name (media_group_name). The
number of created media should equal the parallelism you plan to use for backup. To create a
medium medium_name, execute the following command, depending on the SAP MaxDB version:"
on the previous page of this procedure:
backup_start BACKDP-Data[2] DATA
7. The progress of the session is displayed in the Data Protector Monitor context. For more
information, see "Monitoring sessions " on page 532.
Parameter description
inst_name Name of the instance to be backed up.
name_of_backup_spec Name of the Data Protector backup specification to be used for backup.
username, password Connection string for the SAP MaxDB database user.
Integration Guide
Chapter 13: Data Protector SAP MaxDB integration
HPE Data Protector (9.07) Page 518 of 803](https://image.slidesharecdn.com/hpemandp9-160823080054/85/Hpe-Data-Protector-integration-guide-518-320.jpg)
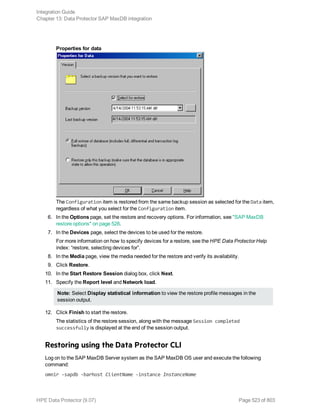
![[-destination ClientName]
[-newinstance DestinationInstanceName]
[-session BackupID]
[-recover [-endlogs | -time: YYYY-MM-DD.hh.mm.ss] [-from_disk]]
[-nochain]
The -barhost option sets the name of the SAP MaxDB Server that was backed up.
The -instance option sets the name of the SAP MaxDB instance that was backed up.
The -session specifies from which backup data (BackupID) to restore. A backup ID is a point in time.
All objects (backup data) created in a backup session have the same backup ID, which is the same as
the session ID of the backup session.
Mirrored objects and objects created in an object copy session have the same backup ID as objects
created in the original backup session. Suppose the media set created in the original backup session no
longer exists, but the media set created in an object copy session still exists. To restore the objects,
you must specify the session ID of the original backup session (that is, the backup ID) and not the
session ID of the object copy session.
The omnir syntax does not let you specify from which object copy to restore if several copies of the
same object exist. This is only possible using the Data Protector GUI by setting the media allocation
priority list.
If this option is not specified, backup data with the latest backup ID is used, regardless of the -endlogs
or the -time option selection.
The -nochain option instructs the integration to restore only the selected or last backup session; the
integration does not restore the whole restore chain of full, differential, and transactional backups.
For descriptions of all other options, see "SAP MaxDB restore options" on page 528. See also to the
omnir man page.
Example
To restore an instance named “inst1” (together with configuration), backed up on an SAP MaxDB
Server named “srv1.company.com” from the last backup session and then perform a recovery until the
end of logs, execute the following command:
omnir -sapdb -barhost srv1.company.com -instance inst1 -recover -endlogs
On how to find information about backup objects to restore from, see "Finding information for restore"
on page 528.
Restoring using SAP MaxDB utilities
Using this integration, it is also possible to run an integrated Data Protector restore of an SAP MaxDB
Server from SAP MaxDB utilities.
To perform a restore to an existing SAP MaxDB Server instance, see "SAP MaxDB restore and
recovery " on the next page.
To migrate an SAP MaxDB instance, see "SAP MaxDB migration" on page 528.
Integration Guide
Chapter 13: Data Protector SAP MaxDB integration
HPE Data Protector (9.07) Page 524 of 803](https://image.slidesharecdn.com/hpemandp9-160823080054/85/Hpe-Data-Protector-integration-guide-524-320.jpg)
![OB2BARLIST=name_of_backup_spec
OB2APPNAME=inst_name
OB2BARHOSTNAME=FQDN
2. Login to the SAP MaxDB database manager as the SAP MaxDB database user created or
identified as described in "Configuring SAP MaxDB users" on page 506. On the SAP MaxDB
Server, execute the following command to login:
dbmcli -d inst_name -u username,password
3. In the SAP MaxDB database manager, switch the database to the Admin mode by executing the
following command:
db_admin
4. Skip this step if the location of the bsi_env file is already registered on the SAP MaxDB Server.
Register the location of the bsi_env file as follows:
Windows systems:
dbm_configset -raw BSI_ENV locationinst_name.bsi_env
UNIX systems:
dbm_configset -raw BSI_ENV location/inst_name.bsi_env
5. Skip this step if the SAP MaxDB media and pipes to be used with Data Protector are already
existing on the SAP MaxDB Server.
Note that to restore a Data Protector SAP MaxDB backup session, the number of SAP MaxDB
media and pipes required equals the parallelism value used during the backup session.
Create SAP MaxDB media in an SAP MaxDB media group. Execute the following command for
every medium to be created, depending on the SAP MaxDB version:
l For SAP MaxDB version 7.6:
medium_put media_group_name/medium_namepipe_namemedia_typetypebackup_type
[size [block_size [overwrite [autoloader [os_command [tool_type]]]]]]
l For other SAP MaxDB versions:
medium_put media_group_name/medium_namepipe_namemedia_typebackup_type
backup_type can be one of the following:
l DATA for full backup
l PAGES for differential (diff) backup
l LOG for transactional (trans) backup
tool_type must be the following:
l "BACK" for backup with Backint for SAP MaxDB
When creating SAP MaxDB media and pipes for the purpose of a Data Protector backup and
restore, the media group name must begin with the "BACK" string. The commands below create
two media and two pipes (parallelism = 2) in a media group:
Windows systems, SAP MaxDB version 7.6:
Integration Guide
Chapter 13: Data Protector SAP MaxDB integration
HPE Data Protector (9.07) Page 526 of 803](https://image.slidesharecdn.com/hpemandp9-160823080054/85/Hpe-Data-Protector-integration-guide-526-320.jpg)
![medium_put BACKDP-Data[2]/1
.Pipeinst_name.BACKDP_Data[2].1 PIPE DATA 0 8
NO NO "" "BACK"
medium_put BACKDP-Data[2]/2
.Pipeinst_name.BACKDP_Data[2].2 PIPE DATA 0 8
NO NO "" "BACK"
UNIX systems, SAP MaxDB version 7.6:
medium_put BACKDP-Data[2]/1
/var/opt/omni/tmp/inst_name.BACKDP_Data[2].1 PIPE
DATA 0 8 NO NO "" "BACK"
medium_put BACKDP-Data[2]/2
/var/opt/omni/tmp/inst_name.BACKDP_Data[2].2 PIPE
DATA 0 8 NO NO "" "BACK"
Windows systems, other SAP MaxDB versions:
medium_put BACKDP-Data[2]/1
.Pipeinst_name.BACKDP_Data[2].1 PIPE DATA
medium_put BACKDP-Data[2]/2
.Pipeinst_name.BACKDP_Data[2].2 PIPE DATA
UNIX systems, other SAP MaxDB versions:
medium_put BACKDP-Data[2]/1
/var/opt/omni/tmp/inst_name.BACKDP_Data[2].1 PIPE DATA
medium_put BACKDP-Data[2]/2
/var/opt/omni/tmp/inst_name.BACKDP_Data[2].2 PIPE DATA
6. Start the SAP MaxDB utility session by executing the following command:
util_connect
7. Start the restore from a Data Protector backup session by executing the following command:
recover_start media_group_namebackup_type EBID "inst_nameSessionID:1 pipe_
name1,inst_nameSessionID:2 pipe_name2[, ...]"
Windows systems:
recover_start BACKDP-Data[2] DATA EBID "inst_nameSessionID:1 .Pipeinst_
name.BACKDP-Data[2].1,TEST SessionID:2 .Pipeinst_name.BACKDP-Data[2].2"
UNIX systems:
recover_start BACKDP-Data[2] DATA EBID "inst_nameSessionID:1
/var/opt/omni/tmp/inst_name.BACKDP-Data[2].1,inst_nameSessionID:2
/var/opt/omni/tmp/inst_name.BACKDP-Data[2].2"
Repeat this step for every session in the required chain of backup sessions.
a. To recover the database until the specified point in time, execute the recover_start
command with the UNTIL clause:
recover_start BACKDP-Archive LOG EBID "inst_name SessionID:1 pipe_
Integration Guide
Chapter 13: Data Protector SAP MaxDB integration
HPE Data Protector (9.07) Page 527 of 803](https://image.slidesharecdn.com/hpemandp9-160823080054/85/Hpe-Data-Protector-integration-guide-527-320.jpg)
![name1,inst_name SessionID:2 pipe_name2[, ...]" UNTIL yyyymmdd hhmmss
where the yyyymmdd and hhmmss parameters specify which redo log should be applied last.
8. Use one of the commands recover_start and recover_replace, based on the exit code from
the previous execution of recover_start or recover_replace.
For more information, see the SAP MaxDB documentation.
9. If the command recover_start or recover_replace from the previous step returned an exit code
of -8020, and you have already restored all relevant data, execute the following command:
recover_ignore
For more information, see the SAP MaxDB documentation.
SAP MaxDB migration
When performing an SAP MaxDB migration, some additional tasks must first be done in order to
prepare the SAP MaxDB Server or instance. These tasks are described in "Before you begin " on page
521.
Follow the procedure in the section "SAP MaxDB restore and recovery " on page 525 to migrate the
SAP MaxDB database using SAP MaxDB utilities from existing Data Protector SAP MaxDB backup
session(s). When following the mentioned procedure, before executing the recover_start command,
delete the existing redo logs on the SAP MaxDB Server by executing the following command in the
SAP MaxDB database manager:
util_execute clear log
Finding information for restore
To find the information needed for a restore, follow the steps below:
Execute the following Data Protector commands:
l omnidb -sapdb
to get a list of SAP MaxDB objects.
l omnidb -sapdb object_name
to get details on a specific object, including the SessionID.
SAP MaxDB restore options
"SAP MaxDB restore and recovery options" on the next page shows the SAP MaxDB GUI restore and
recovery options.
Integration Guide
Chapter 13: Data Protector SAP MaxDB integration
HPE Data Protector (9.07) Page 528 of 803](https://image.slidesharecdn.com/hpemandp9-160823080054/85/Hpe-Data-Protector-integration-guide-528-320.jpg)
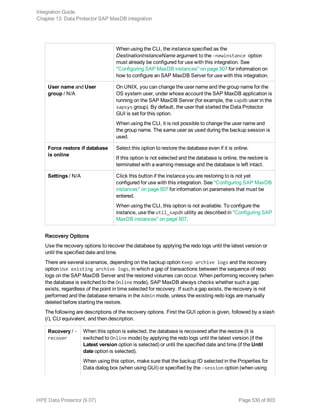
![l See the HPE Data Protector Product Announcements, Software Notes, and References for general
Data Protector limitations, as well as recognized issues and workarounds.
l See http://support.openview.hp.com/selfsolve/manuals for an up-to-date list of supported versions,
platforms, and other information.
Problems
Problem
Data Protector reports the following error during backup or restore:
[Critical] From: OB2BAR_SAPDBBAR@machine.company.com "INSTANCE"
Time: 02/06/04 18:17:18 Error: SAPDB responded with:
-24920,ERR_BACKUPOP: backup operation was unsuccessful
The database was unable to fulfill a request
(-2025, Invalid number of backup devices).
Action
Increase the value of the SAP MaxDB MAXBACKUPDEVS parameter to a value that is greater than or
equal to the value of the Data Protector Parallelism option, or reduce the value of the Data Protector
Parallelism option.
Problem
An SAP MaxDB instance cannot be started after restore
Action
Using the SAP MaxDB db_restartinfo command, check if the instance can be restarted.
l If the instance cannot be restarted, most probably the existing log volumes do not contain enough
data to restart the instance from data volumes. The required differential or transactional backups
might not have been restored.
l If the instance can be restarted, check the SAP MaxDB instance kernel error file for errors.
If there was insufficient space for SAP MaxDB logs at some point of time, logs might have been
corrupted: delete the logs (using the dbmcli util_execute clear log command) or contact SAP
MaxDB or Data Protector support.
Problem
A restore session for restoring data from an object copy gets blocked
Action
Before restarting the restore:
l Increase the number of Disk Agent buffers for the device used for the restore.
l If all objects of the backup are recorded in the IDB, perform the following steps:
a. In the Internal Database context of the Data Protector GUI, search for all objects belonging to
the same backup. The objects are identified by the same backup ID.
Integration Guide
Chapter 13: Data Protector SAP MaxDB integration
HPE Data Protector (9.07) Page 533 of 803](https://image.slidesharecdn.com/hpemandp9-160823080054/85/Hpe-Data-Protector-integration-guide-533-320.jpg)


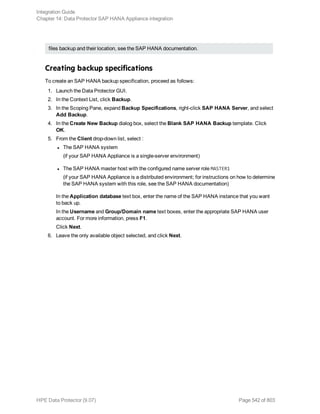
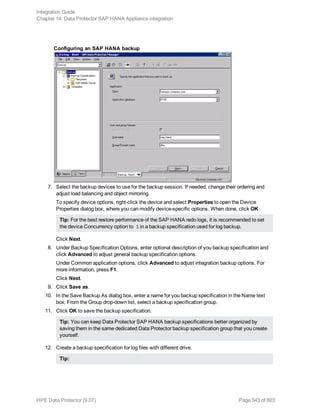

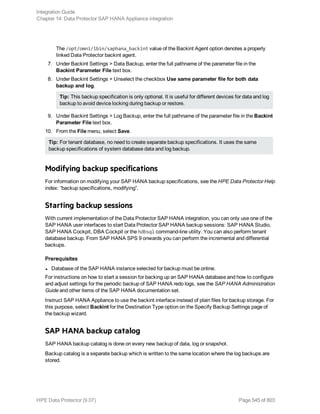
![In case of file-based backup, the data is stored in the configured folder. In HANA backup console,
backups of the catalog are under log backup type. The source type catalog and log names appear as
log_backup_0_0_0_0.
If backint is configured for logs then session outputs appear as log_backup_0_0_0_0.
Restore
The Data Protector SAP HANA integration provides restore of the SAP HANA database and the SAP
HANA redo logs. The restore scope is defined when starting a recovery session from an SAP HANA
Appliance user interface. The Data Protector SAP HANA integration provides the restore of the
particular tenant database and provides copy of the SAP HANA database to another SAP HANA
database.
Tip: SAP HANA Copy database using third party backint is not supported for Tenant database.
Note: For information about data that needs to be restored in scope of SAP HANA configuration
files restore and where, see the SAP HANA documentation.
Finding information for restore
To find the information needed for restoring your SAP HANA data, use the Data Protector omnidb –
saphana [Client:Set] command. The command retrieves a list of SAP HANA objects backed up by
Data Protector and their corresponding sessions. For details, see the omnidb reference page in the
HPE Data Protector Command Line Interface Reference or the omnidb man page.
Starting restore and recovery sessions
With current implementation of the Data Protector SAP HANA integration, you can only use one of the
SAP HANA user interfaces to start Data Protector SAP HANA restore or recovery sessions: SAP
HANA Studio or the hdbsql command-line utility.
Prerequisites
l Database of the target SAP HANA instance must be offline.
SAP HANA Studio can automatically take the database offline when a restore session is initiated. In
contrast, before using the hdbsql command-line utility for restoring or recovering an SAP HANA
database, you need to take the database offline manually.
For instructions on how to start a Data Protector session for restoring an SAP HANA database, how to
perform database recovery, and how to specify other restore options, see the SAP HANA
Administration Guide and other items of the SAP HANA documentation set.
While the recovery wizard of SAP HANA Studio considers the backint interface as the restore source
for the SAP HANA database by default, you need to instruct SAP HANA Appliance to use the backint
interface also as the source for restoring the redo logs. For this purpose, select the Third-Party
Backup Tool (Backint) option on the Other Settings page of the recovery wizard.
Integration Guide
Chapter 14: Data Protector SAP HANA Appliance integration
HPE Data Protector (9.07) Page 546 of 803](https://image.slidesharecdn.com/hpemandp9-160823080054/85/Hpe-Data-Protector-integration-guide-546-320.jpg)

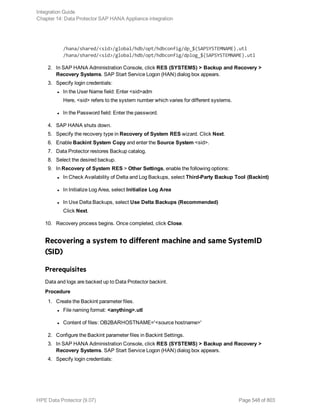
![l Verify that you have properly linked the backint agent in SAP HANA Studio by inspecting the
Backint Agent option in the Backup > Configuration > Backint Settings context.
l Verify that the user performing the SAP HANA backup or restore is added to the Data Protector user
list.
For more information, see "Configuring the integration " on page 540.
Problem
The Data Protector SAP HANA parallel backup session may fail
The Data Protector SAP HANA parallel backup session fails with the following error message:
|Major| From: OB2BAR_SAPHANA_BACKINT@<hostname> "" Time:<Date>>Time>
Aborting connection to BSM. Abort code -2.
Action
Set the SAP HANA variable max_log_backup_group_size to 1 in the global.ini file.
Problem
SAP HANA hdbbackint ends abnormally with error messages.
After upgrading to Data Protector 9.03, the hdbbackint ends abnormally leading to postponed sessions
and logs with the following error messages:
[Major] From: OB2BAR_SAPHANA_BACKINT@<hostname> "" Time: <Date><Time> Aborting
connection to BSM. Abort code 2.
or
[Major] From: BSM@<hostname> "" Time: <Date><Time> |61:1005| Got unexpected close
from OB2BAR Backup DA on <ip_address>.
Action
Set the backint_response_timeout SAP HANA parameter to 600 seconds (10 minutes). This is the
default timeout.
Note: You can adjust the timeout by editing the backint_response_timeout parameter in the
global.ini file.
Problem
Error in SAP HANA
No data backups found
Error in DP
#NOTFOUND "/usr/sap/HAN/SYS/global/hdb/backint/log_backup_0_0_0_0"
Action
Verify the correct hostname OB2BARHOSTNAME in the parameter file.
Integration Guide
Chapter 14: Data Protector SAP HANA Appliance integration
HPE Data Protector (9.07) Page 552 of 803](https://image.slidesharecdn.com/hpemandp9-160823080054/85/Hpe-Data-Protector-integration-guide-552-320.jpg)
![Problem
Error in SAP HANA
failed: <Date> <Time> <Date><Time> P020466 153128bc851 ERROR RECOVERY INQUIRE finished
with error: [449] recovery strategy could not be determined, [110507] Backint
exited with exit code 1 instead of 0.
console output: 15# ##[139:220]# /usr/sap/HAN/SYS/global/hdb/opt/hdbbackint#, [110514]
Backint terminated successfully without connect
Error in DP
Environment variable OB2BARHOSTNAME is not set.
Action
Check if the parameter file exists and hostname OB2BARHOSTNAME is set to SAP HANA
hostname.
Integration Guide
Chapter 14: Data Protector SAP HANA Appliance integration
HPE Data Protector (9.07) Page 553 of 803](https://image.slidesharecdn.com/hpemandp9-160823080054/85/Hpe-Data-Protector-integration-guide-553-320.jpg)

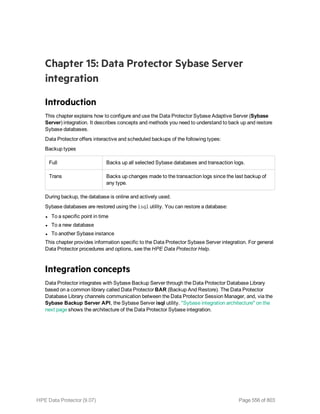
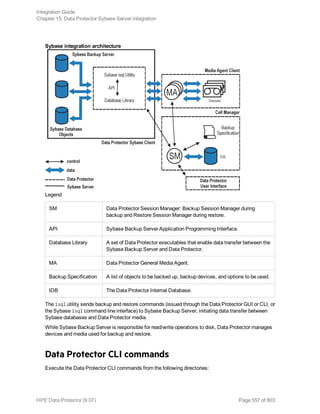
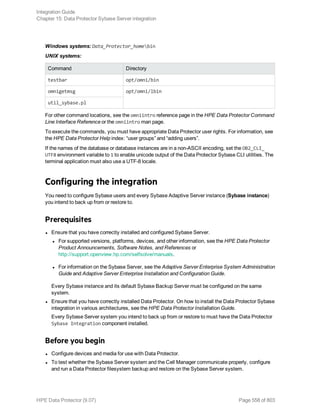

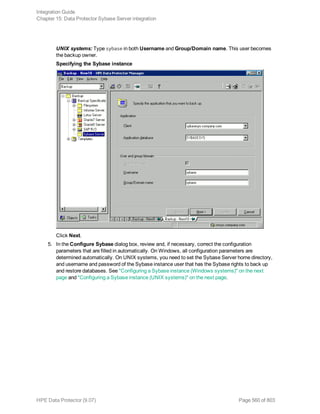
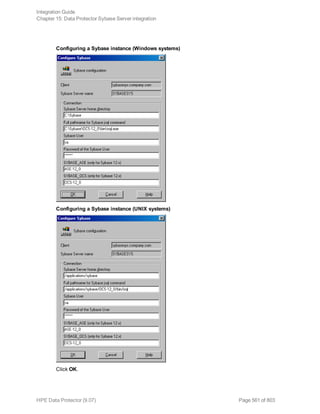
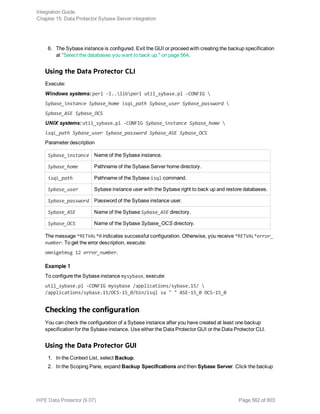

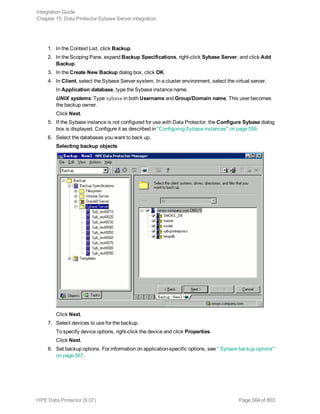
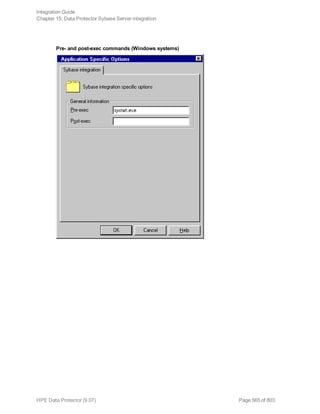
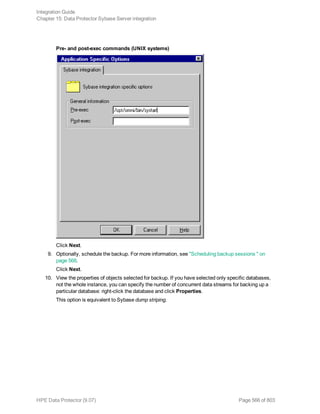
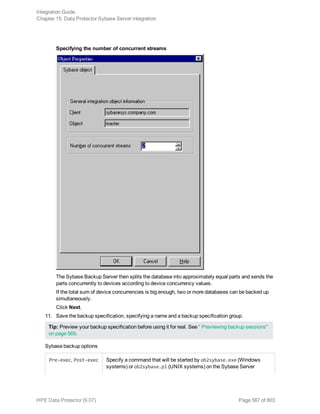
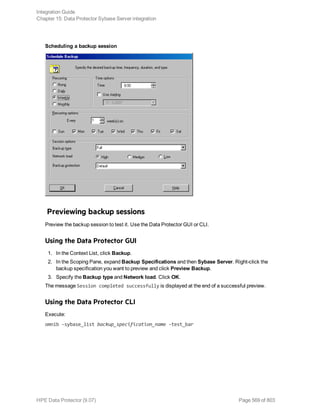
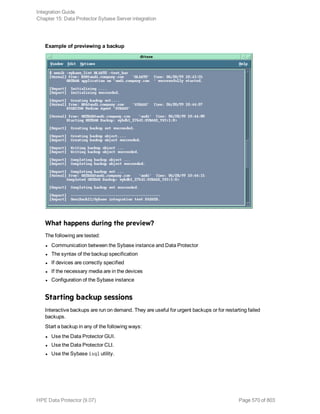
![Using the Data Protector GUI
1. In the Context List, click Backup.
2. In the Scoping Pane, expand Backup Specifications and then Sybase Server. Right-click the
backup specification you want to use and click Start Backup.
3. Select the Backup type and Network load. Click OK.
Successful backup displays the message Session completed successfully.
Using the Data Protector CLI
Execute:
omnib -sybase_list backup_specification [-barmode sybase_mode] [options]
Parameter description
backup_specification Name of the Data Protector Sybase backup specification.
sybase_mode Backup type. Select between full and trans.
options For information, see the omnib man page.
Example
To perform a full backup using the backup specification FullSybase, execute:
omnib -sybase_list FullSybase -barmode full
Using Sybase commands
To start a database backup from the client where the database is located, using the Sybase isql
utility:
1. Check if the devices to be used contain formatted (initialized) media with enough free space.
2. Verify the backup options in the Data Protector Sybase backup specification.
3. Log in to the Sybase Server system as user sybase.
4. Execute the Sybase isql command:
isql -SSybase_instance -USybase_user -PSybase_password dump
database database to "ob2syb::backup_specification"
Parameter description
Sybase_instance Sybase instance name.
Sybase_user Sybase instance user.
Sybase_password Password of the Sybase instance user.
database Name of the database to be backed up.
Integration Guide
Chapter 15: Data Protector Sybase Server integration
HPE Data Protector (9.07) Page 571 of 803](https://image.slidesharecdn.com/hpemandp9-160823080054/85/Hpe-Data-Protector-integration-guide-571-320.jpg)
![Using the Data Protector syb_tool command
The Data Protector syb_tool command returns the exact Sybase load command needed for restore.
The syntax of the syb_tool command is:
syb_tool databaseSybase_instance
-date YYYY/MM/DD.hh:mm:ss
[ -new_db new_database ]
[ -new_server new_Sybase_instance ]
[ -file file ]
[ -media ]
Parameter description
database Database to be restored.
Sybase_
instance
Sybase instance from which the database to be restored was backed up.
date Point in time. The first backup version created after this point in time is restored.
Use the 0-24h time format.
new_database Target database to which to restore.
new_Sybase_
instance
Target Sybase instance to which to restore.
file Pathname of a file to which the load command or command sequence is
recorded.
-media Lists media needed for the restore.
To define the time interval between the closure of transaction logs and the start of a backup session,
set the global option OB2SybaseTransLogDelay. The default value is 20 seconds.
Example 1
To get the load command that restores database1 of the Sybase instance audi from the first backup
performed after 12.00 noon on June 1, 1999, and to get the necessary media, execute:
syb_tool database1 audi -date 1999/06/01.12:00:00 -media
See "Running the syb_tool command" on the next page.
Integration Guide
Chapter 15: Data Protector Sybase Server integration
HPE Data Protector (9.07) Page 573 of 803](https://image.slidesharecdn.com/hpemandp9-160823080054/85/Hpe-Data-Protector-integration-guide-573-320.jpg)
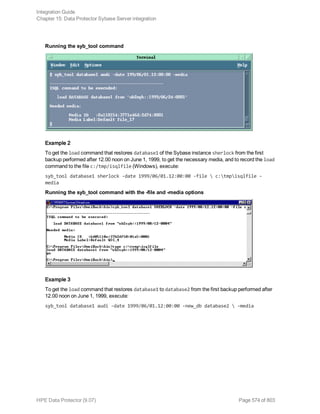
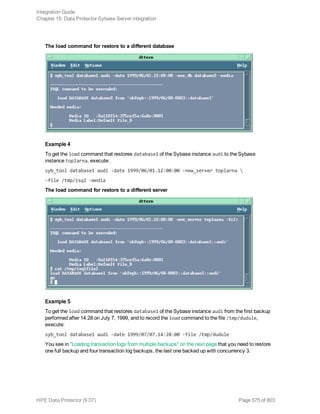
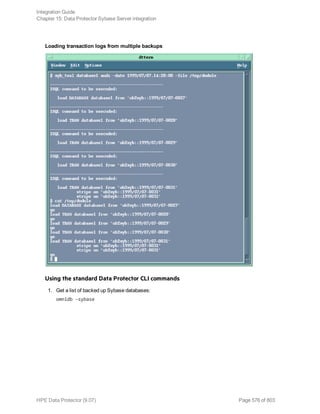
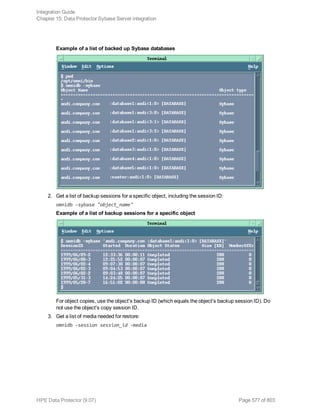
![Example of finding media needed for restore
For details on the omnidb command, see the omnidb man page.
Restoring using the Sybase isql command
1. On UNIX systems, log in to the Sybase Server system as user sybase.
2. Run the Sybase isql utility:
isql -SSybase_instance -USybase_user -PSybase_password [-i
input_file -J utf8]
Parameter description
Sybase_
instance
Sybase instance name.
Sybase_user Sybase instance user.
Sybase_
password
Password of the Sybase instance user.
input_file The file to which the load parameter was saved. See also "Localized database
names" on page 572.
3. If you did not provide the load command in a file, type the desired load command in the first line.
To execute the command(s), type go in the last line and press Enter.
The syntax of the Sybase load command is:
load {database|transaction} new_database from
"ob2syb::version[::database[::Sybase_instance]]"
stripe on
"ob2syb::version[::database[::Sybase_instance]]"
Parameter description
{database|transaction} Defines whether databases or transaction logs are to be restored.
version Session ID of the backup version to restore from. You can also
type latest version to restore from the latest backup.
Integration Guide
Chapter 15: Data Protector Sybase Server integration
HPE Data Protector (9.07) Page 578 of 803](https://image.slidesharecdn.com/hpemandp9-160823080054/85/Hpe-Data-Protector-integration-guide-578-320.jpg)
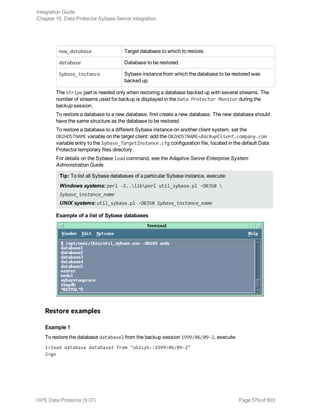

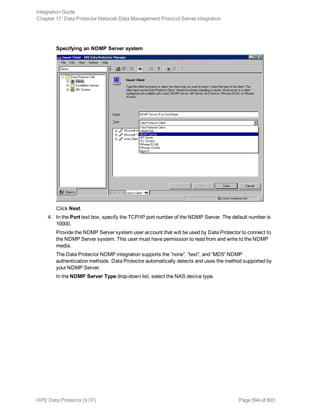
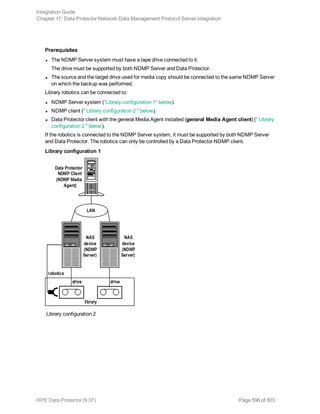
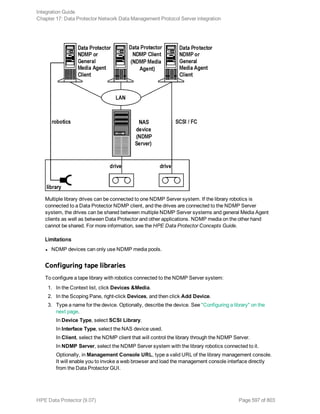
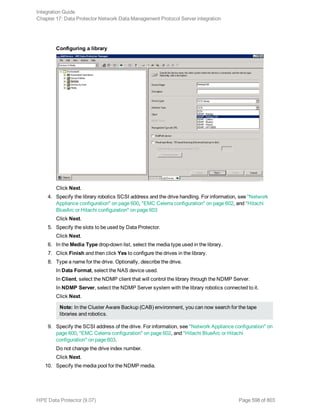
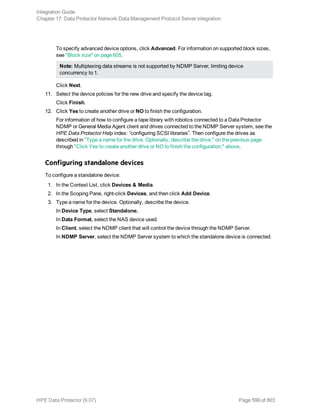
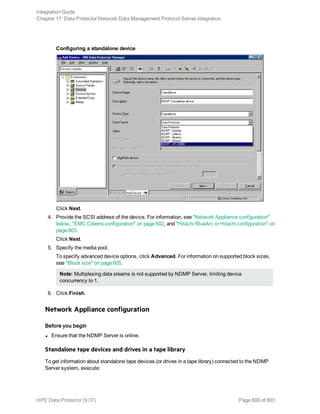
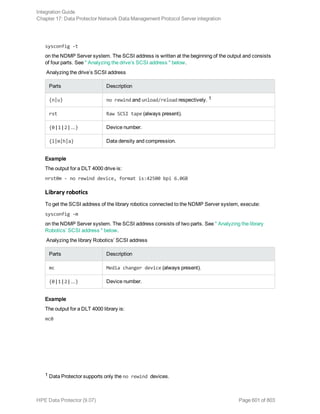
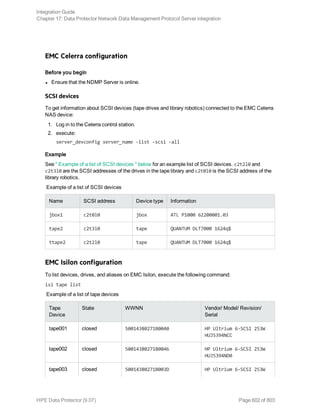
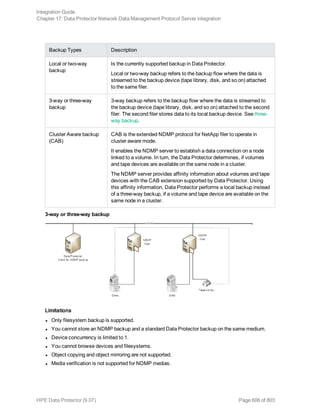
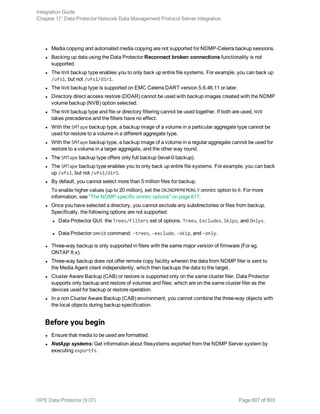
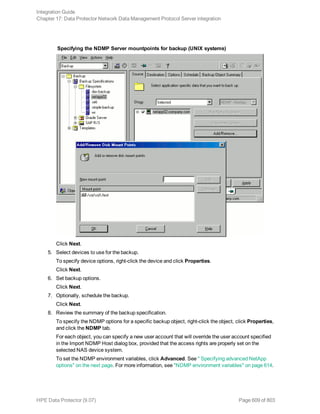
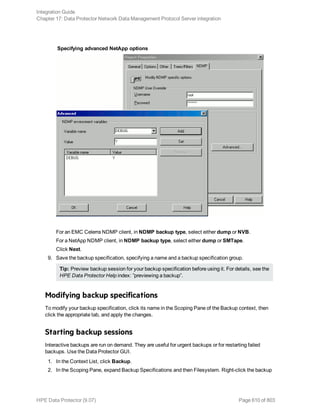
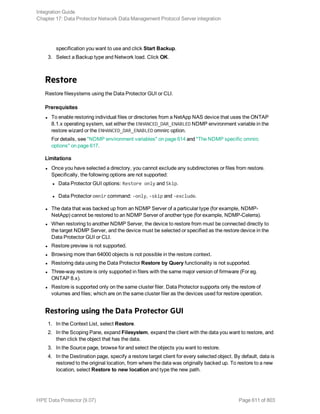
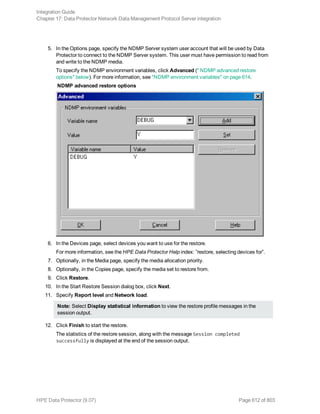
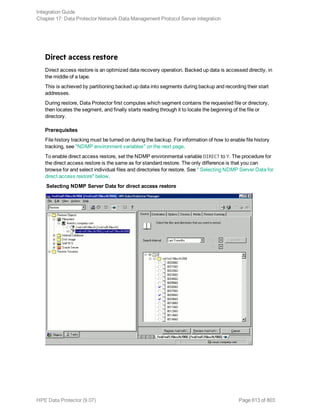
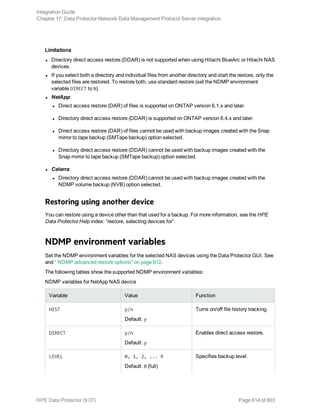
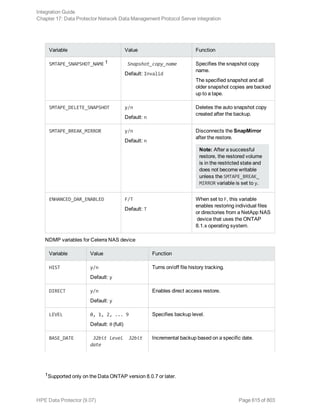
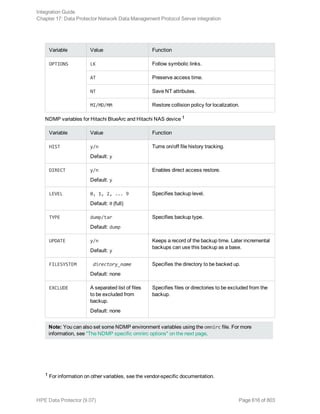
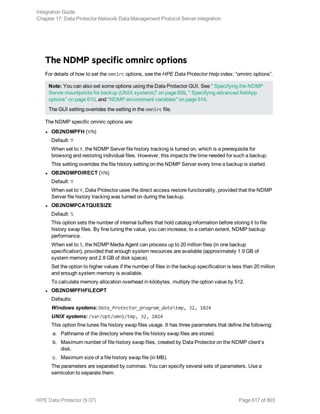
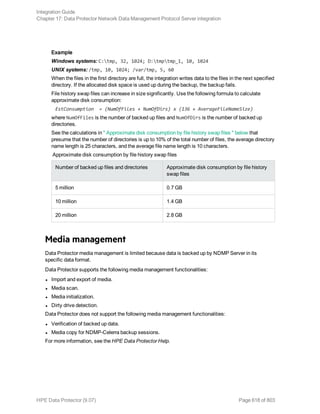
![Troubleshooting
This section lists problems you might encounter when using the Data Protector NDMP Server
integration.
For general Data Protector troubleshooting information, see the HPE Data Protector Troubleshooting
Guide.
Before you begin
l Ensure that the latest official Data Protector patches are installed. See the HPE Data Protector Help
index: ”patches”.
l For general Data Protector limitations, as well as recognized issues and workarounds, see the HPE
Data Protector Product Announcements, Software Notes, and References.
l For an up-to-date list of supported versions, platforms, and other information, see
http://support.openview.hp.com/selfsolve/manuals.
Problems
Problem
End of media
At the end of the backup, Data Protector starts storing the catalog to the media. The catalog size
increases with the number of files backed up. Since Data Protector has no control over how much free
space is left on the media, the End of Media error may occur during the writing of the catalog. This has
no impact on future restore because the catalog is still stored in the IDB. However, the medium cannot
be imported anymore.
Problem
Device and filesystem are not local; switching to 3-way operation
If the selected volume for backup and drive are not local to the node in a cluster, the Data Protector
displays the following error message in the session output:
[Warning] From: BMA-NDMP@hostname.com "netappCAB_drive1" Time: 5.4.2016 15:35:10
Device and the filesystem are not local, switching to 3-way operation.
This means that the selected volume is backed up using the 3-way NDMP mode as it is not local to the
node to which the selected tape drive is attached.
Problem
3-way Direct Access Restore (DAR) restore issue
When using the DAR restore in 3-way configuration, there could be performance degradation.
Integration Guide
Chapter 17: Data Protector Network Data Management Protocol Server integration
HPE Data Protector (9.07) Page 619 of 803](https://image.slidesharecdn.com/hpemandp9-160823080054/85/Hpe-Data-Protector-integration-guide-619-320.jpg)
![Action
Switch over to the local DAR restore.
Or
Disable DAR for 3-way restore.
Problem
Import of NDMP media failed
Action
Ensure that the drive used for importing NMDP media is connected to an NDMP Server system.
Problem
Backup or restore fails in a 3-way Cluster Aware Backup (CAB) or normal mode
If there is not enough NDMP sessions available on the filer, backup or restore fails in a 3-way CAB or
normal mode with the following error message:
[Warning] From: BMA-NDMP@hostname.com "CAB_drive2" Time: 4/26/2016 10:14:31 AM
Device and the filesystem are not local, switching to 3-way operation.
[Warning] From: BMA-NDMP@hostname.com "CAB_drive2" Time: 4/26/2016 10:14:31 AM
BMA-NDMP: Catalog not loaded, message #-1 in set 242
[Normal] From: BMA-NDMP@hostname.com "CAB_drive2" Time: 4/26/2016 10:14:34 AM
Ejecting medium '1'.
(Or)
[Normal] From: BMA-NDMP@hostname.com "NDMP_drive1" Time: 4/26/2016 11:25:14 AM
ABORTED Media Agent.
[Normal] From: BMA-NDMP@hostname.com " NDMP_drive1" Time: 4/26/2016 11:25:18 AM
Ejecting medium '1'.
Action
Refer the filer documentation to understand the number of NDMP sessions that supports and plans the
session accordingly.
Where, one Media Agent (MA) in normal or CAB mode uses two NDMP sessions and 3-way normal or
CAB mode uses three NDMP sessions.
Problem
A tape remains in the drive after a successful drive scan
Integration Guide
Chapter 17: Data Protector Network Data Management Protocol Server integration
HPE Data Protector (9.07) Page 620 of 803](https://image.slidesharecdn.com/hpemandp9-160823080054/85/Hpe-Data-Protector-integration-guide-620-320.jpg)
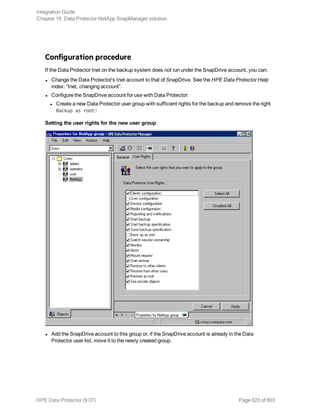
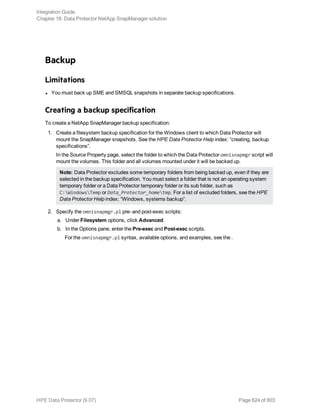
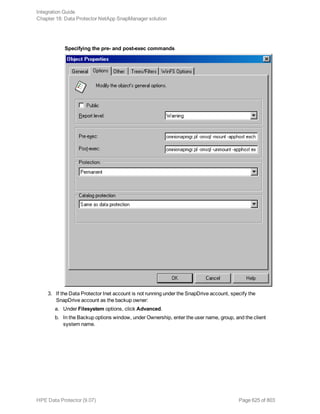
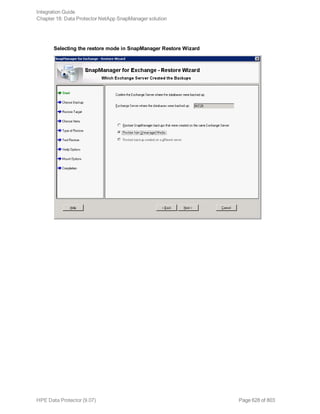
![Specifying SnapManager Restore Wizard options
omnisnapmgr.pl reference page
SYNOPSIS
omnisnapmgr.pl-version | -help
omnisnapmgr.pl [-sme | -smsql] {-mount | -unmount} -apphostClientName [-force] [-
partial] [-preview]
omnisnapmgr.pl-query
DESCRIPTION
The omnisnapmgr.pl script is used to mount or dismount the SME or SMSQL snapshots (when started
as a pre- or post-exec script) or query NetApp snapshots (when run from a Command Prompt window).
OPTIONS
-version Displays the Data Protector version.
Integration Guide
Chapter 18: Data Protector NetApp SnapManager solution
HPE Data Protector (9.07) Page 629 of 803](https://image.slidesharecdn.com/hpemandp9-160823080054/85/Hpe-Data-Protector-integration-guide-629-320.jpg)
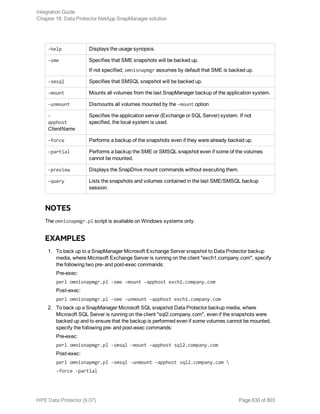

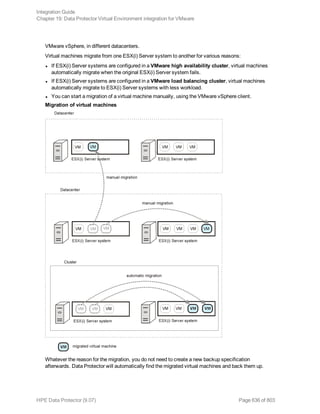
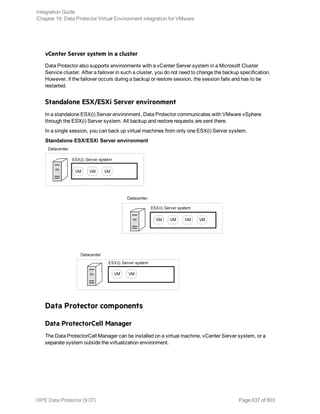
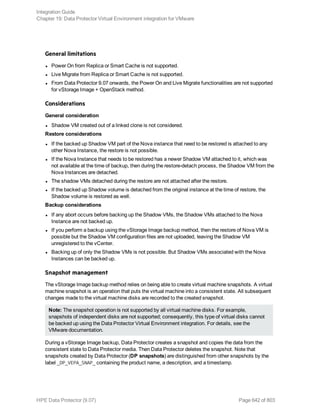


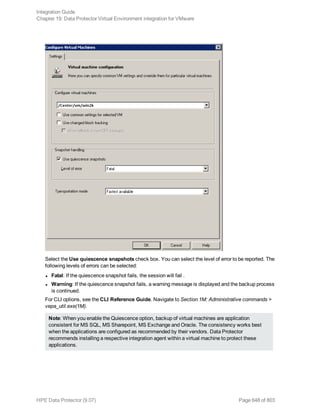
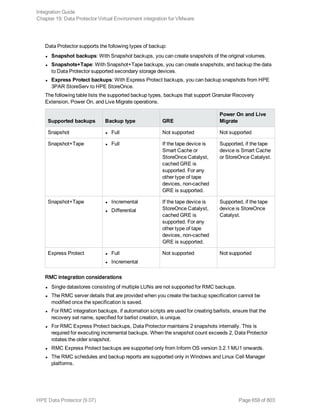
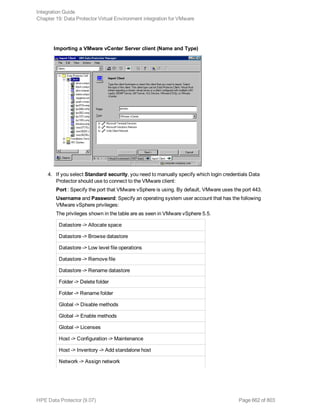
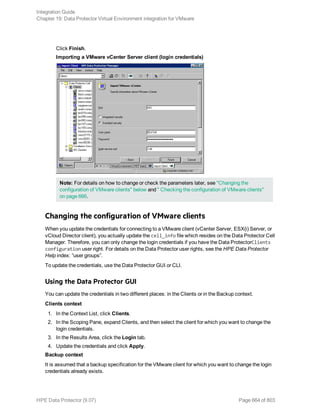
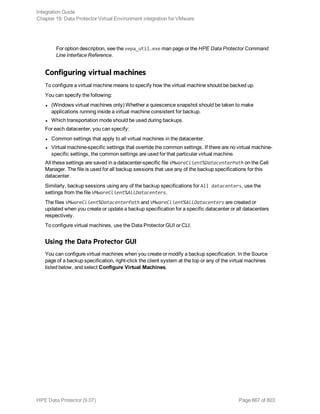
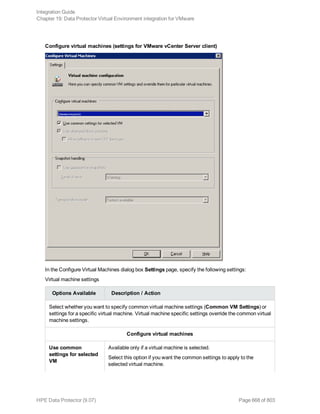
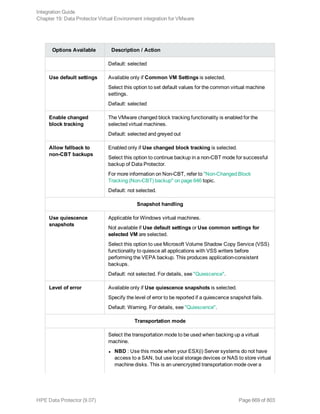
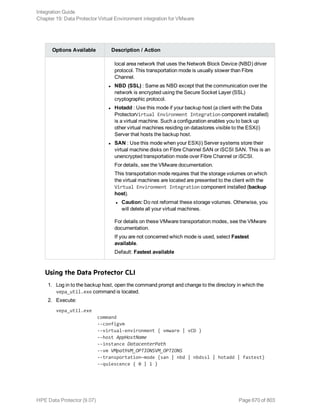
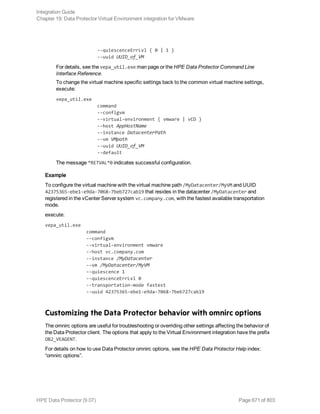

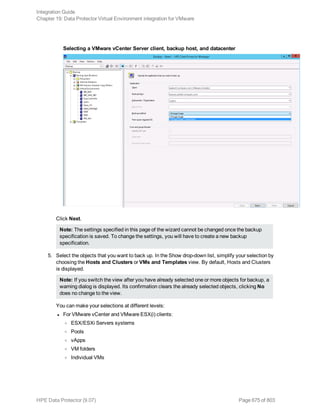
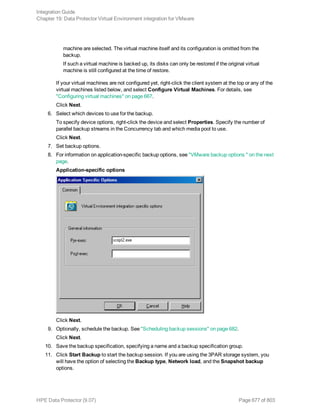
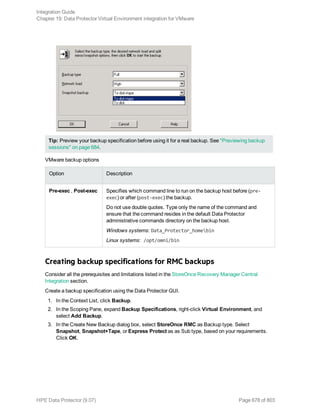
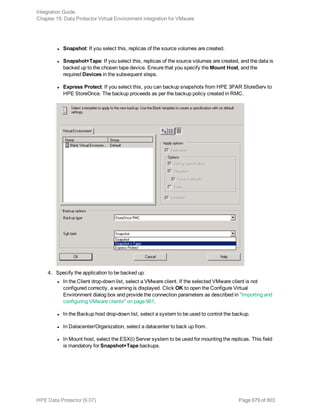
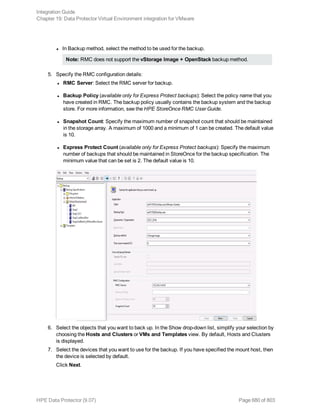

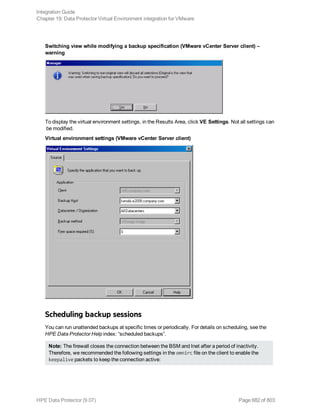
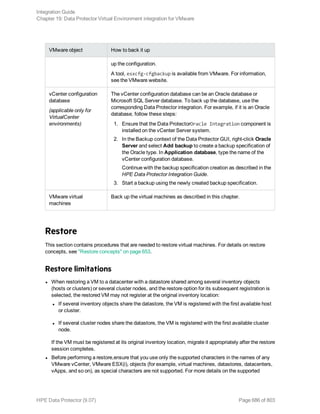
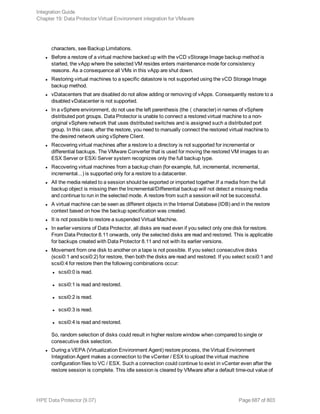
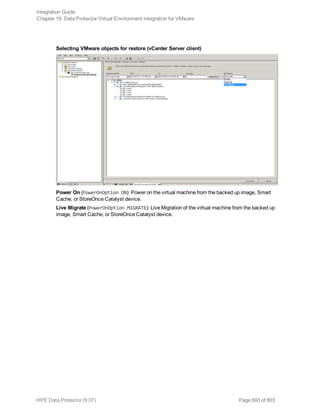
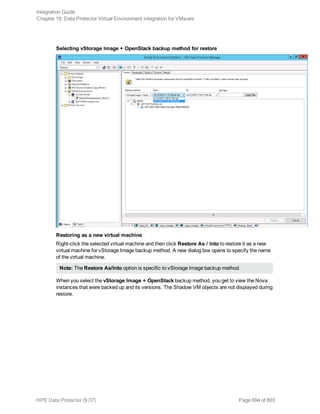
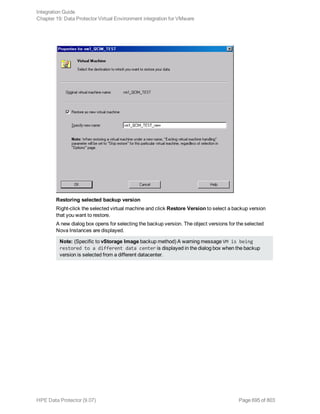
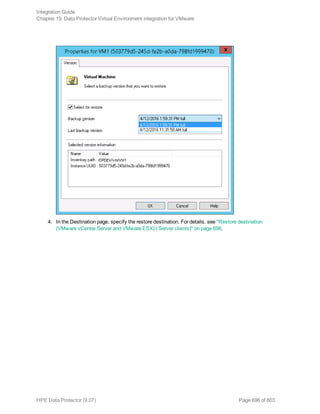
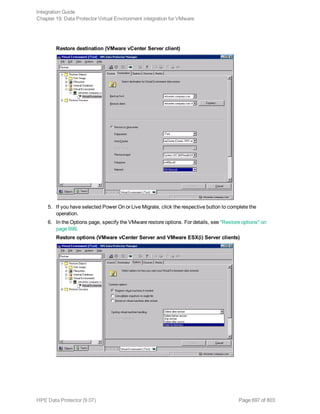
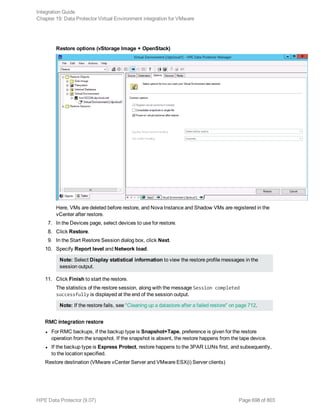

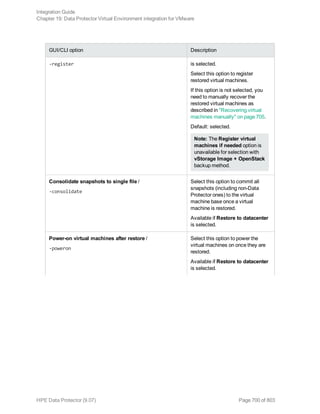
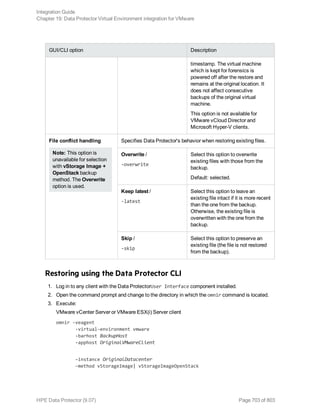
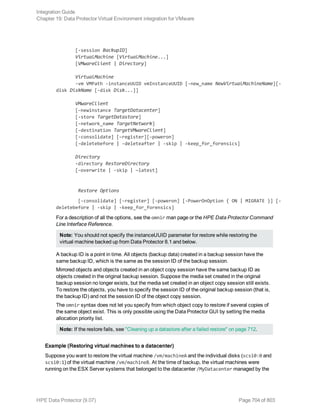
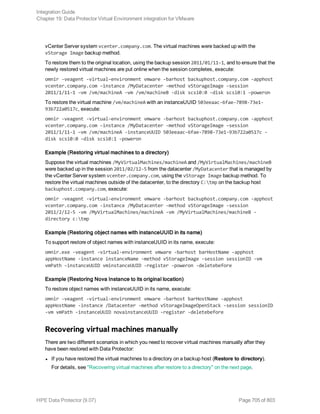
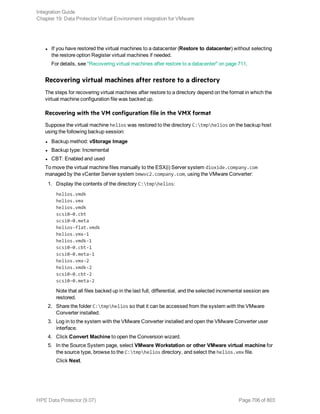
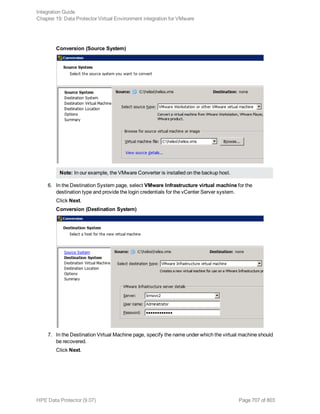
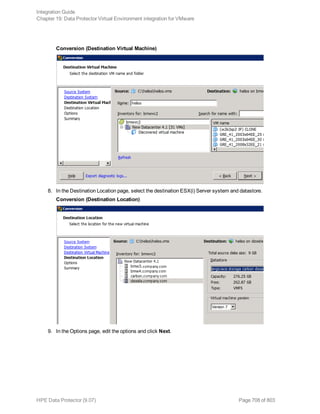
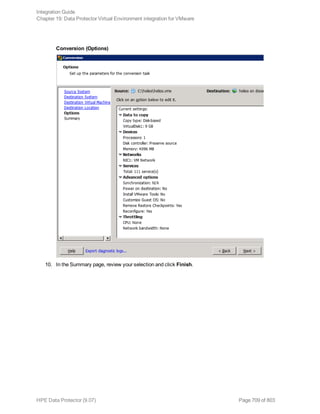
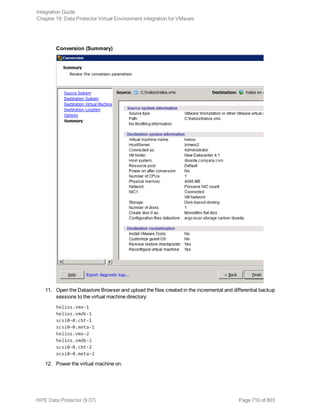
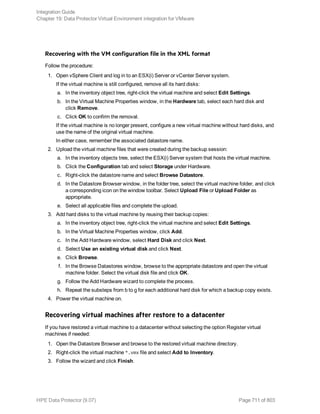

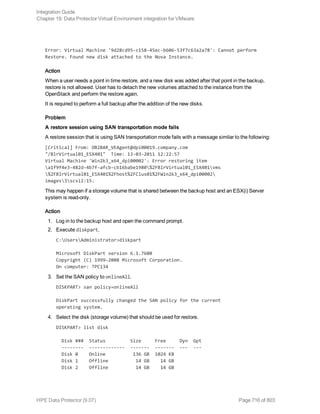
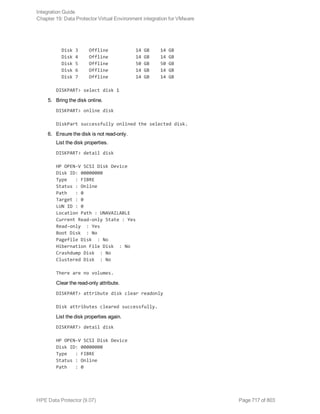
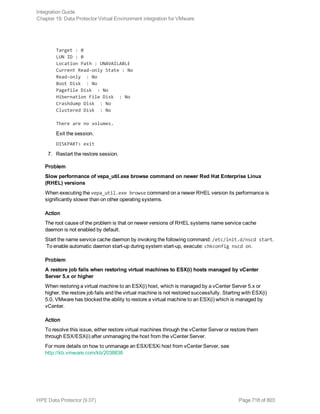
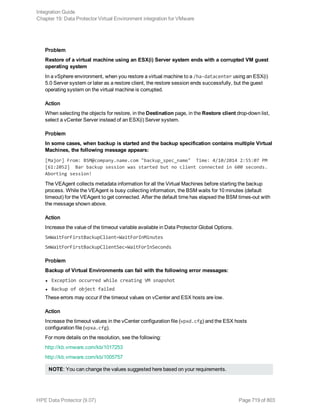
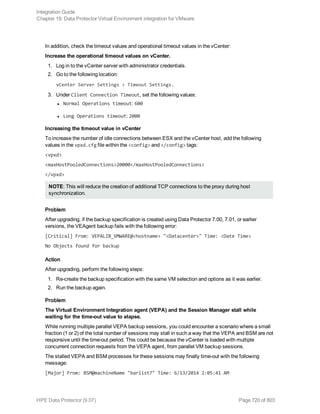
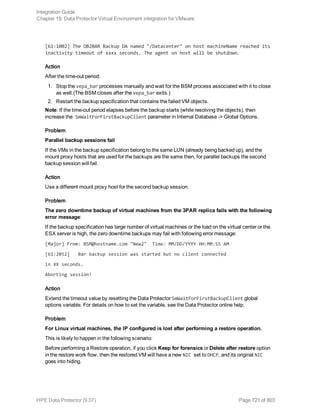
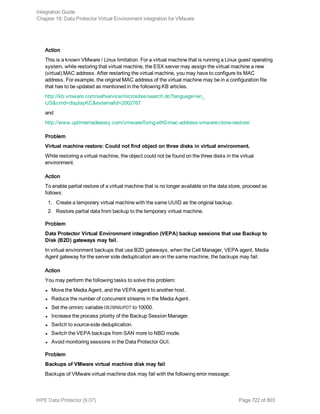
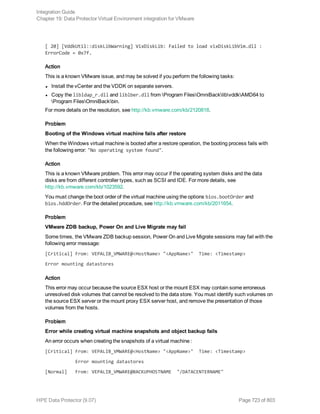
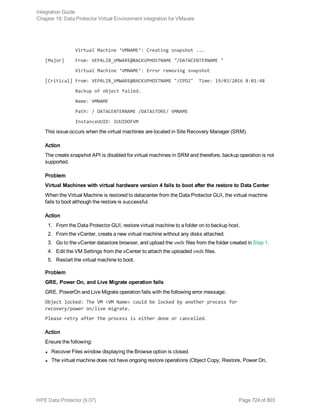
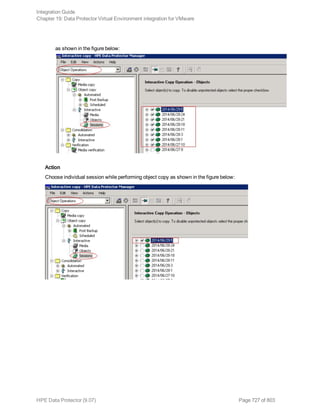

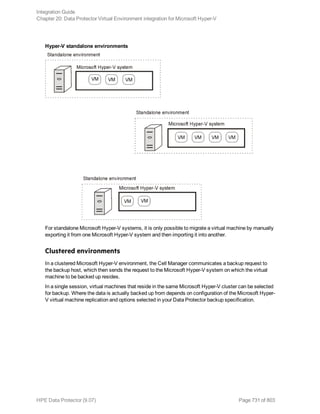

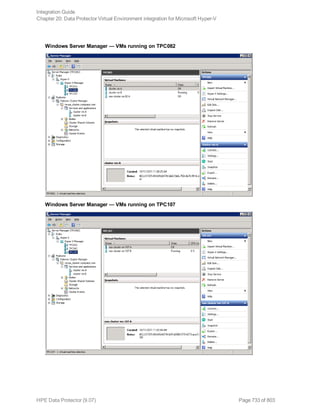
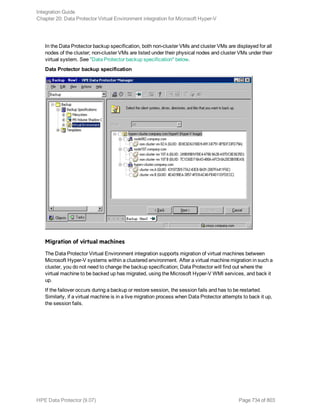
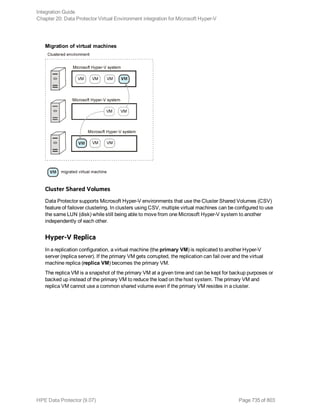
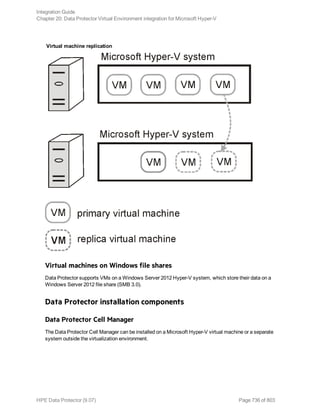
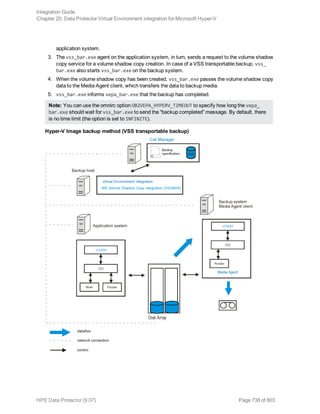
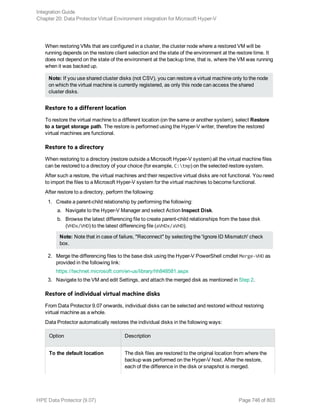
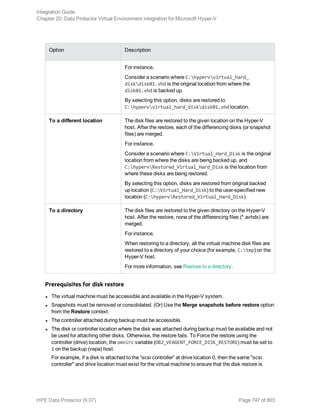
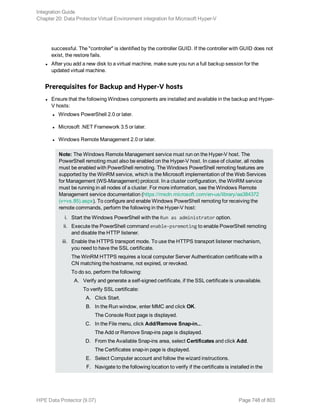
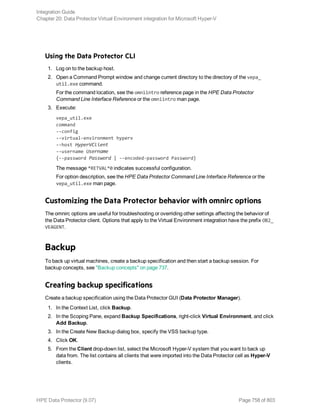
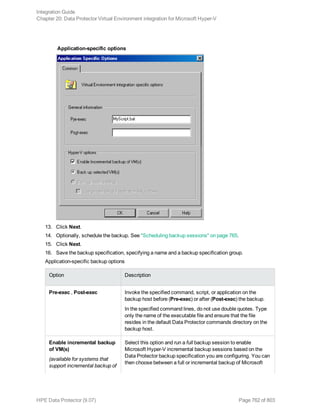
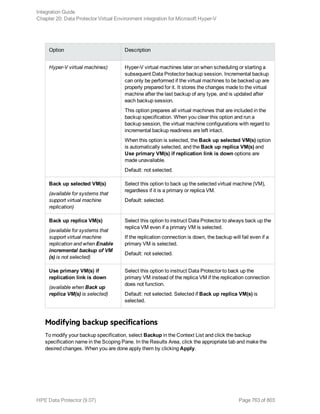
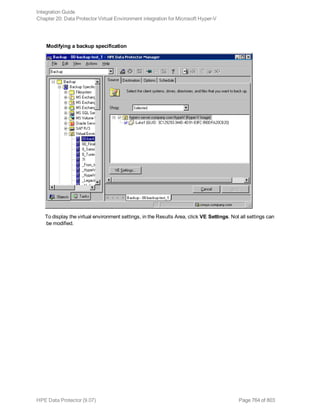
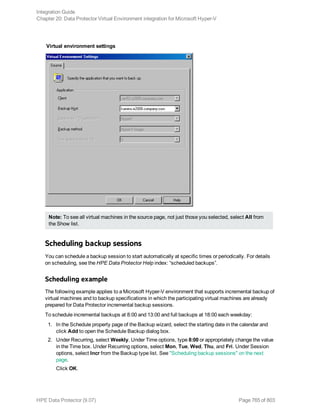
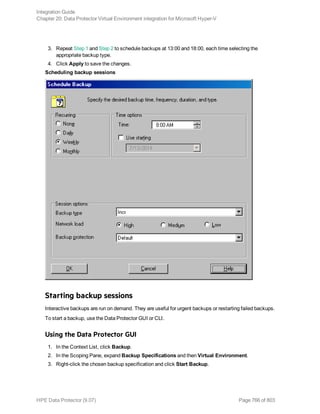
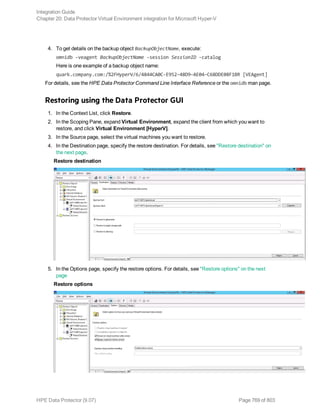
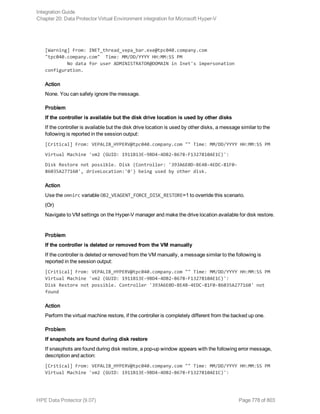
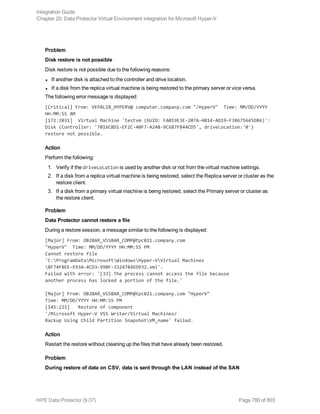
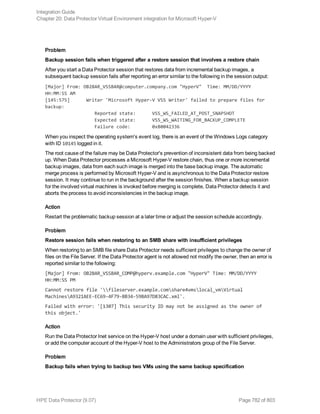

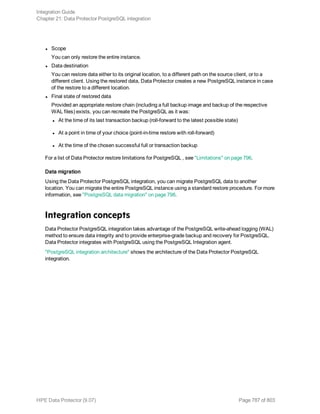
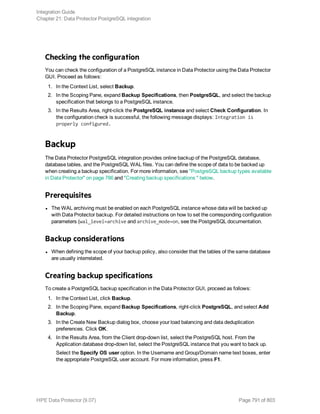
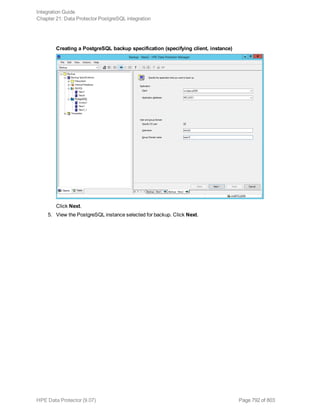
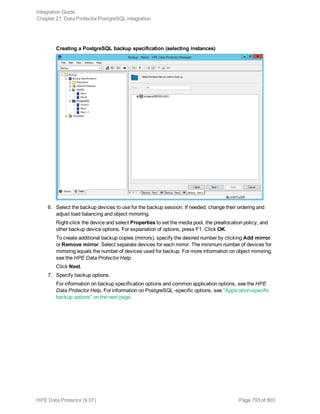
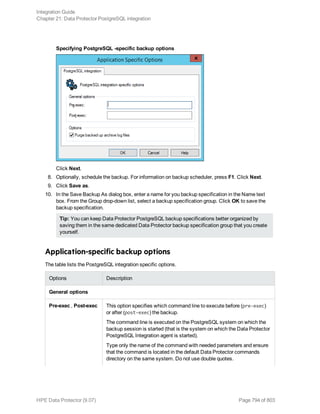


![[Oracle DBA & Developer Day 2012] 高可用性システムに適した管理性と性能を向上させるASM と RMAN の魅力](https://cdn.slidesharecdn.com/ss_thumbnails/ma-4print20121205-200702094006-thumbnail.jpg?width=640&height=640&fit=bounds)


![제 23회 보아즈(BOAZ) 빅데이터 컨퍼런스 - [MBOAX] : ABSA를 활용한 소비자 반응 분석 기반 운영 효율화 대시보드 설계](https://cdn.slidesharecdn.com/ss_thumbnails/3-1boaz23rdconferencemboax-260203102709-9d519923-thumbnail.jpg?width=640&height=640&fit=bounds)


