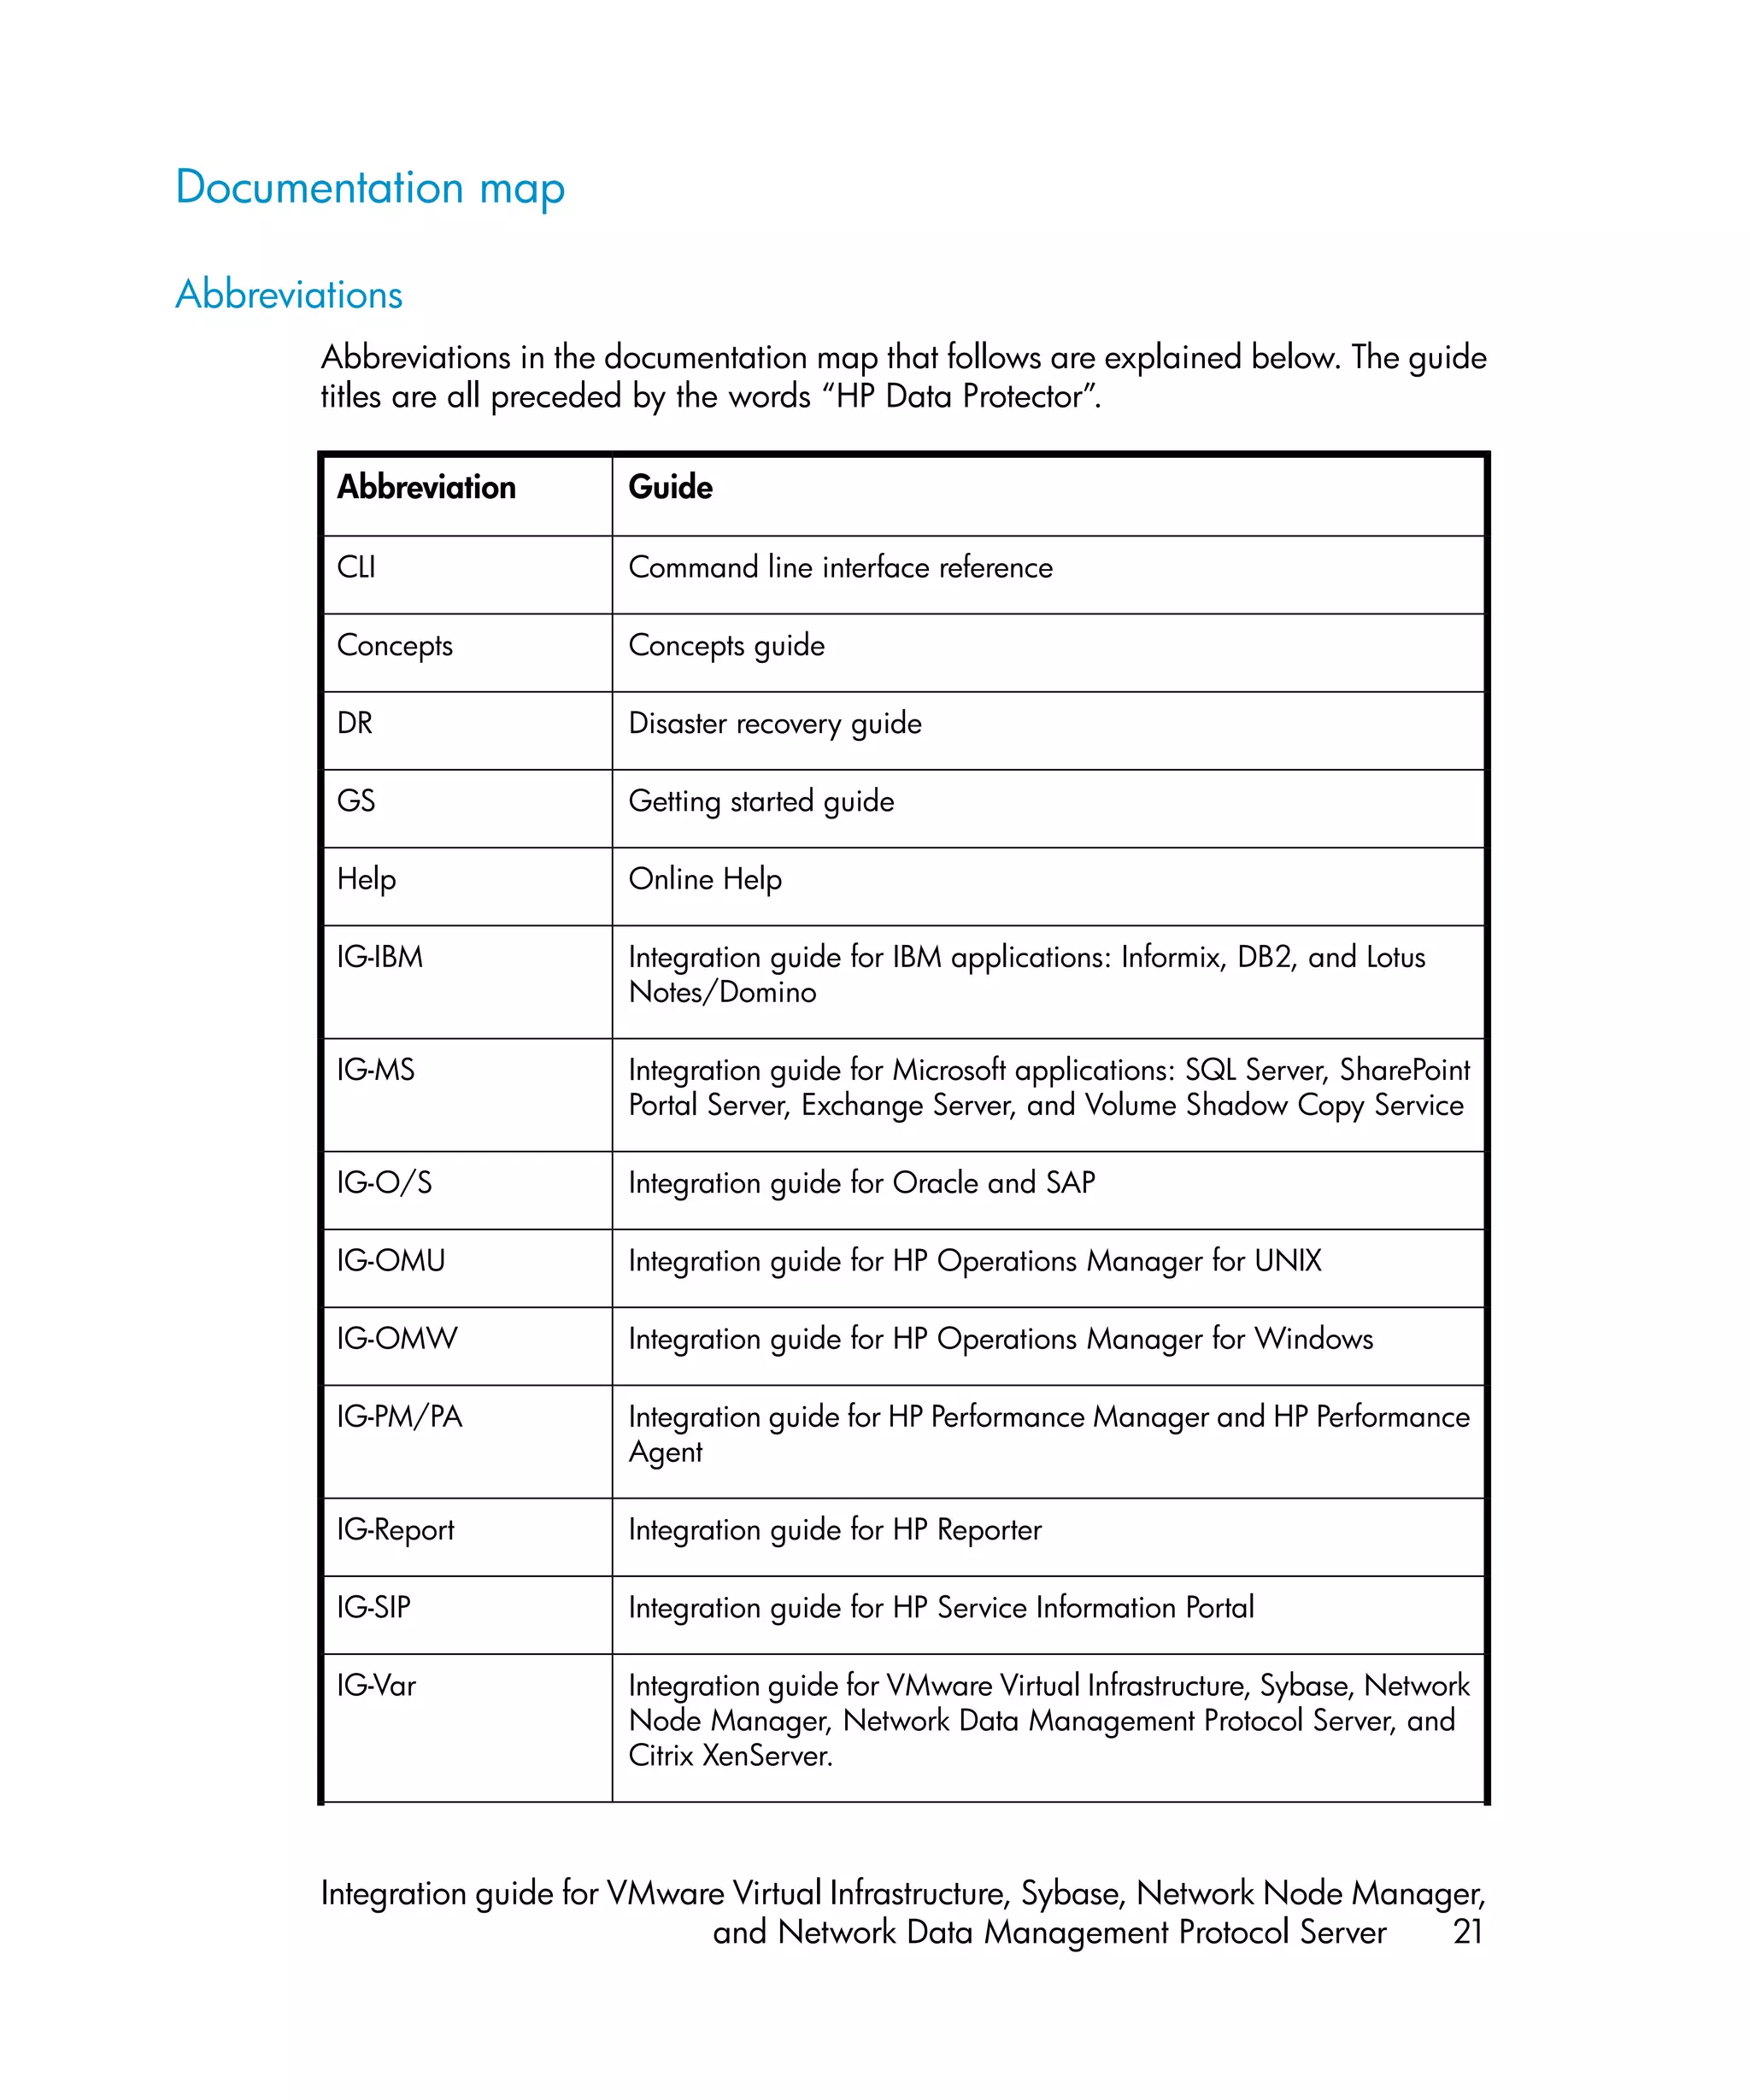
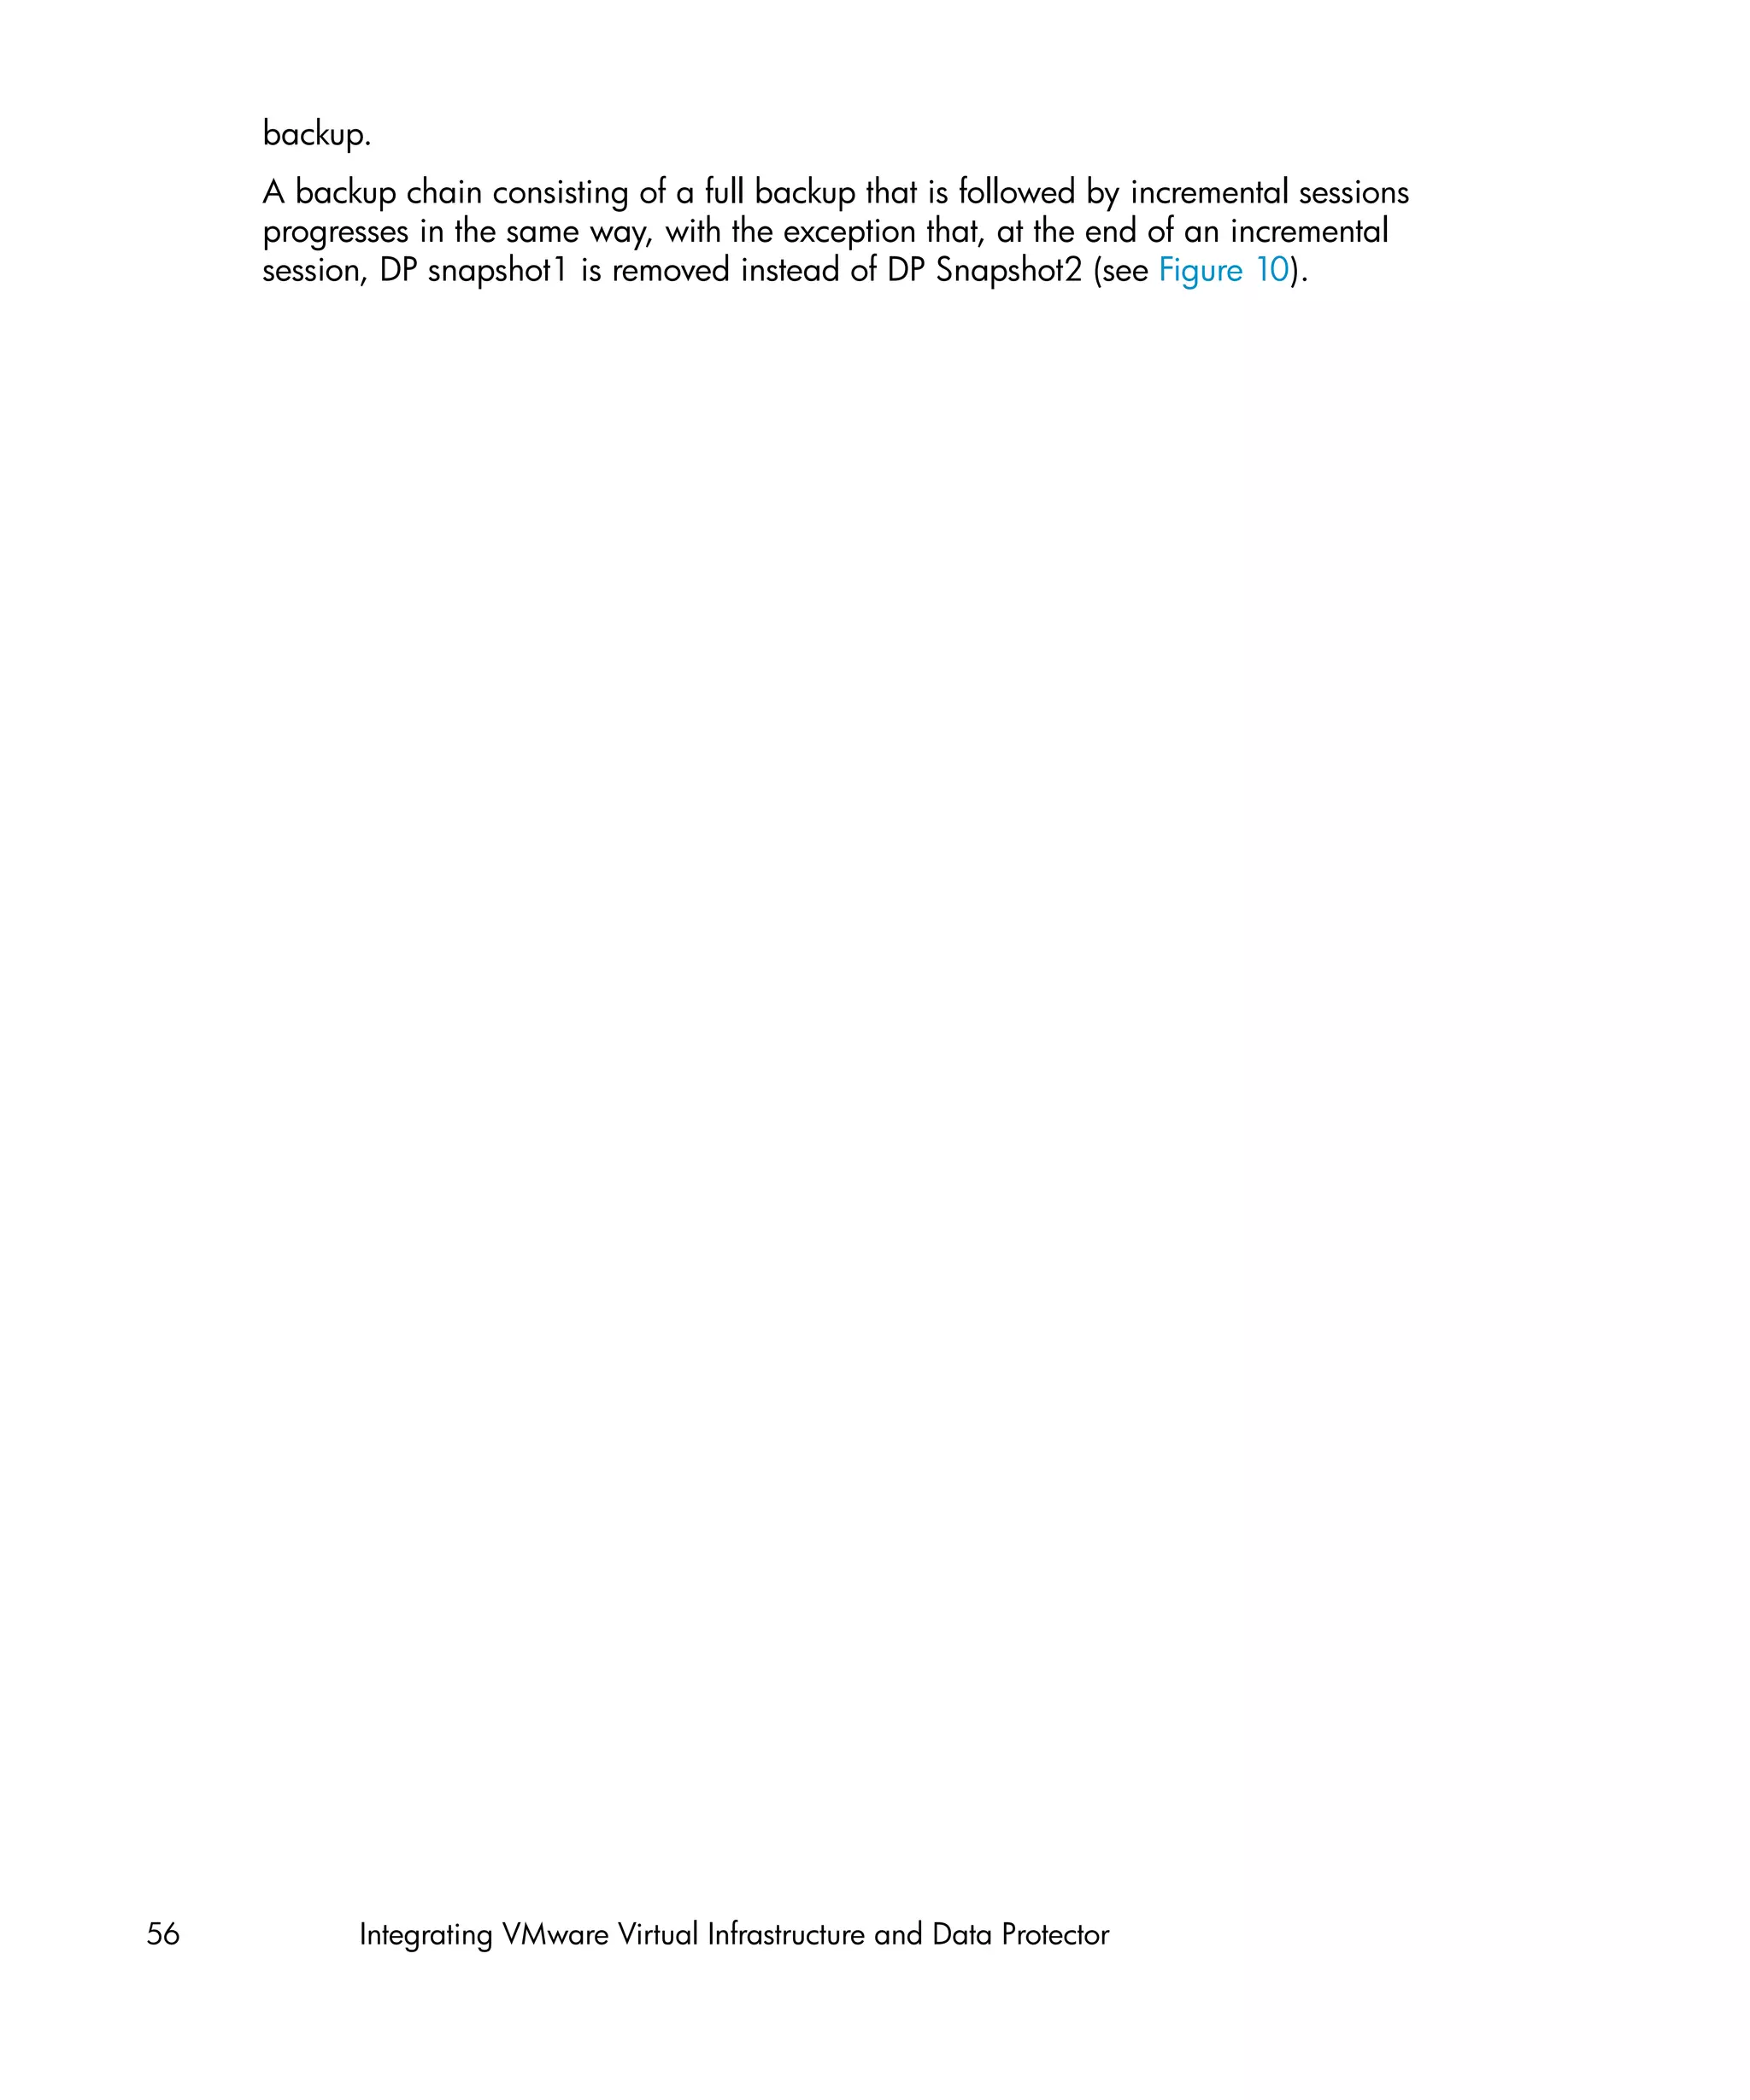
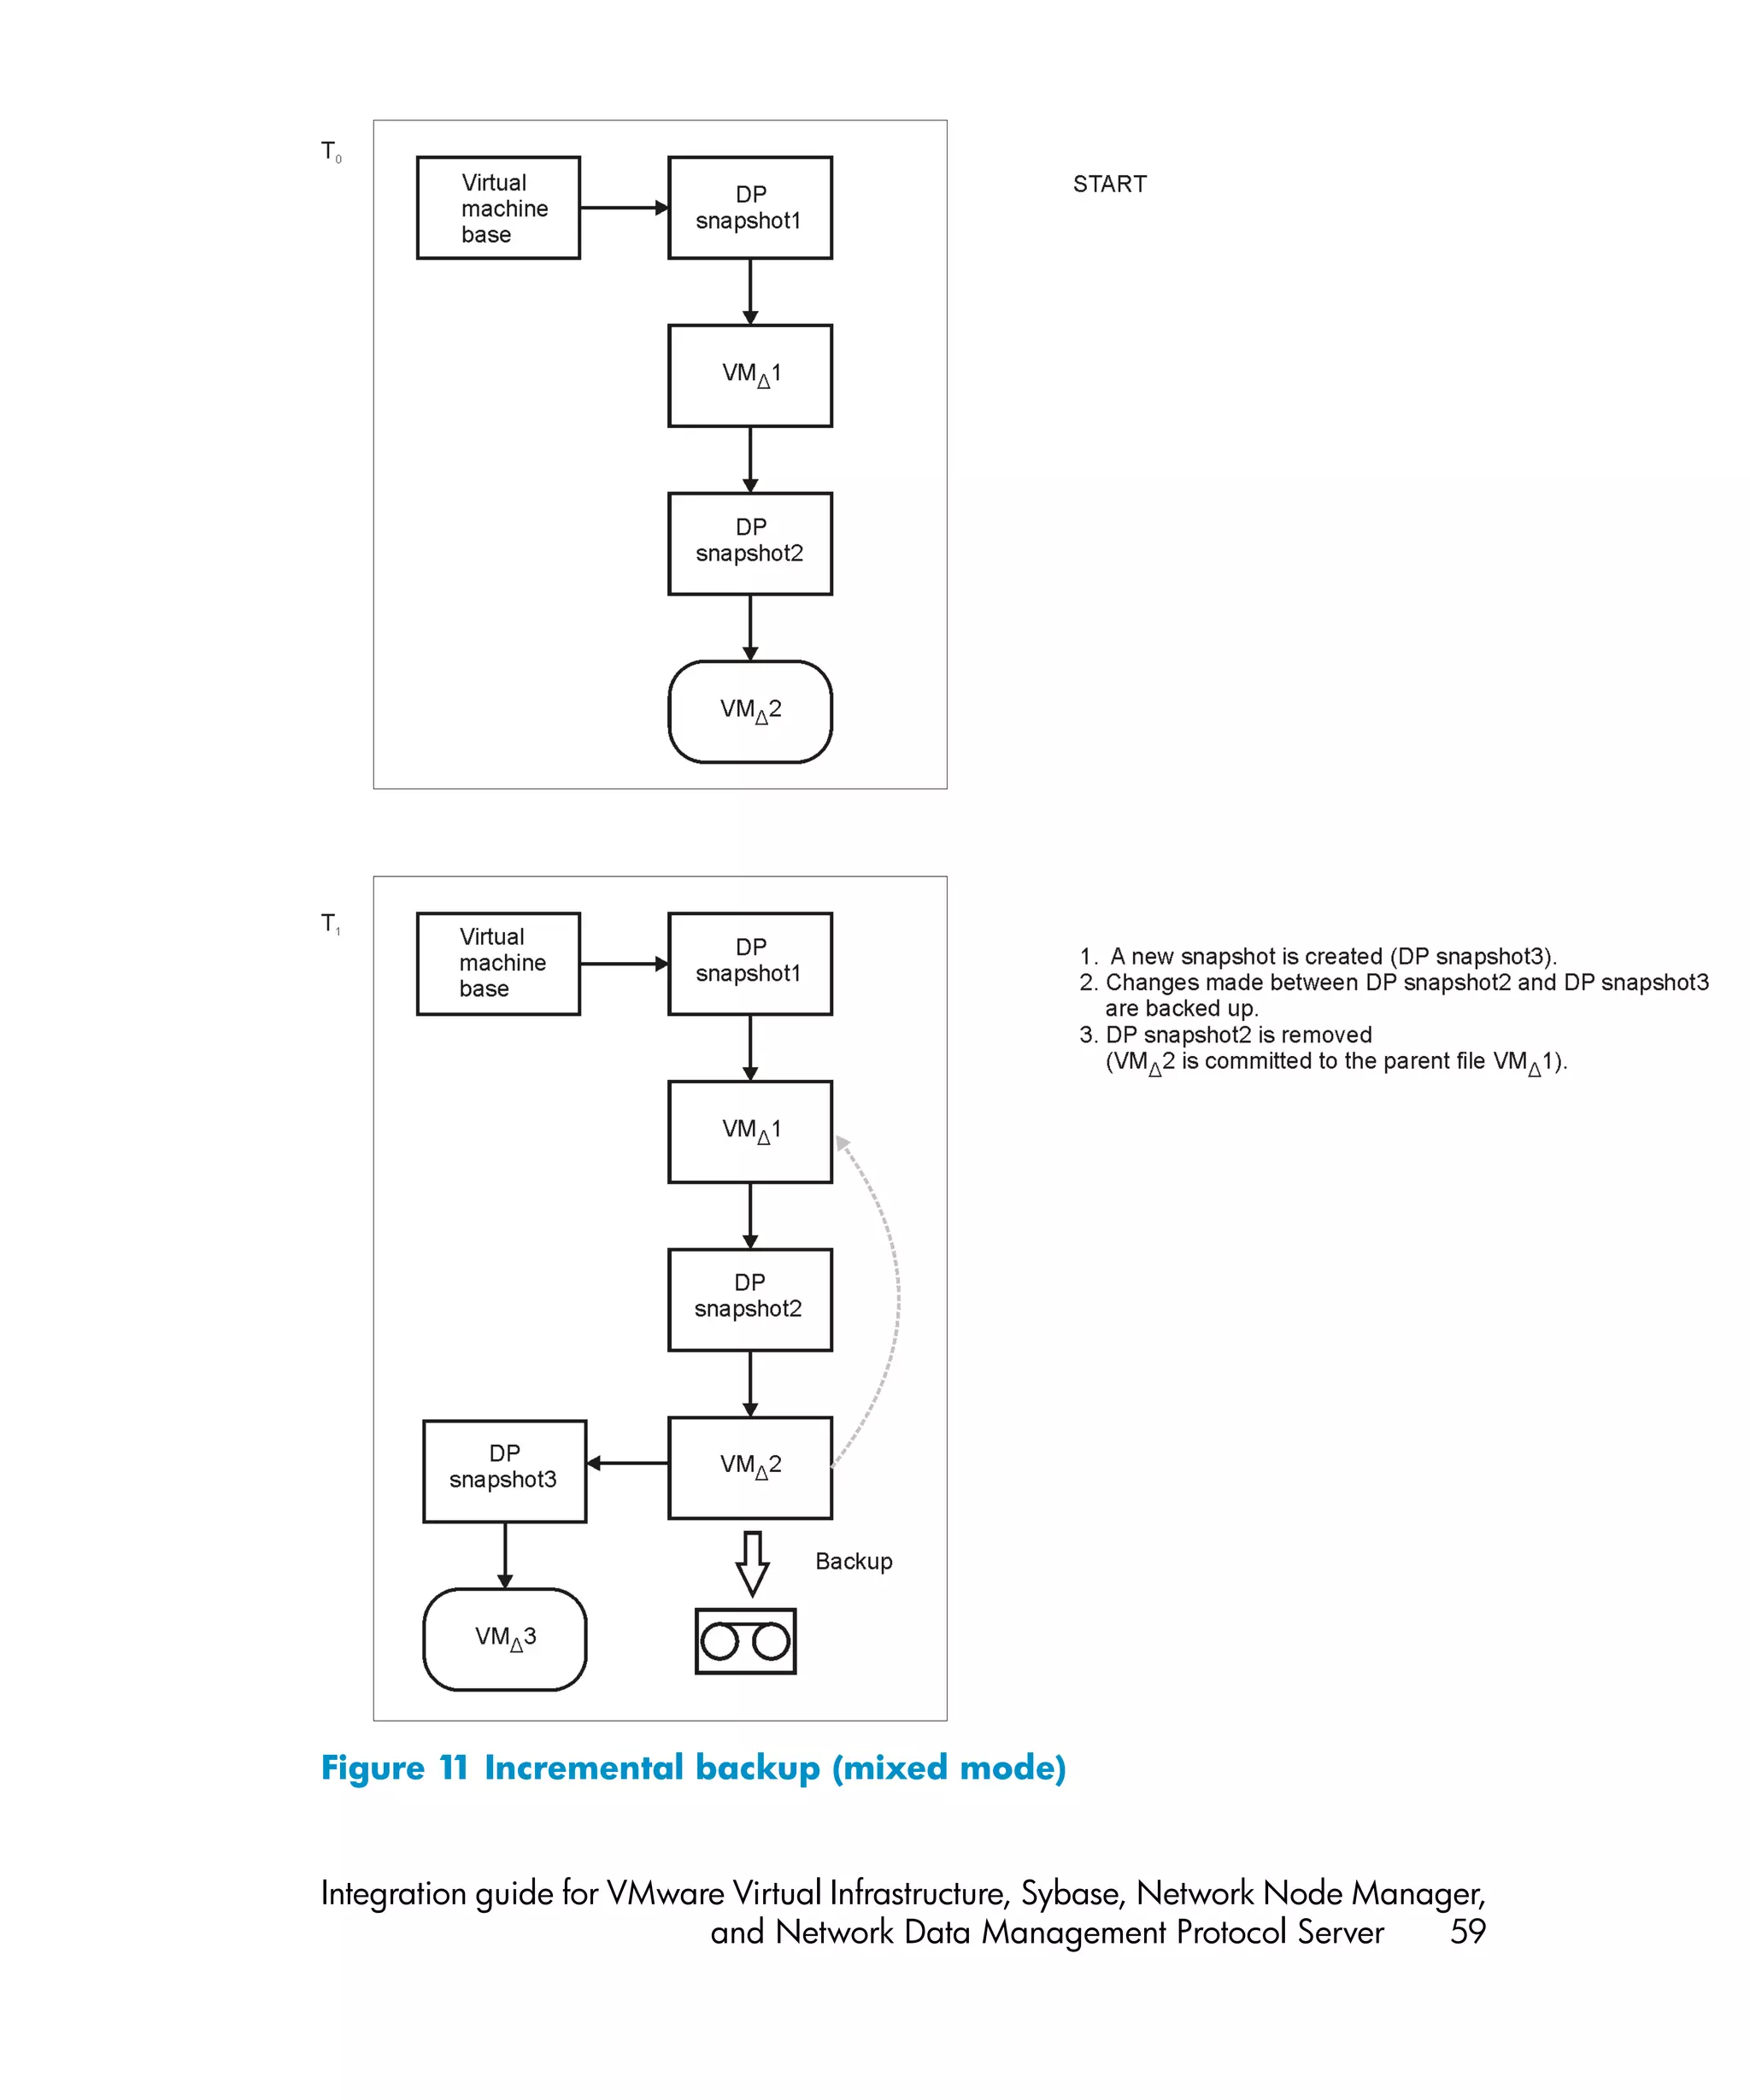
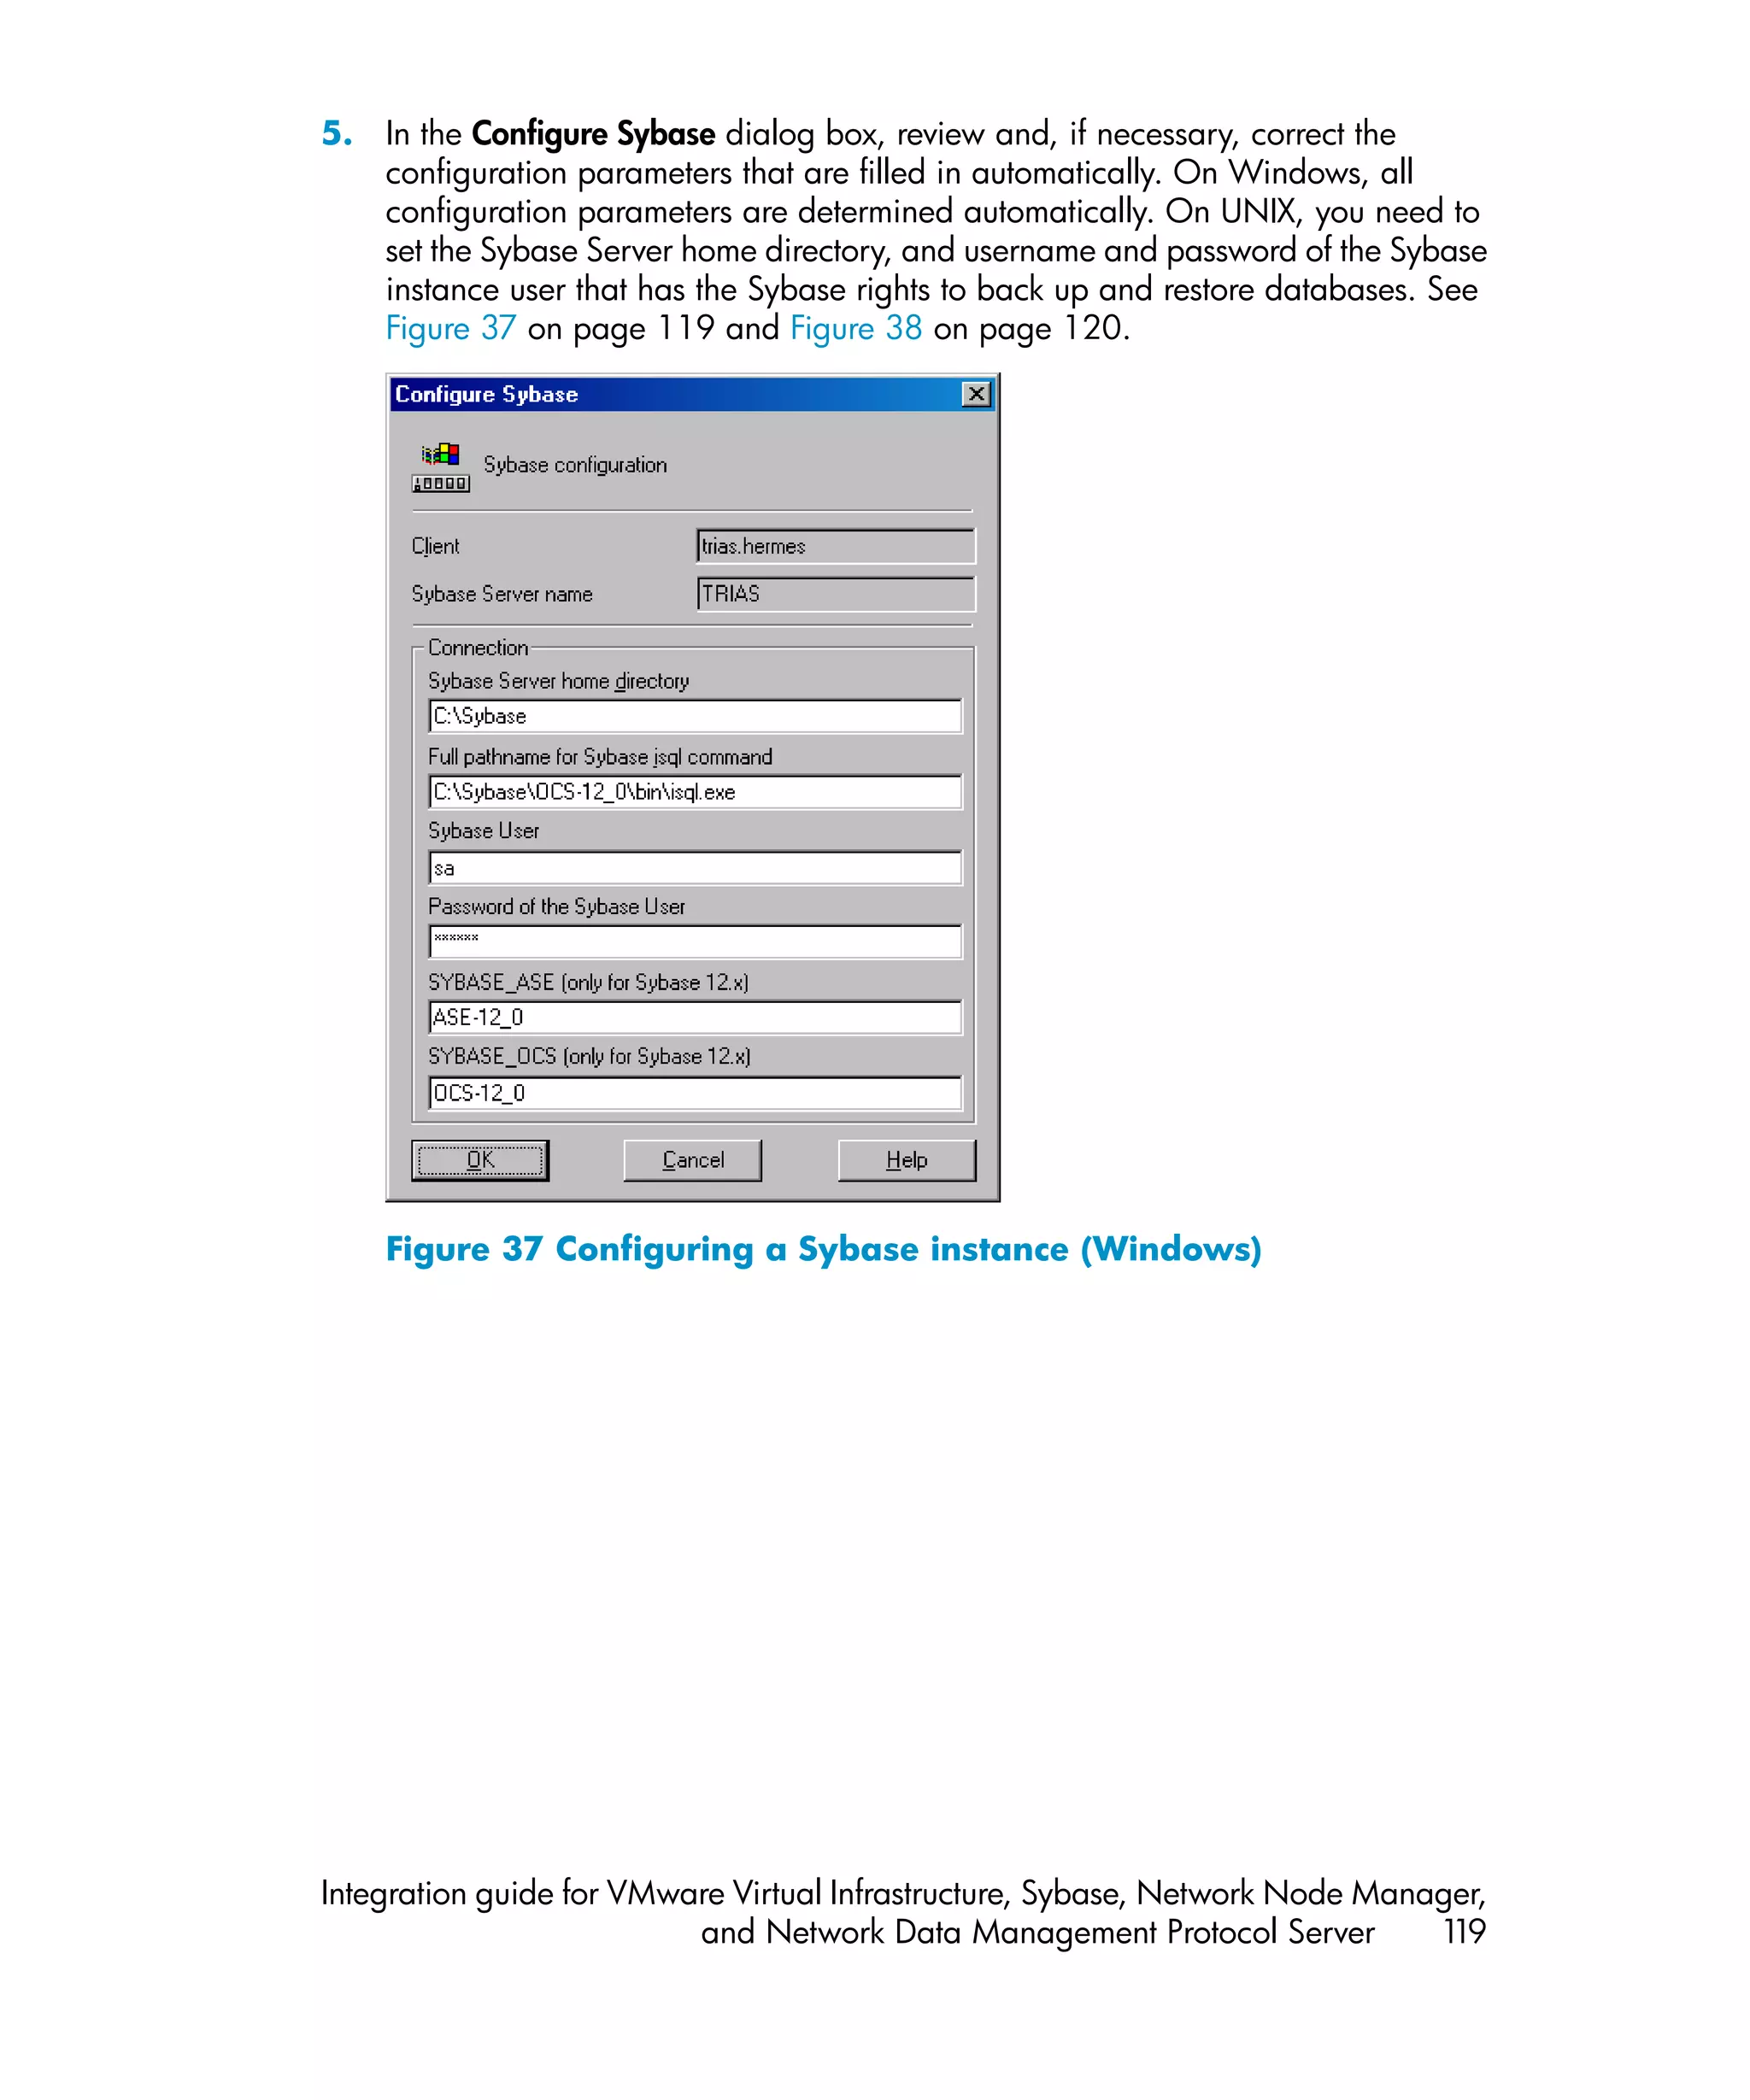
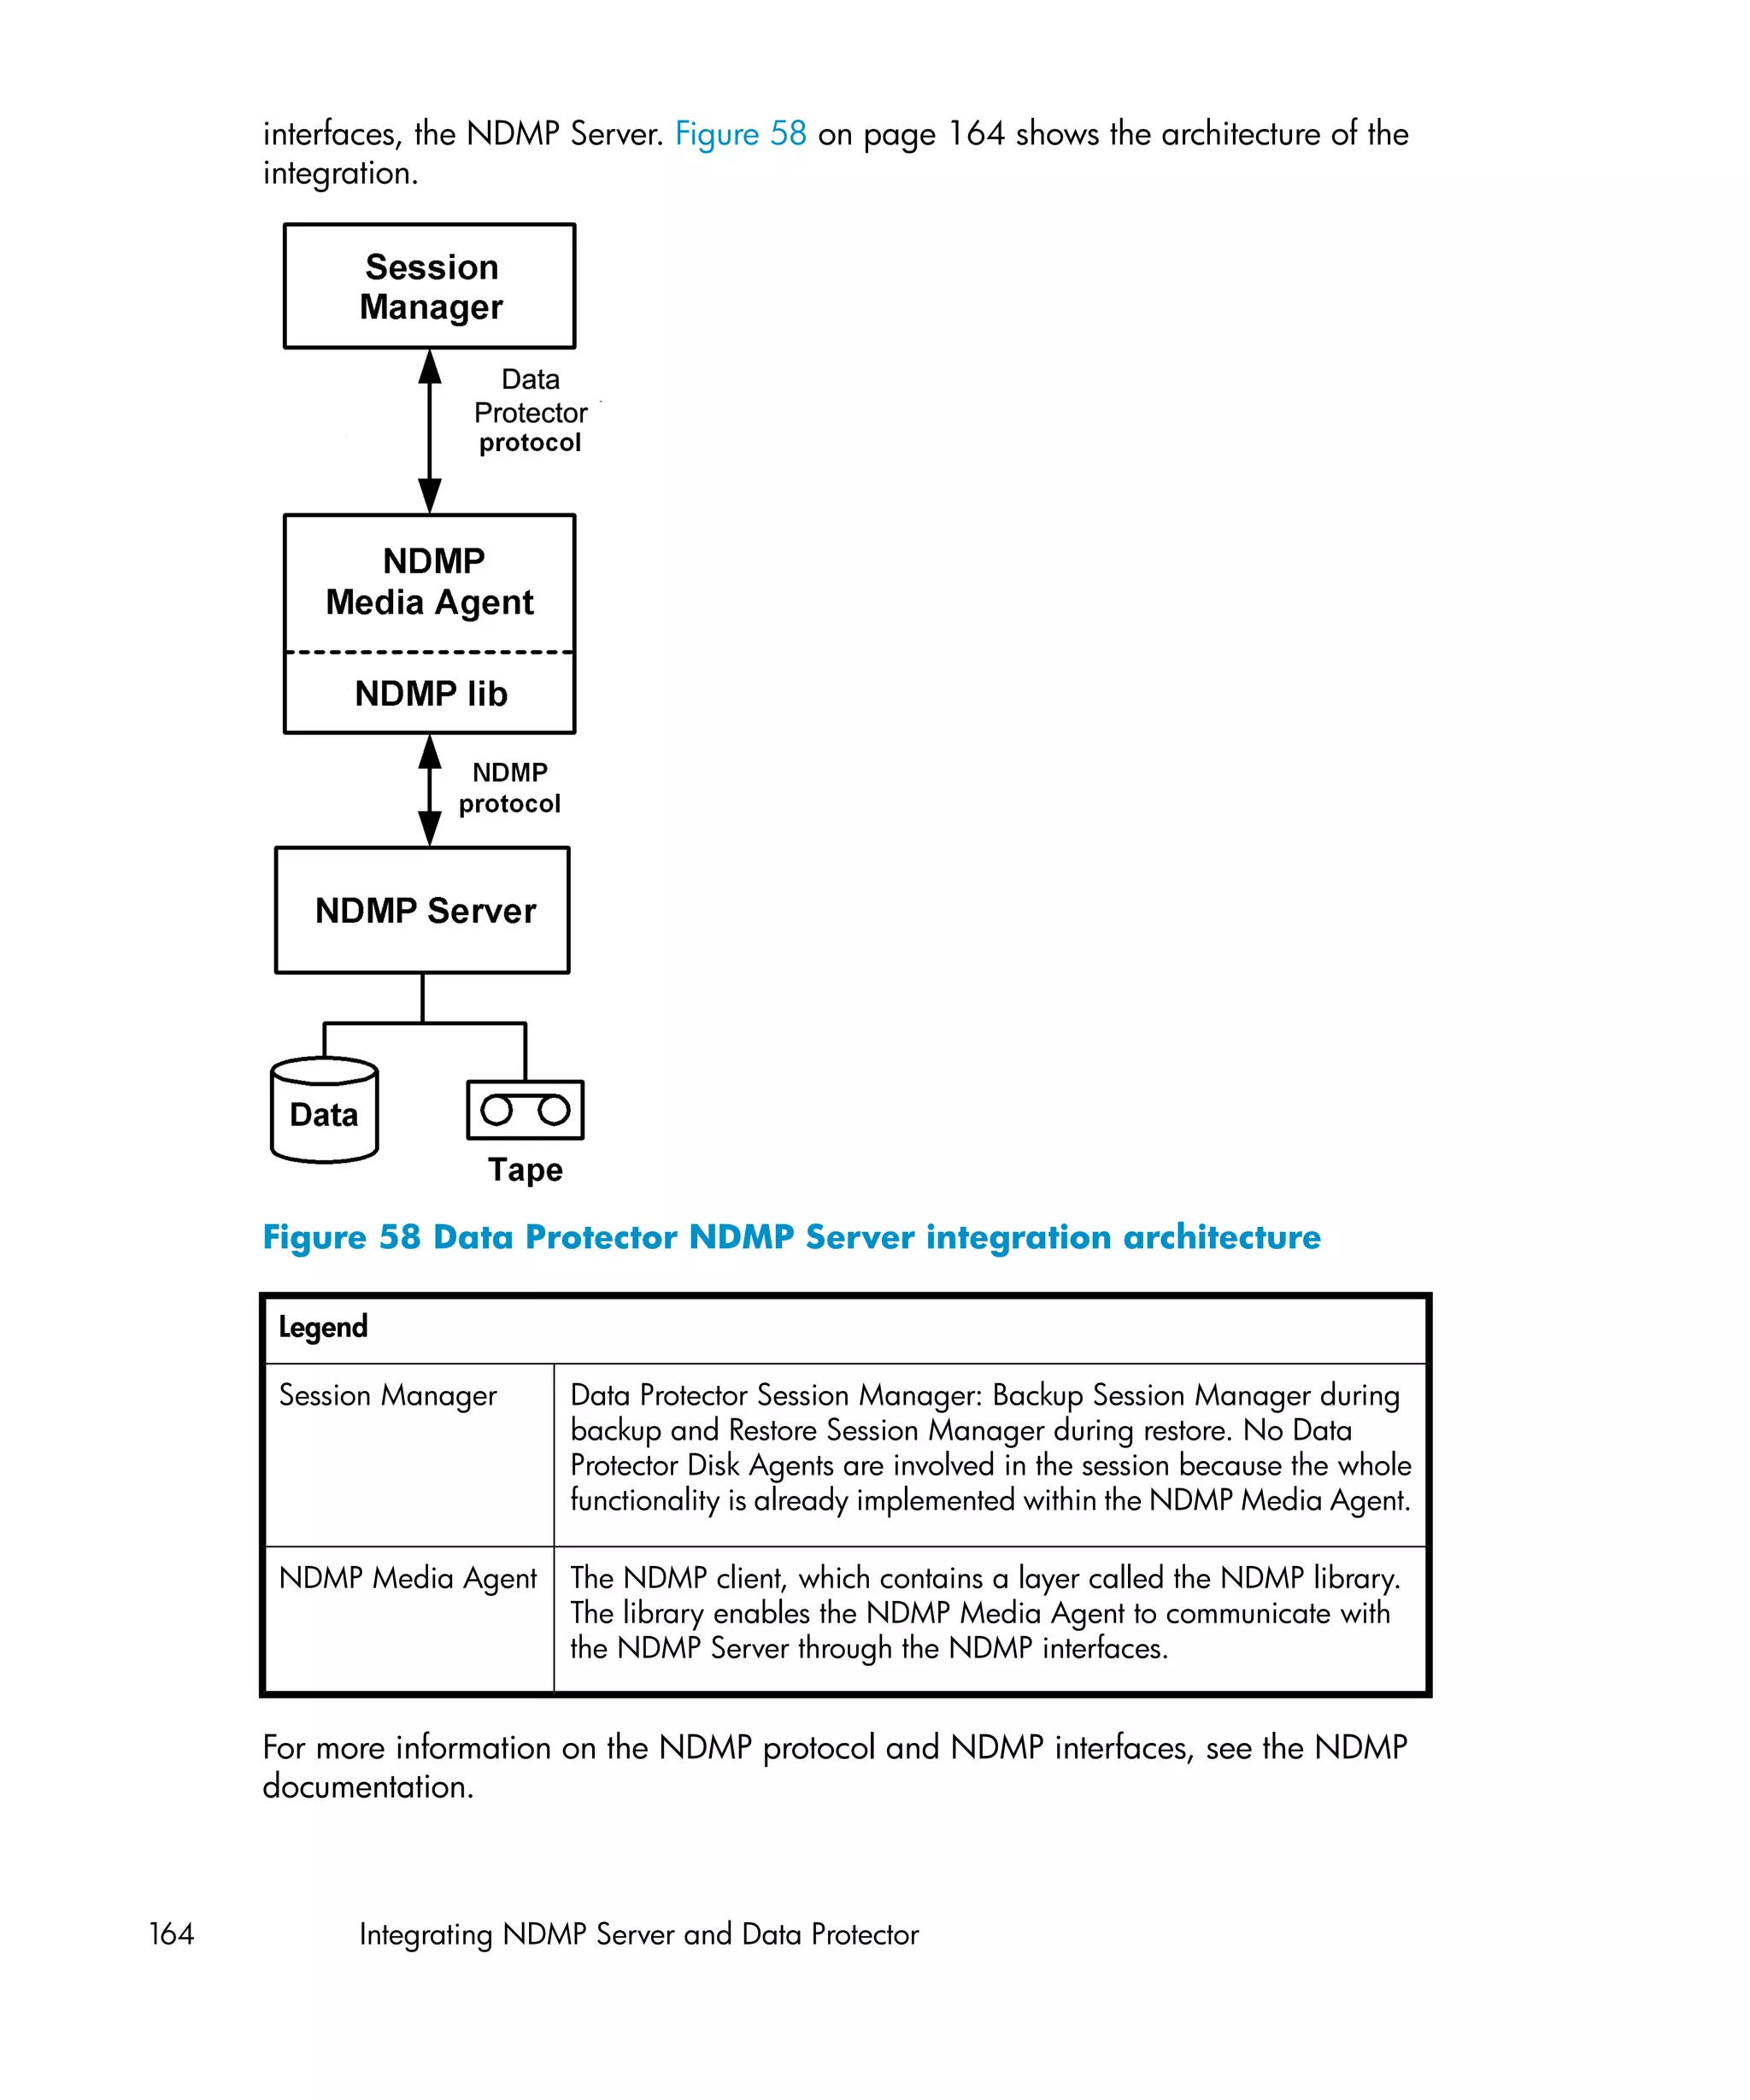
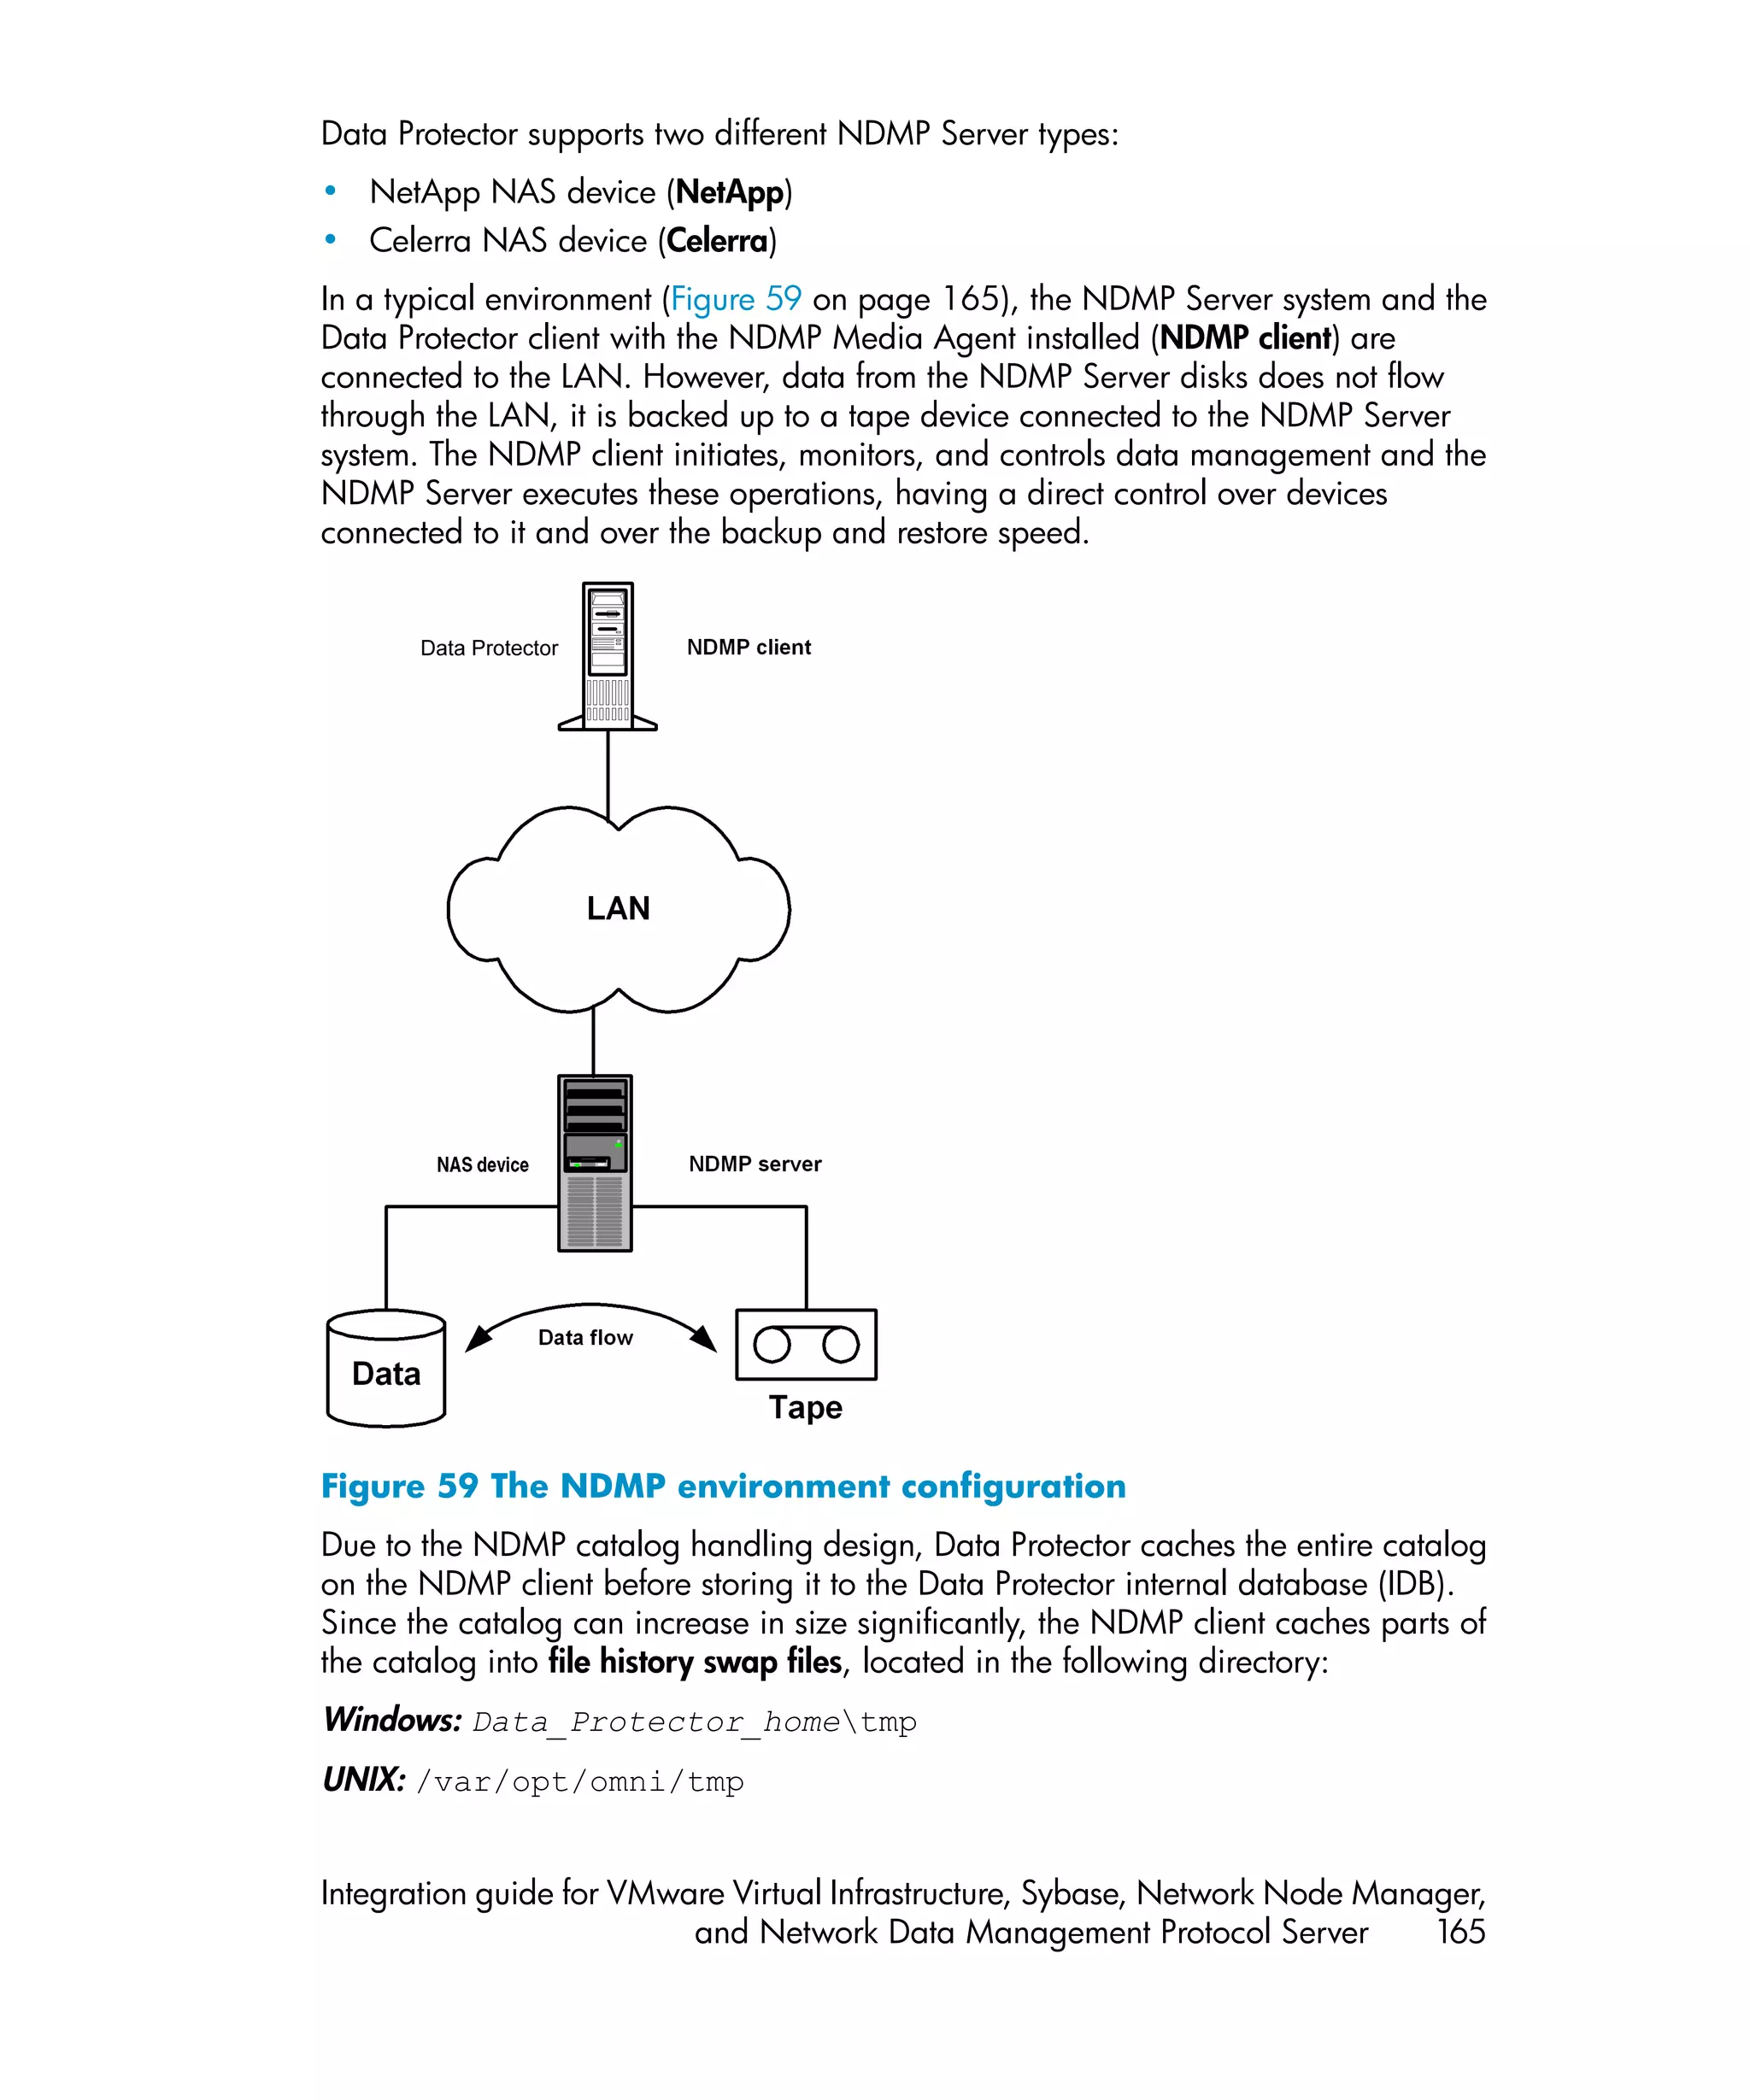
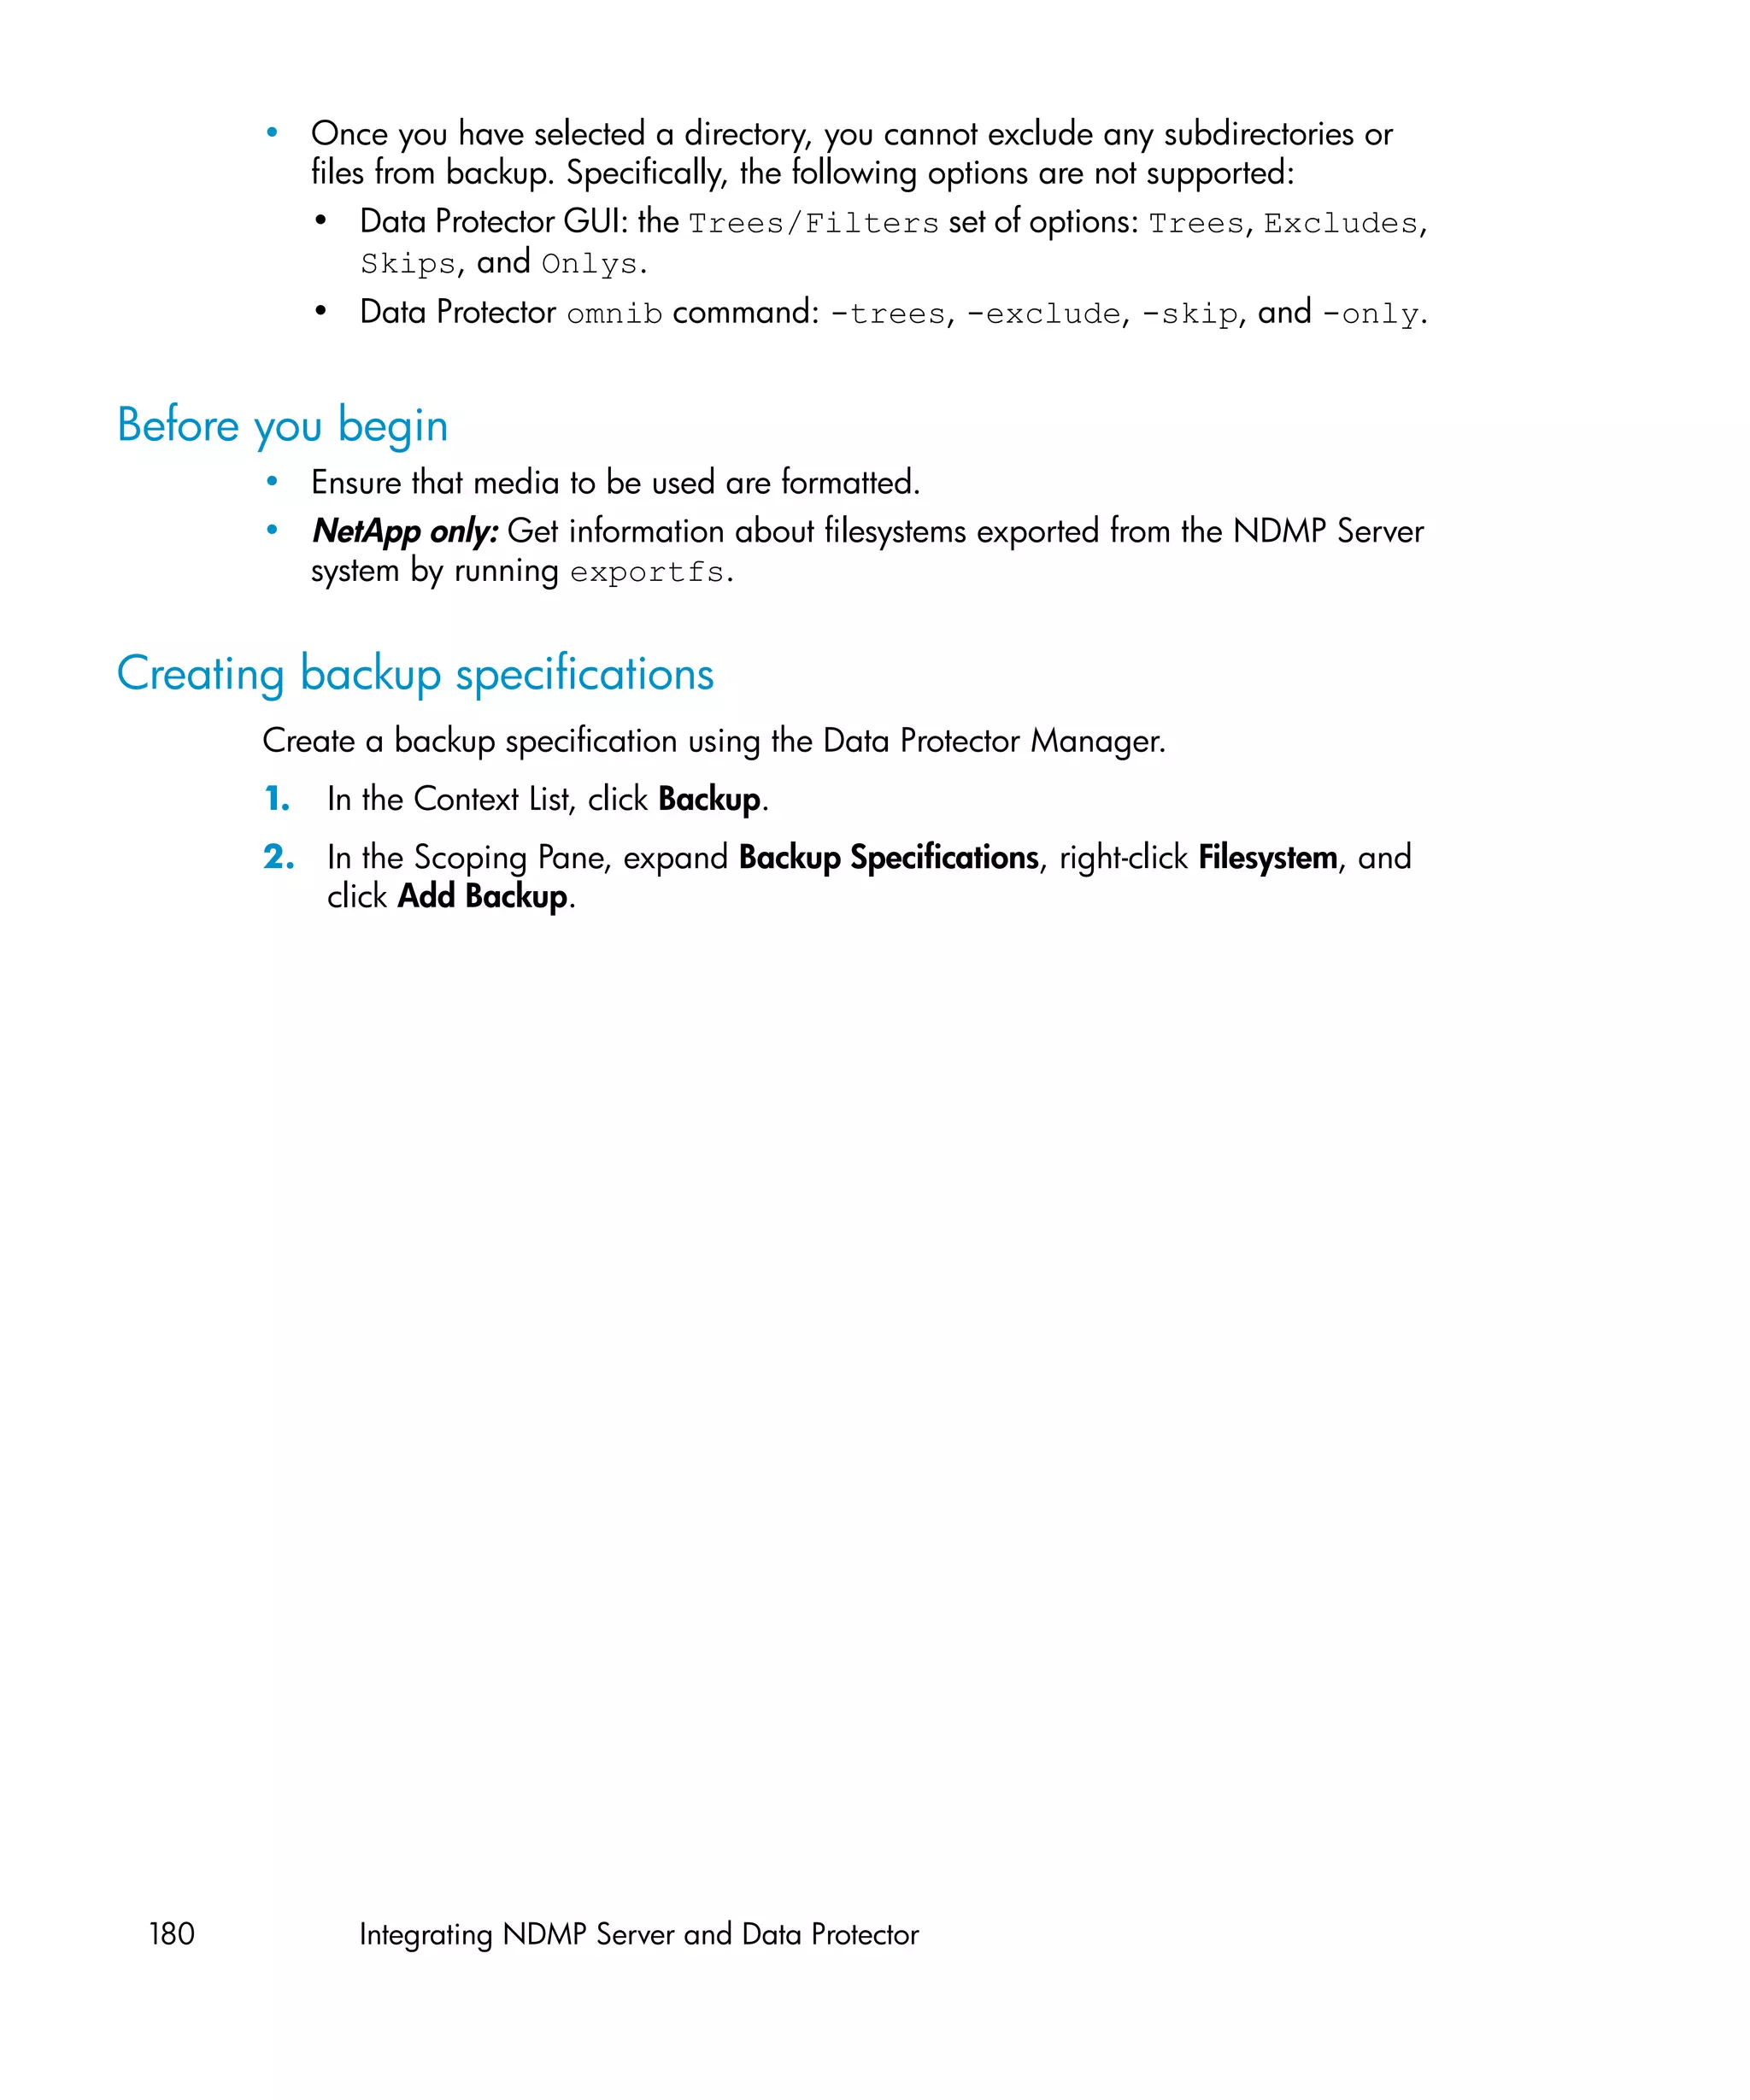
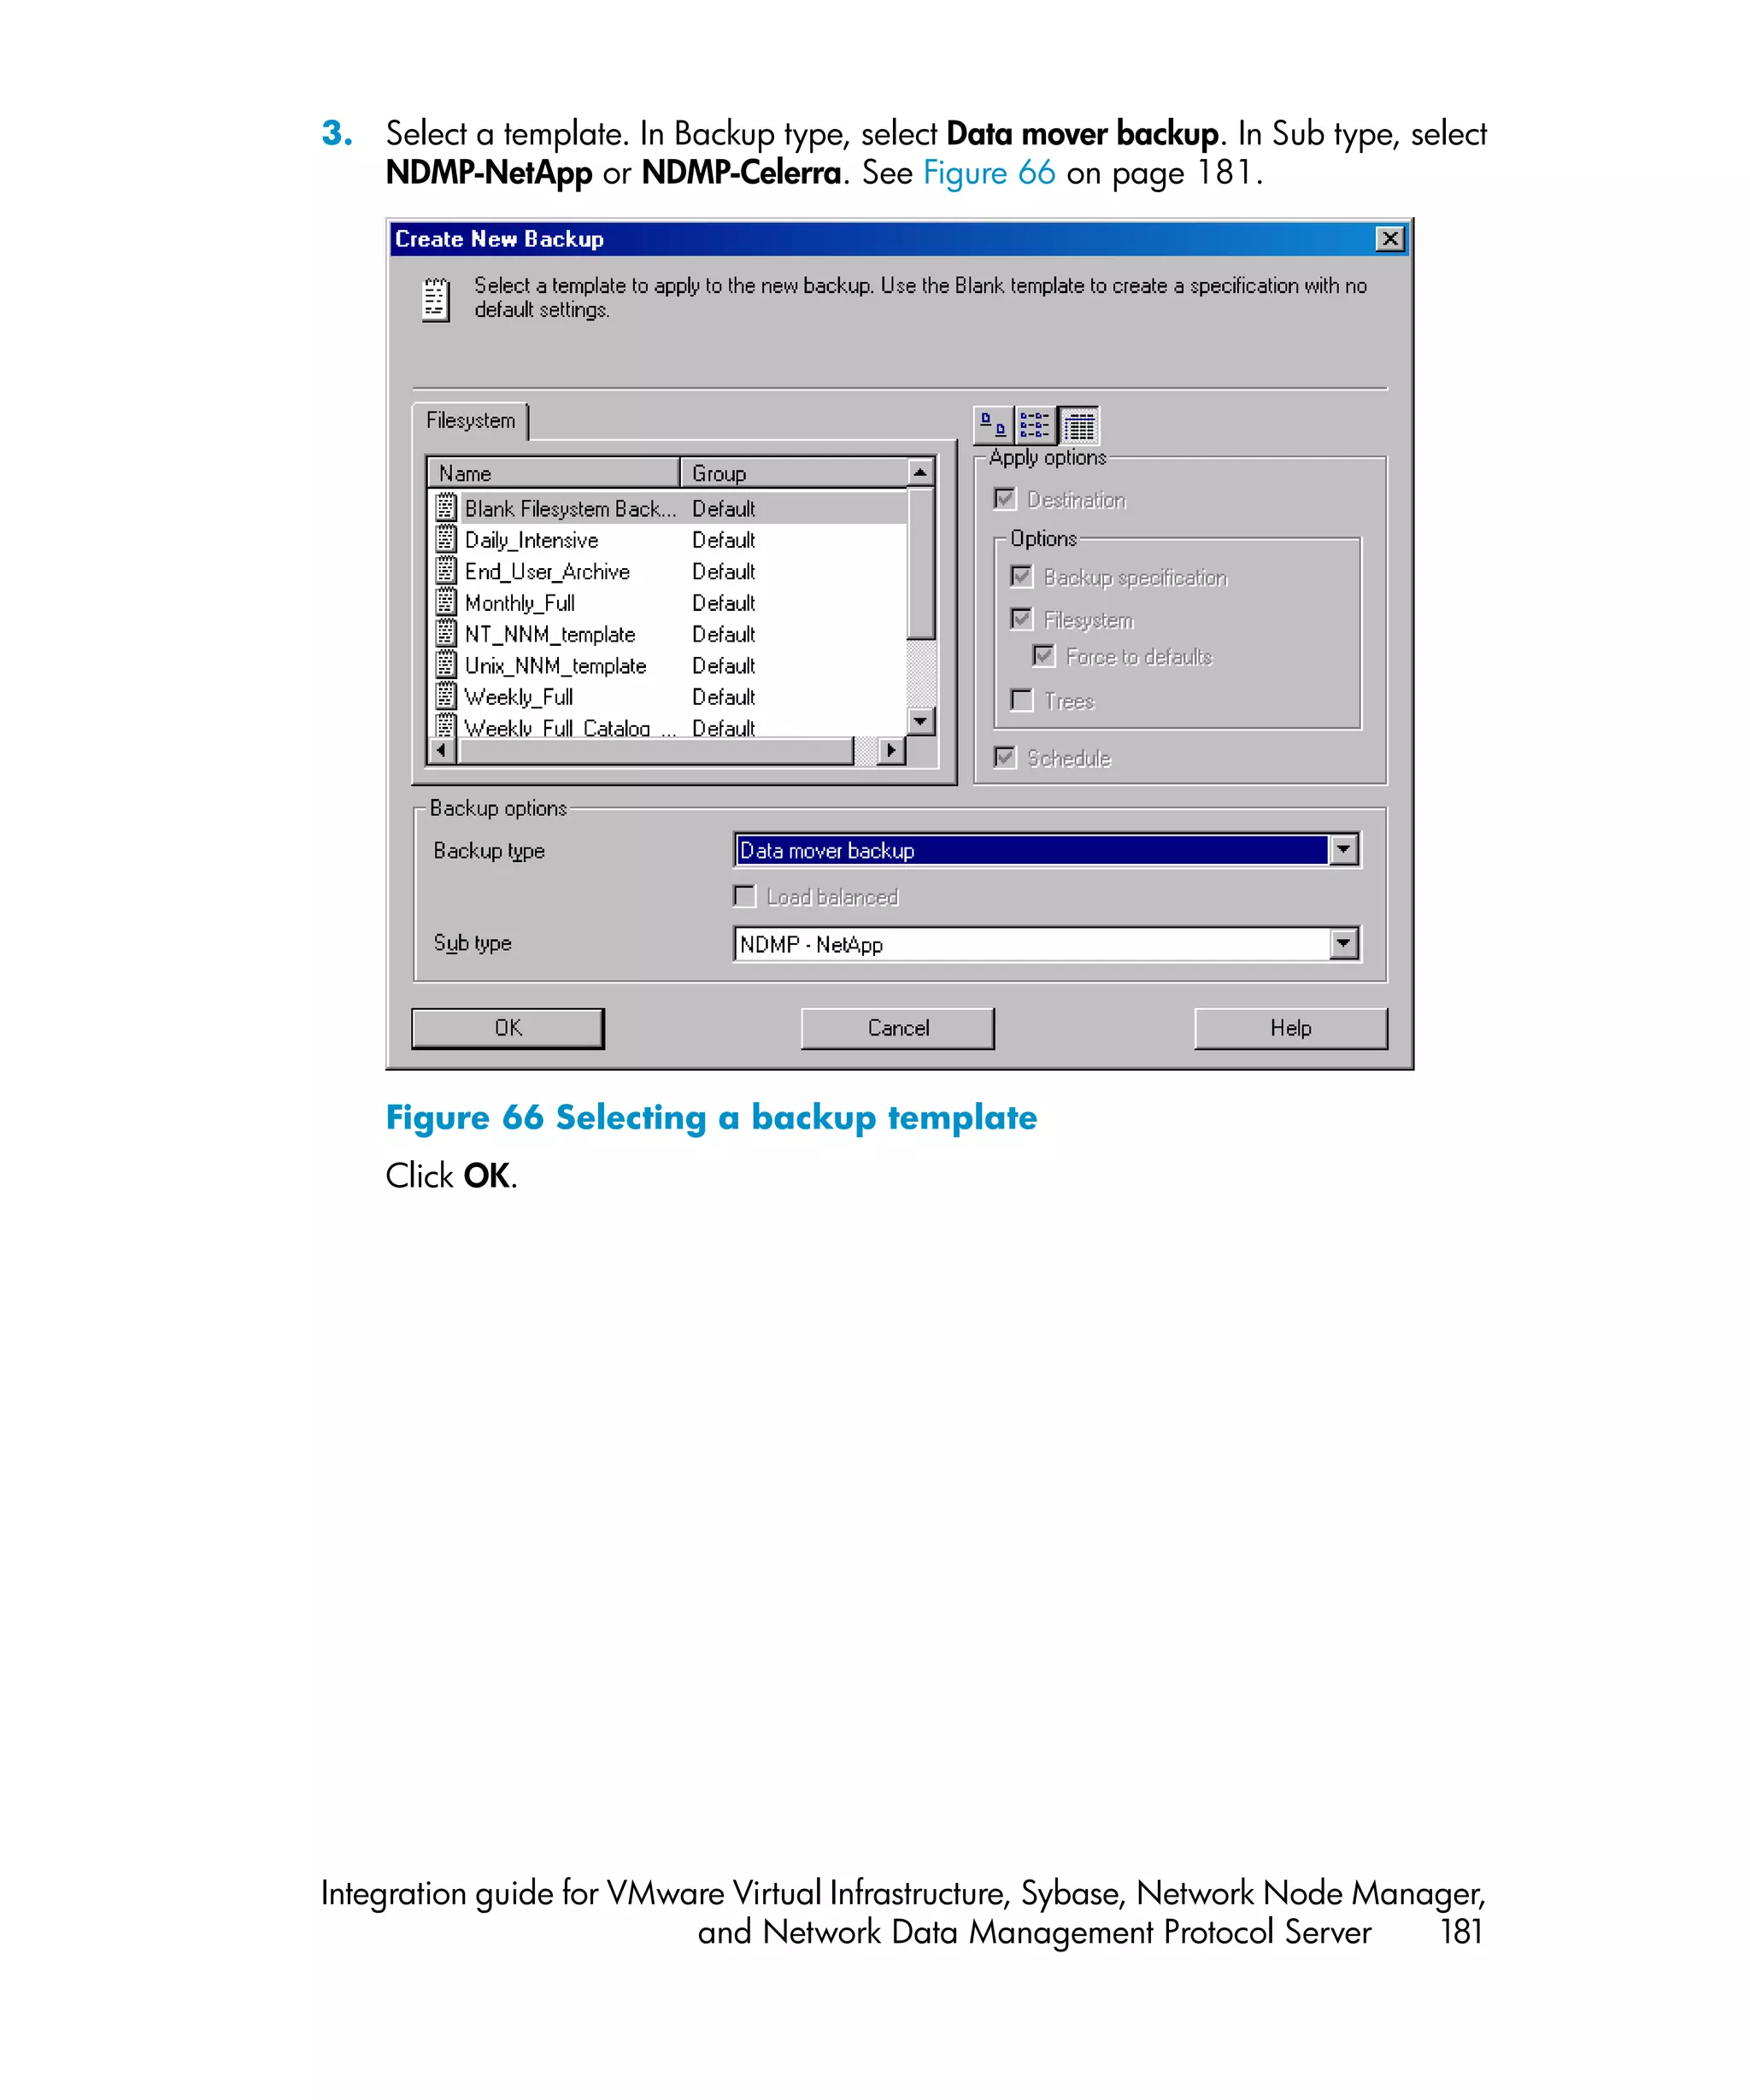
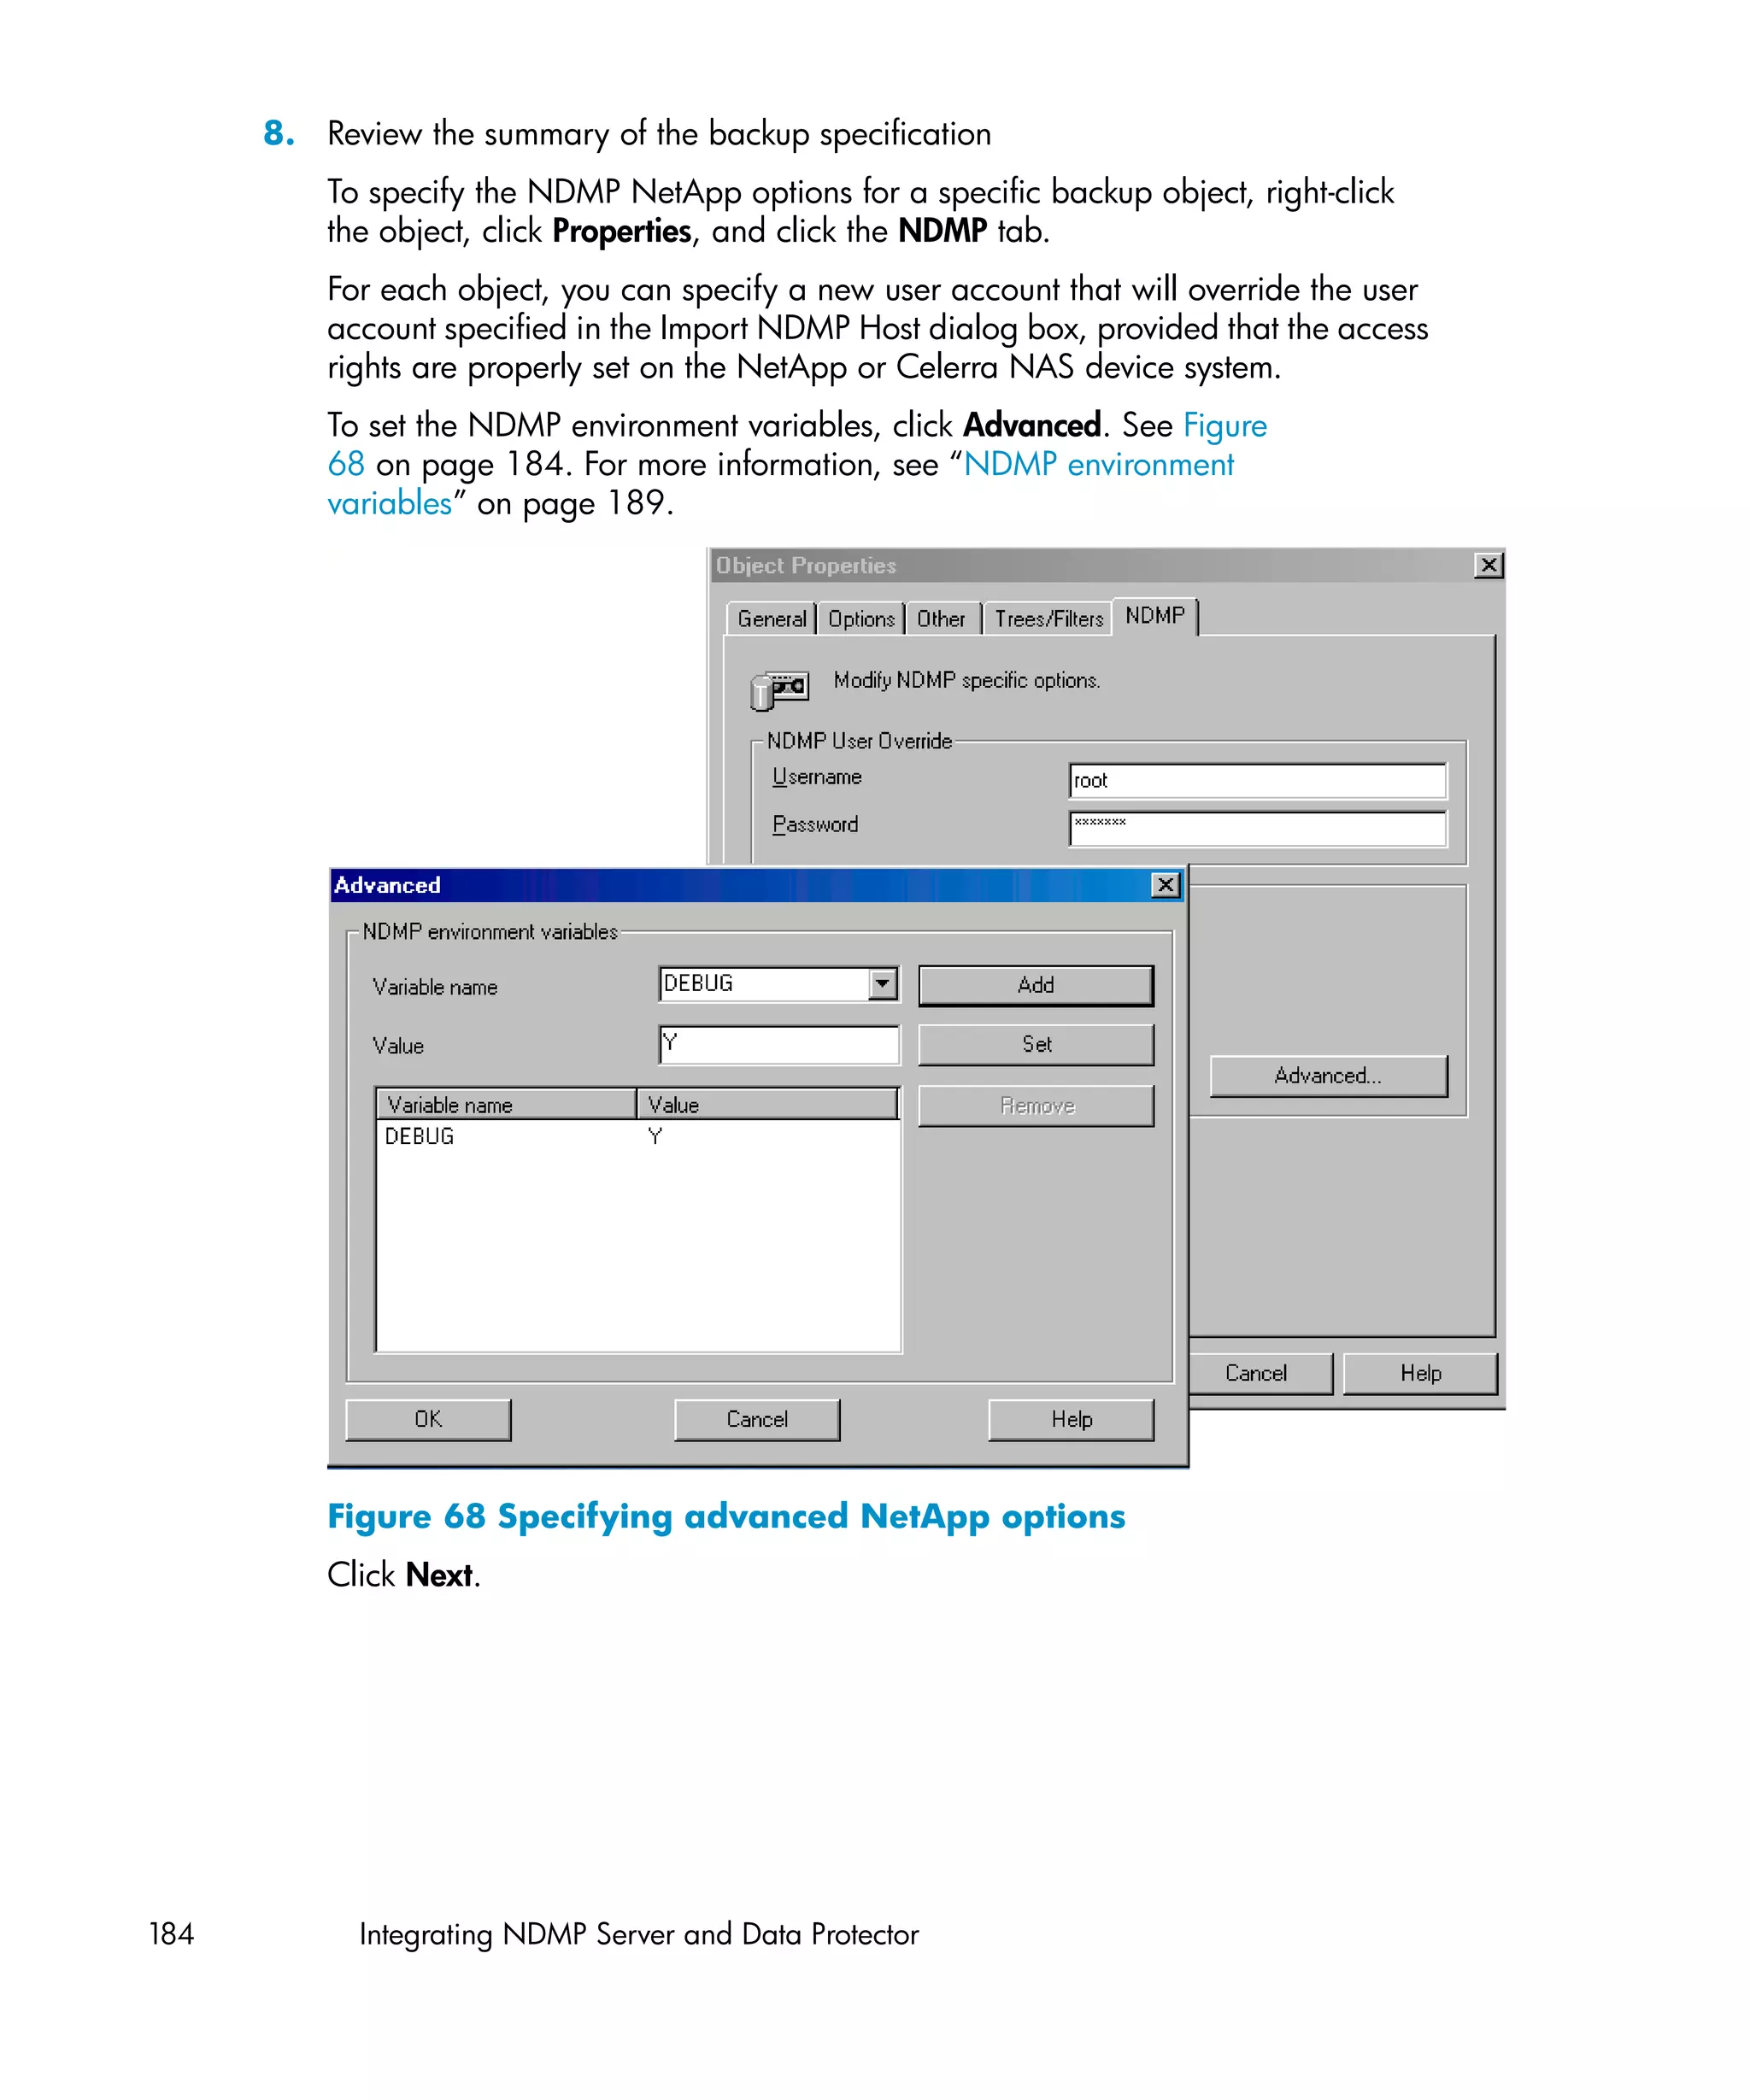
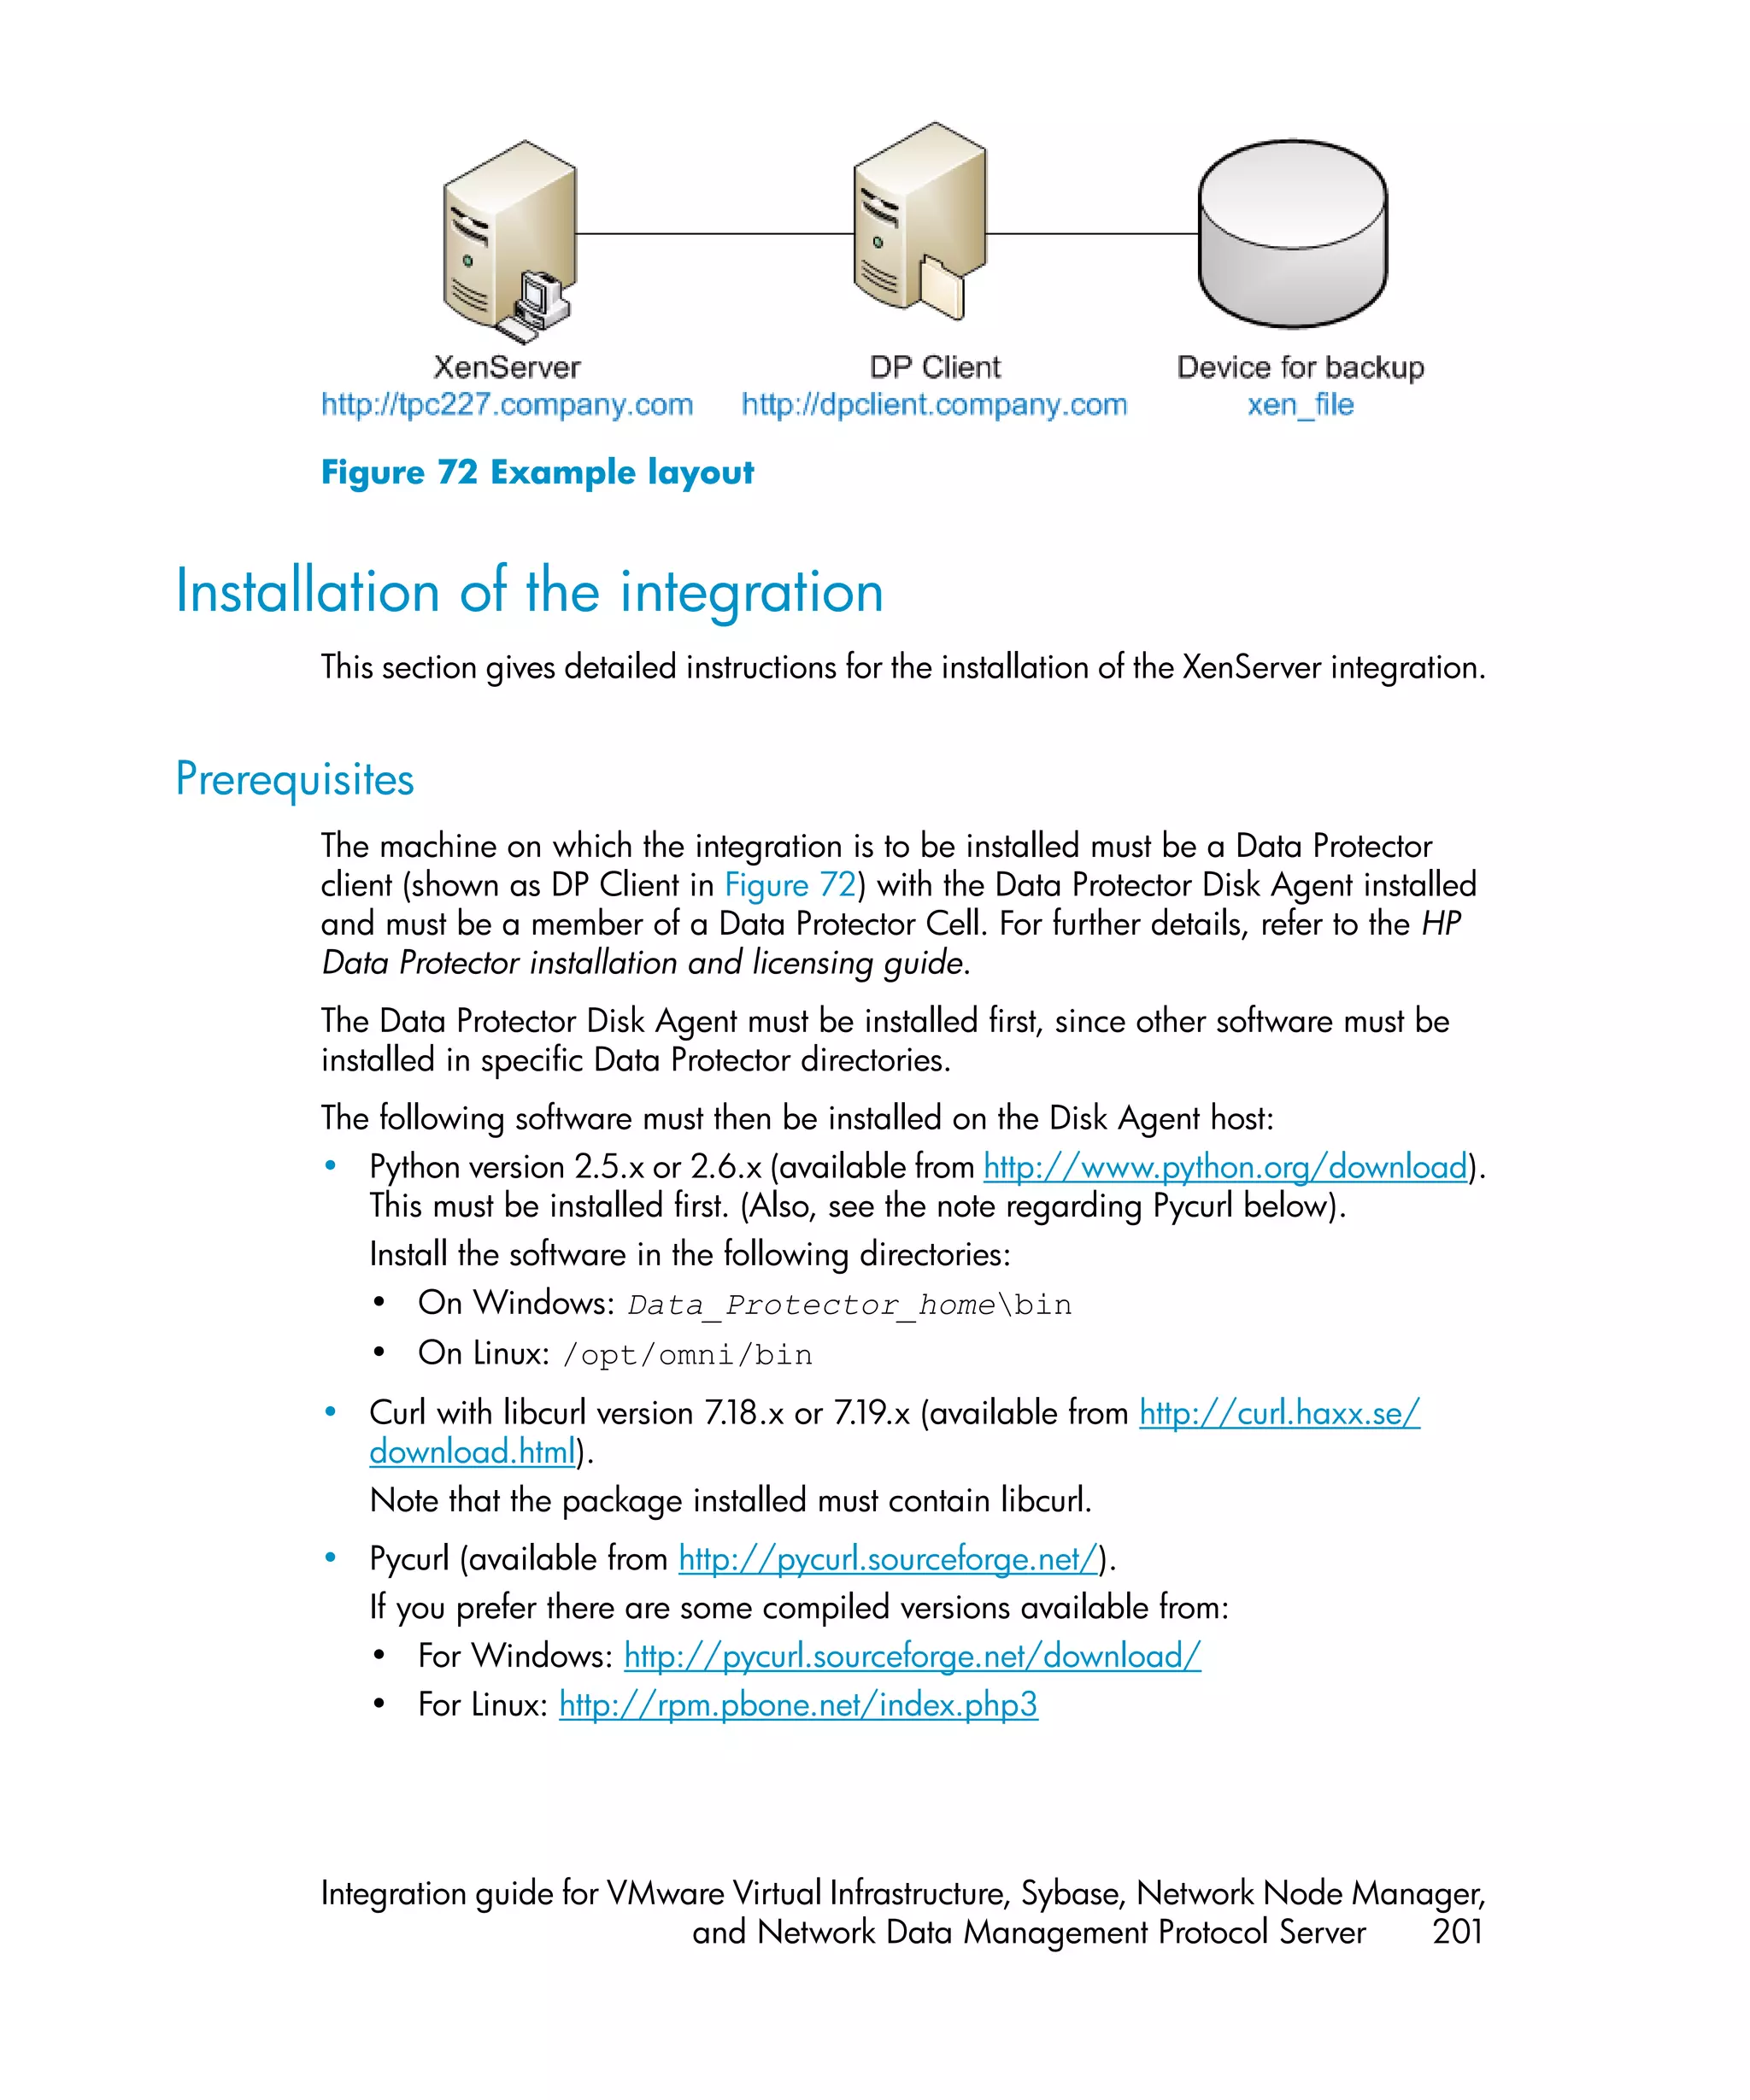
This document provides an integration guide for integrating VMware Virtual Infrastructure, Sybase, Network Node Manager (NNM), and Network Data Management Protocol (NDMP) Server with HP Data Protector. It describes the integration concepts and components, configuration steps, backup and restore procedures, monitoring, and troubleshooting for each integration. The document contains chapters for each integration as well as appendices on additional integrations.


![3. Run:
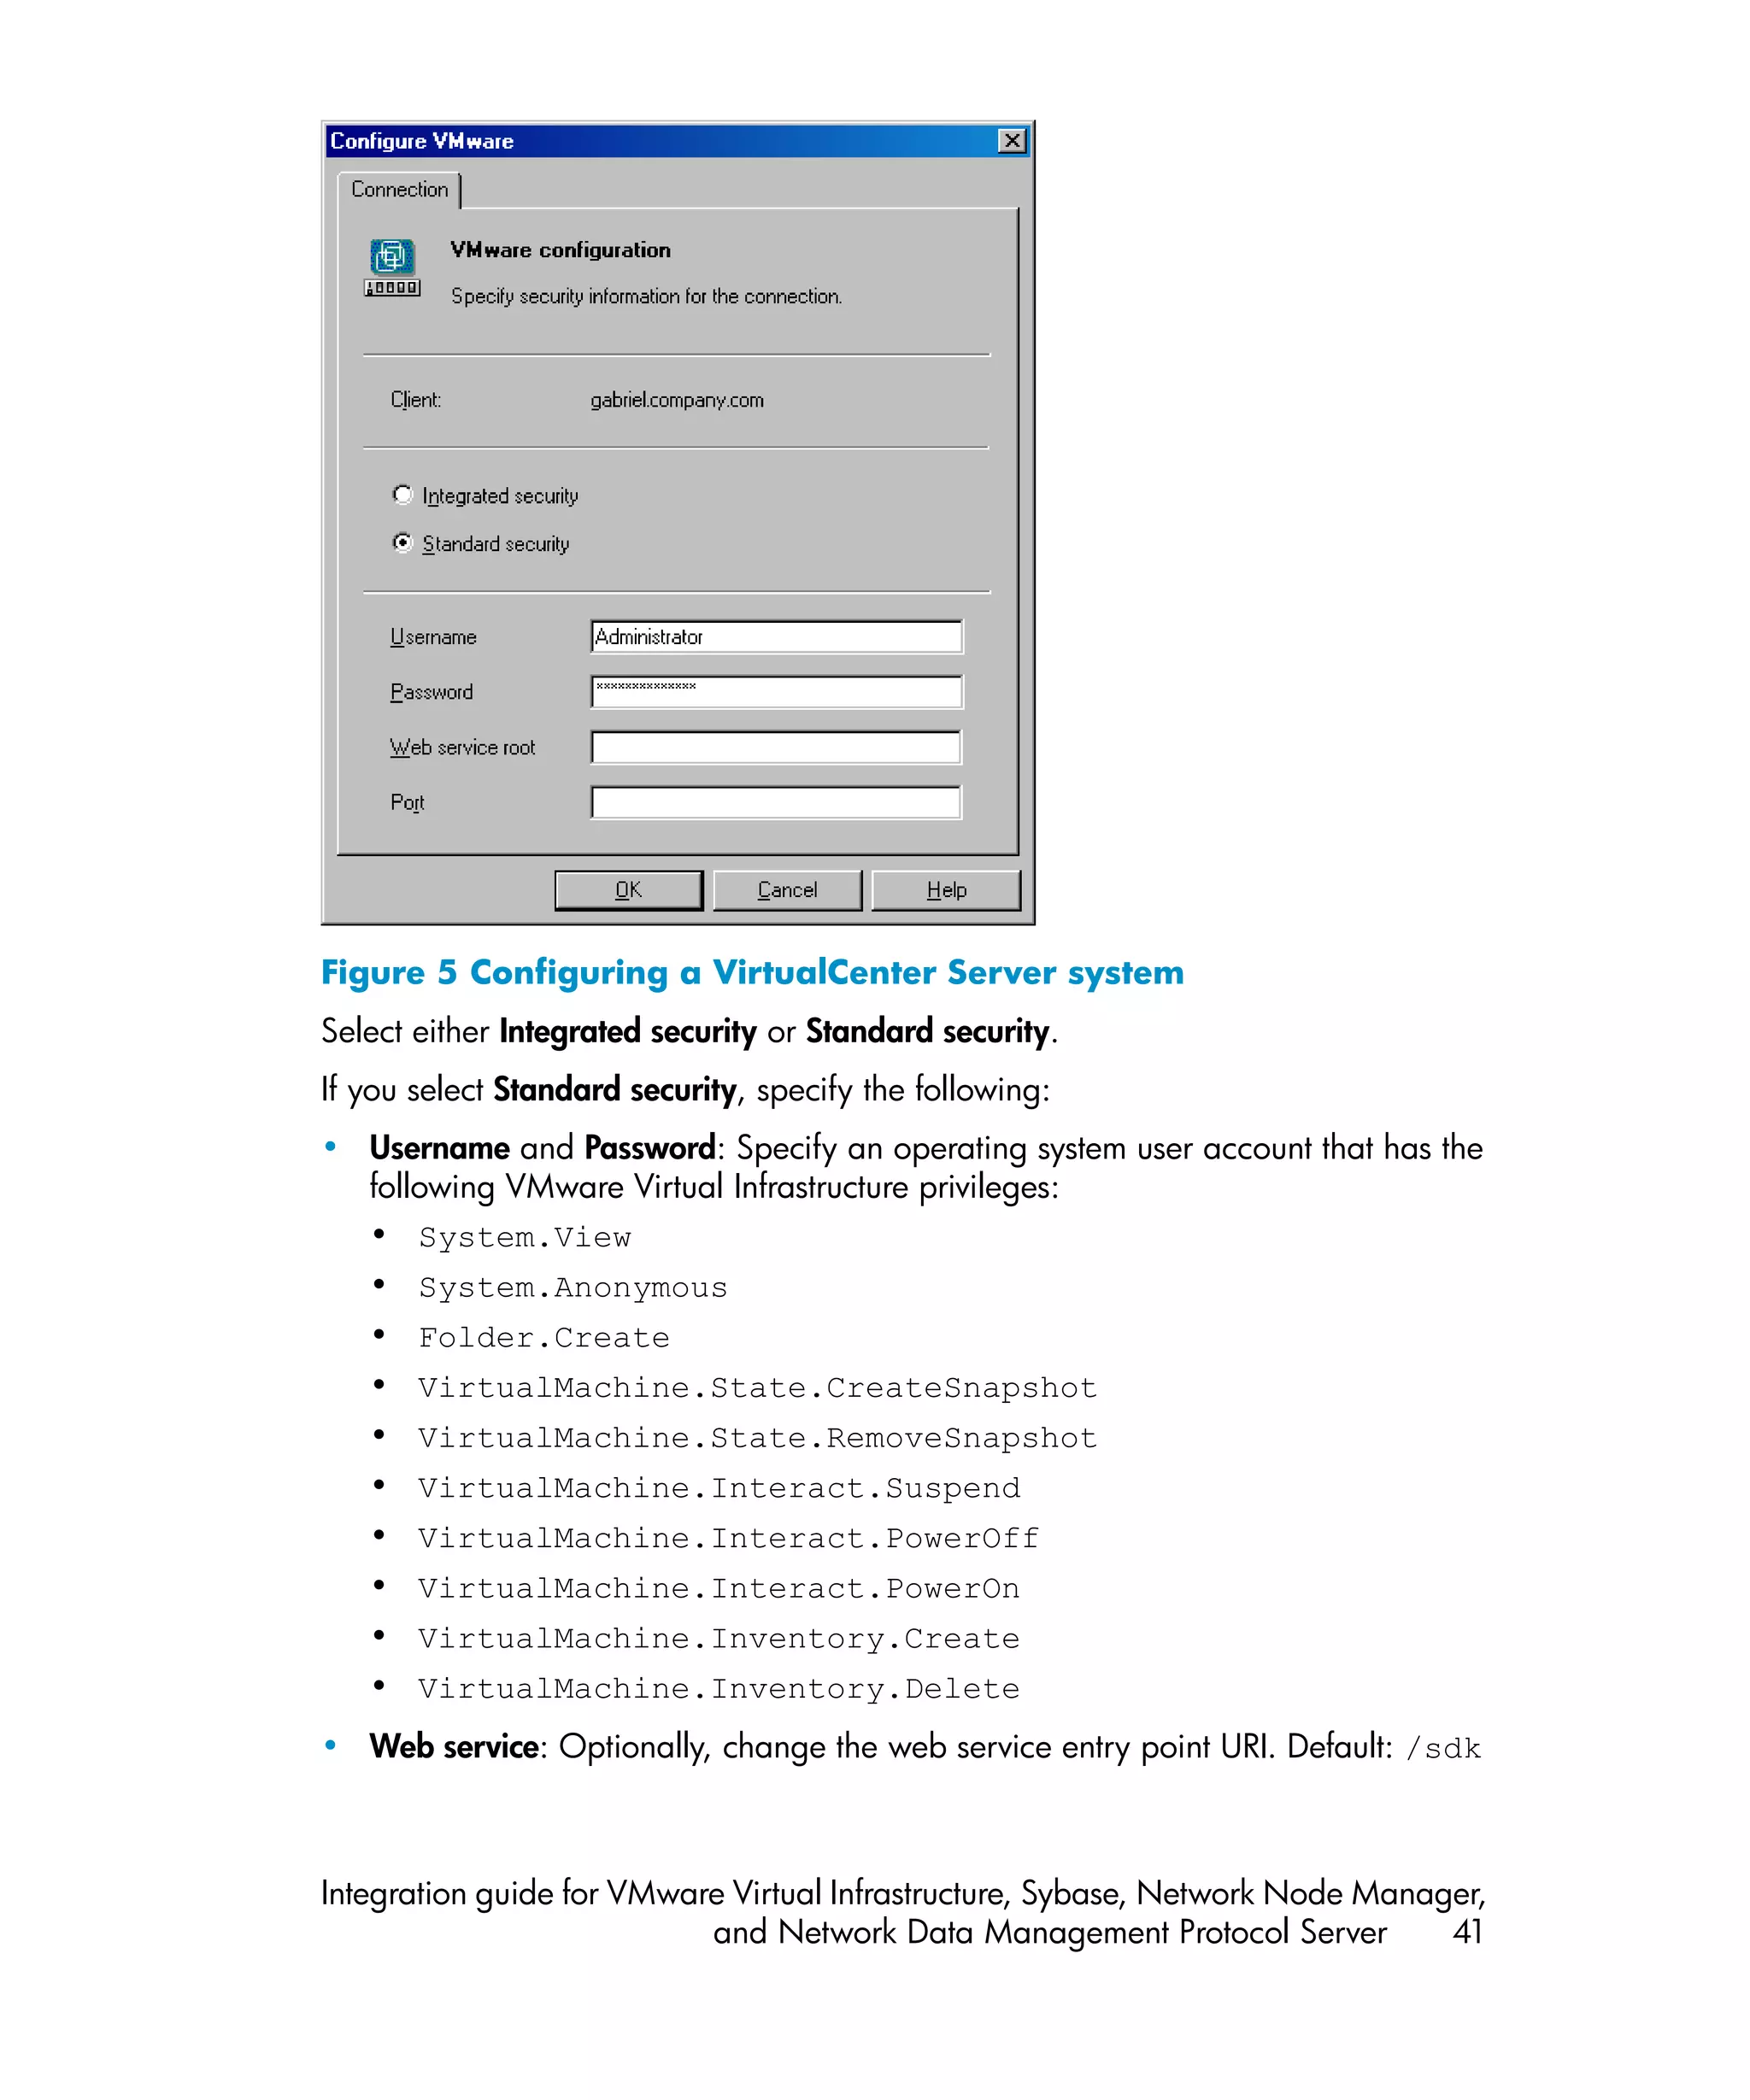
For Integrated security:
util_vmware.exe
–config
–security 1
For Standard security:
util_vmware.exe
–config
–security 0
—user Username
—password Password
[-webroot WebServiceRoot]
[-port WebServicePort]
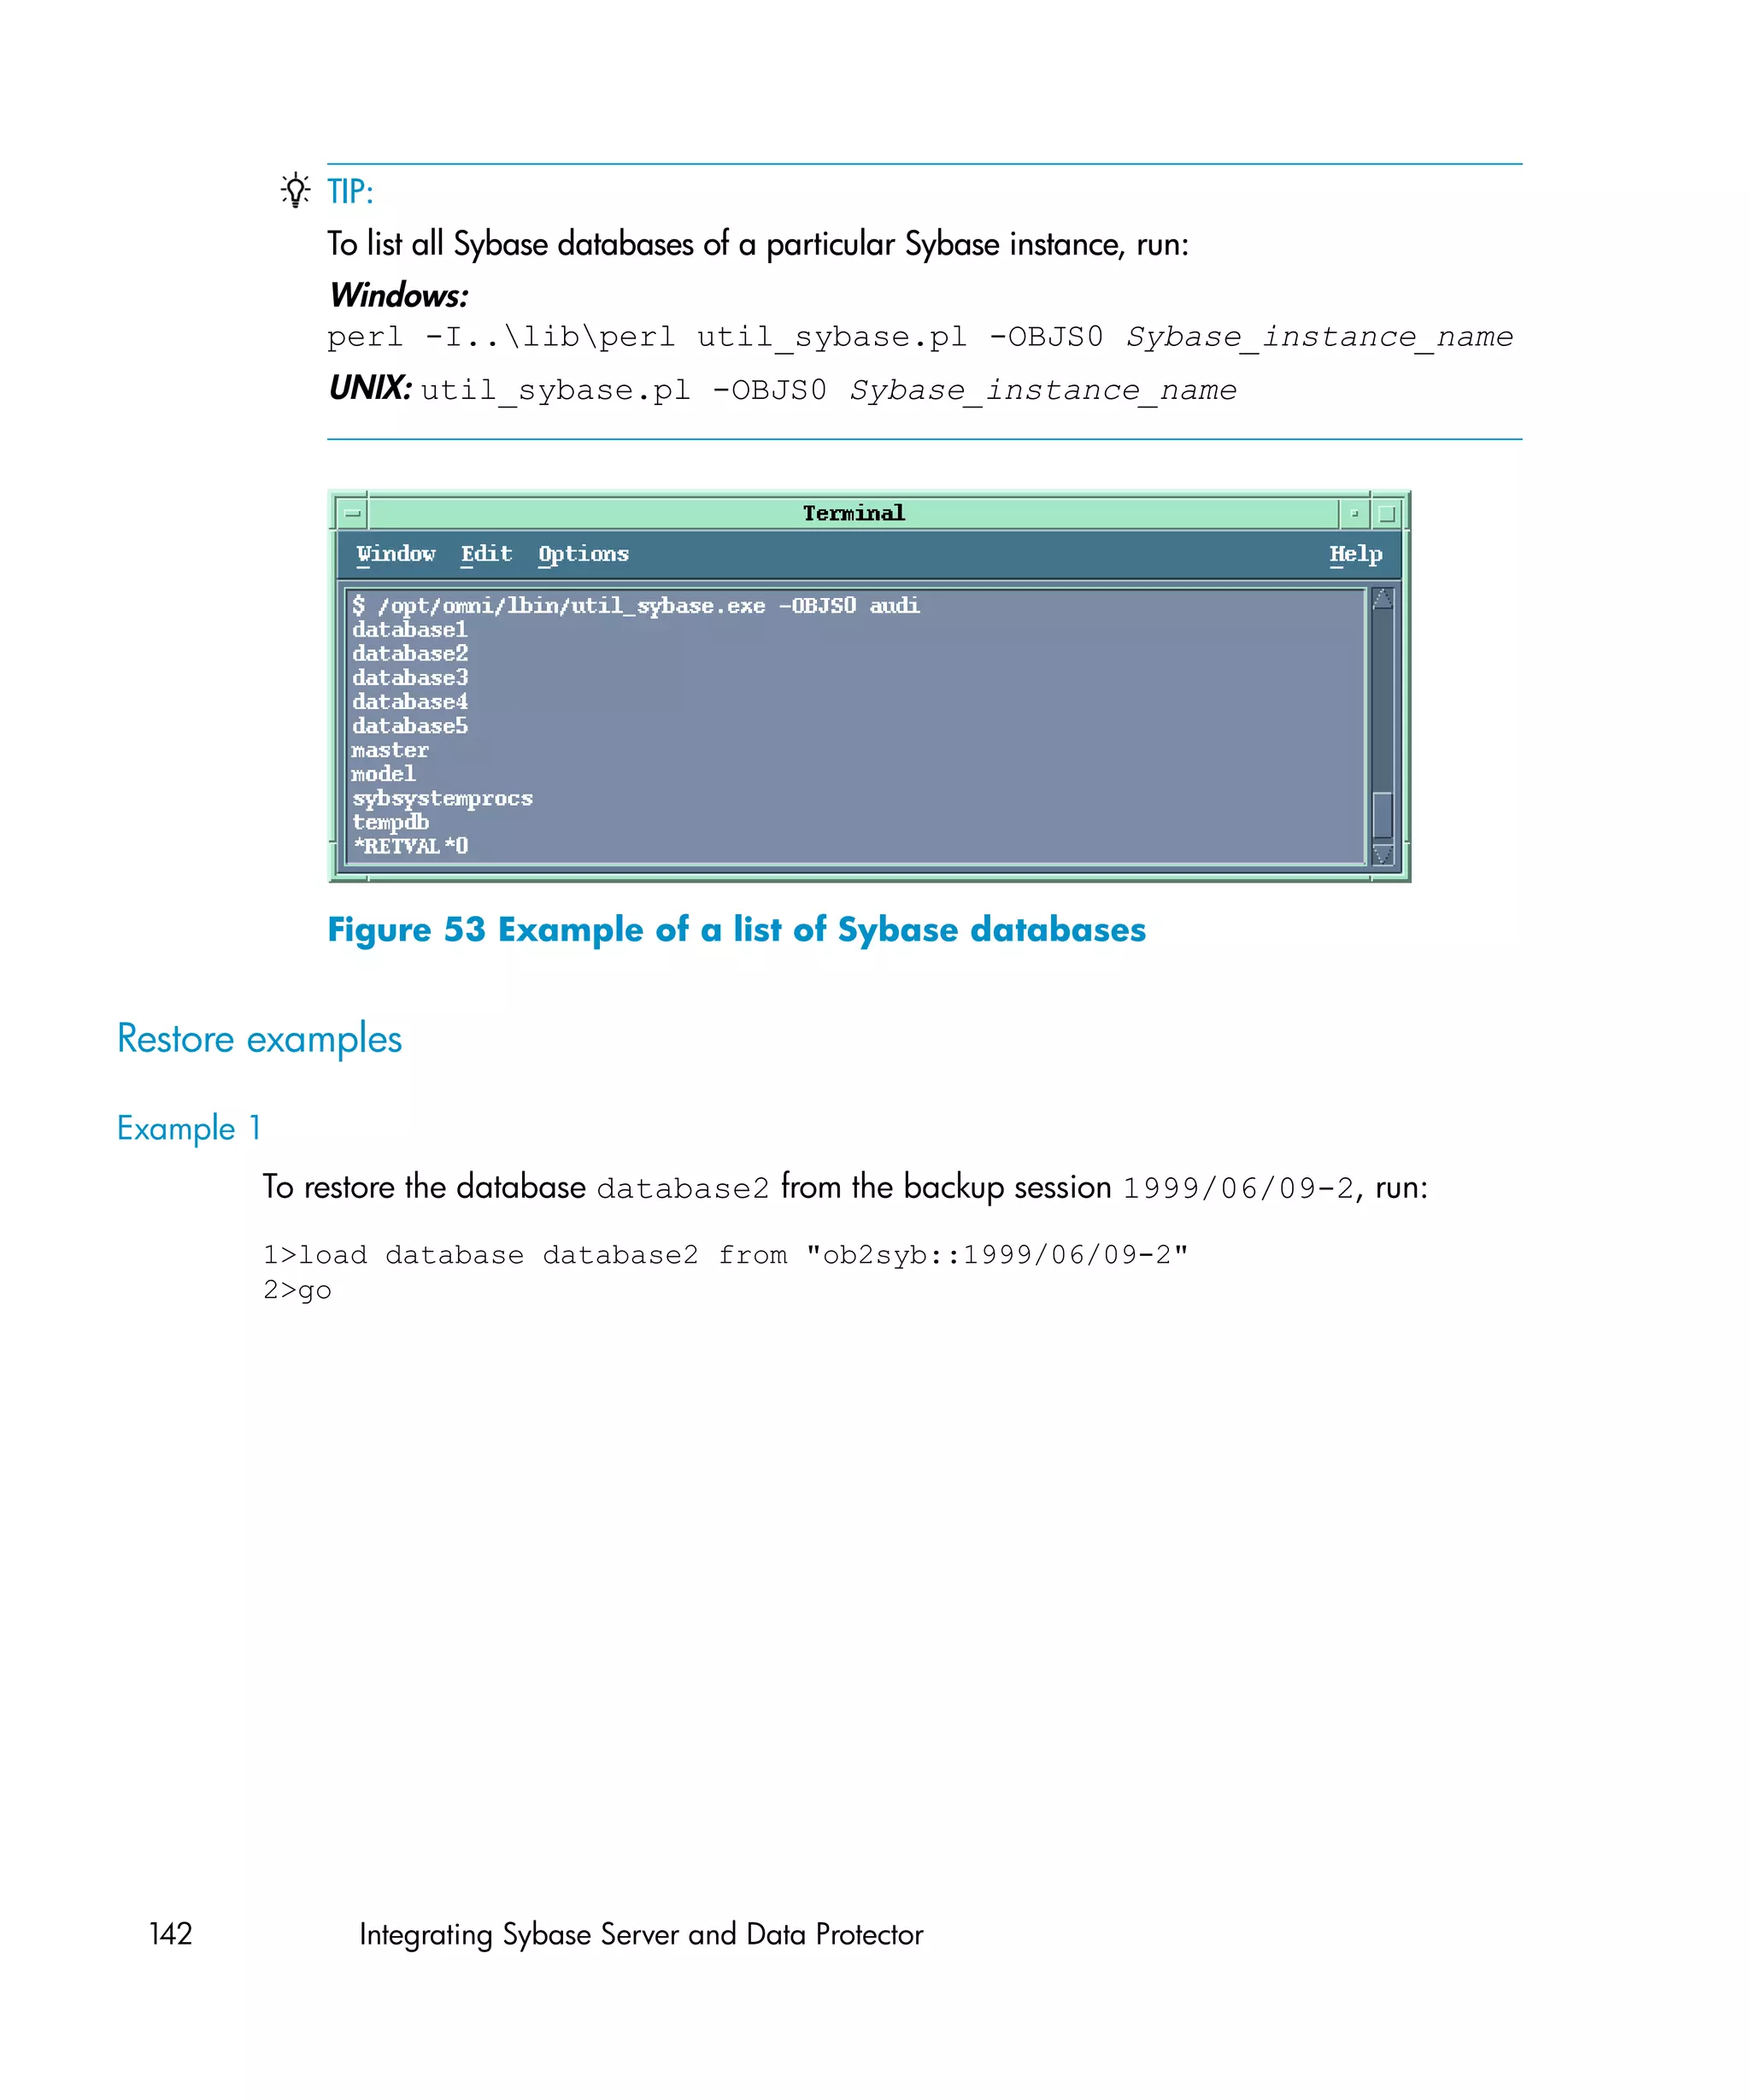
The message *RETVAL*0 indicates successful configuration.
For option description, see the util_vmware.exe man page or the HP Data
Protector command line interface reference.
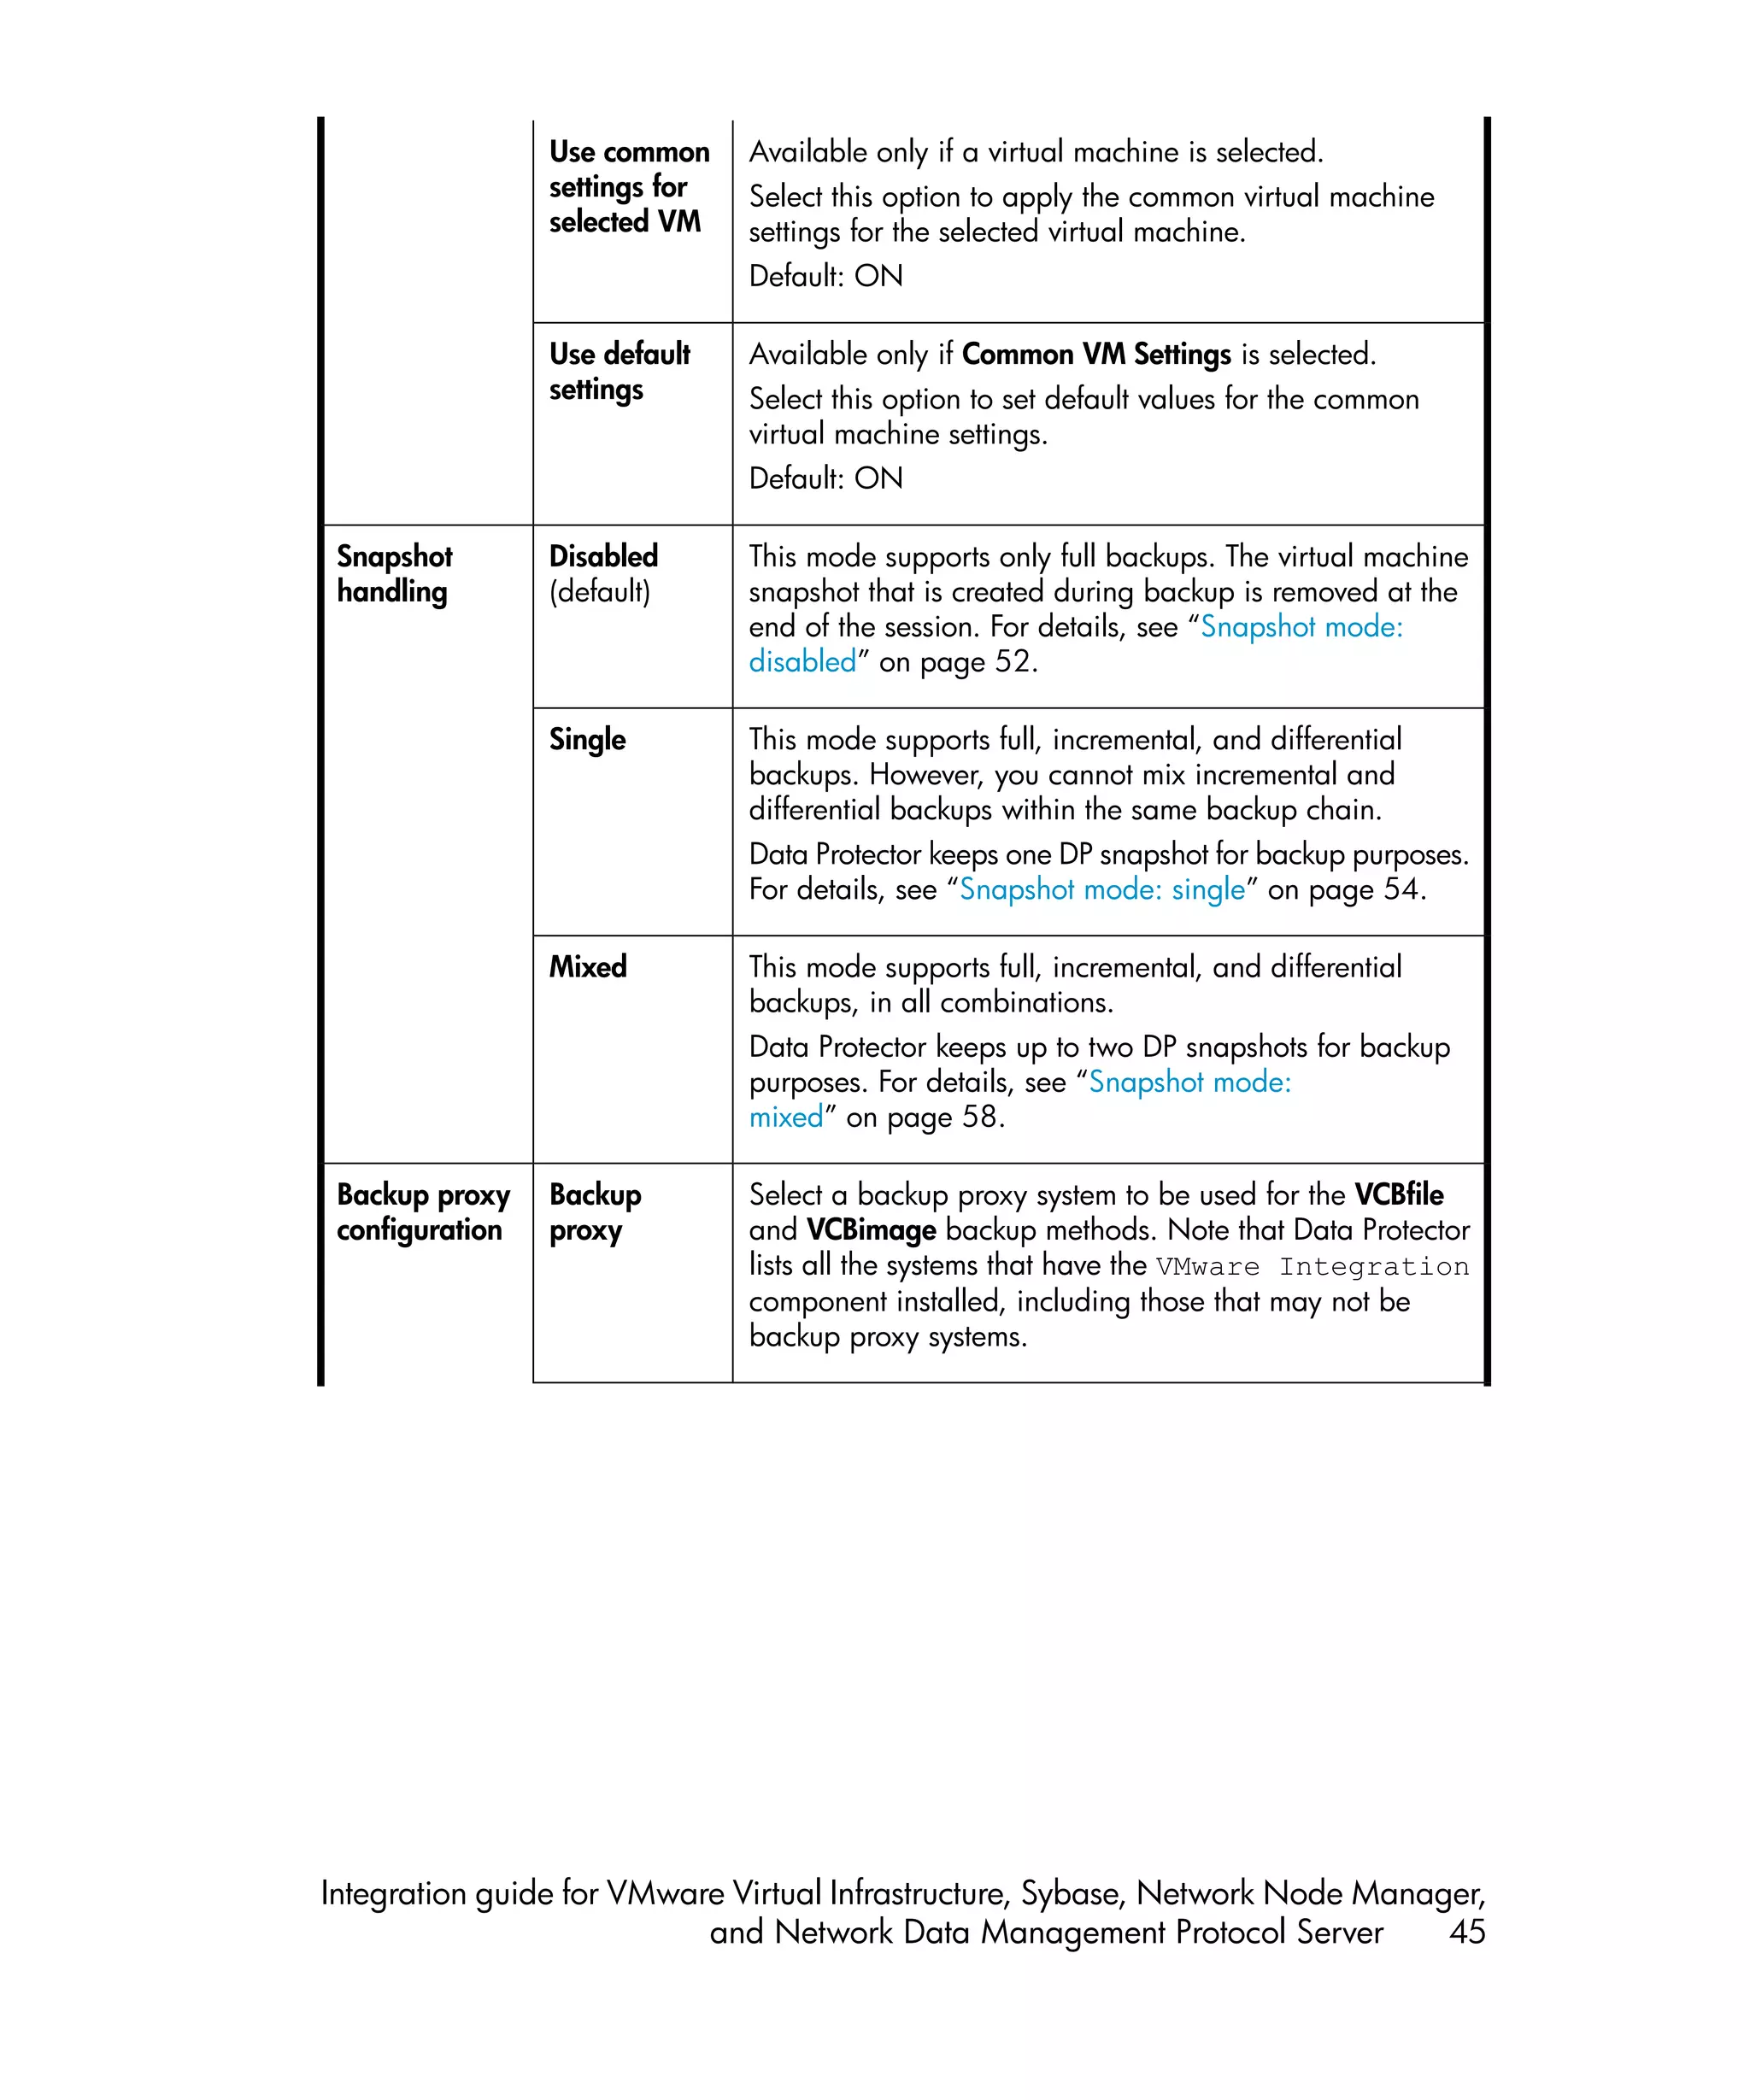
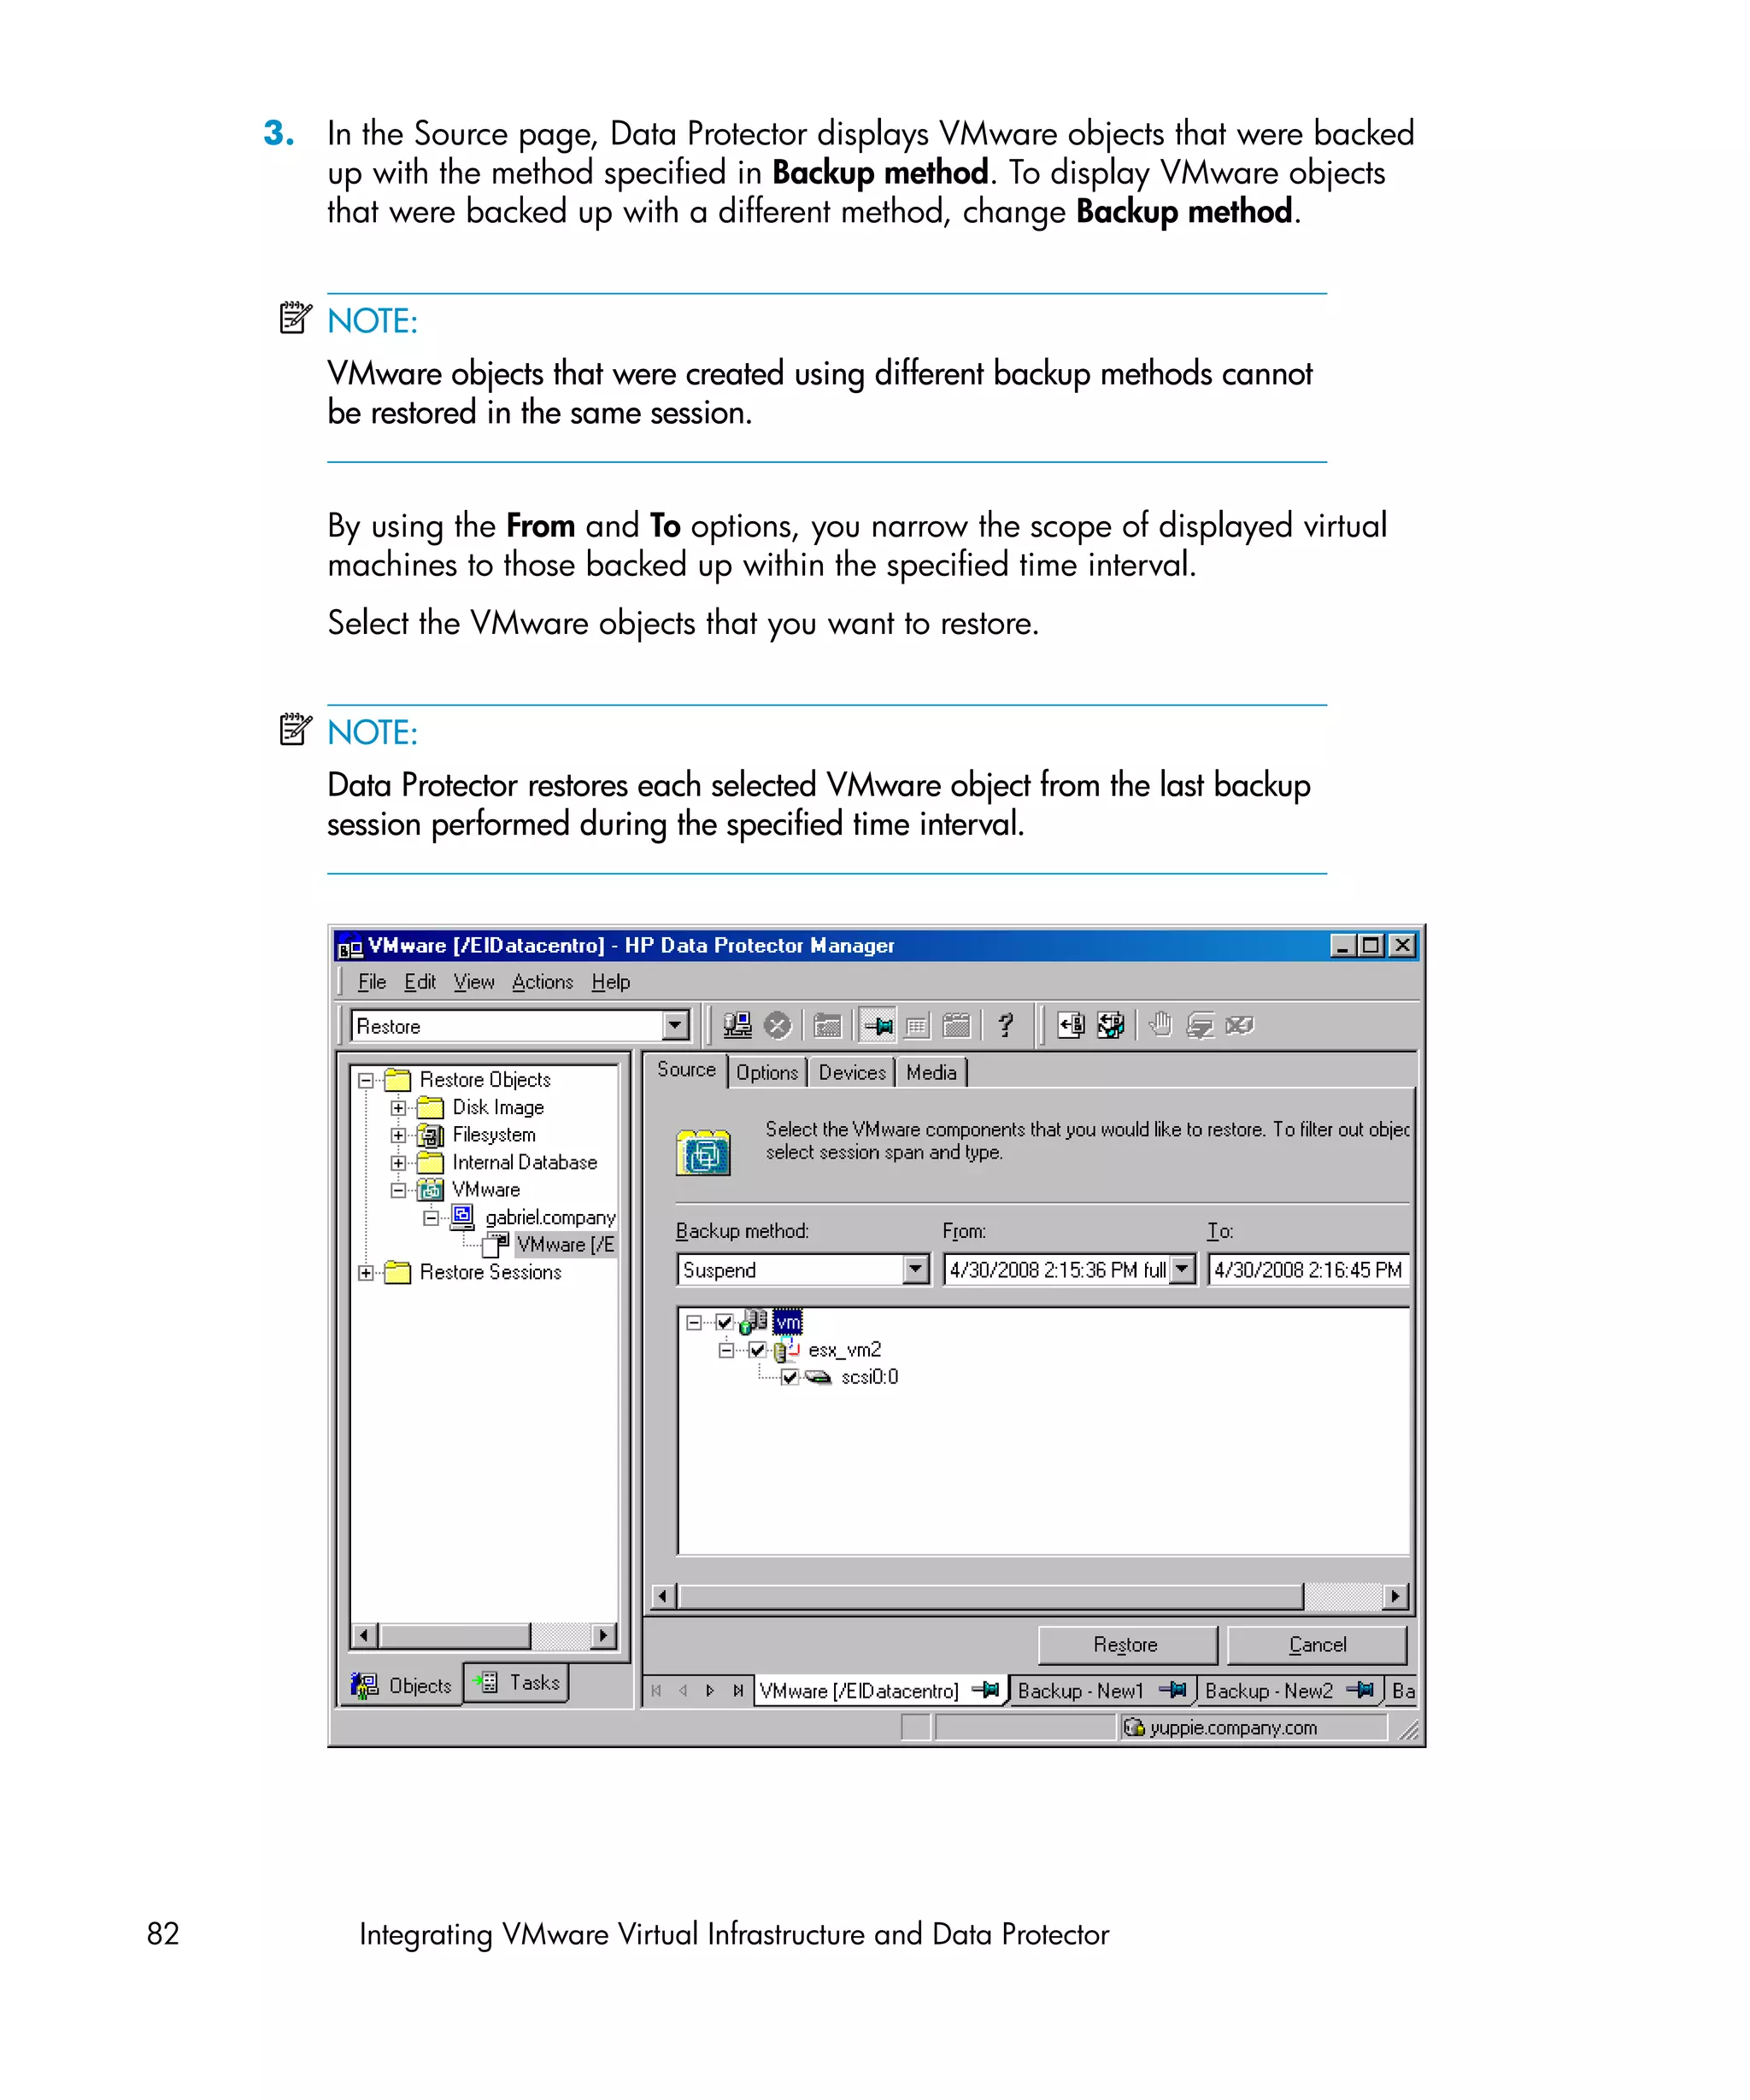
Configuring virtual machines
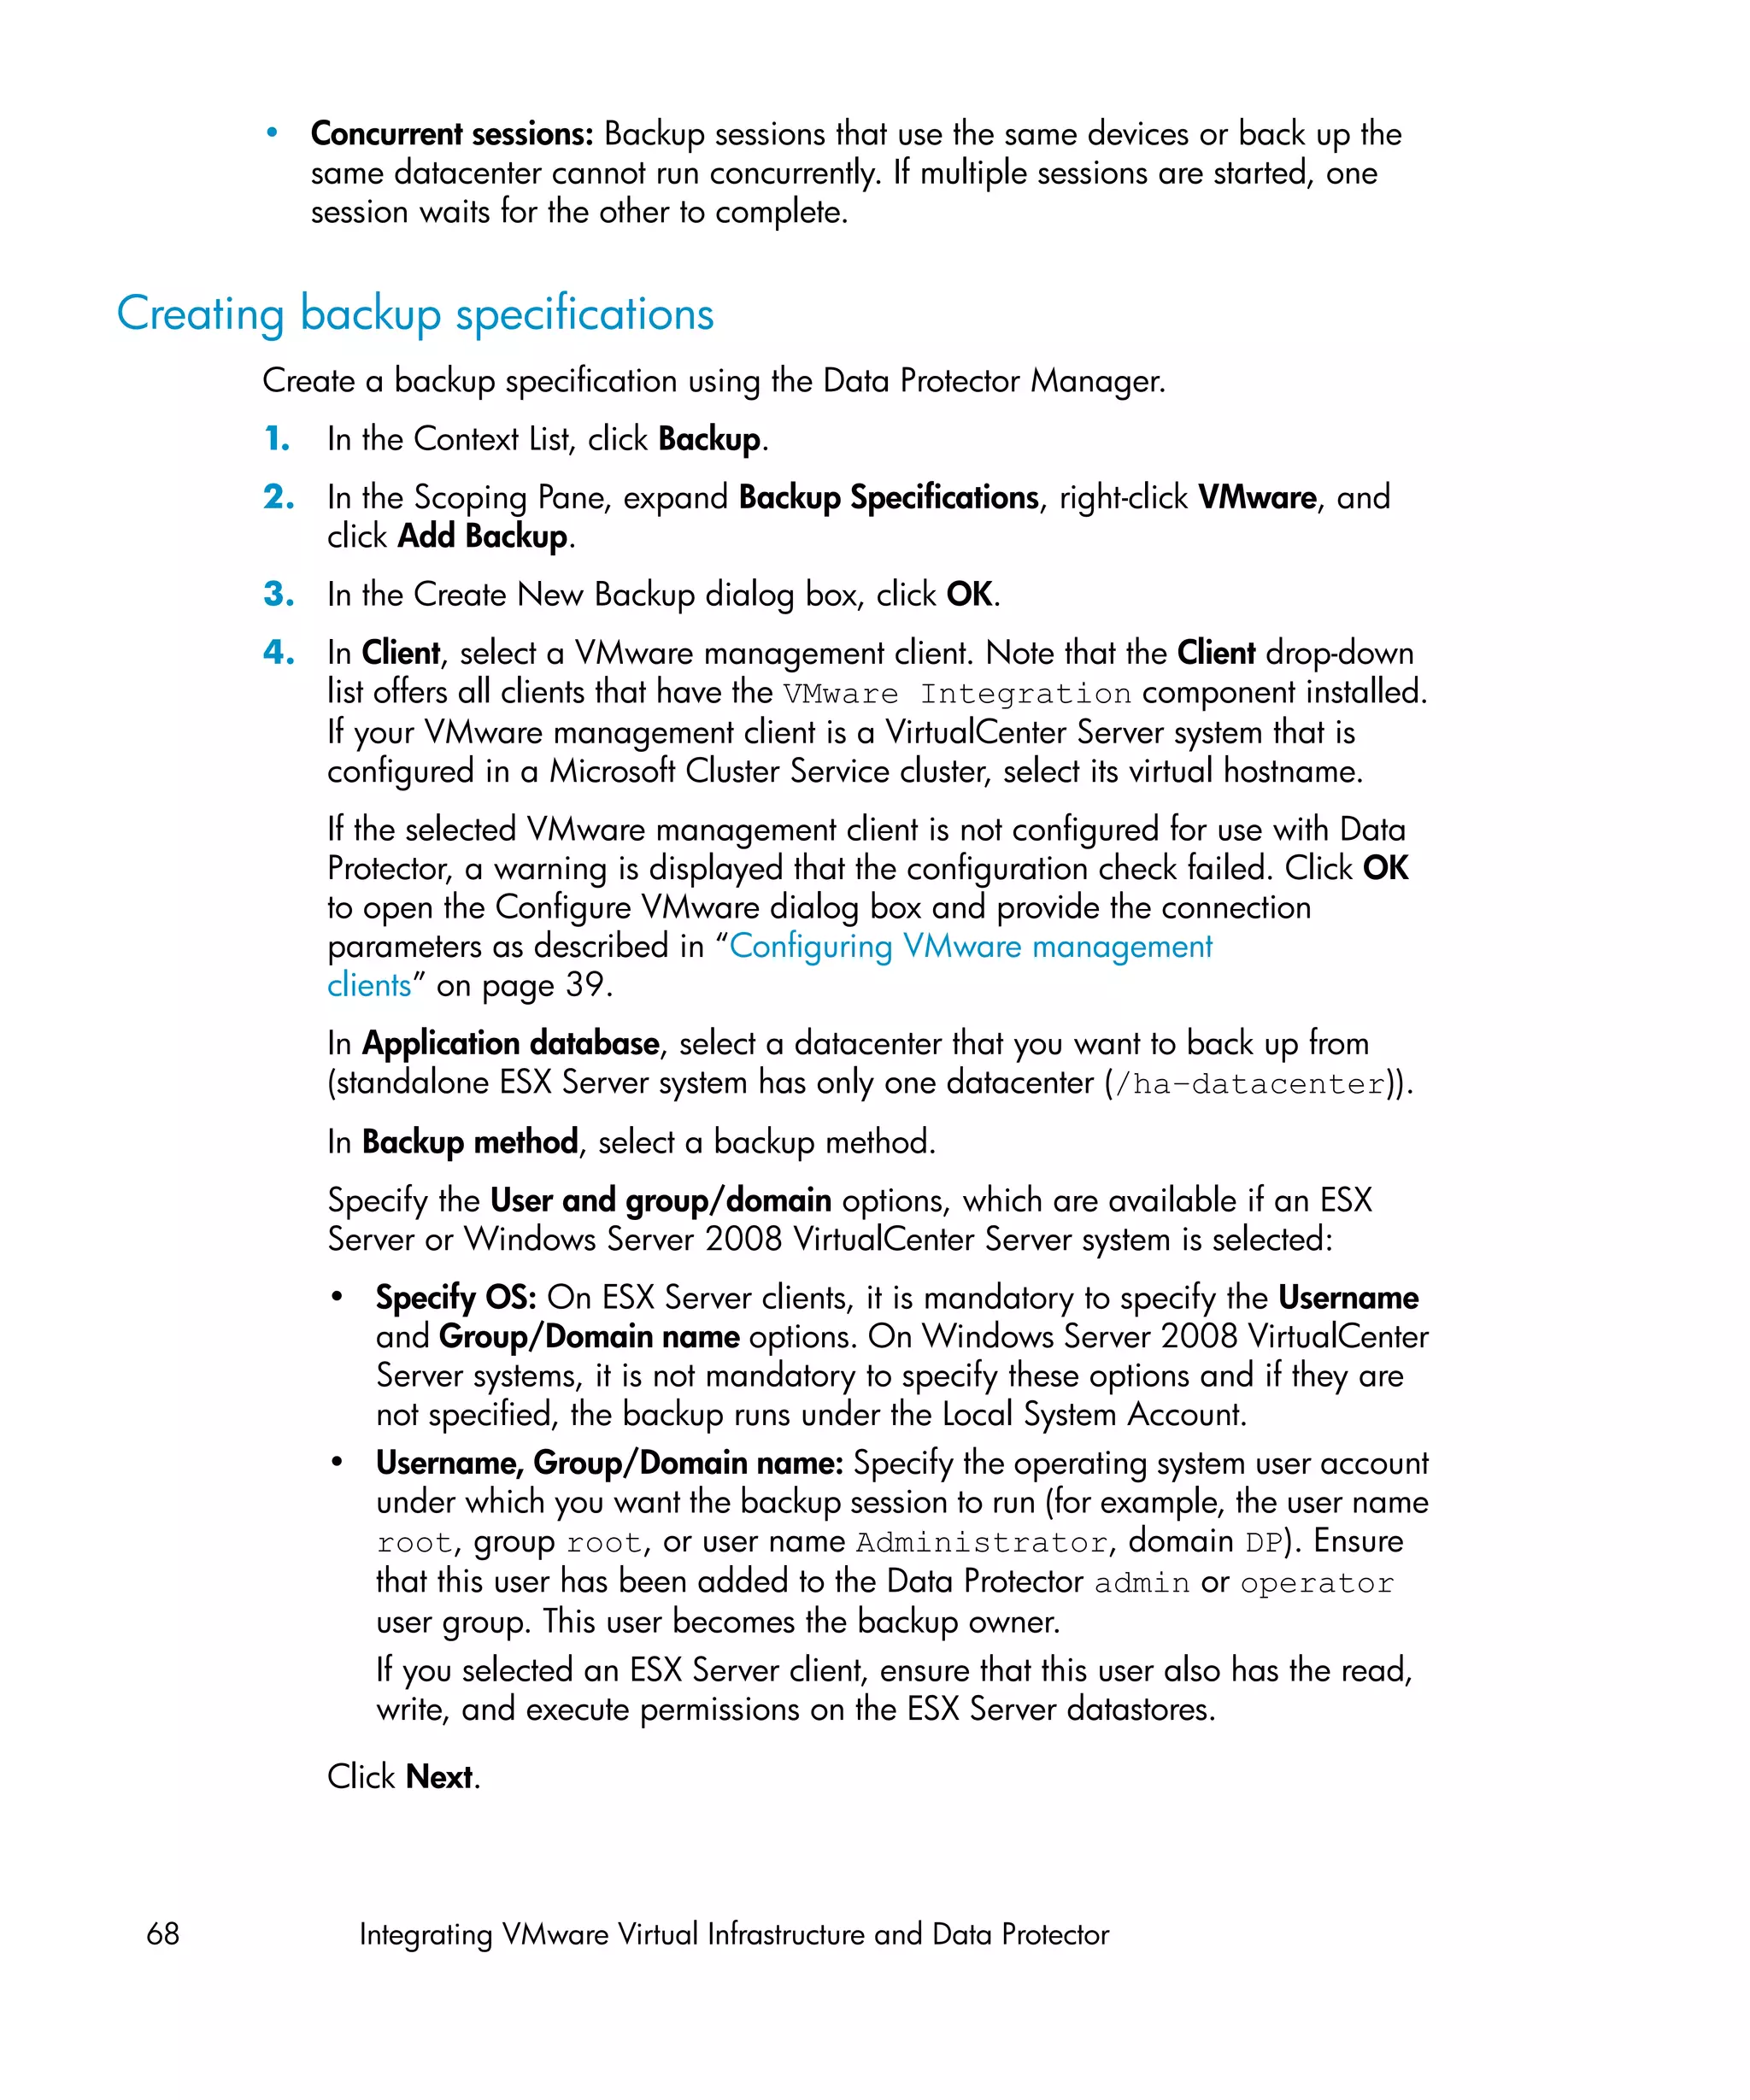
For each virtual machine, specify details on how to perform various backup methods:
• For the Snapshot method, specify how to handle virtual machine snapshots that
are created during backup. Note that not all snapshot handling modes support
incremental and differential backups.
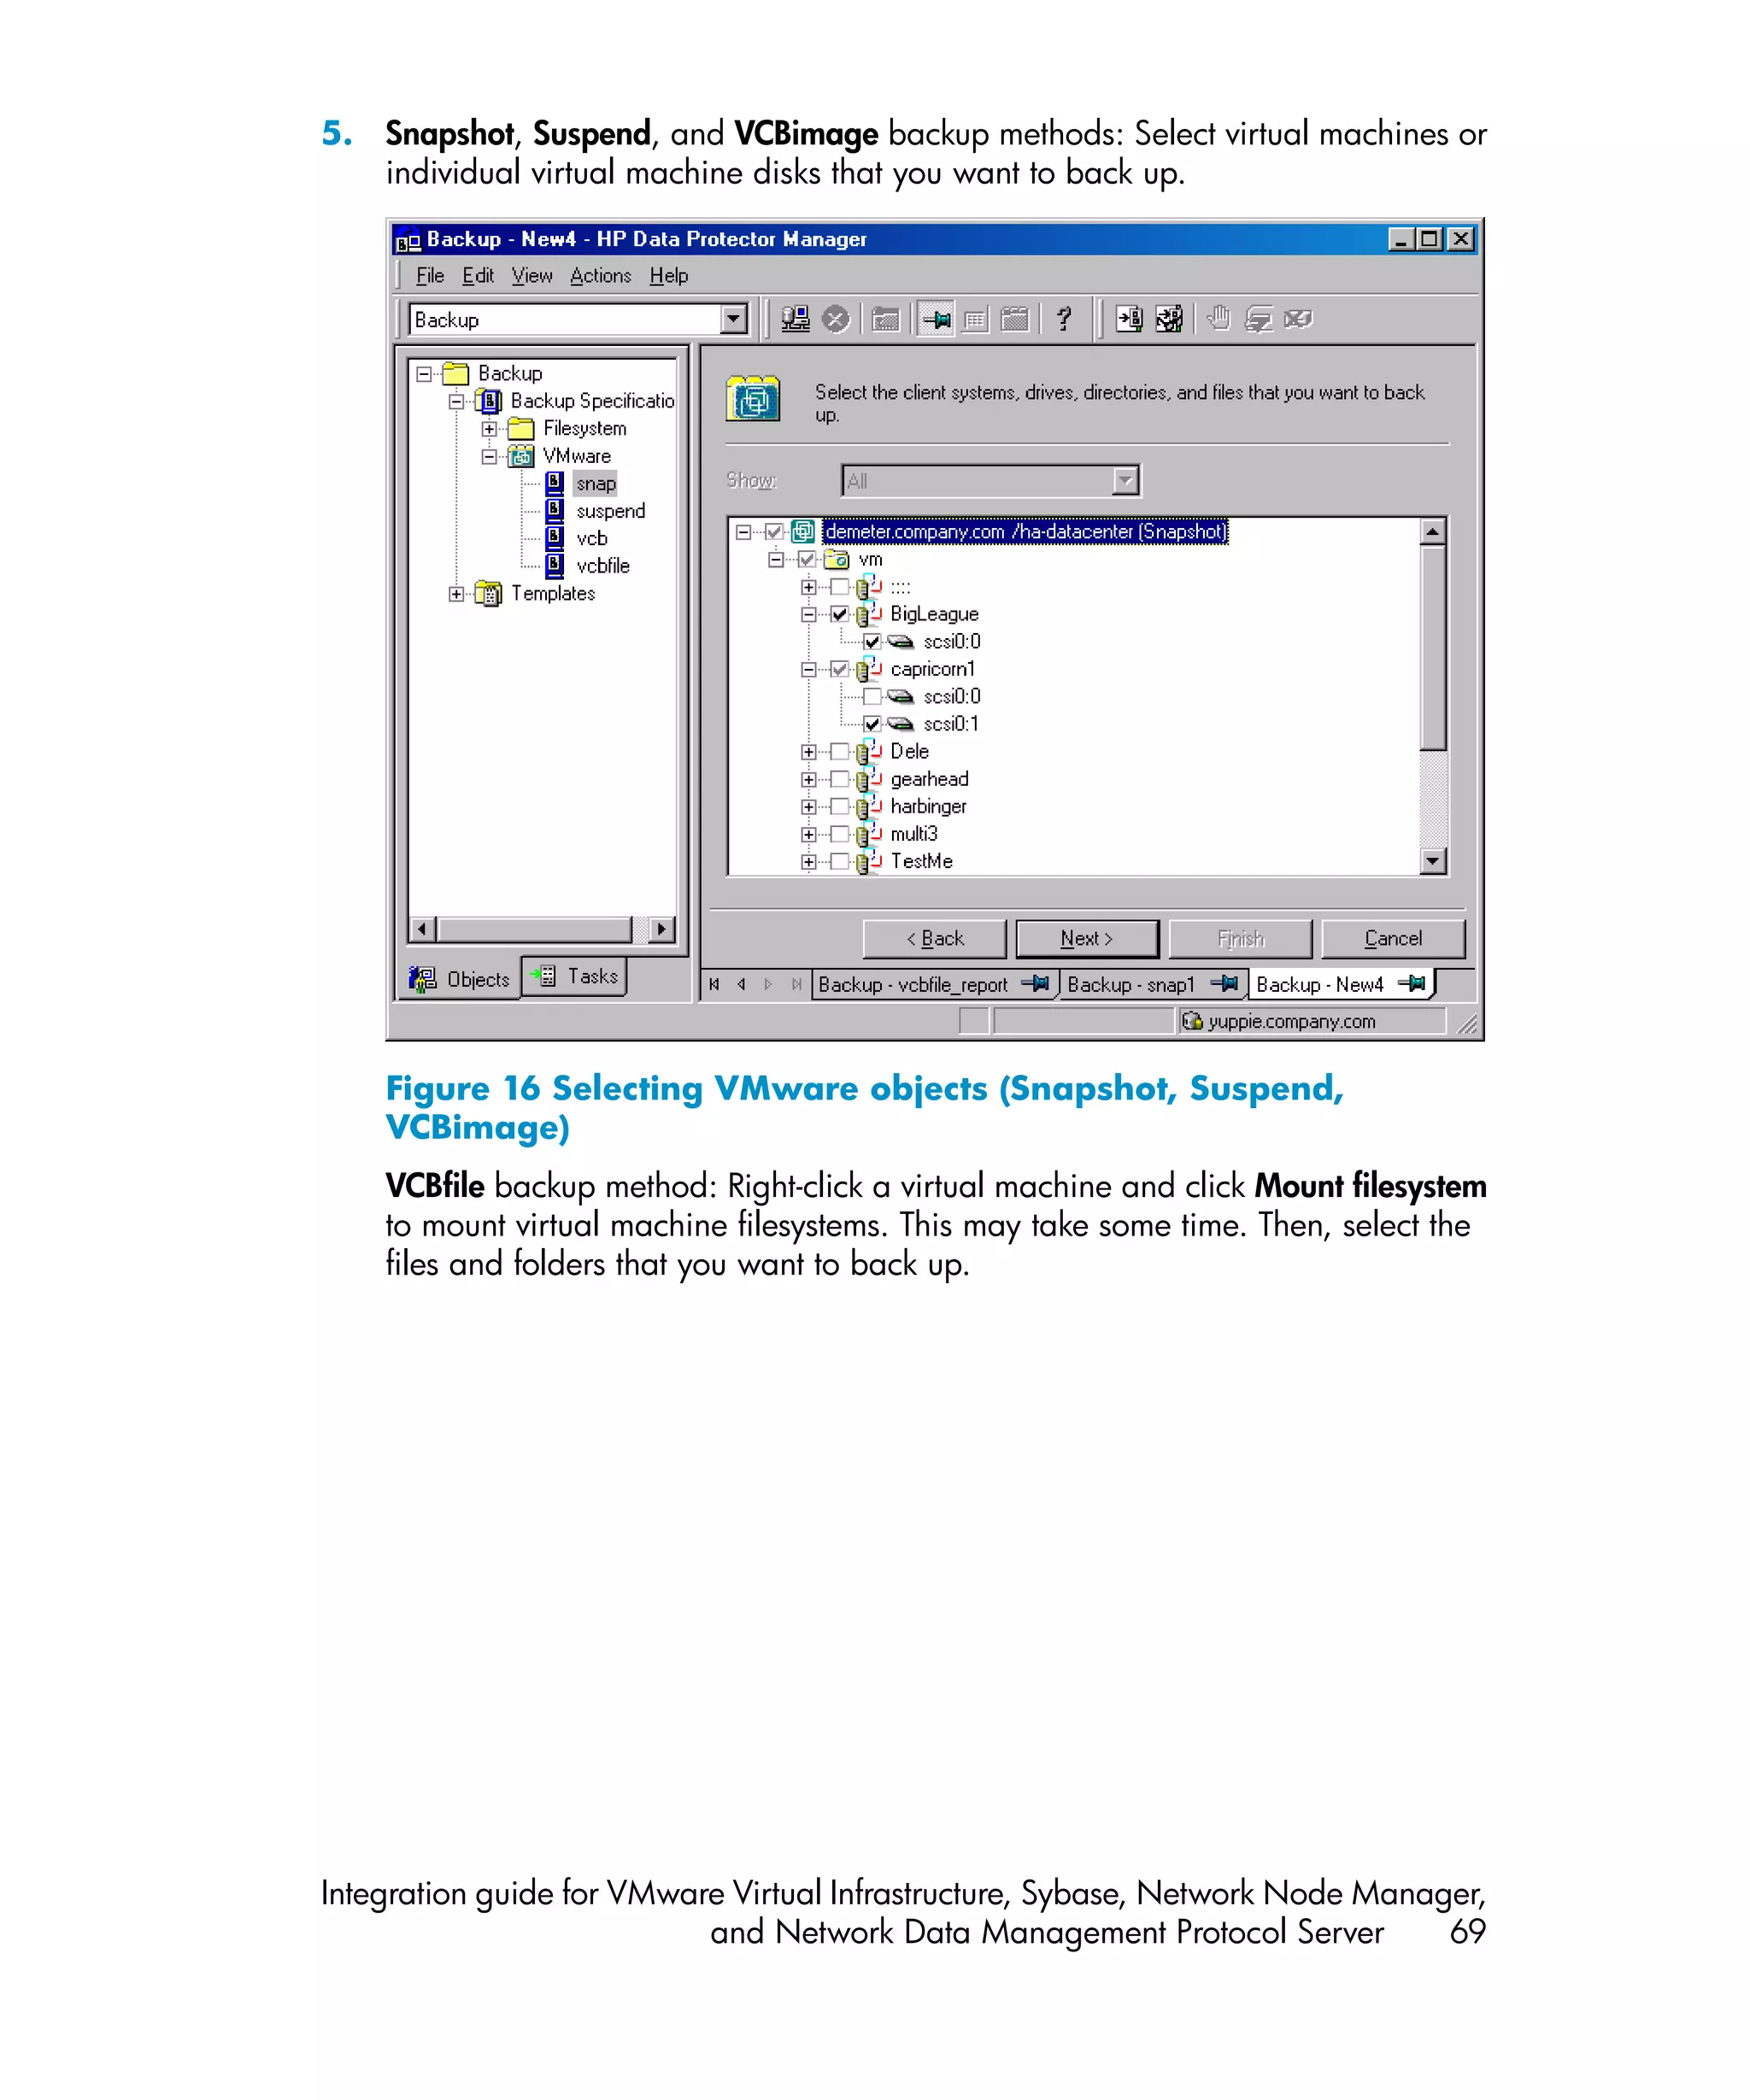
• For the VCBfile and VCBimage backup methods, specify which backup proxy
system and mount points should be used to back up virtual machines or filesystems.
• The Suspend backup method has no specifics.
You can configure each virtual machine separately or all together. Configuration
settings for virtual machines of the same datacenter are saved in a separate
configuration file on the Cell Manager. The file is named
VMwareManagementClient%DatacenterPath. It is used for all backup sessions
involving this particular datacenter.
To configure virtual machines, use the Data Protector GUI or CLI.
Using the Data Protector GUI
You can specify details on how a virtual machine backup should be performed when
you create or modify a backup specification. In the Source page of a backup
Integration guide for VMware Virtual Infrastructure, Sybase, Network Node Manager,
and Network Data Management Protocol Server 43](https://image.slidesharecdn.com/c01631241-120618223515-phpapp01/75/C01631241-43-2048.jpg)

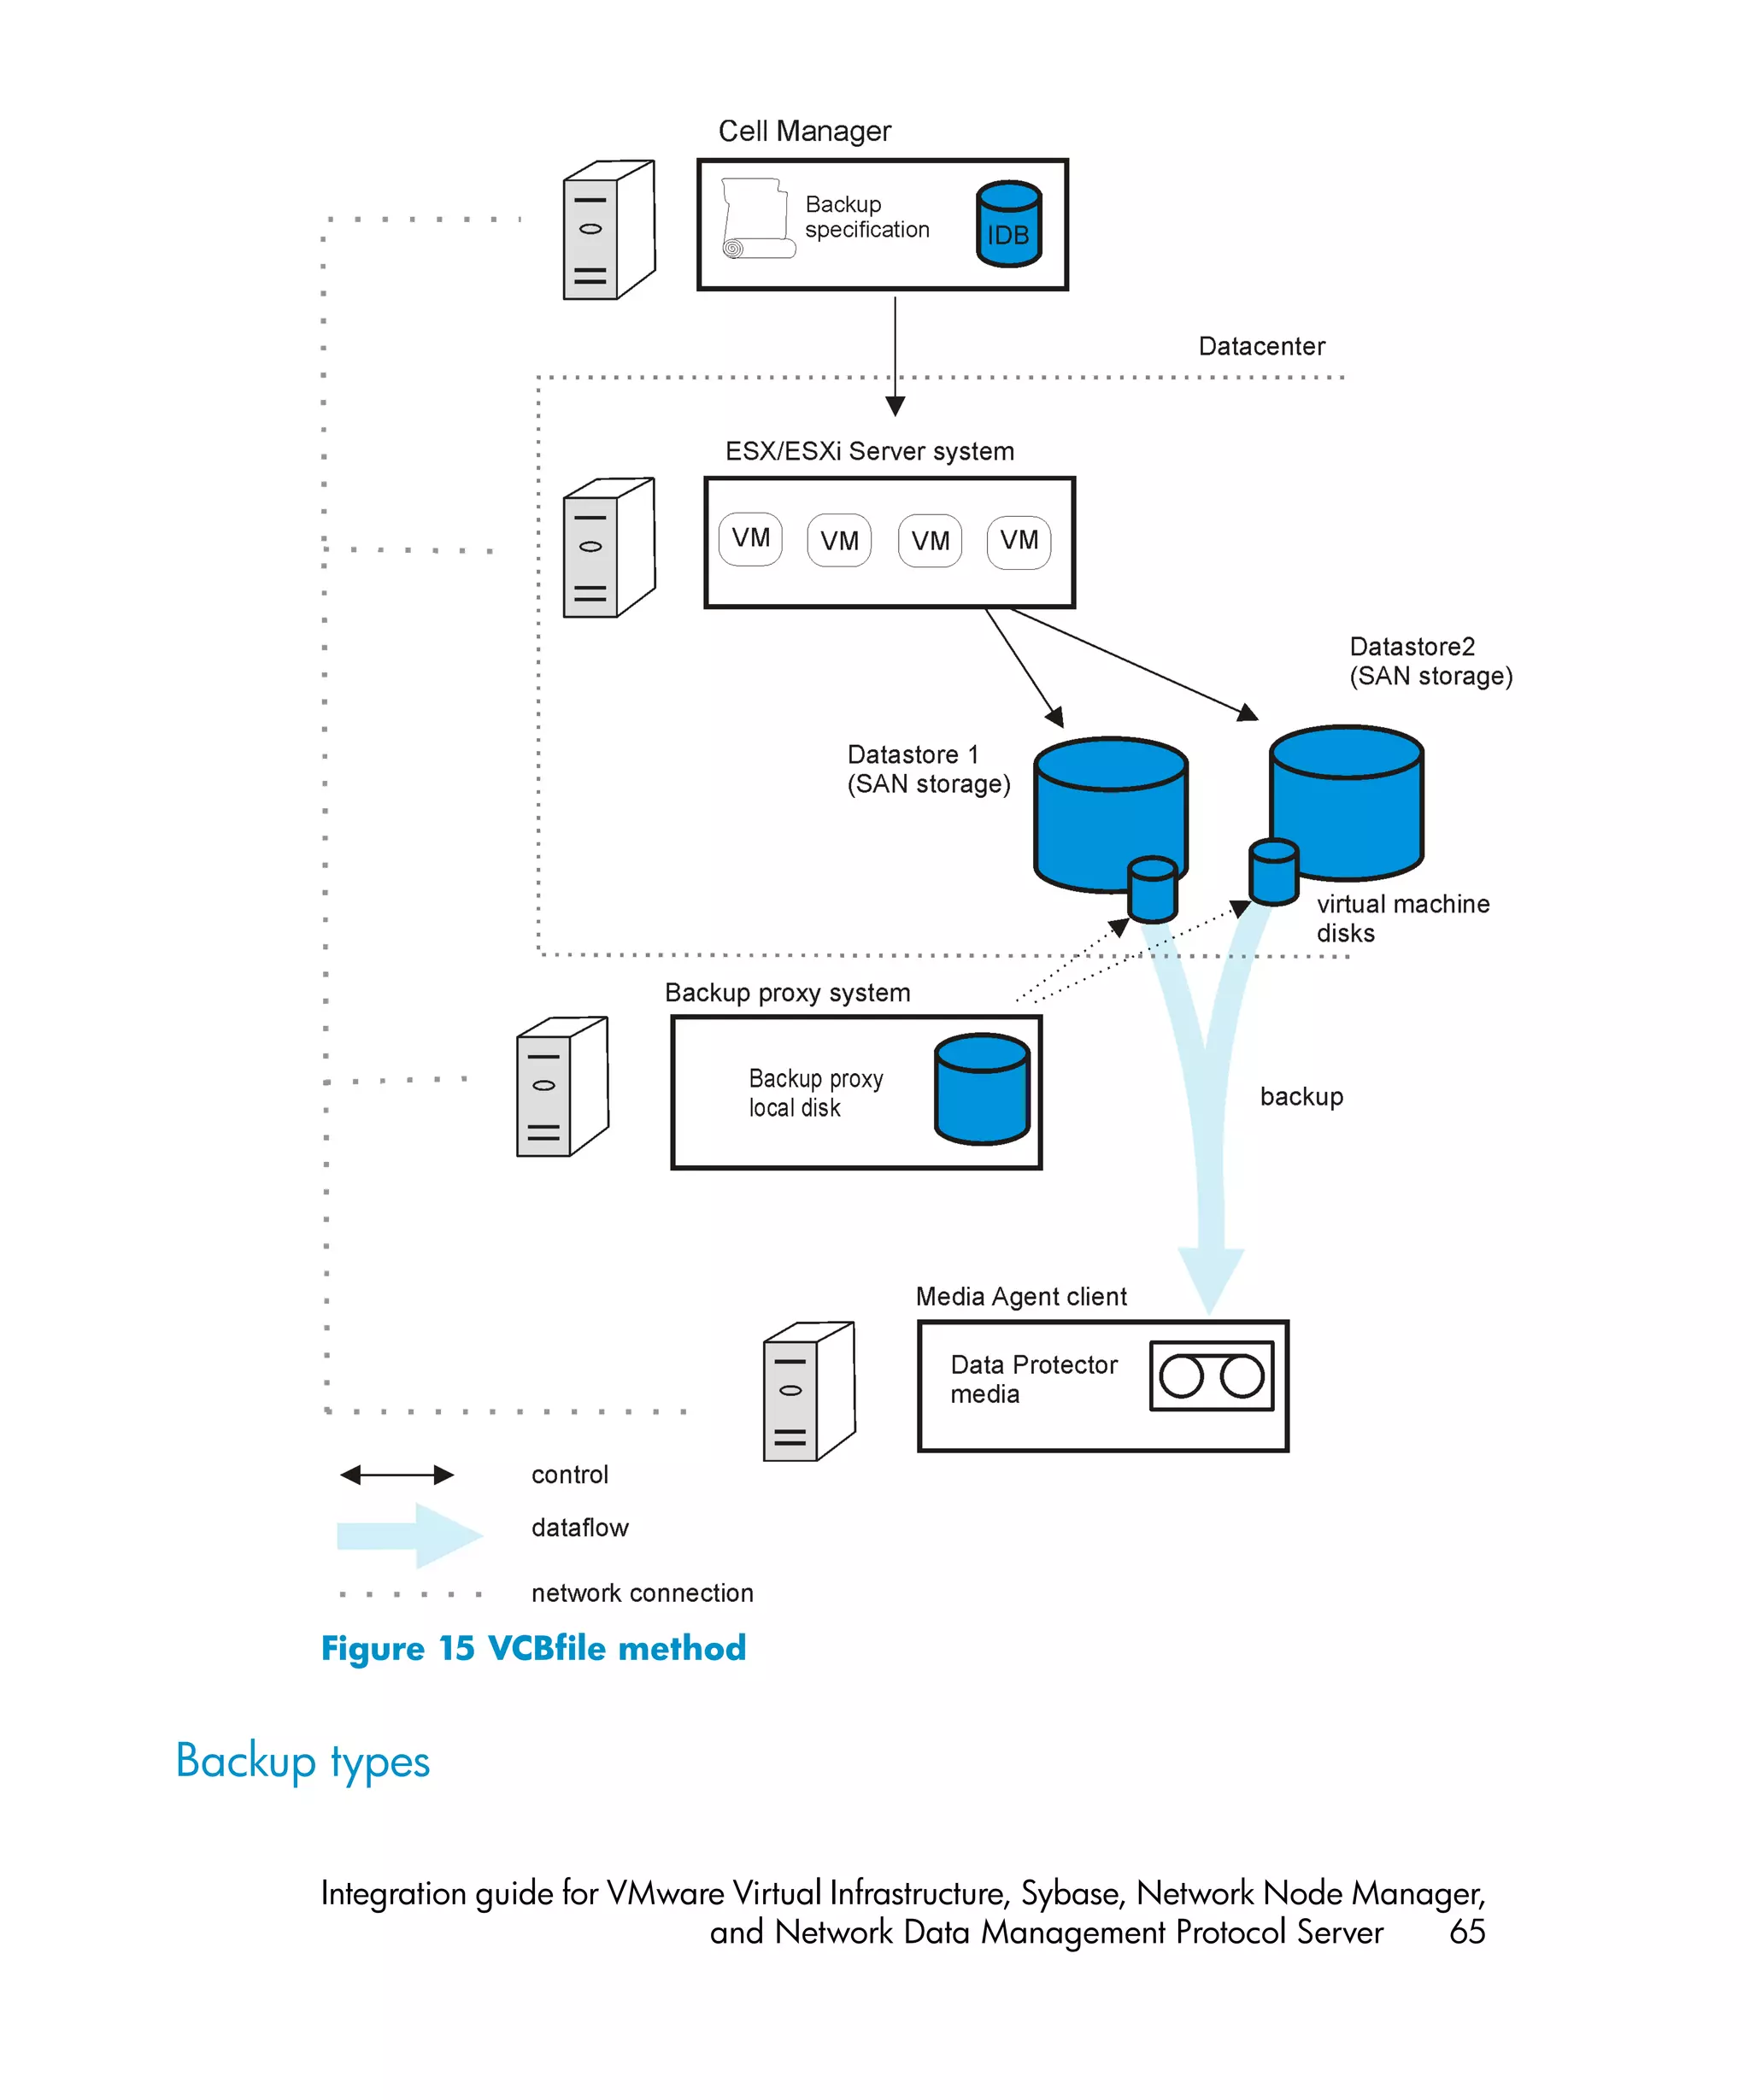
![Specify During a VCB backup session, virtual machine disks are
mountpoint mounted on a backup proxy system. Select this option to
specify a different mount point directory on the backup
proxy system. This is particularly useful for the VCBimage
backup method, during which the virtual machine disks
are copied to a local disk on the backup proxy system.
This option enables you to specify a mount point where
you have enough disk space. It also enables you to mount
virtual machines on different disks, which improves backup
performance.
Default: Data_Protector_hometmp
Using the Data Protector CLI
1. Log in to the VMware management client under a user account that is configured
as described in “Configuring VMware users” on page 38.
2. Go to the following directory:
VirtualCenter Server system: Data_Protector_homebin
Standalone ESX Server system: /opt/omni/lbin
3. Run:
util_vmware.exe
-config
—instance DatacenterPath
–vm VMpath VM_OPTIONS [–vm VMpath VM_OPTIONS...]
VM_OPTIONS
–snapshots { 0 | 1 | 2}
–proxy BackupProxy
–mount ProxyMountPoint
-default
The values { 0 | 1 | 2} represent Disabled, Single, and Mixed snapshot
handling modes respectively. For details, see the util_vmware.exe man page
or the HP Data Protector command line interface reference.
To change virtual machine specific settings back to common virtual machine
settings, run:
util_vmware.exe –config –instance DatacenterPath –vm VMpath
–default [–vm VMpath –default ...]
The message *RETVAL*0 indicates successful configuration.
46 Integrating VMware Virtual Infrastructure and Data Protector](https://image.slidesharecdn.com/c01631241-120618223515-phpapp01/75/C01631241-46-2048.jpg)
![2. Go to the following directory:
VirtualCenter Server system: Data_Protector_homebin
Standalone ESX Server system: /opt/omni/lbin
3. Run:
util_vmware.exe –chkconf [–instance DatacenterPath]
For option description, see the util_vmware.exe man page or the HP Data
Protector command line interface reference.
Backup
Using the Data Protector VMware integration, you can back up the following VMware
objects:
• Virtual machines
• Filesystems of virtual machines
What is backed up?
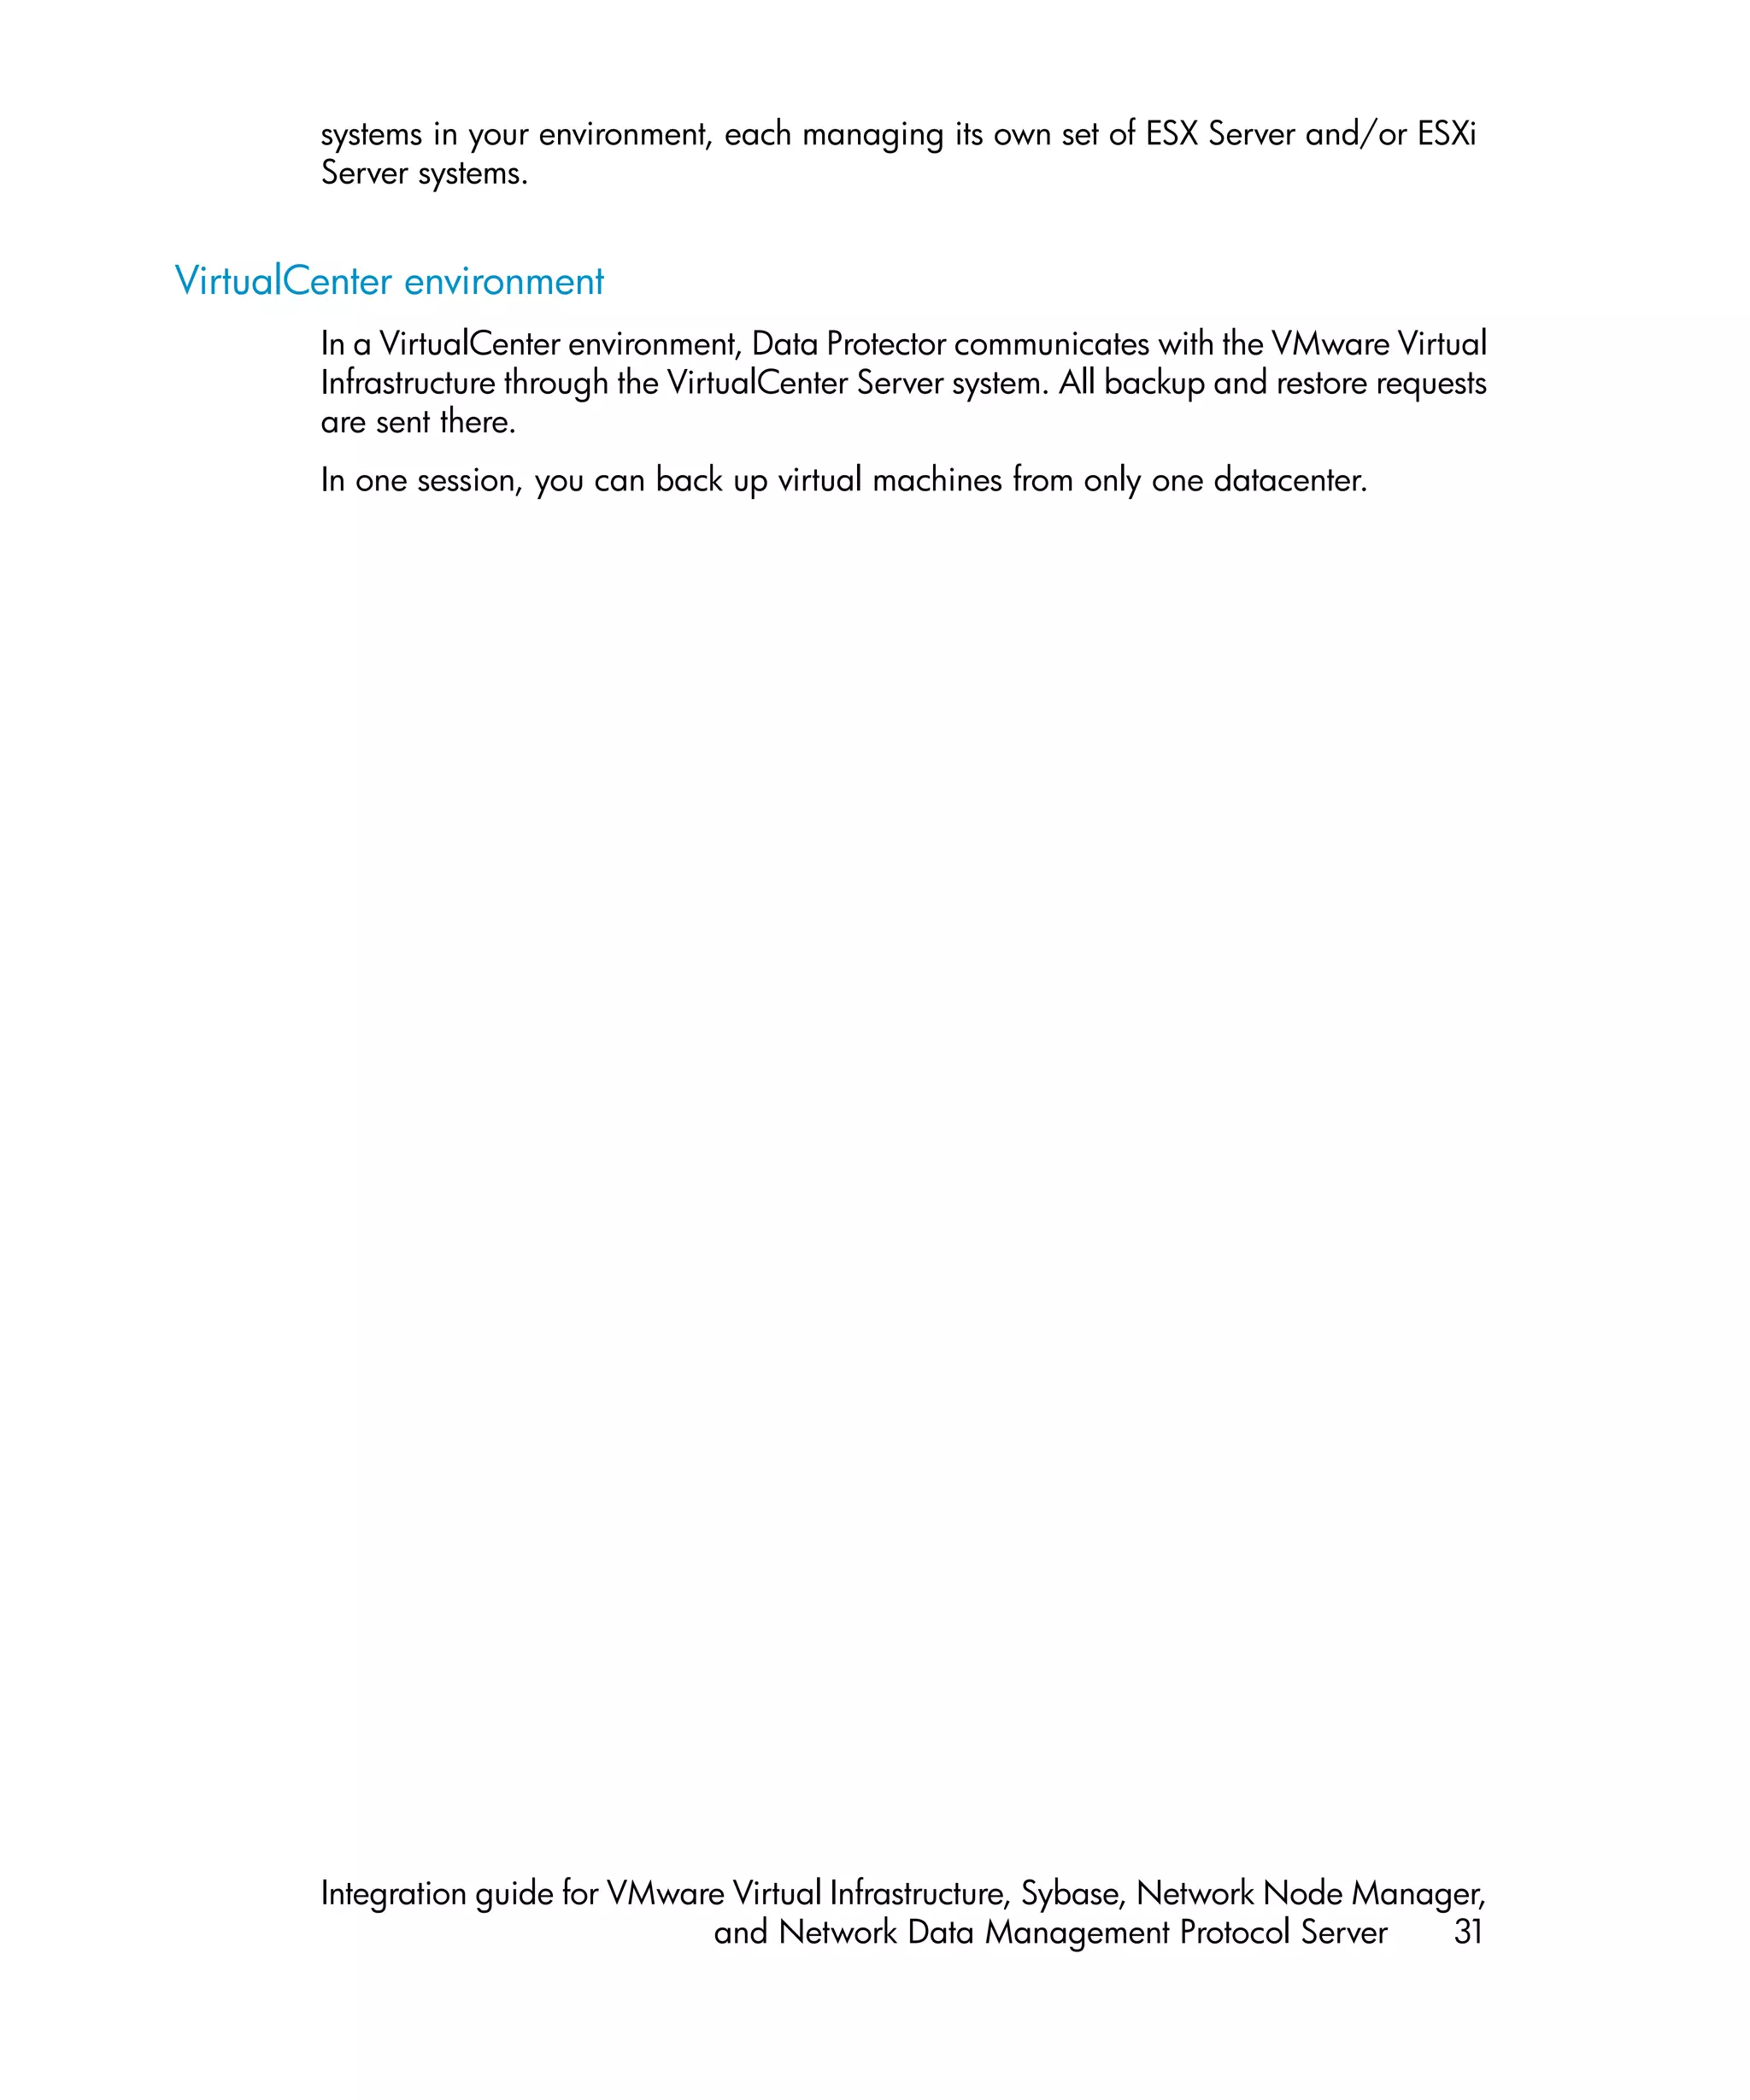
Data Protector identifies datacenters and virtual machines by their Virtual Infrastructure
inventory path. A standalone ESX Server system has only one datacenter
/ha-datacenter and only one folder /vm, which stores all the virtual machines.
Example:
Datacenter: /ha-datacenter
Virtual machine: /vm/myvm1
In a VirtualCenter environment, you can organize virtual machines and datacenters
within folders that you create yourself. However, once you move a datacenter or a
virtual machine to another folder, you need to create a new backup specification
because Data Protector no longer finds the datacenter or virtual machine under the
specified path.
Example:
Virtual machine: /vm/myfolder1/myfolder2/.../myvm2
Datacenter: /myfolder/mydatacenter
Depending on the backup method that you select, you can back up either a virtual
machine or a filesystem of a virtual machine.
48 Integrating VMware Virtual Infrastructure and Data Protector](https://image.slidesharecdn.com/c01631241-120618223515-phpapp01/75/C01631241-48-2048.jpg)

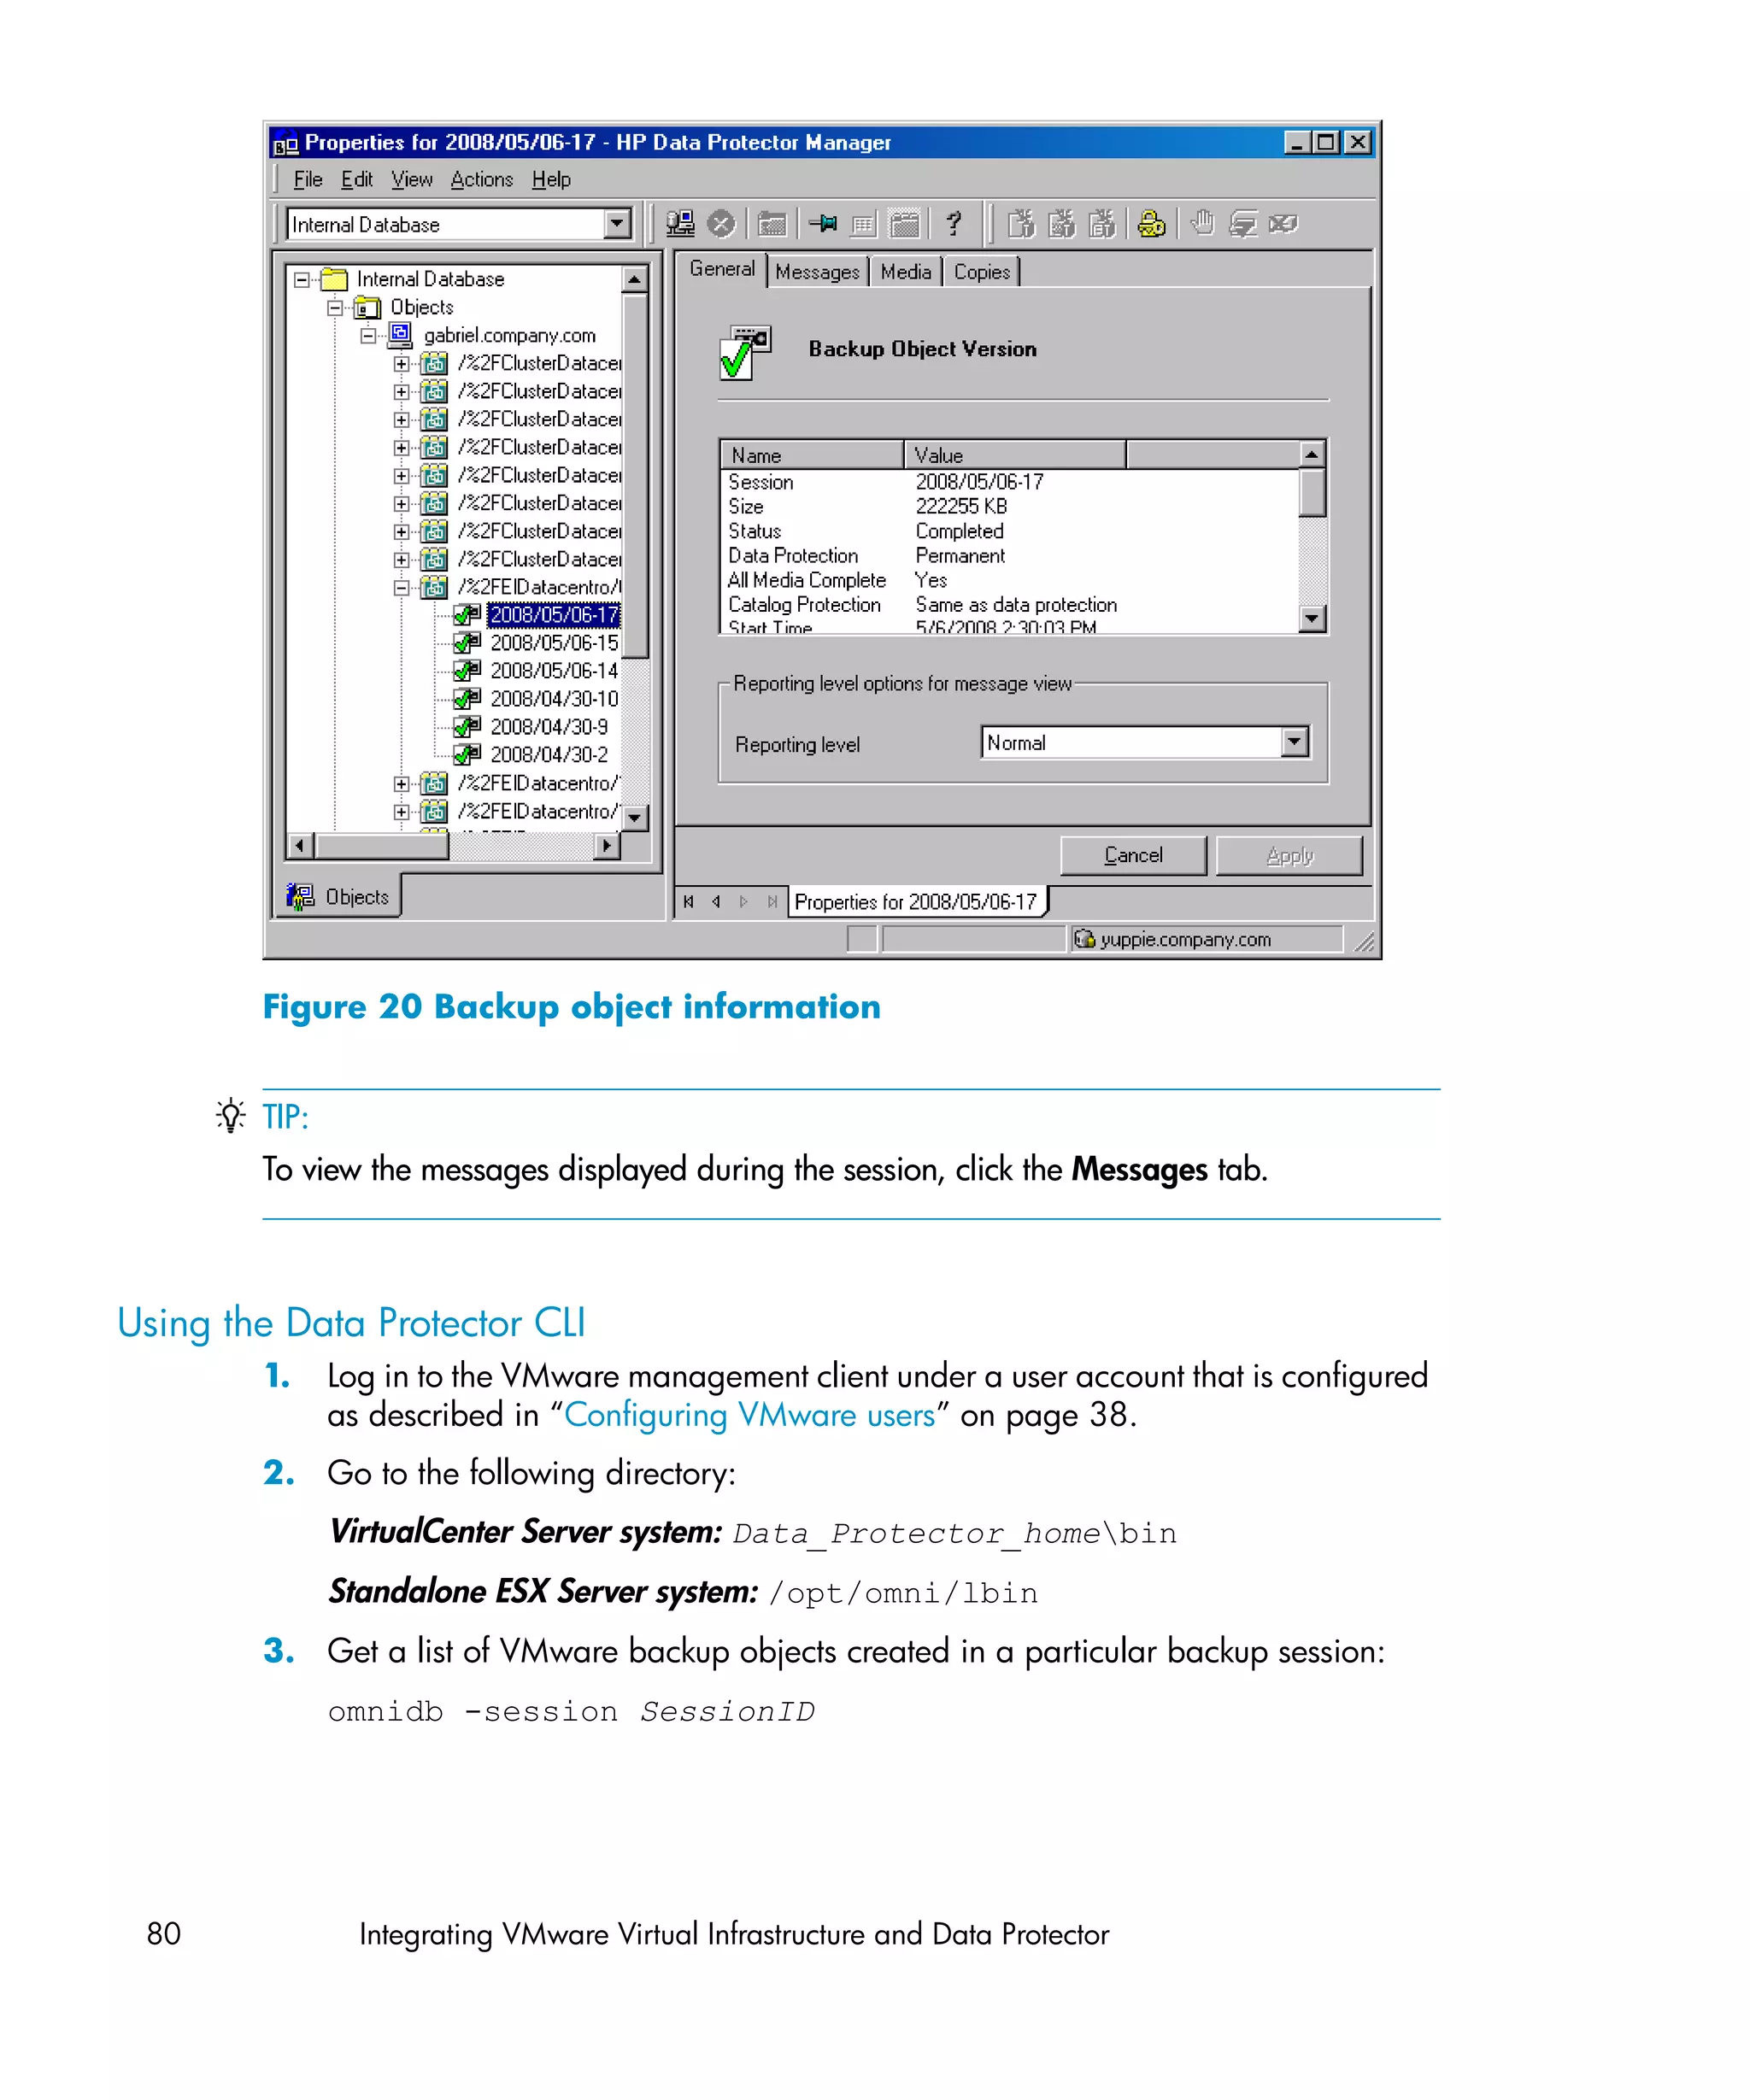
![The message Session completed successfully is displayed at the end of a
successful backup session.
Using the Data Protector CLI
1. Log in to the VMware management client under a user account that is configured
as described in “Configuring VMware users” on page 38.
2. Go to the following directory:
VirtualCenter Server system: Data_Protector_homebin
Standalone ESX Server system: /opt/omni/lbin
3. Run:
omnib -vmware_list BackupSpecificationName [-barmode
VMwareMode][ListOptions]
where VMwareMode is one of the following backup types:
full|incr|diff
The default is full.
For ListOptions, see the omnib man page or the HP Data Protector command
line interface reference.
Examples
To start a full backup using the backup specification snapshot2, run:
omnib -vmware_list snapshot2 -barmode full
To start a differential backup using the same backup specification, run:
omnib -vmware_list snapshot2 -barmode diff
Integration guide for VMware Virtual Infrastructure, Sybase, Network Node Manager,
and Network Data Management Protocol Server 75](https://image.slidesharecdn.com/c01631241-120618223515-phpapp01/75/C01631241-75-2048.jpg)
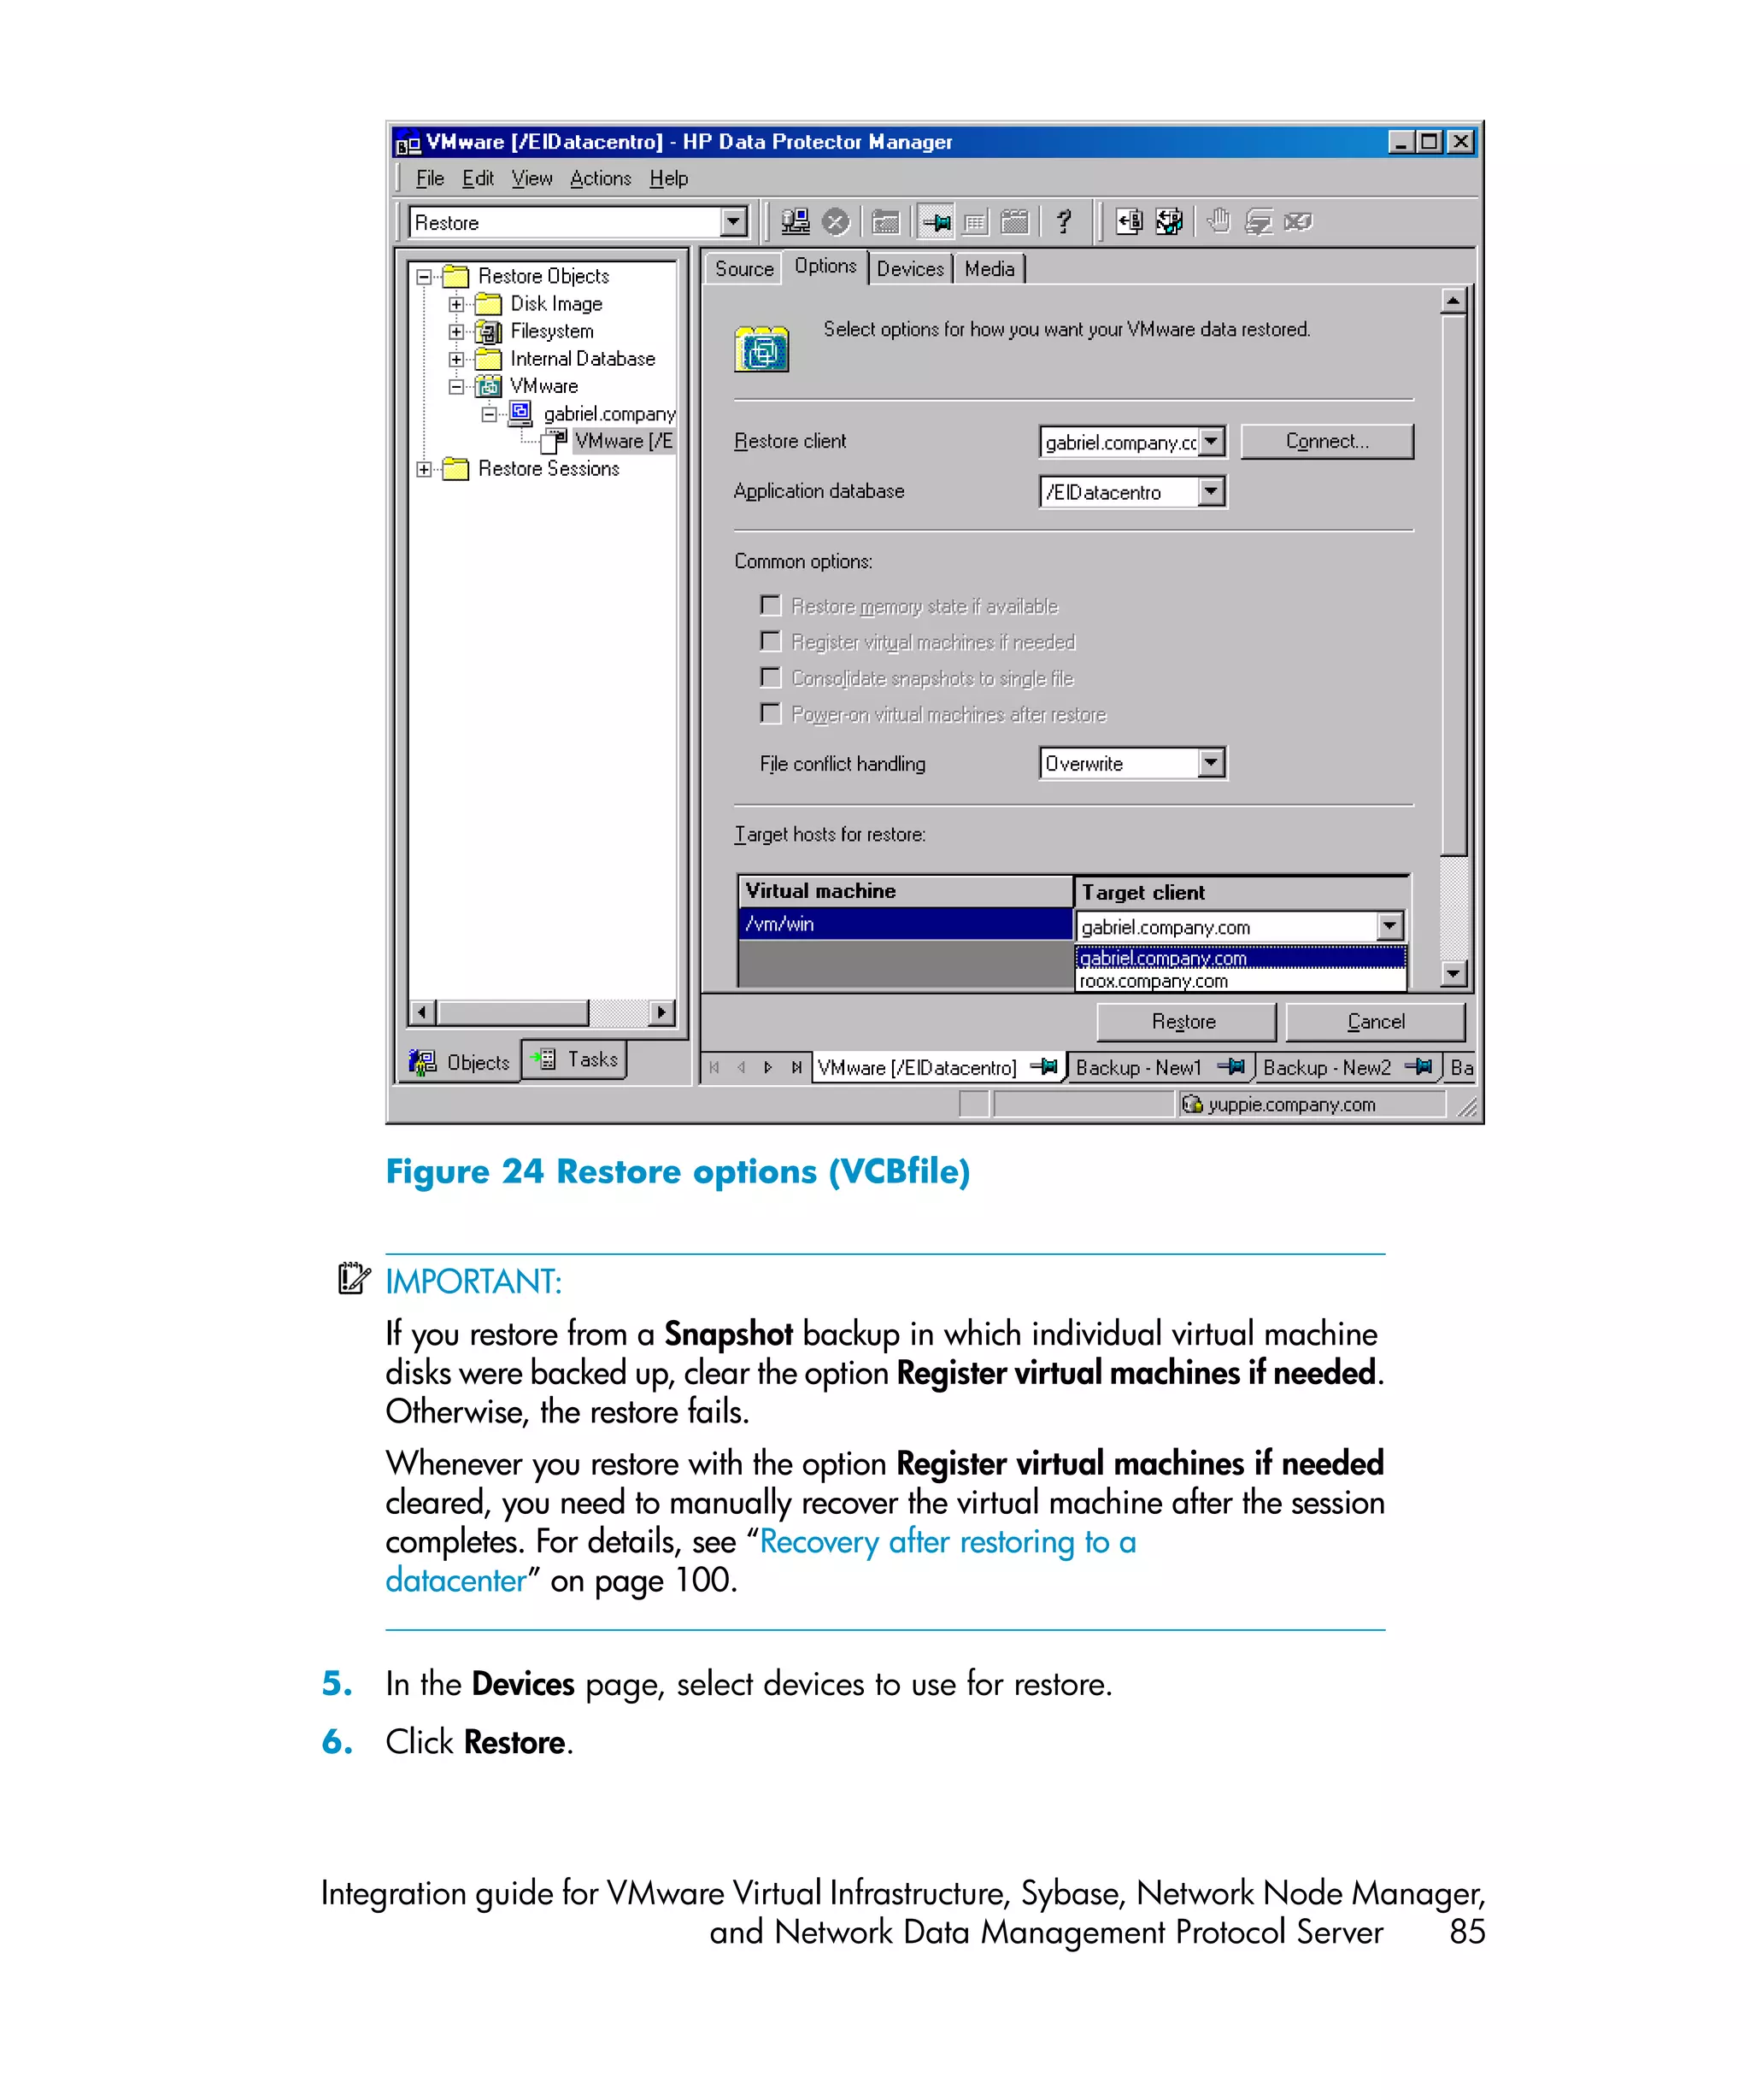
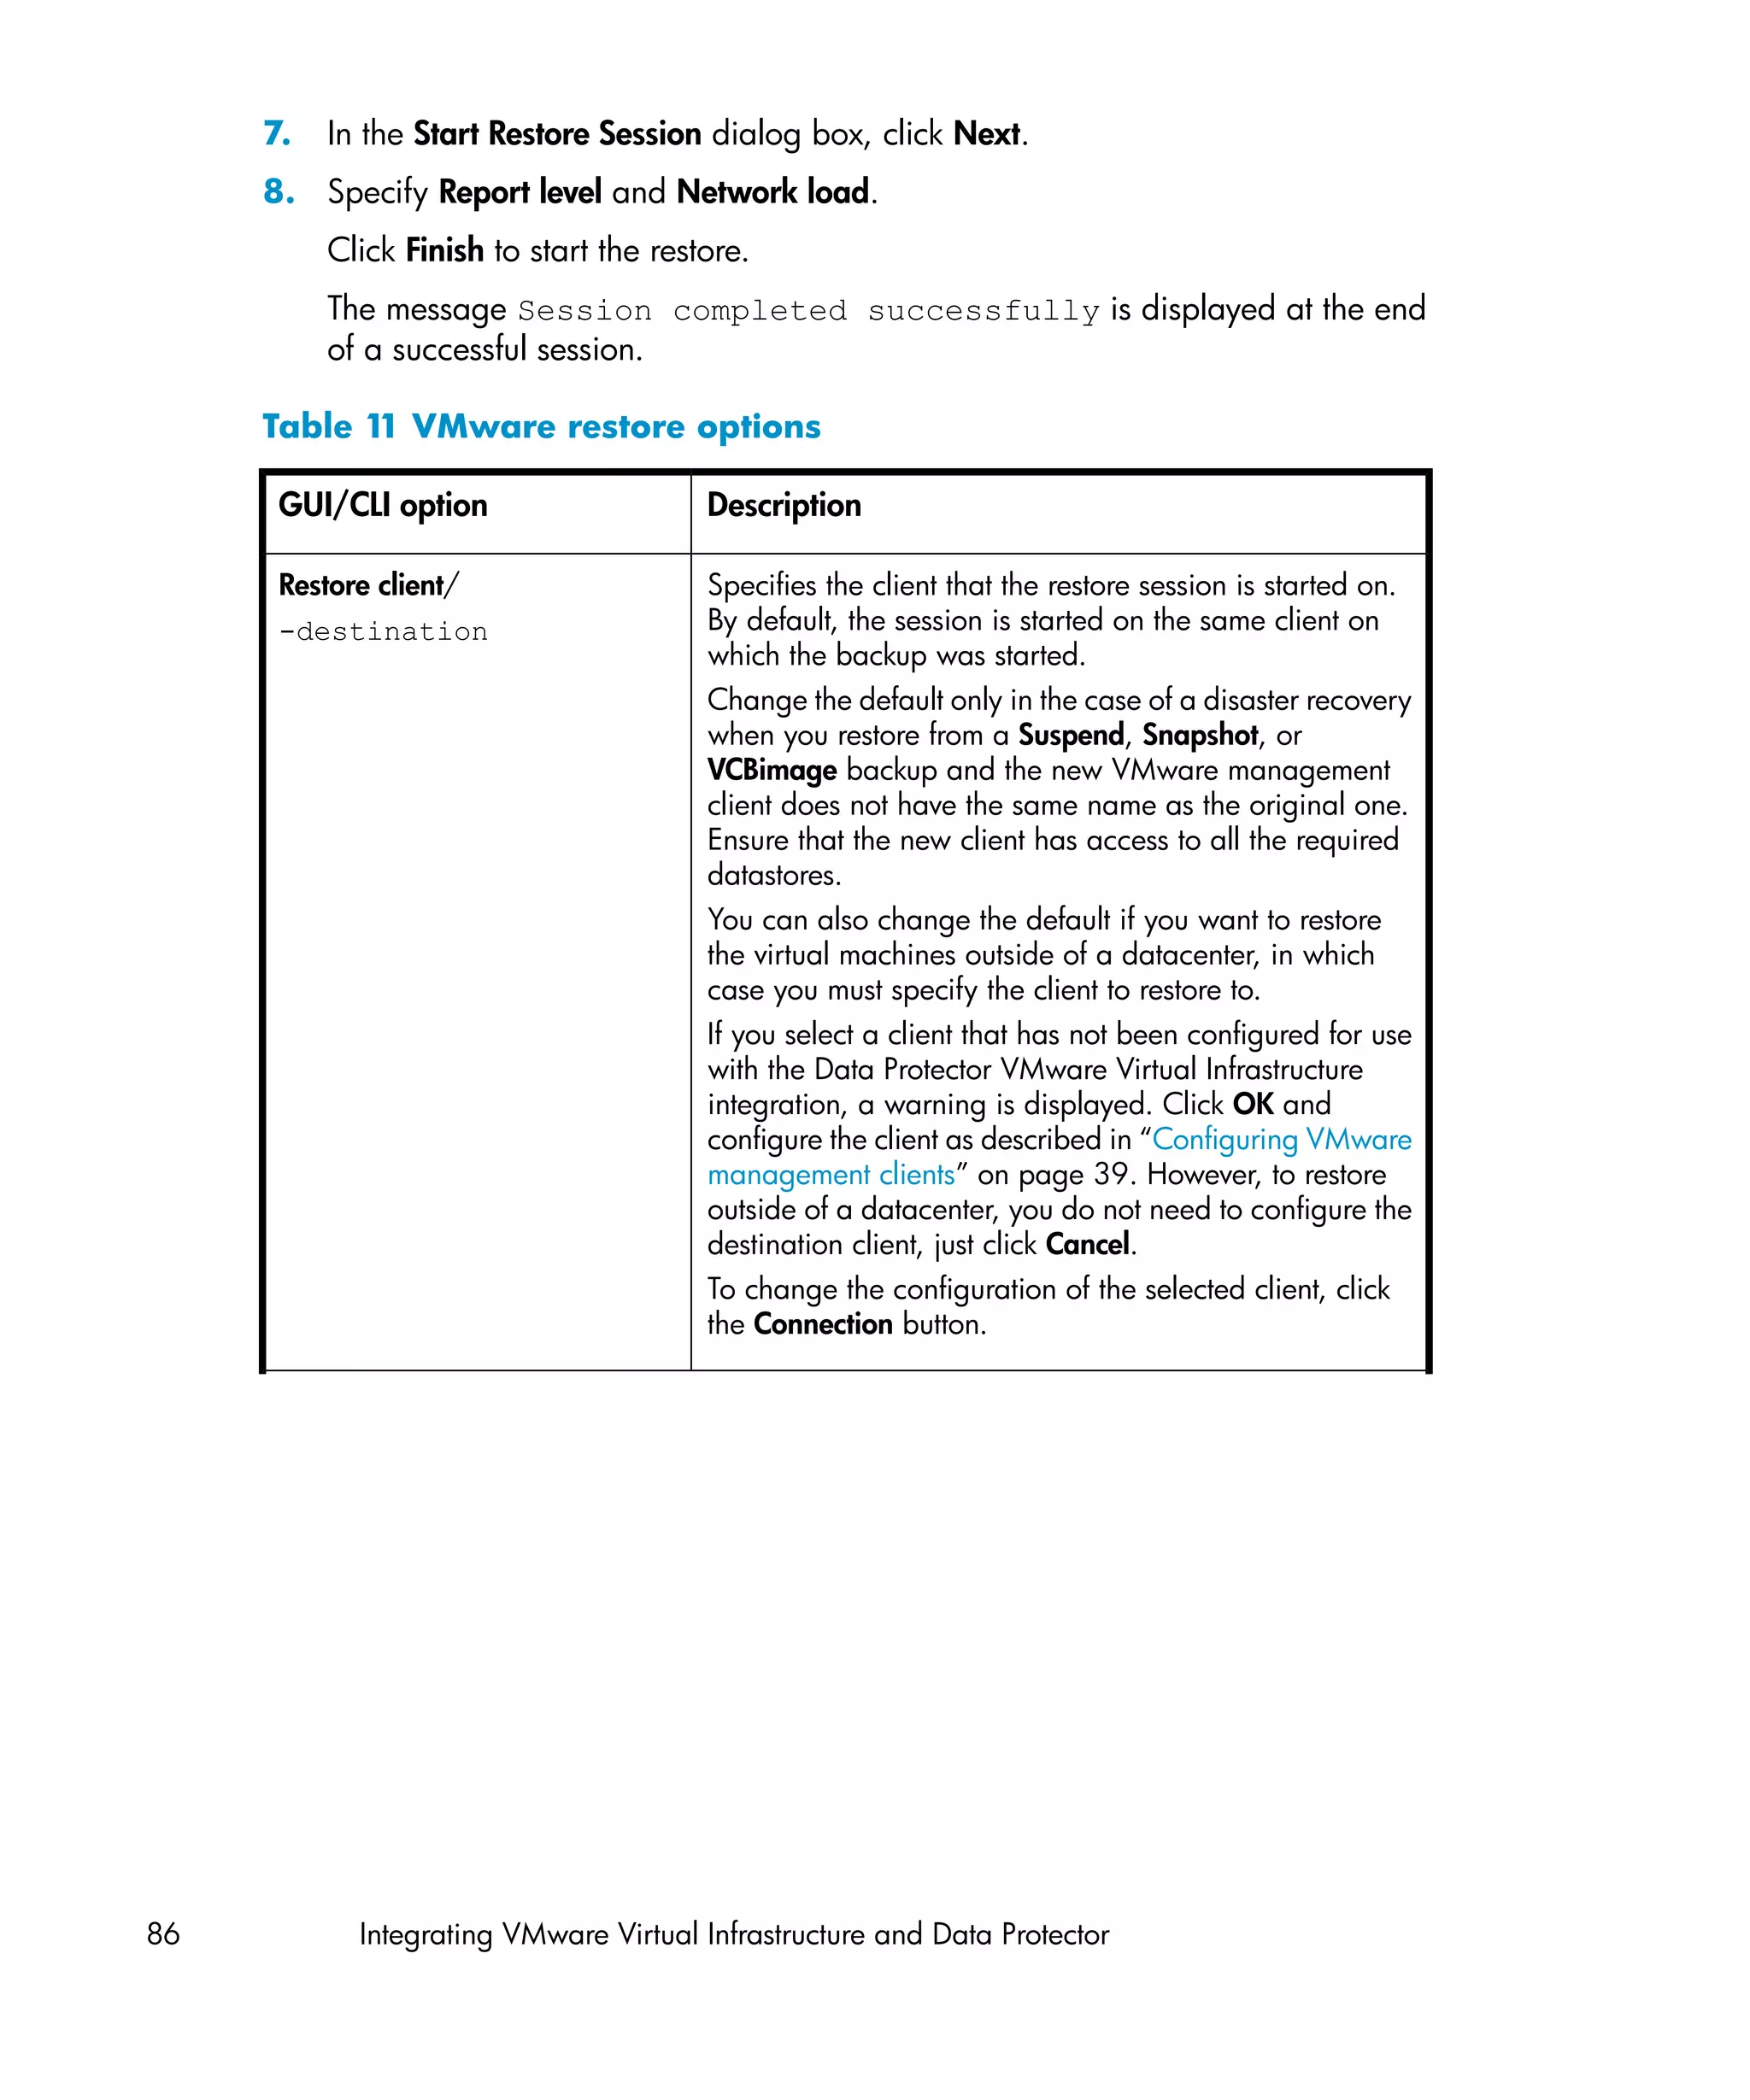

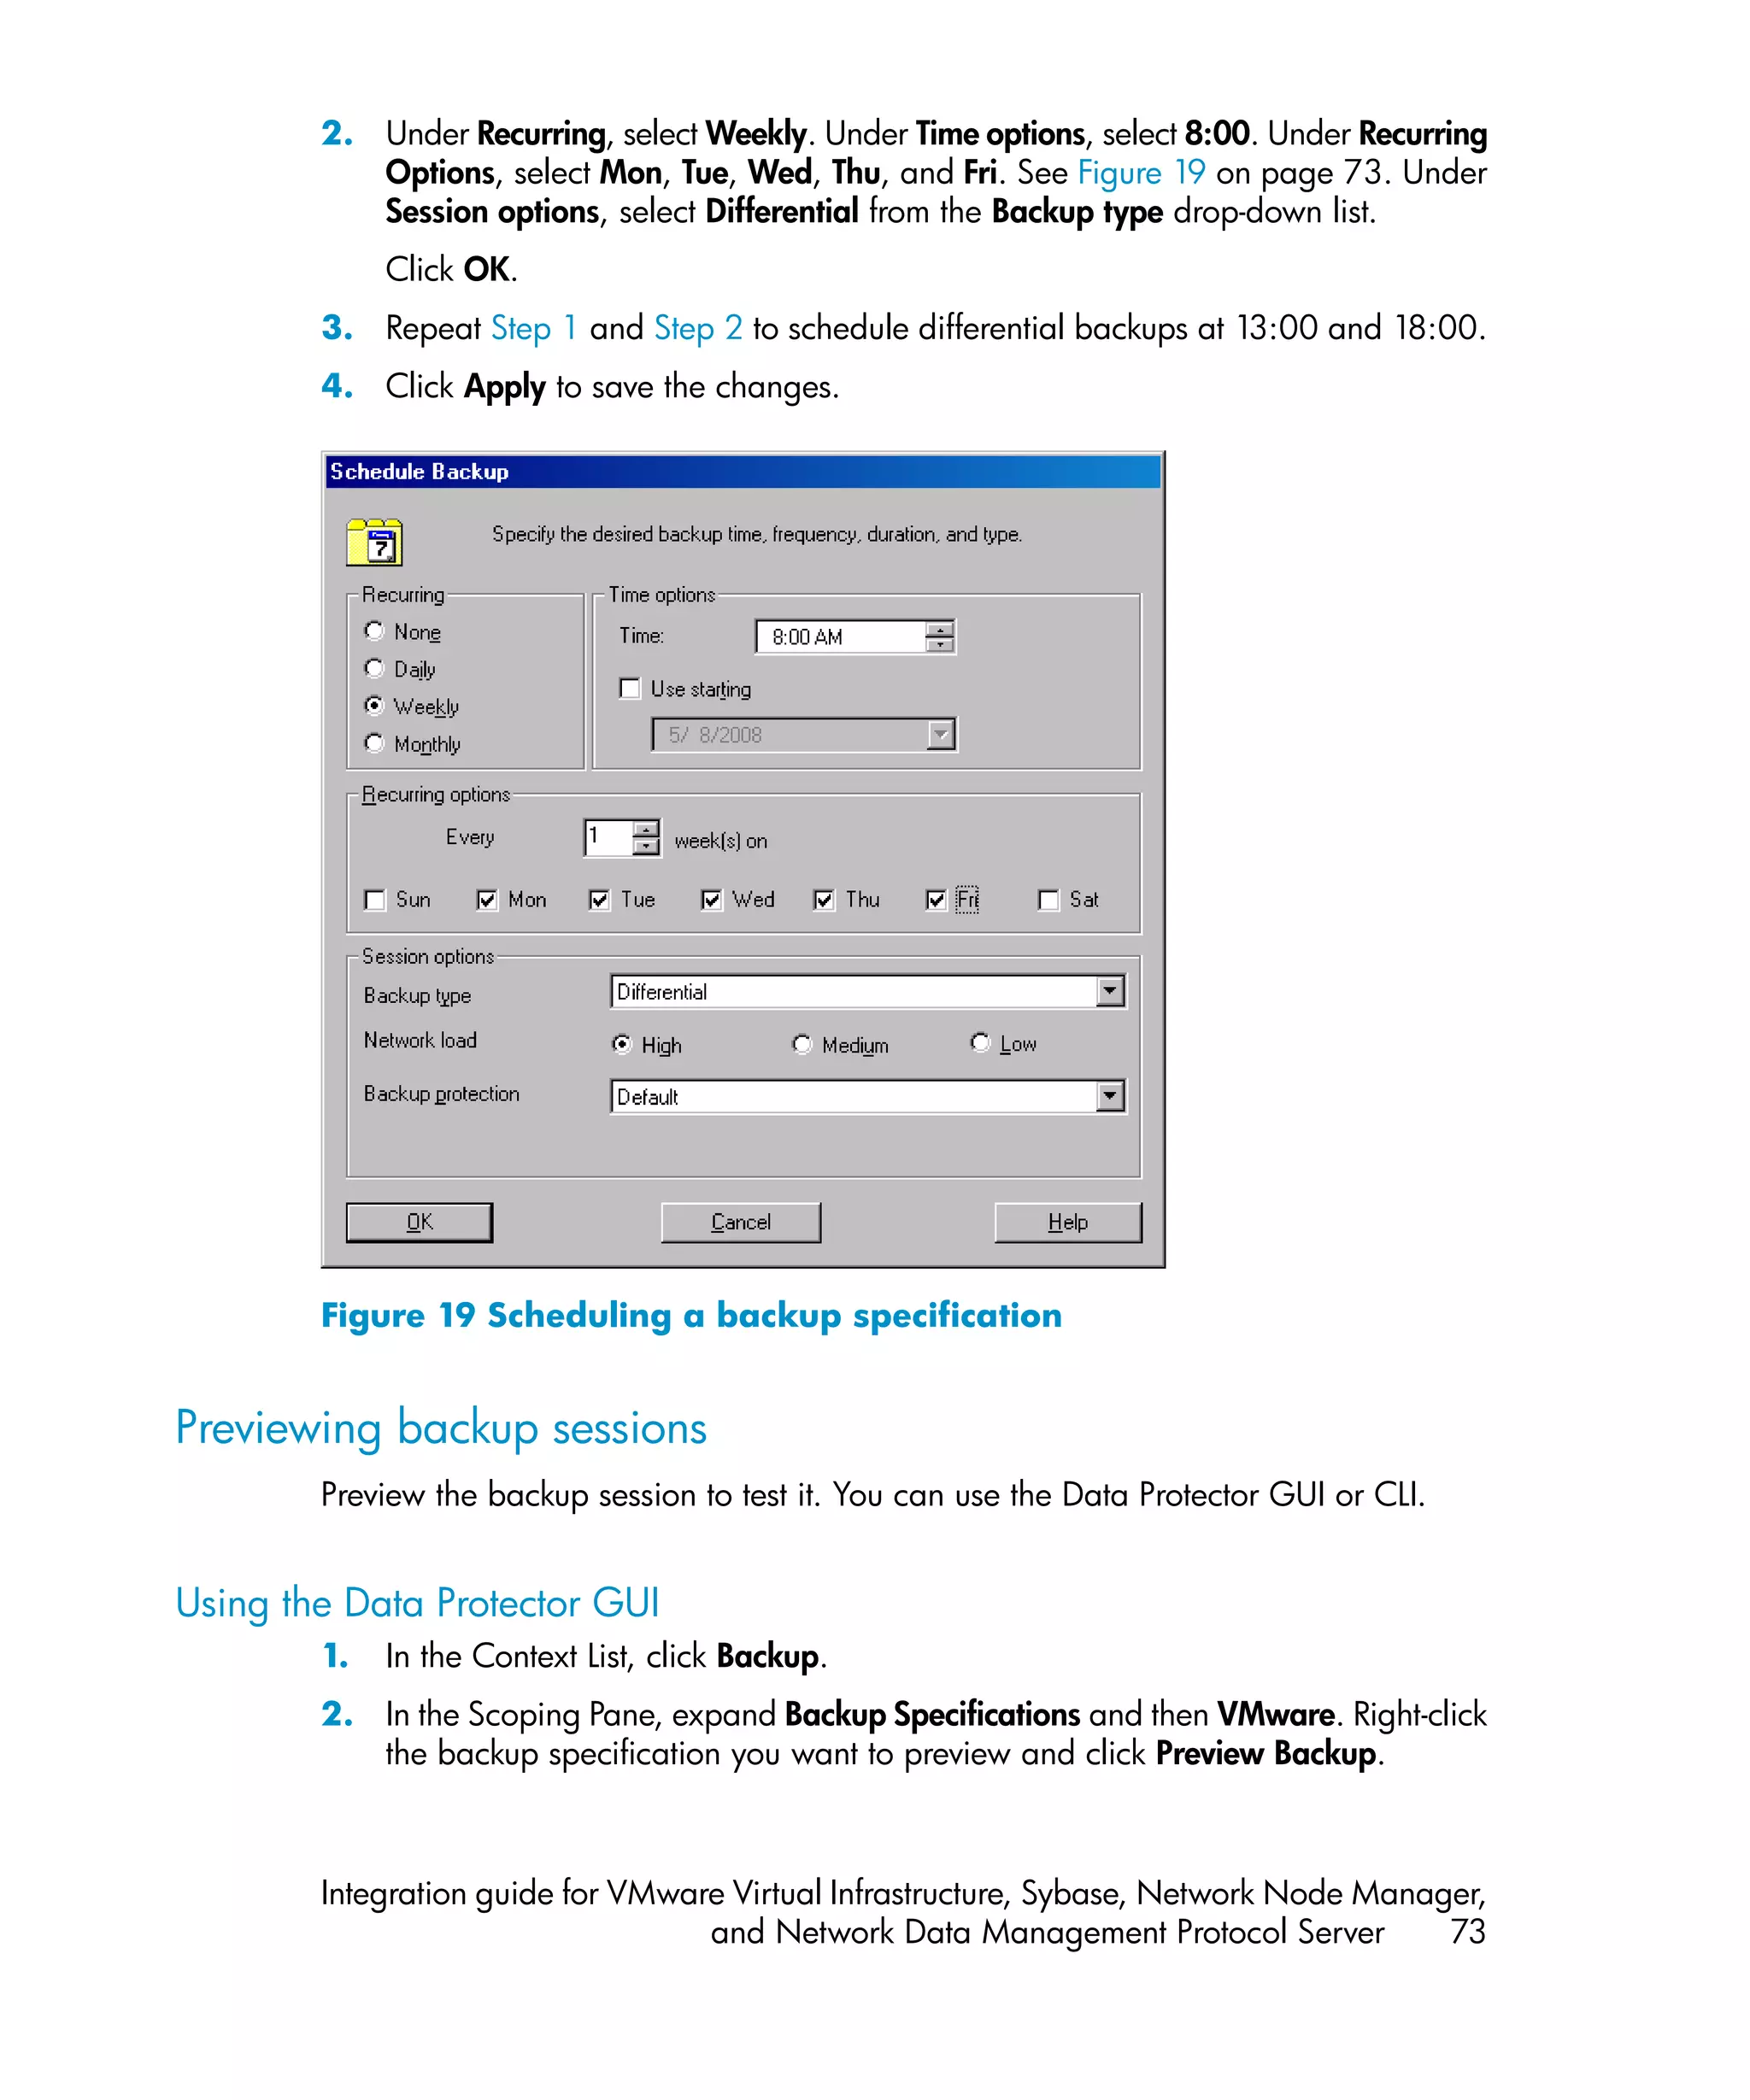
![GUI/CLI option Description
Power-on virtual machines after This option is applicable only if Register virtual machines
restore/ if needed is selected. Select this option to put the
-poweron newly-restored virtual machines online when the session
completes.
This option is not available if None (restore files to client)
is selected in Application database or if you restore from
a VCBfile backup.
Default: OFF
File conflict Specifies Data Protector's behavior if virtual machines or files to be
handling/ restored already exist in the destination. The file handling options
-overwrite have different meanings, depending on whether you restore from a
[older] Snaphot, Suspend, VCBimage, or VCBfile backup.
Note that if you restore from a Snapshot, Suspend, or VCBimage
backup and at the same time you select None (restore files to client)
in Application database, the same description applies as if you
restored from a VCBfile backup.
Overwrite Snapshot, Suspend, VCBimage: Data Protector unregisters
(default) such virtual machines, deletes their files, and then restores
them from the backup.
VCBfile: Data Protector overwrites such files with those
from the backup.
Keep Snapshot, Suspend, VCBimage: Data Protector leaves
latest such virtual machines intact. They are not restored from
the backup.
VCBfile: Data Protector leaves such files intact only if they
are more recent than those from the backup. Otherwise,
such files are overwritten with those from the backup.
Skip Snapshot, Suspend, VCBimage: Data Protector leaves
such virtual machines intact. They are not restored from
the backup.
VCBfile: Data Protector leaves such files intact. They are
not restored from the backup.
88 Integrating VMware Virtual Infrastructure and Data Protector](https://image.slidesharecdn.com/c01631241-120618223515-phpapp01/75/C01631241-88-2048.jpg)
![3. Run:
Restore of virtual machines:
omnir -vmware
-barhost OriginalVMwareManagementClient
–instance OriginalDatacenter
–method {Snapshot | Suspend | VCBimage}
[-session SessionID]
VirtualMachines [-disk Disk [-disk Disk...]]
[VirtualMachines [-disk Disk [-disk Disk...]]...]
[–destination RestoreClient]
[–newinstance TargetDatacenter]
[-consolidate]
[-memory]
[–register]
[–poweron]
[–overwrite [older]]
Restore of filesystems:
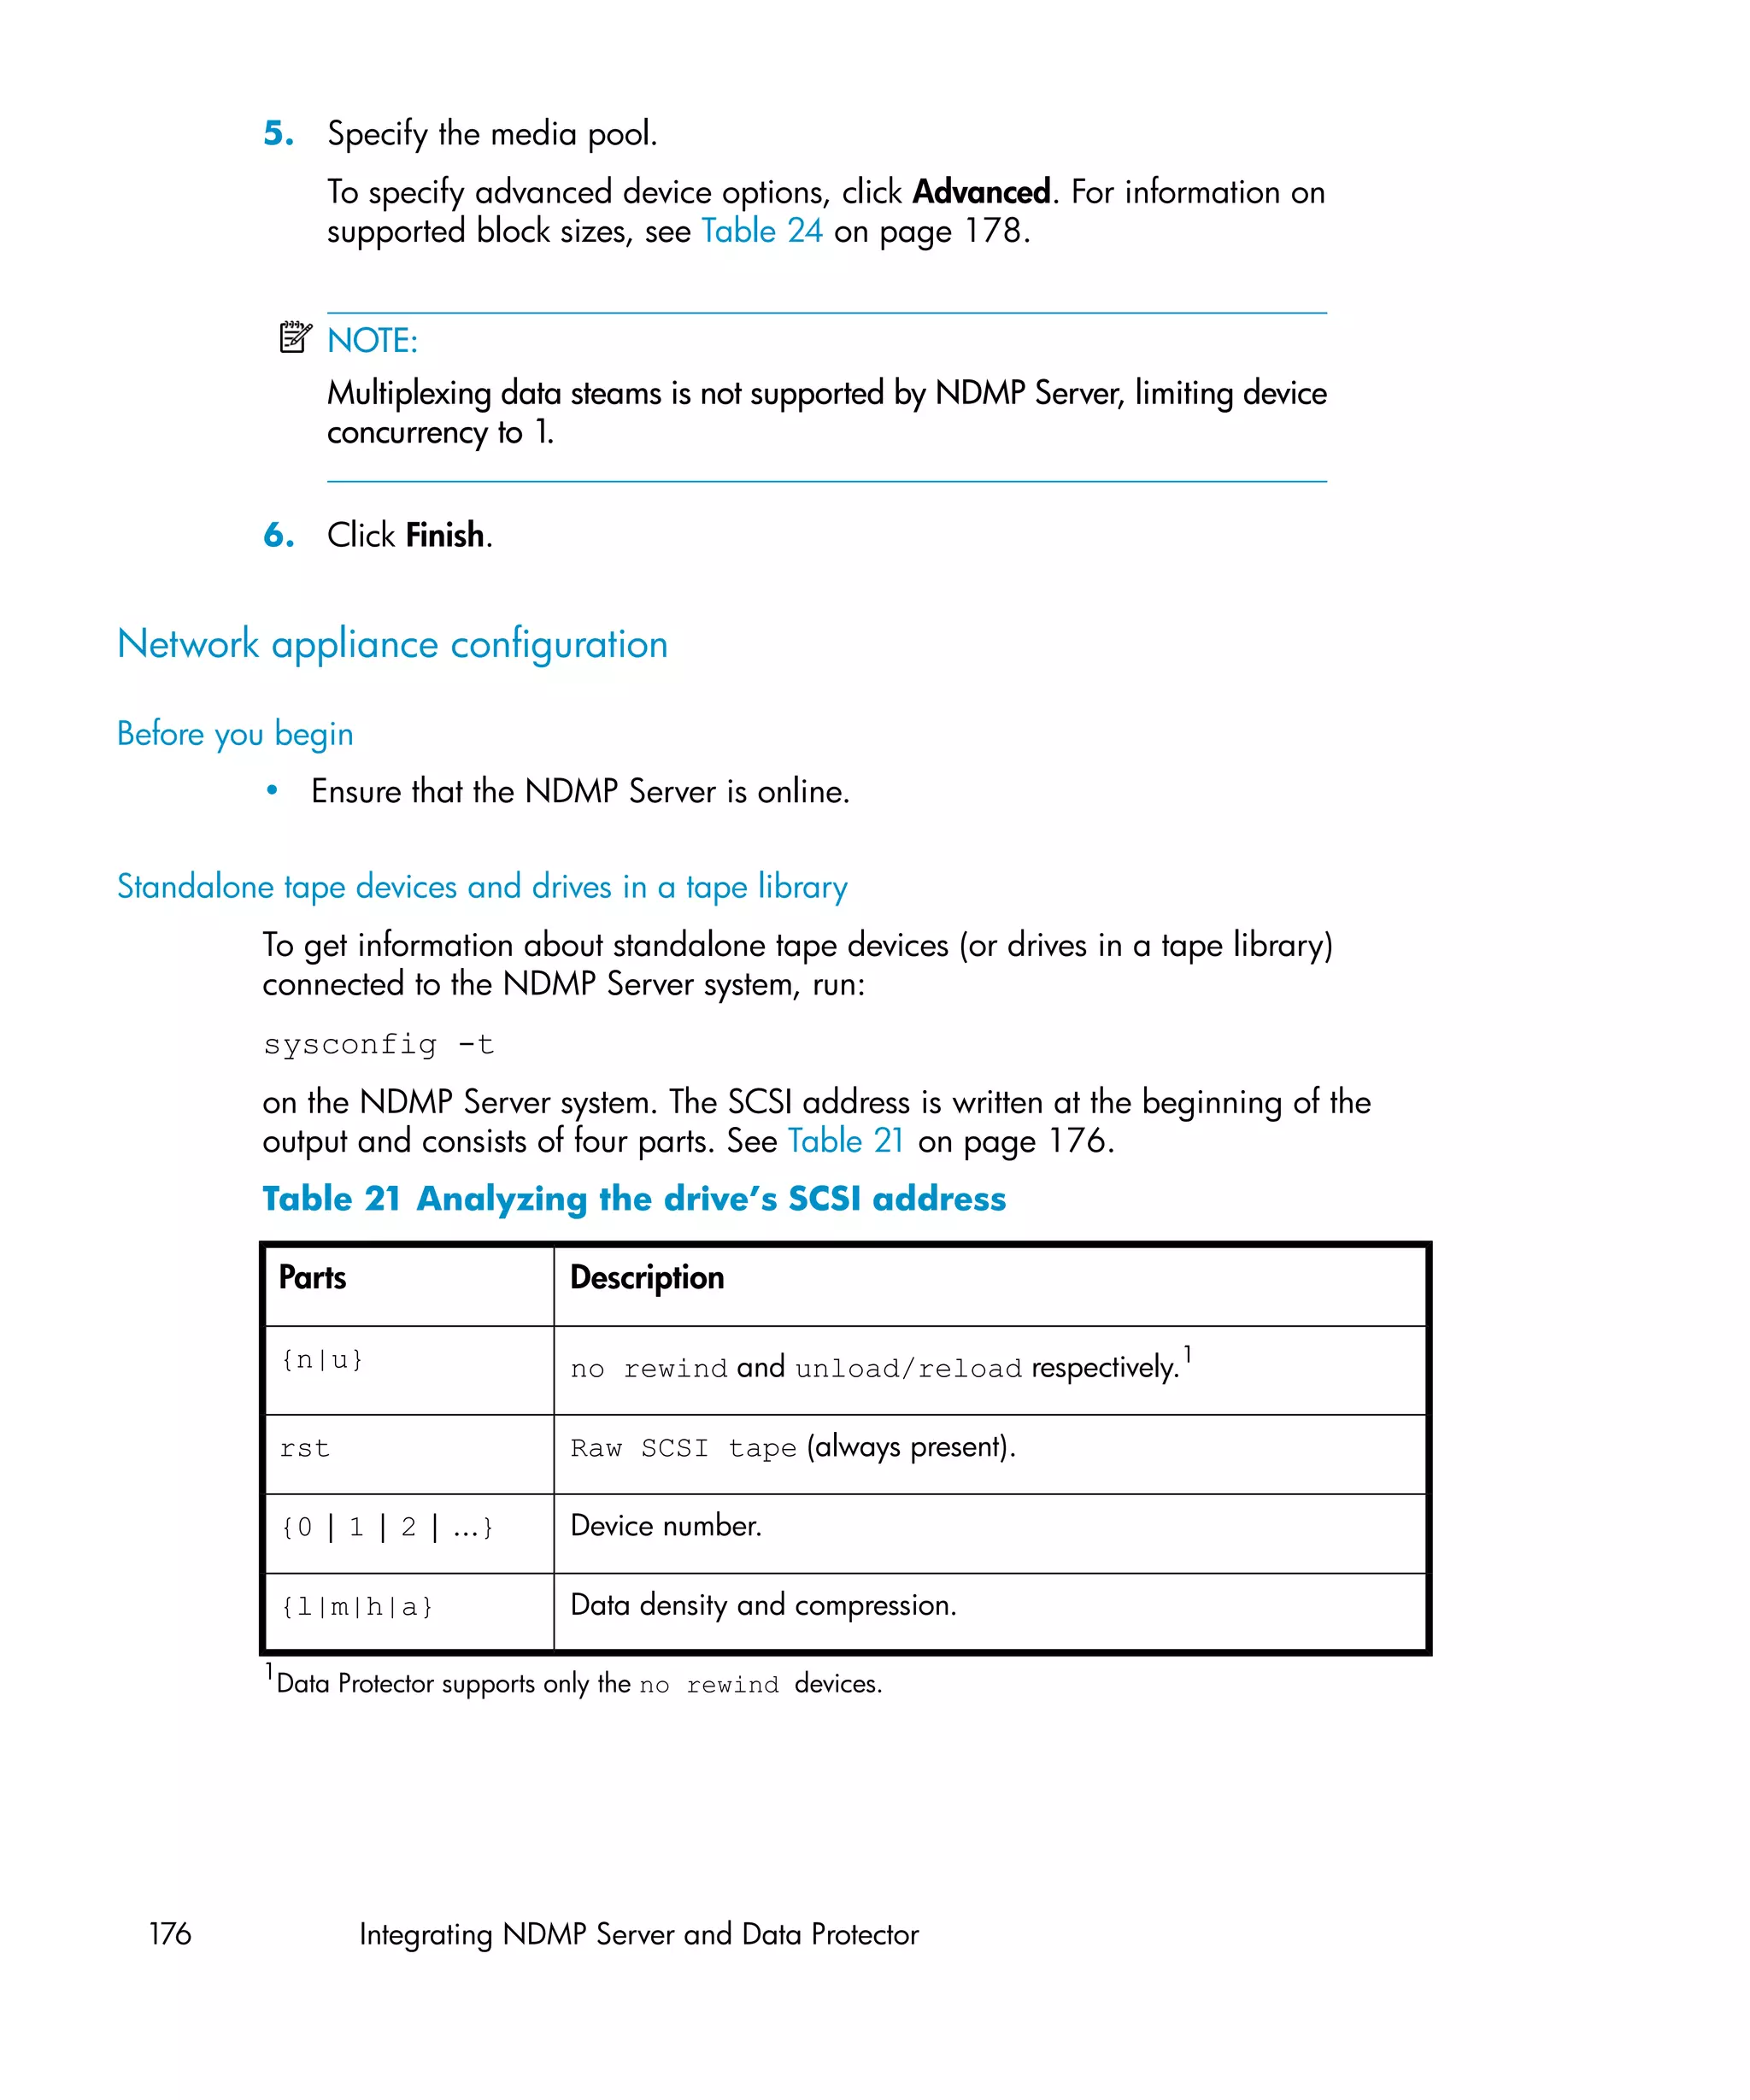
omnir -vmware
-barhost OriginalVMwareManagementClient
–instance OriginalDatacenter
–method VCBfile
[-session SessionID]
VirtualMachines —target TargetClient [-file File [-file File...]]
[VirtualMachines —target TargetClient [-file File [-file File...]]...]
[–destination RestoreClient]
[–overwrite [older]]
where VirtualMachines must be specified in one of the following ways:
{
-all [-exclude VMFolder [-exclude VMFolder...]] |
—vmfolder VMFolder [-exclude VMFolder [-exclude VMFolder...]] |
—vm VM
}
For description of all the options, see the omnir man page or the HP Data
Protector command line interface reference.
Example (Restoring virtual machines to a datacenter)
Suppose you want to restore the virtual machine /vm/machineA and the individual
disks (scsi0:0 and scsi0:1) of the virtual machine /vm/machineB. At the time
of backup, the virtual machines were running on the ESX Server systems that belonged
90 Integrating VMware Virtual Infrastructure and Data Protector](https://image.slidesharecdn.com/c01631241-120618223515-phpapp01/75/C01631241-90-2048.jpg)
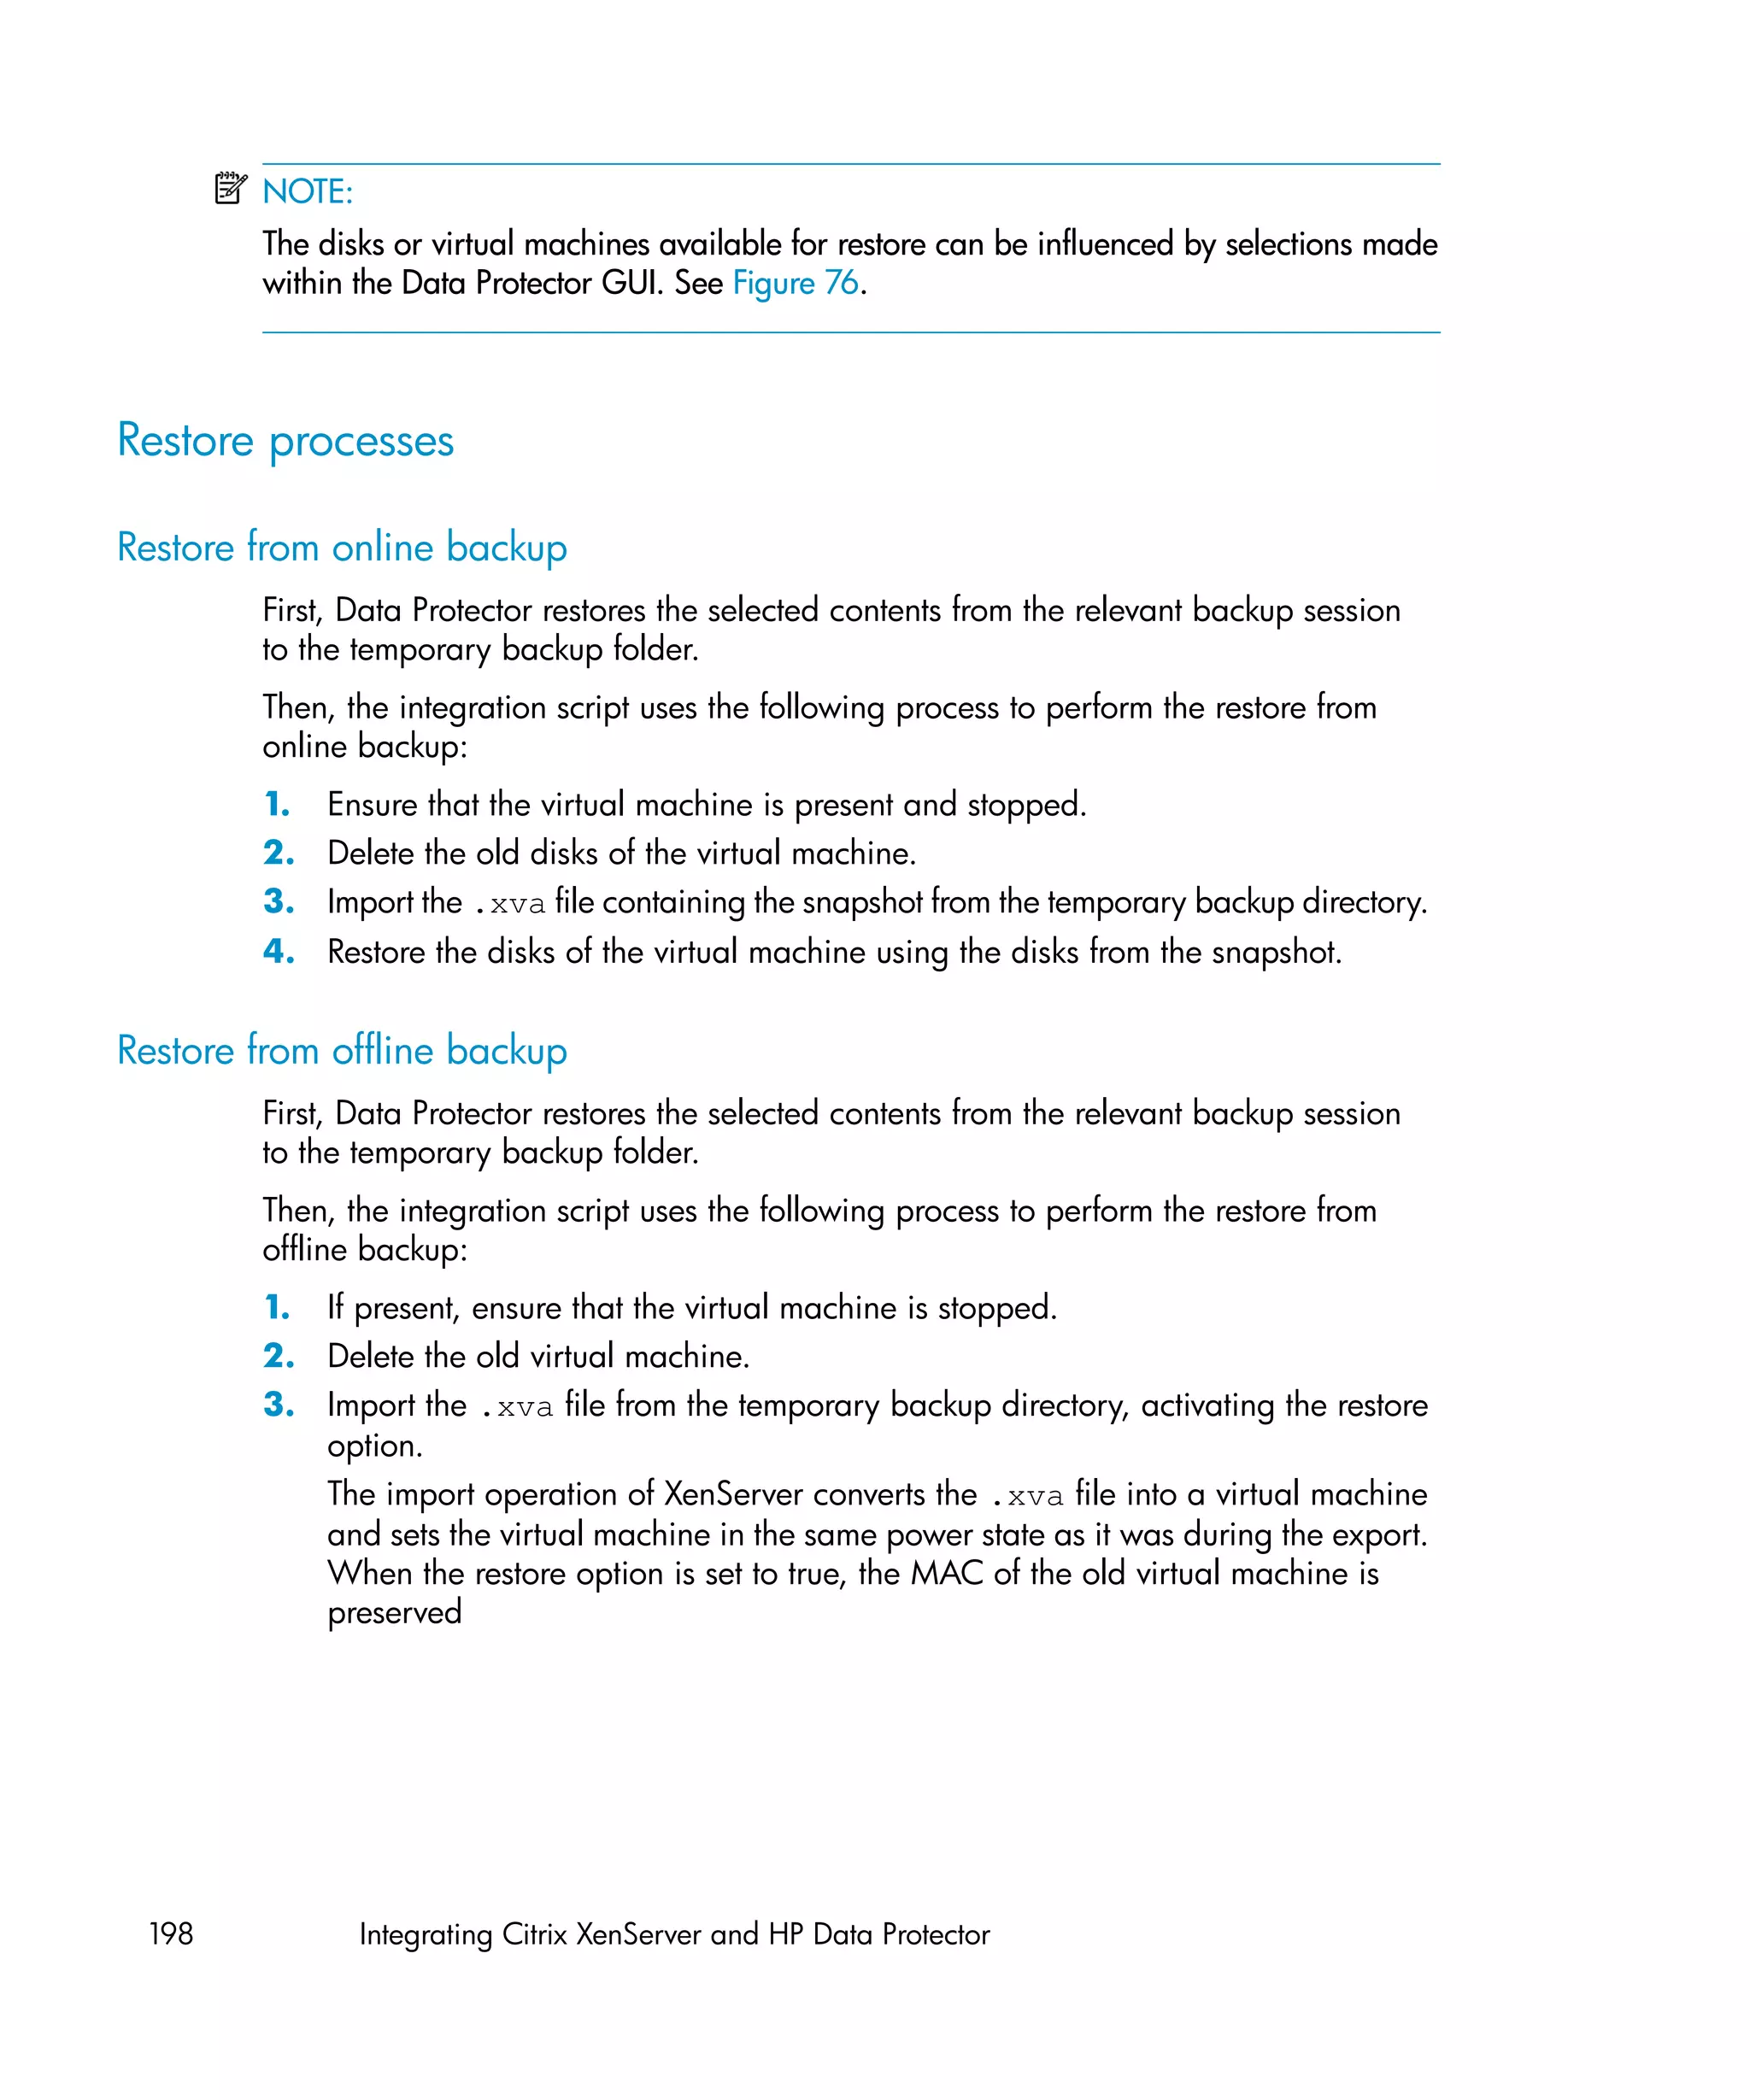
![3. Open the catalog file with a text editor:
catalog
version= esx-3.0
state= poweredOn
display_name= "FreeBSD 8.0 beta2 i386"
uuid= "503d98d9-cad4-5c0e-9132-b35de35b900d"
disk.scsi0:0.filename= "scsi0-0-0-FreeBSD 8.0 beta2 i386.vmdk"
disk.scsi0:0.diskname= "[Storage_VmWare_all] FreeBSD 8.0 beta2
i386/FreeBSD 8.0 beta2 i386.vmdk"
config.vmx= "[Storage_VmWare_all] FreeBSD 8.0 beta2 i386/FreeBSD
8.0 beta2 i386.vmx"
host= srsen.company.com
timestamp= "Fri Jul 17 05:52:17 2009"
config.suspenddir= "[Storage_VmWare_all] FreeBSD 8.0 beta2 i386/"
config.snapshotdir= "[Storage_VmWare_all] FreeBSD 8.0 beta2 i386/"
config.file0= "FreeBSD 8.0 beta2 i386.vmsd"
config.file1= "FreeBSD 8.0 beta2 i386.vmxf"
config.file2= "FreeBSD 8.0 beta2 i386.nvram"
config.logdir= "[Storage_VmWare_all] FreeBSD 8.0 beta2 i386/"
config.log0= "vmware.log"
folderpath= "/Datacenters/europa/vm"
resourcepool= "/Datacenters/europa/host/srsen.company.com/Resources"
The name specified in the disk.scsi0:0.filename catalog variable and
the name of the base metadata file residing in the folder must match. Therefore,
rename the base metadata file FreeBSD 8.0 beta2 i386.vmdk to
scsi0-0-0-FreeBSD 8.0 beta2 i386.vmdk:
catalog
scsi0-0-0-FreeBSD 8.0 beta2 i386.vmdk
FreeBSD 8.0 beta2 i386.vmx
scsi0-0-0-FreeBSD 8.0 beta2 i386-flat.vmdk
4. Share the folder C:tmpFreeBSD 8.0 beta2 i386 so that it is accessible
from the VirtualCenter Server system.
5. Log in to the VirtualCenter Server system and open the VMware Converter user
interface.
6. Click the Convert Machine button to open the Conversion wizard.
94 Integrating VMware Virtual Infrastructure and Data Protector](https://image.slidesharecdn.com/c01631241-120618223515-phpapp01/75/C01631241-94-2048.jpg)


![Problem
Suspend backup fails with the error “insufficient resources to satisfy failover level”
This error may occur if your ESX Server systems are configured in a high availability
cluster and one of the ESX Server systems fails. Consequently, the virtual machines
from the failed system migrate elsewhere. If you start a Suspend backup of such
virtual machines, the power-on operation at the end of the backup fails with an error
similar to the following:
[Critical] From: OB2BAR_VMWARE_BAR@gabriel.company.com
"/ClusterDatacenter" Time: 7.4.2008 16:13:50 Virtual machine
'/vm/vmsan1': operation failed: Error: {
localizedMessage='Insufficient resources to satisfy configured
failover level for HA.';
Action
1. Open the cluster settings dialog box in the Virtual Infrastructure client and select
the option Allow virtual machines to be powered on even if they violate
availability constrains.
2. Power on the virtual machines and restart the backup (if needed).
Problem
Orphaned virtual machines
When you open the Virtual Infrastructure client while the restore session is in progress,
the virtual machines that are being restored are shaded and the note (orphaned)
is added next to them.
This happens if you back up virtual machines from a datacenter that is managed by
a VirtualCenter Server system and, then, restore the virtual machines, specifying a
different client on which to start the restore. Specifically, you change the restore
option Restore client from the VirtualCenter Server system to the ESX Server system
on which the virtual machines were running. Consequently, the restore option
Application database automatically changes to the datacenter /ha-datacenter.
As a result, during restore, the virtual machines are unregistered inside the datacenter
/ha-datacenter, but not inside the VirtualCenter Server datacenter from which
they were backed up.
Integration guide for VMware Virtual Infrastructure, Sybase, Network Node Manager,
and Network Data Management Protocol Server 11
1](https://image.slidesharecdn.com/c01631241-120618223515-phpapp01/75/C01631241-111-2048.jpg)
![Action
Do not change the restore destination. Changes are allowed only in case of a disaster
recovery when the newly configured VirtualCenter systems, ESX Server systems, or
datacenters have different names than the original ones.
Problem
Backup fails if a VM filesystem is still mounted
If not enough time passes between unmounting and mounting of a VM (mount point),
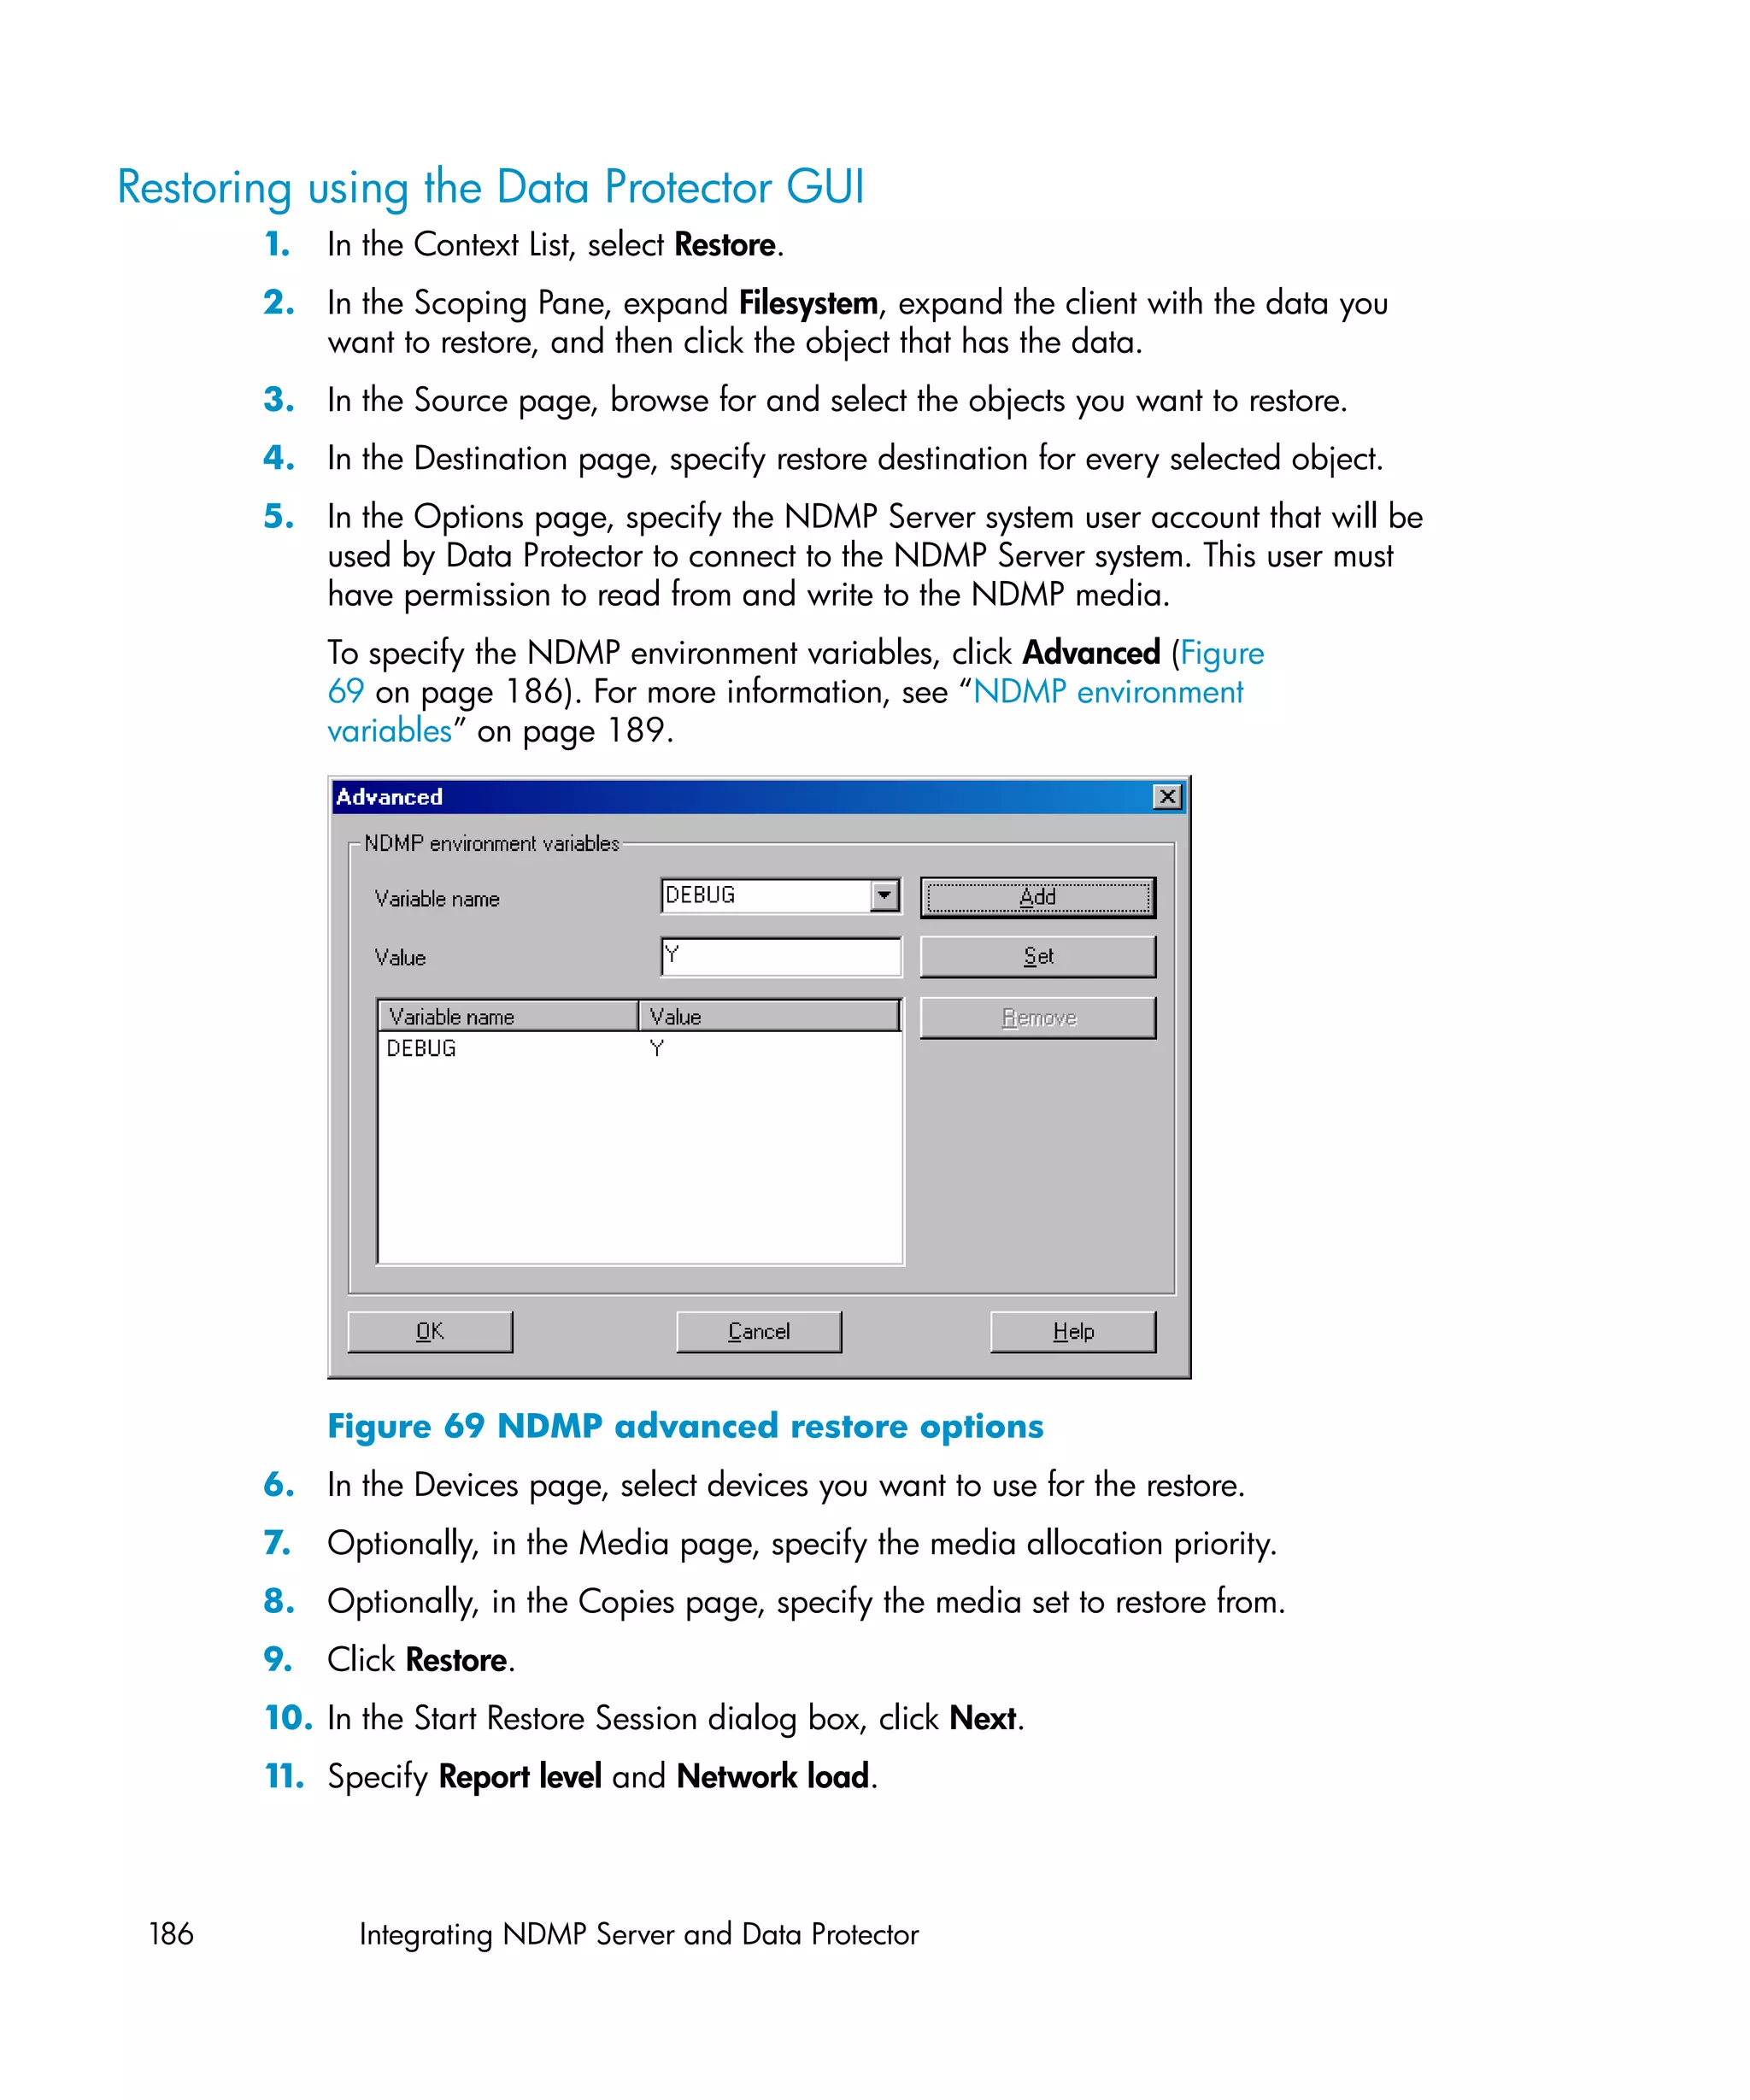
the vcbMounter will report that it cannot create a directory, although the directory
has been removed:
[2009-08-04 12:13:05.218 'vcbMounter' 712 error] Error: Cannot
create directory c:mount-p26752.3
nl
[2009-08-04 12:13:05.218 'vcbMounter' 712 error] An error
occurred, cleaning up...
The issue appears only with interactive backups.
Action
Restart the backup. The previous failed backup resulted in unmounted VMs, so the
issue will not appear.
112 Integrating VMware Virtual Infrastructure and Data Protector](https://image.slidesharecdn.com/c01631241-120618223515-phpapp01/75/C01631241-112-2048.jpg)

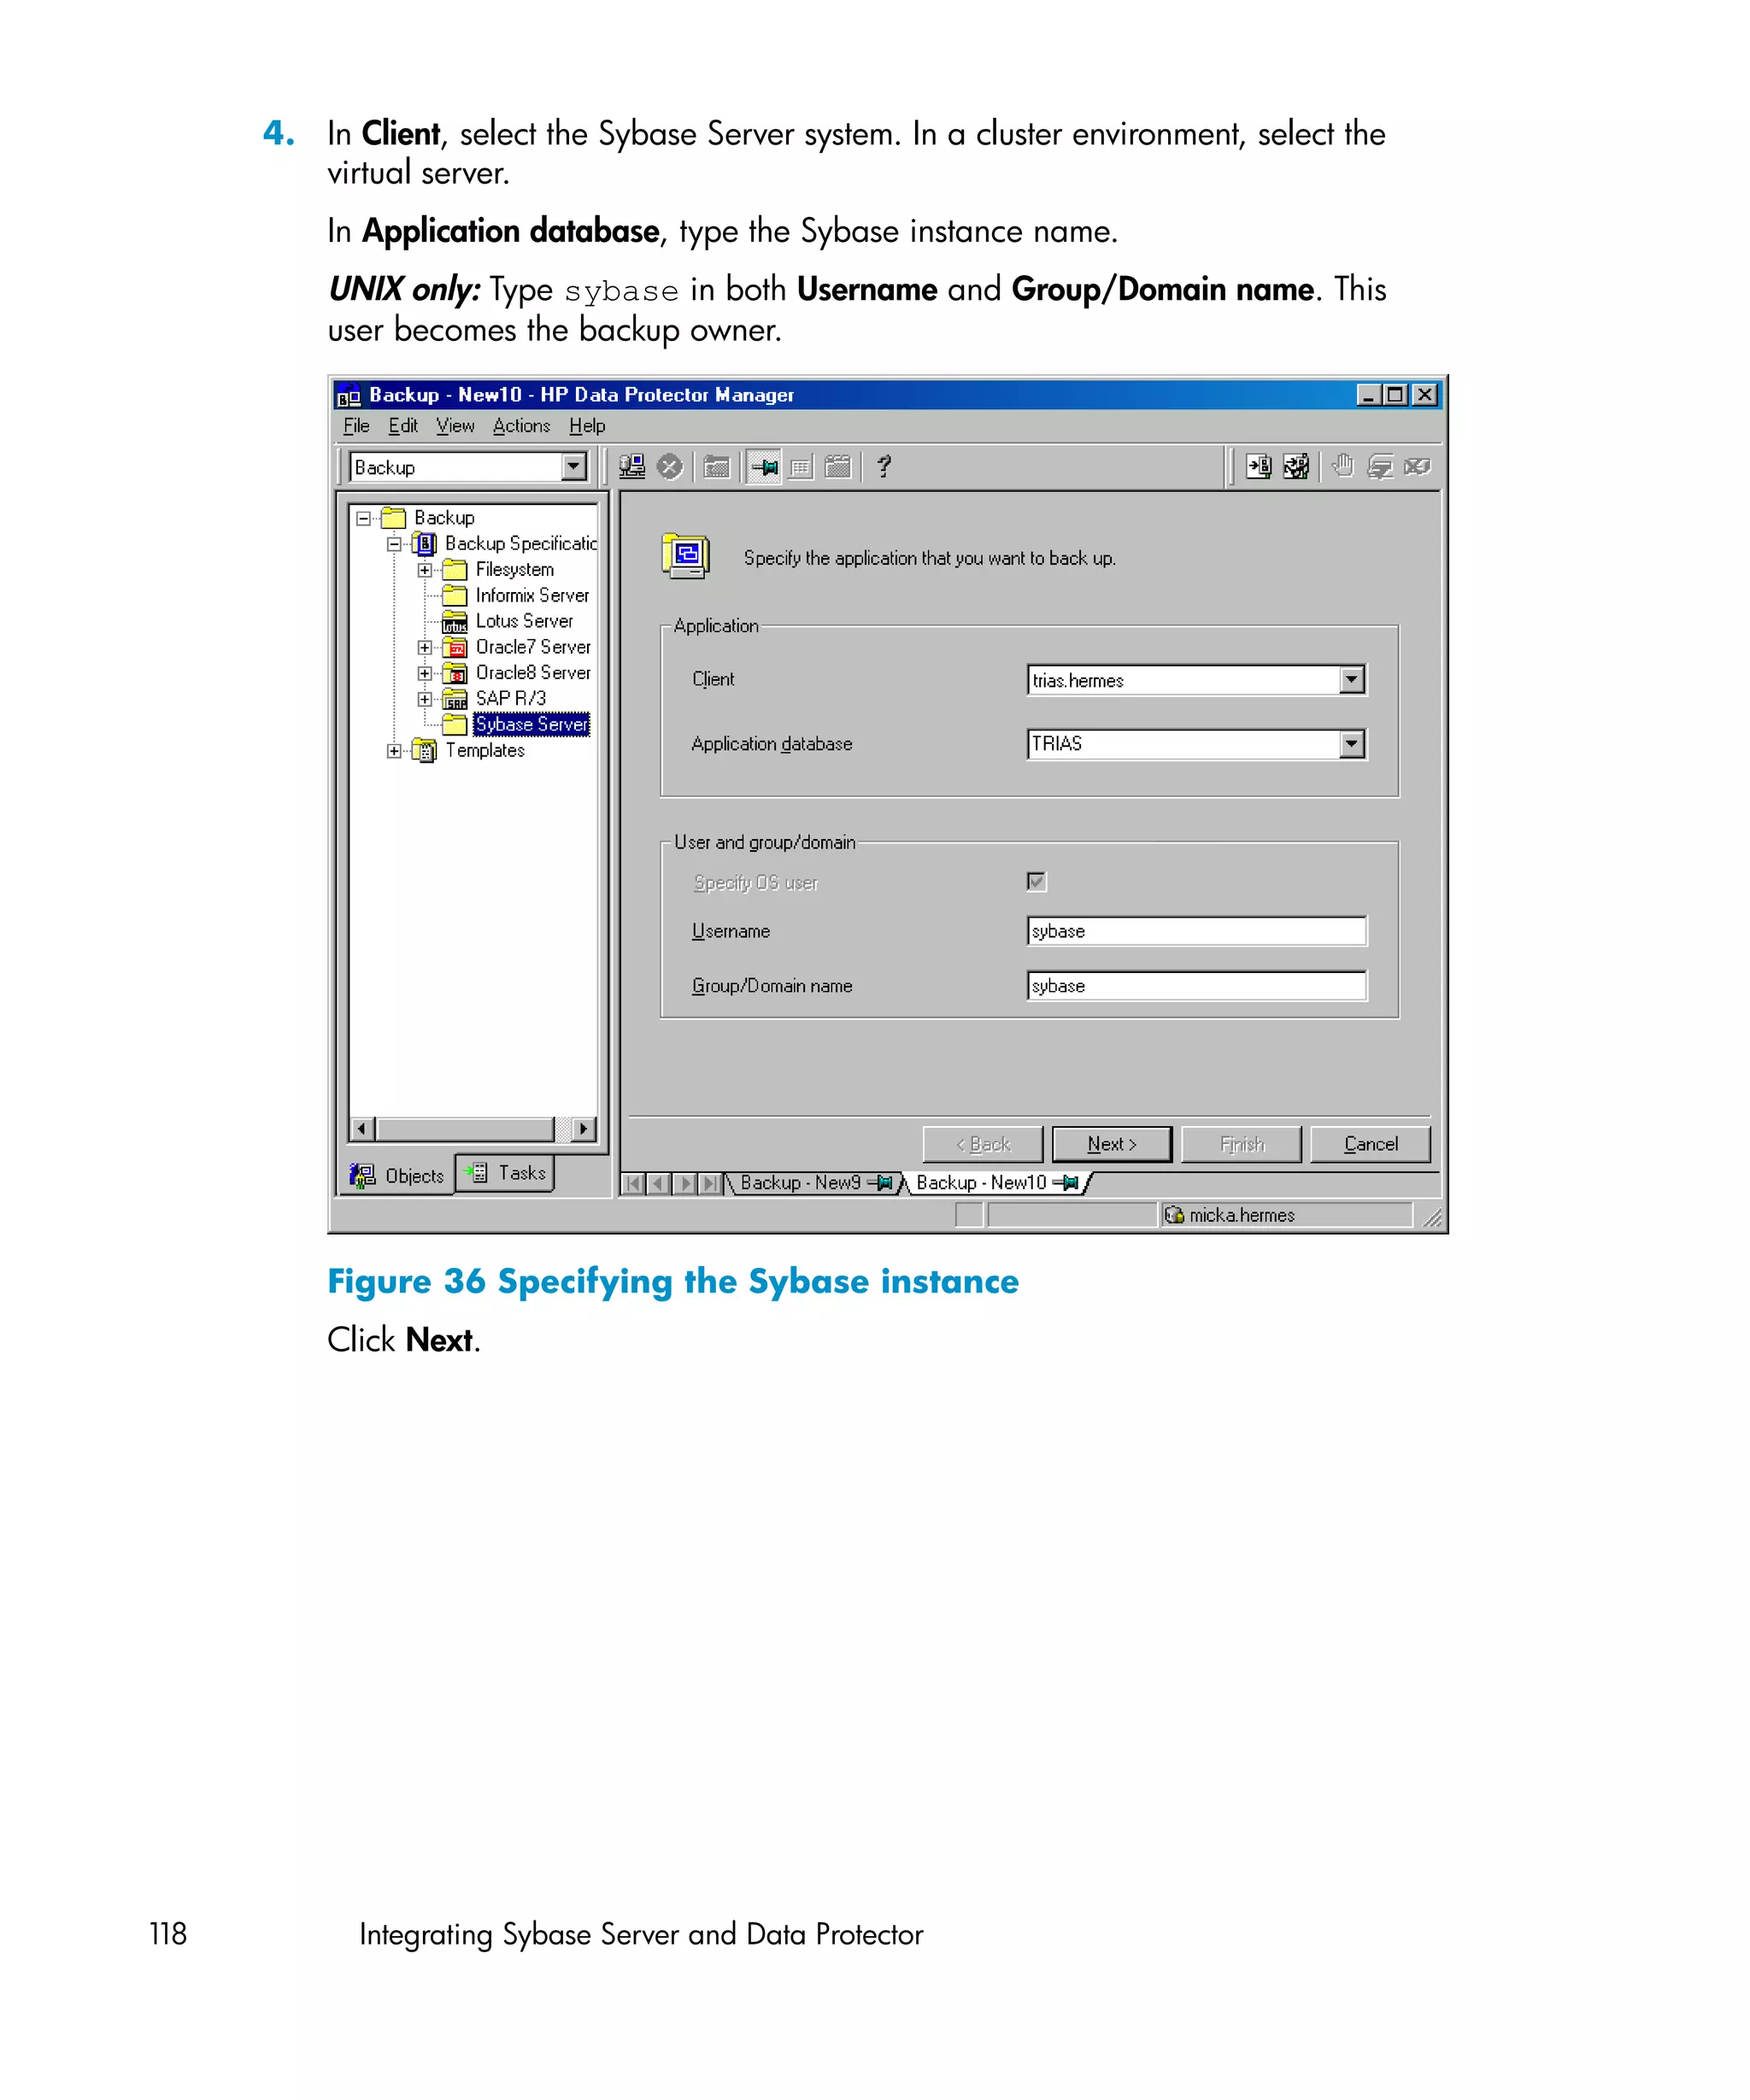


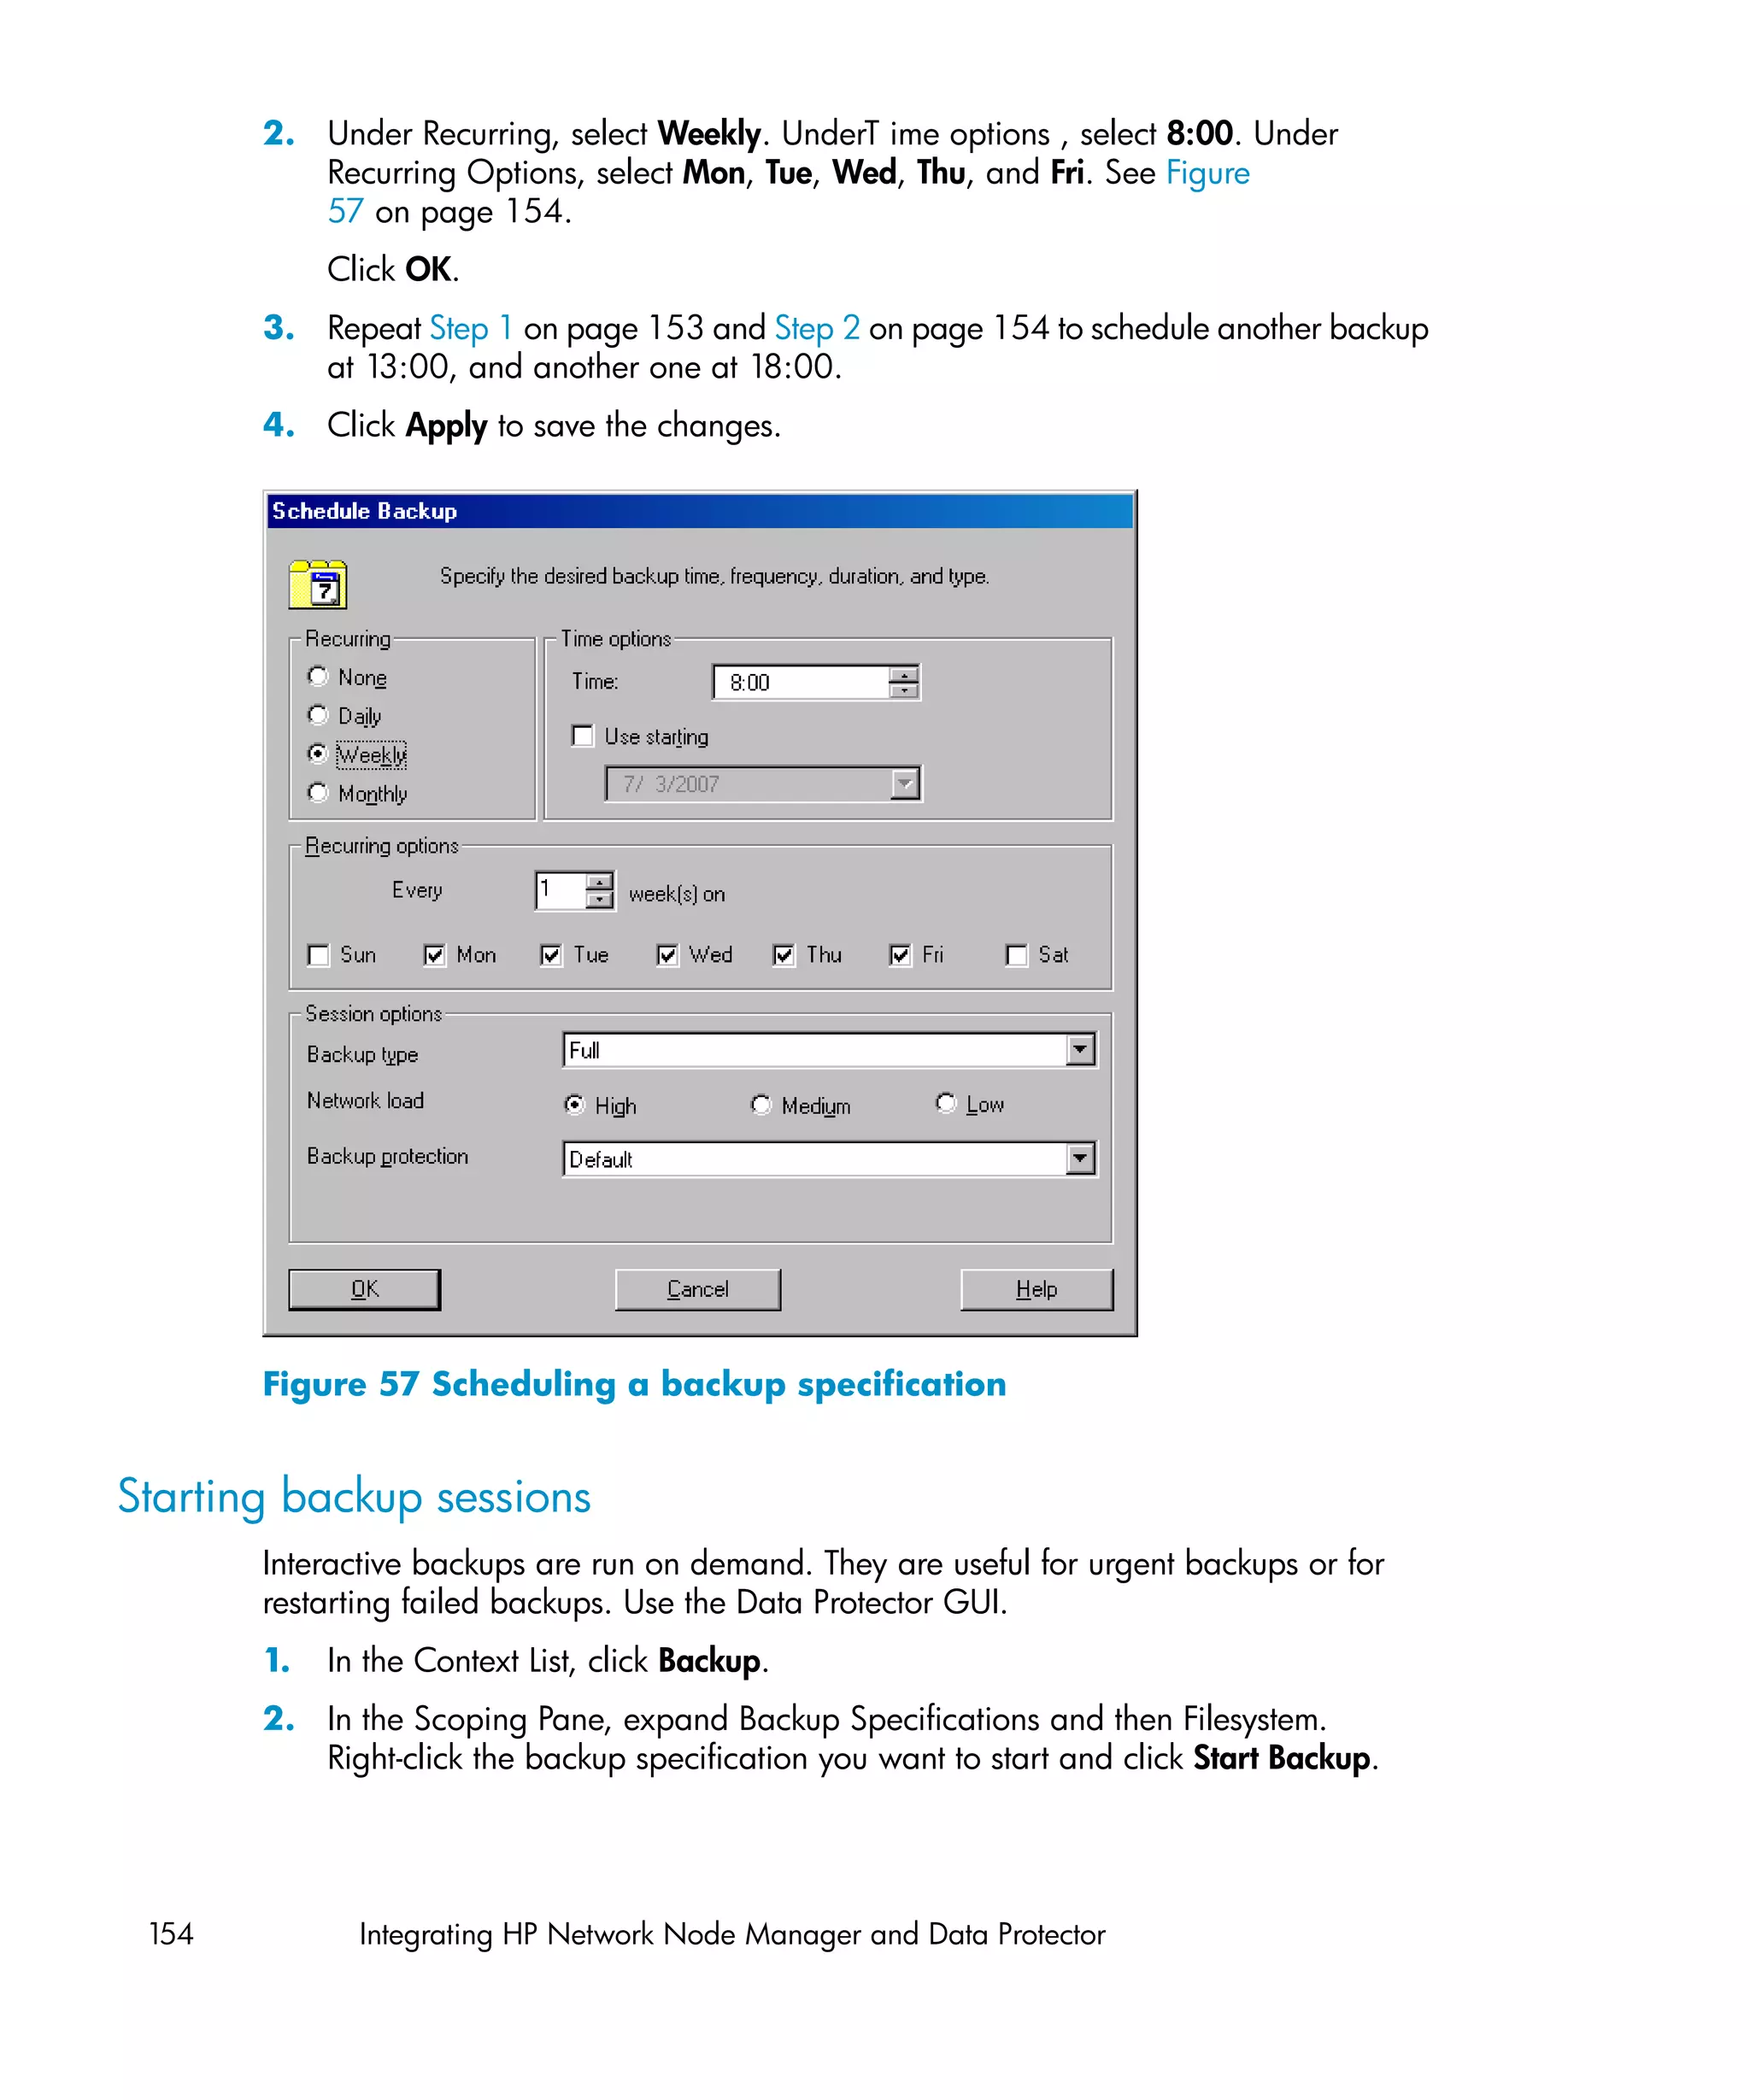
![Starting backup sessions
Interactive backups are run on demand. They are useful for urgent backups or for
restarting failed backups.
Start a backup in any of the following ways:
• Use the Data Protector GUI.
• Use the Data Protector CLI.
• Use the Sybase isql utility.
Using the Data Protector GUI
1. In the Context List, click Backup.
2. In the Scoping Pane, expand Backup Specifications and then Sybase Server.
Right-click the backup specification you want to start and click Start Backup.
3. Select the Backup type and Network load. Click OK.
Successful backup displays the message Session completed successfully.
Using the Data Protector CLI
Run:
omnib -sybase_list backup_specification [-barmode sybase_mode]
[options]
Parameter description
backup_specification Name of the Data Protector Sybase backup
specification.
sybase_mode Backup type. Select among {full |trans}.
options For information, see the omnib man page.
Example
To perform a full backup using the backup specification FullSybase, run:
omnib -sybase_list FullSybase -barmode full
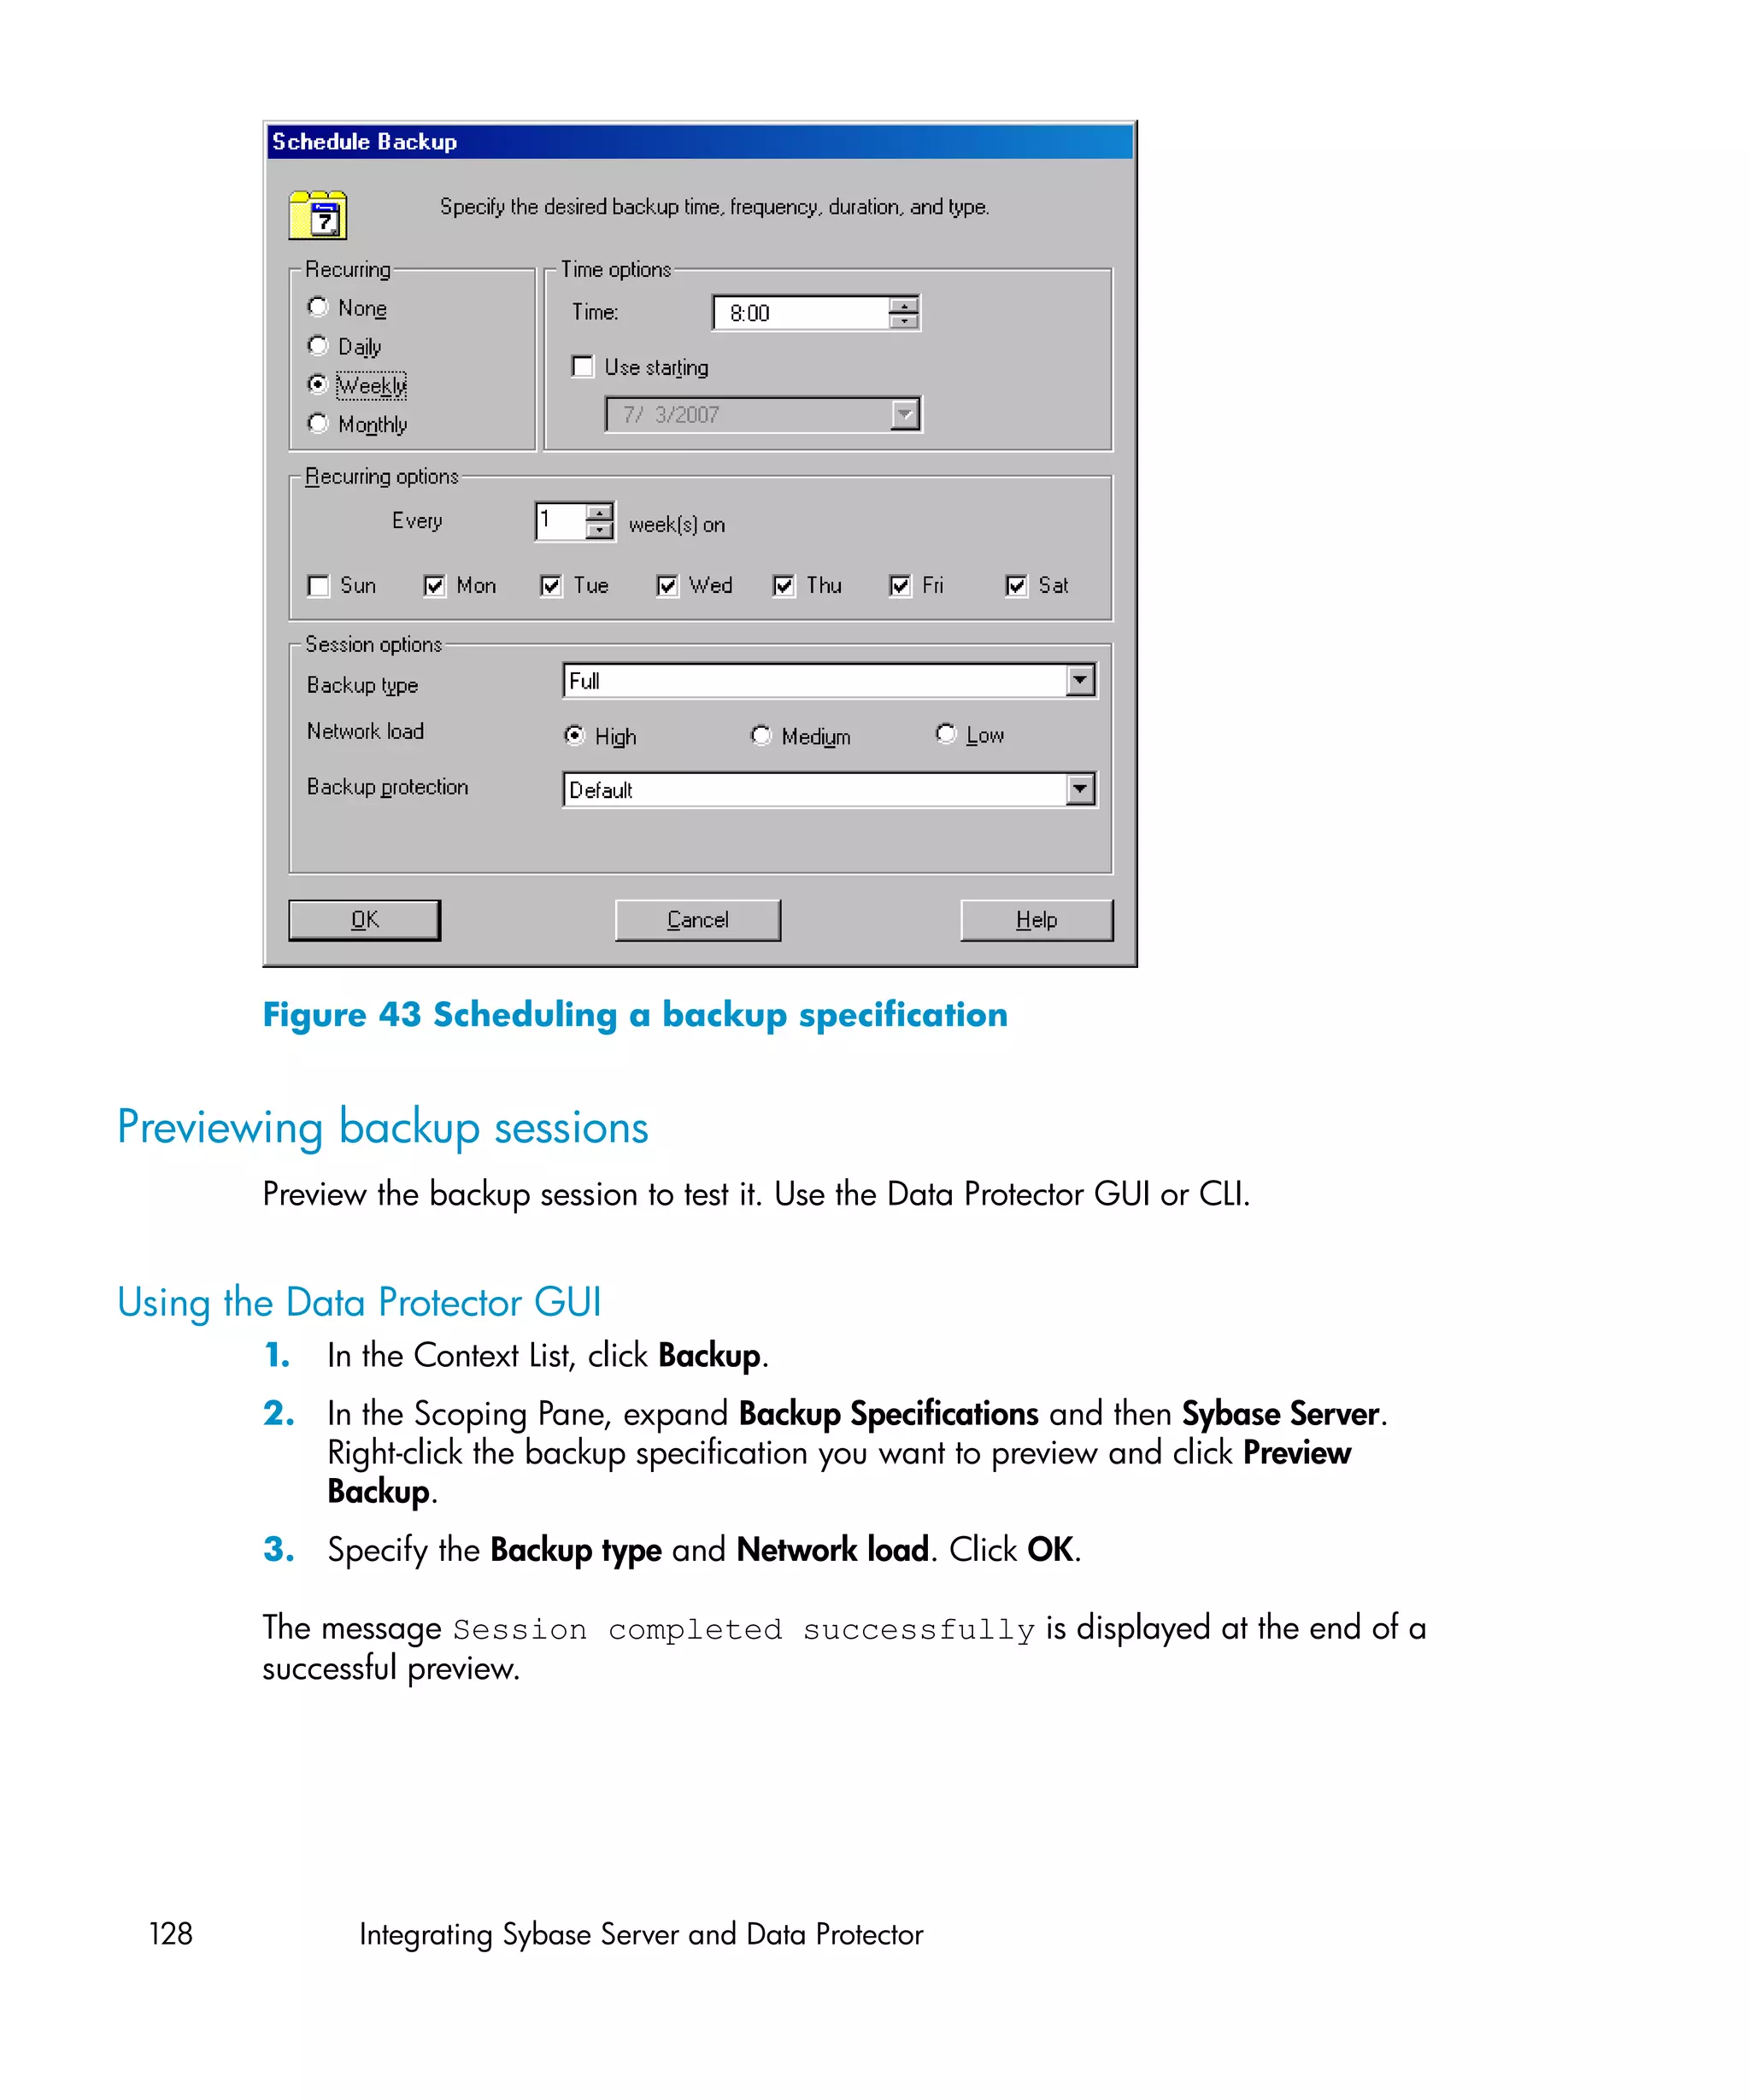
130 Integrating Sybase Server and Data Protector](https://image.slidesharecdn.com/c01631241-120618223515-phpapp01/75/C01631241-130-2048.jpg)
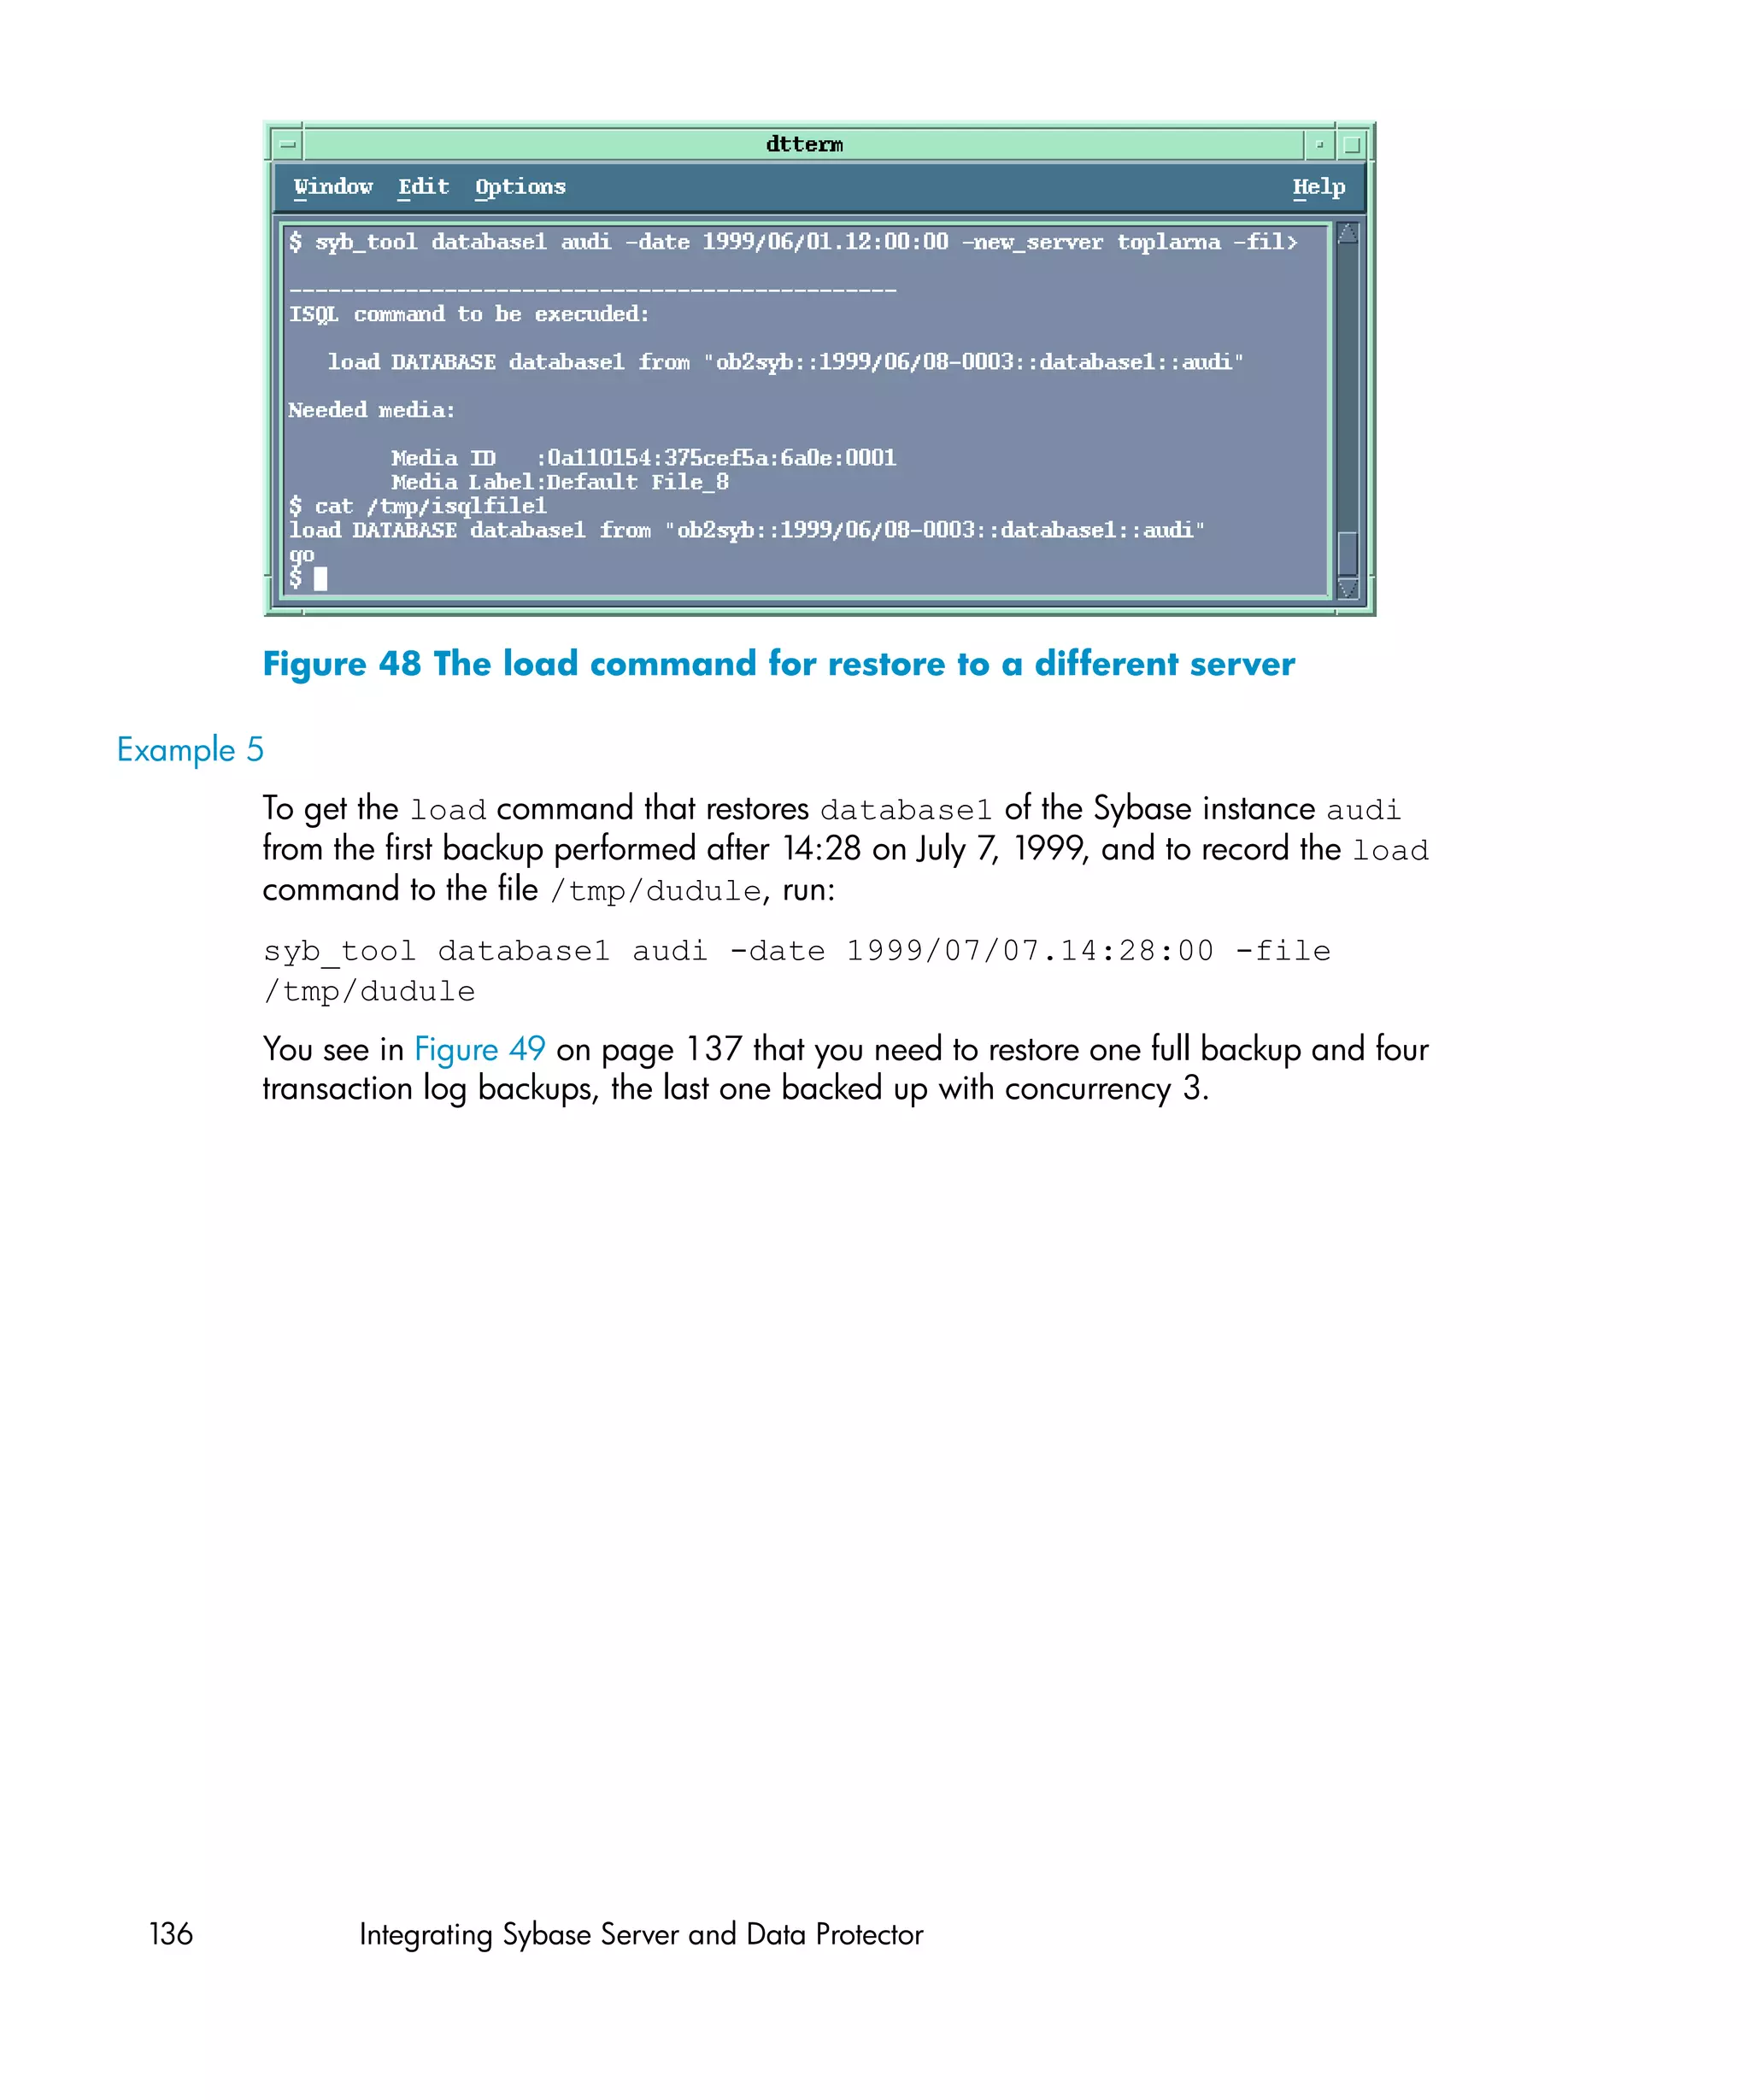
![Using the Data Protector syb_tool command
The Data Protector syb_tool command returns the exact Sybase load command
needed for restore.
The syntax of the syb_tool command is:
syb_tool database Sybase_instance
-date YYYY/MM/DD.hh:mm:ss
[ -new_db new_database ]
[ -new_server new_Sybase_instance ]
[ -file file ]
[ -media ]
Parameter description
database Database to be restored.
Sybase_instance Sybase instance from which the database to
be restored was backed up.
date Point in time. The first backup version created
after this point in time is restored. Use the
0-24h time format.
new_database Target database to which to restore.
new_Sybase_instance Target Sybase instance to which to restore.
file Pathname of a file to which the load
command or command sequence is recorded.
-media Lists media needed for the restore.
To define the time interval between the closure of transaction logs and the start of a
backup session, set the global variable OB2SybaseTransLogDelay. The default
value is 20 seconds.
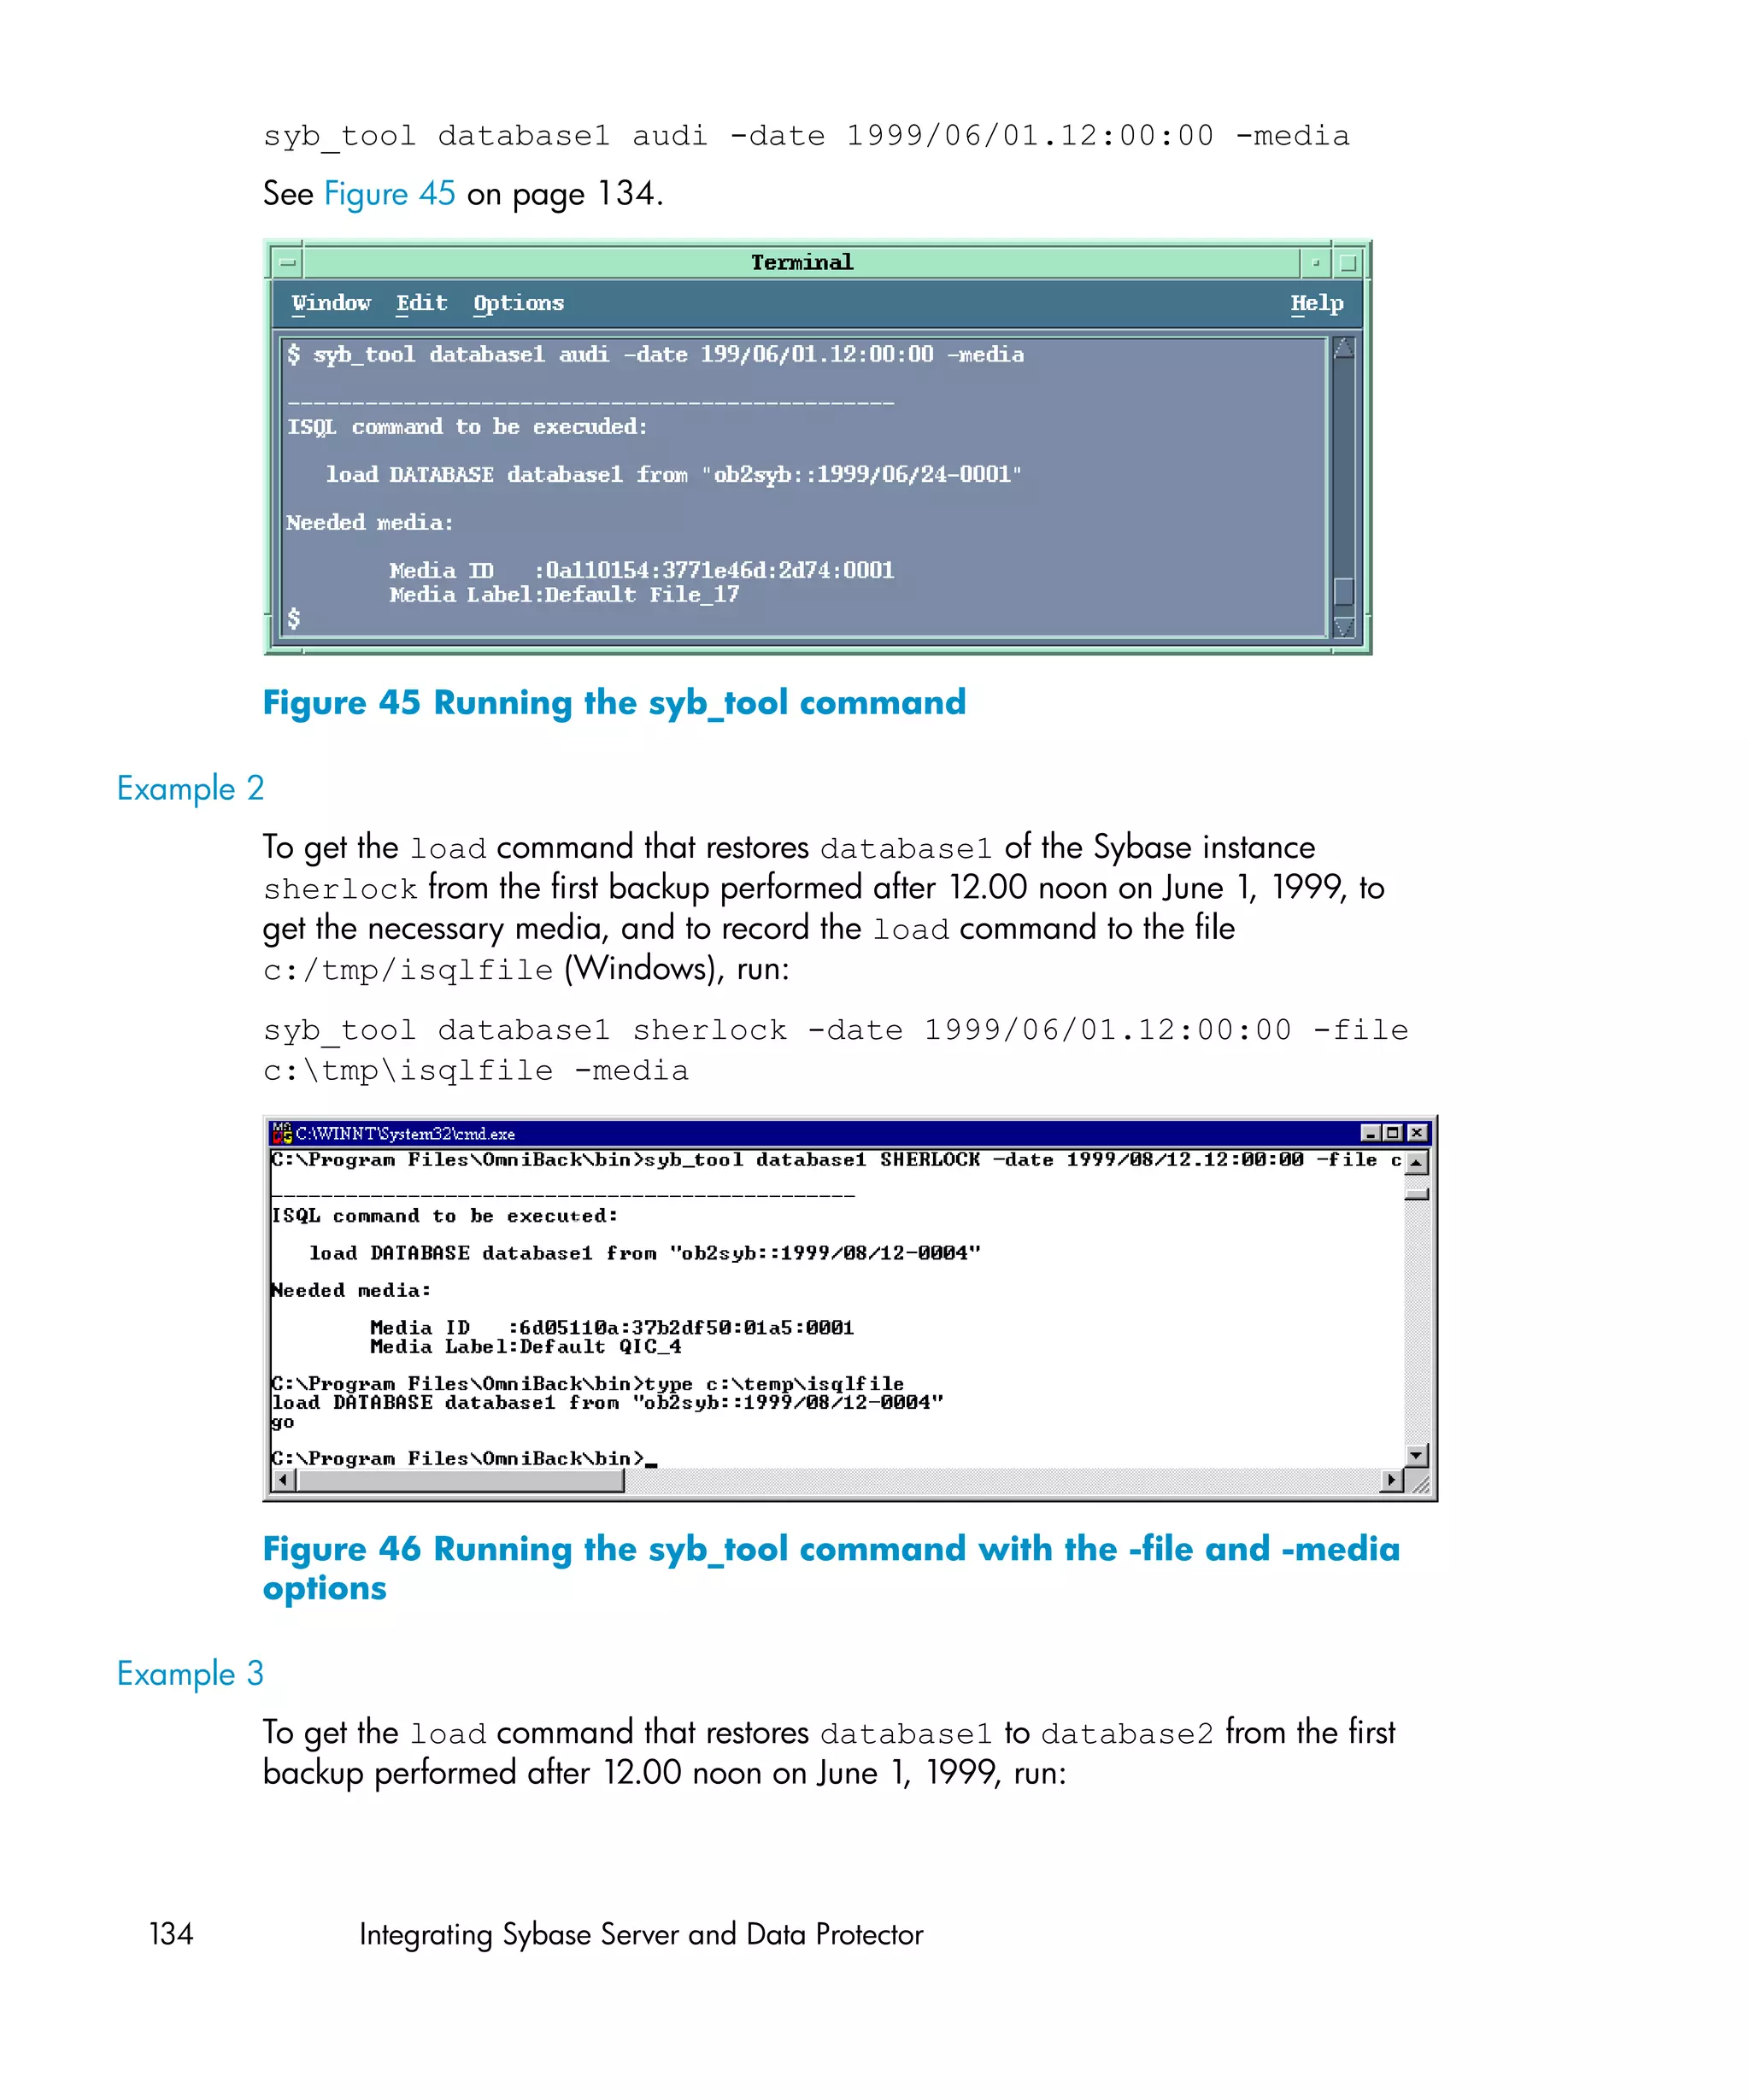
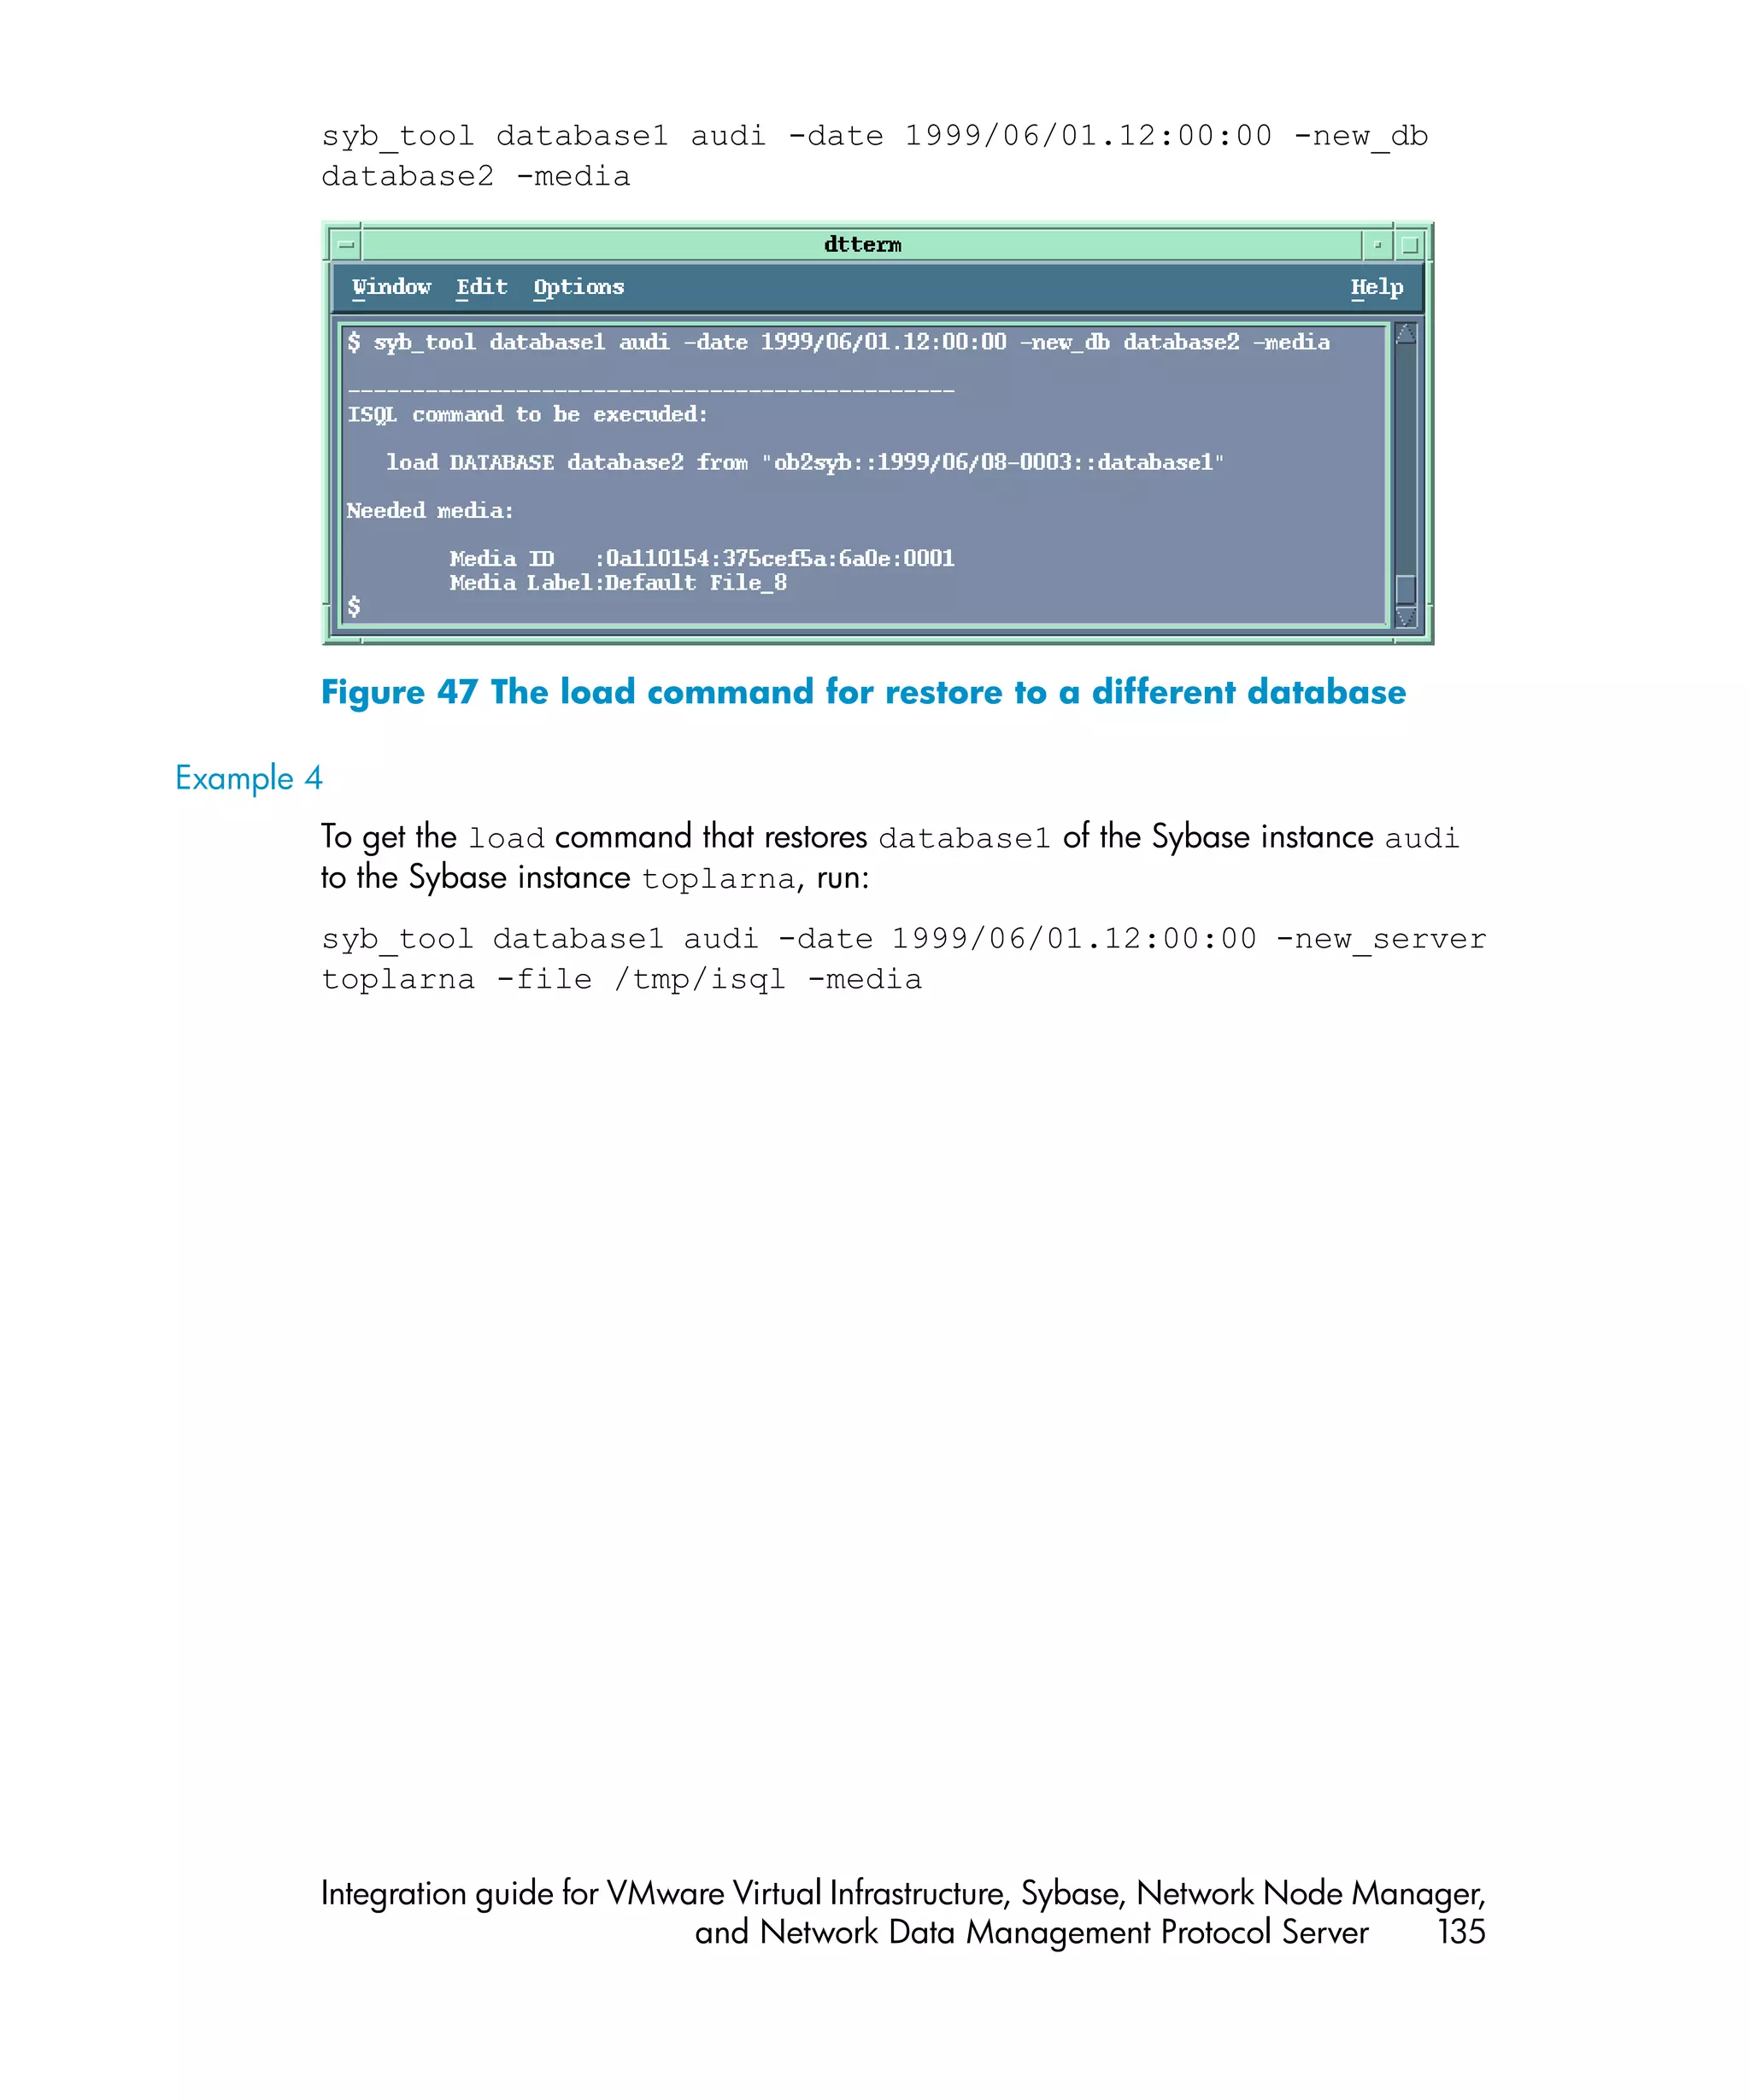
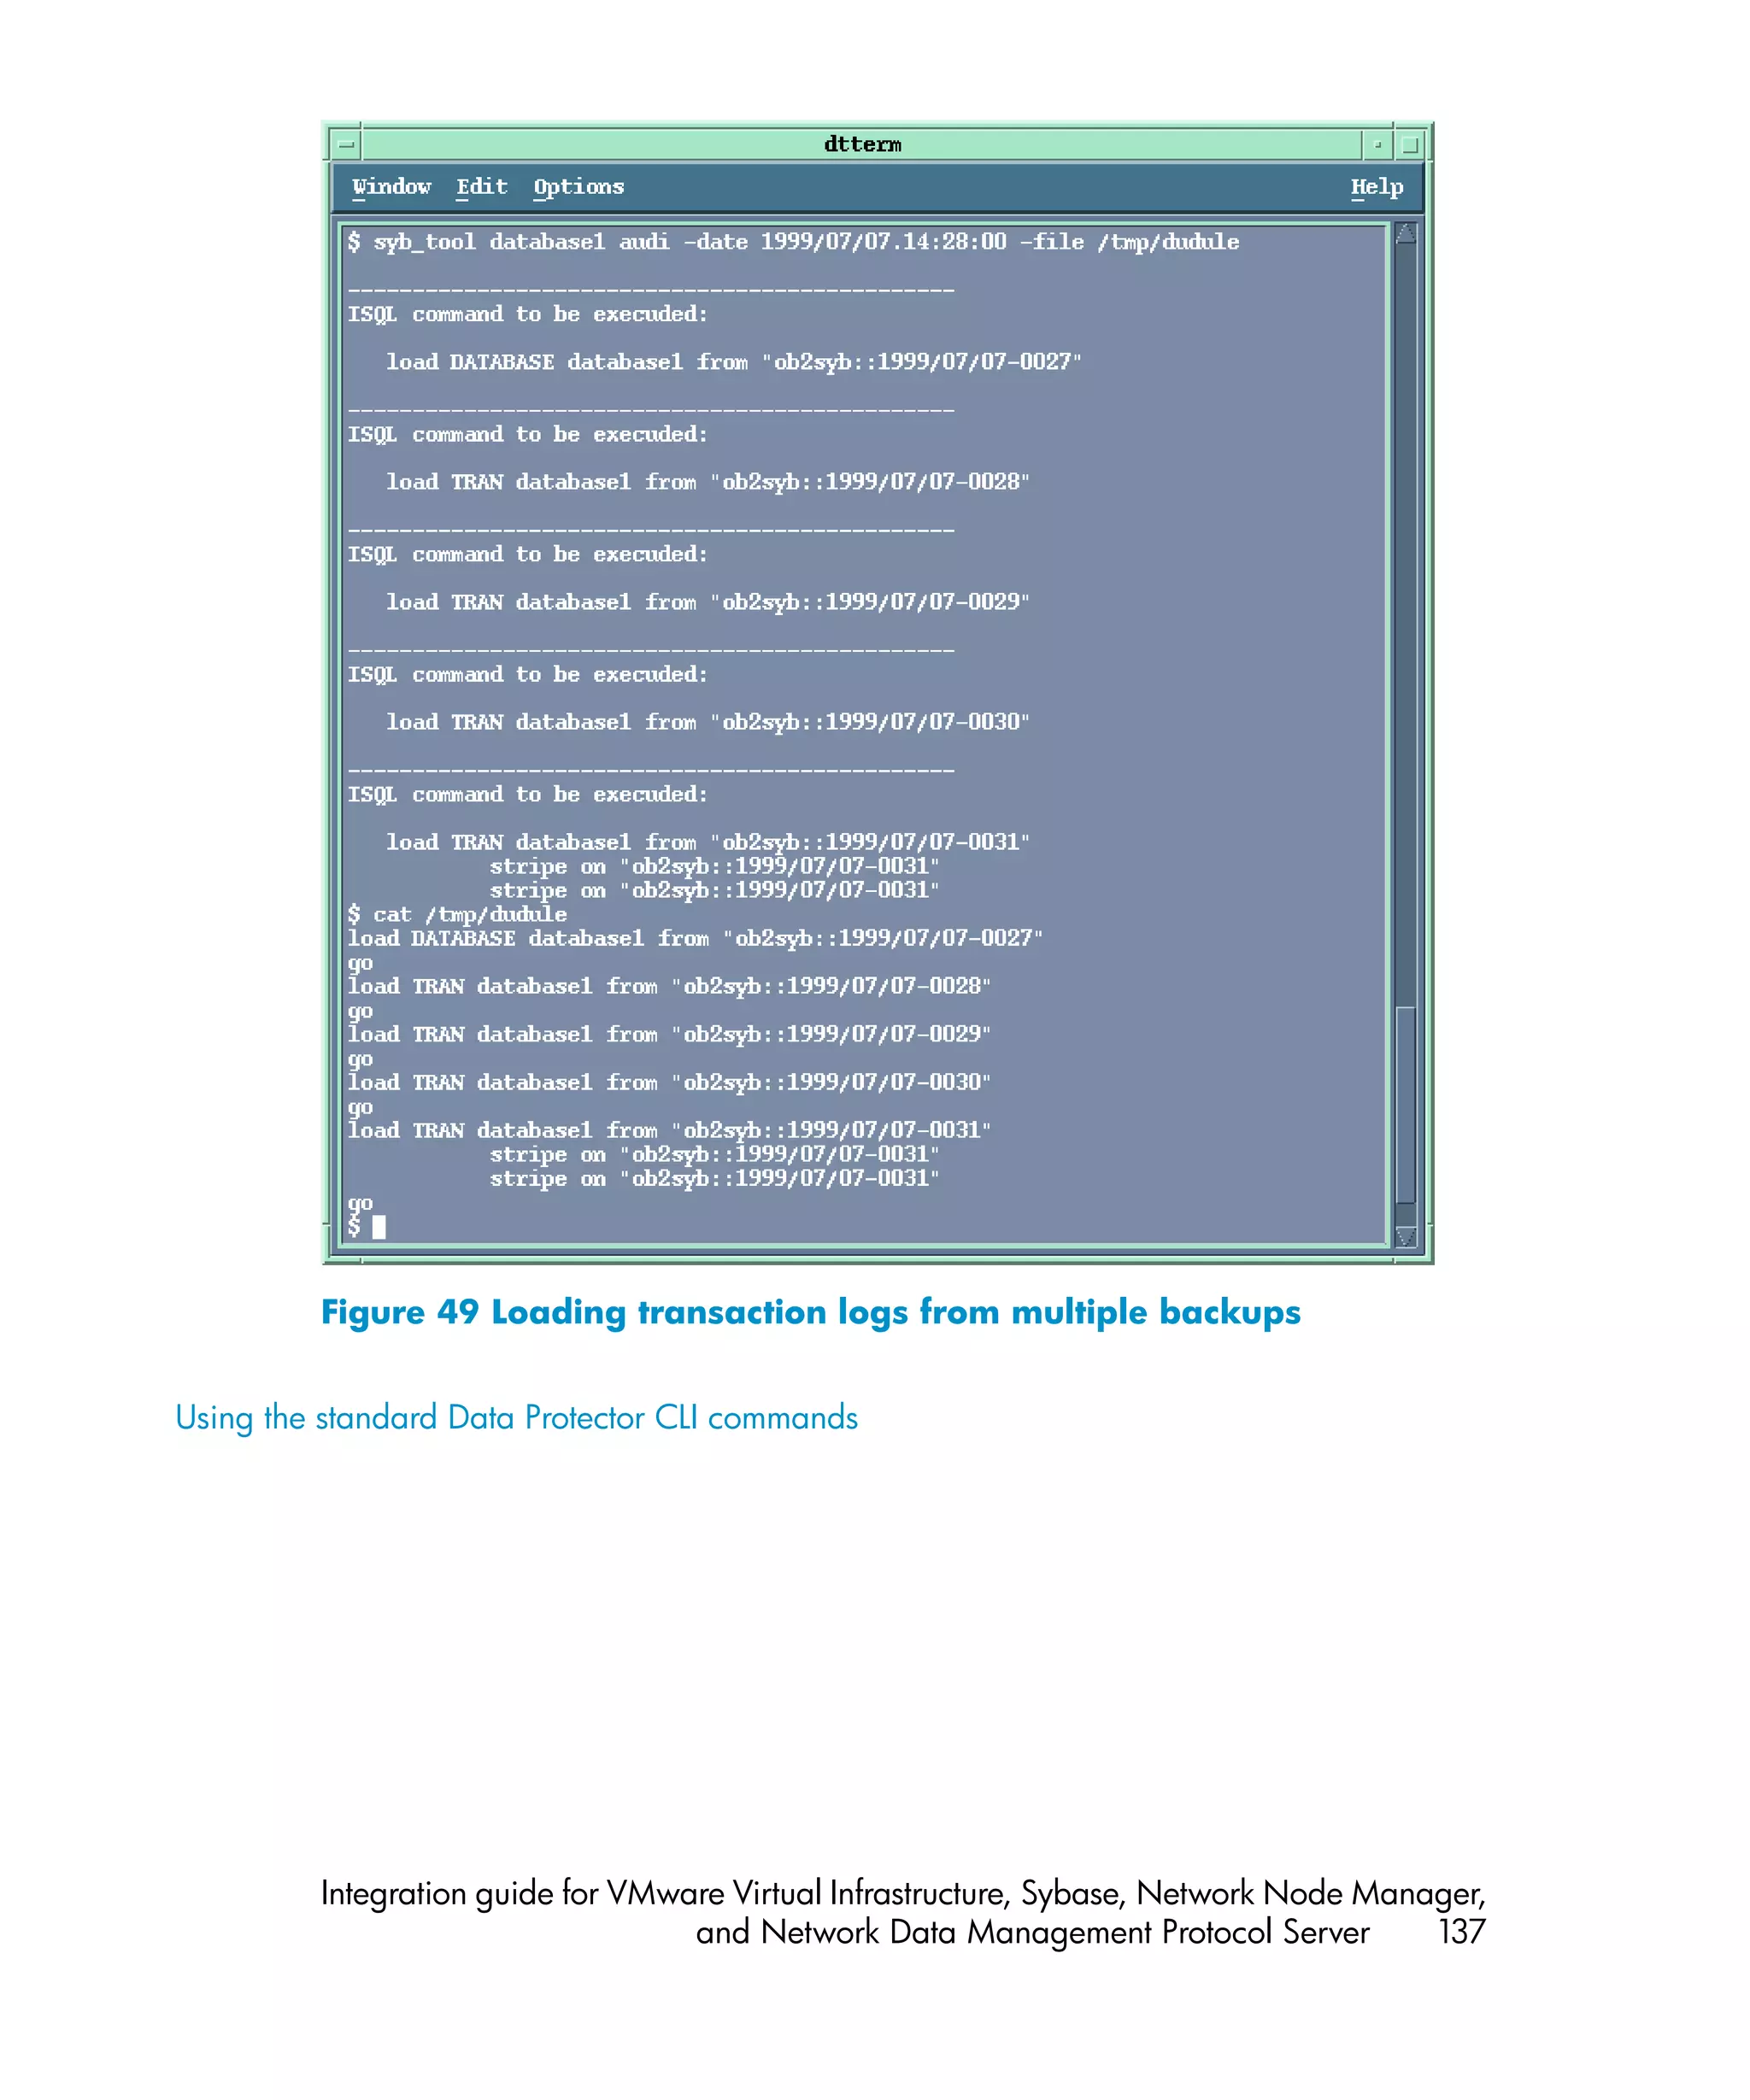
Example 1
To get the load command that restores database1 of the Sybase instance audi
from the first backup performed after 12.00 noon on June 1, 1999, and to get the
necessary media, run:
Integration guide for VMware Virtual Infrastructure, Sybase, Network Node Manager,
and Network Data Management Protocol Server 133](https://image.slidesharecdn.com/c01631241-120618223515-phpapp01/75/C01631241-133-2048.jpg)

![2. Run the Sybase isql utility:
isql -SSybase_instance -USybase_user -PSybase_password [-i
input_file -J utf8]
Parameter description
Sybase_instance Sybase instance name.
Sybase_user Sybase instance user.
Sybase_password Password of the Sybase instance user.
input_file The file to which the load parameter was
saved. See also “Localized database
names” on page 132.
140 Integrating Sybase Server and Data Protector](https://image.slidesharecdn.com/c01631241-120618223515-phpapp01/75/C01631241-140-2048.jpg)
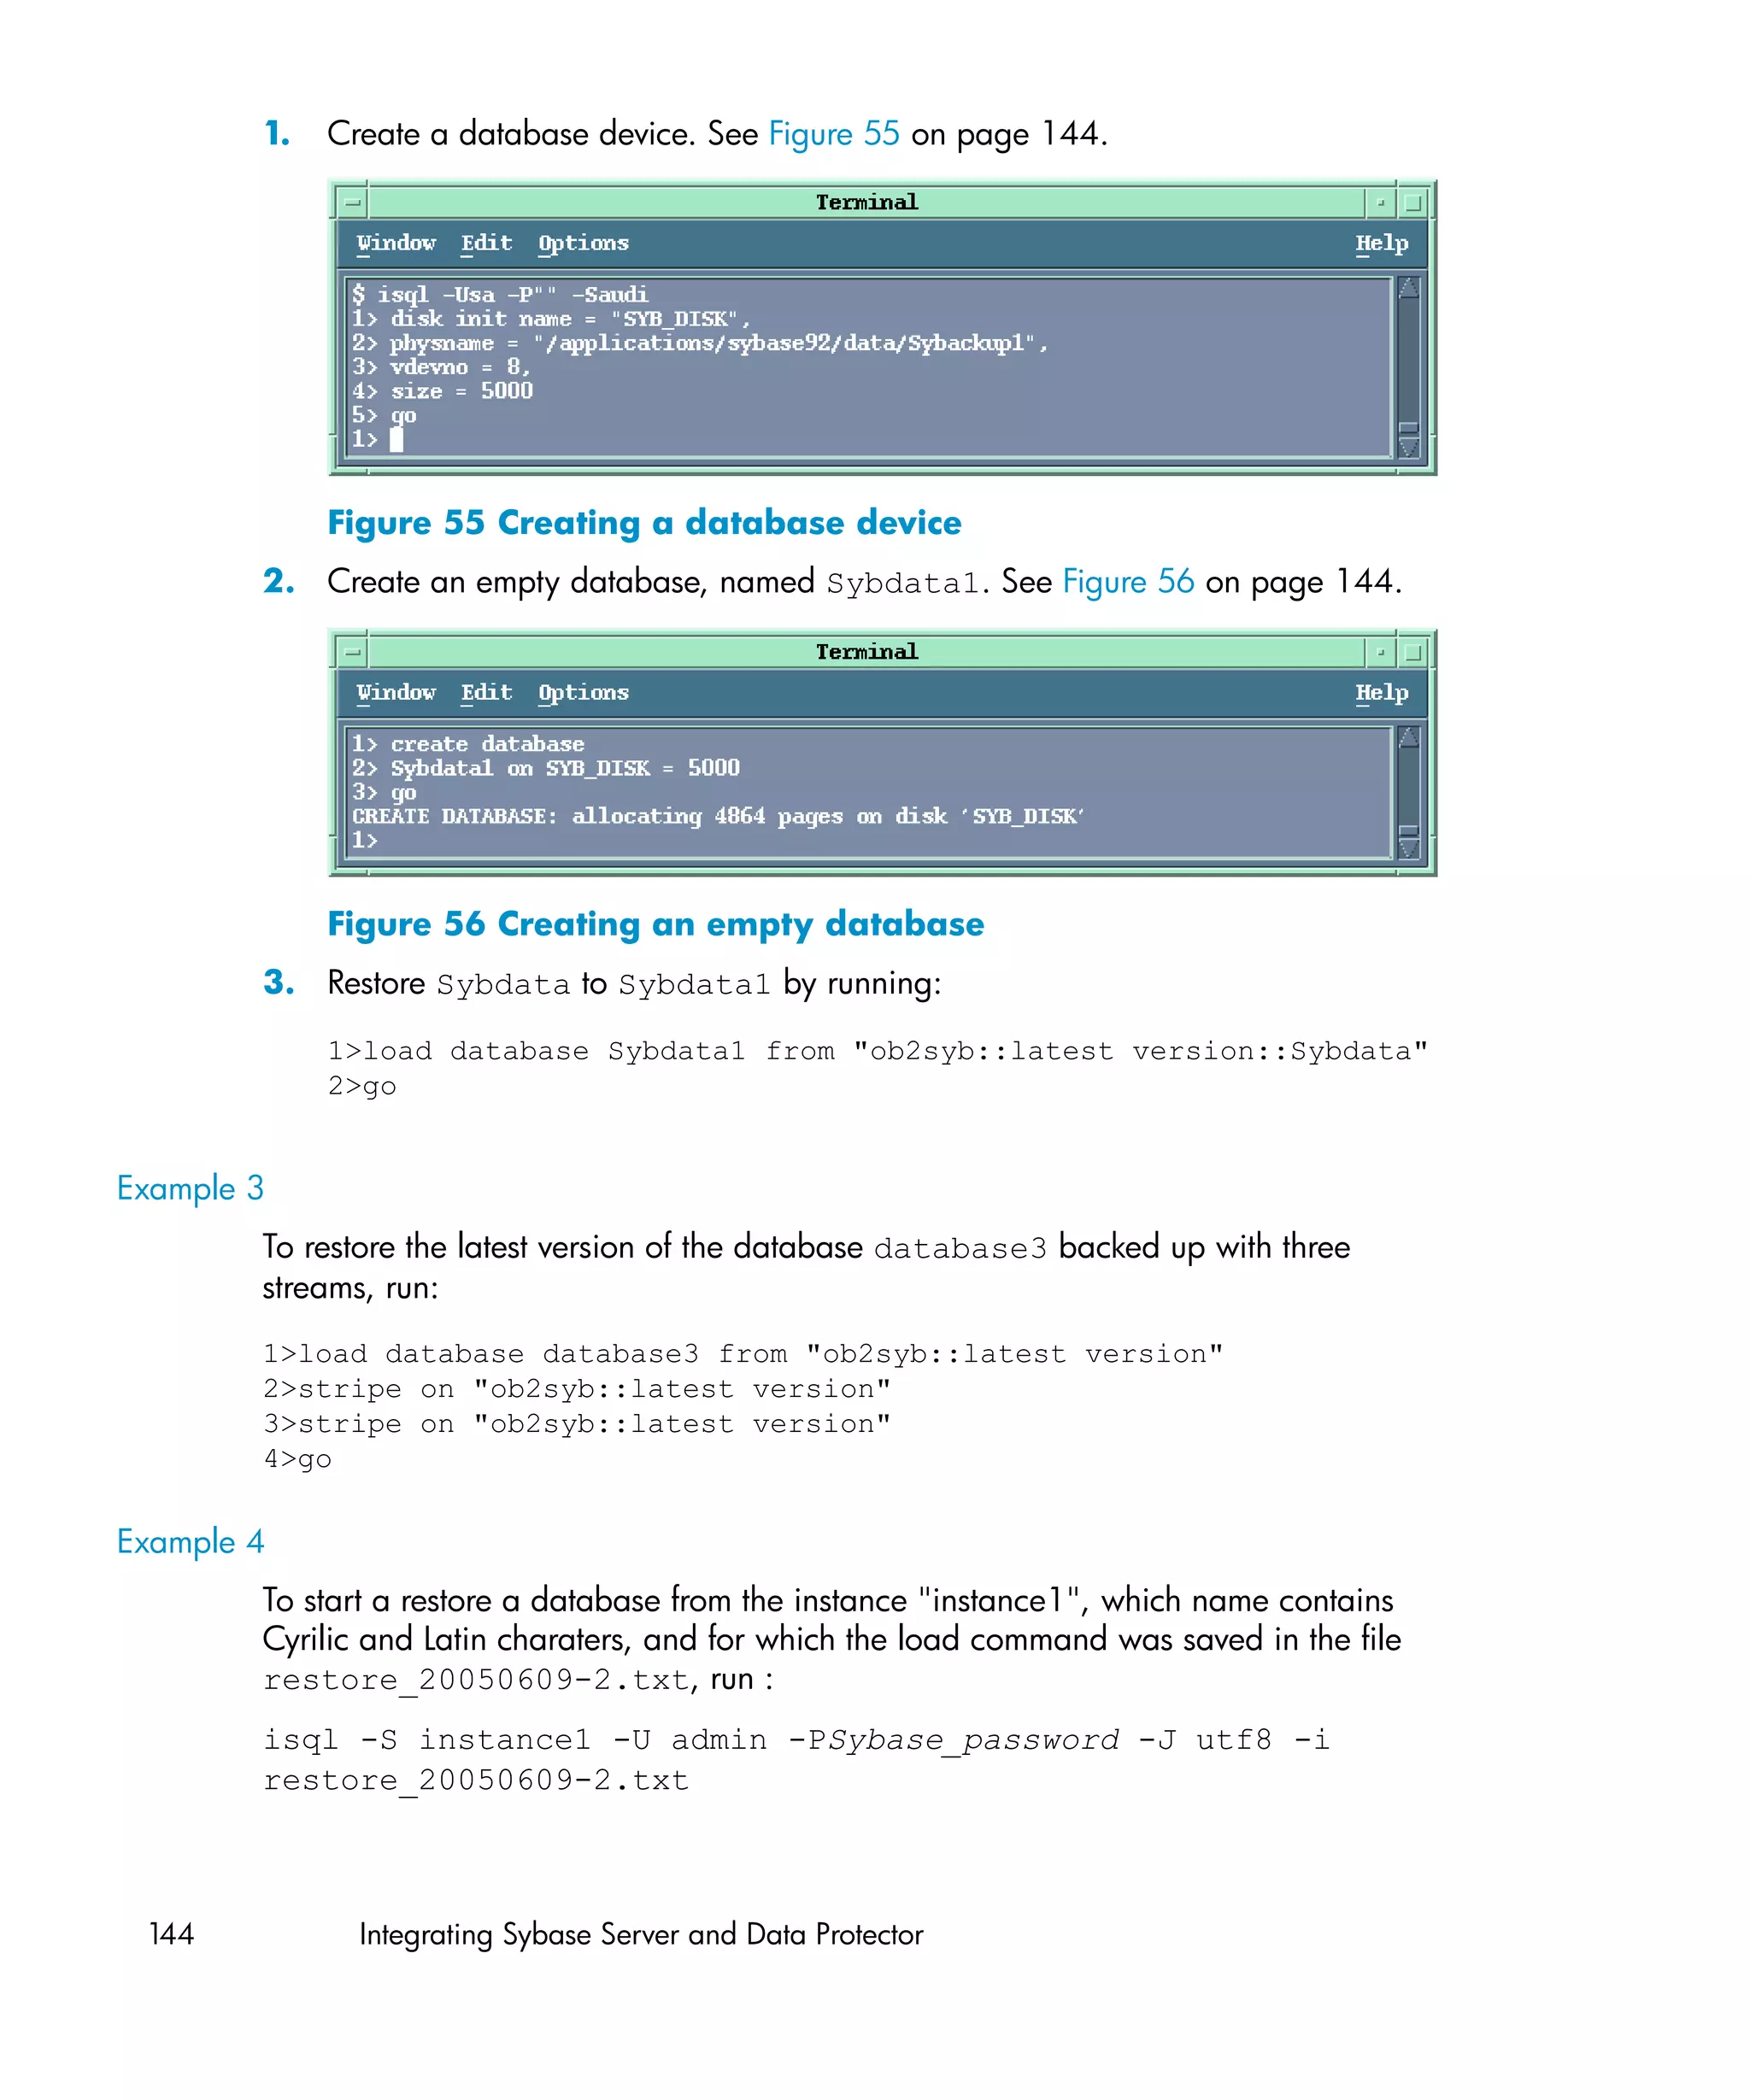
![3. If you did not provide the load command in a file, type the desired load
command in the first line. To run the command(s), type go in the last line and
press Enter.
The syntax of the Sybase load command is:
load {database|transaction} new_database from
"ob2syb::version[::database[::Sybase_instance]]"
stripe on
"ob2syb::version[::database[::Sybase_instance]]"
Parameter description
{database|transaction} Defines whether databases or transaction
logs are to be restored.
version Session ID of the backup version to restore
from. You can also type latest version
to restore from the latest backup.
new_database Target database to which to restore.
database Database to be restored.
Sybase_instance Sybase instance from which the database to
be restored was backed up.
The stripe part is needed only when restoring a database backed up with
several streams. The number of streams used for backup is displayed in the Data
Protector Monitor during the backup session.
IMPORTANT:
To restore a database to a new database, first create a new database. The
new database should have the same structure as the database to be restored.
For details on the Sybase load command, see the Adaptive Server Enterprise
System Administration Guide.
Integration guide for VMware Virtual Infrastructure, Sybase, Network Node Manager,
and Network Data Management Protocol Server 141](https://image.slidesharecdn.com/c01631241-120618223515-phpapp01/75/C01631241-141-2048.jpg)

![3. Specify Backup type and Network load. Click OK.
The message Session completed successfully is displayed at the end
of a successful backup session.
Restore
To restore NNM objects:
1. Stop all NNM processes.
2. Restore the NNM objects using the Data Protector GUI.
3. Perform the NNM recovery procedures.
4. Restart the NNM processes.
For details, see the online Help index: “standard restore procedure” and the
NNM reporting and data analysis manual.
Monitoring sessions
You can monitor currently running sessions in the Data Protector GUI. When you run
an interactive backup or restore session, a monitor window shows you the progress
of the session. Closing the GUI does not affect the session.
You can also monitor sessions from any Data Protector client with the User
Interface component installed, using the Monitor context.
On how to monitor a session, see the online Help index: “viewing currently running
sessions”.
Messages generated by scripts, NNM, and Data Protector are logged to the IDB.
Acceptable warnings on Windows
The following warnings, which are likely to occur during an NNM backup, have no
impact on the validity of the backup. They are only informational.
Message
[Warning] From: session_owner Time: mm/dd/yy hr:mn:sc
[error code] pathHP OpenViewNNMbintcl7.5.dll
Cannot preserve time attributes: ([5] Access is denied.).
Integration guide for VMware Virtual Infrastructure, Sybase, Network Node Manager,
and Network Data Management Protocol Server 155](https://image.slidesharecdn.com/c01631241-120618223515-phpapp01/75/C01631241-155-2048.jpg)
![Description
The file tcl7.5.dll is backed up, but the time attributes, which are not significant
to Data Protector, are not preserved.
Message
[Warning] From: session_owner Time: mm/dd/yy hr:mn:sc
[error code] pathHP
OpenViewNNMdatabasesanalysisdefaultsolid.db Cannot open:
([33] The process cannot access the file ....).
Description
The embedded database file referenced in this message has already been backed
up as part of the pre-exec script. Its default location is in the pathHP
OpenViewNNMdatabasesanalysisdefaultbackup directory, which is
specified in the solid.ini file. After the restore, copy the backed up solid.db
file from that directory to the active pathHP
OpenViewNNMdatabasesanalysisdefault directory.
Message
[Warning] From: session_owner Time: mm/dd/yy hr:mn:sc
[error code] pathHP
OpenViewNNMdatabasesopenviewtoponetmon.lock Cannot open:
([33] The process cannot access the file ....).
Message
[Warning] From: session_owner Time: mm/dd/yy hr:mn:sc
[error code] pathHP OpenViewNNMdatabasessnmpCollectdblock
Cannot open: ([33] The process cannot access the file ....).
Description
These files are not significant to Data Protector.
Troubleshooting
This section lists problems you might encounter when using the Data Protector NNM
integration.
156 Integrating HP Network Node Manager and Data Protector](https://image.slidesharecdn.com/c01631241-120618223515-phpapp01/75/C01631241-156-2048.jpg)


![3. Set up a Data Protector backup specification.
4. Run the backup specification (or schedule it in the specification).
These operations are described in this section.
Updating configuration script DPxen_config.py for backup
In the configuration file DPxen_config.py, or a configuration file with a name of
your own, you can specify the following parameters required to perform the backup:
Mode
The type of backup to be used and whether all, or only specified virtual machines
are to be backed up. Valid options are: online, allOnline, offline, and
allOffline. For explanations of these options, refer to “Integration
concepts” on page 195
url
The URL of the XenServer containing the virtual machines to be backed up.
username
The username of a user with the required access rights to the Xen Server.
password
The password of the user specified in username.
vmName
A list containing the names of the virtual machines to be backed up. If you specify
online or offline for the Mode parameter, you must specify the names of
the individual virtual machines that you want to backup. The format of the list is:
["name1", "name2",...]
The names can be obtained from the command line interface on the XenServer
(running the xe vm-list command) or from the XenCenter interface, as shown
in Figure 73.
If you specify allOnline or allOffline for the Mode parameter, this
parameter will be ignored.
debug
A Boolean value that should be set to True if you want to create a debug file
during the backup.
sr
This parameter is used for restore only. It is ignored during backup operations
and can be left out for backup, if preferred.
Integration guide for VMware Virtual Infrastructure, Sybase, Network Node Manager,
and Network Data Management Protocol Server 205](https://image.slidesharecdn.com/c01631241-120618223515-phpapp01/75/C01631241-205-2048.jpg)
![Figure 73 Obtaining the names of the virtual machines
Once you have all the information for those parameters you can proceed to change
the DPxen_config.py file or create a new configuration file.
Example backup configurations
• Suspend and backup the Debian virtual machine, without creating a debug file.
Mode = "offline"
url = "http://tpc227.company.com"
username = "user"
password = "myPassword"
vmName = ["Debian"]
debug = False
sr = ""
• Suspend and backup all the virtual machines present in the XenServer and create
a debug file. The debug file will be created in /tmp/ or C:/tmp/.
Mode = "allOffline"
url = "http://tpc227.company.com"
username = "user"
password = "myPassword"
vmName = []
debug = True
sr = ""
• Backup the virtual machines Debian and vm2 in hot mode, creating a debug file.
Mode = "online"
url = "http://tpc227.company.com"
username = "user"
password = "myPassword"
206 Integrating Citrix XenServer and HP Data Protector](https://image.slidesharecdn.com/c01631241-120618223515-phpapp01/75/C01631241-206-2048.jpg)
![vmName = ["Debian", "vm2"]
debug = True
sr = ""
• Backup all the virtual machines present in the XenServer, without changing their
power state. When the Mode selected is allOnline or allOffline, the value
of the vmName parameter is ignored so its value is not important. In this example
a debug file will not be created.
Mode = "allOnline"
url = "http://tpc227.company.com"
username = "user"
password = "myPassword"
vmName = []
debug = False
sr = ""
Creating a backup specification
In the Data Protector GUI, create a filesystem backup specification:
1. Select the Backup context and expand Backup Specifications.
2. Right click on Filesystem and select Add Backup.
3. Select a Blank Filesystem Backup template and click OK.
4. Select the item to be backed up. In this case, you must select the temporary
backup folder that was created during the installation process:
• On Windows: C:tmpbackup
• On Linux: /tmp/backup
Integration guide for VMware Virtual Infrastructure, Sybase, Network Node Manager,
and Network Data Management Protocol Server 207](https://image.slidesharecdn.com/c01631241-120618223515-phpapp01/75/C01631241-207-2048.jpg)
![Figure 74 Temporary backup folder selection
5. Click Next.
6. Select the backup device on which the backup will be performed and click Next.
7. In Backup Specification Options, click Advanced.
8. In the Backup Options window, make the following entries in the Pre-exec and
Post-exec sections:
Pre-exec: PythonDirectorypython.exe
ScriptPathDPxen_backup.py [ConfigFile]
On client: myDPClient.com
Post-exec: PythonDirectorypython.exe
ScriptPathDPxen_postbackup.py
On client: myDPClient.com
where:
• PythonDirectory is the name of the directory containing the python
interpreter, for example, Python25. Python must be installed in the correct
location, as described in “Prerequisites” on page 201.
NOTE:
If the integration scripts have been installed on the Cell Manager, the full
path must be given. For example,
Data_Protector_homebinPython25.
208 Integrating Citrix XenServer and HP Data Protector](https://image.slidesharecdn.com/c01631241-120618223515-phpapp01/75/C01631241-208-2048.jpg)
![username
The username of a user with the required access rights to the XenServer.
password
The password of the user specified in Username.
vmName
A list containing the names of the virtual machines to be restored. If you specify
online or offline for the Mode parameter, you must specify the names of
the individual virtual machines that you want to restore. The format of the list is:
["name1", "name2",..]
If you specify allOnline or allOffline for the Mode parameter, the vmName
parameter is ignored.
debug
A Boolean value that should be set to True if you want to create a debug file
during the restore.
sr
The name of the storage repository to which you want to restore the virtual
machine(s) specified in the vmName parameter. This does not have to be the
same storage repository as the one in use when the virtual machine was backed
up. If the specified value is blank (sr = "") the restore is performed to the
default storage repository.
IMPORTANT:
You must have a default storage repository defined if you leave this
parameter blank for a restore, otherwise the restore will fail.
Example restore configurations
• Restore the Debian virtual machine, which was backed up using offline mode,
into the default storage repository. Create a debug file.
Mode = "offline"
url = "http://tpc227.company.com"
username = "user"
password = "myPassword"
vmName = ["Debian"]
debug = False
sr = ""
210 Integrating Citrix XenServer and HP Data Protector](https://image.slidesharecdn.com/c01631241-120618223515-phpapp01/75/C01631241-210-2048.jpg)
![• Restore all the files backed up in the selected session into the default storage
repository. The backup was performed in offline mode. Create a debug file.
Mode = "allOffline"
url = "http://tpc227.company.com"
username = "user"
password = "myPassword"
vmName = []
debug = True
sr = ""
• Restore the virtual machines Debian and vm2, which were backed up in online
mode, into the default storage repository and create a debug file.
Mode = "online"
url = "http://tpc227.company.com"
username = "user"
password = "myPassword"
vmName = ["Debian", "vm2"]
debug = True
sr = ""
• Restore all the virtual machines present in the XenServer, without changing their
power state. Create a debug file.
Mode = "allOnline"
url = "http://tpc227.company.com"
username = "user"
password = "myPassword"
vmName = []
debug = False
sr = ""
• Restore the Debian and vm2 virtual machines, which were backed up using the
offline mode, into storage repository "Shared Storage" (See Figure 75) .
Create a debug file.
Mode = "offline"
url = "http://tpc227.company.com"
username = "user"
password = "myPassword"
vmName = ["Debian", "vm2"]
debug = True
sr = "Shared Storage"
Integration guide for VMware Virtual Infrastructure, Sybase, Network Node Manager,
and Network Data Management Protocol Server 211](https://image.slidesharecdn.com/c01631241-120618223515-phpapp01/75/C01631241-211-2048.jpg)
![Figure 75 Available storage repositories
• Restore the Debian virtual machine, which was originally backed up using the
online mode, into the "Removable storage" storage repository. Do not create
a debug file.
Mode = "online"
url = "http://tpc227.company.com"
username = "user"
password = "myPassword"
vmName = ["Debian"]
debug = False
sr = "Removable storage"
Specifying a restore
1. In the Context List, click Restore.
2. In the Scoping Pane, expand Restore Sessions to display clients and then the
object backed up on those clients (The mount point containing the temporary
backup directory you created during the installation process).
3. Click the object to open the property pages.
4. In the Source tab, select the temporary backup directory to view the files available
for restore. Note that the filename formats indicate the mode of the backups in
the folder, as follows:
• offline or allOffline: servername_vmName.xva
• online or allOnline: servername_vmName_Snapshot.xva
Check the file format, to decide the mode of restore required, (it must be
equivalent to the type of backup). See Figure 76.
212 Integrating Citrix XenServer and HP Data Protector](https://image.slidesharecdn.com/c01631241-120618223515-phpapp01/75/C01631241-212-2048.jpg)
![Figure 76 Selection of files to restore
IMPORTANT:
The Source tab shows the contents of the temporary backup folder when the
backup session was performed. It does not show the current contents of the
folder. It is important to ensure that the temporary backup folder is empty before
performing a restore.
During a restore, the files selected in this tab are first restored to the temporary
backup folder. Only files selected here are subsequently available for the restore
of virtual machines using the DPxen_restore.py script (provided the
temporary backup folder was empty beforehand).
5. In the Options tab, in the Post-exec field, specify the DPxen_restore.py script
as follows:
PythonPathpython.exe ScriptPathDPxen_restore.py
[ConfigFile]
where:
• PythonPath is the full path of the python interpreter, for example,
Data_Protector_homebinPython25
Integration guide for VMware Virtual Infrastructure, Sybase, Network Node Manager,
and Network Data Management Protocol Server 213](https://image.slidesharecdn.com/c01631241-120618223515-phpapp01/75/C01631241-213-2048.jpg)


![Coded Agents – with UiPath SDK + LangGraph [Virtual Hands-on Workshop]](https://cdn.slidesharecdn.com/ss_thumbnails/codedagentsdeck-251215155422-5497c599-thumbnail.jpg?width=640&height=640&fit=bounds)
![Vibe Coding vs. Spec-Driven Development [Free Meetup]](https://cdn.slidesharecdn.com/ss_thumbnails/vibecodingvsspecdrivendevelopment-251209105622-43f455e7-thumbnail.jpg?width=640&height=640&fit=bounds)


