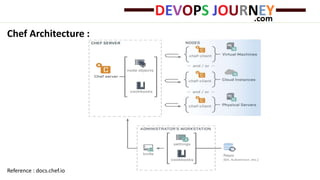
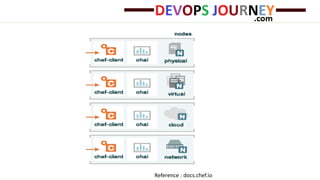
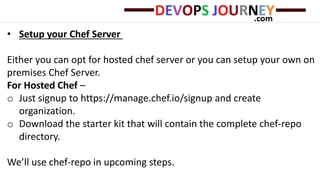
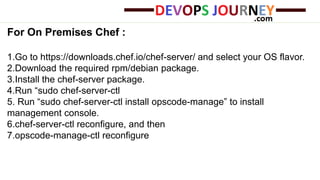
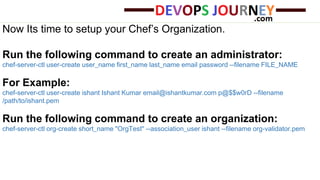
Setup Chef Environment
Server, Workstation and Register node
- Ishant Kumar
Here we will see how to setup Chef Environment that should include
Chef Server Installation, Workstation Configuration and Node
Registration but before that Lets understand the basics of Chef.
Chef is a systems as well as cloud infrastructure automation
framework. It doesn’t matter what is the size of the infrastructure, it
easy to deploy servers and applications to any physical, virtual, or
cloud location. In short chef is infrastructure automation and
management tool.
Understanding Chef Architecture
Before jumping into architecture let us understand which Chef is
right for you. Chef is available in two flavors:
• HOSTED CHEF
• ON PREMISES CHEF
• HOSTED CHEF
Hosted Enterprise Chef is the quickest and easiest way to get started
with Chef. This Chef is hosted by Chef itself. You don’t need to take care
of updates and maintenance. Just signup, setup organization, configure
workstation and upload your cookbooks. Its Highly available and highly
scalable .
• ON PREMISES CHEF
If you just want to set up and manage your own Chef server, choose to
install Enterprise Chef on premises.
Chef Architecture :
Reference : docs.chef.io
• Workstation
A workstation is a computer that is configured to run Knife, to synchronize with
the chef-repo, and interact with a single Chef server. The
workstation is the location from which most users will do most of their work,
including:
— Developing cookbooks and recipes
— Keeping the chef-repo synchronized with version source control
–Using Knife to upload items from the chef-repo to the Chef server
— Configuring organizational policy, including defining roles and environments
and ensuring that critical data is stored in data bags
— Interacting with nodes, as (or when) required, such as performing a bootstrap
operation.
Reference : docs.chef.io
• Knife
Knife is a command-line tool that provides an interface between a
local chef-repo and the Chef server. Knife helps users to manage:
— Nodes
— Cookbooks and recipes Roles
— Stores of JSON data (data bags), including encrypted data
— Environments
— Cloud resources, including provisioning
— The installation of the chef-client on management workstations.
Reference : docs.chef.io
• Node
— Each node stores its own private key locally.
— This private key is generated as part of the bootstrap process that
initially installs the chef-client on the node.
— The first time chef-client runs on that node, it uses the chef-
validator to authenticate, but then on each subsequent run it uses the
private key generated for that client by the Chef server.
Reference : docs.chef.io
• Setup your Chef Server
Either you can opt for hosted chef server or you can setup your own on
premises Chef Server.
For Hosted Chef –
o Just signup to https://manage.chef.io/signup and create
organization.
o Download the starter kit that will contain the complete chef-repo
directory.
We’ll use chef-repo in upcoming steps.
For On Premises Chef :
1.Go to https://downloads.chef.io/chef-server/ and select your OS flavor.
2.Download the required rpm/debian package.
3.Install the chef-server package.
4.Run “sudo chef-server-ctl
5. Run “sudo chef-server-ctl install opscode-manage” to install
management console.
6.chef-server-ctl reconfigure, and then
7.opscode-manage-ctl reconfigure
Now Its time to setup your Chef’s Organization.
Run the following command to create an administrator:
chef-server-ctl user-create user_name first_name last_name email password --filename FILE_NAME
For Example:
chef-server-ctl user-create ishant Ishant Kumar email@ishantkumar.com p@$$w0rD --filename
/path/to/ishant.pem
Run the following command to create an organization:
chef-server-ctl org-create short_name "OrgTest" --association_user ishant --filename org-validator.pem
• Configuring knife
We can configure knife by running command “knife configure –I” on linux
machine.
After running this command it will ask for chef URL and key files, assign it
accordingly.
Second option is we can download knife configuration directly from chef server
and can place it to our machine where we want to configure workstation. This
will give you a directory say chef-repo. In this directory a hidden directory
named .chef will be there . Inside this directory you would be having one
knife.rb file, one user’s key having knife authorization and one server-validation
key.
Chef Workstation Directory structure
You can test the knife by running this command :
#knife client list
(This will lists all the clients associated with the organization for which
knife is configured).
If this works fine. It means your workstation has been configured
correctly.
• Register Node with Chef Server
 Install chef-client package your node machine from https://downloads.chef.io/chef-
client/
 Create a /etc/chef/ directory (if it is linux) or C:/chef/ (if it is windows) and change
the directory.
 Create client.rb file inside /etc/chef/ with below contents
node_name "<your_node_name>"
validation_key "/path/to/org-validator.pem"
chef_server_url "https://api.opscode.com/organizations/<org-short-name>"
 copy org-validator.pem file to /etc/chef/ or C:/chef (depending upon the OS you are
using)
 Run “chef-client” command. Your node will be registered in Chef Server.
So this is how we can Setup Chef Server, configure workstation and
register a node.
Thanks
Looking Forward for your interest in DevOpsJourney.com
http://devopsjourney.com
Email us: mail@devopsjourney.com

Understand Chef

  • 1.
    Setup Chef Environment Server,Workstation and Register node - Ishant Kumar
  • 2.
    Here we willsee how to setup Chef Environment that should include Chef Server Installation, Workstation Configuration and Node Registration but before that Lets understand the basics of Chef. Chef is a systems as well as cloud infrastructure automation framework. It doesn’t matter what is the size of the infrastructure, it easy to deploy servers and applications to any physical, virtual, or cloud location. In short chef is infrastructure automation and management tool.
  • 3.
    Understanding Chef Architecture Beforejumping into architecture let us understand which Chef is right for you. Chef is available in two flavors: • HOSTED CHEF • ON PREMISES CHEF
  • 4.
    • HOSTED CHEF HostedEnterprise Chef is the quickest and easiest way to get started with Chef. This Chef is hosted by Chef itself. You don’t need to take care of updates and maintenance. Just signup, setup organization, configure workstation and upload your cookbooks. Its Highly available and highly scalable . • ON PREMISES CHEF If you just want to set up and manage your own Chef server, choose to install Enterprise Chef on premises.
  • 5.
  • 6.
    • Workstation A workstationis a computer that is configured to run Knife, to synchronize with the chef-repo, and interact with a single Chef server. The workstation is the location from which most users will do most of their work, including: — Developing cookbooks and recipes — Keeping the chef-repo synchronized with version source control –Using Knife to upload items from the chef-repo to the Chef server — Configuring organizational policy, including defining roles and environments and ensuring that critical data is stored in data bags — Interacting with nodes, as (or when) required, such as performing a bootstrap operation.
  • 7.
  • 8.
    • Knife Knife isa command-line tool that provides an interface between a local chef-repo and the Chef server. Knife helps users to manage: — Nodes — Cookbooks and recipes Roles — Stores of JSON data (data bags), including encrypted data — Environments — Cloud resources, including provisioning — The installation of the chef-client on management workstations.
  • 9.
  • 10.
    • Node — Eachnode stores its own private key locally. — This private key is generated as part of the bootstrap process that initially installs the chef-client on the node. — The first time chef-client runs on that node, it uses the chef- validator to authenticate, but then on each subsequent run it uses the private key generated for that client by the Chef server.
  • 11.
  • 12.
    • Setup yourChef Server Either you can opt for hosted chef server or you can setup your own on premises Chef Server. For Hosted Chef – o Just signup to https://manage.chef.io/signup and create organization. o Download the starter kit that will contain the complete chef-repo directory. We’ll use chef-repo in upcoming steps.
  • 13.
    For On PremisesChef : 1.Go to https://downloads.chef.io/chef-server/ and select your OS flavor. 2.Download the required rpm/debian package. 3.Install the chef-server package. 4.Run “sudo chef-server-ctl 5. Run “sudo chef-server-ctl install opscode-manage” to install management console. 6.chef-server-ctl reconfigure, and then 7.opscode-manage-ctl reconfigure
  • 14.
    Now Its timeto setup your Chef’s Organization. Run the following command to create an administrator: chef-server-ctl user-create user_name first_name last_name email password --filename FILE_NAME For Example: chef-server-ctl user-create ishant Ishant Kumar email@ishantkumar.com p@$$w0rD --filename /path/to/ishant.pem Run the following command to create an organization: chef-server-ctl org-create short_name "OrgTest" --association_user ishant --filename org-validator.pem
  • 15.
    • Configuring knife Wecan configure knife by running command “knife configure –I” on linux machine. After running this command it will ask for chef URL and key files, assign it accordingly. Second option is we can download knife configuration directly from chef server and can place it to our machine where we want to configure workstation. This will give you a directory say chef-repo. In this directory a hidden directory named .chef will be there . Inside this directory you would be having one knife.rb file, one user’s key having knife authorization and one server-validation key.
  • 16.
  • 17.
    You can testthe knife by running this command : #knife client list (This will lists all the clients associated with the organization for which knife is configured). If this works fine. It means your workstation has been configured correctly.
  • 18.
    • Register Nodewith Chef Server  Install chef-client package your node machine from https://downloads.chef.io/chef- client/  Create a /etc/chef/ directory (if it is linux) or C:/chef/ (if it is windows) and change the directory.  Create client.rb file inside /etc/chef/ with below contents node_name "<your_node_name>" validation_key "/path/to/org-validator.pem" chef_server_url "https://api.opscode.com/organizations/<org-short-name>"  copy org-validator.pem file to /etc/chef/ or C:/chef (depending upon the OS you are using)  Run “chef-client” command. Your node will be registered in Chef Server.
  • 19.
    So this ishow we can Setup Chef Server, configure workstation and register a node.
  • 20.
    Thanks Looking Forward foryour interest in DevOpsJourney.com http://devopsjourney.com Email us: mail@devopsjourney.com