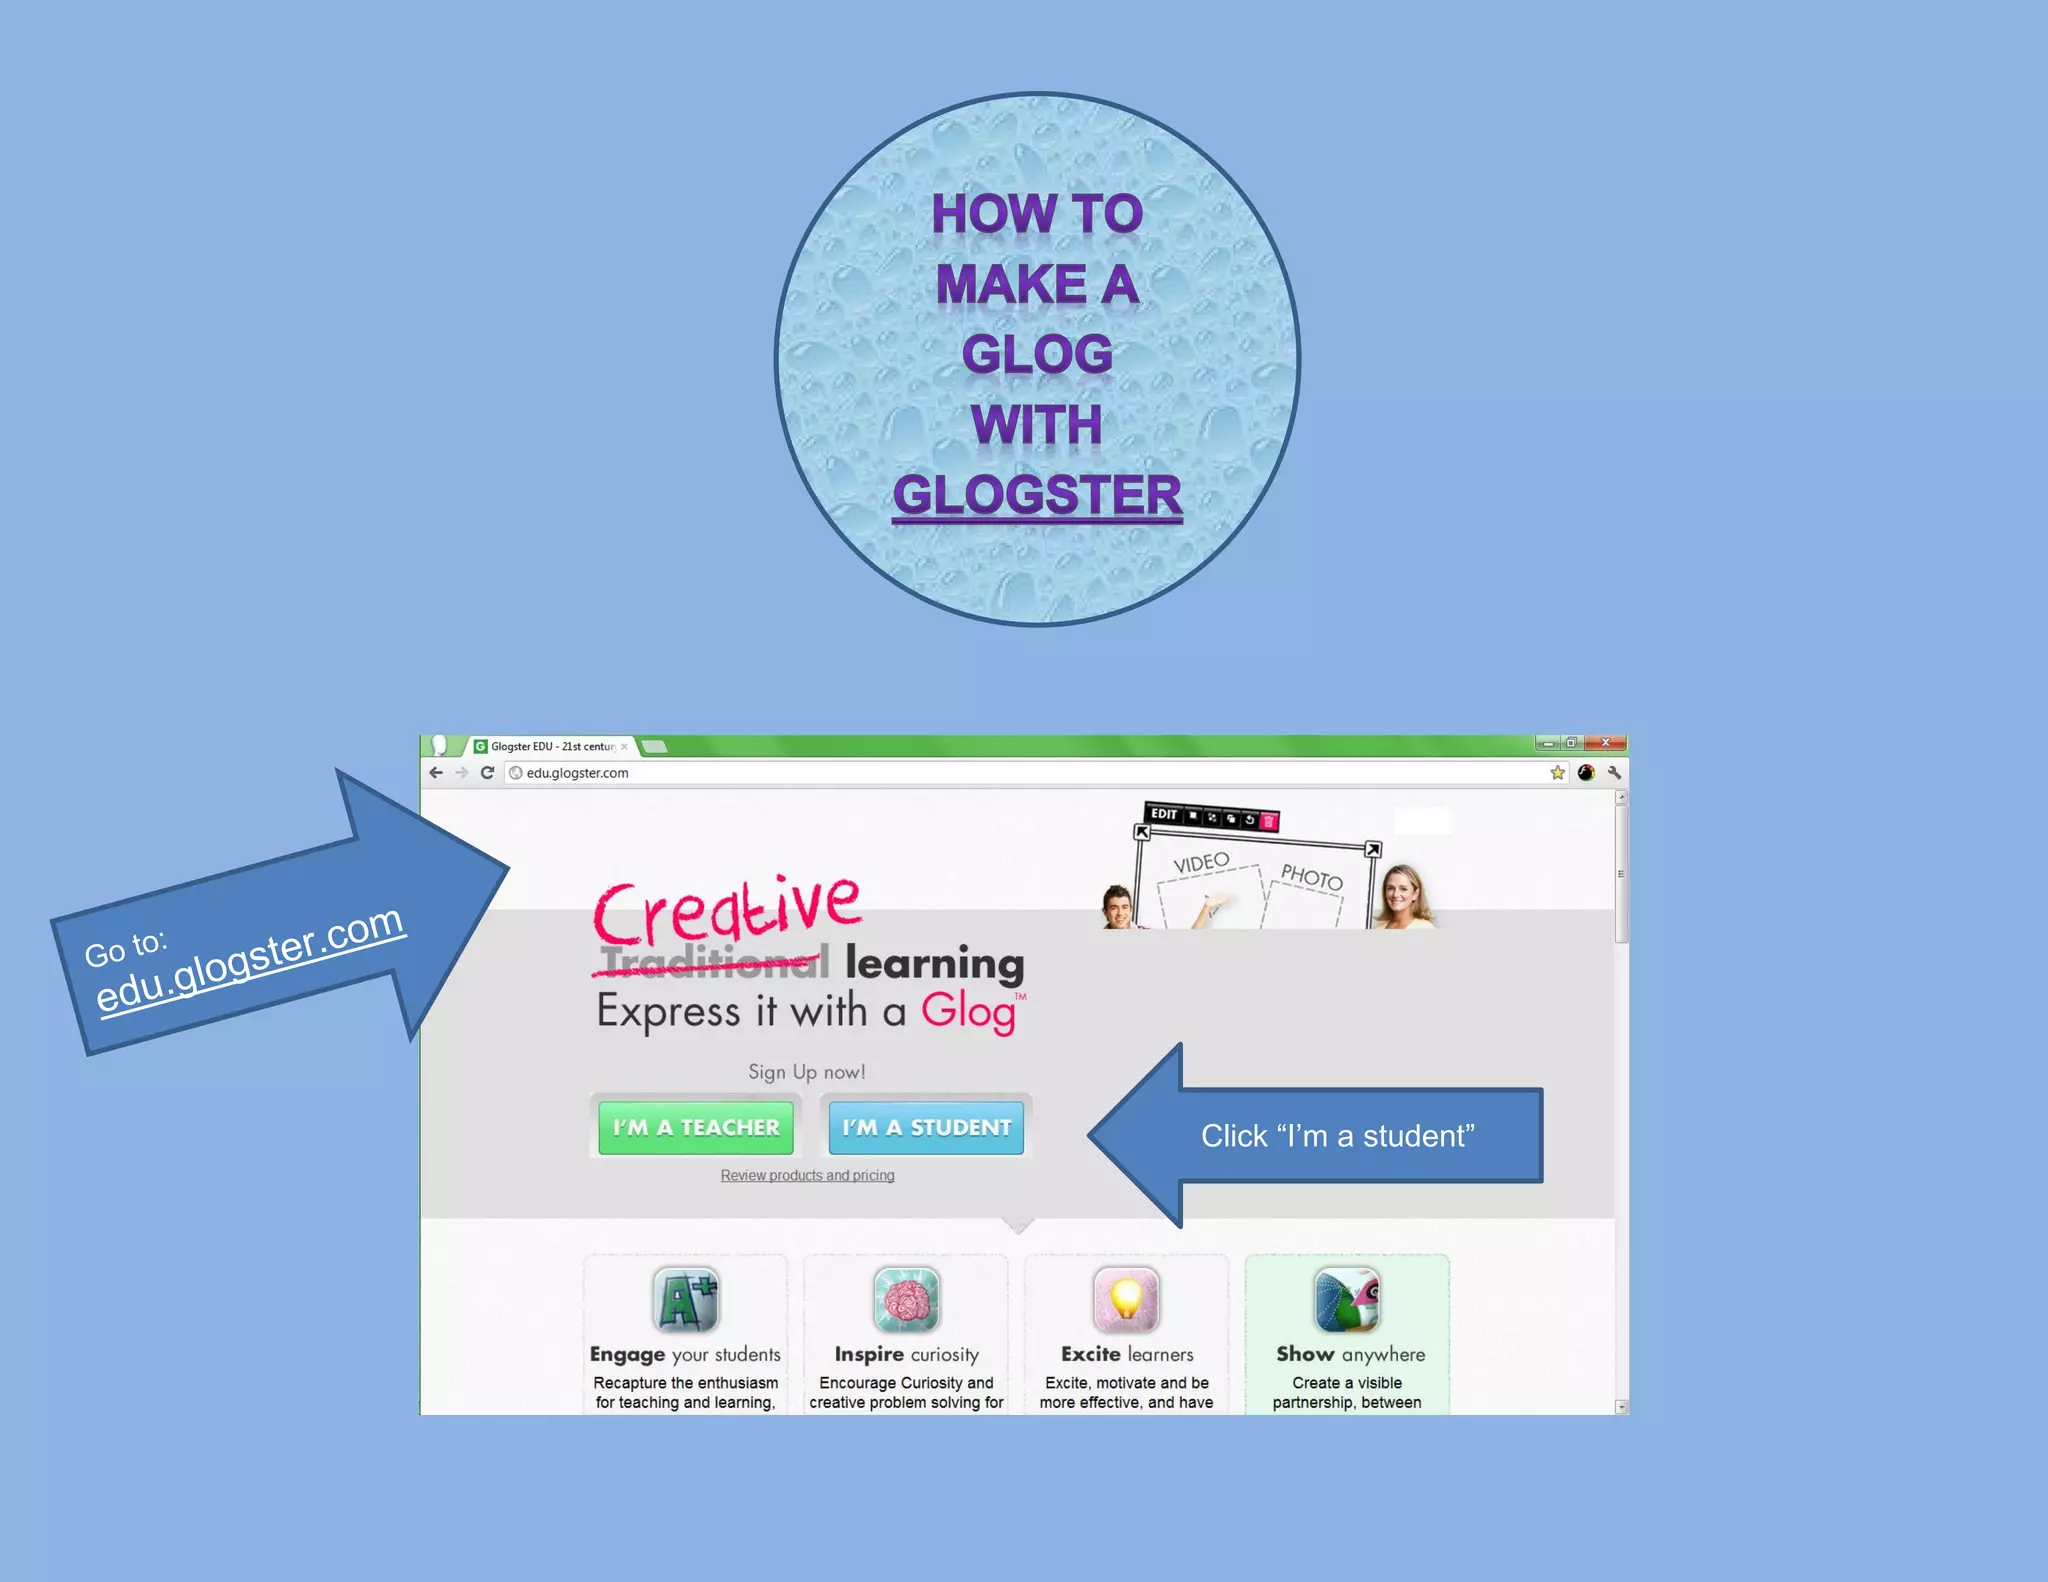
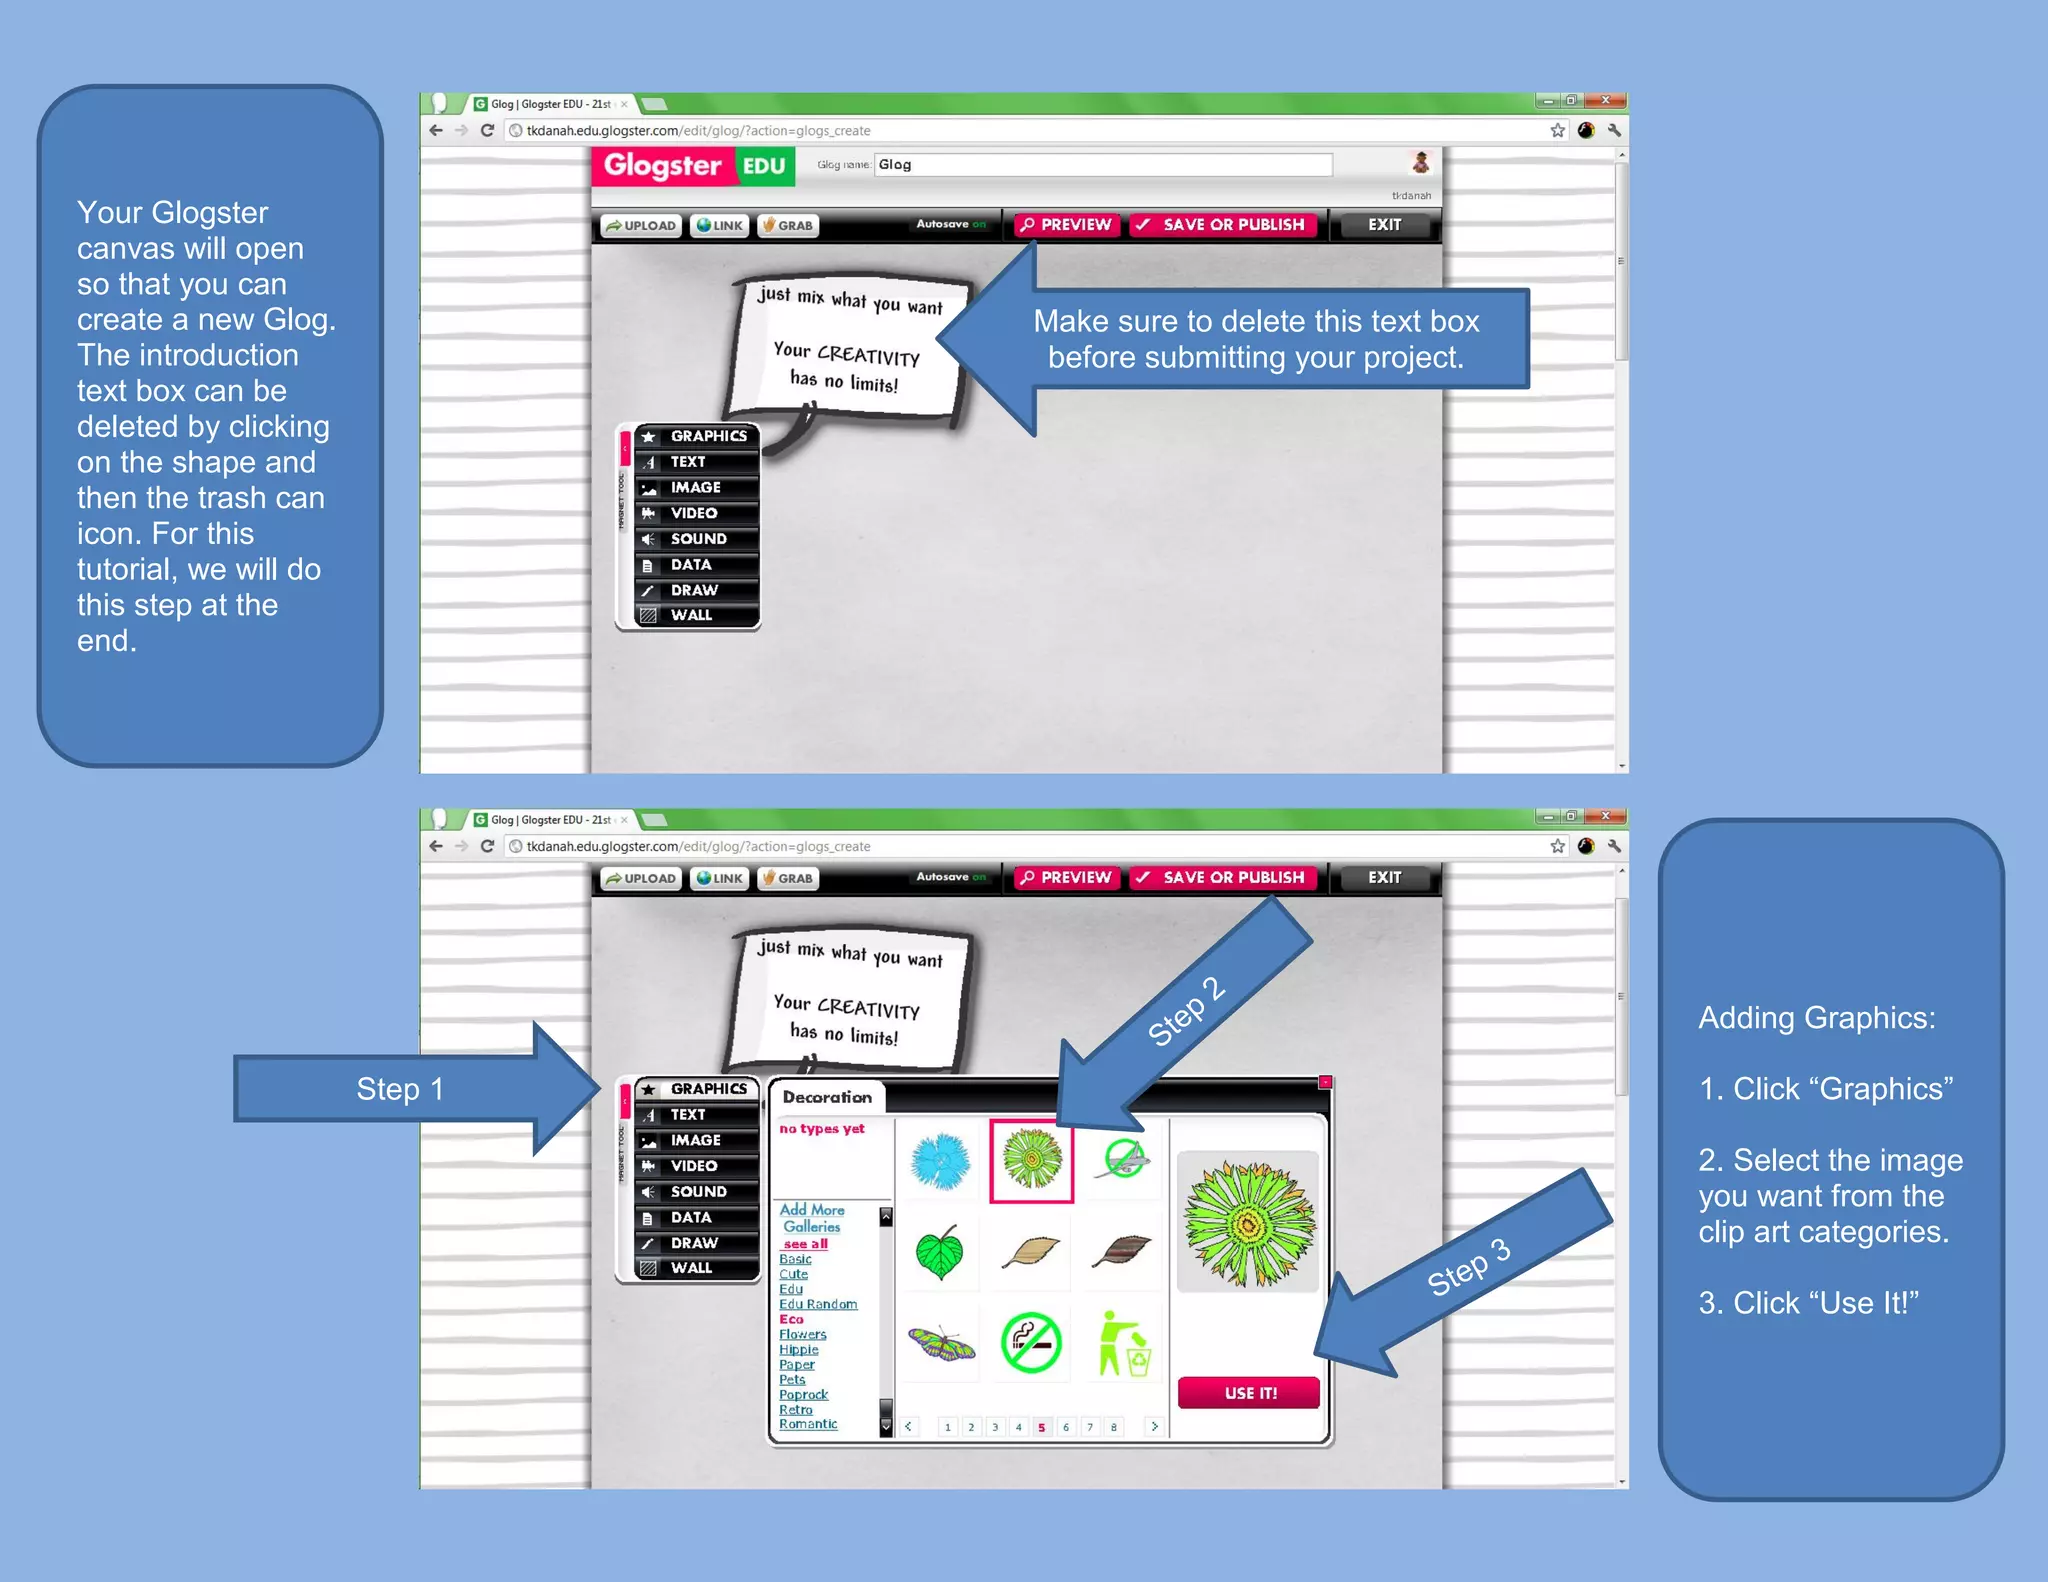
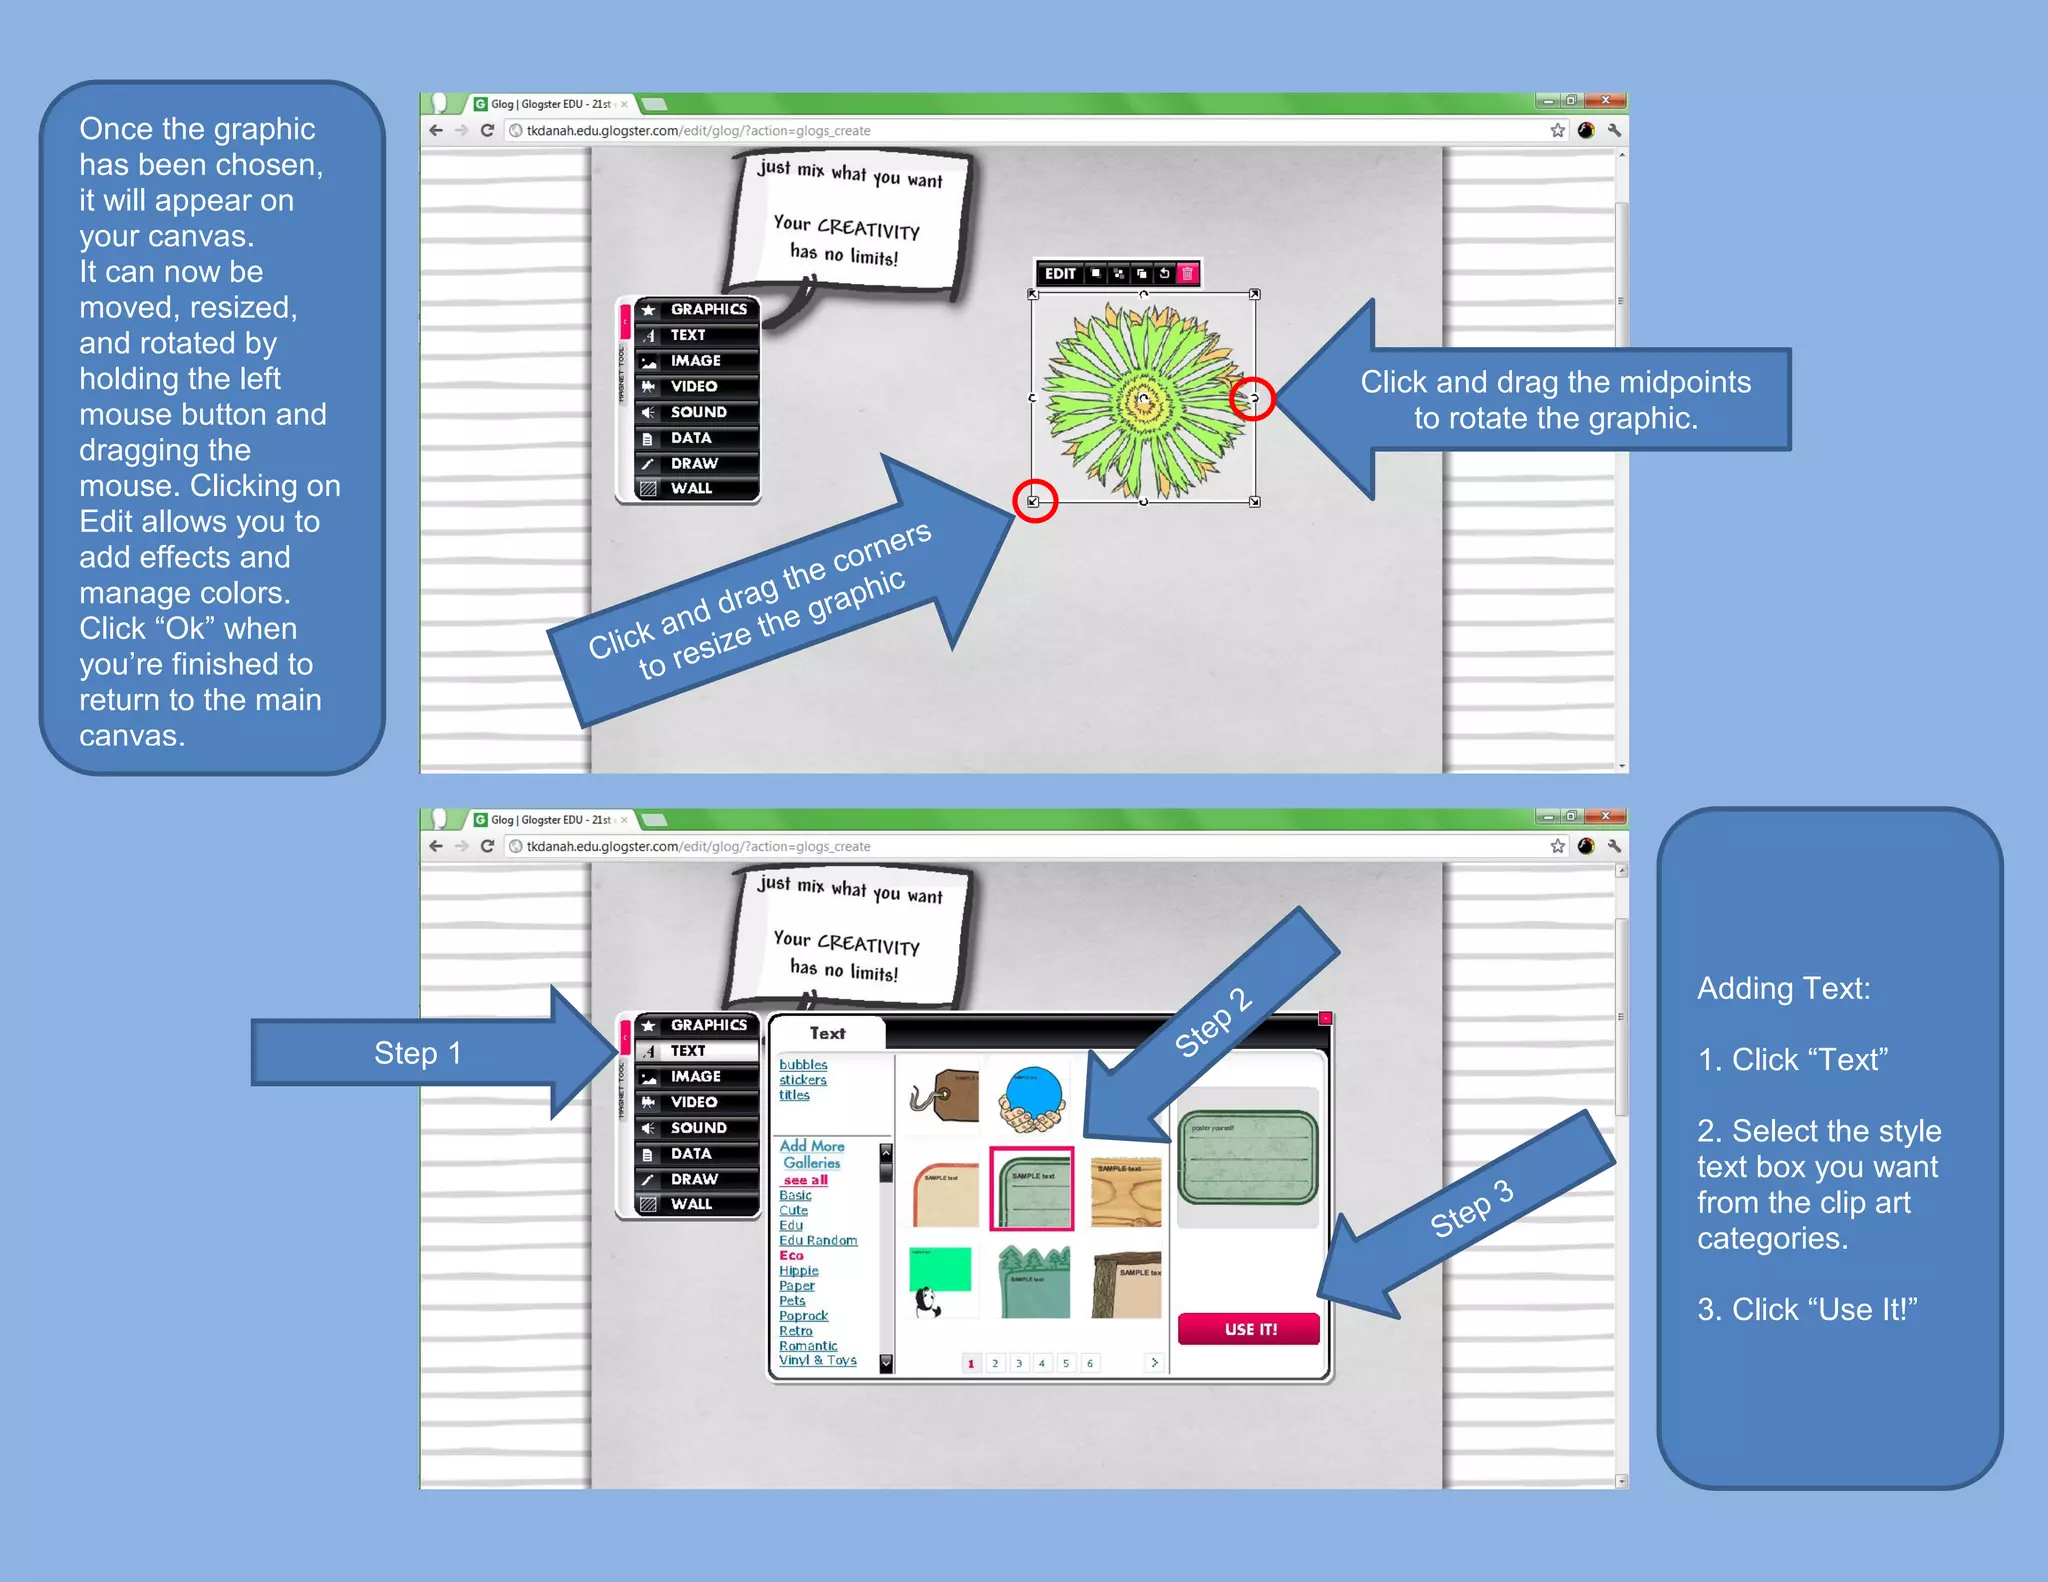
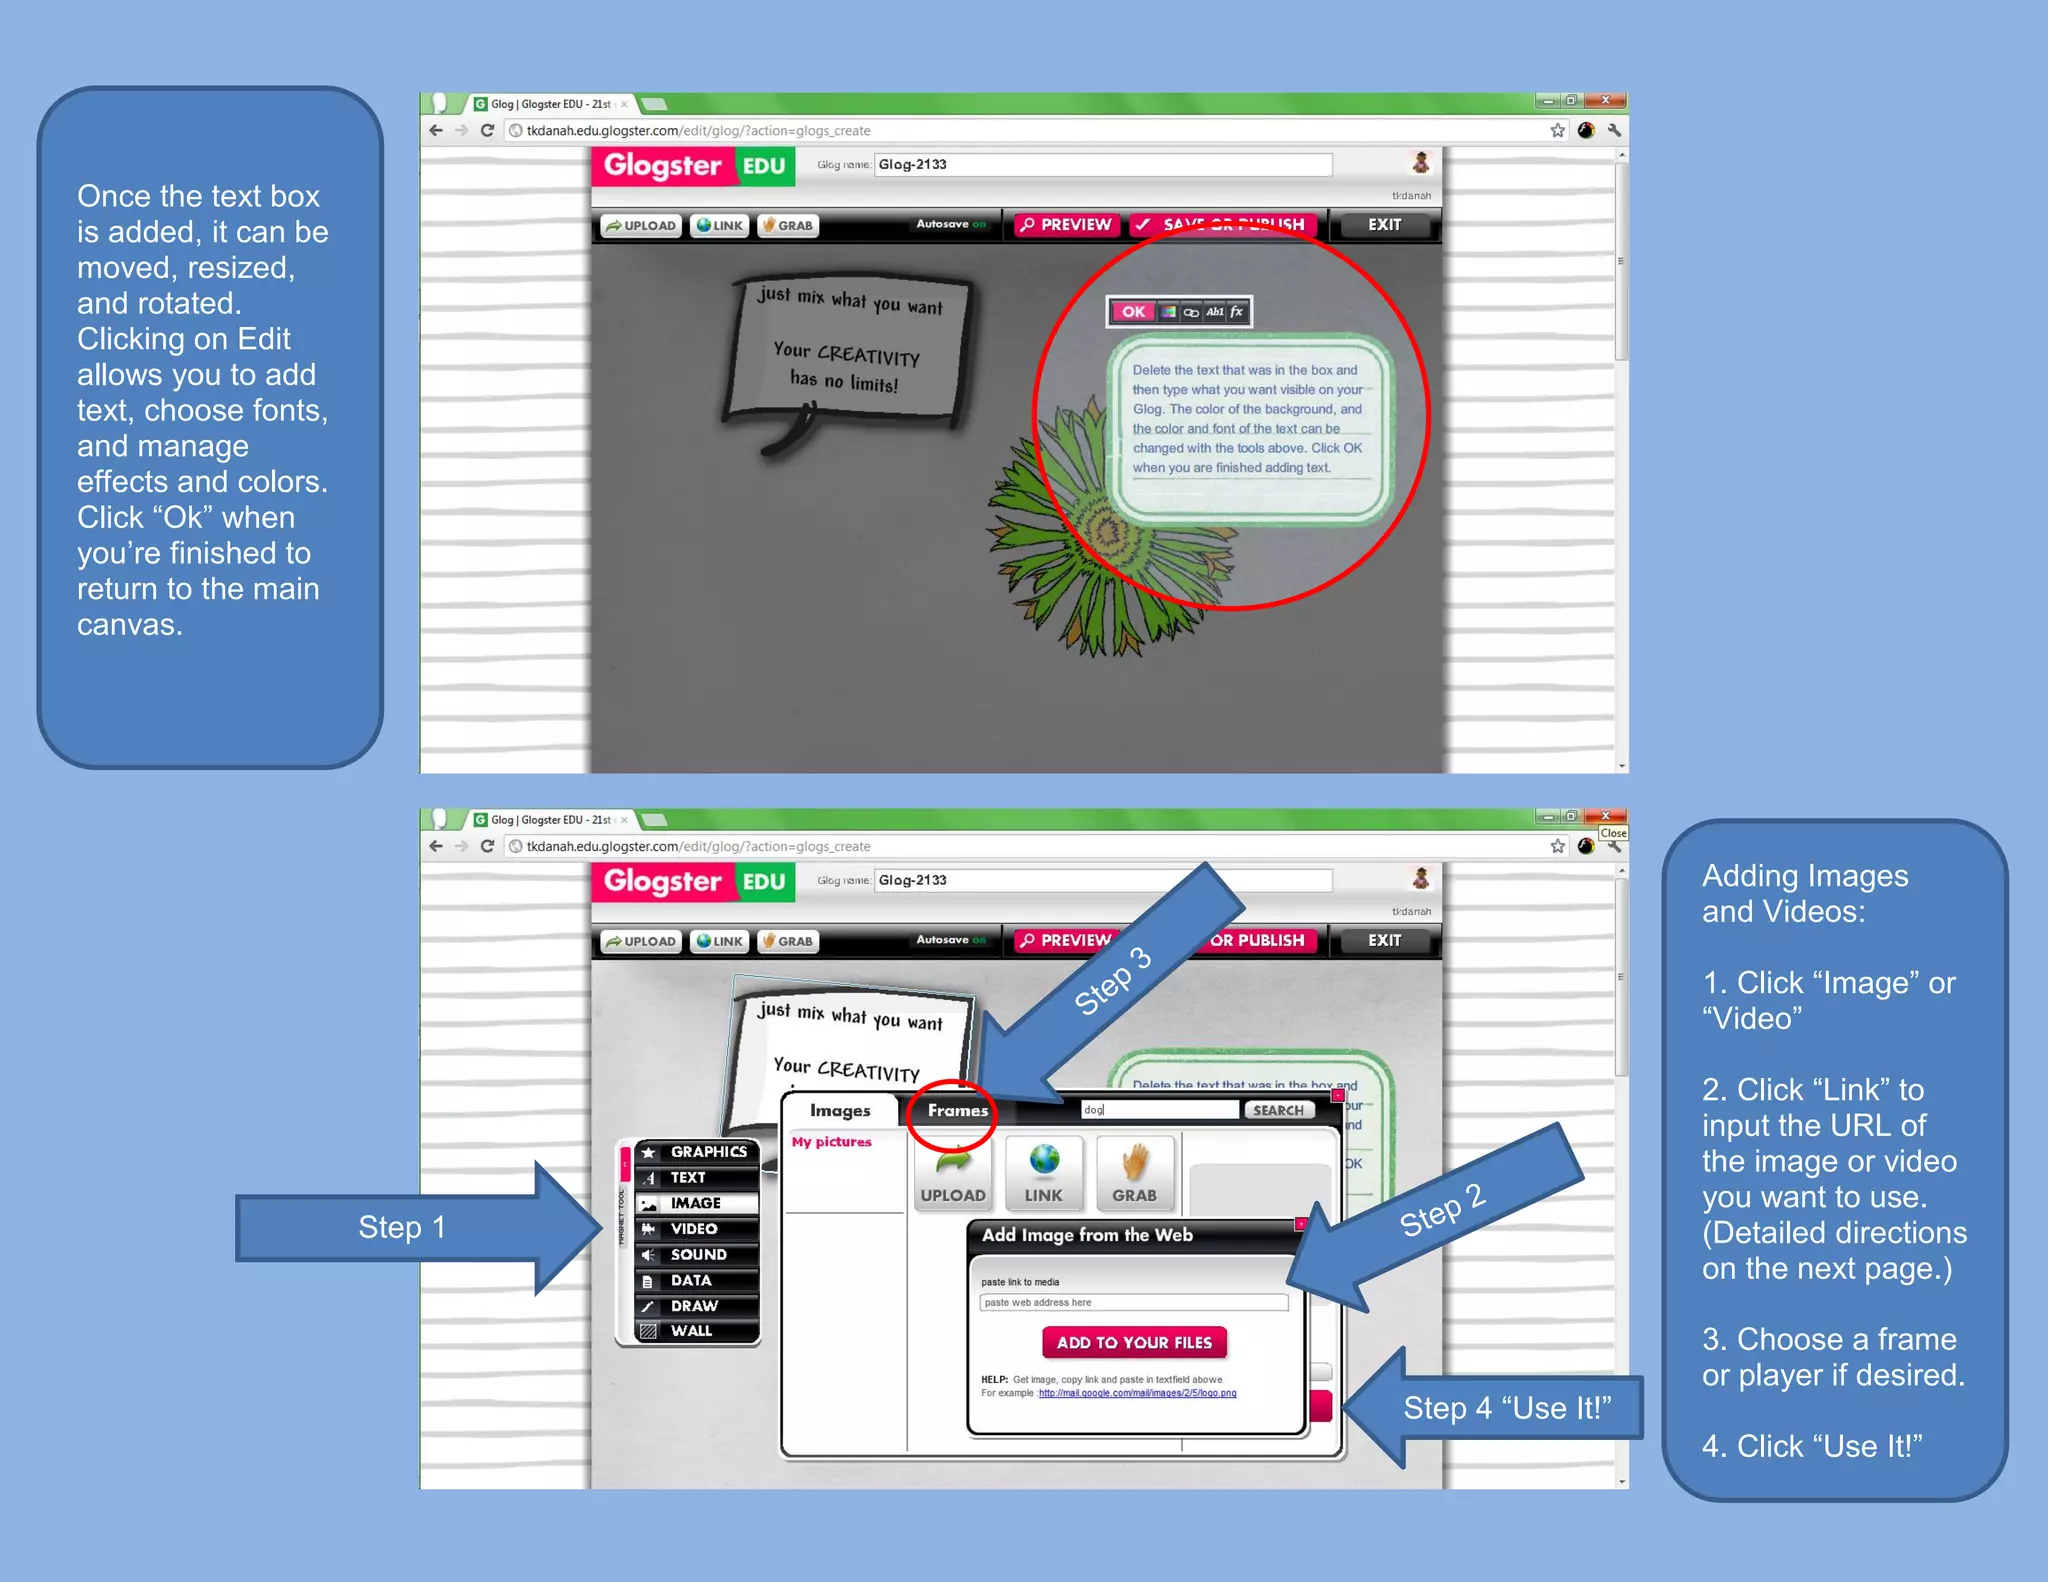
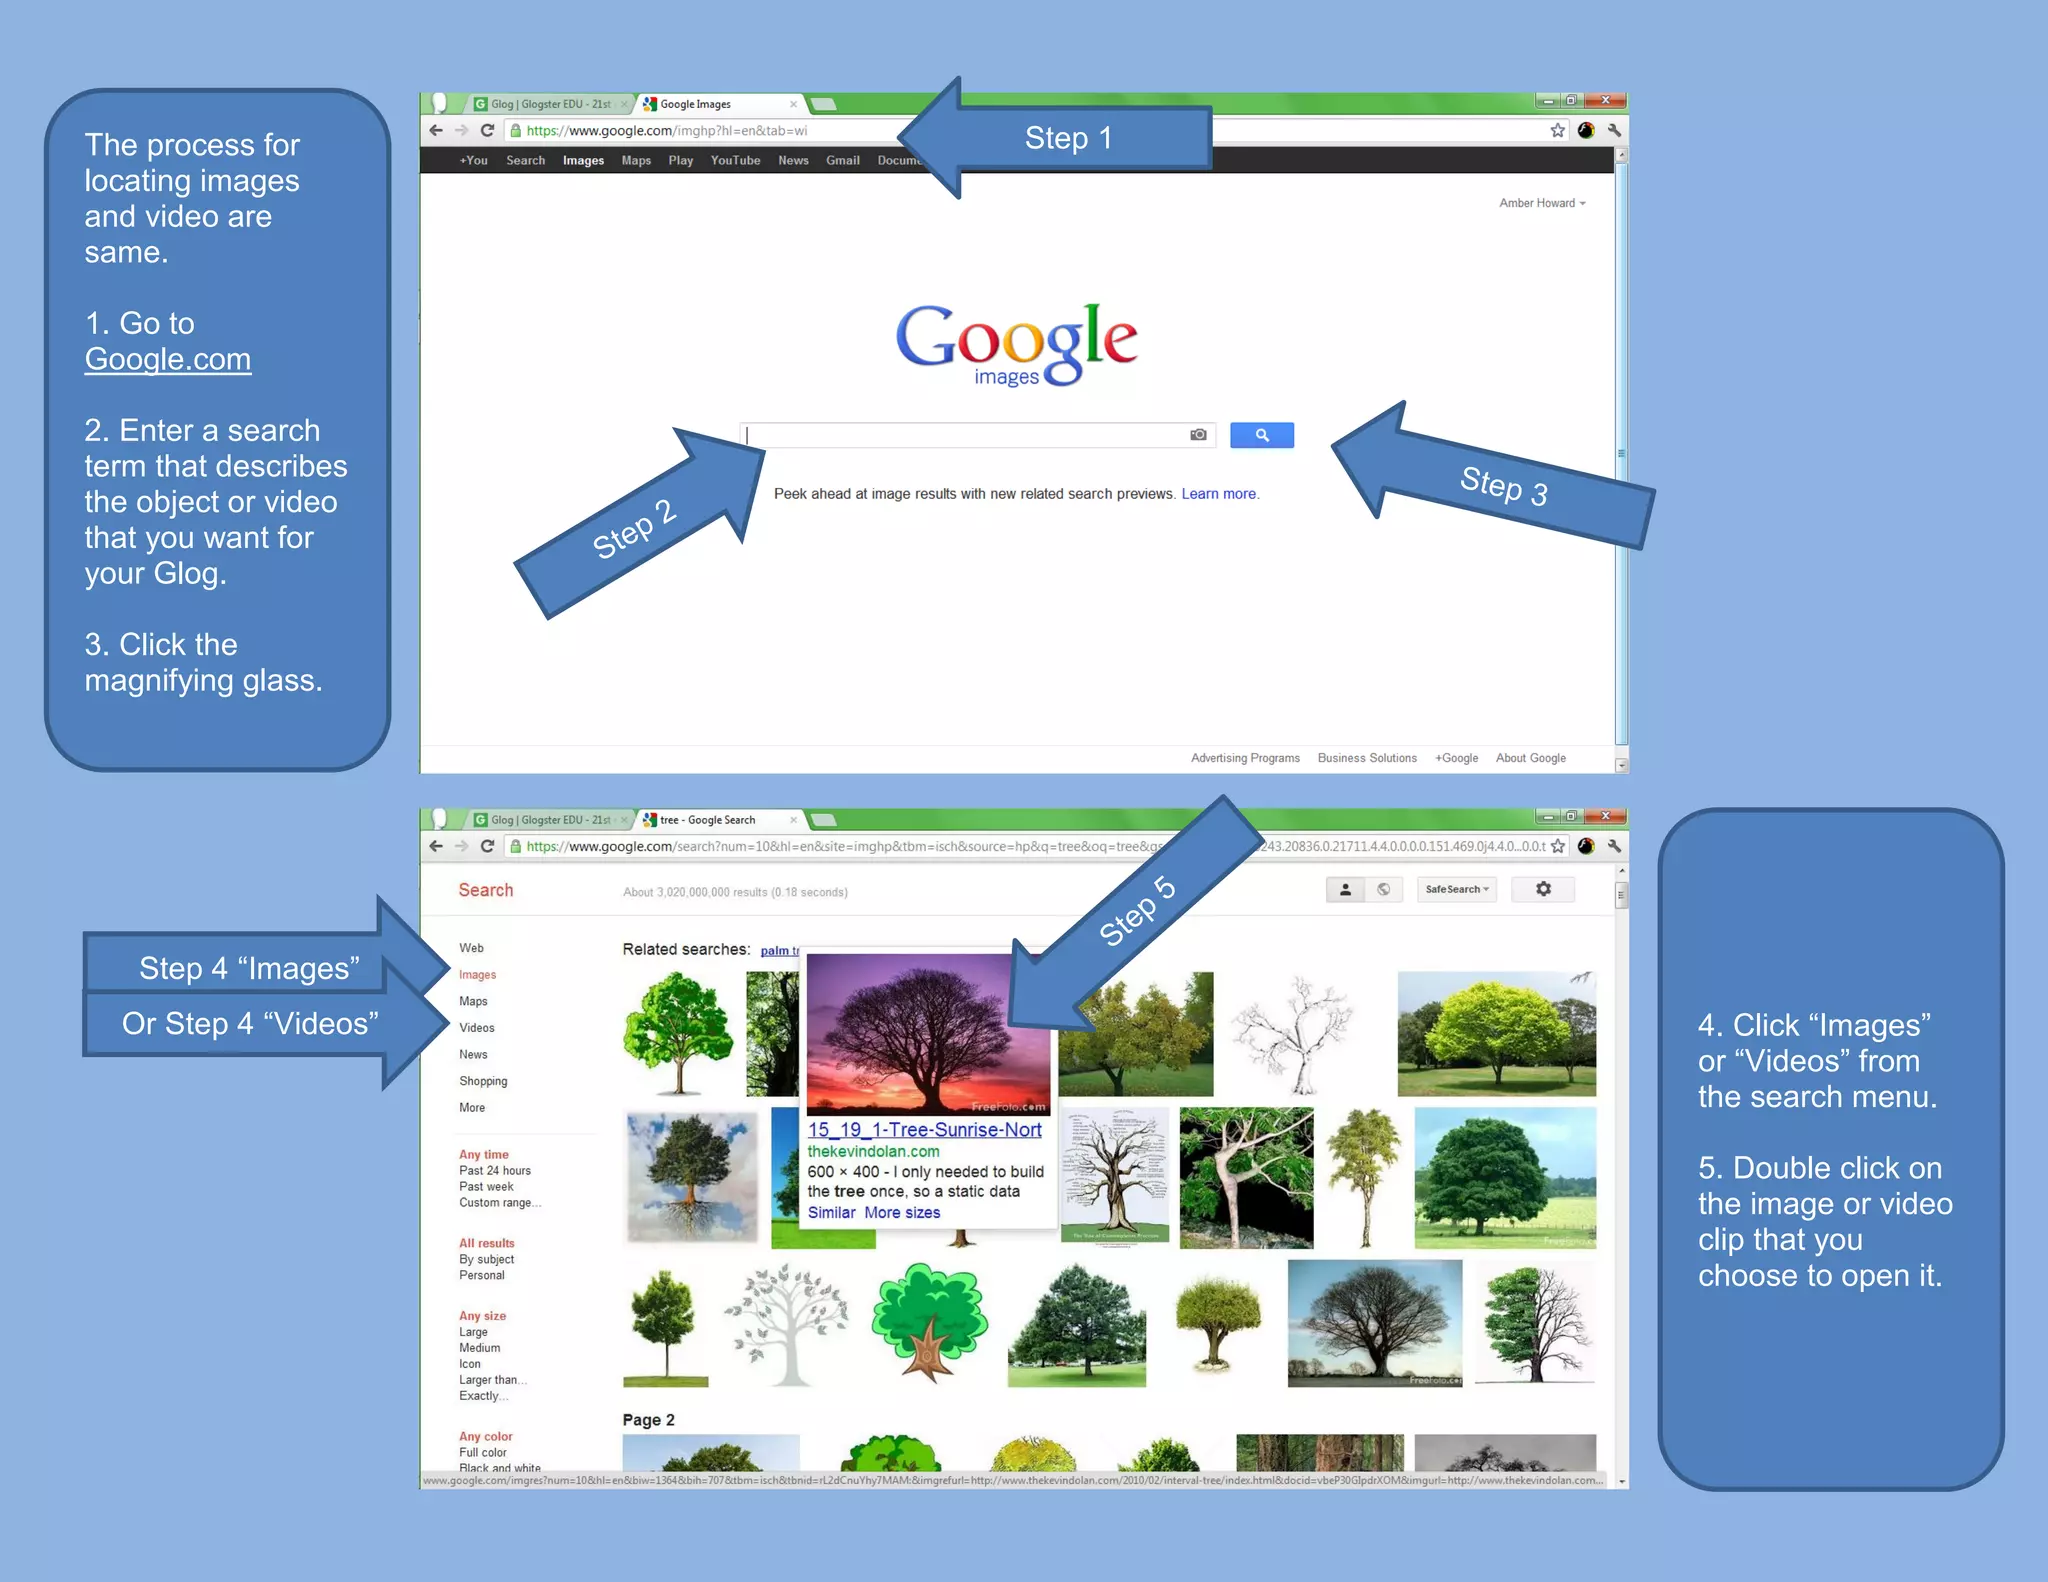
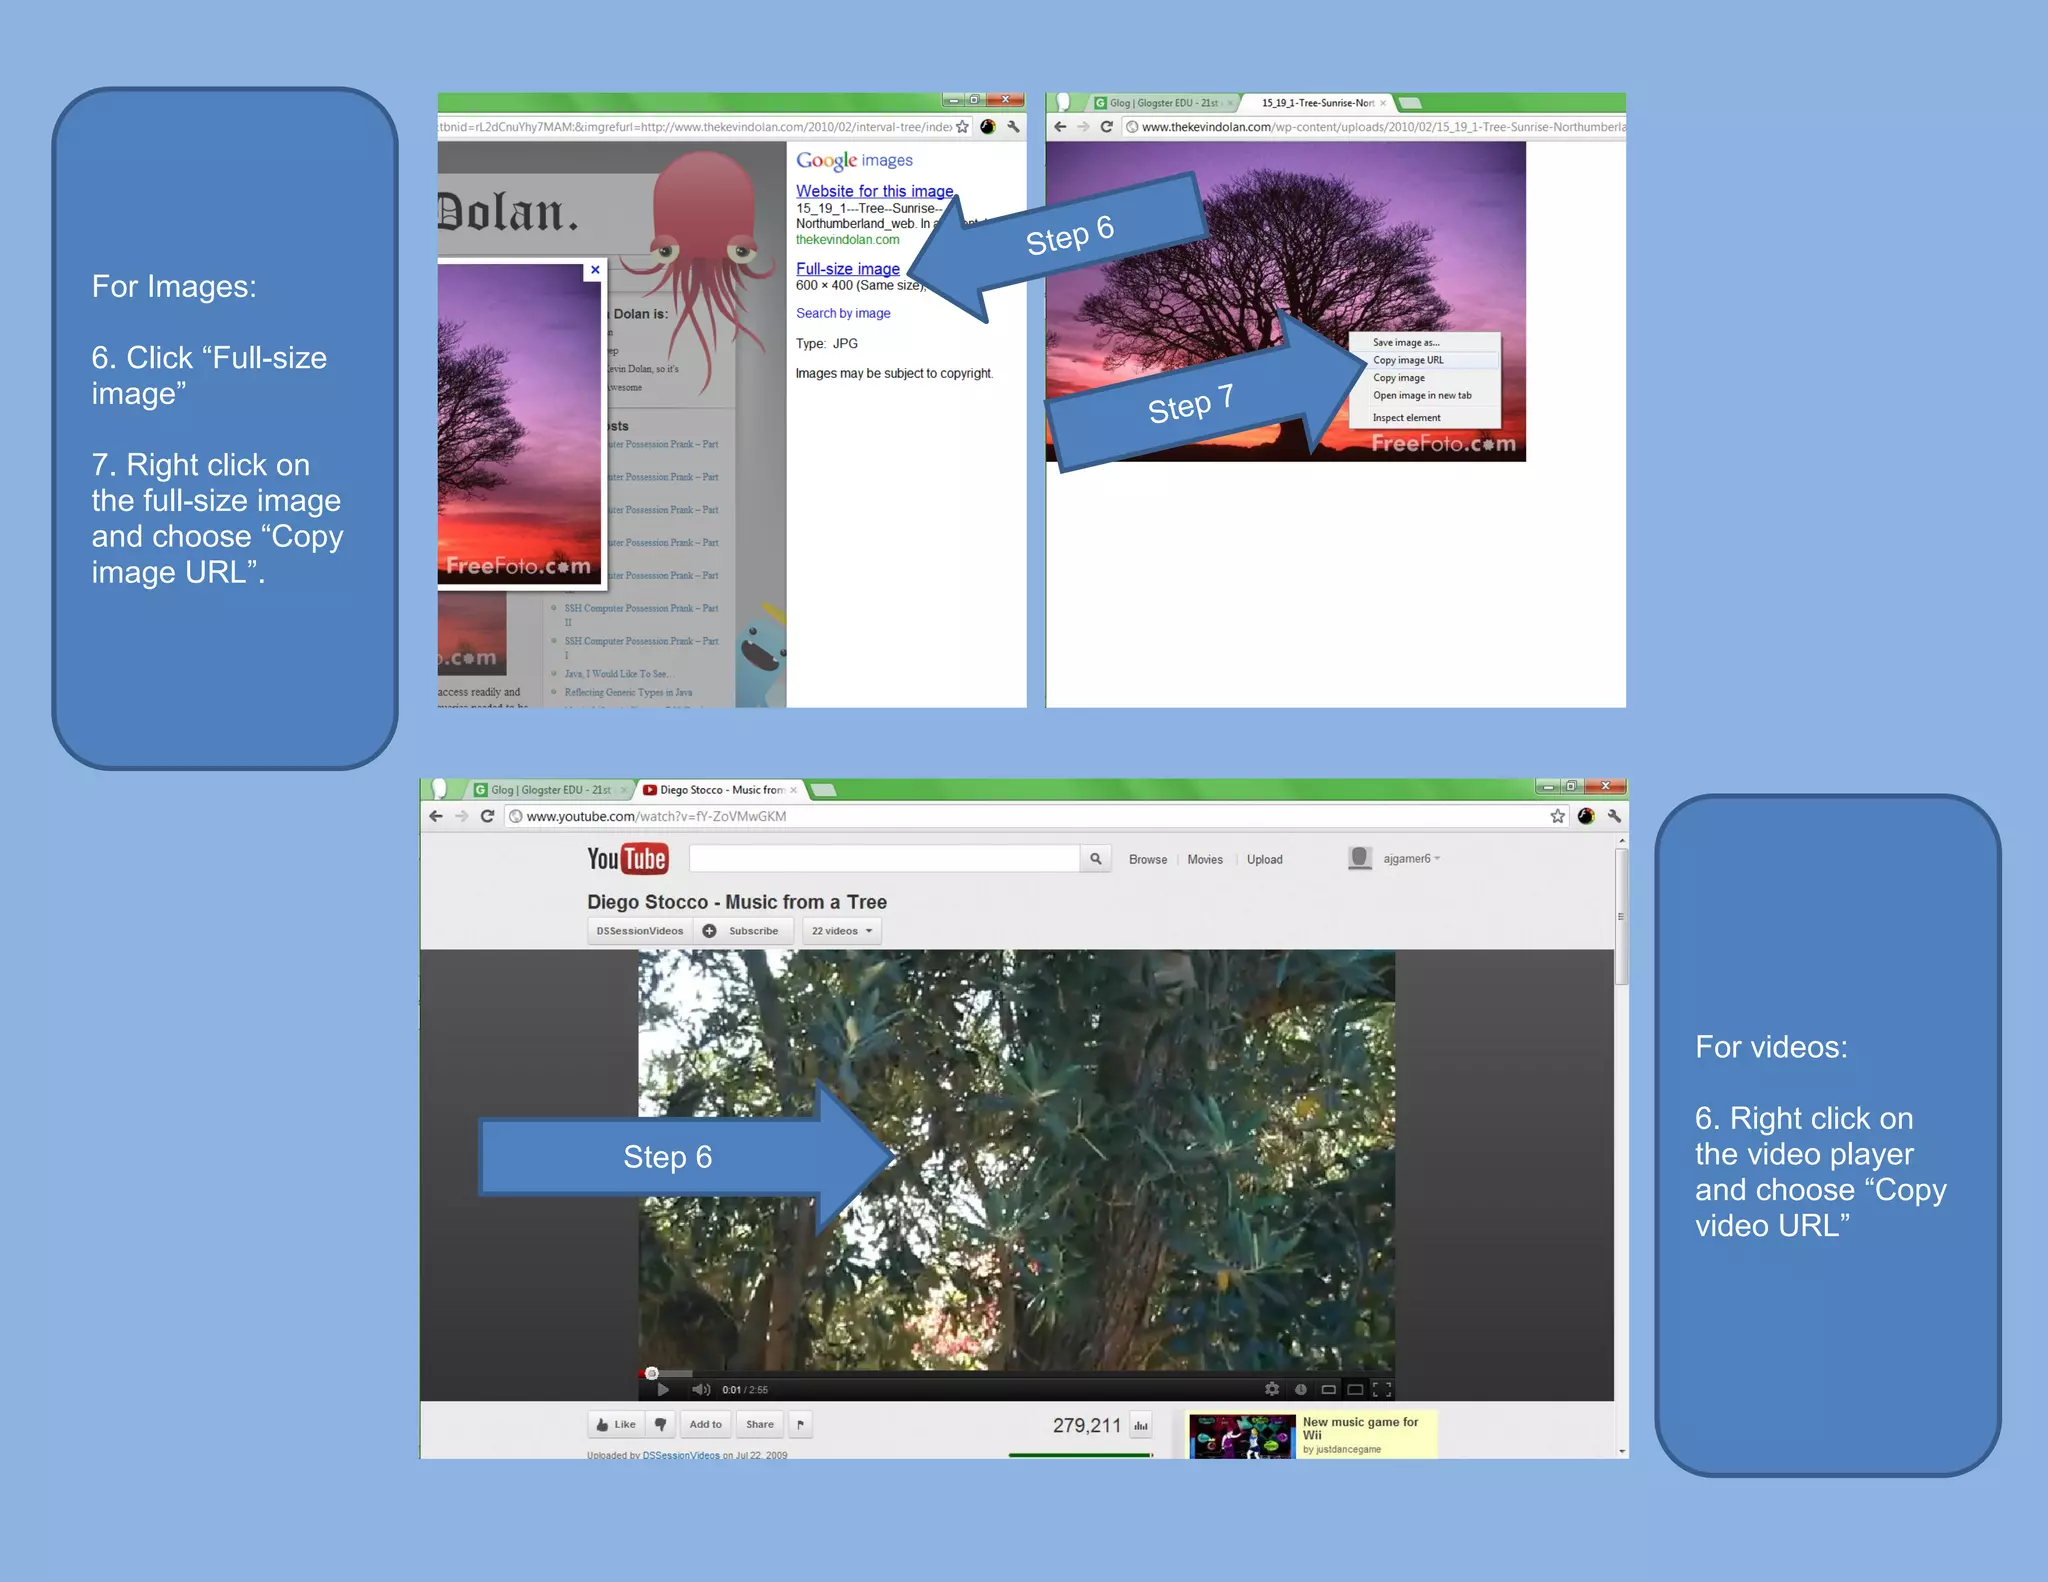
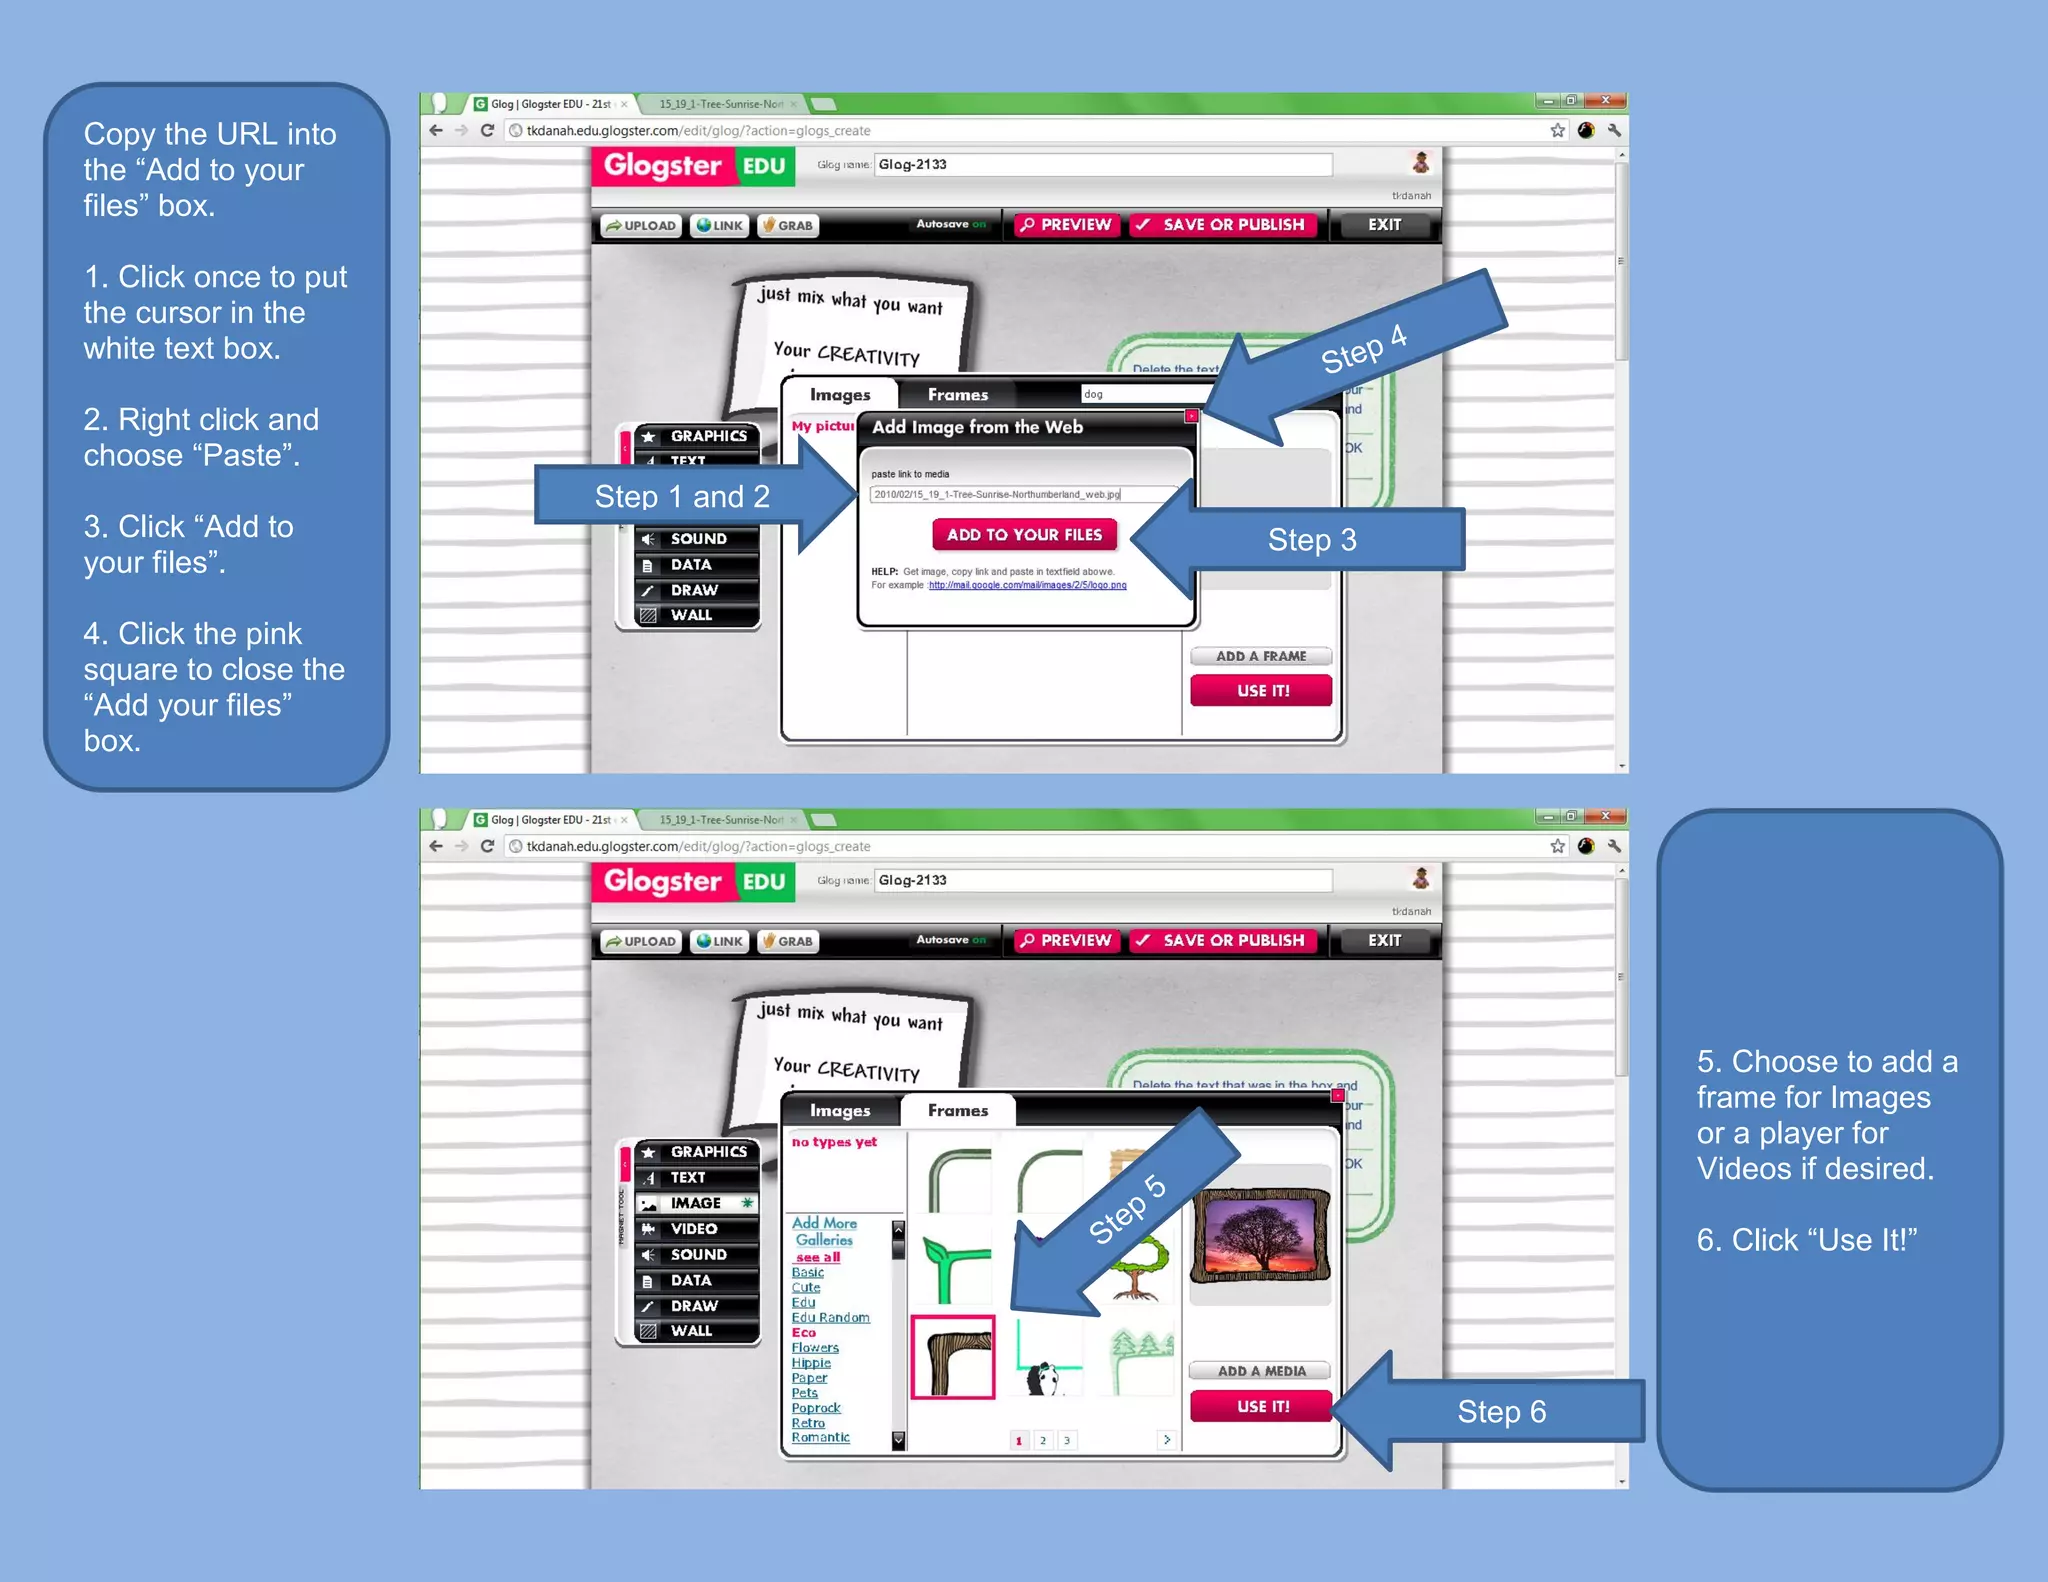
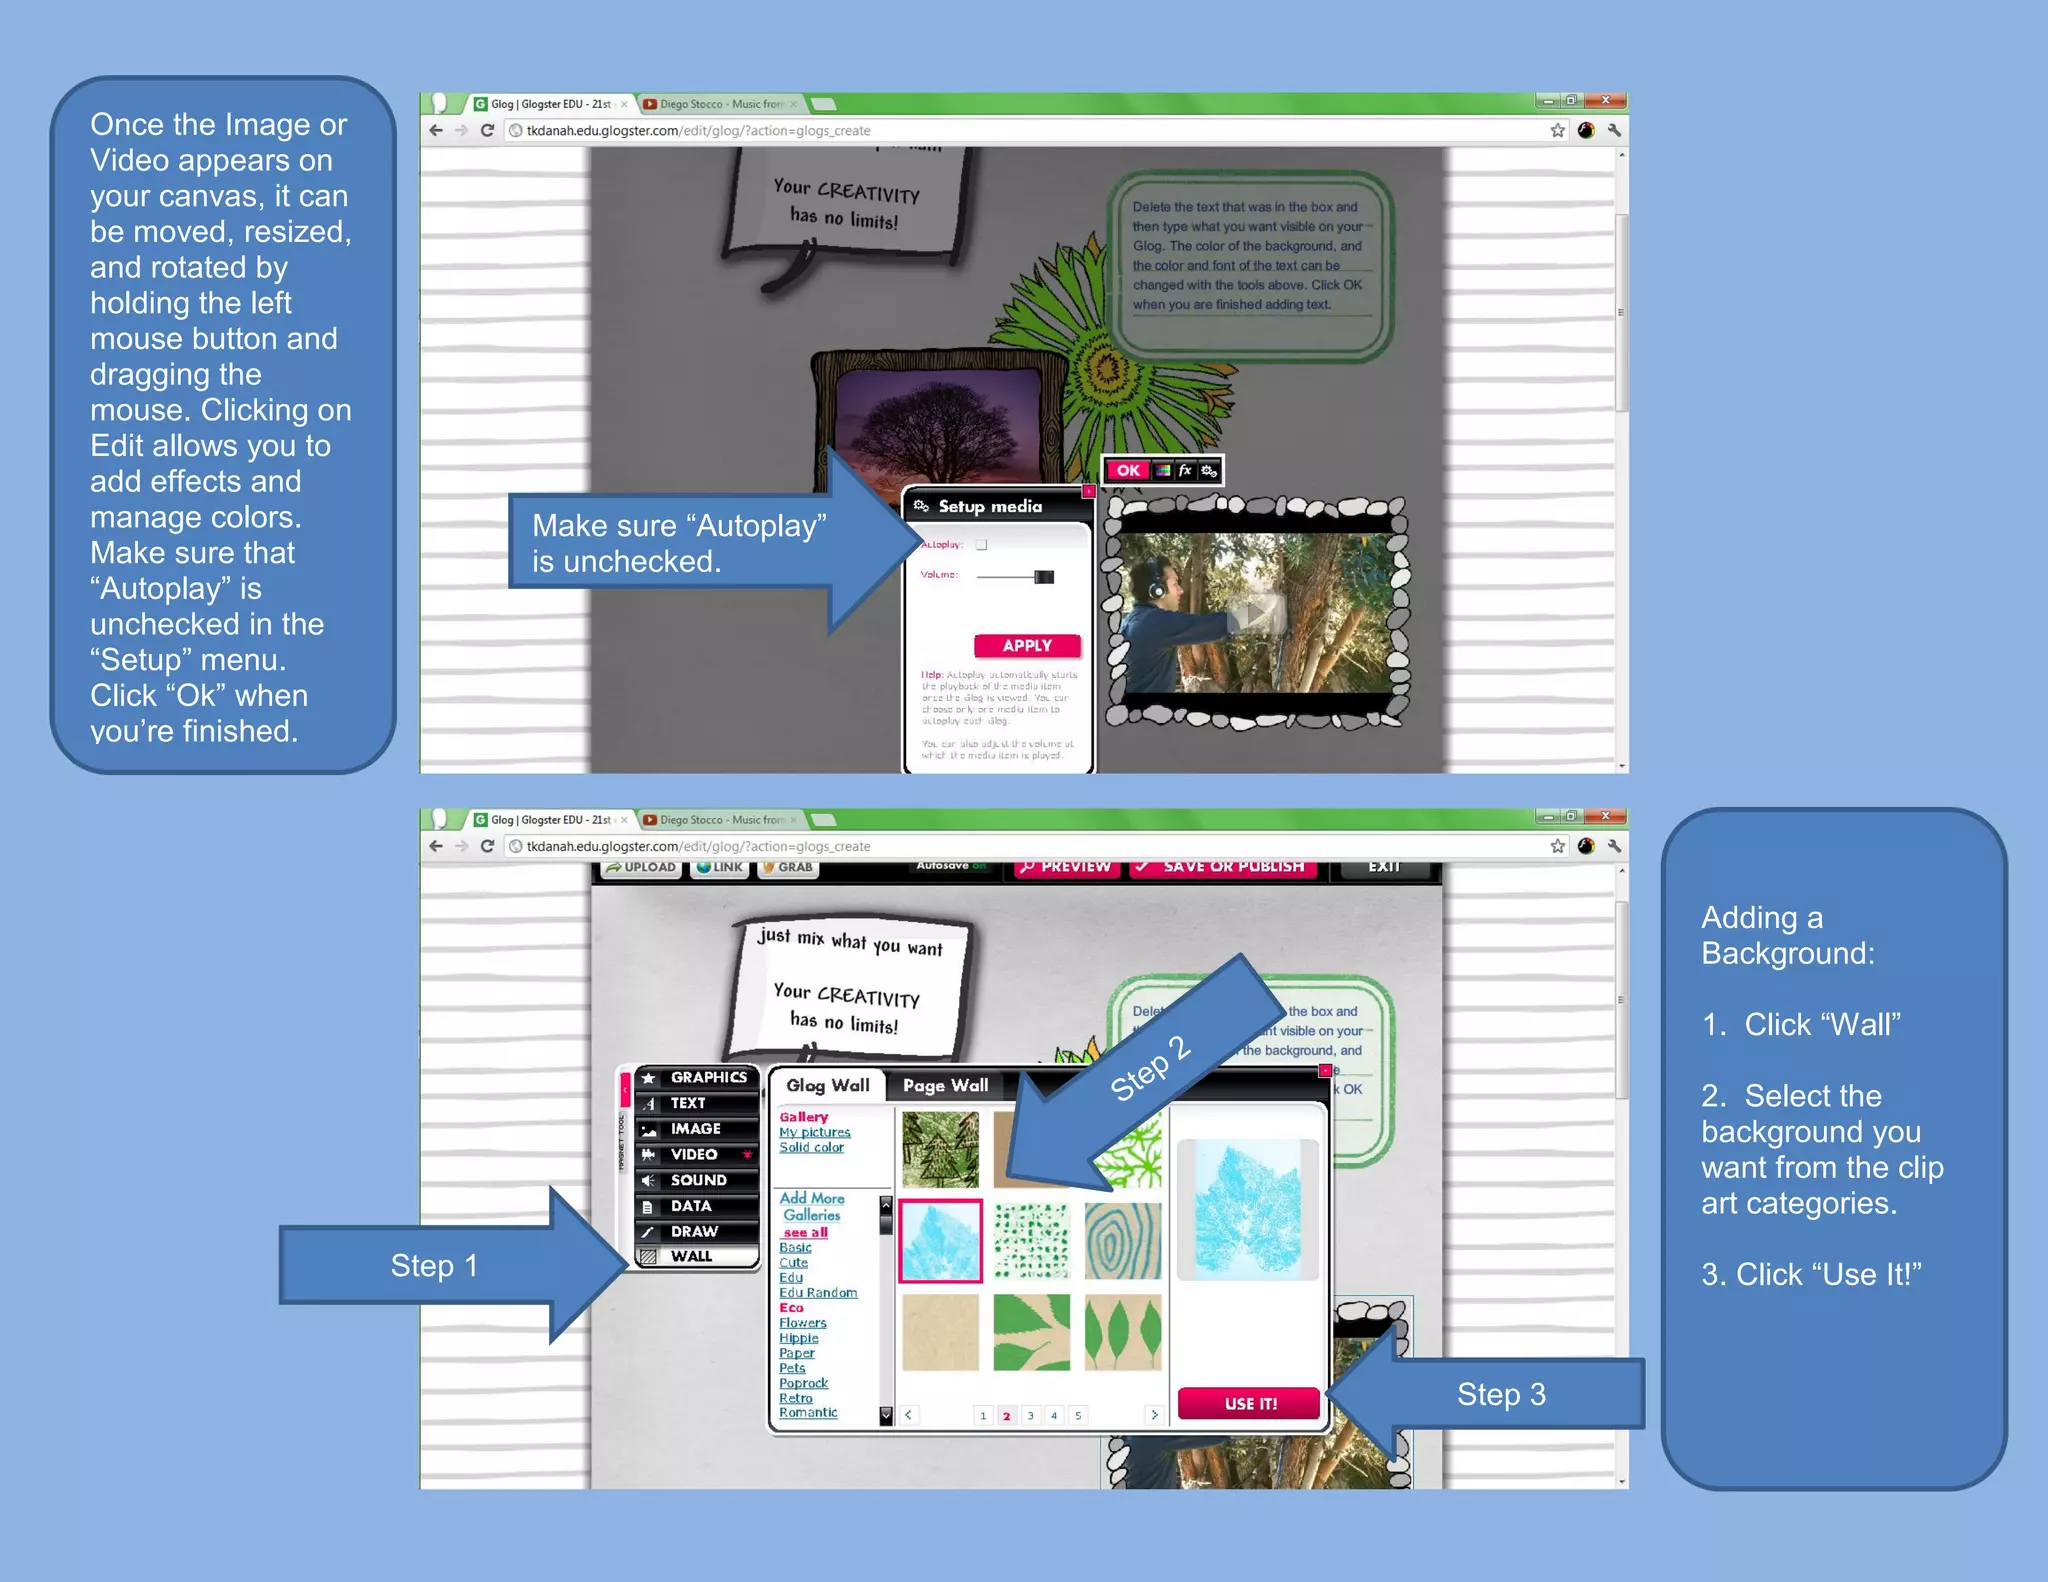
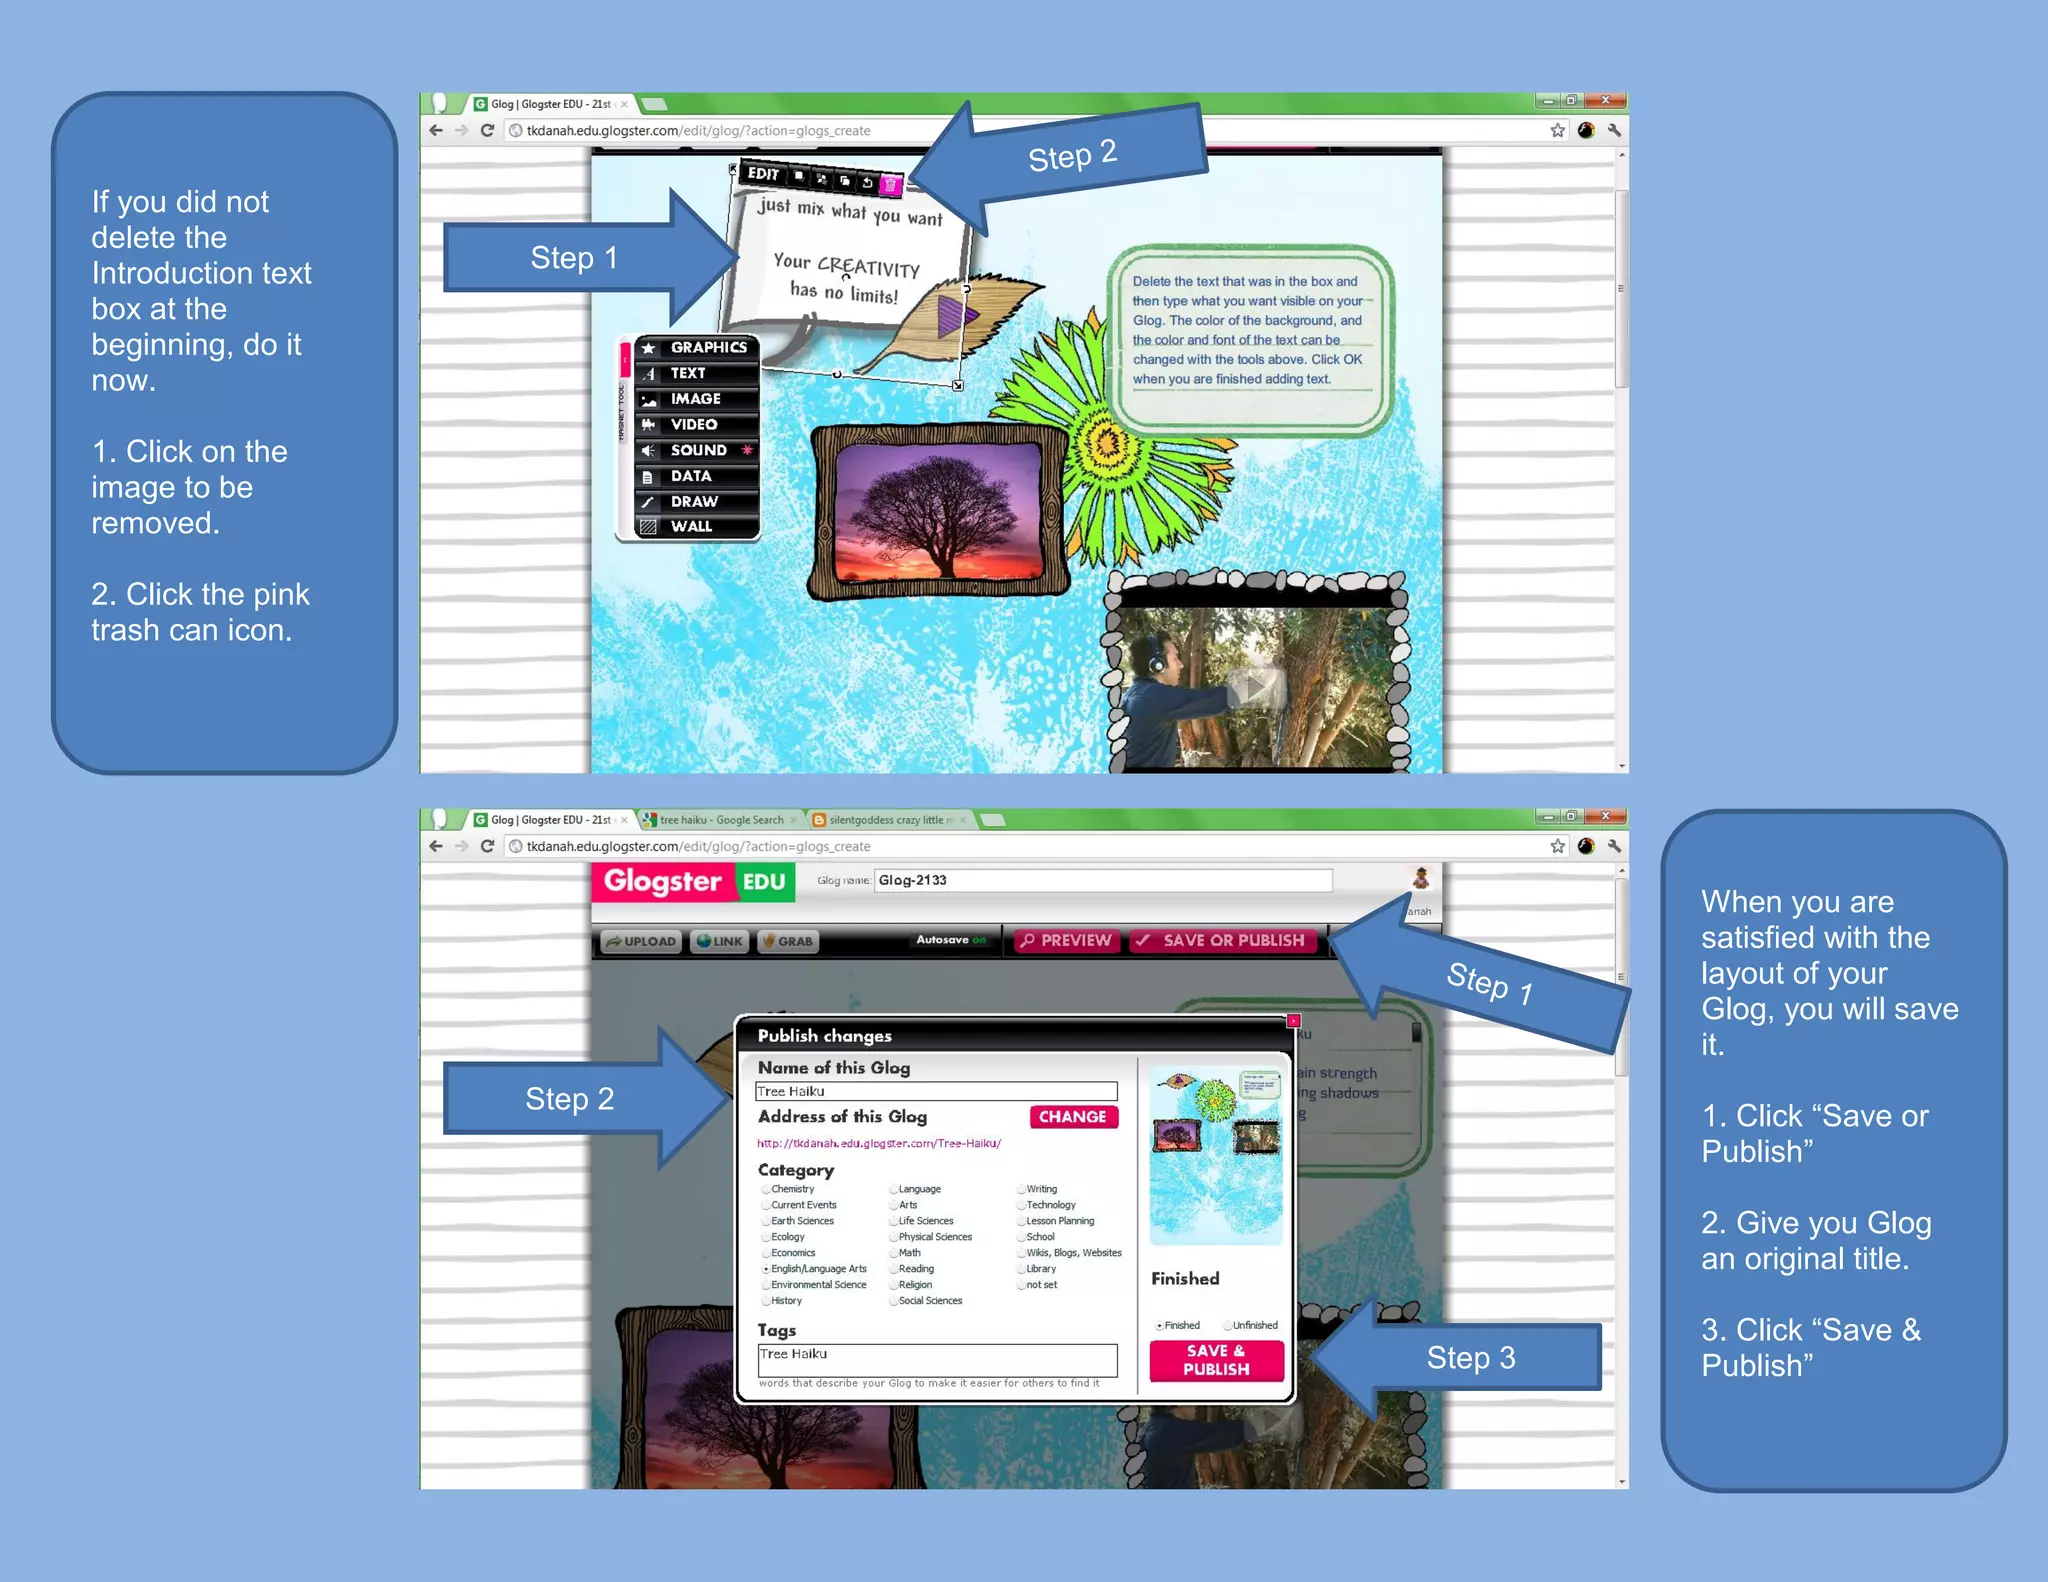
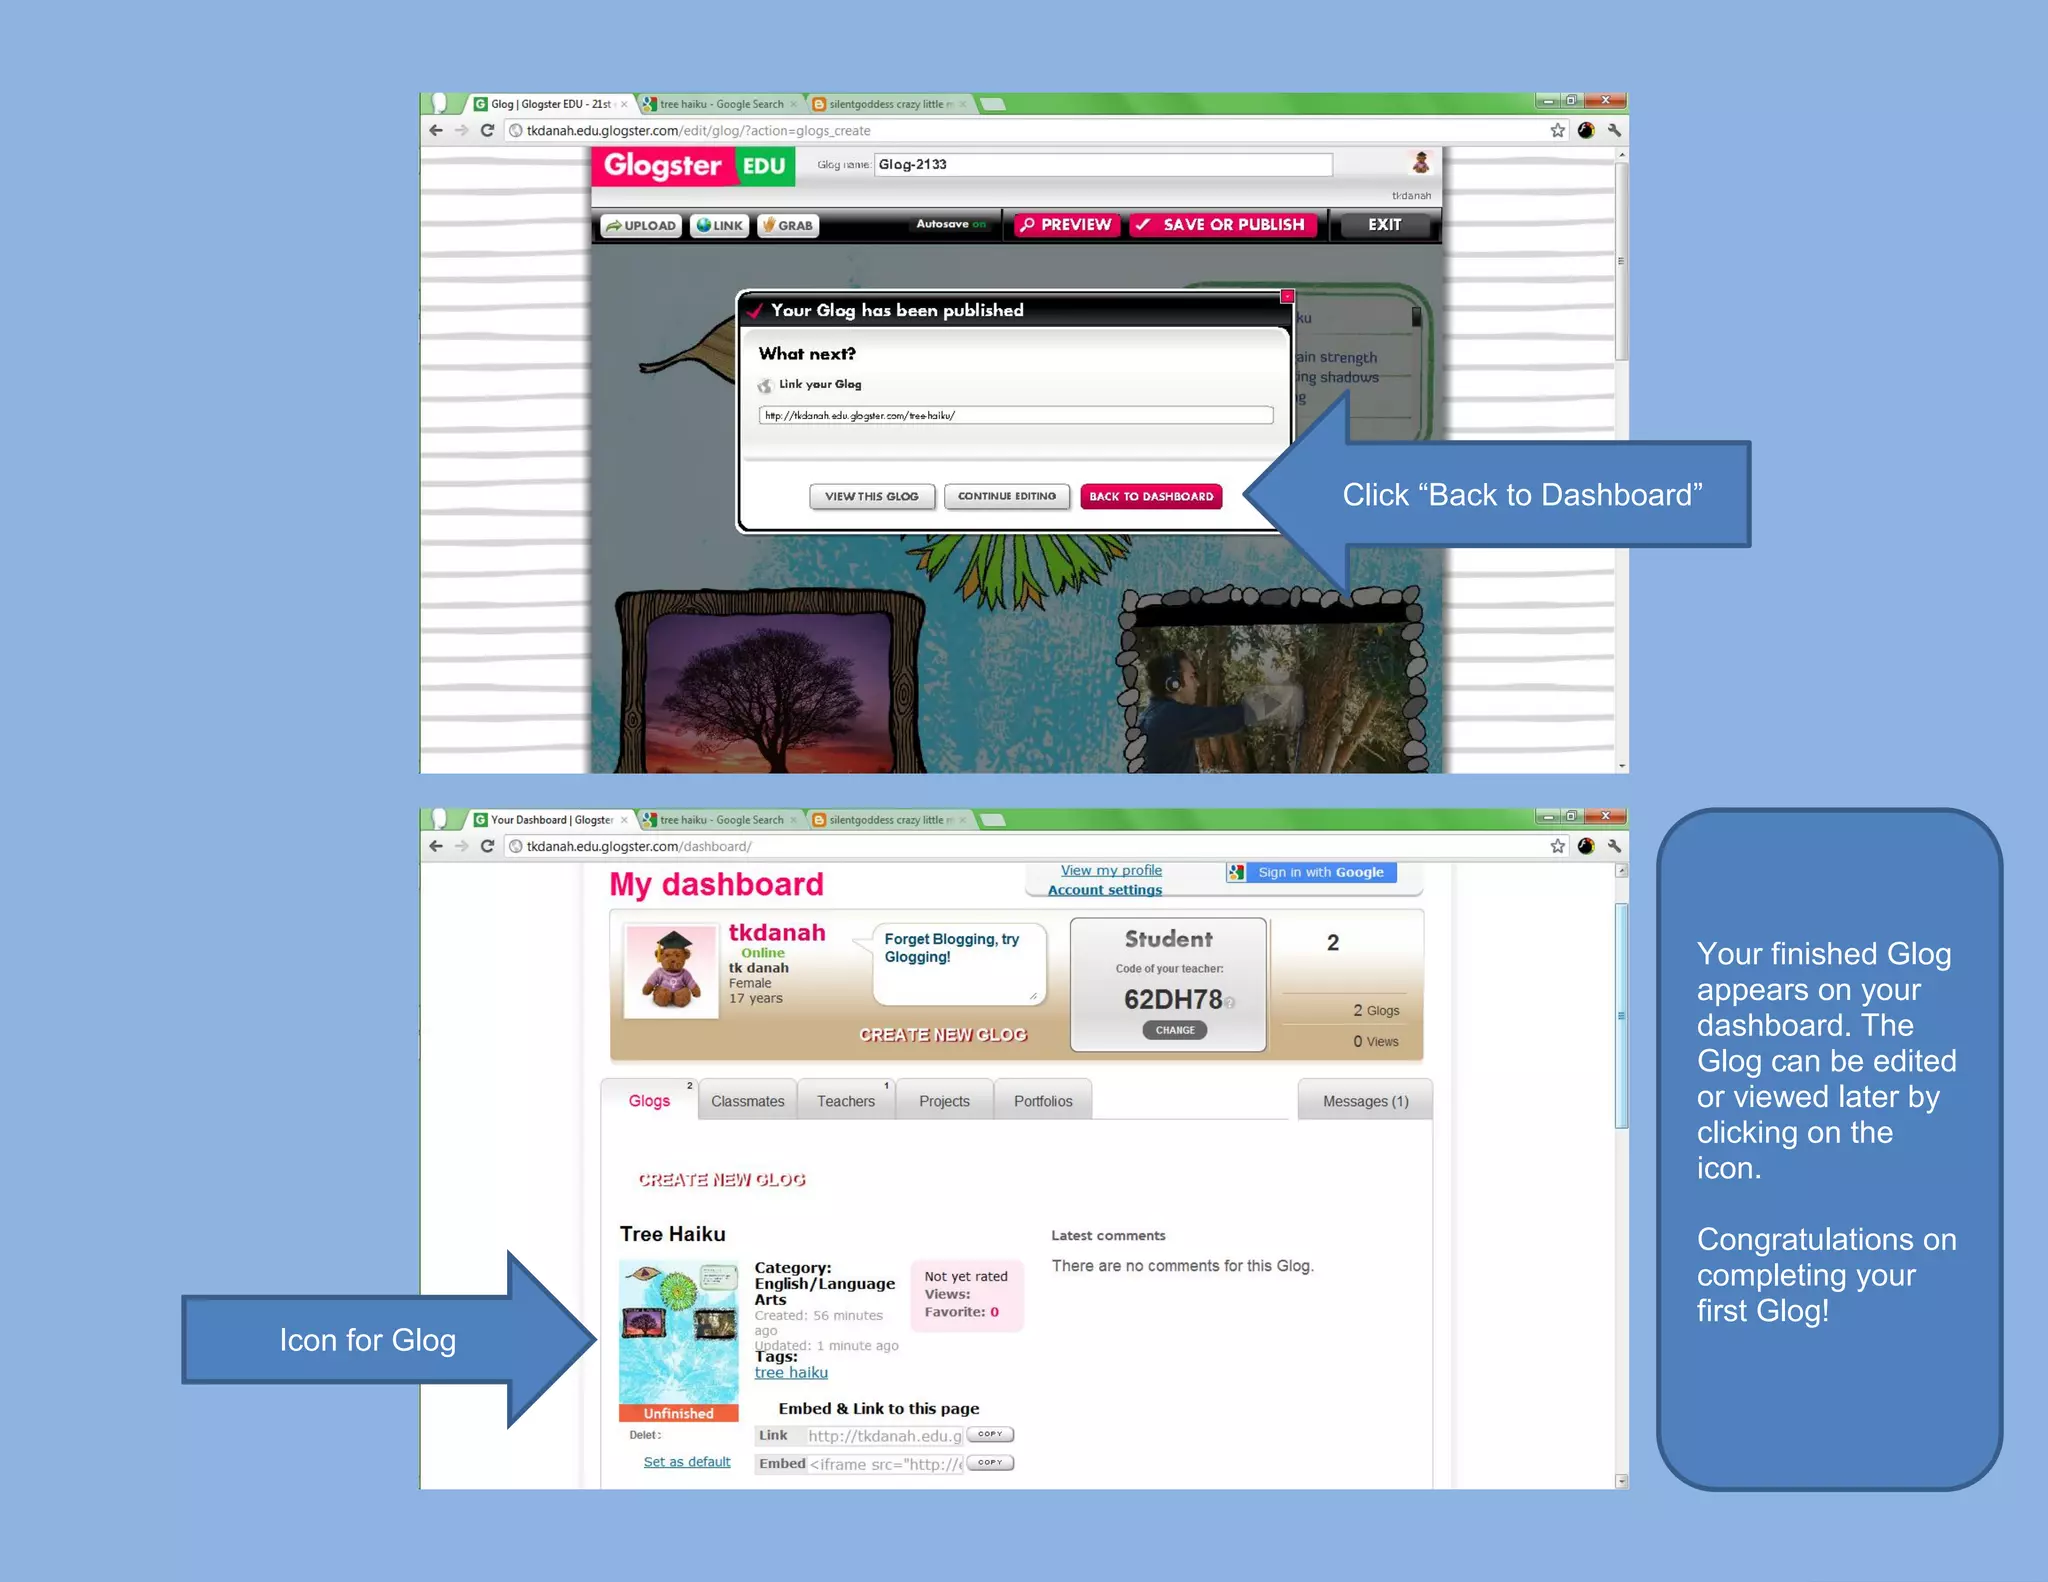
Click “I’m a student”
Enter the code from your teacher
and fill out the rest of the form if   Or login here if you are
    you are new to Glogster.             already registered


                                                    Your dashboard
                                                    shows your
                                                    username,
                                                    classmates,
                                                    teachers, projects,
                                                    and portfolios that
                                                    you have made.
                                                    It also shows any
                                                    messages you
                                                    may have.

   Click “Create your first Glog”
Your Glogster
canvas will open
so that you can
create a new Glog.              Make sure to delete this text box
The introduction                 before submitting your project.
text box can be
deleted by clicking
on the shape and
then the trash can
icon. For this
tutorial, we will do
this step at the
end.


                                                                    Adding Graphics:

                       Step 1                                       1. Click “Graphics”

                                                                    2. Select the image
                                                                    you want from the
                                                                    clip art categories.

                                                                    3. Click “Use It!”
Once the graphic
has been chosen,
it will appear on
your canvas.
It can now be
moved, resized,
and rotated by
holding the left              Click and drag the midpoints
mouse button and                  to rotate the graphic.
dragging the
mouse. Clicking on
Edit allows you to
add effects and
manage colors.
Click “Ok” when
you’re finished to
return to the main
canvas.


                                                      Adding Text:

                     Step 1                           1. Click “Text”

                                                      2. Select the style
                                                      text box you want
                                                      from the clip art
                                                      categories.

                                                      3. Click “Use It!”
Once the text box
is added, it can be
moved, resized,
and rotated.
Clicking on Edit
allows you to add
text, choose fonts,
and manage
effects and colors.
Click “Ok” when
you’re finished to
return to the main
canvas.


                                                  Adding Images
                                                  and Videos:

                                                  1. Click “Image” or
                                                  “Video”

                                                  2. Click “Link” to
                                                  input the URL of
                                                  the image or video
                                                  you want to use.
                      Step 1                      (Detailed directions
                                                  on the next page.)

                                                  3. Choose a frame
                                                  or player if desired.
                               Step 4 “Use It!”
                                                  4. Click “Use It!”
The process for        Step 1
locating images
and video are
same.

1. Go to
Google.com

2. Enter a search
term that describes
the object or video
that you want for
your Glog.

3. Click the
magnifying glass.


   Step 4 “Images”
  Or Step 4 “Videos”            4. Click “Images”
                                or “Videos” from
                                the search menu.

                                5. Double click on
                                the image or video
                                clip that you
                                choose to open it.
For Images:

6. Click “Full-size
image”

7. Right click on
the full-size image
and choose “Copy
image URL”.


                               For videos:

                               6. Right click on
                      Step 6   the video player
                               and choose “Copy
                               video URL”
Copy the URL into
the “Add to your
files” box.

1. Click once to put
the cursor in the
white text box.

2. Right click and
choose “Paste”.
                       Step 1 and 2
3. Click “Add to                      Step 3
your files”.

4. Click the pink
square to close the
“Add your files”
box.


                                                        5. Choose to add a
                                                        frame for Images
                                                        or a player for
                                                        Videos if desired.

                                                        6. Click “Use It!”


                                               Step 6
Once the Image or
Video appears on
your canvas, it can
be moved, resized,
and rotated by
holding the left
mouse button and
dragging the
mouse. Clicking on
Edit allows you to
add effects and
manage colors.                 Make sure “Autoplay”
Make sure that                 is unchecked.
“Autoplay” is
unchecked in the
“Setup” menu.
Click “Ok” when
you’re finished.


                                                               Adding a
                                                               Background:

                                                               1. Click “Wall”

                                                               2. Select the
                                                               background you
                                                               want from the clip
                                                               art categories.

                      Step 1                                   3. Click “Use It!”


                                                      Step 3
If you did not
delete the
Introduction text   Step 1
box at the
beginning, do it
now.

1. Click on the
image to be
removed.

2. Click the pink
trash can icon.


                                      When you are
                                      satisfied with the
                                      layout of your
                                      Glog, you will save
                                      it.
                    Step 2
                                      1. Click “Save or
                                      Publish”

                                      2. Give you Glog
                                      an original title.

                                      3. Click “Save &
                             Step 3   Publish”
Click “Back to Dashboard”


                                        Your finished Glog
                                        appears on your
                                        dashboard. The
                                        Glog can be edited
                                        or viewed later by
                                        clicking on the
                                        icon.

                                        Congratulations on
                                        completing your
                                        first Glog!
Icon for Glog

How to make a Glog with Glogster, tutorial

  • 1.
    Click “I’m astudent”
  • 2.
    Enter the codefrom your teacher and fill out the rest of the form if Or login here if you are you are new to Glogster. already registered Your dashboard shows your username, classmates, teachers, projects, and portfolios that you have made. It also shows any messages you may have. Click “Create your first Glog”
  • 3.
    Your Glogster canvas willopen so that you can create a new Glog. Make sure to delete this text box The introduction before submitting your project. text box can be deleted by clicking on the shape and then the trash can icon. For this tutorial, we will do this step at the end. Adding Graphics: Step 1 1. Click “Graphics” 2. Select the image you want from the clip art categories. 3. Click “Use It!”
  • 4.
    Once the graphic hasbeen chosen, it will appear on your canvas. It can now be moved, resized, and rotated by holding the left Click and drag the midpoints mouse button and to rotate the graphic. dragging the mouse. Clicking on Edit allows you to add effects and manage colors. Click “Ok” when you’re finished to return to the main canvas. Adding Text: Step 1 1. Click “Text” 2. Select the style text box you want from the clip art categories. 3. Click “Use It!”
  • 5.
    Once the textbox is added, it can be moved, resized, and rotated. Clicking on Edit allows you to add text, choose fonts, and manage effects and colors. Click “Ok” when you’re finished to return to the main canvas. Adding Images and Videos: 1. Click “Image” or “Video” 2. Click “Link” to input the URL of the image or video you want to use. Step 1 (Detailed directions on the next page.) 3. Choose a frame or player if desired. Step 4 “Use It!” 4. Click “Use It!”
  • 6.
    The process for Step 1 locating images and video are same. 1. Go to Google.com 2. Enter a search term that describes the object or video that you want for your Glog. 3. Click the magnifying glass. Step 4 “Images” Or Step 4 “Videos” 4. Click “Images” or “Videos” from the search menu. 5. Double click on the image or video clip that you choose to open it.
  • 7.
    For Images: 6. Click“Full-size image” 7. Right click on the full-size image and choose “Copy image URL”. For videos: 6. Right click on Step 6 the video player and choose “Copy video URL”
  • 8.
    Copy the URLinto the “Add to your files” box. 1. Click once to put the cursor in the white text box. 2. Right click and choose “Paste”. Step 1 and 2 3. Click “Add to Step 3 your files”. 4. Click the pink square to close the “Add your files” box. 5. Choose to add a frame for Images or a player for Videos if desired. 6. Click “Use It!” Step 6
  • 9.
    Once the Imageor Video appears on your canvas, it can be moved, resized, and rotated by holding the left mouse button and dragging the mouse. Clicking on Edit allows you to add effects and manage colors. Make sure “Autoplay” Make sure that is unchecked. “Autoplay” is unchecked in the “Setup” menu. Click “Ok” when you’re finished. Adding a Background: 1. Click “Wall” 2. Select the background you want from the clip art categories. Step 1 3. Click “Use It!” Step 3
  • 10.
    If you didnot delete the Introduction text Step 1 box at the beginning, do it now. 1. Click on the image to be removed. 2. Click the pink trash can icon. When you are satisfied with the layout of your Glog, you will save it. Step 2 1. Click “Save or Publish” 2. Give you Glog an original title. 3. Click “Save & Step 3 Publish”
  • 11.
    Click “Back toDashboard” Your finished Glog appears on your dashboard. The Glog can be edited or viewed later by clicking on the icon. Congratulations on completing your first Glog! Icon for Glog