Download to read offline
![Windows 7 Clean Install Step by step Guide
Windows Vista to Windows 7
Step 1 Preparation
1.1 If your computer does not come with a DVD or BD reading device, you will need
to provide an external one to continue.
1.2 You can download the latest drivers for Windows 7 and save them in an USB flash
disk. The drivers can be found on GIGABYTE product support page. Please go to
www.gigabyte.com.tw for more information.
1.3 If you are not following the upgrade path for Windows 7, you will need a clean
installation.
During the Windows 7 installation, your Hard Drive Disc will be formatted and all
the data will be lost. Please backup your data before installation.
Step 2 Step by step installation
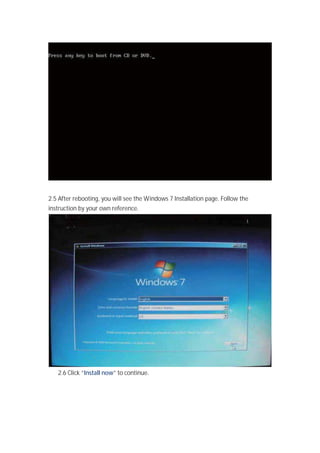
2.1 Insert the Windows 7 Installation Disc into the external DVD or BD reading device.
Turn on your computer.
2.2 During the boot up screen, press [F12] on your keyboard to enter Boot Manager.](https://image.slidesharecdn.com/windows7cleaninstallvistasopen1-160407155820/85/How-To-Clean-Install-Windows-10-awesomehowto-com-1-320.jpg)


This document provides step-by-step instructions for performing a clean installation of Windows 7 from the installation disc on a computer that currently runs Windows Vista. It outlines preparing the computer with necessary drivers and backups, booting from the installation media, partitioning and formatting the hard drive, completing the installation by setting up user accounts and preferences.


