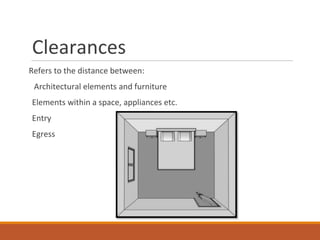
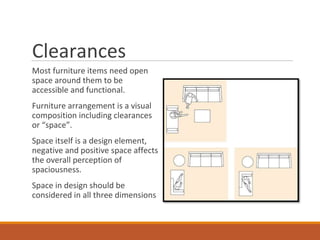
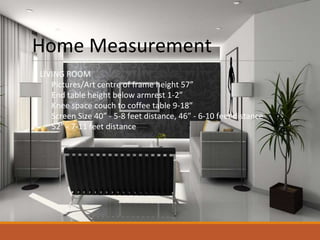
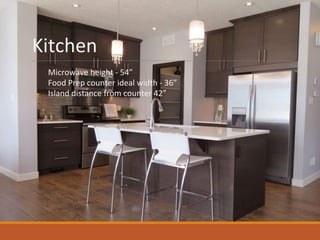
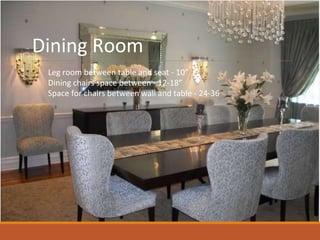
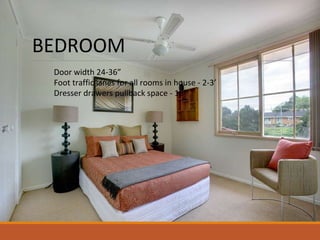
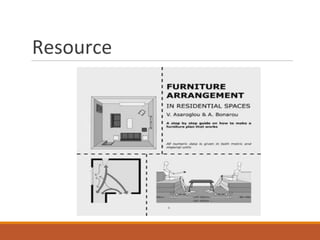
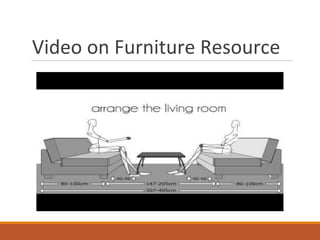
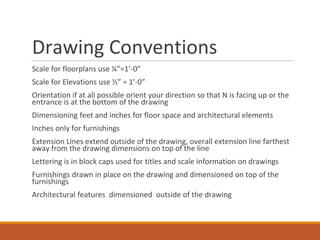
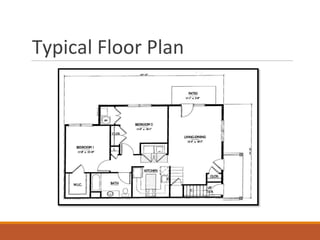
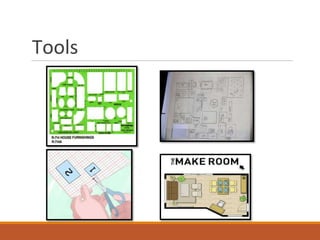
Home Staging Week 4
Clearances
Circulation
How to Measure
How to Scale
Drawing Conventions
Dimensioning
Floor Plans Exercise
Furniture Arrangement
Discussion Q&A
Clearances
Refers to the distance between:
Architectural elements and furniture
Elements within a space, appliances etc.
Entry
Egress
Clearances
Most furniture items need open
space around them to be
accessible and functional.
Furniture arrangement is a visual
composition including clearances
or “space”.
Space itself is a design element,
negative and positive space affects
the overall perception of
spaciousness.
Space in design should be
considered in all three dimensions
Home Measurement
LIVING ROOM
Pictures/Art centre of frame height 57”
End table height below armrest 1-2”
Knee space couch to coffee table 9-18”
Screen Size 40” - 5-8 feet distance, 46” - 6-10 feet distance
52” - 7-11 feet distance
Kitchen
Microwave height - 54”
Food Prep counter ideal width - 36”
Island distance from counter 42”
Dining Room
Leg room between table and seat - 10”
Dining chairs space between - 12-18”
Space for chairs between wall and table - 24-36”
BATHROOM
Towel rack height - 48”
Height of sink -36”
Legroom radius around toilet - 16”
Toilet paper distance from sink - 8”
BEDROOM
Door width 24-36”
Foot traffic lanes for all rooms in house - 2-3’
Dresser drawers pullback space - 18”
Resource
Video on Furniture Resource
Circulation
Furnishings should not block easy
movement in a space
Plan around natural traffic pattern
as much as possible
Redirect a bad natural traffic
pattern
Circulation should not interfere
with a function – conversation
area, entertainment area, etc.
Circulation in Home Staging
Furniture Placement and
Circulation in Home Staging
Guidelines for furniture layout
FUNCTION
Consider how the room is used and how many people will use it. That
will dictate the type of furnishings needed and if it is a living
room/dining room the amount of seating required.
FOCAL POINT
Identify the rooms focal point whether it be a fireplace or bay window
and orient the furniture accordingly.
PRIORITY
Largest pieces of furniture should be placed first, chairs being no more
than 8 feet apart to facilitate conversation.
How to Read a Tape Measure
Drawing Floor Plans
Simple Way to Create Floor
Plans
How to Use a Scale
Drawing Conventions
Scale for floorplans use ¼”=1’-0”
Scale for Elevations use ½” = 1’-0”
Orientation if at all possible orient your direction so that N is facing up or the
entrance is at the bottom of the drawing
Dimensioning feet and inches for floor space and architectural elements
Inches only for furnishings
Extension Lines extend outside of the drawing, overall extension line farthest
away from the drawing dimensions on top of the line
Lettering is in block caps used for titles and scale information on drawings
Furnishings drawn in place on the drawing and dimensioned on top of the
furnishings
Architectural features dimensioned outside of the drawing
Typical Floor Plan
Tools
Room Shape
Rectangle or Square
• Balance furnishings
• Create a circulation pathway
• Reduce large items
• Soften the edges
• Use circular motifs or organic
shapes
• Emphasise focal point if
possible in centre of the room
across from doorway
Image Source: lastdetail.ca
Room Shape
L- Shaped
• Define functional areas
• Open space between two areas
• Direct flow
• Fixed or non fixed focal point in
each area
• Pay attention to entry ways,
circulation and potential dead
zones
• Circulate around rather than
through functional areas
Room Shapes
Bowling Alley or Long and
Narrow
• V shaped conversation area
•Angle furnishings
• Circular elements
• Organic forms
• Use art or other elements to fill
wall expanses
• Balance both sides of the room
Image Source: luvne.com
Room Shapes
Angled
• Created by walls, windows or fixed
elements
• Balance the angle
• Soften the edges
• Light the opposite angle
• Pay attention to traffic patterns and
sight lines
Image Source: home-design-information.com
Multi Purpose
Multi Purpose
-Define functional areas
-Continual sight lines
-Proportioned furnishings and
accessories
-Continuous cohesive colour
palette
-Repeated motifs, materials, style
-Circulation around functional
areas, not through
Image Source: memebrooks.com
Making Small Rooms Larger
• Choose properly scaled furniture
• Allow space around furnishings
• Use glass tables that don’t take up
visual space
• Use a monochromatic colour scheme
• Show your legs
• Remove the area rugs
• Expand the view
• Use mirrors and light to expand the
space
• Take advantage of the vertical space
Measuring and Floorplan
Exercise
Draw your floor plan to scale using your preferred method.
Measure and dimension all of the furnishings and architectural elements
in the room
Draw the furniture onto the floor plan dimension the furnishings.
Draw in the circulation pattern on the floor plan.
Bring to class next week.
For Next Week
Homework:
Walk through your home and create a room by room staging report.
Focus on the condition of the floors, walls, ceilings, furnishings and
accessories as well as colour and lighting in each space.
Bring your report to class next week.
Add before photographs and suggestions for staging each room in your
home.
Discussion

Home staging week 4

  • 1.
    Home Staging Week4 Clearances Circulation How to Measure How to Scale Drawing Conventions Dimensioning Floor Plans Exercise Furniture Arrangement Discussion Q&A
  • 2.
    Clearances Refers to thedistance between: Architectural elements and furniture Elements within a space, appliances etc. Entry Egress
  • 3.
    Clearances Most furniture itemsneed open space around them to be accessible and functional. Furniture arrangement is a visual composition including clearances or “space”. Space itself is a design element, negative and positive space affects the overall perception of spaciousness. Space in design should be considered in all three dimensions
  • 4.
    Home Measurement LIVING ROOM Pictures/Artcentre of frame height 57” End table height below armrest 1-2” Knee space couch to coffee table 9-18” Screen Size 40” - 5-8 feet distance, 46” - 6-10 feet distance 52” - 7-11 feet distance
  • 5.
    Kitchen Microwave height -54” Food Prep counter ideal width - 36” Island distance from counter 42”
  • 6.
    Dining Room Leg roombetween table and seat - 10” Dining chairs space between - 12-18” Space for chairs between wall and table - 24-36”
  • 7.
    BATHROOM Towel rack height- 48” Height of sink -36” Legroom radius around toilet - 16” Toilet paper distance from sink - 8”
  • 8.
    BEDROOM Door width 24-36” Foottraffic lanes for all rooms in house - 2-3’ Dresser drawers pullback space - 18”
  • 9.
  • 10.
  • 11.
    Circulation Furnishings should notblock easy movement in a space Plan around natural traffic pattern as much as possible Redirect a bad natural traffic pattern Circulation should not interfere with a function – conversation area, entertainment area, etc.
  • 12.
  • 13.
  • 14.
    Guidelines for furniturelayout FUNCTION Consider how the room is used and how many people will use it. That will dictate the type of furnishings needed and if it is a living room/dining room the amount of seating required. FOCAL POINT Identify the rooms focal point whether it be a fireplace or bay window and orient the furniture accordingly. PRIORITY Largest pieces of furniture should be placed first, chairs being no more than 8 feet apart to facilitate conversation.
  • 15.
    How to Reada Tape Measure
  • 16.
  • 17.
    Simple Way toCreate Floor Plans
  • 18.
    How to Usea Scale
  • 19.
    Drawing Conventions Scale forfloorplans use ¼”=1’-0” Scale for Elevations use ½” = 1’-0” Orientation if at all possible orient your direction so that N is facing up or the entrance is at the bottom of the drawing Dimensioning feet and inches for floor space and architectural elements Inches only for furnishings Extension Lines extend outside of the drawing, overall extension line farthest away from the drawing dimensions on top of the line Lettering is in block caps used for titles and scale information on drawings Furnishings drawn in place on the drawing and dimensioned on top of the furnishings Architectural features dimensioned outside of the drawing
  • 20.
  • 21.
  • 22.
    Room Shape Rectangle orSquare • Balance furnishings • Create a circulation pathway • Reduce large items • Soften the edges • Use circular motifs or organic shapes • Emphasise focal point if possible in centre of the room across from doorway Image Source: lastdetail.ca
  • 23.
    Room Shape L- Shaped •Define functional areas • Open space between two areas • Direct flow • Fixed or non fixed focal point in each area • Pay attention to entry ways, circulation and potential dead zones • Circulate around rather than through functional areas
  • 24.
    Room Shapes Bowling Alleyor Long and Narrow • V shaped conversation area •Angle furnishings • Circular elements • Organic forms • Use art or other elements to fill wall expanses • Balance both sides of the room Image Source: luvne.com
  • 25.
    Room Shapes Angled • Createdby walls, windows or fixed elements • Balance the angle • Soften the edges • Light the opposite angle • Pay attention to traffic patterns and sight lines Image Source: home-design-information.com
  • 26.
    Multi Purpose Multi Purpose -Definefunctional areas -Continual sight lines -Proportioned furnishings and accessories -Continuous cohesive colour palette -Repeated motifs, materials, style -Circulation around functional areas, not through Image Source: memebrooks.com
  • 27.
    Making Small RoomsLarger • Choose properly scaled furniture • Allow space around furnishings • Use glass tables that don’t take up visual space • Use a monochromatic colour scheme • Show your legs • Remove the area rugs • Expand the view • Use mirrors and light to expand the space • Take advantage of the vertical space
  • 29.
    Measuring and Floorplan Exercise Drawyour floor plan to scale using your preferred method. Measure and dimension all of the furnishings and architectural elements in the room Draw the furniture onto the floor plan dimension the furnishings. Draw in the circulation pattern on the floor plan. Bring to class next week.
  • 30.
    For Next Week Homework: Walkthrough your home and create a room by room staging report. Focus on the condition of the floors, walls, ceilings, furnishings and accessories as well as colour and lighting in each space. Bring your report to class next week. Add before photographs and suggestions for staging each room in your home.
  • 31.