This document presents a mini-project report on implementing a voice-activated home automation system using the NodeMCU ESP8266 microcontroller, focusing on both voice commands and mobile application controls. The project showcases the integration of various sensors and actuators, allowing users to monitor and manage their home environment efficiently while ensuring security and data privacy. The report includes the rationale, construction details, working models, and potential future developments of the system, emphasizing its cost-effectiveness and accessibility.

![DR. BABASAHEB AMBEDKAR TECHNOLOGICAL
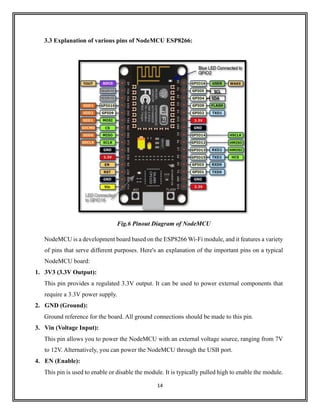
UNIVERSITY LONERE, RAIGAD, MAHARASHTRA-402103
DEPARTMENT OF ELECTRICAL ENGINEERING
CERTIFICATE
This is to certify that a Mini-Project Report entitled “Voice Activated Home Automation
using NodeMCU ESP8266” is being submitted by Mr. Adhyay Mahesh Deshmukh
[PRN-23030331293509] in partial requirement of the award of Degree of Bachelor of
Technology in Electrical Engineering is a record of own work carried by him under my
supervision as prescribed in the syllabus of Dr. Babasaheb Ambedkar Technological
University, Lonere during the Academic Year 2023-24.
Prof.A.M. Bhaware Prof. M.F.A.R. Satarkar
Guide Head of The Department
Department of Electrical Engineering Department of Electrical Engineering
Examiners:
1]
2]
Date:
Place: Lonere](https://image.slidesharecdn.com/mini-projectreport11-240825150315-ec8ba27a/85/Home-Automation-Using-NodeMCU-ESP8266-project-2-320.jpg)