Glass Blowing 101
•
3 likes•3,411 views

This presentation of Glass Blowing was an assignment to meet specific objectives: Use PowerPoint presentation to demonstrate how I do one of the arts. Include in the slideshow: 1. Selection of one the arts and why you chose it. 2. Images of you working on your selected art. 3. What you had to do to learn about the art. 4. Your reflections about this experience, both as a student learning it and as a teacher who might teach it in the future.

Recommended
More Related Content
What's hot
What's hot (20)
Viewers also liked
Similar to Glass Blowing 101
Similar to Glass Blowing 101 (18)
Recently uploaded
Recently uploaded (20)
Glass Blowing 101
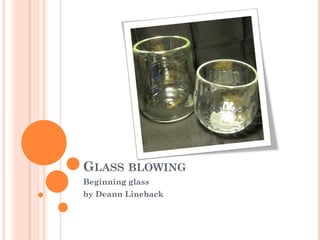
- 1. GLASS BLOWING Beginning glass by Deann Lineback
- 2. GLASS BLOWING I chose glass blowing because it is a course I am currently enrolled in at CSU Chico. This is the first time I have ever worked with molten glass. I am in the process of learning the terms and skills it takes to make a simple glass cup. Glass blowing is an active, hands-on art that requires craftsmanship, dexterity and agility. I have begun to truly appreciate glass blowing as an art since taking this course.
- 3. FIRST THING FIRST Knowing terminology of glass blowing •Blower – The glass worker that blows the air through the blowpipe (within the mold or freehanded). That’s me!
- 4. TOOLS TO USE •Bench - The bench is the center of the hot Shoppe. It is where the artist works a piece and is the where all the tools are kept. The bench has two rails spaced on either side going perpendicular to the seat; these rails are used to roll the glass pipes on. Bench •Jack - Large tongs that are used in order to create score lines in the neck of a piece. Pincers Making a Jack line is often the line. •Pincers – Glassmakers tool for picking up, transferring and applying water to the Punty to remove the glass piece from the pipe of blowpipe.
- 5. TOOLS CONTINUED… •Block – The forming tool used for the shaping of the molten glass. The “Block” is usually made of cherry wood and is “wet” while used with the hot glass. BLOW MOULD •Blow Mould – An open ended cylindrical designed to create effects or grooves in the molten glass by blowing into the blowpipe while in the mould vertically.
- 6. TOOLS CONTINUED…. •Punty - A solid steel rod that is •Pipe Warmer- a used for small gas oven gathering hot that is used to glass that is preheat the steel placed on the pipes; many glory receiving pipe for holes have pipe transferring the warmers built into glass work that is the side. BLOWPIPE currently connected to the blowpipe. Also the technique used to change the end of the •Blowpipe – A steel pipe with an air passage glass that is being way throughout its entire length. One end has worked on. the mouthpiece and the other has the larger built up area for the molten glass to gather and blow the bubble on.
- 7. MORE TOOLS CONTINUED….. •Pot – A holding area •Glory Hole – The opening of the furnace used for molten glass where to keep the glass hot and workable. Several the glass is different sizes may be attached to a large furnace continually kept at a The cylinder is usually heated up to 2300 degrees. designated heat for gathering. •Yoke - A stand in front of the glory hole that is used as a support for the blowpipes. Using ball bearings it allows the artist to turn the pipe easily with little effort giving them a chance to regain TOO HOT FOR COMFORT strength.
- 8. SO MUCH TO KNOW!.... •Parison – The first small bubble at the end of a blowpipe. •Gather - Placing molten glass on the end of the blowpipe or pipe for the further development of that glass project. •Gathering - obtaining a layer of clear glass over a subsequent layer of glass. Tiny air Bubble MY FIRST GATHER
- 9. AFTER SECOND GATHERING, SHAPING OCCURS This can be done with the wooden block shaper….. ~OR~ By rolling the molten glass on the marver. •Marver – A flat steel plate that’s used for the picking up color chips or the shaping of molten glass on the end of a blowpipe or pipe with a rolling action. A Marver can also help in the uneven cooling of the glass for a desired effect.
- 10. NOW THAT THERE IS GLASS OFF THE TIP OF THE BLOW PIPE BEGIN TO BLOW! end of blow pipe •Reheat - to heat the glass back to a molten state; usually done in the glory hole.
- 11. I’M GOING TO USE THE BLOW MOULD Stand on tippy toes and blow Then flash! HARD! Then blow out air bubble •Flash - A quick reheat in the glory hole in order to keep a part of the glass from getting too cold.
- 12. READY FOR JACK LINE The crease line that will be used to separate the glass work from the blowpipe is made by the Jacks •Neck - The edge of the piece that will be scored and separated when transferring the working piece onto the punty.
- 13. TIME FOR PUNTY…AND TRANSFER •Wetting Off – The separation line for the glass work from the blowpipe using cold water to fracture wetting control the break Punty onto bottom of glass piece usually done by dipping the pincers in water and droplets touch the neck of the piece. These are not mine,… I lost my piece Then flash. when I tapped it off the blow pipe . next: open the top with (that’s the “breaks” ha ha) the Jacks. •Flash. Continue to shape top. •Flash. •Shape. •Flash. •Shape. •Flash.
- 14. TIME TO ANNEAL When you’re satisfied with shape then place in the annealing oven by wetting off your piece. •Annealing Oven – The process of gradual cooling of the outside and the inside of the molten glass to assure that the glass won’t cool to fast causing cracks or breaks; known as…. •Thermal Shock – The cause by a sudden shift of temperature hot or cold causing the glass to break, crack or shatter.
- 15. MY FIRST COMPLETED PROJECT This small cup was made by using the blowon mould to give the line pattern. Glass links http://www.orientandflume.com/ http://www.chihuly.com/Video/screening.html http://www.artofvenice.com/art/dfaction.htm http://www.mundyhepburn.com/main2.html