Downloaded 1,129 times


![4 Quality Assurance in Reprocessing
Microbiological surveillance is an important means of evaluating the
outcome quality of reprocessing procedures and is an instrument of
regular quality control in gastrointestinal endoscopy, whether
endoscopic procedures are performed in hospital, in private clinics or
doctors offices. It is an instrument for detecting and redressing
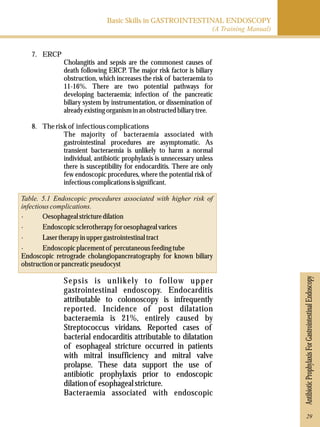
procedure, and for preventing the transmission of infections agents
through endoscopy.
Table. 4.1 Weaknesses and deficiencies in endoscope reprocessing (modified
from reference[12])
a. Inadequate reprocessing of endoscopes and accessories
- Inadequate cleaning (e. g. inadequate manual cleaning and brushing of
endoscope channels)
- Contaminated cleaning accessories (e. g. cleaning brushes)
- Use of unsuitable or incompatible detergents and disinfectants
- Inadequate concentrations and contact time of agents
- Contaminated or time-expired solutions
- Contaminated rinsing water
- Fixed organic material (biofilm) in endoscopes, water pipes , containers, or
washer-disinfectors
- Use of nonsterile accessories in invasive diagnosis and treatment (e. g. nonsterile
biopsy forceps, polypectomy snares)
- Inadequate reprocessing of water bottles (e. g. no sterilization)
- Use of tap water in water bottles
b. Inadequate transport and storage of endoscopes
- Insufficient drying before storage (e. g. Pseudomonas spp.)
- Inappropriate storage conditions
c. Contaminated or defective washer-disinfector
- Contaminated pipes, containers, etc.
- Contaminated final rinsing water
- Mechanical/electronic defects of washer-disinfector
- Incorrect use of washer-disinfector (e. g. wrong connections)
- Lack of regular maintenance of washer-disinfector according to manufacturer’s
recommendations
d. Design limitations and damaged endoscopes
- Small lumina, branched channels, not accessible to cleaning brushes
- Damage to the surfaces (internal and external) of the endoscope, providing
potential for contamination
e. Contaminated water in the endoscopy unit
- Contaminated main water pipes/supply
- Contaminated or inadequate water supply systems (filtration etc.)
23](https://image.slidesharecdn.com/gastrointestinalendoscopy-trainingmanual-141128192047-conversion-gate02/85/Gastrointestinal-endoscopy-training-manual-32-320.jpg)


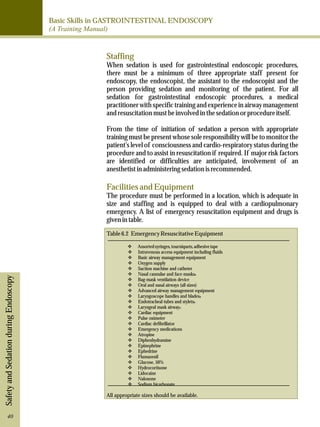

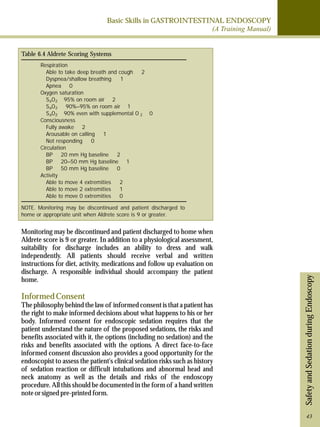


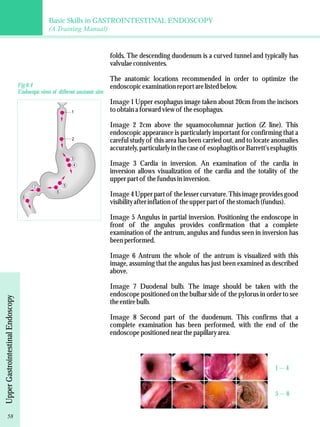


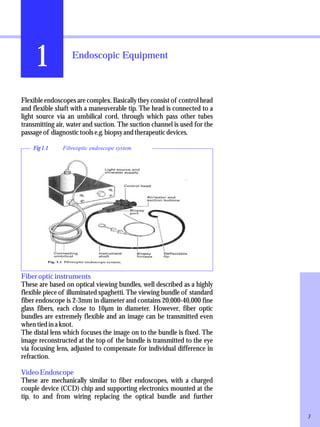
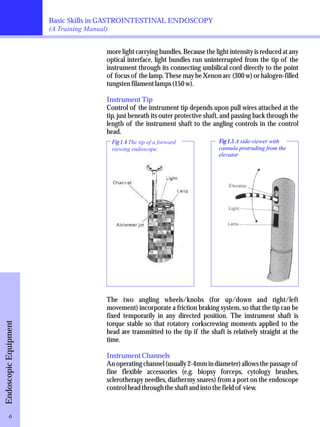
This document provides an overview of endoscopic equipment used for gastrointestinal endoscopy. It describes the basic components of a flexible endoscope, including the control head, insertion tube, bending section, and umbilical cord. It explains the differences between fiber optic and video endoscopes. Fiber optic endoscopes transmit light via optical glass fiber bundles to an eyepiece, while video endoscopes use a video chip at the tip to transmit images electronically to a monitor. Video endoscopy offers advantages like high resolution and the ability for others to view but is more costly. Illumination is provided via external light sources conducted through light carrying bundles. Control of the instrument tip is achieved via pull wires connected to angling wheels in


