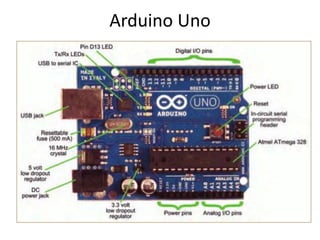
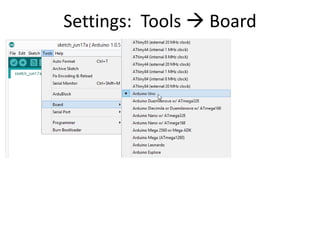
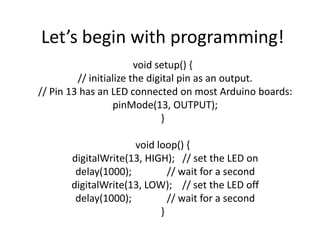
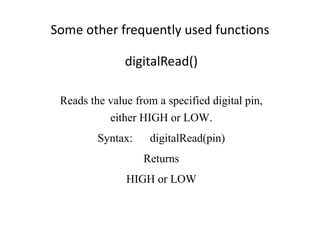
SlideShare a Scribd company logo
Overview
The Arduino Uno is a microcontroller board based on
the ATmega328 . It has:
• 14 digital input/output pins (of which 6 can be used as PWM
outputs),
• 6 analog inputs,
• a 16 MHz ceramic resonator,
•a USB connection, a power jack,
•an ICSP header,
• and a reset button.
Overview
It contains everything needed to support the
microcontroller; simply connect it to a computer with
a USB cable or power it with a AC-to-DC adapter or
battery to get started.
Arduino Uno
Power Supply
Arduino works on 5V. There are basically two ways to give supply to
arduino:
1 Using USB cable. The cable can be connected with USB port of
the laptop. This way it directly gets +5V.
2 Using DC jack : The DC jack can be connected with a battery
(supply voltage should not exceed 12V). 7805 IC is inbuilt which
supplies the board with 5V.
3 There is a Vin pin on the board, through which we can give dc
supply. (But the use of this pin should be avoided, because sometimes
it causes damage to the board).
Settings: Tools  Board
Settings: Tools  Serial Port
Introduction to Programming Syntax
Setup()
Setup function is used once when your program starts. It is used to set
up baud rate and initialize pins as input or output pins
#define op1 6
int pwm1 = 20
int pwm2 = 100
void setup()
{
Serial.begin(9600);
pinMode(op1,OUTPUT);
pinMode(4,INPUT);
}
Comments, Comments, Comments
• Comments are for you – the programmer and your
friends…or anyone else human that might read your code.
• // this is for single line comments
• // it’s good to put a description at
the top and before anything ‘tricky’
• /* this is for multi-line comments
• Like this…
• And this….
• */
Loop()
As the name suggests, code written inside loop will continue to
execute.
void loop()
{
digitalWrite(13,HGH);
delay(1000);
digitalWrite(13,LOW);
Delay(2000);
}
Data Types
Void short
Boolean float
Char double
Unsigned char string
Byte array
Int Unsigned int
Word Long
Unsigned long
Control Structures
If if..else
For switch case
While do..while
Break continue
Return goto
Comparison Operators
==
<
>
<=
>=
!=
Boolean Operators
&&
||
!
Let’s begin with programming!
void setup() {
// initialize the digital pin as an output.
// Pin 13 has an LED connected on most Arduino boards:
pinMode(13, OUTPUT);
}
void loop() {
digitalWrite(13, HIGH); // set the LED on
delay(1000); // wait for a second
digitalWrite(13, LOW); // set the LED off
delay(1000); // wait for a second
}
PMW Pins
• Command:
analogWrite(pin,value)
• value is duty cycle:
between 0 and 255
• Examples:
analogWrite(9, 128)
for a 50% duty cycle
analogWrite(11, 64)
for a 25% duty cycle
Image from Theory and Practice of Tangible User Interfaces at UC Berkley
PWM + for loop
int ledPin = 9; // LED connected to digital pin 9
void setup() {
}
void loop() {
for(int fadeValue = 0 ; fadeValue <= 255; fadeValue +=5) {
analogWrite(ledPin, fadeValue);
delay(30);
}
for(int fadeValue = 255 ; fadeValue >= 0; fadeValue -=5) {
analogWrite(ledPin, fadeValue);
delay(30);
}
}
Printing on the serial monitor
int x = 10;
void setup()
{
Serial.begin(9600);
}
void loop()
{
Serial.println(“X=“);
Serial.println(x);
}
Some other frequently used functions
digitalRead()
Reads the value from a specified digital pin,
either HIGH or LOW.
Syntax: digitalRead(pin)
Returns
HIGH or LOW
Example
int ledPin = 13; // LED connected to digital pin 13
int inPin = 7; // pushbutton connected to digital pin 7
int val = 0; // variable to store the read value
void setup()
{
pinMode(ledPin, OUTPUT); // sets the digital pin 13 as output
pinMode(inPin, INPUT); // sets the digital pin 7 as input
}
void loop()
{
val = digitalRead(inPin); // read the input pin
digitalWrite(ledPin, val); // sets the LED to the button's value
}
analogRead()
Description
Reads the value from the specified analog pin. The Arduino board
contains a 6 channel (8 channels on the Mini and Nano, 16 on the
Mega), 10-bit analog to digital converter. This means that it will
map input voltages between 0 and 5 volts into integer values
between 0 and 1023. This yields a resolution between readings of:
5 volts / 1024 units or, .0049 volts (4.9 mV) per unit. The input
range and resolution can be changed using analogReference().
It takes about 100 microseconds (0.0001 s) to read an analog input,
so the maximum reading rate is about 10,000 times a second.
Syntax
analogRead(pin)
Example
int analogPin = A3; // potentiometer wiper (middle terminal) connected to
analog pin 3
// outside leads to ground and +5V
int val = 0; // variable to store the value read
void setup()
{
Serial.begin(9600); // setup serial
}
void loop()
{
val = analogRead(analogPin); // read the input pin
Serial.println(val); // debug value
}
pulseIn()
Description : Reads a pulse (either HIGH or LOW) on a
pin. For example, if value is HIGH, pulseIn() waits for
the pin to go HIGH, starts timing, then waits for the pin to
go LOW and stops timing. Returns the length of the pulse in
microseconds. Gives up and returns 0 if no pulse starts
within a specified time out.
The timing of this function has been determined empirically
and will probably show errors in longer pulses. Works on
pulses from 10 microseconds to 3 minutes in length.
Syntax
pulseIn(pin, value)
pulseIn(pin, value, timeout)
Parameters
pin: the number of the pin on which you want to read
the pulse. (int)
value: type of pulse to read: either HIGH or LOW. (int)
timeout (optional): the number of microseconds to wait
for the pulse to start; default is one second (unsigned
long)
Returns
the length of the pulse (in microseconds) or 0 if no
pulse started before the timeout (unsigned long)
Example:
int pin = 7;
unsigned long duration;
void setup() {
pinMode(pin, INPUT);
}
void loop()
{
duration = pulseIn(pin, HIGH);
}
To explore many other functions
that can be used..
Visit
http://arduino.cc/en/Reference/Ho
mePage
Thank
You.

More Related Content

What's hot

Physical prototyping lab1-input_output (2)
Physical prototyping lab1-input_output (2)Physical prototyping lab1-input_output (2)
Physical prototyping lab1-input_output (2)
Tony Olsson.
 
Arduino: Analog I/O
Arduino: Analog I/OArduino: Analog I/O
Arduino: Analog I/OJune-Hao Hou
 
Arduino اردوينو
Arduino اردوينوArduino اردوينو
Arduino اردوينو
salih mahmod
 
Introduction to the Arduino
Introduction to the ArduinoIntroduction to the Arduino
Introduction to the ArduinoWingston
 
Physical prototyping lab3-serious_serial
Physical prototyping lab3-serious_serialPhysical prototyping lab3-serious_serial
Physical prototyping lab3-serious_serial
Tony Olsson.
 
Multi Sensory Communication 2/2
Multi Sensory Communication 2/2Multi Sensory Communication 2/2
Multi Sensory Communication 2/2
Satoru Tokuhisa
 
Mims effect
Mims effectMims effect
Mims effectarnaullb
 
Programming A Robot Using
Programming A Robot UsingProgramming A Robot Using
Programming A Robot Using
Spitiq
 
Programming with arduino
Programming with arduinoProgramming with arduino
Programming with arduino
Makers of India
 
Arduino Lecture 4 - Interactive Media CS4062 Semester 2 2009
Arduino Lecture 4 - Interactive Media CS4062 Semester 2 2009Arduino Lecture 4 - Interactive Media CS4062 Semester 2 2009
Arduino Lecture 4 - Interactive Media CS4062 Semester 2 2009
Eoin Brazil
 
Arduino programming
Arduino programmingArduino programming
Arduino programming
MdAshrafulAlam47
 
How to measure frequency and duty cycle using arduino
How to measure frequency and duty cycle using  arduinoHow to measure frequency and duty cycle using  arduino
How to measure frequency and duty cycle using arduino
Sagar Srivastav
 
Starting with Arduino
Starting with Arduino Starting with Arduino
Starting with Arduino
MajdyShamasneh
 
02 General Purpose Input - Output on the Arduino
02   General Purpose Input -  Output on the Arduino02   General Purpose Input -  Output on the Arduino
02 General Purpose Input - Output on the Arduino
Wingston
 
Introduction to Arduino Microcontroller
Introduction to Arduino MicrocontrollerIntroduction to Arduino Microcontroller
Introduction to Arduino Microcontroller
Mujahid Hussain
 
Presentation S4A
Presentation S4A Presentation S4A
Presentation S4A
Pedro González Romero
 

What's hot (20)

Physical prototyping lab1-input_output (2)
Physical prototyping lab1-input_output (2)Physical prototyping lab1-input_output (2)
Physical prototyping lab1-input_output (2)
 
Arduino: Analog I/O
Arduino: Analog I/OArduino: Analog I/O
Arduino: Analog I/O
 
Arduino اردوينو
Arduino اردوينوArduino اردوينو
Arduino اردوينو
 
Introduction to the Arduino
Introduction to the ArduinoIntroduction to the Arduino
Introduction to the Arduino
 
Physical prototyping lab3-serious_serial
Physical prototyping lab3-serious_serialPhysical prototyping lab3-serious_serial
Physical prototyping lab3-serious_serial
 
Multi Sensory Communication 2/2
Multi Sensory Communication 2/2Multi Sensory Communication 2/2
Multi Sensory Communication 2/2
 
Mims effect
Mims effectMims effect
Mims effect
 
Programming A Robot Using
Programming A Robot UsingProgramming A Robot Using
Programming A Robot Using
 
Programming with arduino
Programming with arduinoProgramming with arduino
Programming with arduino
 
Arduino Lecture 4 - Interactive Media CS4062 Semester 2 2009
Arduino Lecture 4 - Interactive Media CS4062 Semester 2 2009Arduino Lecture 4 - Interactive Media CS4062 Semester 2 2009
Arduino Lecture 4 - Interactive Media CS4062 Semester 2 2009
 
Arduino programming
Arduino programmingArduino programming
Arduino programming
 
Arduino
ArduinoArduino
Arduino
 
How to measure frequency and duty cycle using arduino
How to measure frequency and duty cycle using  arduinoHow to measure frequency and duty cycle using  arduino
How to measure frequency and duty cycle using arduino
 
Starting with Arduino
Starting with Arduino Starting with Arduino
Starting with Arduino
 
Lab2ppt
Lab2pptLab2ppt
Lab2ppt
 
02 General Purpose Input - Output on the Arduino
02   General Purpose Input -  Output on the Arduino02   General Purpose Input -  Output on the Arduino
02 General Purpose Input - Output on the Arduino
 
Introduction to Arduino Microcontroller
Introduction to Arduino MicrocontrollerIntroduction to Arduino Microcontroller
Introduction to Arduino Microcontroller
 
Soc
SocSoc
Soc
 
I/O Ports
I/O Ports I/O Ports
I/O Ports
 
Presentation S4A
Presentation S4A Presentation S4A
Presentation S4A
 

Similar to Arduino cic3

Arduino.pptx
Arduino.pptxArduino.pptx
Arduino.pptx
ArunKumar313658
 
4 IOT 18ISDE712 MODULE 4 IoT Physical Devices and End Point-Aurdino Uno.pdf
4 IOT 18ISDE712  MODULE 4 IoT Physical Devices and End Point-Aurdino  Uno.pdf4 IOT 18ISDE712  MODULE 4 IoT Physical Devices and End Point-Aurdino  Uno.pdf
4 IOT 18ISDE712 MODULE 4 IoT Physical Devices and End Point-Aurdino Uno.pdf
Jayanthi Kannan MK
 
Arduino Programming
Arduino ProgrammingArduino Programming
Arduino Programming
Dr Karthikeyan Periasamy
 
Arduino intro.pptx
Arduino intro.pptxArduino intro.pptx
Arduino intro.pptx
SanthanaMari11
 
Fun with arduino
Fun with arduinoFun with arduino
Fun with arduino
Ravikumar Tiwari
 
Introduction to Arduino
Introduction to ArduinoIntroduction to Arduino
Introduction to Arduino
Luki B. Subekti
 
The IoT Academy IoT Training Arduino Part 3 programming
The IoT Academy IoT Training Arduino Part 3 programmingThe IoT Academy IoT Training Arduino Part 3 programming
The IoT Academy IoT Training Arduino Part 3 programming
The IOT Academy
 
How to use an Arduino
How to use an ArduinoHow to use an Arduino
How to use an Arduino
AntonAndreev13
 
Arduino for Beginners
Arduino for BeginnersArduino for Beginners
Arduino for Beginners
Sarwan Singh
 
Arduino Day 1 Presentation
Arduino Day 1 PresentationArduino Day 1 Presentation
Arduino Day 1 Presentation
Yogendra Tamang
 
Syed IoT - module 5
Syed  IoT - module 5Syed  IoT - module 5
Syed IoT - module 5
Syed Mustafa
 
arduino.ppt
arduino.pptarduino.ppt
arduino.ppt
sunilkumar652338
 
Physical prototyping lab2-analog_digital
Physical prototyping lab2-analog_digitalPhysical prototyping lab2-analog_digital
Physical prototyping lab2-analog_digital
Tony Olsson.
 
Physical prototyping lab2-analog_digital
Physical prototyping lab2-analog_digitalPhysical prototyping lab2-analog_digital
Physical prototyping lab2-analog_digital
Tony Olsson.
 
Embedded system course projects - Arduino Course
Embedded system course projects - Arduino CourseEmbedded system course projects - Arduino Course
Embedded system course projects - Arduino Course
Elaf A.Saeed
 
Microcontroller_basics_lesson1_2019 (1).pptx
Microcontroller_basics_lesson1_2019 (1).pptxMicrocontroller_basics_lesson1_2019 (1).pptx
Microcontroller_basics_lesson1_2019 (1).pptx
HebaEng
 
AVR arduino dasar
AVR arduino dasarAVR arduino dasar
AVR arduino dasar
Oktaf Kharisma
 
Arduino workshop
Arduino workshopArduino workshop
Arduino workshop
Jonah Marrs
 
Arduino_CSE ece ppt for working and principal of arduino.ppt
Arduino_CSE ece ppt for working and principal of arduino.pptArduino_CSE ece ppt for working and principal of arduino.ppt
Arduino_CSE ece ppt for working and principal of arduino.ppt
SAURABHKUMAR892774
 

Similar to Arduino cic3 (20)

Arduino.pptx
Arduino.pptxArduino.pptx
Arduino.pptx
 
4 IOT 18ISDE712 MODULE 4 IoT Physical Devices and End Point-Aurdino Uno.pdf
4 IOT 18ISDE712  MODULE 4 IoT Physical Devices and End Point-Aurdino  Uno.pdf4 IOT 18ISDE712  MODULE 4 IoT Physical Devices and End Point-Aurdino  Uno.pdf
4 IOT 18ISDE712 MODULE 4 IoT Physical Devices and End Point-Aurdino Uno.pdf
 
Arduino Programming
Arduino ProgrammingArduino Programming
Arduino Programming
 
Arduino Programming Basic
Arduino Programming BasicArduino Programming Basic
Arduino Programming Basic
 
Arduino intro.pptx
Arduino intro.pptxArduino intro.pptx
Arduino intro.pptx
 
Fun with arduino
Fun with arduinoFun with arduino
Fun with arduino
 
Introduction to Arduino
Introduction to ArduinoIntroduction to Arduino
Introduction to Arduino
 
The IoT Academy IoT Training Arduino Part 3 programming
The IoT Academy IoT Training Arduino Part 3 programmingThe IoT Academy IoT Training Arduino Part 3 programming
The IoT Academy IoT Training Arduino Part 3 programming
 
How to use an Arduino
How to use an ArduinoHow to use an Arduino
How to use an Arduino
 
Arduino for Beginners
Arduino for BeginnersArduino for Beginners
Arduino for Beginners
 
Arduino Day 1 Presentation
Arduino Day 1 PresentationArduino Day 1 Presentation
Arduino Day 1 Presentation
 
Syed IoT - module 5
Syed  IoT - module 5Syed  IoT - module 5
Syed IoT - module 5
 
arduino.ppt
arduino.pptarduino.ppt
arduino.ppt
 
Physical prototyping lab2-analog_digital
Physical prototyping lab2-analog_digitalPhysical prototyping lab2-analog_digital
Physical prototyping lab2-analog_digital
 
Physical prototyping lab2-analog_digital
Physical prototyping lab2-analog_digitalPhysical prototyping lab2-analog_digital
Physical prototyping lab2-analog_digital
 
Embedded system course projects - Arduino Course
Embedded system course projects - Arduino CourseEmbedded system course projects - Arduino Course
Embedded system course projects - Arduino Course
 
Microcontroller_basics_lesson1_2019 (1).pptx
Microcontroller_basics_lesson1_2019 (1).pptxMicrocontroller_basics_lesson1_2019 (1).pptx
Microcontroller_basics_lesson1_2019 (1).pptx
 
AVR arduino dasar
AVR arduino dasarAVR arduino dasar
AVR arduino dasar
 
Arduino workshop
Arduino workshopArduino workshop
Arduino workshop
 
Arduino_CSE ece ppt for working and principal of arduino.ppt
Arduino_CSE ece ppt for working and principal of arduino.pptArduino_CSE ece ppt for working and principal of arduino.ppt
Arduino_CSE ece ppt for working and principal of arduino.ppt
 

Recently uploaded

MATHEMATICS BRIDGE COURSE (TEN DAYS PLANNER) (FOR CLASS XI STUDENTS GOING TO ...
MATHEMATICS BRIDGE COURSE (TEN DAYS PLANNER) (FOR CLASS XI STUDENTS GOING TO ...MATHEMATICS BRIDGE COURSE (TEN DAYS PLANNER) (FOR CLASS XI STUDENTS GOING TO ...
MATHEMATICS BRIDGE COURSE (TEN DAYS PLANNER) (FOR CLASS XI STUDENTS GOING TO ...
PinkySharma900491
 
一比一原版UVM毕业证佛蒙特大学毕业证成绩单如何办理
一比一原版UVM毕业证佛蒙特大学毕业证成绩单如何办理一比一原版UVM毕业证佛蒙特大学毕业证成绩单如何办理
一比一原版UVM毕业证佛蒙特大学毕业证成绩单如何办理
kywwoyk
 
web-tech-lab-manual-final-abhas.pdf. Jer
web-tech-lab-manual-final-abhas.pdf. Jerweb-tech-lab-manual-final-abhas.pdf. Jer
web-tech-lab-manual-final-abhas.pdf. Jer
freshgammer09
 
一比一原版SDSU毕业证圣地亚哥州立大学毕业证成绩单如何办理
一比一原版SDSU毕业证圣地亚哥州立大学毕业证成绩单如何办理一比一原版SDSU毕业证圣地亚哥州立大学毕业证成绩单如何办理
一比一原版SDSU毕业证圣地亚哥州立大学毕业证成绩单如何办理
kywwoyk
 
一比一原版SDSU毕业证圣地亚哥州立大学毕业证成绩单如何办理
一比一原版SDSU毕业证圣地亚哥州立大学毕业证成绩单如何办理一比一原版SDSU毕业证圣地亚哥州立大学毕业证成绩单如何办理
一比一原版SDSU毕业证圣地亚哥州立大学毕业证成绩单如何办理
eemet
 
NO1 Uk Amil Baba In Lahore Kala Jadu In Lahore Best Amil In Lahore Amil In La...
NO1 Uk Amil Baba In Lahore Kala Jadu In Lahore Best Amil In Lahore Amil In La...NO1 Uk Amil Baba In Lahore Kala Jadu In Lahore Best Amil In Lahore Amil In La...
NO1 Uk Amil Baba In Lahore Kala Jadu In Lahore Best Amil In Lahore Amil In La...
Amil baba
 
F5 LTM TROUBLESHOOTING Guide latest.pptx
F5 LTM TROUBLESHOOTING Guide latest.pptxF5 LTM TROUBLESHOOTING Guide latest.pptx
F5 LTM TROUBLESHOOTING Guide latest.pptx
ArjunJain44
 
Drugs used in parkinsonism and other movement disorders.pptx
Drugs used in parkinsonism and other movement disorders.pptxDrugs used in parkinsonism and other movement disorders.pptx
Drugs used in parkinsonism and other movement disorders.pptx
ThalapathyVijay15
 
Cyber Sequrity.pptx is life of cyber security
Cyber Sequrity.pptx is life of cyber securityCyber Sequrity.pptx is life of cyber security
Cyber Sequrity.pptx is life of cyber security
perweeng31
 

Recently uploaded (9)

MATHEMATICS BRIDGE COURSE (TEN DAYS PLANNER) (FOR CLASS XI STUDENTS GOING TO ...
MATHEMATICS BRIDGE COURSE (TEN DAYS PLANNER) (FOR CLASS XI STUDENTS GOING TO ...MATHEMATICS BRIDGE COURSE (TEN DAYS PLANNER) (FOR CLASS XI STUDENTS GOING TO ...
MATHEMATICS BRIDGE COURSE (TEN DAYS PLANNER) (FOR CLASS XI STUDENTS GOING TO ...
 
一比一原版UVM毕业证佛蒙特大学毕业证成绩单如何办理
一比一原版UVM毕业证佛蒙特大学毕业证成绩单如何办理一比一原版UVM毕业证佛蒙特大学毕业证成绩单如何办理
一比一原版UVM毕业证佛蒙特大学毕业证成绩单如何办理
 
web-tech-lab-manual-final-abhas.pdf. Jer
web-tech-lab-manual-final-abhas.pdf. Jerweb-tech-lab-manual-final-abhas.pdf. Jer
web-tech-lab-manual-final-abhas.pdf. Jer
 
一比一原版SDSU毕业证圣地亚哥州立大学毕业证成绩单如何办理
一比一原版SDSU毕业证圣地亚哥州立大学毕业证成绩单如何办理一比一原版SDSU毕业证圣地亚哥州立大学毕业证成绩单如何办理
一比一原版SDSU毕业证圣地亚哥州立大学毕业证成绩单如何办理
 
一比一原版SDSU毕业证圣地亚哥州立大学毕业证成绩单如何办理
一比一原版SDSU毕业证圣地亚哥州立大学毕业证成绩单如何办理一比一原版SDSU毕业证圣地亚哥州立大学毕业证成绩单如何办理
一比一原版SDSU毕业证圣地亚哥州立大学毕业证成绩单如何办理
 
NO1 Uk Amil Baba In Lahore Kala Jadu In Lahore Best Amil In Lahore Amil In La...
NO1 Uk Amil Baba In Lahore Kala Jadu In Lahore Best Amil In Lahore Amil In La...NO1 Uk Amil Baba In Lahore Kala Jadu In Lahore Best Amil In Lahore Amil In La...
NO1 Uk Amil Baba In Lahore Kala Jadu In Lahore Best Amil In Lahore Amil In La...
 
F5 LTM TROUBLESHOOTING Guide latest.pptx
F5 LTM TROUBLESHOOTING Guide latest.pptxF5 LTM TROUBLESHOOTING Guide latest.pptx
F5 LTM TROUBLESHOOTING Guide latest.pptx
 
Drugs used in parkinsonism and other movement disorders.pptx
Drugs used in parkinsonism and other movement disorders.pptxDrugs used in parkinsonism and other movement disorders.pptx
Drugs used in parkinsonism and other movement disorders.pptx
 
Cyber Sequrity.pptx is life of cyber security
Cyber Sequrity.pptx is life of cyber securityCyber Sequrity.pptx is life of cyber security
Cyber Sequrity.pptx is life of cyber security
 

Arduino cic3

  • 1.
  • 2. Overview The Arduino Uno is a microcontroller board based on the ATmega328 . It has: • 14 digital input/output pins (of which 6 can be used as PWM outputs), • 6 analog inputs, • a 16 MHz ceramic resonator, •a USB connection, a power jack, •an ICSP header, • and a reset button.
  • 3. Overview It contains everything needed to support the microcontroller; simply connect it to a computer with a USB cable or power it with a AC-to-DC adapter or battery to get started.
  • 5. Power Supply Arduino works on 5V. There are basically two ways to give supply to arduino: 1 Using USB cable. The cable can be connected with USB port of the laptop. This way it directly gets +5V. 2 Using DC jack : The DC jack can be connected with a battery (supply voltage should not exceed 12V). 7805 IC is inbuilt which supplies the board with 5V. 3 There is a Vin pin on the board, through which we can give dc supply. (But the use of this pin should be avoided, because sometimes it causes damage to the board).
  • 7. Settings: Tools  Serial Port
  • 9. Setup() Setup function is used once when your program starts. It is used to set up baud rate and initialize pins as input or output pins #define op1 6 int pwm1 = 20 int pwm2 = 100 void setup() { Serial.begin(9600); pinMode(op1,OUTPUT); pinMode(4,INPUT); }
  • 10. Comments, Comments, Comments • Comments are for you – the programmer and your friends…or anyone else human that might read your code. • // this is for single line comments • // it’s good to put a description at the top and before anything ‘tricky’ • /* this is for multi-line comments • Like this… • And this…. • */
  • 11. Loop() As the name suggests, code written inside loop will continue to execute. void loop() { digitalWrite(13,HGH); delay(1000); digitalWrite(13,LOW); Delay(2000); }
  • 12. Data Types Void short Boolean float Char double Unsigned char string Byte array Int Unsigned int Word Long Unsigned long
  • 13. Control Structures If if..else For switch case While do..while Break continue Return goto
  • 16. Let’s begin with programming! void setup() { // initialize the digital pin as an output. // Pin 13 has an LED connected on most Arduino boards: pinMode(13, OUTPUT); } void loop() { digitalWrite(13, HIGH); // set the LED on delay(1000); // wait for a second digitalWrite(13, LOW); // set the LED off delay(1000); // wait for a second }
  • 17. PMW Pins • Command: analogWrite(pin,value) • value is duty cycle: between 0 and 255 • Examples: analogWrite(9, 128) for a 50% duty cycle analogWrite(11, 64) for a 25% duty cycle Image from Theory and Practice of Tangible User Interfaces at UC Berkley
  • 18. PWM + for loop int ledPin = 9; // LED connected to digital pin 9 void setup() { } void loop() { for(int fadeValue = 0 ; fadeValue <= 255; fadeValue +=5) { analogWrite(ledPin, fadeValue); delay(30); } for(int fadeValue = 255 ; fadeValue >= 0; fadeValue -=5) { analogWrite(ledPin, fadeValue); delay(30); } }
  • 19. Printing on the serial monitor int x = 10; void setup() { Serial.begin(9600); } void loop() { Serial.println(“X=“); Serial.println(x); }
  • 20. Some other frequently used functions digitalRead() Reads the value from a specified digital pin, either HIGH or LOW. Syntax: digitalRead(pin) Returns HIGH or LOW
  • 21. Example int ledPin = 13; // LED connected to digital pin 13 int inPin = 7; // pushbutton connected to digital pin 7 int val = 0; // variable to store the read value void setup() { pinMode(ledPin, OUTPUT); // sets the digital pin 13 as output pinMode(inPin, INPUT); // sets the digital pin 7 as input } void loop() { val = digitalRead(inPin); // read the input pin digitalWrite(ledPin, val); // sets the LED to the button's value }
  • 22. analogRead() Description Reads the value from the specified analog pin. The Arduino board contains a 6 channel (8 channels on the Mini and Nano, 16 on the Mega), 10-bit analog to digital converter. This means that it will map input voltages between 0 and 5 volts into integer values between 0 and 1023. This yields a resolution between readings of: 5 volts / 1024 units or, .0049 volts (4.9 mV) per unit. The input range and resolution can be changed using analogReference(). It takes about 100 microseconds (0.0001 s) to read an analog input, so the maximum reading rate is about 10,000 times a second. Syntax analogRead(pin)
  • 23. Example int analogPin = A3; // potentiometer wiper (middle terminal) connected to analog pin 3 // outside leads to ground and +5V int val = 0; // variable to store the value read void setup() { Serial.begin(9600); // setup serial } void loop() { val = analogRead(analogPin); // read the input pin Serial.println(val); // debug value }
  • 24. pulseIn() Description : Reads a pulse (either HIGH or LOW) on a pin. For example, if value is HIGH, pulseIn() waits for the pin to go HIGH, starts timing, then waits for the pin to go LOW and stops timing. Returns the length of the pulse in microseconds. Gives up and returns 0 if no pulse starts within a specified time out. The timing of this function has been determined empirically and will probably show errors in longer pulses. Works on pulses from 10 microseconds to 3 minutes in length.
  • 25. Syntax pulseIn(pin, value) pulseIn(pin, value, timeout) Parameters pin: the number of the pin on which you want to read the pulse. (int) value: type of pulse to read: either HIGH or LOW. (int) timeout (optional): the number of microseconds to wait for the pulse to start; default is one second (unsigned long) Returns the length of the pulse (in microseconds) or 0 if no pulse started before the timeout (unsigned long)
  • 26. Example: int pin = 7; unsigned long duration; void setup() { pinMode(pin, INPUT); } void loop() { duration = pulseIn(pin, HIGH); }
  • 27. To explore many other functions that can be used.. Visit http://arduino.cc/en/Reference/Ho mePage