Photoshop construction:
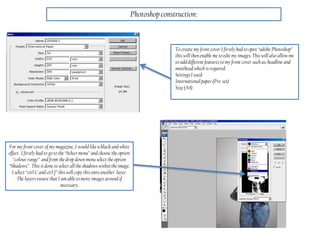
To create my front cover I firstly had to open “adobe Photoshop”
this will then enable me to edit my images. This will also allow me
to adddifferent features to my front cover such as, headline and
masthead which is required.
Settings I used:
International paper (Pre-set)
Size (A4)
For my front cover of my magazine, I would like a black and white
effect. I firstly had to go to the “Select menu” and choose the option
“colour range” and from thedrop down menu select the option
“Shadows”. This is done to select all the shadows within the image.
I select “ctrl C and ctrl J” this will copy thisonto another layer.
The layers ensure that I am able to move images around if
necessary.
Photoshop construction:
The next stage involves selecting the “MD tones” option.
This was done by clicking on “Select”, “Colour range” and from the
drop down box provided, “MD tones” then has to be selected. When
this is done, I again had to “ctrl C and ctrl J” to copy the layer. I
then turned of the background layer, this was done by clicking on
the eye of the layer which will then turn it of. This means thatthis
layer can then not be seen.
Photoshop construction:
I then clicked on the md tones layer that I had just selected. Then
go onto the “edit menu” and choose the option 50% grey. This will
make half of the picture have a grey shaded effect. When this is
done I had to ensure thatthe “preserve transparency” option was
selected. This has to be done whenever this option appears.
I then hadto select the shadows layer and then click on the layer
button on the tool bar, which then brought up options of “edit”. The
then hadto change the contents to “black”. I again had to ensure
thatpreserve transparency” option was selected.
Photoshop construction:
I then merged the layers by right clicking and choosing the option of “Merge layers”.
Photoshop construction:
When all of this is done, the black and white effect will have been applied to my image of my model “Lydia Hughes”. The next
stage was adding my text.
Photoshop construction:
When adding my masthead to my magazine cover, I firstly had to
add a new layer. I then had to select the “Text” option which is
situatedwithin the tool bar. I then chose my text as “Californian
fb italic, I also then changed the colour of my writing of
“Throwback” to black” and the colour of “Thursday” to white.
This then was my Masthead for my magazine.

Construction

  • 1.
    Photoshop construction: To createmy front cover I firstly had to open “adobe Photoshop” this will then enable me to edit my images. This will also allow me to adddifferent features to my front cover such as, headline and masthead which is required. Settings I used: International paper (Pre-set) Size (A4) For my front cover of my magazine, I would like a black and white effect. I firstly had to go to the “Select menu” and choose the option “colour range” and from thedrop down menu select the option “Shadows”. This is done to select all the shadows within the image. I select “ctrl C and ctrl J” this will copy thisonto another layer. The layers ensure that I am able to move images around if necessary.
  • 2.
    Photoshop construction: The nextstage involves selecting the “MD tones” option. This was done by clicking on “Select”, “Colour range” and from the drop down box provided, “MD tones” then has to be selected. When this is done, I again had to “ctrl C and ctrl J” to copy the layer. I then turned of the background layer, this was done by clicking on the eye of the layer which will then turn it of. This means thatthis layer can then not be seen.
  • 3.
    Photoshop construction: I thenclicked on the md tones layer that I had just selected. Then go onto the “edit menu” and choose the option 50% grey. This will make half of the picture have a grey shaded effect. When this is done I had to ensure thatthe “preserve transparency” option was selected. This has to be done whenever this option appears. I then hadto select the shadows layer and then click on the layer button on the tool bar, which then brought up options of “edit”. The then hadto change the contents to “black”. I again had to ensure thatpreserve transparency” option was selected.
  • 4.
    Photoshop construction: I thenmerged the layers by right clicking and choosing the option of “Merge layers”.
  • 5.
    Photoshop construction: When allof this is done, the black and white effect will have been applied to my image of my model “Lydia Hughes”. The next stage was adding my text.
  • 6.
    Photoshop construction: When addingmy masthead to my magazine cover, I firstly had to add a new layer. I then had to select the “Text” option which is situatedwithin the tool bar. I then chose my text as “Californian fb italic, I also then changed the colour of my writing of “Throwback” to black” and the colour of “Thursday” to white. This then was my Masthead for my magazine.