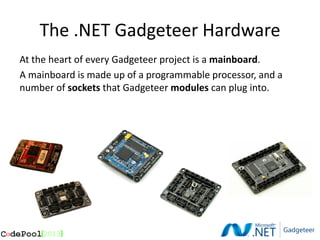
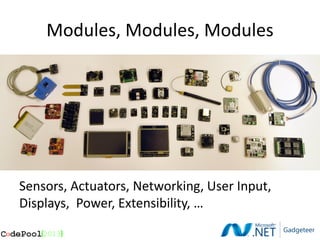
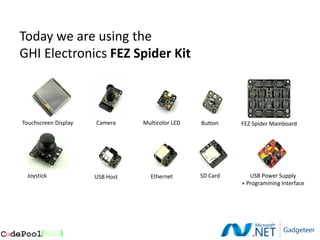
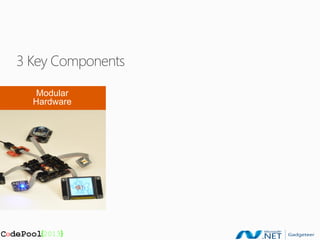
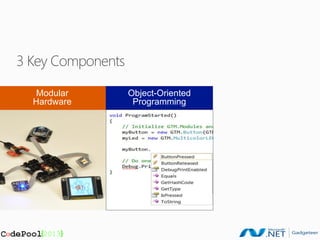
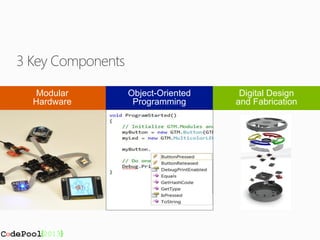
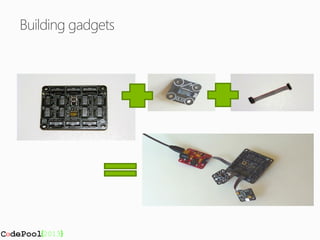
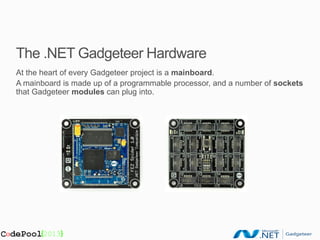
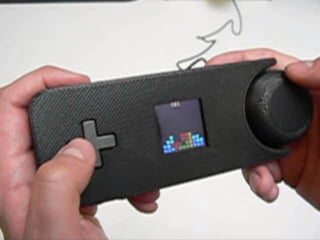
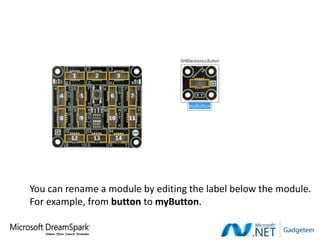
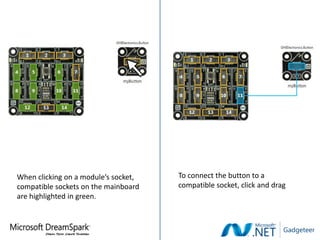
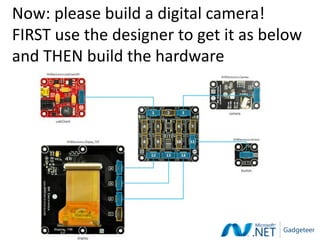
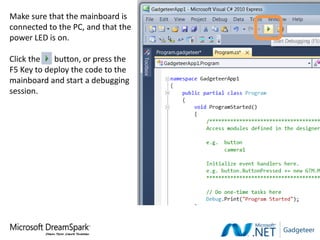
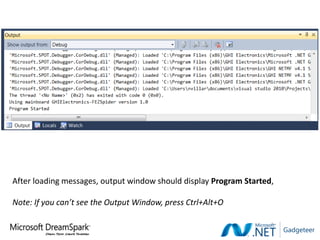
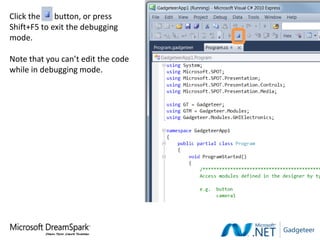
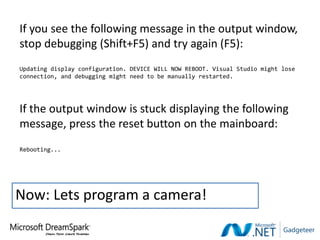
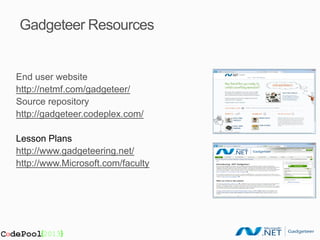
Computer Science with
                   Microsoft .NET Gadgeteer


Lee Stott
@lee_stott
LeeStott@Microsoft.com
Microsoft
http://www.microsoft.com/uk/faculty
A new way to make inspire and stimulate learning
History
• .NET Gadgeteer comes from Microsoft Research in
  Cambridge, UK
• Designed as a tool for researchers to make it faster and
  easier to prototype new kinds of devices
• Since then, it has proven to be of interest to hobbyists
  and for secondary and tertiary education
• Because of this interest, we have launched .NET
  Gadgeteer as open source software/hardware
The .NET Gadgeteer Hardware
At the heart of every Gadgeteer project is a mainboard.
A mainboard is made up of a programmable processor, and a
number of sockets that Gadgeteer modules can plug into.
Modules, Modules, Modules


Sensors, Actuators, Networking, User Input,
Displays, Power, Extensibility, …
Today we are using the
GHI Electronics FEZ Spider Kit


Touchscreen Display   Camera     Multicolor LED   Button    FEZ Spider Mainboard


 Joystick             USB Host     Ethernet       SD Card      USB Power Supply
                                                            + Programming Interface
Goals

Low threshold
 Simple gadgets should be very quick to build


High ceiling
 It should also be possible to build sophisticated and complex
 devices
3 Key Components

   Modular
  Hardware
3 Key Components

   Modular         Object-Oriented
  Hardware          Programming
3 Key Components

   Modular         Object-Oriented    Digital Design
  Hardware          Programming      and Fabrication
Building gadgets
The .NET Gadgeteer Hardware
At the heart of every Gadgeteer project is a mainboard.
A mainboard is made up of a programmable processor, and a number of sockets
that Gadgeteer modules can plug into.
A Closer Look at the Mainboard

                Socket Numbers


    Power LED                             Debug LED


                                         Socket Types


                          Reset Button
Match socket type letters when connecting modules to the mainboard
Connect modules to mainboard, and connect to PC via USB.
Engineering and Technology


We want to make it easier to give shape to Gadgeteer devices by using
digital fabrication technologies

First step: integration with 3D CAD modelling software (e.g. Solidworks)
Auto-generate mounting fixtures
Falling cost and increasing availability of 3D printers
Digital design and rapid manufacture
Hardware configuration (~5 minutes to assemble)
                         MICROSOFT CONFIDENTIAL

                                          Four-way switch to control
                                          placement of puzzle piece


                                                              Knob to rotate
                                                              piece


                                                  Colour OLED display
USB power source
                                                  (128x128 resolution)
and programming socket
Software development CONFIDENTIAL
           MICROSOFT in C# (~5 hours)
Enclosure design in   MICROSOFT CONFIDENTIAL
Solidworks
(>3 hours)
Enclosure 3D printed (>6MICROSOFT CONFIDENTIAL
hours)
MICROSOFT CONFIDENTIAL
                 Assembly (>30 minutes)
LETS BUILD A DIGITAL CAMERA
FROM SCRATCH IN 15 MINUTES
Development Tool: Visual Studio


                                    or


Available for FREE for students and educators from www.dreamspark.com
Designer Tab
                      Solution Explorer
(Program.gadgeteer)
                        (Project Files)
Code Tab
(Program.cs)
Designer Tab
          (Program.gadgeteer)


Toolbox
Module manufacturer
and module type


    Module name
You can rename a module by editing the label below the module.
For example, from button to myButton.
When clicking on a module’s socket,   To connect the button to a
compatible sockets on the mainboard   compatible socket, click and drag
are highlighted in green.
Now: please build a digital camera!
FIRST use the designer to get it as below
and THEN build the hardware
VERY BRIEF INTRODUCTION TO C#
using   System;
using   Microsoft.SPOT;                                The code starts with a
using   Microsoft.SPOT.Presentation;
using   Microsoft.SPOT.Presentation.Controls;          standard template
using   Microsoft.SPOT.Presentation.Media;

using GT = Gadgeteer;
using GTM = Gadgeteer.Modules;
using Gadgeteer.Modules.GHIElectronics;

namespace GadgeteerApp1
{
    public partial class Program
    {
        void ProgramStarted()
        {
            /******************************************************************************************
            Access modules defined in the designer by typing their name:

             e.g.   button
                    camera1

             Initialize event handlers here.
             e.g. button.ButtonPressed += new GTM.MSR.Button.ButtonEventHandler(button_ButtonPressed);
             ***************************************************************************************** */

             // Do one-time tasks here
             Debug.Print("Program Started");
         }
    }
}
ProgramStarted() executes
                                                      whenever the mainboard is first
namespace GadgeteerApp1
{                                                     powered up or restarted.
    public partial class Program
    {
        void ProgramStarted()
        {
            /******************************************************************************************
            Access modules defined in the designer by typing their name:

            e.g.   button
                   camera1

            Initialize event handlers here.
            e.g. button.ButtonPressed += new GTM.MSR.Button.ButtonEventHandler(button_ButtonPressed);
            ***************************************************************************************** */

            // Do one-time tasks here
            Debug.Print("Program Started");
        }
    }
}
namespace GadgeteerApp1
{
    public partial class Program
    {
        void ProgramStarted()
        {
            /******************************************************************************************
            Access modules defined in the designer by typing their name:

            e.g.   button
                   camera1

            Initialize event handlers here.
            e.g. button.ButtonPressed += new GTM.MSR.Button.ButtonEventHandler(button_ButtonPressed);
            ***************************************************************************************** */

            // Do one-time tasks here
            Debug.Print("Program Started");
        }
    }
}

                                                      Debug.Print(string) prints
                                                      text to the debug output
                                                      window.
To access hardware functionality type the name
of the hardware module followed by a period
e.g. myButton.
Properties
Values that can be read, and sometimes also assigned.
Methods
Built-in functions that can include a number of parameters.
Events
Notification that something of interest has occurred.
Events
Notification that something of interest has occurred.

            This line specifies that we are interested in knowing when this
            particular event occurs, and associates it with a specific method.
Events
Notification that something of interest has occurred.

            This line specifies that we are interested in knowing when this
            particular event occurs, and associates it with a specific method.
Events
Notification that something of interest has occurred.


This method will now get called (and the code inside
it will get executed) whenever the button is pressed.
The quick way to use events
Inside the ProgramStarted() method, type module name followed
by a period, then select event using the arrow and Enter keys.
The quick way to use events
 Type +=, followed by the Tab key twice.
The quick way to use events
Replace the line   throw new NotImplementedException();   with your own
code.
SOFTWARE FOR A DIGITAL CAMERA
Setup events for camera.PictureCaptured and button.ButtonPressed
by typing the event name, then +=, then <tab> twice
When the button is pressed, call the
camera.TakePicture() method.
When the camera has captured a picture,
use the display’s SimpleGraphics to
display the image.
The DisplayImage method takes three parameters: a
GT.Picture object, an X coordinate and a Y coordinate.

The PicturedCaptured event returns a GT.Picture object,
called picture, which is used as the first parameter.

The coordinate 0, 0 (passed as the second and third
parameters) refers top-left corner of the display.
RUNNING THE PROGRAM
Make sure that the mainboard is
connected to the PC, and that the
power LED is on.

Click the   button, or press the
F5 Key to deploy the code to the
mainboard and start a debugging
session.
After loading messages, output window should display Program Started,

Note: If you can’t see the Output Window, press Ctrl+Alt+O
Click the    button, or press
Shift+F5 to exit the debugging
mode.

Note that you can’t edit the code
while in debugging mode.
If you see the following message in the output window,
stop debugging (Shift+F5) and try again (F5):
Updating display configuration. DEVICE WILL NOW REBOOT. Visual Studio might lose
connection, and debugging might need to be manually restarted.


If the output window is stuck displaying the following
message, press the reset button on the mainboard:
Rebooting...


Now: Lets program a camera!
Completed program (comments removed)
Now: Please write your program!
Gadgeteer Resources


End user website
http://netmf.com/gadgeteer/
Source repository
http://gadgeteer.codeplex.com/

Lesson Plans
http://www.gadgeteering.net/
http://www.Microsoft.com/faculty

CodePool Liverpool 2013 - Microsoft Gadgeteer Presentation

  • 1.
    Computer Science with Microsoft .NET Gadgeteer Lee Stott @lee_stott LeeStott@Microsoft.com Microsoft http://www.microsoft.com/uk/faculty
  • 2.
    A new wayto make inspire and stimulate learning
  • 3.
    History • .NET Gadgeteercomes from Microsoft Research in Cambridge, UK • Designed as a tool for researchers to make it faster and easier to prototype new kinds of devices • Since then, it has proven to be of interest to hobbyists and for secondary and tertiary education • Because of this interest, we have launched .NET Gadgeteer as open source software/hardware
  • 4.
    The .NET GadgeteerHardware At the heart of every Gadgeteer project is a mainboard. A mainboard is made up of a programmable processor, and a number of sockets that Gadgeteer modules can plug into.
  • 5.
    Modules, Modules, Modules Sensors,Actuators, Networking, User Input, Displays, Power, Extensibility, …
  • 6.
    Today we areusing the GHI Electronics FEZ Spider Kit Touchscreen Display Camera Multicolor LED Button FEZ Spider Mainboard Joystick USB Host Ethernet SD Card USB Power Supply + Programming Interface
  • 7.
    Goals Low threshold Simplegadgets should be very quick to build High ceiling It should also be possible to build sophisticated and complex devices
  • 8.
    3 Key Components Modular Hardware
  • 9.
    3 Key Components Modular Object-Oriented Hardware Programming
  • 10.
    3 Key Components Modular Object-Oriented Digital Design Hardware Programming and Fabrication
  • 11.
  • 12.
    The .NET GadgeteerHardware At the heart of every Gadgeteer project is a mainboard. A mainboard is made up of a programmable processor, and a number of sockets that Gadgeteer modules can plug into.
  • 13.
    A Closer Lookat the Mainboard Socket Numbers Power LED Debug LED Socket Types Reset Button
  • 14.
    Match socket typeletters when connecting modules to the mainboard
  • 16.
    Connect modules tomainboard, and connect to PC via USB.
  • 17.
    Engineering and Technology Wewant to make it easier to give shape to Gadgeteer devices by using digital fabrication technologies First step: integration with 3D CAD modelling software (e.g. Solidworks)
  • 18.
  • 19.
    Falling cost andincreasing availability of 3D printers
  • 20.
    Digital design andrapid manufacture
  • 21.
    Hardware configuration (~5minutes to assemble) MICROSOFT CONFIDENTIAL Four-way switch to control placement of puzzle piece Knob to rotate piece Colour OLED display USB power source (128x128 resolution) and programming socket
  • 22.
    Software development CONFIDENTIAL MICROSOFT in C# (~5 hours)
  • 23.
    Enclosure design in MICROSOFT CONFIDENTIAL Solidworks (>3 hours)
  • 24.
    Enclosure 3D printed(>6MICROSOFT CONFIDENTIAL hours)
  • 25.
    MICROSOFT CONFIDENTIAL Assembly (>30 minutes)
  • 27.
    LETS BUILD ADIGITAL CAMERA FROM SCRATCH IN 15 MINUTES
  • 28.
    Development Tool: VisualStudio or Available for FREE for students and educators from www.dreamspark.com
  • 29.
    Designer Tab Solution Explorer (Program.gadgeteer) (Project Files)
  • 30.
  • 31.
    Designer Tab (Program.gadgeteer) Toolbox
  • 33.
  • 34.
    You can renamea module by editing the label below the module. For example, from button to myButton.
  • 35.
    When clicking ona module’s socket, To connect the button to a compatible sockets on the mainboard compatible socket, click and drag are highlighted in green.
  • 36.
    Now: please builda digital camera! FIRST use the designer to get it as below and THEN build the hardware
  • 37.
  • 38.
    using System; using Microsoft.SPOT; The code starts with a using Microsoft.SPOT.Presentation; using Microsoft.SPOT.Presentation.Controls; standard template using Microsoft.SPOT.Presentation.Media; using GT = Gadgeteer; using GTM = Gadgeteer.Modules; using Gadgeteer.Modules.GHIElectronics; namespace GadgeteerApp1 { public partial class Program { void ProgramStarted() { /****************************************************************************************** Access modules defined in the designer by typing their name: e.g. button camera1 Initialize event handlers here. e.g. button.ButtonPressed += new GTM.MSR.Button.ButtonEventHandler(button_ButtonPressed); ***************************************************************************************** */ // Do one-time tasks here Debug.Print("Program Started"); } } }
  • 39.
    ProgramStarted() executes whenever the mainboard is first namespace GadgeteerApp1 { powered up or restarted. public partial class Program { void ProgramStarted() { /****************************************************************************************** Access modules defined in the designer by typing their name: e.g. button camera1 Initialize event handlers here. e.g. button.ButtonPressed += new GTM.MSR.Button.ButtonEventHandler(button_ButtonPressed); ***************************************************************************************** */ // Do one-time tasks here Debug.Print("Program Started"); } } }
  • 40.
    namespace GadgeteerApp1 { public partial class Program { void ProgramStarted() { /****************************************************************************************** Access modules defined in the designer by typing their name: e.g. button camera1 Initialize event handlers here. e.g. button.ButtonPressed += new GTM.MSR.Button.ButtonEventHandler(button_ButtonPressed); ***************************************************************************************** */ // Do one-time tasks here Debug.Print("Program Started"); } } } Debug.Print(string) prints text to the debug output window.
  • 41.
    To access hardwarefunctionality type the name of the hardware module followed by a period e.g. myButton.
  • 42.
    Properties Values that canbe read, and sometimes also assigned.
  • 43.
    Methods Built-in functions thatcan include a number of parameters.
  • 44.
    Events Notification that somethingof interest has occurred.
  • 45.
    Events Notification that somethingof interest has occurred. This line specifies that we are interested in knowing when this particular event occurs, and associates it with a specific method.
  • 46.
    Events Notification that somethingof interest has occurred. This line specifies that we are interested in knowing when this particular event occurs, and associates it with a specific method.
  • 47.
    Events Notification that somethingof interest has occurred. This method will now get called (and the code inside it will get executed) whenever the button is pressed.
  • 48.
    The quick wayto use events Inside the ProgramStarted() method, type module name followed by a period, then select event using the arrow and Enter keys.
  • 49.
    The quick wayto use events Type +=, followed by the Tab key twice.
  • 50.
    The quick wayto use events Replace the line throw new NotImplementedException(); with your own code.
  • 51.
    SOFTWARE FOR ADIGITAL CAMERA
  • 52.
    Setup events forcamera.PictureCaptured and button.ButtonPressed by typing the event name, then +=, then <tab> twice
  • 53.
    When the buttonis pressed, call the camera.TakePicture() method.
  • 54.
    When the camerahas captured a picture, use the display’s SimpleGraphics to display the image.
  • 55.
    The DisplayImage methodtakes three parameters: a GT.Picture object, an X coordinate and a Y coordinate. The PicturedCaptured event returns a GT.Picture object, called picture, which is used as the first parameter. The coordinate 0, 0 (passed as the second and third parameters) refers top-left corner of the display.
  • 56.
  • 57.
    Make sure thatthe mainboard is connected to the PC, and that the power LED is on. Click the button, or press the F5 Key to deploy the code to the mainboard and start a debugging session.
  • 58.
    After loading messages,output window should display Program Started, Note: If you can’t see the Output Window, press Ctrl+Alt+O
  • 59.
    Click the button, or press Shift+F5 to exit the debugging mode. Note that you can’t edit the code while in debugging mode.
  • 60.
    If you seethe following message in the output window, stop debugging (Shift+F5) and try again (F5): Updating display configuration. DEVICE WILL NOW REBOOT. Visual Studio might lose connection, and debugging might need to be manually restarted. If the output window is stuck displaying the following message, press the reset button on the mainboard: Rebooting... Now: Lets program a camera!
  • 61.
    Completed program (commentsremoved) Now: Please write your program!
  • 62.
    Gadgeteer Resources End userwebsite http://netmf.com/gadgeteer/ Source repository http://gadgeteer.codeplex.com/ Lesson Plans http://www.gadgeteering.net/ http://www.Microsoft.com/faculty