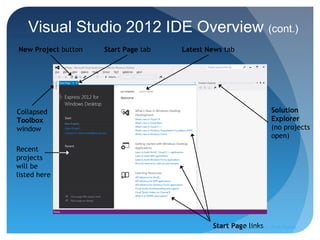
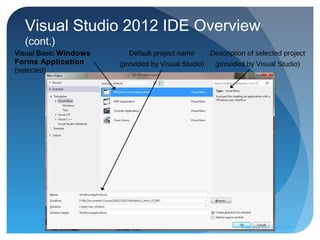
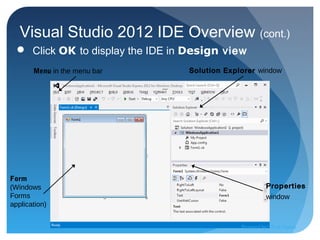
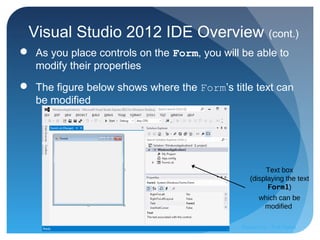
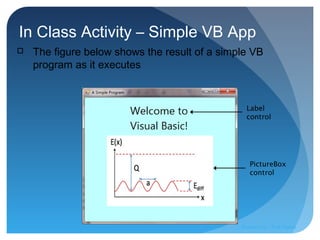
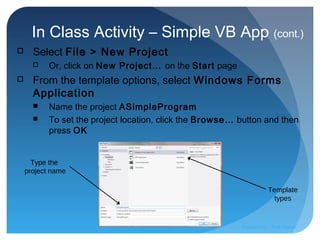
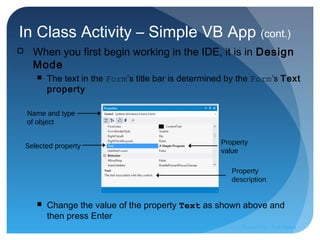
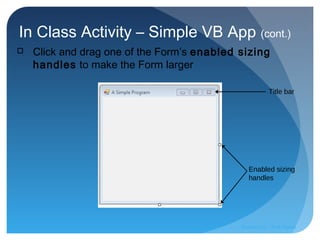
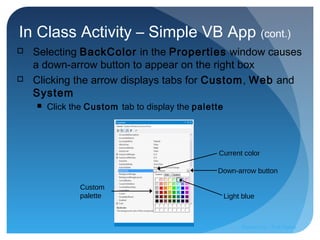
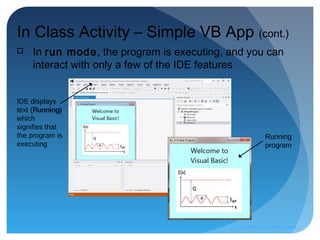
Introduction to the
Visual Studio 2012 for Windows
Desktop Integrated Development
Environment
Prepared by:: Pork Naron
Module Learning Objectives
In this module we will discuss:
 The basics of the Visual Studio 2012 for Windows
Desktop Integrated Development Environment (IDE) for
writing, running and debugging your apps
 Visual Studio’s help features
 Key commands contained in the IDE’s menus and toolbars
 The purpose of the various kinds of windows in the Visual
Studio 2012 for Windows Desktop IDE
 How to create, compile and execute a simple Visual Basic
app that displays text and an image
Prepared by:: Pork Naron
Introduction
 Visual Studio 2012 is Microsoft’s Integrated
Development Environment (IDE) for creating, running
and debugging applications (also called apps) written in
various .NET programming languages
 This module provides an overview of the Visual Studio
2012 IDE
 Shows how to create a simple Visual Basic app by dragging and
dropping predefined building blocks into place
 A technique known as visual app development
Prepared by:: Pork Naron
Visual Studio 2012 IDE Overview
 Once Visual Studio 2012 begins execution,
the Start Page displays
 The Start Page contains a list of links to Visual
Studio resources and web-based resources
 At any time, you can return to the Start Page by
selecting VIEW > Start Page
Prepared by:: Pork Naron
Visual Studio 2012 IDE Overview (cont.)
New Project button Start Page tab Latest News tab
Solution
Explorer
(no projects
open)
Collapsed
Toolbox
window
Recent
projects
will be
listed here
Start Page linksPrepared by:: Pork Naron
Visual Studio 2012 IDE Overview (cont.)
 The Recent Projects section shows solutions
you have been working on
 The links in the Get Started tab provide
information about the programming languages
supported by Visual Studio and various learning
resources
 An Internet connection is required for the IDE to access
most of this information
Prepared by:: Pork Naron
Visual Studio 2012 IDE Overview (cont.)
 The IDE also has an internal web browser
 Go to VIEW > Other Windows > Web Browser
Prepared by:: Pork Naron
Visual Studio 2012 IDE Overview (cont.)
Creating a New Project
Select File > New Project... to create a new project
 On the Start Page, just click the link labeled New Project…
A project is a group of related files, such as the Visual
Basic code and any images that might make up an app
Visual Studio organizes apps into projects and
solutions, which contain one or more projects
 However, most apps consist of a solution containing a single
project
Prepared by:: Pork Naron
Creating a New Project (cont.)
When you select FILE > New Project… or click the
New Project… link on the Start Page, the New
Project dialog displays
Visual Studio provides several templates
 Project types users can create in Visual Basic and other
languages
Project templates are the project types users can
create in Visual Basic
In this course, we will concentrate on Windows
Forms applications
 A Windows Forms application has a graphical user
interface (GUI)
Prepared by:: Pork Naron
Visual Studio 2012 IDE Overview
(cont.)
Visual Basic Windows
Forms Application
(selected)
Default project name
(provided by Visual Studio)
Description of selected project
(provided by Visual Studio)
Prepared by:: Pork Naron
Visual Studio 2012 IDE Overview (cont.)
 Click OK to display the IDE in Design view
Menu in the menu bar Solution Explorer window
Form
(Windows
Forms
application)
Properties
window
Prepared by:: Pork Naron
Visual Studio 2012 IDE Overview (cont.)
 As you place controls on the Form, you will be able to
modify their properties
 The figure below shows where the Form’s title text can
be modified
Text box
(displaying the text
Form1)
which can be
modified
Prepared by:: Pork Naron
Visual Studio 2012 IDE Overview (cont.)
 Collectively, the Form and controls make up the
app’s GUI
 Users enter data into the app by typing at the
keyboard, by clicking the mouse buttons and in a
variety of other ways
 Programs use the GUI to display instructions and
other information for users to view
Prepared by:: Pork Naron
Visual Studio 2012 IDE Overview (cont.)
 The figure below shows a dialog in which a control’s
font properties can be modified
Prepared by:: Pork Naron
Menu Bar and Toolbar
 Commands for managing the IDE and for developing,
maintaining and executing apps are contained in
menus
 Located on the menu bar of the IDE
 The set of menus displayed depends on what you are
currently doing in the IDE
Prepared by:: Pork Naron
Menu Bar and Toolbar (cont.)
Summary of Visual Studio 2012 IDE
menus
Prepared by:: Pork Naron
Menu Bar and Toolbar (cont.)
 You can access common commands from the toolbar
icons
Prepared by:: Pork Naron
Menu Bar and Toolbar (cont.)
 You can customize which toolbars are displayed by
selecting View > Toolbars
 Each toolbar you select is displayed at the top of the Visual
Studio window
Prepared by:: Pork Naron
Menu Bar and Toolbar (cont.)
 Positioning the mouse pointer over an icon
highlights it and, after a brief pause, displays a
description called a tool tip
Tool tip displayed when the mouse
pointer rests on an icon for a few
seconds
Prepared by:: Pork Naron
Navigating the Visual Studio IDE
 The IDE provides windows for accessing project
files and customizing controls
 Solution Explorer Window
 Toolbox Window
 Properties Window
Prepared by:: Pork Naron
Navigating the Visual Studio IDE (cont.)
 Visual Studio provides a space-saving feature called
auto-hide
When auto-hide is enabled, a tab appears along the edge of
the IDE window
Icon for hidden
window
(auto-hide
enabled)
Prepared by:: Pork Naron
Navigating the Visual Studio IDE (cont.)
Toolbox
title bar
Horizontal orientation for pin icon
when auto-hide is enabled
 Placing the mouse pointer over one of these icons
displays that window
Prepared by:: Pork Naron
Navigating the Visual Studio IDE (cont.)
Vertical
orientation for
pin icon when
window is
pinned down
 To “pin down” a window, click its pin icon
 When auto-hide is enabled, the pin icon is horizontal
 When a window is “pinned down,” the pin is vertical
Prepared by:: Pork Naron
Navigating the Visual Studio IDE (cont.)
Solution Explorer Window
The Solution Explorer provides access to all of
the solution’s files
The solution’s startup project is the one that runs
when you select Debug > Start Debugging
Show All
Files icon
Toolbar
Startup
project
Prepared by:: Pork Naron
Navigating the Visual Studio IDE (cont.)
Solution Explorer Window
By default, the IDE displays only files that you may
need to edit
 Other files that the IDE generates are hidden
The Solution Explorer window includes a toolbar that
contains several icons
Clicking the Show All Files icon displays all the
solution’s files, including those generated by the IDE
 Clicking the arrows to the left of a file or folder expands or
collapses the project tree’s nodes
Prepared by:: Pork Naron
Navigating the Visual Studio IDE (cont.)
Toolbox Window
The Toolbox contains the controls used to customize
Forms
With visual app development, you can “drag and drop”
controls onto the Form and the IDE will write the code that
creates the controls for you
 Just as you do not need to know how to build an engine to drive a
car, you do not need to know how to build controls to use them
Reusing preexisting controls saves time and money when
you develop apps
Prepared by:: Pork Naron
Navigating the Visual Studio IDE (cont.)
Toolbox Window
Group
Names
Controls
Prepared by:: Pork Naron
Navigating the Visual Studio IDE (cont.)
Properties Window
Select View > Properties Window
 The Properties window allows you to modify a control’s
properties visually, without writing code
The Properties window displays the properties for the
currently selected Form, control or file in Design view
At the top of the Properties window is the component
selection drop-down list
The Properties window is crucial to visual app
development
 It allows you to modify a control’s properties visually, without
writing code
Prepared by:: Pork Naron
Navigating the Visual Studio IDE (cont.)
Properties Window
Categorized icon
Alphabetical icon
Properties
Selected
property’s
description
Property
values
Toolbar
Component selection
drop-down list
Prepared by:: Pork Naron
Using Help
Context-Sensitive Help
Visual Studio provides context-sensitive help
pertaining to the “current content”
 i.e., The items around the location of the mouse cursor
To use context-sensitive help, click an item, then
press the F1 key
 The help documentation is displayed in a web browser
window
To return to the IDE, either close the browser window
or select the IDE’s icon in your Windows task bar
Prepared by:: Pork Naron
In Class Activity – Simple VB App
 The figure below shows the result of a simple VB
program as it executes
Label
control
PictureBox
control
Prepared by:: Pork Naron
In Class Activity – Simple VB App (cont.)
 Select File > New Project
 Or, click on New Project… on the Start page
 From the template options, select Windows Forms
Application
 Name the project ASimpleProgram
 To set the project location, click the Browse… button and then
press OK
Template
types
Type the
project name
Prepared by:: Pork Naron
 When you first begin working in the IDE, it is in Design
Mode
 The text in the Form’s title bar is determined by the Form’s Text
property
 Change the value of the property Text as shown above and
then press Enter
In Class Activity – Simple VB App (cont.)
Name and type
of object
Property
value
Selected property
Property
description
Prepared by:: Pork Naron
In Class Activity – Simple VB App (cont.)
 Click and drag one of the Form’s enabled sizing
handles to make the Form larger
Title bar
Enabled sizing
handles
Prepared by:: Pork Naron
In Class Activity – Simple VB App (cont.)
 Selecting BackColor in the Properties window causes
a down-arrow button to appear on the right box
 Clicking the arrow displays tabs for Custom, Web and
System
 Click the Custom tab to display the palette
Current color
Down-arrow button
Light blue
Custom
palette
Prepared by:: Pork Naron
In Class Activity – Simple VB App (cont.)
New background
color
 Once you select a color, the palette closes and the
Form’s background color changes
Prepared by:: Pork Naron
In Class Activity – Simple VB App (cont.)
Label control
 Click on the tab labeled Toolbox to display the set of
controls
 Double click the Label control in the Toolbox
Prepared by:: Pork Naron
In Class Activity – Simple VB App (cont.)
AutoSize property
 Set the Label’s Text property to Welcome to Visual
Basic!
 Set the AutoSize property to False so that you can
resize the Label on your own
Prepared by:: Pork Naron
 Resize the Label so that the text fits
 Center the Label control horizontally by selecting
Format > Center In Form > Horizontally
In Class Activity – Simple VB App (cont.)
Sizing
handles
Label
centered with
updated
Text
property
Prepared by:: Pork Naron
Ellipsis button
In Class Activity – Simple VB App (cont.)
 Select the Font property, which causes an ellipsis
button to appear next to the value
Prepared by:: Pork Naron
In Class Activity – Simple VB App (cont.)
 When the ellipsis button is clicked, the Font dialog is
displayed
 Under Font, select Segoe UI
 Under Size, select 24 points and click OK
Prepared by:: Pork Naron
Text alignment
options
Middle-center
alignment option
In Class Activity – Simple VB App (cont.)
 Select the TextAlign property
 Set the TextAlign property to MiddleCenter to
have the text to appear centered in the Label
Prepared by:: Pork Naron
PictureBox
Updated
Label
In Class Activity – Simple VB App (cont.)
 The PictureBox control displays images
 Locate the PictureBox in the Toolbox and double
click it to add it to the Form
Prepared by:: Pork Naron
Image property
value
(no image selected)
In Class Activity – Simple VB App (cont.)
 Locate the Image property
 No picture has been assigned, so the value of the
Image property displays (none)
Prepared by:: Pork Naron
 Click the ellipsis button to display the Select
Resource dialog
In Class Activity – Simple VB App (cont.)
Prepared by:: Pork Naron
In Class Activity – Simple VB App (cont.)
Locate the option Project resource file
 Click the Import… button
Locate the file “Diffusion_energy.png”, select it and click
Open
 The resource named Diffusion_energy represents
“Diffusion_energy.png”
Click OK to place the image in your app
 Supported image formats include PNG, GIF, JPEG and BMP
Image file
name
Prepared by:: Pork Naron
In Class Activity – Simple VB App (cont.)
To size the image to the PictureBox, change the
SizeMode property to StretchImage
 Resize the PictureBox, making it larger
This is a good time to save your work
 Select File > Save All to save the entire solution
 x
 Ctrl + Shift + S
SizeMode
property set to
StretchImage
SizeMode
property
Prepared by:: Pork Naron
Debug menu
In Class Activity – Simple VB App (cont.)
 Select Debug > Start Debugging to execute the
program
Prepared by:: Pork Naron
Running
program
IDE displays
text (Running)
which
signifies that
the program is
executing
In Class Activity – Simple VB App (cont.)
 In run mode, the program is executing, and you can
interact with only a few of the IDE features
Prepared by:: Pork Naron

Chapter 01

  • 1.
    Introduction to the VisualStudio 2012 for Windows Desktop Integrated Development Environment Prepared by:: Pork Naron
  • 2.
    Module Learning Objectives Inthis module we will discuss:  The basics of the Visual Studio 2012 for Windows Desktop Integrated Development Environment (IDE) for writing, running and debugging your apps  Visual Studio’s help features  Key commands contained in the IDE’s menus and toolbars  The purpose of the various kinds of windows in the Visual Studio 2012 for Windows Desktop IDE  How to create, compile and execute a simple Visual Basic app that displays text and an image Prepared by:: Pork Naron
  • 3.
    Introduction  Visual Studio2012 is Microsoft’s Integrated Development Environment (IDE) for creating, running and debugging applications (also called apps) written in various .NET programming languages  This module provides an overview of the Visual Studio 2012 IDE  Shows how to create a simple Visual Basic app by dragging and dropping predefined building blocks into place  A technique known as visual app development Prepared by:: Pork Naron
  • 4.
    Visual Studio 2012IDE Overview  Once Visual Studio 2012 begins execution, the Start Page displays  The Start Page contains a list of links to Visual Studio resources and web-based resources  At any time, you can return to the Start Page by selecting VIEW > Start Page Prepared by:: Pork Naron
  • 5.
    Visual Studio 2012IDE Overview (cont.) New Project button Start Page tab Latest News tab Solution Explorer (no projects open) Collapsed Toolbox window Recent projects will be listed here Start Page linksPrepared by:: Pork Naron
  • 6.
    Visual Studio 2012IDE Overview (cont.)  The Recent Projects section shows solutions you have been working on  The links in the Get Started tab provide information about the programming languages supported by Visual Studio and various learning resources  An Internet connection is required for the IDE to access most of this information Prepared by:: Pork Naron
  • 7.
    Visual Studio 2012IDE Overview (cont.)  The IDE also has an internal web browser  Go to VIEW > Other Windows > Web Browser Prepared by:: Pork Naron
  • 8.
    Visual Studio 2012IDE Overview (cont.) Creating a New Project Select File > New Project... to create a new project  On the Start Page, just click the link labeled New Project… A project is a group of related files, such as the Visual Basic code and any images that might make up an app Visual Studio organizes apps into projects and solutions, which contain one or more projects  However, most apps consist of a solution containing a single project Prepared by:: Pork Naron
  • 9.
    Creating a NewProject (cont.) When you select FILE > New Project… or click the New Project… link on the Start Page, the New Project dialog displays Visual Studio provides several templates  Project types users can create in Visual Basic and other languages Project templates are the project types users can create in Visual Basic In this course, we will concentrate on Windows Forms applications  A Windows Forms application has a graphical user interface (GUI) Prepared by:: Pork Naron
  • 10.
    Visual Studio 2012IDE Overview (cont.) Visual Basic Windows Forms Application (selected) Default project name (provided by Visual Studio) Description of selected project (provided by Visual Studio) Prepared by:: Pork Naron
  • 11.
    Visual Studio 2012IDE Overview (cont.)  Click OK to display the IDE in Design view Menu in the menu bar Solution Explorer window Form (Windows Forms application) Properties window Prepared by:: Pork Naron
  • 12.
    Visual Studio 2012IDE Overview (cont.)  As you place controls on the Form, you will be able to modify their properties  The figure below shows where the Form’s title text can be modified Text box (displaying the text Form1) which can be modified Prepared by:: Pork Naron
  • 13.
    Visual Studio 2012IDE Overview (cont.)  Collectively, the Form and controls make up the app’s GUI  Users enter data into the app by typing at the keyboard, by clicking the mouse buttons and in a variety of other ways  Programs use the GUI to display instructions and other information for users to view Prepared by:: Pork Naron
  • 14.
    Visual Studio 2012IDE Overview (cont.)  The figure below shows a dialog in which a control’s font properties can be modified Prepared by:: Pork Naron
  • 15.
    Menu Bar andToolbar  Commands for managing the IDE and for developing, maintaining and executing apps are contained in menus  Located on the menu bar of the IDE  The set of menus displayed depends on what you are currently doing in the IDE Prepared by:: Pork Naron
  • 16.
    Menu Bar andToolbar (cont.) Summary of Visual Studio 2012 IDE menus Prepared by:: Pork Naron
  • 17.
    Menu Bar andToolbar (cont.)  You can access common commands from the toolbar icons Prepared by:: Pork Naron
  • 18.
    Menu Bar andToolbar (cont.)  You can customize which toolbars are displayed by selecting View > Toolbars  Each toolbar you select is displayed at the top of the Visual Studio window Prepared by:: Pork Naron
  • 19.
    Menu Bar andToolbar (cont.)  Positioning the mouse pointer over an icon highlights it and, after a brief pause, displays a description called a tool tip Tool tip displayed when the mouse pointer rests on an icon for a few seconds Prepared by:: Pork Naron
  • 20.
    Navigating the VisualStudio IDE  The IDE provides windows for accessing project files and customizing controls  Solution Explorer Window  Toolbox Window  Properties Window Prepared by:: Pork Naron
  • 21.
    Navigating the VisualStudio IDE (cont.)  Visual Studio provides a space-saving feature called auto-hide When auto-hide is enabled, a tab appears along the edge of the IDE window Icon for hidden window (auto-hide enabled) Prepared by:: Pork Naron
  • 22.
    Navigating the VisualStudio IDE (cont.) Toolbox title bar Horizontal orientation for pin icon when auto-hide is enabled  Placing the mouse pointer over one of these icons displays that window Prepared by:: Pork Naron
  • 23.
    Navigating the VisualStudio IDE (cont.) Vertical orientation for pin icon when window is pinned down  To “pin down” a window, click its pin icon  When auto-hide is enabled, the pin icon is horizontal  When a window is “pinned down,” the pin is vertical Prepared by:: Pork Naron
  • 24.
    Navigating the VisualStudio IDE (cont.) Solution Explorer Window The Solution Explorer provides access to all of the solution’s files The solution’s startup project is the one that runs when you select Debug > Start Debugging Show All Files icon Toolbar Startup project Prepared by:: Pork Naron
  • 25.
    Navigating the VisualStudio IDE (cont.) Solution Explorer Window By default, the IDE displays only files that you may need to edit  Other files that the IDE generates are hidden The Solution Explorer window includes a toolbar that contains several icons Clicking the Show All Files icon displays all the solution’s files, including those generated by the IDE  Clicking the arrows to the left of a file or folder expands or collapses the project tree’s nodes Prepared by:: Pork Naron
  • 26.
    Navigating the VisualStudio IDE (cont.) Toolbox Window The Toolbox contains the controls used to customize Forms With visual app development, you can “drag and drop” controls onto the Form and the IDE will write the code that creates the controls for you  Just as you do not need to know how to build an engine to drive a car, you do not need to know how to build controls to use them Reusing preexisting controls saves time and money when you develop apps Prepared by:: Pork Naron
  • 27.
    Navigating the VisualStudio IDE (cont.) Toolbox Window Group Names Controls Prepared by:: Pork Naron
  • 28.
    Navigating the VisualStudio IDE (cont.) Properties Window Select View > Properties Window  The Properties window allows you to modify a control’s properties visually, without writing code The Properties window displays the properties for the currently selected Form, control or file in Design view At the top of the Properties window is the component selection drop-down list The Properties window is crucial to visual app development  It allows you to modify a control’s properties visually, without writing code Prepared by:: Pork Naron
  • 29.
    Navigating the VisualStudio IDE (cont.) Properties Window Categorized icon Alphabetical icon Properties Selected property’s description Property values Toolbar Component selection drop-down list Prepared by:: Pork Naron
  • 30.
    Using Help Context-Sensitive Help VisualStudio provides context-sensitive help pertaining to the “current content”  i.e., The items around the location of the mouse cursor To use context-sensitive help, click an item, then press the F1 key  The help documentation is displayed in a web browser window To return to the IDE, either close the browser window or select the IDE’s icon in your Windows task bar Prepared by:: Pork Naron
  • 31.
    In Class Activity– Simple VB App  The figure below shows the result of a simple VB program as it executes Label control PictureBox control Prepared by:: Pork Naron
  • 32.
    In Class Activity– Simple VB App (cont.)  Select File > New Project  Or, click on New Project… on the Start page  From the template options, select Windows Forms Application  Name the project ASimpleProgram  To set the project location, click the Browse… button and then press OK Template types Type the project name Prepared by:: Pork Naron
  • 33.
     When youfirst begin working in the IDE, it is in Design Mode  The text in the Form’s title bar is determined by the Form’s Text property  Change the value of the property Text as shown above and then press Enter In Class Activity – Simple VB App (cont.) Name and type of object Property value Selected property Property description Prepared by:: Pork Naron
  • 34.
    In Class Activity– Simple VB App (cont.)  Click and drag one of the Form’s enabled sizing handles to make the Form larger Title bar Enabled sizing handles Prepared by:: Pork Naron
  • 35.
    In Class Activity– Simple VB App (cont.)  Selecting BackColor in the Properties window causes a down-arrow button to appear on the right box  Clicking the arrow displays tabs for Custom, Web and System  Click the Custom tab to display the palette Current color Down-arrow button Light blue Custom palette Prepared by:: Pork Naron
  • 36.
    In Class Activity– Simple VB App (cont.) New background color  Once you select a color, the palette closes and the Form’s background color changes Prepared by:: Pork Naron
  • 37.
    In Class Activity– Simple VB App (cont.) Label control  Click on the tab labeled Toolbox to display the set of controls  Double click the Label control in the Toolbox Prepared by:: Pork Naron
  • 38.
    In Class Activity– Simple VB App (cont.) AutoSize property  Set the Label’s Text property to Welcome to Visual Basic!  Set the AutoSize property to False so that you can resize the Label on your own Prepared by:: Pork Naron
  • 39.
     Resize theLabel so that the text fits  Center the Label control horizontally by selecting Format > Center In Form > Horizontally In Class Activity – Simple VB App (cont.) Sizing handles Label centered with updated Text property Prepared by:: Pork Naron
  • 40.
    Ellipsis button In ClassActivity – Simple VB App (cont.)  Select the Font property, which causes an ellipsis button to appear next to the value Prepared by:: Pork Naron
  • 41.
    In Class Activity– Simple VB App (cont.)  When the ellipsis button is clicked, the Font dialog is displayed  Under Font, select Segoe UI  Under Size, select 24 points and click OK Prepared by:: Pork Naron
  • 42.
    Text alignment options Middle-center alignment option InClass Activity – Simple VB App (cont.)  Select the TextAlign property  Set the TextAlign property to MiddleCenter to have the text to appear centered in the Label Prepared by:: Pork Naron
  • 43.
    PictureBox Updated Label In Class Activity– Simple VB App (cont.)  The PictureBox control displays images  Locate the PictureBox in the Toolbox and double click it to add it to the Form Prepared by:: Pork Naron
  • 44.
    Image property value (no imageselected) In Class Activity – Simple VB App (cont.)  Locate the Image property  No picture has been assigned, so the value of the Image property displays (none) Prepared by:: Pork Naron
  • 45.
     Click theellipsis button to display the Select Resource dialog In Class Activity – Simple VB App (cont.) Prepared by:: Pork Naron
  • 46.
    In Class Activity– Simple VB App (cont.) Locate the option Project resource file  Click the Import… button Locate the file “Diffusion_energy.png”, select it and click Open  The resource named Diffusion_energy represents “Diffusion_energy.png” Click OK to place the image in your app  Supported image formats include PNG, GIF, JPEG and BMP Image file name Prepared by:: Pork Naron
  • 47.
    In Class Activity– Simple VB App (cont.) To size the image to the PictureBox, change the SizeMode property to StretchImage  Resize the PictureBox, making it larger This is a good time to save your work  Select File > Save All to save the entire solution  x  Ctrl + Shift + S SizeMode property set to StretchImage SizeMode property Prepared by:: Pork Naron
  • 48.
    Debug menu In ClassActivity – Simple VB App (cont.)  Select Debug > Start Debugging to execute the program Prepared by:: Pork Naron
  • 49.
    Running program IDE displays text (Running) which signifiesthat the program is executing In Class Activity – Simple VB App (cont.)  In run mode, the program is executing, and you can interact with only a few of the IDE features Prepared by:: Pork Naron

Editor's Notes

  • #3 (IDE) is a programming environment that has been packaged as an application program, typically consisting of a code editor, a compiler, a debugger, and a graphical user interface (GUI) builder. Compile is the act of turning human-readable code into code the machine can understand and execute. Debug is the act of finding out where in the code the application is going wrong (debug = get rid of bugs.)
  • #4 IDE is a programming environment that has been packaged as an application program, typically consisting of : a code editor a compiler a debugger a graphical user interface (GUI) builder. software framework is an abstraction in which software providing generic functionality can be selectively changed by additional user-written code, thus providing application-specific software. The .NET Framework is a technology that supports building and running the next generation of applications and XML Web services. The .NET Framework is designed to fulfill the following objectives: To provide a consistent object-oriented programming environment whether object code is stored and executed locally, executed locally but Internet-distributed, or executed remotely. To provide a code-execution environment that minimizes software deployment and versioning conflicts. To provide a code-execution environment that promotes safe execution of code, including code created by an unknown or semi-trusted third party. To provide a code-execution environment that eliminates the performance problems of scripted or interpreted environments. To make the developer experience consistent across widely varying types of applications, such as Windows-based applications and Web-based applications. To build all communication on industry standards to ensure that code based on the .NET Framework can integrate with any other code. (pronounced dot net) is a software framework developed by Microsoft that runs primarily on Microsoft Windows. It includes a large library and provides language interoperability (each language can use code written in other languages) across several programming languages. Programs written for .NET Framework execute in a software environment (as contrasted to hardware environment), known as the Common Language Runtime (CLR), an application virtual machine that provides services such as security, memory management, and exception handling. The class library and the CLR together constitute .NET Framework.