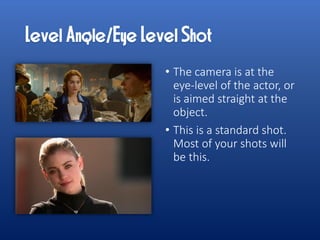
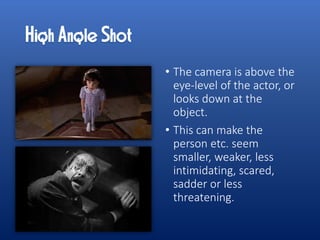
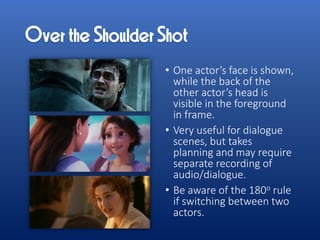
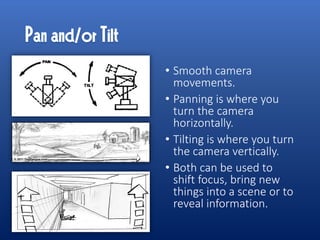
Shot:
The distance between the camera and the subject.
Angle:
The level at which the camera is held relative to
the subject.
Movement:
Whether the camera is static or in motion during a
shot.
• Gives an overview of
the scene and allows
the audience to see
where things are
occurring.
• Often used at the start
of a scene to ‘establish’
where characters are in
relation to each other,
setting and props.
• Difficult to show details.
• Usually shows the
upper-half of a person’s
body.
• Good for conversations.
• It allows you to fit one
or two people into the
shot.
• Can still see the setting
of the scene in the
background.
• Focusses on a specific
thing, such as an actor’s
face or an object.
• It is very good for
drawing the audience’s
attention to important
things.
• Used sparingly and
deliberately.
• Focusses in a lot of
detail on a specific
detail of a person or
object, such as a
person’s eye or a word
written on a piece of
paper.
• Provides even greater
emphasis.
• Be careful of focus and
that it isn’t too jarring.
• The camera is at the
eye-level of the actor, or
is aimed straight at the
object.
• This is a standard shot.
Most of your shots will
be this.
• The camera is above the
eye-level of the actor, or
looks down at the
object.
• This can make the
person etc. seem
smaller, weaker, less
intimidating, scared,
sadder or less
threatening.
• The camera is below
the eye-level of the
actor, or looks up at the
object.
• This can make the
person etc. seem bigger,
more powerful,
confident, threatening
or overwhelming.
• The camera is held at an
obviously slanted angle.
• Conveys uncertainty,
chaos or madness.
• Used deliberately, it can
be very effective. If
overused, it looks
amateurish.
• It takes practise to get
the right angle.
• The shot is taken as if it
is from the point of
view of a specific
character (i.e. as if we
are looking through
their eyes).
• Need to establish
whose perspective you
are looking from,
usually through a
proceeding close-up
shot.
• One actor’s face is shown,
while the back of the
other actor’s head is
visible in the foreground
in frame.
• Very useful for dialogue
scenes, but takes
planning and may require
separate recording of
audio/dialogue.
• Be aware of the 180o rule
if switching between two
actors.
• The camera is in a fixed
position and does not
move.
• Usually the camera will be
attached to a tripod in
order to keep it steady.
This is a standard shot.
• If the camera is held in
your hand, small
movements will be
unavoidable.
• Smooth camera
movements.
• Panning is where you
turn the camera
horizontally.
• Tilting is where you turn
the camera vertically.
• Both can be used to
shift focus, bring new
things into a scene or to
reveal information.
• A smooth shot where
the camera moves as
steadily as possible.
• Slows down pacing,
looks professional.
• Can be achieved by using a
chair with wheels and
holding the camera as still
as possible while moving
along a flat surface.
• The camera moves,
usually in order to follow
a character, with small
shuddering movements.
• The trick is to try and hold
the camera as still as
possible while moving.
• Don’t shake your hand!
Natural hand tremors are
often enough – larger
movements result in a
loss of focus.
• Abrupt transition where
the camera doesn’t move
between shots.
• Makes it appear a
person/thing has moved
instantly from one place
to another or has
suddenly appeared.
• In films it is avoided
unless you deliberately
want a particularly jarring
effect.

Camera Shots, Angles and Movements

  • 1.
    Shot: The distance betweenthe camera and the subject. Angle: The level at which the camera is held relative to the subject. Movement: Whether the camera is static or in motion during a shot.
  • 2.
    • Gives anoverview of the scene and allows the audience to see where things are occurring. • Often used at the start of a scene to ‘establish’ where characters are in relation to each other, setting and props. • Difficult to show details.
  • 3.
    • Usually showsthe upper-half of a person’s body. • Good for conversations. • It allows you to fit one or two people into the shot. • Can still see the setting of the scene in the background.
  • 4.
    • Focusses ona specific thing, such as an actor’s face or an object. • It is very good for drawing the audience’s attention to important things. • Used sparingly and deliberately.
  • 5.
    • Focusses ina lot of detail on a specific detail of a person or object, such as a person’s eye or a word written on a piece of paper. • Provides even greater emphasis. • Be careful of focus and that it isn’t too jarring.
  • 6.
    • The camerais at the eye-level of the actor, or is aimed straight at the object. • This is a standard shot. Most of your shots will be this.
  • 7.
    • The camerais above the eye-level of the actor, or looks down at the object. • This can make the person etc. seem smaller, weaker, less intimidating, scared, sadder or less threatening.
  • 8.
    • The camerais below the eye-level of the actor, or looks up at the object. • This can make the person etc. seem bigger, more powerful, confident, threatening or overwhelming.
  • 9.
    • The camerais held at an obviously slanted angle. • Conveys uncertainty, chaos or madness. • Used deliberately, it can be very effective. If overused, it looks amateurish. • It takes practise to get the right angle.
  • 10.
    • The shotis taken as if it is from the point of view of a specific character (i.e. as if we are looking through their eyes). • Need to establish whose perspective you are looking from, usually through a proceeding close-up shot.
  • 11.
    • One actor’sface is shown, while the back of the other actor’s head is visible in the foreground in frame. • Very useful for dialogue scenes, but takes planning and may require separate recording of audio/dialogue. • Be aware of the 180o rule if switching between two actors.
  • 12.
    • The camerais in a fixed position and does not move. • Usually the camera will be attached to a tripod in order to keep it steady. This is a standard shot. • If the camera is held in your hand, small movements will be unavoidable.
  • 13.
    • Smooth camera movements. •Panning is where you turn the camera horizontally. • Tilting is where you turn the camera vertically. • Both can be used to shift focus, bring new things into a scene or to reveal information.
  • 14.
    • A smoothshot where the camera moves as steadily as possible. • Slows down pacing, looks professional. • Can be achieved by using a chair with wheels and holding the camera as still as possible while moving along a flat surface.
  • 15.
    • The cameramoves, usually in order to follow a character, with small shuddering movements. • The trick is to try and hold the camera as still as possible while moving. • Don’t shake your hand! Natural hand tremors are often enough – larger movements result in a loss of focus.
  • 16.
    • Abrupt transitionwhere the camera doesn’t move between shots. • Makes it appear a person/thing has moved instantly from one place to another or has suddenly appeared. • In films it is avoided unless you deliberately want a particularly jarring effect.