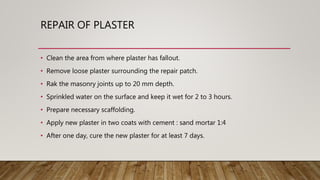
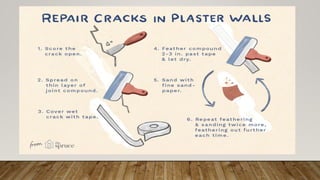
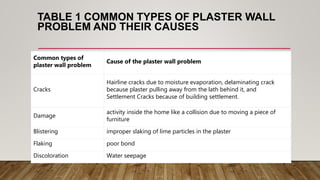
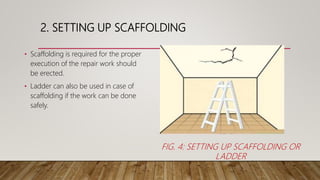
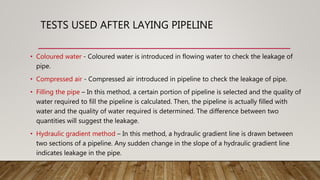
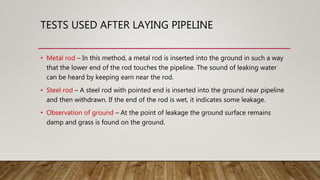
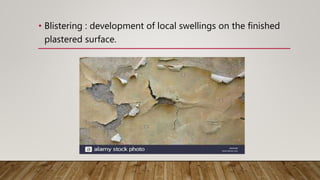
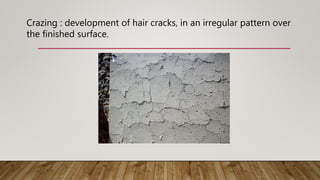
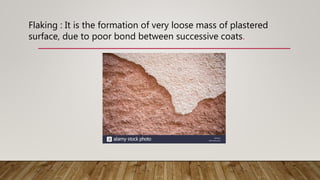
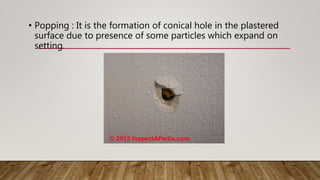
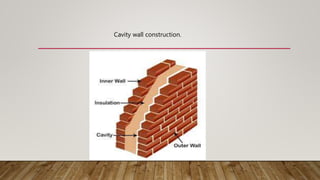
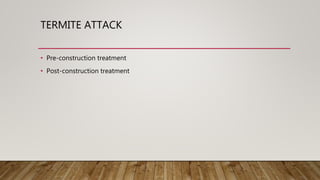
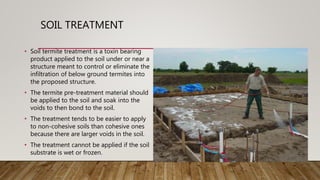
BUILDING
MAINTENANCE
Prepared by
- Prof. Janki Patel
CONTENTS
• Causes of failure of structures
• Purpose of maintenance
• Types of maintenance works
• Maintenance report
• Repair of plaster
• Replacing old door frame by new frame
• Tests used after laying pipeline
• Defects in building
CAUSES OF FAILURE OF STRUCTURES
• Unpredictable
• Design error
• Error in detailing and drafting
• Materials
• Workmanship
• Inspection
• Maintenance
UNPREDICTABLE
• Earthquake
• Bomb blast
• Striking aircraft
DESIGN ERROR
• Wrong design concept
• Error in load calculation
• Error in load combinations
• Improper use of computer software
• Error in design of joints
ERROR IN DETAILING AND DRAFTING
• Sometimes, the design of various elements of a structure may be correct.
• But, error in detailing and drafting may cause failure of structure.
MATERIALS
• Main construction materials are concrete, steel, bricks, wood, plastic, etc.
• Use of poor quality materials may affect the durability of structure and the
structure may fail due to weakness of the materials.
• Sometimes, high yield strength steel is used in place of mild steel to get more
strength.
• But, the risk of failure increases due to brightness of high strength steel.
WORKMANSHIP
• Poor workmanship reduces durability of structure and may lead to failure of the
structure.
INSPECTION
• During the construction of structure, inspection by an experienced engineer is
necessary.
• Inspection may be spot inspection, periodic inspection and full time inspection.
• Good inspection may rectify errors during construction and the danger of failure
may be avoided.
MAINTENANCE
• Poor maintenance reduced the structural capacity of a structure and may failure
of the structure.
• The main failures in this type are due to deterioration of concrete and corrosion
of reinforcement
PURPOSE OF MAINTENANCE
• Deterioration of building takes place due to weathering effects like rain, wind,
temperature, moisture etc. thus, maintenance is essential
• To fulfil the purpose for which the building is constructed, for a longer period.
• When building is in use, it is subjected to wear.
• To strengthen the weak parts of a building.
• To preserve the good appearance of a building.
• To prevent any accident due to failure of structure.
• To make some modifications in the old structure.
TYPES OF MAINTENANCE WORKS
• Preventive maintenance
• Remedial maintenance
PREVENTIVE MAINTENANCE
• The measures taken to prevent wear or decay of abuilding is known as preventive maintenance.
 Painting of doors and windows
 Painting of steel work like door, grill, etc.
• Preventive maintenance may be divided into for parts:
1. Routine maintenance
2. Periodical maintenance
3. Pre-monsoon maintenance
4. Post-monsoon maintenance
ROUTINE MAINTENANCE
• The everyday maintenance of a building is called routine maintenance.
• Cleaning of floor - Proper cleaning of walls and floors, possibly every day (depending
on the dirt exposure) must be done to avoid accumulation of dirt and dust. If the
building has washable paints, it is supposed to clean with water as well.
• Cleaning door/windows - There are certain cleaning liquids that can be employed in
glass and woods, that won’t affect wood quality. This helps in keeping the glass and
wood clean for a lifetime.
• Cleaning w.c/bathrooms - Cleaning water closets are essential primarily for hygiene
and proper maintenance
PERIODICAL MAINTENANCE
• The maintenance of a building at some regular time interval is known as
periodical maintenance
• Washing of building
• Painting of doors and windows, etc.
PRE – MONSOON MAINTENANCE
• The maintenance work carried out before start of monsoon to prevent the
building from effects of rain, is known as pre – monsoon maintenance.
• Repair of plaster in outer walls
• Cleaning of sewer lines
• Applying waterproofing course on ceiling
• Changing broken tiles of roof, etc.
POST – MONSOON MAINTENANCE
• The maintenance of a building after monsoon is over is known as post -
monsoon maintenance.
• To fill depressions formed near compound wall
MAINTENANCE REPORT
• Before starting the maintenance work, a survey is carried out to identify the parts
of a building requiring maintenance.
• The type of treatment for various parts of a building is also decided.
• A brief report is prepared on survey work and the treatment required.
• This report is known as maintenance report.
MAINTENANCE REPORT
• Foundation condition
• Condition of masonry work
• Condition of flooring
• Condition of woodwork
• Condition of steelwork
• Condition of water supply and drainage lines
REPAIR OF PLASTER
• Clean the area from where plaster has fallout.
• Remove loose plaster surrounding the repair patch.
• Rak the masonry joints up to 20 mm depth.
• Sprinkled water on the surface and keep it wet for 2 to 3 hours.
• Prepare necessary scaffolding.
• Apply new plaster in two coats with cement : sand mortar 1:4
• After one day, cure the new plaster for at least 7 days.
1. IDENTIFY PLASTER WALL PROBLEM
• The type of damage shall be specified prior to the commence of repairing
operation. In this manner, the most suitable technique and equipment can be
employed to repair the damage and best outcome could be achieved.
TABLE 1 COMMON TYPES OF PLASTER WALL
PROBLEM AND THEIR CAUSES
Common types of
plaster wall problem
Cause of the plaster wall problem
Cracks
Hairline cracks due to moisture evaporation, delaminating crack
because plaster pulling away from the lath behind it, and
Settlement Cracks because of building settlement.
Damage
activity inside the home like a collision due to moving a piece of
furniture
Blistering improper slaking of lime particles in the plaster
Flaking poor bond
Discoloration Water seepage
FIG. 1: DELAMINATING CRACKS IN
PLASTER WALL
FIG. 2: HAIRLINE CRACKS IN PLASTER
WALL
FIG. 3: SETTLEMENT CRACKS
2. SETTING UP SCAFFOLDING
• Scaffolding is required for the proper
execution of the repair work should
be erected.
• Ladder can also be used in case of
scaffolding if the work can be done
safely.
FIG. 4: SETTING UP SCAFFOLDING OR
LADDER
• 3. Protective Measure
• Doors, windows, floors, articles of furniture etc. and such other parts of the building
should be protected from being splashed by mortar.
• 4. Cutting of Old Plaster
• The mortar of the patch, where the existing plaster has cracked, crumbled or sounds
hollow when gently tapped on the surface, is first removed.
• The patch is be cut out to a square or rectangular shape at position where repairing is
needed. The edges of cut plaster is made under cut to provide a neat joint.
5. PREPARATION OF SURFACE
• The masonry joints which become exposed after removal of old plaster is raked
out to a minimum depth of 10 mm in the case of brick work and 20 mm in the
case of stone work.
• The raking is carried out uniformly with a raking tool, and loose mortar is dusted
off. The surface is then thoroughly washed with water, and kept wet till plastering
is commenced.
• In case of concrete surfaces, the old plaster is thoroughly scrubbed with wire
brushes after the plaster had been cut out, and pock marked the surface is
roughened by wire brushing, and all the resulting dust and loose particles
cleaned off. The surface is washed and cleaned and kept wet till plastering is
commenced.
FIG. 5: SURFACE PREPARATION
6. APPLICATION OF PLASTER
• Mortar of specific mix such as 1:4 or
1:6 with the good quality plaster
sand is used.
• After the plaster has been applied to
the surface, finishing of plaster is
done to match with the old
surrounding plaster.
Fig. 6: Application of
plaster
7. Curing of Plaster
• Curing of plaster is necessary to prevent cracking. It should be done for at least
days at regular interval.
8. Finishing of Plaster
• After the plaster is thoroughly cured and dried the surface is then painted with
the color of the surrounding area.
REPLACING OLD DOOR FRAME BY NEW FRAME
• Remove the shutter from the door frame.
• Open the horns and hold fasts of doorframe by making holes in the wall.
• Remove the door frame.
• Place the new door frame in position and check its verticality using plumb bob.
• Support the frame properly. Fill the holes for hold fasts and horns using cement
mortar.
• Apply plaster on the new masonry work.
• Cure the new masonry – plaster for 7 days.
• Fix the shutter to the door frame.
TESTS USED AFTER LAYING PIPELINE
• Coloured water
• Compressed air
• Filling the pipe
• Hydraulic gradient method
• Metal rod
• Steel rod
• Observation on ground
• Coloured water - Coloured water is introduced in flowing water to check the leakage of
pipe.
• Compressed air - Compressed air introduced in pipeline to check the leakage of pipe.
• Filling the pipe – In this method, a certain portion of pipeline is selected and the quality of
water required to fill the pipeline is calculated. Then, the pipeline is actually filled with
water and the quality of water required is determined. The difference between two
quantities will suggest the leakage.
• Hydraulic gradient method – In this method, a hydraulic gradient line is drawn between
two sections of a pipeline. Any sudden change in the slope of a hydraulic gradient line
indicates leakage in the pipe.
TESTS USED AFTER LAYING PIPELINE
• Metal rod – In this method, a metal rod is inserted into the ground in such a way
that the lower end of the rod touches the pipeline. The sound of leaking water
can be heard by keeping earn near the rod.
• Steel rod – A steel rod with pointed end is inserted into the ground near pipeline
and then withdrawn. If the end of the rod is wet, it indicates some leakage.
• Observation of ground – At the point of leakage the ground surface remains
damp and grass is found on the ground.
TESTS USED AFTER LAYING PIPELINE
DEFECTS IN BUILDINGS
• Defects in plastering
• Dampness in building
• Termite attack
• Remedies for leakage through roofs
• Remedies for settlement of tiles in floor
• Blistering : development of local swellings on the finished
plastered surface.
Crazing : development of hair cracks, in an irregular pattern over
the finished surface.
Flaking : It is the formation of very loose mass of plastered
surface, due to poor bond between successive coats.
• Popping : It is the formation of conical hole in the plastered
surface due to presence of some particles which expand on
setting.
REMEDIAL MEASURES
• To maintain the quality of work.
• To use good quality of bricks.
• To use water surface free from salt.
• Soaking bricks in water before using in masoning.
DAMPNESS IN BUILDING
Causes of dampness
• Rising moisture from ground.
• Rain penetration from roof.
• Rain penetration from top walls.
• Moisture penetration from exposed
walls.
Rain penetration from roof
Rain penetration from top walls
REMEDIES FOR DAMPNESS IN BUILDING
• Laying DPC layer (1 : 2 : 4) at plinth level
above wall.
• Laying mastic asphalt or bitumen layer on
walls at plinth level.
Cavity wall construction.
TERMITE ATTACK
• Pre-construction treatment
• Post-construction treatment
SOIL TREATMENT
• Soil termite treatment is a toxin bearing
product applied to the soil under or near a
structure meant to control or eliminate the
infiltration of below ground termites into
the proposed structure.
• The termite pre-treatment material should
be applied to the soil and soak into the
voids to then bond to the soil.
• The treatment tends to be easier to apply
to non-cohesive soils than cohesive ones
because there are larger voids in the soil.
• The treatment cannot be applied if the soil
substrate is wet or frozen.
REMEDIES FOR LEAKAGE THROUGH ROOFS
• Cleaning drain pipes.
• Level the surface and provide proper slope.
• To carryout waterproofing treatment.
REMEDIES FOR SETTLEMENT OF TILES IN FLOOR
• Remove the tiles from floor, compact the soil by rammer.
• Lay cement concrete layer on the compacted soil bed.
• Refix the tiles over the PCC bedding.
THANK YOU

Building maintenance

  • 1.
  • 2.
    CONTENTS • Causes offailure of structures • Purpose of maintenance • Types of maintenance works • Maintenance report • Repair of plaster • Replacing old door frame by new frame • Tests used after laying pipeline • Defects in building
  • 3.
    CAUSES OF FAILUREOF STRUCTURES • Unpredictable • Design error • Error in detailing and drafting • Materials • Workmanship • Inspection • Maintenance
  • 4.
    UNPREDICTABLE • Earthquake • Bombblast • Striking aircraft
  • 5.
    DESIGN ERROR • Wrongdesign concept • Error in load calculation • Error in load combinations • Improper use of computer software • Error in design of joints
  • 6.
    ERROR IN DETAILINGAND DRAFTING • Sometimes, the design of various elements of a structure may be correct. • But, error in detailing and drafting may cause failure of structure.
  • 7.
    MATERIALS • Main constructionmaterials are concrete, steel, bricks, wood, plastic, etc. • Use of poor quality materials may affect the durability of structure and the structure may fail due to weakness of the materials. • Sometimes, high yield strength steel is used in place of mild steel to get more strength. • But, the risk of failure increases due to brightness of high strength steel.
  • 8.
    WORKMANSHIP • Poor workmanshipreduces durability of structure and may lead to failure of the structure.
  • 9.
    INSPECTION • During theconstruction of structure, inspection by an experienced engineer is necessary. • Inspection may be spot inspection, periodic inspection and full time inspection. • Good inspection may rectify errors during construction and the danger of failure may be avoided.
  • 10.
    MAINTENANCE • Poor maintenancereduced the structural capacity of a structure and may failure of the structure. • The main failures in this type are due to deterioration of concrete and corrosion of reinforcement
  • 11.
    PURPOSE OF MAINTENANCE •Deterioration of building takes place due to weathering effects like rain, wind, temperature, moisture etc. thus, maintenance is essential • To fulfil the purpose for which the building is constructed, for a longer period. • When building is in use, it is subjected to wear. • To strengthen the weak parts of a building. • To preserve the good appearance of a building. • To prevent any accident due to failure of structure. • To make some modifications in the old structure.
  • 12.
    TYPES OF MAINTENANCEWORKS • Preventive maintenance • Remedial maintenance
  • 13.
    PREVENTIVE MAINTENANCE • Themeasures taken to prevent wear or decay of abuilding is known as preventive maintenance.  Painting of doors and windows  Painting of steel work like door, grill, etc. • Preventive maintenance may be divided into for parts: 1. Routine maintenance 2. Periodical maintenance 3. Pre-monsoon maintenance 4. Post-monsoon maintenance
  • 14.
    ROUTINE MAINTENANCE • Theeveryday maintenance of a building is called routine maintenance. • Cleaning of floor - Proper cleaning of walls and floors, possibly every day (depending on the dirt exposure) must be done to avoid accumulation of dirt and dust. If the building has washable paints, it is supposed to clean with water as well. • Cleaning door/windows - There are certain cleaning liquids that can be employed in glass and woods, that won’t affect wood quality. This helps in keeping the glass and wood clean for a lifetime. • Cleaning w.c/bathrooms - Cleaning water closets are essential primarily for hygiene and proper maintenance
  • 15.
    PERIODICAL MAINTENANCE • Themaintenance of a building at some regular time interval is known as periodical maintenance • Washing of building • Painting of doors and windows, etc.
  • 16.
    PRE – MONSOONMAINTENANCE • The maintenance work carried out before start of monsoon to prevent the building from effects of rain, is known as pre – monsoon maintenance. • Repair of plaster in outer walls • Cleaning of sewer lines • Applying waterproofing course on ceiling • Changing broken tiles of roof, etc.
  • 17.
    POST – MONSOONMAINTENANCE • The maintenance of a building after monsoon is over is known as post - monsoon maintenance. • To fill depressions formed near compound wall
  • 18.
    MAINTENANCE REPORT • Beforestarting the maintenance work, a survey is carried out to identify the parts of a building requiring maintenance. • The type of treatment for various parts of a building is also decided. • A brief report is prepared on survey work and the treatment required. • This report is known as maintenance report.
  • 19.
    MAINTENANCE REPORT • Foundationcondition • Condition of masonry work • Condition of flooring • Condition of woodwork • Condition of steelwork • Condition of water supply and drainage lines
  • 20.
    REPAIR OF PLASTER •Clean the area from where plaster has fallout. • Remove loose plaster surrounding the repair patch. • Rak the masonry joints up to 20 mm depth. • Sprinkled water on the surface and keep it wet for 2 to 3 hours. • Prepare necessary scaffolding. • Apply new plaster in two coats with cement : sand mortar 1:4 • After one day, cure the new plaster for at least 7 days.
  • 22.
    1. IDENTIFY PLASTERWALL PROBLEM • The type of damage shall be specified prior to the commence of repairing operation. In this manner, the most suitable technique and equipment can be employed to repair the damage and best outcome could be achieved.
  • 23.
    TABLE 1 COMMONTYPES OF PLASTER WALL PROBLEM AND THEIR CAUSES Common types of plaster wall problem Cause of the plaster wall problem Cracks Hairline cracks due to moisture evaporation, delaminating crack because plaster pulling away from the lath behind it, and Settlement Cracks because of building settlement. Damage activity inside the home like a collision due to moving a piece of furniture Blistering improper slaking of lime particles in the plaster Flaking poor bond Discoloration Water seepage
  • 24.
    FIG. 1: DELAMINATINGCRACKS IN PLASTER WALL FIG. 2: HAIRLINE CRACKS IN PLASTER WALL FIG. 3: SETTLEMENT CRACKS
  • 25.
    2. SETTING UPSCAFFOLDING • Scaffolding is required for the proper execution of the repair work should be erected. • Ladder can also be used in case of scaffolding if the work can be done safely. FIG. 4: SETTING UP SCAFFOLDING OR LADDER
  • 26.
    • 3. ProtectiveMeasure • Doors, windows, floors, articles of furniture etc. and such other parts of the building should be protected from being splashed by mortar. • 4. Cutting of Old Plaster • The mortar of the patch, where the existing plaster has cracked, crumbled or sounds hollow when gently tapped on the surface, is first removed. • The patch is be cut out to a square or rectangular shape at position where repairing is needed. The edges of cut plaster is made under cut to provide a neat joint.
  • 27.
    5. PREPARATION OFSURFACE • The masonry joints which become exposed after removal of old plaster is raked out to a minimum depth of 10 mm in the case of brick work and 20 mm in the case of stone work. • The raking is carried out uniformly with a raking tool, and loose mortar is dusted off. The surface is then thoroughly washed with water, and kept wet till plastering is commenced. • In case of concrete surfaces, the old plaster is thoroughly scrubbed with wire brushes after the plaster had been cut out, and pock marked the surface is roughened by wire brushing, and all the resulting dust and loose particles cleaned off. The surface is washed and cleaned and kept wet till plastering is commenced.
  • 28.
    FIG. 5: SURFACEPREPARATION
  • 29.
    6. APPLICATION OFPLASTER • Mortar of specific mix such as 1:4 or 1:6 with the good quality plaster sand is used. • After the plaster has been applied to the surface, finishing of plaster is done to match with the old surrounding plaster. Fig. 6: Application of plaster
  • 30.
    7. Curing ofPlaster • Curing of plaster is necessary to prevent cracking. It should be done for at least days at regular interval. 8. Finishing of Plaster • After the plaster is thoroughly cured and dried the surface is then painted with the color of the surrounding area.
  • 31.
    REPLACING OLD DOORFRAME BY NEW FRAME • Remove the shutter from the door frame. • Open the horns and hold fasts of doorframe by making holes in the wall. • Remove the door frame. • Place the new door frame in position and check its verticality using plumb bob. • Support the frame properly. Fill the holes for hold fasts and horns using cement mortar. • Apply plaster on the new masonry work. • Cure the new masonry – plaster for 7 days. • Fix the shutter to the door frame.
  • 32.
    TESTS USED AFTERLAYING PIPELINE • Coloured water • Compressed air • Filling the pipe • Hydraulic gradient method • Metal rod • Steel rod • Observation on ground
  • 33.
    • Coloured water- Coloured water is introduced in flowing water to check the leakage of pipe. • Compressed air - Compressed air introduced in pipeline to check the leakage of pipe. • Filling the pipe – In this method, a certain portion of pipeline is selected and the quality of water required to fill the pipeline is calculated. Then, the pipeline is actually filled with water and the quality of water required is determined. The difference between two quantities will suggest the leakage. • Hydraulic gradient method – In this method, a hydraulic gradient line is drawn between two sections of a pipeline. Any sudden change in the slope of a hydraulic gradient line indicates leakage in the pipe. TESTS USED AFTER LAYING PIPELINE
  • 34.
    • Metal rod– In this method, a metal rod is inserted into the ground in such a way that the lower end of the rod touches the pipeline. The sound of leaking water can be heard by keeping earn near the rod. • Steel rod – A steel rod with pointed end is inserted into the ground near pipeline and then withdrawn. If the end of the rod is wet, it indicates some leakage. • Observation of ground – At the point of leakage the ground surface remains damp and grass is found on the ground. TESTS USED AFTER LAYING PIPELINE
  • 35.
    DEFECTS IN BUILDINGS •Defects in plastering • Dampness in building • Termite attack • Remedies for leakage through roofs • Remedies for settlement of tiles in floor
  • 36.
    • Blistering :development of local swellings on the finished plastered surface.
  • 37.
    Crazing : developmentof hair cracks, in an irregular pattern over the finished surface.
  • 38.
    Flaking : Itis the formation of very loose mass of plastered surface, due to poor bond between successive coats.
  • 39.
    • Popping :It is the formation of conical hole in the plastered surface due to presence of some particles which expand on setting.
  • 40.
    REMEDIAL MEASURES • Tomaintain the quality of work. • To use good quality of bricks. • To use water surface free from salt. • Soaking bricks in water before using in masoning.
  • 41.
    DAMPNESS IN BUILDING Causesof dampness • Rising moisture from ground. • Rain penetration from roof. • Rain penetration from top walls. • Moisture penetration from exposed walls. Rain penetration from roof
  • 42.
  • 43.
    REMEDIES FOR DAMPNESSIN BUILDING • Laying DPC layer (1 : 2 : 4) at plinth level above wall. • Laying mastic asphalt or bitumen layer on walls at plinth level.
  • 44.
  • 45.
    TERMITE ATTACK • Pre-constructiontreatment • Post-construction treatment
  • 46.
    SOIL TREATMENT • Soiltermite treatment is a toxin bearing product applied to the soil under or near a structure meant to control or eliminate the infiltration of below ground termites into the proposed structure. • The termite pre-treatment material should be applied to the soil and soak into the voids to then bond to the soil. • The treatment tends to be easier to apply to non-cohesive soils than cohesive ones because there are larger voids in the soil. • The treatment cannot be applied if the soil substrate is wet or frozen.
  • 47.
    REMEDIES FOR LEAKAGETHROUGH ROOFS • Cleaning drain pipes. • Level the surface and provide proper slope. • To carryout waterproofing treatment.
  • 48.
    REMEDIES FOR SETTLEMENTOF TILES IN FLOOR • Remove the tiles from floor, compact the soil by rammer. • Lay cement concrete layer on the compacted soil bed. • Refix the tiles over the PCC bedding.
  • 49.