SlideShare a Scribd company logo
Installing a custom image is similar to installing the Windows® 7 operating system from the Microsoft® Volume Licensing or retail media, but
it uses an operating system image that includes your customizations and applications. This process takes a bit more time to set up but can save
you time in the end.
The guidance in section is designed specifically for small and medium business that may not have prior experience with Windows deployment or
do not have enterprise deployment infrastructure.
Watch the companion video tutorial for more information.
Also see the following related documents:
 Upgrading to Windows 7 for Small and Midsize Businesses
 Upgrading to Windows 7 with a Standard Image: Overview
 Manual Installation of Windows 7: Overview
 Automated Installation of Windows 7: Overview
 Automated Installation to Upgrade to Windows 7: Step-by-Step Guide
Note
For a complete view of Windows 7 resources, articles, demos, and guidance, please visit the Springboard Series for Windows 7 on the Windows
Client TechCenter.
For a downloadable version of this document, see Building a Standard Image of Windows 7: Step-by-Step Guide in the Microsoft Download
Center (http://go.microsoft.com/fwlink/?LinkId=162740).
Creating a custom image for the Standard Image method has seven major steps. You need two computers to build the custom image for this
method: You configure your tools on the technician computer and customize your image on the reference computer. Table 1 has a column for
each computer. You complete steps in the On the technician computer column on your own computer. You complete steps in the On the
reference computer column on the computer that you are using to build the custom image.
Table 1. Steps for Creating a Custom Image
Step On the technician computer On the reference computer
1. Install the Windows Automated Installation Kit (Windows AIK).
2.
Create a Windows Preinstallation Environment (Windows PE) startup
disk.
3. Install and customize Windows 7.
4. Start the reference computer in Audit mode to clean the image.
5.
Generalize the reference computer to prepare the image for
duplication.
6. Capture the reference computer to an image file by using ImageX.
7. Create new Windows 7 installation media for the custom image.
The following sections provide detailed instructions for each step. To use these instructions, you must have the Windows 7 Volume Licensing
media, two USB flash disks (UFDs) that you can use to start computers (8 gigabytes [GB] or larger, depending on the size of the Windows 7
image you create), and a reference computer on which you can build and customize the standard image. You will be formatting the reference
computer’s disk, so make sure you back up important files if you are using an existing computer for this purpose.
Install the Windows AIK
The Windows AIK provides the tools required to build custom Windows 7 images. In particular, it includes ImageX, which you use to capture
an image of the reference computer, and the files necessary to build a Windows PE startup disk.
First, download the Windows Automated Installation Kit (AIK) for Windows 7 from the Microsoft Download Center
(http://go.microsoft.com/fwlink/?LinkId=136976).
The file KB3AIK_EN.iso is an International Organization for Standardization (ISO) image that you must burn to a DVD or mount to a virtual
machine. Windows 7 can burn ISO files to DVDs. For more information, see Tip: Burn a Disc Image from an ISO or IMG file in Windows 7 in
TechNet Magazine.
To install the Windows AIK from the Windows AIK DVD
1. Open the Windows AIK DVD in Windows Explorer.
2. Perform one of the following tasks based on the computer on which you are installing the
Windows AIK:
o If your computer is a 32-bit computer, right-click wAIKX86.msi, and then click
Install.
o If your computer is a 64-bit computer, right-click wAIKAMD64.msi, and then click
Install.
3. Click Next.
4. On the License Agreement page, click I Agree, and then click Next.
5. On the Select Installation Folder page, click Next to install to the default installation folder
for anyone who uses the computer.
6. On the Confirm Installation page, click Next to begin installation.
7. Click Close to finish installation.
Create a Bootable UFD
You use the bootable UFD that you create in this step to start the reference computer so you can capture an image of the hard disk after you
install and customize Windows 7. Windows PE does not include ImageX, so these instructions include a step for copying ImageX.exe from the
Windows AIK installation folder to the Windows PE source files before you create the Windows PE ISO file.
To create a bootable UFD with Windows PE
1. Click Start, point to All Programs, and then click Microsoft Windows AIK.
2. Right-click Deployment Tools Command Prompt, and then click Run as administrator.
3. Click Yes to open the Deployment Tools Command Prompt window with elevated
permissions.
Tip You can copy and paste commands from these instructions into the Deployment Tools
Command Prompt window. Doing so saves time and helps ensure that you run the command
correctly.
4. In the Deployment Tools Command Prompt window, perform one of the following tasks, and
then press ENTER:
o If the reference computer is a 32-bit computer, type copype.cmd x86 C:winpe_x86.
o If the reference computer is a 64-bit computer, type copype.cmd amd64
C:winpe_amd64.
5. In the Deployment Tools Command Prompt window, perform one of the following tasks, and
then press ENTER:
o If the reference computer is a 32-bit computer, type copy C:winpe_x86winpe.wim
C:winpe_x86ISOsourcesboot.wim.
o If the reference computer is a 64-bit computer, type copy
C:winpe_amd64winpe.wim C:winpe_amd64ISOsourcesboot.wim.
6. In the Deployment Tools Command Prompt window, perform one of the following tasks, and
then press ENTER:
o If the reference computer is a 32-bit computer, type copy "C:Program
FilesWindows AIKToolsx86ImageX.exe" C:winpe_x86ISO.
o If the reference computer is a 64-bit computer, type copy "C:Program
FilesWindows AIKToolsamd64ImageX.exe" C:winpe_amd64ISO.
7. Insert a UFD into the computer.
8. In the Deployment Tools Command Prompt window, type diskpart, and then press ENTER.
9. Perform the following tasks to prepare the UFD to start the reference computer:
1. Type list disk, and then press ENTER.
2. From the list of disks, identify the number of the UFD. It is important that you
identify the correct disk, as you will be formatting the disk. Make sure the size and
free space match what you expect for the UFD.
3. Type select disk number, where number is the disk number of the UFD, and then
press ENTER.
4. Type clean, and then press ENTER.
5. Type create partition primary, and then press ENTER.
6. Type select partition 1, and then press ENTER.
7. Type format fs=fat32 quick, and then press ENTER.
8. Type active, and then press ENTER.
9. Type exit, and then press ENTER.
10. In the Deployment Tools Command Prompt window, type xcopy /s C:winpe_x86iso*.*
D:, where D is the drive letter of the UFD. Alternatively, you can copy all the files in
C:winpe_x86 to the UFD using Windows Explorer.
Install Windows 7
After completing the previous two steps—installing the Windows AIK and creating a bootable UFD—you have the tools necessary to capture a
custom image. You will complete these steps on the reference computer. Now, you need your Windows 7 Volume Licensing media, which you
will install on the reference computer.After installing Windows 7 on the reference computer, customize it by installing any applications, device
drivers, and updates that you want to include in the custom image. Remember that anything you install in the custom image will be on each
computer to which you install the image. Examples of applications and updates you might want to install in the image include:
 Antivirus software
 The 2007 Microsoft Office system
 Windows Virtual PC
 Virtual Windows XP
To install Windows 7 on the reference computer
1. Turn on your computer, insert the Windows 7 Volume Licensing media into the computer’s
DVD drive, and then perform one of the following tasks:
o If you are asked to press a key to boot from the Windows 7 Volume Licensing media,
press any key. If the Install Windows page appears, go to step 2.
o If the Install Windows page does not appear and you are not asked to press a key to
start from the Windows 7 Volume Licensing media, you might have to specify that
your computer uses its DVD drive as the startup device.
For more information, see the Windows Help and How-to article Start Windows from
a CD or DVD. After you select your DVD drive as the startup device, restart your
computer, and then start Windows 7 from the Volume Licensing media.
2. On the Install Windows page, shown in Figure 1, perform the following tasks, and then click
Next:
1. In the Language to install list, click the language you want to install on your image.
2. In the Time and currency format list, click the location you want in your image.
3. In the Keyboard or input method list, click the keyboard layout you want in your
image.
Figure 1. The Install Windows page
3. On the Install Windows page, click Install now.
4. On the Please read the license terms page, if you accept the license terms, select I accept
the license terms. You must accept to continue the installation. Click Next.
5. On the Which type of installation do you want? page, click Custom.
6. On the Where do you want to install Windows? page, perform one of the following tasks:
o If you do not want to specify a specific partition to install Windows 7 on or create
partitions on your hard disk, click Next to begin the installation.
o If you want to create, extend, delete, or format a partition, click Drive options
(advanced), select the option you want, and then follow the instructions. Click Next
to begin the installation.
Windows 7 continues installing on the reference computer, as shown in Figure 2.
Figure 2. The Installing Windows page
7. On the Set Up Windows page, which you will see only after Windows 7 finishes installing
on the reference computer, perform the following tasks, and then click Next:
0. In the Type a user name box, type a temporary user name. You can use any user
name, as you will remove this user account before capturing the image.
1. In the Type a computer name box, type a temporary computer name. You can use
any computer name, as you will change the computer name during deployment.
8. On the Set a password for your user account page, perform the following tasks, and then
click Next:
0. In the Type a password box, type a password for the temporary user account.
1. In the Retype your password box, type the password again to verify it.
2. In the Type a password hint box, type a password reminder.
9. On the Type your product key for activation page, type your Windows 7 Volume
Licensing product key, and then click Next.
10. On the Help protect your computer and improve Windows automatically page, click Use
recommended settings to install important and recommended updates. You can choose a
different setting after you install the image on each computer.
11. On the Review your time and date settings page, set the time and date, and then click Next.
12. Optionally, on the Join a wireless network page, click a wireless network, type the security
key, and then click Next. You can also skip connecting to a wireless network by clicking
Skip.
13. On the Select your computer’s current location page, shown in Figure 3, click Work
network.
Figure 3. Select your computer’s current location
To customize Windows 7 on the reference computer
1. Use Windows Update to install recommended updates as well as the optional updates that you
choose to include in the image. To start Windows Update, click Start; in the Search box, type
windows update, and then click Windows Update in the search results under Programs.
2. Install any applications that you want to include in the custom image.
3. Install any out-of-box device drivers (device drivers that do not come with Windows 7) that
you want to include in the custom image.
4. Configure any computer-specific settings that you want to include in the custom image.
Note
You can configure computer-specific settings like hardware settings in the custom image, but you cannot configure user-specific settings using
this method without using an answer file or writing a script. For example, you cannot configure a Windows Internet Explorer® 8 home page in
the custom image, and then deploy that to all users in the organization. For more information about creating a default user profile, see article
959753 in the Microsoft Knowledge Base.
Clean Up the Image
When you set up Windows 7, you created a temporary user account to log on to it. In this step, you start the computer in Audit mode to remove
that temporary user account and its user profile. This is also your last chance to install any applications, device drivers, and updates in your
image.
To start the computer in Audit mode using the System Preparation Tool (Sysprep)
1. Click Start, type C:WindowsSystem32sysprepsysprep.exe in the Search box, and then
press ENTER to start Sysprep, shown in Figure 4.
Figure 4. The System Preparation Tool
2. In the System Cleanup Action list, select Enter System Audit Mode.
3. Select the Generalize check box.
4. In the Shutdown Options list, select Reboot.
5. Click OK to restart the computer in Audit mode.
6. After the computer restarts, Windows 7 automatically logs in as Administrator.
To remove the temporary user account’s profile
1. Click Start, type user profile in the Search box, and then click Configure advanced user
profile properties in the search results.
2. In the User Profiles dialog box, click the name of the temporary user account you created
when you installed Windows 7 on the reference computer, and then click Delete. Click Yes to
confirm.
3. Click OK to close the User Profiles dialog box.
To remove the temporary user account
1. Click Start, right-click Computer, and then click Manage.
2. In the console tree (left pane), click Local Users and Groups.
3. In the details pane (middle pane), double-click Users.
4. Right-click the name of the temporary account you created when you installed Windows 7 on
the reference computer, and then click Delete.
5. Click Yes to confirm that you want to delete the temporary user account.
6. Click OK to acknowledge that you are deleting an administrator account.
7. Close the Computer Management window.
Generalize the Image
In this step, you generalize the image and prepare it to start in Windows Welcome after you install it on each computer. Generalizing the image
removes any hardware-dependent information from it, resets the activation timer, and cleans up Windows 7 so that you can duplicate the image
on other computers.
To prepare the computer to start in Windows Welcome using Sysprep
1. Open Sysprep. (Windows 7 automatically runs Sysprep when you start the operating system
in Audit mode.)
2. In the System Cleanup Action list, select Enter System Out-of-Box Experience (OOBE).
3. Select the Generalize check box.
4. In the Shutdown Options list, select Shutdown.
5. Click OK to run Sysprep and shut down the computer.
Capture the Image
At this point in the process, you have installed Windows 7 on the reference computer, and you are ready to capture an image of it. You use the
bootable UFD you created earlier to start the computer. Additionally, you will capture the image to this UFD. For this reason, you should use a
UFD that has a capacity of 8 GB or more to ensure that there is room for both Windows PE and the image you capture.
To capture an image of Windows 7 on the bootable UFD
1. Insert the bootable UFD into a USB port on the reference computer.
2. Turn on the reference computer, and then perform the following tasks:
1. When prompted, open the boot device list. (In most cases, pressing F12 during the
basic input/output system [BIOS] splash screen opens the computer’s boot device
list.)
2. From the list of boot devices, select the bootable UFD that you inserted in step 1 to
start the computer using the bootable UFD.
Note
If you do not see a prompt to display a boot device list, you must enable booting from UFD devices in the computer’s BIOS. For
more information, see the computer’s documentation.
3. At the command prompt, identify which drive contains Windows 7—typically drive D in
Windows PE. To verify this, type dir d:, and then press ENTER.
If you see the Program Files, Users, and Windows folders, drive D contains Windows 7.
Otherwise, examine each drive to determine which drive contains Windows 7.
4. At the command prompt, identify which drive is the bootable UFD.
This drive contains Imagex.exe in the root of the drive. It will not be drive X. To determine
the drive letter, run dir e:, dir f:, dir g:, and so on until you locate the drive that contains
Image.exe in the root.
5. At the command prompt, type one of the commands shown in Table 2, depending on the
edition of Windows 7 you are using, and then press ENTER. Substitute the actual drive letter
containing Windows 7 for D: and the drive letter containing Image.exe for E: in Table 2.
Table 2. ImageX Commands
Edition ImageX Commands
Enterprise
E:imagex /compress fast /check /flags “Enterprise” /capture D:
E:install.wim “Windows 7 Enterprise” “Windows 7 Enterprise Custom”
Professional
E:imagex /compress fast /check /flags “Professional” /capture D:
E:install.wim “Windows 7 Professional” “Windows 7 Professional Custom”
6. Shut down the reference computer, and remove the UFD from its USB port.
Build Windows 7 Media
You have successfully captured a custom Windows 7 image that includes applications, device drivers, and updates. It is on the root of the
bootable UFD that you used to start the reference computer and capture the image. In this step, you create new Windows 7 installation media
that use your custom image instead of the image that Microsoft provides on the media.
To create the custom Windows 7 media, you create another bootable UFD. Then, you copy the installation files from the original Windows 7
Volume Licensing media to the bootable UFD. Finally, you replace the install.wim file on the bootable UFD with the custom install.wim file you
captured in the previous step.
To copy the custom Windows 7 image to your computer
1. Insert the UFD containing your custom Windows 7 image in to your computer.
2. In Windows Explorer, copy the install.wim file from the UFD to C:install.wim.
3. Remove the UFD containing your custom Windows 7 image from your computer.
To create a bootable UFD containing your Windows 7 Volume Licensing media
1. Click Start, point to All Programs, and then click Microsoft Windows AIK.
2. Right-click Deployment Tools Command Prompt, and then click Run as administrator.
3. Click Yes to open the Deployment Tools Command Prompt window with elevated
permissions.
4. Insert a UFD in to the computer. Do not insert the UFD to which you captured the custom
Windows 7 image, however, as you will be formatting this UFD.
5. In the Deployment Tools Command Prompt window, type diskpart, and then press ENTER.
6. Perform the following tasks to prepare the UFD to start the reference computer:
1. Type list disk, and then press ENTER.
2. From the list of disks, identify the number of the UFD. It is important that you
identify the correct disk, as you will be formatting the disk. Make sure the size and
free space match what you expect for the UFD.
3. Type select disknumber, where number is the disk number of the UFD, and then press
ENTER.
4. Type clean, and then press ENTER.
5. Type create partition primary, and then press ENTER.
6. Type select partition 1, and then press ENTER.
7. Type format fs=fat32 quick, and then press ENTER.
8. Type active, and then press ENTER.
9. Type exit, and then press ENTER.
7. Insert your Windows 7 Volume Licensing media into the DVD drive.
8. In the Deployment Tools Command Prompt window, type xcopy /s D:*.* E:*.*, where D is
the drive letter of the Windows 7 Volume Licensing media and E is the drive letter of the
UFD you previously formatted.
Alternatively, you can copy all the files on the Windows 7 Volume Licensing media to the
UFD using Windows Explorer.
To copy your custom image to the UFD containing Windows 7
1. In the Deployment Tools Command Prompt window, type xcopy /r C:install.wim
E:sourcesinstall.wim, where E is the drive letter of the UFD you created in the previous
step. If prompted, type Y to confirm that you want to overwrite the file.
Alternatively, you can copy C:install.wim to E:sourcesinstall.wim using Windows
Explorer. If prompted, click Yes to confirm that you want to overwrite install.wim on the
UFD.
2. Safely eject the UFD containing your custom Windows 7 image.
Install the Custom Image
Now that you have created a bootable UFD that contains your custom Windows image, you can use the UFD to install Windows 7 on other
computers. Consider backing up the contents of the UFD. In addition, you can create multiple UFDs to help speed up the installation on multiple
computers.
To install the custom image from the bootable UFD
1. Insert the bootable UFD containing the custom Windows 7 image into a USB port on the
destination computer.
2. Turn on the destination computer, and then perform the following tasks:
1. When prompted, open the boot device list. (In most cases, pressing F12 during the
BIOS splash screen opens the computer’s boot device list.)
2. From the list of boot devices, select the bootable UFD that you inserted in step 1 to
start the computer using the bootable UFD.
Note
If you do not see a prompt to display a boot device list, you must enable booting from UFD devices in the computer’s BIOS. For more
information, see the computer’s documentation.
3. Follow the instructions you see on screen to finish installing Windows 7. The process is
similar to the process described in the Install Windows 7 section earlier in this document.
4. After installing the custom Windows 7 image on the destination computer, you must active
the operating system with Microsoft. If your company does not use the Key Management
Service (KMS), manually activate Windows 7 with Microsoft.
For more information, see Windows Volume Activation on the Microsoft Web site.
Note
Installing the custom image for the Standard Image method is a manual process. You can automate much of this process. For more information,
see Automated Installation of Windows 7: Overview.
Was this page helpful?
Yes
No
Community Additions
ADD
Getting Error "The System cannot find the path Specified" after giving the capturing image command
I am on "Capture the Image". I have created the UFD bootable drive per the instructions in this article. The message I get on my screen when
trying to make an image of my system "The System cannot find the path Specified"
i have followed each and every step mentioned thoroughly My windows installation drive is D and my UFD drive is G
in which imagex.exe file is existing. I'm using windows 7 ultimate for which i'm giving the below commands
G:imagex /compress fast /check /flags “Ultimate” /capture D:
G:install.wim “Windows 7 Ultimate” “Windows 7 Ultimate Custom”
also tried
G:imagex /compress fast /capture d: G:install.wim “Windows7" but all in vein i've tried this many times more than 20 but no results
afterall instead
"The System cannot find the path Specified"
I have tried the same creating both NTFS & Fat32 File system UFD for 64 bit OS installed on my reference computer. Can Anyone please help
and get me solve this error?
Regards Adit
Adit Pal
8/30/2014
Tips and Trick : Building Standard Image..
this the tricky when create standard image Windows 7 :
when you'll running sysprep please take note below :
1. Don't install any driver
2. Don't activate your windows licensing
3. customize it by installing any program
if you installed driver and activated windows it's should be facing error message "Fatal error....."
Resolution :
1. type "slmgr /dlv" without quote's on command prompt --> to check how many times of windows activation
2. edit GeneralizationState under HKLMsystemsetupsysprepstatus set to 7 and SkimRearm under HKLMSoftwareMicrosoftWindows
NTCurrentVersionSoftwareProtectionPlatform set to 1
3. Renaming or deleting "Panther" folder on c:windowssystem32sysprep
4. Kill Process wmpnetwk.exe with description is Windows Media Player Sharing Service
then, Run sysprep and remember please check 4 point above before you run it....
Hope its help!
Panjul_Pea
12/13/2013
more issues
First, Thanks to all additional postings above. Here are some issues and resolves that I've had:
Tip: Online research showed that the process WMPNetwork needs to be ended for Generalize to work properly. Ending it with Task Manager
works, but it comes back after 10 seconds. Instead type "Services" from the start menu and select "Services" (can't for the life of me figure out
why component services gets listed first). Stop the Windows Media Player Network Sharing Service. Not sure if it's necessary on both, but I do
this before the Clean operation as well as before the Generalize operation.
1. Received endless reboot cycle on the Reference machine after Generalize. Online research indicated that leaving the Domain before Cleaning
and Generalizing would prevent this. It did.
2. Received a Fatal Error when trying to Generalize. There is a limit of 3 rearms (re-arms) or generations of creating an image. For example:
Say I create an image, that's the first generation or arming. Six months later, I decide to make a more up to date image with recent patches and
updates. If, for a reference machine, I use a machine whose Windows installation was made with original image from six months ago to make
this new image (rather than from media), that becomes the second generation. Therefore I can repeat this process only one more time. When
remaining rearms is 0, then I get the Fatal Error when trying to Generalize. The resolve is to use original media, apply all updates and install
necessary software and create a new fresh first-generation image. Or at least use a previous generation image and update it. To find out what
generation an installation is (how many rearms are remaining), type "slmgr /dlv" minus the quotes with a space before the "/" at the command
prompt. It will immediately give you another command prompt like nothing happened. Wait 10 seconds and a report will appear showing
Remaining Windows rearm count.
Hope this helps.
Psyanic
7/9/2013
Installing on machine with UEFI and GPT Partition
We encountered a problem whereby our customised image was greater then 4GB so we had to format the UFD with NTFS. However UEFI does
not recognise NTFS devices in its boot menu and if we select the UFD from the legacy boot menu we cannot install Windows 7 on a GPT
enabled partition. To get round this problem we used two UFDs, one formatted with FAT32 and the other with NTFS.
1. Copy the Windows 7 DVD onto both UFD's.
2. Copy your customised install.wim to the sources folder on the NTFS formatted UFD only.
3. Boot the computer using the FAT32 UFD and stop when you get to the Install screen.
4. Remove the FAT32 UFD and insert the NTFS UFD into the same USB port.
5. Click install and continue as descibed in the article.
With UEFI and GPT enabled partitions it is important to select the UFD from the UEFI boot menu and not the legacy boot menu.
Regards,
Steve Perrins
SCP Computers.
scpcomp-Steve
12/16/2012
Please make correction to guide "To create a bootable UFD with Windows PE"
Item 10 under "To create a bootable UFD with Windows PE" omits instructions for x64 computers. It should be corrected to read:
10. In the Deployment Tools Command Prompt window, perform one of the following tasks, and then press ENTER:
If the reference computer is a 32-bit computer, type xcopy /s C:winpe_x86iso*.* D:, where D is the drive letter of the UFD.
If the reference computer is a 64-bit computer, type xcopy /s C:winpe_amd64iso*.* D:, where D is the drive letter of the UFD.
Thanks.
telecentricity1
10/23/2012
Error
While making boot from USB (WinPE) , the command prompt will come with drive letter X , how to change from this letter to USB letter to
type the command ? as while typing the command F:imagex/compress fast/check/flags "Ultimate" /capture D: F:install.wim "Window7
Ultimate" "Window7 Ultimate Custom" , i am getting error like "System cannot find specified path"
My USB drive letter is "F" and window image in machine is in D
An y help would be appreciated :-)
Maanya
10/18/2012
Error Capturing Image
I'm going throught the steps and I'm at the task in the step to capture the image where you have to type one of the commands from table 2 into
the command prompt. It says scanning files and directories... and then after a couple minutes I get an error message as follows:
[ERROR] C:ProgramDataMicrosoftMicrosoft AntimalwareIMpServiceEDB4FA23-53B8-4AFA-8C5D-99752CCA7094.lock (Error = 32)
Error imaging drive [C:]
The process cannot access the file because it is being used by another process.
Can someone please help and get me past this error?
IT-Mouse
10/11/2012
Table 2
Would have saved me some time if i had known that the 2 lines were actually one line...
Kazoa
9/6/2012
Image Size
It would be helpful if there was a guideline as to how big the USB Flash Drive should be based on the amount of drive space used on the
reference machine. I used an 8GB drive only to be told the drive was not large enough. The machine was using 21GB of hard drive space with
very little software installed (although it did have the numerous updates since the last Service Pack).
How much does Imagex compress the files? May be if I had used NTFS instead of FAT32, as suggested above, it may have worked, but after 2
hours, I had to give up. I will have to try at another time.
bstep55
8/15/2012
Diskpart does not see UFD to be formatted
Under the Create a Bootable UFD section, step 10 has me copy a directory structure that was never even created if I was installing the AIK for a
64 bit installation. I assume that the instruction should have me copy the 64 bit structure.
I also can not get the UFD formatted using the instructions as Diskpart does not see the UFD even though Windows explorer does see the flash
drive that I will be reformatting and partioning. Has anyone else run into that?
Southerner
6/28/2012
Remove disks or other media
I am on "Capture the Image". I have created the UFD bootable drive per the instructions in this article. The message I get on my screen when
trying to boot to the USB drive is
"Remove disks or other media
Press any key to restart"
When I press any key, I get
"Reboot and Select proper Boot device
or Insert Boot Media in selected Boot device and press a key"
I have follwed all the instructions to the tee. I've also done some web searches on this particular problem but none of the results directly address
this issue.
Any help/guidance would be appreciated. Thank you.
Steverinos
6/13/2012
Device drivers not found
when i try to install the image on a laptop, just before the select partition bit it says "device drivers not found" and will not let me progress with
the install.
this image did however work on other computers. do you have any idea why?
Thanks in advance
David
David Microsoft apprentice
5/2/2012
Process works on my small test image but not the actual large image
If my image is made from Windows 7 and a few changes to make about a 4GB image then this process is working for me.
If I make my image from Windows 7 with SP1 and security patches applied (and the full company settings) it is 23 GB and I get the error:
"Windows could not apply unattend settings during pass (offline serving)"
I have googled this error and found it to relate to version settings in an unattend.xml file. But this process does not involve an unattend.xml file
so I could use some help.
Scott
Milkboy
3/16/2012
Required device is inaccessible.
After following these directions, when booting from the UFD, I get error "0xc000000f - The boot selection failed because a required device is
inaccessible." Has anyone encountered this previously?
The Training Associates
3/8/2012
HI i need to make my Bootable UFD to be Burned to DVD how can i burn the same
HI
i need to make my Bootable UFD to be Burned to DVD how can i burn the same and it shuld work as bootable DVD.
Please Help in this and all your steps are really helped me a lot to make a customized image.
Thanks a lot
Regards,
Manoz
Manoz Denial
2/18/2012
User Prompts
Hi,
I work for a small business who provide practise management software for our clients on small business networks.
We provide them with all their hardware and currently run through the windows enviroment disabling services and features that cause conflicts.
Really we would like the boot disk to prompt us which version of word to install, install our own client or server software, set the IPs of that
workstation and the terminal server they connect to.
1. Can I set exe files to run as part of the windows installation?
2. Can I select which services and folder options are disabled?
3. Can I add other program installs as part of the installation and still prompt users for info
required during the installation? i.e Serial keys, IP addresses, user names and passwords, etc
Thanks
Thomas Lee
1/6/2012
imagex command
Ran into a problem when copy/pasting the commands.
To create a bootable UFD with Windows PE
Section 6
For 64 bit, the "copy" part of the command is not bold and therefore may be missed. Verify your files (imagex in this instance) was copied
correctly to the UFD.
Otherwise went as outlined.
Thanks
Hillbilly Hooker
1/6/2012
imagex command problem
the command that are discribed here did not work for me. instead I used
E:imagex /compress fast /capture d: E:install.wim “Windows7"
Answer... You probably don't have your UFD in drive E: ... it would be different on your PC... Another drive could already be using it.
Joshua Woodcraft
11/29/2011
SOLVED: Problems with UDF capturing the Image.
when i attempt to boot into my UDF on the reference computer, it tells me to remove disk and other media and press any key to restart. I
formatted using FAT32 and i made sure in the BIOS that i could boot from a USB. i also tried formatting my USB using NTFS and i would get
an error stating the "bootmgr is missing". I'm not sure why my reference computer (Dell Optiplex 780) isn't reading my USB (with the files from
step where you create a bootable UFD). If anyone could help me out I would really appreciate it.
Thanks
SOLVED:
when you use a UDF for capturing the system image with FAT32 format, it has an individual file limit of 4GB. meaning if any given file is over
4GB it won't be able to capture it to the FAT32 formatted UFD. solved my issue by using a ntfs quick format and it captured no problem.
Vroomie
9/21/2011
SOLVED the Disk Space Problem
Okay, I followed the direction for creating a UFD to the letter and had the same "Not enough disk space error" so I tried a new approach.
I created a second UFD using format fs:ntfs quick for the file system format. After starting my lapotp with the FAT32 UFD build I replaced the
it with the NTFS formatted UFD. I was able to create the image without any problems. I used a 16Gb UFD, however I will make my next
attempy using a smaller FAT32 UFD since it will only b e used for startup.
As a note I attempted to boot with the NTFS formated UFD, however my systems do not like the NTFS versin for startup.
mafogle
9/20/2011
Windows could not complete the installation
ColorodoRuss went into this issue vaguely. I had the same problem with a smaller network, thinking the local Administrator account was
enabled and working. Here is what you need to do in order to get it to work.
Once you get the error "Windows could not complete the installation" press Shift+F10 and bring up your command prompt. Type mmc and hit
enter. Go to file > add snap-in and add Computer Management & Group Policy Object. Hit OK and once you're in the MMC expand Computer
Management > Users and Groups > Users and double-click on Administrator. Make sure the account is not disabled and that the password is set
to never expire. If you get a message about the password not meeting complexity cancel out of the Administrator window and right-click on the
Administrator account and Set Password to something that meets criteria. Once the password is set double-click the Administrator account again
and make sure it's not disabled. Click OK and you're done with that.
Expand the Group Policy Object and browse to Local Computer >Computer Configuration > Windows Settings>Security Settings>Local
Policies>Security Option and changed "Accounts:
Administrator Accounts status" to enabled.
Restart and you're golden. You may get an error when you get to the logon screen about a password being incorrect but just enter the
Administrator password you set and you're in.
SkillTech
7/13/2011
Hardware Independence
Hey Guys,
I followed the steps outlined and successfully made an image which I can install to computers similar to the reference computer. My question is,
I was under the impression this process is supposed to produce a hardware independent image? I blue screen with the 7B error (driver problem)
every time I install it on a different computer. (For example, my reference computer was an atom/nvidia ion and I want to install it to a P4/ati
radeon)
How can I remove the hardware specific drivers from the reference computer and make Windows always use basic/default ones or find
applicable ones when I install it to each computer?
Thanks.
guardianx5
7/3/2011
video drivers
I have one problem. After I run the sysprep process and the laptop shutsdown. I start the laptop back up, it goes through services and driver
install process, but the video drivers roll back to the origenal version, not the updated one that I installed before I ran sysprep.
can anyone help me with this?
Hello - You need to set the persist option to true in your unattend.xml.
Taken from http://technet.microsoft.com/en-us/library/cc766514(WS.10).aspx
"Persisting Plug and Play Device Drivers during generalize
You can persist device drivers when you run the sysprep /generalize command by specifying the PersistentAllDeviceInstalls setting in the
Microsoft-Windows-PnPSysprep component. During the specialize pass, Plug and Play scans the computer for devices and installs device
drivers for the detected devices. By default, these device drivers are removed from the system when you generalize the system. If you set
PersistAllDeviceInstalls to True in an answer file, Sysprep will not remove the detected device drivers. For more information, see the
Unattended Windows Setup Reference."
Cheers! -jlester3
jlester3
6/17/2011
UFD not accessible after formatting and making active .
I faced issue after completing UFD formatting ,drive was not accessible . So you have enter command: " assign " to assign the drive letter to
UFD then only you can copy the files on it . ..
Ravikaran
6/14/2011
Capture problem
For anyone who receives the error "There is not enough space on the disk." when performing the capture to a UFD, reformat the flash drive to
NTFS instead of FAT32. Worked for me.
Trey Carlee
6/10/2011
RE: imagex command problem
If any one is having issue with imageX command, the command lines shown in Table 2 aren't supposed to be two lines;it's one long command
line.
ProUndeniable
4/22/2011
Local Administrator account
I learned this the hard way. You have to set a password and enable the local "Administrator" account or the system grinds to a halt after running
sysprep. There may be an easier way, but I had to start from scratch.
ColoradoRuss
12/7/2010
Re Video Drivers
You have to provide an XML file for the unattend switch on sysprep.
This is mine
<?xml version="1.0" encoding="utf-8"?>
<unattend xmlns="urn:schemas-microsoft-com:unattend">
<settings pass="generalize">
<component name="Microsoft-Windows-Security-Licensing-SLC" processorArchitecture="x86" publicKeyToken="31bf3856ad364e35"
language="neutral" versionScope="nonSxS" xmlns:wcm="http://schemas.microsoft.com/WMIConfig/2002/State"
xmlns:xsi="http://www.w3.org/2001/XMLSchema-instance">
<SkipRearm>1</SkipRearm>
</component>
<component name="Microsoft-Windows-PnpSysprep" processorArchitecture="x86" publicKeyToken="31bf3856ad364e35"
language="neutral" versionScope="nonSxS" xmlns:wcm="http://schemas.microsoft.com/WMIConfig/2002/State"
xmlns:xsi="http://www.w3.org/2001/XMLSchema-instance">
<DoNotCleanUpNonPresentDevices>true</DoNotCleanUpNonPresentDevices>
<PersistAllDeviceInstalls>true</PersistAllDeviceInstalls>
</component>
</settings>
<cpi:offlineImage cpi:source="wim:c:/mystuff/install.wim#Windows Vista ULTIMATE" xmlns:cpi="urn:schemas-microsoft-com:cpi" />
</unattend>
NathanSimpson
10/7/2010
NTFS/Fat32
If your image is big or UFD>32GB use NTFS instead of FAT32 formating. Worked well for me.
Tudi-Imprezzio
8/12/2010
important
While doing the process of sysprep you must end the task named wmpnetwork in task manager to run correctly
Thomas Lee
8/2/2010
Device not ready
as soon as I look for E: after inserting the UFD into the computer I'm trying to capture an image of, it keeps coming up "Device not ready". I've
gone through all the other drives and they came up along the line as destination not available so this leads my to believe E: is the correct drive.
anyone else have this problem?
Thomas Lee
8/2/2010

More Related Content

What's hot

TLE ICT CSS 10 Cot lesson plan1
TLE ICT CSS 10 Cot lesson plan1TLE ICT CSS 10 Cot lesson plan1
TLE ICT CSS 10 Cot lesson plan1
Leonel Rivas
 
Windows reinstallation-guide
Windows reinstallation-guideWindows reinstallation-guide
Windows reinstallation-guide
vipin473
 
Cloud ready+installation+instructions
Cloud ready+installation+instructionsCloud ready+installation+instructions
Cloud ready+installation+instructions
Vishrut Chhajer
 
Windows 10 Deployment with Microsoft Deployment Toolkit
Windows 10 Deployment with Microsoft Deployment Toolkit Windows 10 Deployment with Microsoft Deployment Toolkit
Windows 10 Deployment with Microsoft Deployment Toolkit
Roel van Bueren
 
Fix WOW Error 132
Fix WOW Error 132Fix WOW Error 132
Fix WOW Error 132
-
 
windows 11 bugs errors issues problems
windows 11 bugs errors issues problemswindows 11 bugs errors issues problems
windows 11 bugs errors issues problems
ssuser1eca7d
 
Testing the Video Chat
Testing the Video ChatTesting the Video Chat
Testing the Video Chatuptuse
 
Wos portable help
Wos portable helpWos portable help
Wos portable help
Kevin Chilton
 
My Teacher Got IT v2.0 - Software Installation Track
My Teacher Got IT v2.0 - Software Installation TrackMy Teacher Got IT v2.0 - Software Installation Track
My Teacher Got IT v2.0 - Software Installation Track
Laguna State Polytechnic University
 
no output input devices found
no output input devices foundno output input devices found
no output input devices found
ssuser1eca7d
 
Installation Guide XBRL Software [Zen Exbace] on Windows XP
Installation Guide XBRL Software [Zen Exbace] on Windows XPInstallation Guide XBRL Software [Zen Exbace] on Windows XP
Installation Guide XBRL Software [Zen Exbace] on Windows XP
KDK Software
 
downgrade windows 10 enterprise to pro
downgrade windows 10 enterprise to prodowngrade windows 10 enterprise to pro
downgrade windows 10 enterprise to pro
ssuser1eca7d
 
Jsky User Guide
Jsky User GuideJsky User Guide
Jsky User Guide
mattotamhe
 
Oracle 10g Installation
Oracle 10g InstallationOracle 10g Installation
Oracle 10g Installation
sasidharreddilingala
 
Installing om2.x on windows xp-7-2003
Installing om2.x on windows xp-7-2003Installing om2.x on windows xp-7-2003
Installing om2.x on windows xp-7-2003Riadh Harizi
 
Guide to dual booting
Guide to dual bootingGuide to dual booting
Guide to dual bootingMahfud Saja
 
Laptop Dell Inspiron 3576 giá rẻ thiết kế bền bỉ
Laptop Dell Inspiron 3576 giá rẻ thiết kế bền bỉLaptop Dell Inspiron 3576 giá rẻ thiết kế bền bỉ
Laptop Dell Inspiron 3576 giá rẻ thiết kế bền bỉ
LAPTOP TRẦN PHÁT
 

What's hot (19)

TLE ICT CSS 10 Cot lesson plan1
TLE ICT CSS 10 Cot lesson plan1TLE ICT CSS 10 Cot lesson plan1
TLE ICT CSS 10 Cot lesson plan1
 
Windows reinstallation-guide
Windows reinstallation-guideWindows reinstallation-guide
Windows reinstallation-guide
 
Cloud ready+installation+instructions
Cloud ready+installation+instructionsCloud ready+installation+instructions
Cloud ready+installation+instructions
 
Windows 10 Deployment with Microsoft Deployment Toolkit
Windows 10 Deployment with Microsoft Deployment Toolkit Windows 10 Deployment with Microsoft Deployment Toolkit
Windows 10 Deployment with Microsoft Deployment Toolkit
 
SCCM HOw to
SCCM HOw toSCCM HOw to
SCCM HOw to
 
Fix WOW Error 132
Fix WOW Error 132Fix WOW Error 132
Fix WOW Error 132
 
windows 11 bugs errors issues problems
windows 11 bugs errors issues problemswindows 11 bugs errors issues problems
windows 11 bugs errors issues problems
 
Testing the Video Chat
Testing the Video ChatTesting the Video Chat
Testing the Video Chat
 
Wos portable help
Wos portable helpWos portable help
Wos portable help
 
My Teacher Got IT v2.0 - Software Installation Track
My Teacher Got IT v2.0 - Software Installation TrackMy Teacher Got IT v2.0 - Software Installation Track
My Teacher Got IT v2.0 - Software Installation Track
 
Win7guide
Win7guideWin7guide
Win7guide
 
no output input devices found
no output input devices foundno output input devices found
no output input devices found
 
Installation Guide XBRL Software [Zen Exbace] on Windows XP
Installation Guide XBRL Software [Zen Exbace] on Windows XPInstallation Guide XBRL Software [Zen Exbace] on Windows XP
Installation Guide XBRL Software [Zen Exbace] on Windows XP
 
downgrade windows 10 enterprise to pro
downgrade windows 10 enterprise to prodowngrade windows 10 enterprise to pro
downgrade windows 10 enterprise to pro
 
Jsky User Guide
Jsky User GuideJsky User Guide
Jsky User Guide
 
Oracle 10g Installation
Oracle 10g InstallationOracle 10g Installation
Oracle 10g Installation
 
Installing om2.x on windows xp-7-2003
Installing om2.x on windows xp-7-2003Installing om2.x on windows xp-7-2003
Installing om2.x on windows xp-7-2003
 
Guide to dual booting
Guide to dual bootingGuide to dual booting
Guide to dual booting
 
Laptop Dell Inspiron 3576 giá rẻ thiết kế bền bỉ
Laptop Dell Inspiron 3576 giá rẻ thiết kế bền bỉLaptop Dell Inspiron 3576 giá rẻ thiết kế bền bỉ
Laptop Dell Inspiron 3576 giá rẻ thiết kế bền bỉ
 

Viewers also liked

Brown Harris Stevens 2016 Year End Preliminary Hamptons Market Report
Brown Harris Stevens 2016 Year End Preliminary Hamptons Market ReportBrown Harris Stevens 2016 Year End Preliminary Hamptons Market Report
Brown Harris Stevens 2016 Year End Preliminary Hamptons Market ReportCristina Menendez
 
social_media_in_PR
social_media_in_PRsocial_media_in_PR
social_media_in_PR
Imre Hanyecz
 
Helspolitikk pp
Helspolitikk ppHelspolitikk pp
Helspolitikk pp
theabakke
 
IVT företagspresentation
IVT företagspresentationIVT företagspresentation
IVT företagspresentation
Gnosjö Rörledningsaffär AB
 

Viewers also liked (7)

Brown Harris Stevens 2016 Year End Preliminary Hamptons Market Report
Brown Harris Stevens 2016 Year End Preliminary Hamptons Market ReportBrown Harris Stevens 2016 Year End Preliminary Hamptons Market Report
Brown Harris Stevens 2016 Year End Preliminary Hamptons Market Report
 
social_media_in_PR
social_media_in_PRsocial_media_in_PR
social_media_in_PR
 
pin circle temp
pin circle temppin circle temp
pin circle temp
 
PosterPower
PosterPowerPosterPower
PosterPower
 
Helspolitikk pp
Helspolitikk ppHelspolitikk pp
Helspolitikk pp
 
Cold water corals
Cold water coralsCold water corals
Cold water corals
 
IVT företagspresentation
IVT företagspresentationIVT företagspresentation
IVT företagspresentation
 

Similar to Building an standard image for windows7

Create windows 7 recovery usb without dvd
Create windows 7 recovery usb without dvdCreate windows 7 recovery usb without dvd
Create windows 7 recovery usb without dvd
ssuser1eca7d
 
Windows xp and windows 7 installaton
Windows xp and windows 7 installatonWindows xp and windows 7 installaton
Windows xp and windows 7 installaton
Siddharth Jain
 
How to download and install windows 8.1 with free crack ?
How to download and install windows 8.1 with free crack ?How to download and install windows 8.1 with free crack ?
How to download and install windows 8.1 with free crack ?
TechieOasis
 
Virtualization.pdf
Virtualization.pdfVirtualization.pdf
Windows setup process
Windows setup processWindows setup process
Windows setup process
Banna Hasan
 
The installing of widows 7
The installing of widows 7The installing of widows 7
The installing of widows 7MCC
 
Midterm
MidtermMidterm
Midterm
federpmatc
 
Windows 7 installation
Windows 7 installationWindows 7 installation
Windows 7 installation
chokoy
 
CSS 4th Quarter Lessons.pptx
CSS 4th Quarter Lessons.pptxCSS 4th Quarter Lessons.pptx
CSS 4th Quarter Lessons.pptx
RGSMags
 
Installing Windows-10
Installing Windows-10Installing Windows-10
Installing Windows-10
YvannAdolfo
 
How to Install Windows 10, 8 and 7 Without USB Drive or DVD
How to Install Windows 10, 8 and 7 Without USB Drive or DVDHow to Install Windows 10, 8 and 7 Without USB Drive or DVD
How to Install Windows 10, 8 and 7 Without USB Drive or DVD
Viney Dhiman
 
images_of_windows_xp_for_system_deployment_using_windows_pe
images_of_windows_xp_for_system_deployment_using_windows_peimages_of_windows_xp_for_system_deployment_using_windows_pe
images_of_windows_xp_for_system_deployment_using_windows_pe
iartem
 
Pc hardware course work
Pc hardware course workPc hardware course work
Pc hardware course work
Ismail Mukiibi
 

Similar to Building an standard image for windows7 (20)

To upgrade your pc from windows xp to windows 7.rtf
To upgrade your pc from windows xp to windows 7.rtfTo upgrade your pc from windows xp to windows 7.rtf
To upgrade your pc from windows xp to windows 7.rtf
 
To upgrade your pc from windows xp to windows 7.rtf
To upgrade your pc from windows xp to windows 7.rtfTo upgrade your pc from windows xp to windows 7.rtf
To upgrade your pc from windows xp to windows 7.rtf
 
To upgrade your pc from windows xp to windows 7
To upgrade your pc from windows xp to windows 7To upgrade your pc from windows xp to windows 7
To upgrade your pc from windows xp to windows 7
 
Create windows 7 recovery usb without dvd
Create windows 7 recovery usb without dvdCreate windows 7 recovery usb without dvd
Create windows 7 recovery usb without dvd
 
Windows xp and windows 7 installaton
Windows xp and windows 7 installatonWindows xp and windows 7 installaton
Windows xp and windows 7 installaton
 
How to download and install windows 8.1 with free crack ?
How to download and install windows 8.1 with free crack ?How to download and install windows 8.1 with free crack ?
How to download and install windows 8.1 with free crack ?
 
Virtualization.pdf
Virtualization.pdfVirtualization.pdf
Virtualization.pdf
 
groupProject-1-Win8
groupProject-1-Win8groupProject-1-Win8
groupProject-1-Win8
 
Windows setup process
Windows setup processWindows setup process
Windows setup process
 
The installing of widows 7
The installing of widows 7The installing of widows 7
The installing of widows 7
 
Midterm
MidtermMidterm
Midterm
 
Windows 7 installation
Windows 7 installationWindows 7 installation
Windows 7 installation
 
CSS 4th Quarter Lessons.pptx
CSS 4th Quarter Lessons.pptxCSS 4th Quarter Lessons.pptx
CSS 4th Quarter Lessons.pptx
 
Installing Windows-10
Installing Windows-10Installing Windows-10
Installing Windows-10
 
How to Install Windows 10, 8 and 7 Without USB Drive or DVD
How to Install Windows 10, 8 and 7 Without USB Drive or DVDHow to Install Windows 10, 8 and 7 Without USB Drive or DVD
How to Install Windows 10, 8 and 7 Without USB Drive or DVD
 
images_of_windows_xp_for_system_deployment_using_windows_pe
images_of_windows_xp_for_system_deployment_using_windows_peimages_of_windows_xp_for_system_deployment_using_windows_pe
images_of_windows_xp_for_system_deployment_using_windows_pe
 
Pc hardware course work
Pc hardware course workPc hardware course work
Pc hardware course work
 
Photoshop cs5 read me
Photoshop cs5 read mePhotoshop cs5 read me
Photoshop cs5 read me
 
Photoshop cs5 read me
Photoshop cs5 read mePhotoshop cs5 read me
Photoshop cs5 read me
 
Photoshop cs5 read me
Photoshop cs5 read mePhotoshop cs5 read me
Photoshop cs5 read me
 

Recently uploaded

Operation Blue Star - Saka Neela Tara
Operation Blue Star   -  Saka Neela TaraOperation Blue Star   -  Saka Neela Tara
Operation Blue Star - Saka Neela Tara
Balvir Singh
 
Guidance_and_Counselling.pdf B.Ed. 4th Semester
Guidance_and_Counselling.pdf B.Ed. 4th SemesterGuidance_and_Counselling.pdf B.Ed. 4th Semester
Guidance_and_Counselling.pdf B.Ed. 4th Semester
Atul Kumar Singh
 
Home assignment II on Spectroscopy 2024 Answers.pdf
Home assignment II on Spectroscopy 2024 Answers.pdfHome assignment II on Spectroscopy 2024 Answers.pdf
Home assignment II on Spectroscopy 2024 Answers.pdf
Tamralipta Mahavidyalaya
 
How libraries can support authors with open access requirements for UKRI fund...
How libraries can support authors with open access requirements for UKRI fund...How libraries can support authors with open access requirements for UKRI fund...
How libraries can support authors with open access requirements for UKRI fund...
Jisc
 
Polish students' mobility in the Czech Republic
Polish students' mobility in the Czech RepublicPolish students' mobility in the Czech Republic
Polish students' mobility in the Czech Republic
Anna Sz.
 
Welcome to TechSoup New Member Orientation and Q&A (May 2024).pdf
Welcome to TechSoup   New Member Orientation and Q&A (May 2024).pdfWelcome to TechSoup   New Member Orientation and Q&A (May 2024).pdf
Welcome to TechSoup New Member Orientation and Q&A (May 2024).pdf
TechSoup
 
Palestine last event orientationfvgnh .pptx
Palestine last event orientationfvgnh .pptxPalestine last event orientationfvgnh .pptx
Palestine last event orientationfvgnh .pptx
RaedMohamed3
 
Phrasal Verbs.XXXXXXXXXXXXXXXXXXXXXXXXXX
Phrasal Verbs.XXXXXXXXXXXXXXXXXXXXXXXXXXPhrasal Verbs.XXXXXXXXXXXXXXXXXXXXXXXXXX
Phrasal Verbs.XXXXXXXXXXXXXXXXXXXXXXXXXX
MIRIAMSALINAS13
 
678020731-Sumas-y-Restas-Para-Colorear.pdf
678020731-Sumas-y-Restas-Para-Colorear.pdf678020731-Sumas-y-Restas-Para-Colorear.pdf
678020731-Sumas-y-Restas-Para-Colorear.pdf
CarlosHernanMontoyab2
 
Biological Screening of Herbal Drugs in detailed.
Biological Screening of Herbal Drugs in detailed.Biological Screening of Herbal Drugs in detailed.
Biological Screening of Herbal Drugs in detailed.
Ashokrao Mane college of Pharmacy Peth-Vadgaon
 
The geography of Taylor Swift - some ideas
The geography of Taylor Swift - some ideasThe geography of Taylor Swift - some ideas
The geography of Taylor Swift - some ideas
GeoBlogs
 
The basics of sentences session 5pptx.pptx
The basics of sentences session 5pptx.pptxThe basics of sentences session 5pptx.pptx
The basics of sentences session 5pptx.pptx
heathfieldcps1
 
TESDA TM1 REVIEWER FOR NATIONAL ASSESSMENT WRITTEN AND ORAL QUESTIONS WITH A...
TESDA TM1 REVIEWER  FOR NATIONAL ASSESSMENT WRITTEN AND ORAL QUESTIONS WITH A...TESDA TM1 REVIEWER  FOR NATIONAL ASSESSMENT WRITTEN AND ORAL QUESTIONS WITH A...
TESDA TM1 REVIEWER FOR NATIONAL ASSESSMENT WRITTEN AND ORAL QUESTIONS WITH A...
EugeneSaldivar
 
The French Revolution Class 9 Study Material pdf free download
The French Revolution Class 9 Study Material pdf free downloadThe French Revolution Class 9 Study Material pdf free download
The French Revolution Class 9 Study Material pdf free download
Vivekanand Anglo Vedic Academy
 
Unit 8 - Information and Communication Technology (Paper I).pdf
Unit 8 - Information and Communication Technology (Paper I).pdfUnit 8 - Information and Communication Technology (Paper I).pdf
Unit 8 - Information and Communication Technology (Paper I).pdf
Thiyagu K
 
The Roman Empire A Historical Colossus.pdf
The Roman Empire A Historical Colossus.pdfThe Roman Empire A Historical Colossus.pdf
The Roman Empire A Historical Colossus.pdf
kaushalkr1407
 
Acetabularia Information For Class 9 .docx
Acetabularia Information For Class 9  .docxAcetabularia Information For Class 9  .docx
Acetabularia Information For Class 9 .docx
vaibhavrinwa19
 
The approach at University of Liverpool.pptx
The approach at University of Liverpool.pptxThe approach at University of Liverpool.pptx
The approach at University of Liverpool.pptx
Jisc
 
BÀI TẬP BỔ TRỢ TIẾNG ANH GLOBAL SUCCESS LỚP 3 - CẢ NĂM (CÓ FILE NGHE VÀ ĐÁP Á...
BÀI TẬP BỔ TRỢ TIẾNG ANH GLOBAL SUCCESS LỚP 3 - CẢ NĂM (CÓ FILE NGHE VÀ ĐÁP Á...BÀI TẬP BỔ TRỢ TIẾNG ANH GLOBAL SUCCESS LỚP 3 - CẢ NĂM (CÓ FILE NGHE VÀ ĐÁP Á...
BÀI TẬP BỔ TRỢ TIẾNG ANH GLOBAL SUCCESS LỚP 3 - CẢ NĂM (CÓ FILE NGHE VÀ ĐÁP Á...
Nguyen Thanh Tu Collection
 
Sha'Carri Richardson Presentation 202345
Sha'Carri Richardson Presentation 202345Sha'Carri Richardson Presentation 202345
Sha'Carri Richardson Presentation 202345
beazzy04
 

Recently uploaded (20)

Operation Blue Star - Saka Neela Tara
Operation Blue Star   -  Saka Neela TaraOperation Blue Star   -  Saka Neela Tara
Operation Blue Star - Saka Neela Tara
 
Guidance_and_Counselling.pdf B.Ed. 4th Semester
Guidance_and_Counselling.pdf B.Ed. 4th SemesterGuidance_and_Counselling.pdf B.Ed. 4th Semester
Guidance_and_Counselling.pdf B.Ed. 4th Semester
 
Home assignment II on Spectroscopy 2024 Answers.pdf
Home assignment II on Spectroscopy 2024 Answers.pdfHome assignment II on Spectroscopy 2024 Answers.pdf
Home assignment II on Spectroscopy 2024 Answers.pdf
 
How libraries can support authors with open access requirements for UKRI fund...
How libraries can support authors with open access requirements for UKRI fund...How libraries can support authors with open access requirements for UKRI fund...
How libraries can support authors with open access requirements for UKRI fund...
 
Polish students' mobility in the Czech Republic
Polish students' mobility in the Czech RepublicPolish students' mobility in the Czech Republic
Polish students' mobility in the Czech Republic
 
Welcome to TechSoup New Member Orientation and Q&A (May 2024).pdf
Welcome to TechSoup   New Member Orientation and Q&A (May 2024).pdfWelcome to TechSoup   New Member Orientation and Q&A (May 2024).pdf
Welcome to TechSoup New Member Orientation and Q&A (May 2024).pdf
 
Palestine last event orientationfvgnh .pptx
Palestine last event orientationfvgnh .pptxPalestine last event orientationfvgnh .pptx
Palestine last event orientationfvgnh .pptx
 
Phrasal Verbs.XXXXXXXXXXXXXXXXXXXXXXXXXX
Phrasal Verbs.XXXXXXXXXXXXXXXXXXXXXXXXXXPhrasal Verbs.XXXXXXXXXXXXXXXXXXXXXXXXXX
Phrasal Verbs.XXXXXXXXXXXXXXXXXXXXXXXXXX
 
678020731-Sumas-y-Restas-Para-Colorear.pdf
678020731-Sumas-y-Restas-Para-Colorear.pdf678020731-Sumas-y-Restas-Para-Colorear.pdf
678020731-Sumas-y-Restas-Para-Colorear.pdf
 
Biological Screening of Herbal Drugs in detailed.
Biological Screening of Herbal Drugs in detailed.Biological Screening of Herbal Drugs in detailed.
Biological Screening of Herbal Drugs in detailed.
 
The geography of Taylor Swift - some ideas
The geography of Taylor Swift - some ideasThe geography of Taylor Swift - some ideas
The geography of Taylor Swift - some ideas
 
The basics of sentences session 5pptx.pptx
The basics of sentences session 5pptx.pptxThe basics of sentences session 5pptx.pptx
The basics of sentences session 5pptx.pptx
 
TESDA TM1 REVIEWER FOR NATIONAL ASSESSMENT WRITTEN AND ORAL QUESTIONS WITH A...
TESDA TM1 REVIEWER  FOR NATIONAL ASSESSMENT WRITTEN AND ORAL QUESTIONS WITH A...TESDA TM1 REVIEWER  FOR NATIONAL ASSESSMENT WRITTEN AND ORAL QUESTIONS WITH A...
TESDA TM1 REVIEWER FOR NATIONAL ASSESSMENT WRITTEN AND ORAL QUESTIONS WITH A...
 
The French Revolution Class 9 Study Material pdf free download
The French Revolution Class 9 Study Material pdf free downloadThe French Revolution Class 9 Study Material pdf free download
The French Revolution Class 9 Study Material pdf free download
 
Unit 8 - Information and Communication Technology (Paper I).pdf
Unit 8 - Information and Communication Technology (Paper I).pdfUnit 8 - Information and Communication Technology (Paper I).pdf
Unit 8 - Information and Communication Technology (Paper I).pdf
 
The Roman Empire A Historical Colossus.pdf
The Roman Empire A Historical Colossus.pdfThe Roman Empire A Historical Colossus.pdf
The Roman Empire A Historical Colossus.pdf
 
Acetabularia Information For Class 9 .docx
Acetabularia Information For Class 9  .docxAcetabularia Information For Class 9  .docx
Acetabularia Information For Class 9 .docx
 
The approach at University of Liverpool.pptx
The approach at University of Liverpool.pptxThe approach at University of Liverpool.pptx
The approach at University of Liverpool.pptx
 
BÀI TẬP BỔ TRỢ TIẾNG ANH GLOBAL SUCCESS LỚP 3 - CẢ NĂM (CÓ FILE NGHE VÀ ĐÁP Á...
BÀI TẬP BỔ TRỢ TIẾNG ANH GLOBAL SUCCESS LỚP 3 - CẢ NĂM (CÓ FILE NGHE VÀ ĐÁP Á...BÀI TẬP BỔ TRỢ TIẾNG ANH GLOBAL SUCCESS LỚP 3 - CẢ NĂM (CÓ FILE NGHE VÀ ĐÁP Á...
BÀI TẬP BỔ TRỢ TIẾNG ANH GLOBAL SUCCESS LỚP 3 - CẢ NĂM (CÓ FILE NGHE VÀ ĐÁP Á...
 
Sha'Carri Richardson Presentation 202345
Sha'Carri Richardson Presentation 202345Sha'Carri Richardson Presentation 202345
Sha'Carri Richardson Presentation 202345
 

Building an standard image for windows7

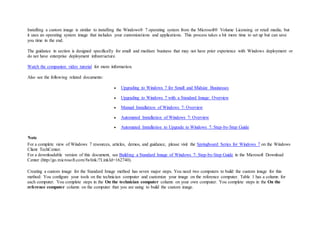
  • 1. Installing a custom image is similar to installing the Windows® 7 operating system from the Microsoft® Volume Licensing or retail media, but it uses an operating system image that includes your customizations and applications. This process takes a bit more time to set up but can save you time in the end. The guidance in section is designed specifically for small and medium business that may not have prior experience with Windows deployment or do not have enterprise deployment infrastructure. Watch the companion video tutorial for more information. Also see the following related documents:  Upgrading to Windows 7 for Small and Midsize Businesses  Upgrading to Windows 7 with a Standard Image: Overview  Manual Installation of Windows 7: Overview  Automated Installation of Windows 7: Overview  Automated Installation to Upgrade to Windows 7: Step-by-Step Guide Note For a complete view of Windows 7 resources, articles, demos, and guidance, please visit the Springboard Series for Windows 7 on the Windows Client TechCenter. For a downloadable version of this document, see Building a Standard Image of Windows 7: Step-by-Step Guide in the Microsoft Download Center (http://go.microsoft.com/fwlink/?LinkId=162740). Creating a custom image for the Standard Image method has seven major steps. You need two computers to build the custom image for this method: You configure your tools on the technician computer and customize your image on the reference computer. Table 1 has a column for each computer. You complete steps in the On the technician computer column on your own computer. You complete steps in the On the reference computer column on the computer that you are using to build the custom image.
  • 2. Table 1. Steps for Creating a Custom Image Step On the technician computer On the reference computer 1. Install the Windows Automated Installation Kit (Windows AIK). 2. Create a Windows Preinstallation Environment (Windows PE) startup disk. 3. Install and customize Windows 7. 4. Start the reference computer in Audit mode to clean the image. 5. Generalize the reference computer to prepare the image for duplication. 6. Capture the reference computer to an image file by using ImageX. 7. Create new Windows 7 installation media for the custom image. The following sections provide detailed instructions for each step. To use these instructions, you must have the Windows 7 Volume Licensing media, two USB flash disks (UFDs) that you can use to start computers (8 gigabytes [GB] or larger, depending on the size of the Windows 7 image you create), and a reference computer on which you can build and customize the standard image. You will be formatting the reference computer’s disk, so make sure you back up important files if you are using an existing computer for this purpose. Install the Windows AIK The Windows AIK provides the tools required to build custom Windows 7 images. In particular, it includes ImageX, which you use to capture an image of the reference computer, and the files necessary to build a Windows PE startup disk. First, download the Windows Automated Installation Kit (AIK) for Windows 7 from the Microsoft Download Center (http://go.microsoft.com/fwlink/?LinkId=136976).
  • 3. The file KB3AIK_EN.iso is an International Organization for Standardization (ISO) image that you must burn to a DVD or mount to a virtual machine. Windows 7 can burn ISO files to DVDs. For more information, see Tip: Burn a Disc Image from an ISO or IMG file in Windows 7 in TechNet Magazine. To install the Windows AIK from the Windows AIK DVD 1. Open the Windows AIK DVD in Windows Explorer. 2. Perform one of the following tasks based on the computer on which you are installing the Windows AIK: o If your computer is a 32-bit computer, right-click wAIKX86.msi, and then click Install. o If your computer is a 64-bit computer, right-click wAIKAMD64.msi, and then click Install. 3. Click Next. 4. On the License Agreement page, click I Agree, and then click Next. 5. On the Select Installation Folder page, click Next to install to the default installation folder for anyone who uses the computer. 6. On the Confirm Installation page, click Next to begin installation. 7. Click Close to finish installation. Create a Bootable UFD You use the bootable UFD that you create in this step to start the reference computer so you can capture an image of the hard disk after you install and customize Windows 7. Windows PE does not include ImageX, so these instructions include a step for copying ImageX.exe from the Windows AIK installation folder to the Windows PE source files before you create the Windows PE ISO file. To create a bootable UFD with Windows PE 1. Click Start, point to All Programs, and then click Microsoft Windows AIK. 2. Right-click Deployment Tools Command Prompt, and then click Run as administrator.
  • 4. 3. Click Yes to open the Deployment Tools Command Prompt window with elevated permissions. Tip You can copy and paste commands from these instructions into the Deployment Tools Command Prompt window. Doing so saves time and helps ensure that you run the command correctly. 4. In the Deployment Tools Command Prompt window, perform one of the following tasks, and then press ENTER: o If the reference computer is a 32-bit computer, type copype.cmd x86 C:winpe_x86. o If the reference computer is a 64-bit computer, type copype.cmd amd64 C:winpe_amd64. 5. In the Deployment Tools Command Prompt window, perform one of the following tasks, and then press ENTER: o If the reference computer is a 32-bit computer, type copy C:winpe_x86winpe.wim C:winpe_x86ISOsourcesboot.wim. o If the reference computer is a 64-bit computer, type copy C:winpe_amd64winpe.wim C:winpe_amd64ISOsourcesboot.wim. 6. In the Deployment Tools Command Prompt window, perform one of the following tasks, and then press ENTER: o If the reference computer is a 32-bit computer, type copy "C:Program FilesWindows AIKToolsx86ImageX.exe" C:winpe_x86ISO. o If the reference computer is a 64-bit computer, type copy "C:Program FilesWindows AIKToolsamd64ImageX.exe" C:winpe_amd64ISO. 7. Insert a UFD into the computer. 8. In the Deployment Tools Command Prompt window, type diskpart, and then press ENTER. 9. Perform the following tasks to prepare the UFD to start the reference computer:
  • 5. 1. Type list disk, and then press ENTER. 2. From the list of disks, identify the number of the UFD. It is important that you identify the correct disk, as you will be formatting the disk. Make sure the size and free space match what you expect for the UFD. 3. Type select disk number, where number is the disk number of the UFD, and then press ENTER. 4. Type clean, and then press ENTER. 5. Type create partition primary, and then press ENTER. 6. Type select partition 1, and then press ENTER. 7. Type format fs=fat32 quick, and then press ENTER. 8. Type active, and then press ENTER. 9. Type exit, and then press ENTER. 10. In the Deployment Tools Command Prompt window, type xcopy /s C:winpe_x86iso*.* D:, where D is the drive letter of the UFD. Alternatively, you can copy all the files in C:winpe_x86 to the UFD using Windows Explorer. Install Windows 7 After completing the previous two steps—installing the Windows AIK and creating a bootable UFD—you have the tools necessary to capture a custom image. You will complete these steps on the reference computer. Now, you need your Windows 7 Volume Licensing media, which you will install on the reference computer.After installing Windows 7 on the reference computer, customize it by installing any applications, device drivers, and updates that you want to include in the custom image. Remember that anything you install in the custom image will be on each computer to which you install the image. Examples of applications and updates you might want to install in the image include:
  • 6.  Antivirus software  The 2007 Microsoft Office system  Windows Virtual PC  Virtual Windows XP To install Windows 7 on the reference computer 1. Turn on your computer, insert the Windows 7 Volume Licensing media into the computer’s DVD drive, and then perform one of the following tasks: o If you are asked to press a key to boot from the Windows 7 Volume Licensing media, press any key. If the Install Windows page appears, go to step 2. o If the Install Windows page does not appear and you are not asked to press a key to start from the Windows 7 Volume Licensing media, you might have to specify that your computer uses its DVD drive as the startup device. For more information, see the Windows Help and How-to article Start Windows from a CD or DVD. After you select your DVD drive as the startup device, restart your computer, and then start Windows 7 from the Volume Licensing media. 2. On the Install Windows page, shown in Figure 1, perform the following tasks, and then click Next: 1. In the Language to install list, click the language you want to install on your image. 2. In the Time and currency format list, click the location you want in your image. 3. In the Keyboard or input method list, click the keyboard layout you want in your image.
  • 7. Figure 1. The Install Windows page 3. On the Install Windows page, click Install now. 4. On the Please read the license terms page, if you accept the license terms, select I accept the license terms. You must accept to continue the installation. Click Next. 5. On the Which type of installation do you want? page, click Custom. 6. On the Where do you want to install Windows? page, perform one of the following tasks: o If you do not want to specify a specific partition to install Windows 7 on or create partitions on your hard disk, click Next to begin the installation.
  • 8. o If you want to create, extend, delete, or format a partition, click Drive options (advanced), select the option you want, and then follow the instructions. Click Next to begin the installation. Windows 7 continues installing on the reference computer, as shown in Figure 2. Figure 2. The Installing Windows page
  • 9. 7. On the Set Up Windows page, which you will see only after Windows 7 finishes installing on the reference computer, perform the following tasks, and then click Next: 0. In the Type a user name box, type a temporary user name. You can use any user name, as you will remove this user account before capturing the image. 1. In the Type a computer name box, type a temporary computer name. You can use any computer name, as you will change the computer name during deployment. 8. On the Set a password for your user account page, perform the following tasks, and then click Next: 0. In the Type a password box, type a password for the temporary user account. 1. In the Retype your password box, type the password again to verify it. 2. In the Type a password hint box, type a password reminder. 9. On the Type your product key for activation page, type your Windows 7 Volume Licensing product key, and then click Next. 10. On the Help protect your computer and improve Windows automatically page, click Use recommended settings to install important and recommended updates. You can choose a different setting after you install the image on each computer. 11. On the Review your time and date settings page, set the time and date, and then click Next. 12. Optionally, on the Join a wireless network page, click a wireless network, type the security key, and then click Next. You can also skip connecting to a wireless network by clicking Skip. 13. On the Select your computer’s current location page, shown in Figure 3, click Work network.
  • 10. Figure 3. Select your computer’s current location To customize Windows 7 on the reference computer 1. Use Windows Update to install recommended updates as well as the optional updates that you choose to include in the image. To start Windows Update, click Start; in the Search box, type windows update, and then click Windows Update in the search results under Programs. 2. Install any applications that you want to include in the custom image.
  • 11. 3. Install any out-of-box device drivers (device drivers that do not come with Windows 7) that you want to include in the custom image. 4. Configure any computer-specific settings that you want to include in the custom image. Note You can configure computer-specific settings like hardware settings in the custom image, but you cannot configure user-specific settings using this method without using an answer file or writing a script. For example, you cannot configure a Windows Internet Explorer® 8 home page in the custom image, and then deploy that to all users in the organization. For more information about creating a default user profile, see article 959753 in the Microsoft Knowledge Base. Clean Up the Image When you set up Windows 7, you created a temporary user account to log on to it. In this step, you start the computer in Audit mode to remove that temporary user account and its user profile. This is also your last chance to install any applications, device drivers, and updates in your image. To start the computer in Audit mode using the System Preparation Tool (Sysprep) 1. Click Start, type C:WindowsSystem32sysprepsysprep.exe in the Search box, and then press ENTER to start Sysprep, shown in Figure 4.
  • 12. Figure 4. The System Preparation Tool 2. In the System Cleanup Action list, select Enter System Audit Mode. 3. Select the Generalize check box. 4. In the Shutdown Options list, select Reboot. 5. Click OK to restart the computer in Audit mode. 6. After the computer restarts, Windows 7 automatically logs in as Administrator. To remove the temporary user account’s profile 1. Click Start, type user profile in the Search box, and then click Configure advanced user profile properties in the search results. 2. In the User Profiles dialog box, click the name of the temporary user account you created when you installed Windows 7 on the reference computer, and then click Delete. Click Yes to confirm. 3. Click OK to close the User Profiles dialog box.
  • 13. To remove the temporary user account 1. Click Start, right-click Computer, and then click Manage. 2. In the console tree (left pane), click Local Users and Groups. 3. In the details pane (middle pane), double-click Users. 4. Right-click the name of the temporary account you created when you installed Windows 7 on the reference computer, and then click Delete. 5. Click Yes to confirm that you want to delete the temporary user account. 6. Click OK to acknowledge that you are deleting an administrator account. 7. Close the Computer Management window. Generalize the Image In this step, you generalize the image and prepare it to start in Windows Welcome after you install it on each computer. Generalizing the image removes any hardware-dependent information from it, resets the activation timer, and cleans up Windows 7 so that you can duplicate the image on other computers. To prepare the computer to start in Windows Welcome using Sysprep 1. Open Sysprep. (Windows 7 automatically runs Sysprep when you start the operating system in Audit mode.) 2. In the System Cleanup Action list, select Enter System Out-of-Box Experience (OOBE). 3. Select the Generalize check box. 4. In the Shutdown Options list, select Shutdown. 5. Click OK to run Sysprep and shut down the computer. Capture the Image At this point in the process, you have installed Windows 7 on the reference computer, and you are ready to capture an image of it. You use the bootable UFD you created earlier to start the computer. Additionally, you will capture the image to this UFD. For this reason, you should use a UFD that has a capacity of 8 GB or more to ensure that there is room for both Windows PE and the image you capture.
  • 14. To capture an image of Windows 7 on the bootable UFD 1. Insert the bootable UFD into a USB port on the reference computer. 2. Turn on the reference computer, and then perform the following tasks: 1. When prompted, open the boot device list. (In most cases, pressing F12 during the basic input/output system [BIOS] splash screen opens the computer’s boot device list.) 2. From the list of boot devices, select the bootable UFD that you inserted in step 1 to start the computer using the bootable UFD. Note If you do not see a prompt to display a boot device list, you must enable booting from UFD devices in the computer’s BIOS. For more information, see the computer’s documentation. 3. At the command prompt, identify which drive contains Windows 7—typically drive D in Windows PE. To verify this, type dir d:, and then press ENTER. If you see the Program Files, Users, and Windows folders, drive D contains Windows 7. Otherwise, examine each drive to determine which drive contains Windows 7. 4. At the command prompt, identify which drive is the bootable UFD. This drive contains Imagex.exe in the root of the drive. It will not be drive X. To determine the drive letter, run dir e:, dir f:, dir g:, and so on until you locate the drive that contains Image.exe in the root. 5. At the command prompt, type one of the commands shown in Table 2, depending on the edition of Windows 7 you are using, and then press ENTER. Substitute the actual drive letter containing Windows 7 for D: and the drive letter containing Image.exe for E: in Table 2.
  • 15. Table 2. ImageX Commands Edition ImageX Commands Enterprise E:imagex /compress fast /check /flags “Enterprise” /capture D: E:install.wim “Windows 7 Enterprise” “Windows 7 Enterprise Custom” Professional E:imagex /compress fast /check /flags “Professional” /capture D: E:install.wim “Windows 7 Professional” “Windows 7 Professional Custom” 6. Shut down the reference computer, and remove the UFD from its USB port. Build Windows 7 Media You have successfully captured a custom Windows 7 image that includes applications, device drivers, and updates. It is on the root of the bootable UFD that you used to start the reference computer and capture the image. In this step, you create new Windows 7 installation media that use your custom image instead of the image that Microsoft provides on the media. To create the custom Windows 7 media, you create another bootable UFD. Then, you copy the installation files from the original Windows 7 Volume Licensing media to the bootable UFD. Finally, you replace the install.wim file on the bootable UFD with the custom install.wim file you captured in the previous step. To copy the custom Windows 7 image to your computer 1. Insert the UFD containing your custom Windows 7 image in to your computer. 2. In Windows Explorer, copy the install.wim file from the UFD to C:install.wim. 3. Remove the UFD containing your custom Windows 7 image from your computer. To create a bootable UFD containing your Windows 7 Volume Licensing media
  • 16. 1. Click Start, point to All Programs, and then click Microsoft Windows AIK. 2. Right-click Deployment Tools Command Prompt, and then click Run as administrator. 3. Click Yes to open the Deployment Tools Command Prompt window with elevated permissions. 4. Insert a UFD in to the computer. Do not insert the UFD to which you captured the custom Windows 7 image, however, as you will be formatting this UFD. 5. In the Deployment Tools Command Prompt window, type diskpart, and then press ENTER. 6. Perform the following tasks to prepare the UFD to start the reference computer: 1. Type list disk, and then press ENTER. 2. From the list of disks, identify the number of the UFD. It is important that you identify the correct disk, as you will be formatting the disk. Make sure the size and free space match what you expect for the UFD. 3. Type select disknumber, where number is the disk number of the UFD, and then press ENTER. 4. Type clean, and then press ENTER. 5. Type create partition primary, and then press ENTER. 6. Type select partition 1, and then press ENTER. 7. Type format fs=fat32 quick, and then press ENTER. 8. Type active, and then press ENTER. 9. Type exit, and then press ENTER. 7. Insert your Windows 7 Volume Licensing media into the DVD drive. 8. In the Deployment Tools Command Prompt window, type xcopy /s D:*.* E:*.*, where D is the drive letter of the Windows 7 Volume Licensing media and E is the drive letter of the UFD you previously formatted.
  • 17. Alternatively, you can copy all the files on the Windows 7 Volume Licensing media to the UFD using Windows Explorer. To copy your custom image to the UFD containing Windows 7 1. In the Deployment Tools Command Prompt window, type xcopy /r C:install.wim E:sourcesinstall.wim, where E is the drive letter of the UFD you created in the previous step. If prompted, type Y to confirm that you want to overwrite the file. Alternatively, you can copy C:install.wim to E:sourcesinstall.wim using Windows Explorer. If prompted, click Yes to confirm that you want to overwrite install.wim on the UFD. 2. Safely eject the UFD containing your custom Windows 7 image. Install the Custom Image Now that you have created a bootable UFD that contains your custom Windows image, you can use the UFD to install Windows 7 on other computers. Consider backing up the contents of the UFD. In addition, you can create multiple UFDs to help speed up the installation on multiple computers. To install the custom image from the bootable UFD 1. Insert the bootable UFD containing the custom Windows 7 image into a USB port on the destination computer. 2. Turn on the destination computer, and then perform the following tasks: 1. When prompted, open the boot device list. (In most cases, pressing F12 during the BIOS splash screen opens the computer’s boot device list.) 2. From the list of boot devices, select the bootable UFD that you inserted in step 1 to start the computer using the bootable UFD.
  • 18. Note If you do not see a prompt to display a boot device list, you must enable booting from UFD devices in the computer’s BIOS. For more information, see the computer’s documentation. 3. Follow the instructions you see on screen to finish installing Windows 7. The process is similar to the process described in the Install Windows 7 section earlier in this document. 4. After installing the custom Windows 7 image on the destination computer, you must active the operating system with Microsoft. If your company does not use the Key Management Service (KMS), manually activate Windows 7 with Microsoft. For more information, see Windows Volume Activation on the Microsoft Web site. Note Installing the custom image for the Standard Image method is a manual process. You can automate much of this process. For more information, see Automated Installation of Windows 7: Overview. Was this page helpful? Yes No Community Additions ADD Getting Error "The System cannot find the path Specified" after giving the capturing image command I am on "Capture the Image". I have created the UFD bootable drive per the instructions in this article. The message I get on my screen when trying to make an image of my system "The System cannot find the path Specified"
  • 19. i have followed each and every step mentioned thoroughly My windows installation drive is D and my UFD drive is G in which imagex.exe file is existing. I'm using windows 7 ultimate for which i'm giving the below commands G:imagex /compress fast /check /flags “Ultimate” /capture D: G:install.wim “Windows 7 Ultimate” “Windows 7 Ultimate Custom” also tried G:imagex /compress fast /capture d: G:install.wim “Windows7" but all in vein i've tried this many times more than 20 but no results afterall instead "The System cannot find the path Specified"
  • 20. I have tried the same creating both NTFS & Fat32 File system UFD for 64 bit OS installed on my reference computer. Can Anyone please help and get me solve this error? Regards Adit Adit Pal 8/30/2014 Tips and Trick : Building Standard Image.. this the tricky when create standard image Windows 7 : when you'll running sysprep please take note below :
  • 21. 1. Don't install any driver 2. Don't activate your windows licensing 3. customize it by installing any program if you installed driver and activated windows it's should be facing error message "Fatal error....." Resolution : 1. type "slmgr /dlv" without quote's on command prompt --> to check how many times of windows activation 2. edit GeneralizationState under HKLMsystemsetupsysprepstatus set to 7 and SkimRearm under HKLMSoftwareMicrosoftWindows NTCurrentVersionSoftwareProtectionPlatform set to 1 3. Renaming or deleting "Panther" folder on c:windowssystem32sysprep
  • 22. 4. Kill Process wmpnetwk.exe with description is Windows Media Player Sharing Service then, Run sysprep and remember please check 4 point above before you run it.... Hope its help! Panjul_Pea 12/13/2013 more issues First, Thanks to all additional postings above. Here are some issues and resolves that I've had:
  • 23. Tip: Online research showed that the process WMPNetwork needs to be ended for Generalize to work properly. Ending it with Task Manager works, but it comes back after 10 seconds. Instead type "Services" from the start menu and select "Services" (can't for the life of me figure out why component services gets listed first). Stop the Windows Media Player Network Sharing Service. Not sure if it's necessary on both, but I do this before the Clean operation as well as before the Generalize operation. 1. Received endless reboot cycle on the Reference machine after Generalize. Online research indicated that leaving the Domain before Cleaning and Generalizing would prevent this. It did. 2. Received a Fatal Error when trying to Generalize. There is a limit of 3 rearms (re-arms) or generations of creating an image. For example: Say I create an image, that's the first generation or arming. Six months later, I decide to make a more up to date image with recent patches and updates. If, for a reference machine, I use a machine whose Windows installation was made with original image from six months ago to make this new image (rather than from media), that becomes the second generation. Therefore I can repeat this process only one more time. When remaining rearms is 0, then I get the Fatal Error when trying to Generalize. The resolve is to use original media, apply all updates and install necessary software and create a new fresh first-generation image. Or at least use a previous generation image and update it. To find out what generation an installation is (how many rearms are remaining), type "slmgr /dlv" minus the quotes with a space before the "/" at the command prompt. It will immediately give you another command prompt like nothing happened. Wait 10 seconds and a report will appear showing Remaining Windows rearm count. Hope this helps.
  • 24. Psyanic 7/9/2013 Installing on machine with UEFI and GPT Partition We encountered a problem whereby our customised image was greater then 4GB so we had to format the UFD with NTFS. However UEFI does not recognise NTFS devices in its boot menu and if we select the UFD from the legacy boot menu we cannot install Windows 7 on a GPT enabled partition. To get round this problem we used two UFDs, one formatted with FAT32 and the other with NTFS. 1. Copy the Windows 7 DVD onto both UFD's. 2. Copy your customised install.wim to the sources folder on the NTFS formatted UFD only. 3. Boot the computer using the FAT32 UFD and stop when you get to the Install screen. 4. Remove the FAT32 UFD and insert the NTFS UFD into the same USB port. 5. Click install and continue as descibed in the article.
  • 25. With UEFI and GPT enabled partitions it is important to select the UFD from the UEFI boot menu and not the legacy boot menu. Regards, Steve Perrins SCP Computers. scpcomp-Steve 12/16/2012 Please make correction to guide "To create a bootable UFD with Windows PE" Item 10 under "To create a bootable UFD with Windows PE" omits instructions for x64 computers. It should be corrected to read: 10. In the Deployment Tools Command Prompt window, perform one of the following tasks, and then press ENTER: If the reference computer is a 32-bit computer, type xcopy /s C:winpe_x86iso*.* D:, where D is the drive letter of the UFD. If the reference computer is a 64-bit computer, type xcopy /s C:winpe_amd64iso*.* D:, where D is the drive letter of the UFD.
  • 26. Thanks. telecentricity1 10/23/2012 Error While making boot from USB (WinPE) , the command prompt will come with drive letter X , how to change from this letter to USB letter to type the command ? as while typing the command F:imagex/compress fast/check/flags "Ultimate" /capture D: F:install.wim "Window7 Ultimate" "Window7 Ultimate Custom" , i am getting error like "System cannot find specified path" My USB drive letter is "F" and window image in machine is in D An y help would be appreciated :-) Maanya 10/18/2012 Error Capturing Image I'm going throught the steps and I'm at the task in the step to capture the image where you have to type one of the commands from table 2 into the command prompt. It says scanning files and directories... and then after a couple minutes I get an error message as follows: [ERROR] C:ProgramDataMicrosoftMicrosoft AntimalwareIMpServiceEDB4FA23-53B8-4AFA-8C5D-99752CCA7094.lock (Error = 32)
  • 27. Error imaging drive [C:] The process cannot access the file because it is being used by another process. Can someone please help and get me past this error? IT-Mouse 10/11/2012 Table 2 Would have saved me some time if i had known that the 2 lines were actually one line... Kazoa 9/6/2012 Image Size It would be helpful if there was a guideline as to how big the USB Flash Drive should be based on the amount of drive space used on the reference machine. I used an 8GB drive only to be told the drive was not large enough. The machine was using 21GB of hard drive space with very little software installed (although it did have the numerous updates since the last Service Pack). How much does Imagex compress the files? May be if I had used NTFS instead of FAT32, as suggested above, it may have worked, but after 2 hours, I had to give up. I will have to try at another time. bstep55 8/15/2012 Diskpart does not see UFD to be formatted
  • 28. Under the Create a Bootable UFD section, step 10 has me copy a directory structure that was never even created if I was installing the AIK for a 64 bit installation. I assume that the instruction should have me copy the 64 bit structure. I also can not get the UFD formatted using the instructions as Diskpart does not see the UFD even though Windows explorer does see the flash drive that I will be reformatting and partioning. Has anyone else run into that? Southerner 6/28/2012 Remove disks or other media I am on "Capture the Image". I have created the UFD bootable drive per the instructions in this article. The message I get on my screen when trying to boot to the USB drive is "Remove disks or other media Press any key to restart" When I press any key, I get "Reboot and Select proper Boot device or Insert Boot Media in selected Boot device and press a key" I have follwed all the instructions to the tee. I've also done some web searches on this particular problem but none of the results directly address this issue.
  • 29. Any help/guidance would be appreciated. Thank you. Steverinos 6/13/2012 Device drivers not found when i try to install the image on a laptop, just before the select partition bit it says "device drivers not found" and will not let me progress with the install. this image did however work on other computers. do you have any idea why? Thanks in advance David David Microsoft apprentice 5/2/2012 Process works on my small test image but not the actual large image If my image is made from Windows 7 and a few changes to make about a 4GB image then this process is working for me. If I make my image from Windows 7 with SP1 and security patches applied (and the full company settings) it is 23 GB and I get the error: "Windows could not apply unattend settings during pass (offline serving)" I have googled this error and found it to relate to version settings in an unattend.xml file. But this process does not involve an unattend.xml file so I could use some help. Scott
  • 30. Milkboy 3/16/2012 Required device is inaccessible. After following these directions, when booting from the UFD, I get error "0xc000000f - The boot selection failed because a required device is inaccessible." Has anyone encountered this previously? The Training Associates 3/8/2012 HI i need to make my Bootable UFD to be Burned to DVD how can i burn the same HI i need to make my Bootable UFD to be Burned to DVD how can i burn the same and it shuld work as bootable DVD. Please Help in this and all your steps are really helped me a lot to make a customized image. Thanks a lot Regards, Manoz
  • 31. Manoz Denial 2/18/2012 User Prompts Hi, I work for a small business who provide practise management software for our clients on small business networks. We provide them with all their hardware and currently run through the windows enviroment disabling services and features that cause conflicts. Really we would like the boot disk to prompt us which version of word to install, install our own client or server software, set the IPs of that workstation and the terminal server they connect to. 1. Can I set exe files to run as part of the windows installation? 2. Can I select which services and folder options are disabled? 3. Can I add other program installs as part of the installation and still prompt users for info required during the installation? i.e Serial keys, IP addresses, user names and passwords, etc Thanks Thomas Lee 1/6/2012 imagex command Ran into a problem when copy/pasting the commands. To create a bootable UFD with Windows PE Section 6 For 64 bit, the "copy" part of the command is not bold and therefore may be missed. Verify your files (imagex in this instance) was copied
  • 32. correctly to the UFD. Otherwise went as outlined. Thanks Hillbilly Hooker 1/6/2012 imagex command problem the command that are discribed here did not work for me. instead I used E:imagex /compress fast /capture d: E:install.wim “Windows7" Answer... You probably don't have your UFD in drive E: ... it would be different on your PC... Another drive could already be using it. Joshua Woodcraft 11/29/2011 SOLVED: Problems with UDF capturing the Image. when i attempt to boot into my UDF on the reference computer, it tells me to remove disk and other media and press any key to restart. I formatted using FAT32 and i made sure in the BIOS that i could boot from a USB. i also tried formatting my USB using NTFS and i would get an error stating the "bootmgr is missing". I'm not sure why my reference computer (Dell Optiplex 780) isn't reading my USB (with the files from step where you create a bootable UFD). If anyone could help me out I would really appreciate it. Thanks
  • 33. SOLVED: when you use a UDF for capturing the system image with FAT32 format, it has an individual file limit of 4GB. meaning if any given file is over 4GB it won't be able to capture it to the FAT32 formatted UFD. solved my issue by using a ntfs quick format and it captured no problem. Vroomie 9/21/2011 SOLVED the Disk Space Problem Okay, I followed the direction for creating a UFD to the letter and had the same "Not enough disk space error" so I tried a new approach. I created a second UFD using format fs:ntfs quick for the file system format. After starting my lapotp with the FAT32 UFD build I replaced the it with the NTFS formatted UFD. I was able to create the image without any problems. I used a 16Gb UFD, however I will make my next attempy using a smaller FAT32 UFD since it will only b e used for startup. As a note I attempted to boot with the NTFS formated UFD, however my systems do not like the NTFS versin for startup.
  • 34. mafogle 9/20/2011 Windows could not complete the installation ColorodoRuss went into this issue vaguely. I had the same problem with a smaller network, thinking the local Administrator account was enabled and working. Here is what you need to do in order to get it to work. Once you get the error "Windows could not complete the installation" press Shift+F10 and bring up your command prompt. Type mmc and hit enter. Go to file > add snap-in and add Computer Management & Group Policy Object. Hit OK and once you're in the MMC expand Computer Management > Users and Groups > Users and double-click on Administrator. Make sure the account is not disabled and that the password is set to never expire. If you get a message about the password not meeting complexity cancel out of the Administrator window and right-click on the Administrator account and Set Password to something that meets criteria. Once the password is set double-click the Administrator account again and make sure it's not disabled. Click OK and you're done with that. Expand the Group Policy Object and browse to Local Computer >Computer Configuration > Windows Settings>Security Settings>Local Policies>Security Option and changed "Accounts: Administrator Accounts status" to enabled. Restart and you're golden. You may get an error when you get to the logon screen about a password being incorrect but just enter the Administrator password you set and you're in.
  • 35. SkillTech 7/13/2011 Hardware Independence Hey Guys, I followed the steps outlined and successfully made an image which I can install to computers similar to the reference computer. My question is, I was under the impression this process is supposed to produce a hardware independent image? I blue screen with the 7B error (driver problem) every time I install it on a different computer. (For example, my reference computer was an atom/nvidia ion and I want to install it to a P4/ati radeon) How can I remove the hardware specific drivers from the reference computer and make Windows always use basic/default ones or find applicable ones when I install it to each computer?
  • 36. Thanks. guardianx5 7/3/2011 video drivers I have one problem. After I run the sysprep process and the laptop shutsdown. I start the laptop back up, it goes through services and driver install process, but the video drivers roll back to the origenal version, not the updated one that I installed before I ran sysprep. can anyone help me with this? Hello - You need to set the persist option to true in your unattend.xml. Taken from http://technet.microsoft.com/en-us/library/cc766514(WS.10).aspx "Persisting Plug and Play Device Drivers during generalize You can persist device drivers when you run the sysprep /generalize command by specifying the PersistentAllDeviceInstalls setting in the Microsoft-Windows-PnPSysprep component. During the specialize pass, Plug and Play scans the computer for devices and installs device drivers for the detected devices. By default, these device drivers are removed from the system when you generalize the system. If you set PersistAllDeviceInstalls to True in an answer file, Sysprep will not remove the detected device drivers. For more information, see the Unattended Windows Setup Reference." Cheers! -jlester3 jlester3 6/17/2011
  • 37. UFD not accessible after formatting and making active . I faced issue after completing UFD formatting ,drive was not accessible . So you have enter command: " assign " to assign the drive letter to UFD then only you can copy the files on it . .. Ravikaran 6/14/2011 Capture problem For anyone who receives the error "There is not enough space on the disk." when performing the capture to a UFD, reformat the flash drive to NTFS instead of FAT32. Worked for me. Trey Carlee 6/10/2011 RE: imagex command problem If any one is having issue with imageX command, the command lines shown in Table 2 aren't supposed to be two lines;it's one long command line. ProUndeniable 4/22/2011 Local Administrator account I learned this the hard way. You have to set a password and enable the local "Administrator" account or the system grinds to a halt after running sysprep. There may be an easier way, but I had to start from scratch.
  • 38. ColoradoRuss 12/7/2010 Re Video Drivers You have to provide an XML file for the unattend switch on sysprep. This is mine <?xml version="1.0" encoding="utf-8"?> <unattend xmlns="urn:schemas-microsoft-com:unattend"> <settings pass="generalize"> <component name="Microsoft-Windows-Security-Licensing-SLC" processorArchitecture="x86" publicKeyToken="31bf3856ad364e35" language="neutral" versionScope="nonSxS" xmlns:wcm="http://schemas.microsoft.com/WMIConfig/2002/State" xmlns:xsi="http://www.w3.org/2001/XMLSchema-instance"> <SkipRearm>1</SkipRearm> </component> <component name="Microsoft-Windows-PnpSysprep" processorArchitecture="x86" publicKeyToken="31bf3856ad364e35" language="neutral" versionScope="nonSxS" xmlns:wcm="http://schemas.microsoft.com/WMIConfig/2002/State" xmlns:xsi="http://www.w3.org/2001/XMLSchema-instance"> <DoNotCleanUpNonPresentDevices>true</DoNotCleanUpNonPresentDevices>
  • 39. <PersistAllDeviceInstalls>true</PersistAllDeviceInstalls> </component> </settings> <cpi:offlineImage cpi:source="wim:c:/mystuff/install.wim#Windows Vista ULTIMATE" xmlns:cpi="urn:schemas-microsoft-com:cpi" /> </unattend> NathanSimpson 10/7/2010 NTFS/Fat32 If your image is big or UFD>32GB use NTFS instead of FAT32 formating. Worked well for me. Tudi-Imprezzio 8/12/2010 important While doing the process of sysprep you must end the task named wmpnetwork in task manager to run correctly Thomas Lee 8/2/2010 Device not ready
  • 40. as soon as I look for E: after inserting the UFD into the computer I'm trying to capture an image of, it keeps coming up "Device not ready". I've gone through all the other drives and they came up along the line as destination not available so this leads my to believe E: is the correct drive. anyone else have this problem? Thomas Lee 8/2/2010