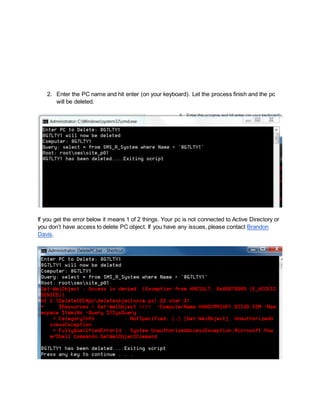
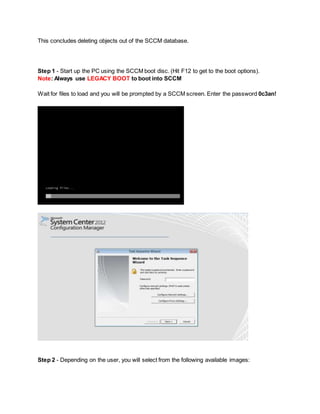
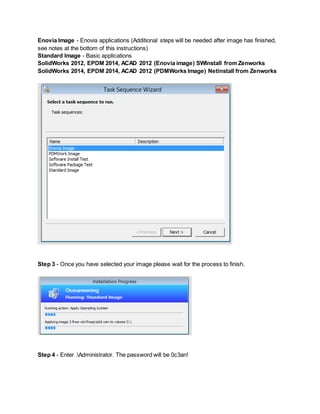
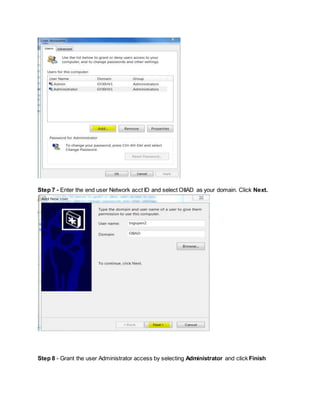
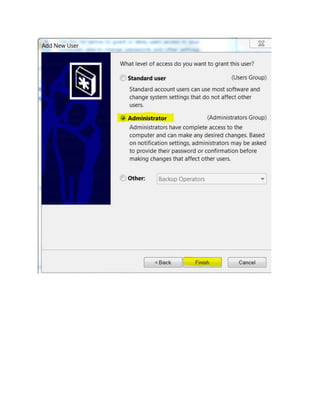
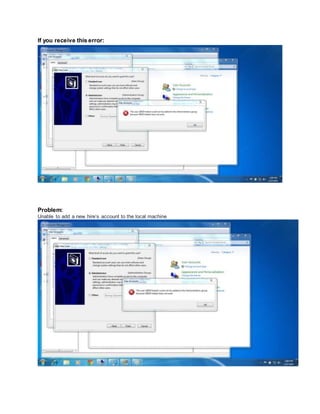
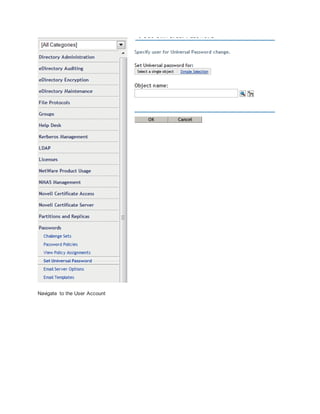
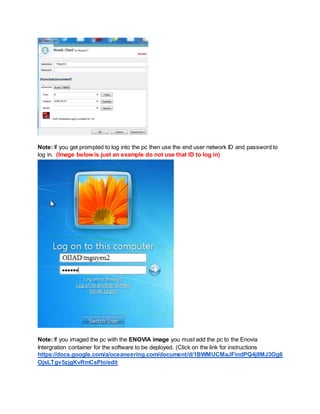
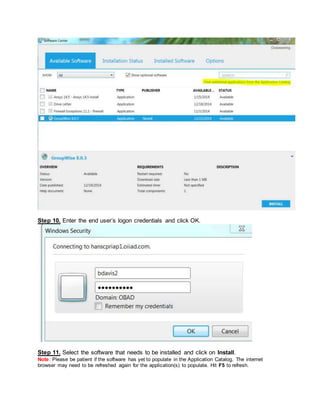
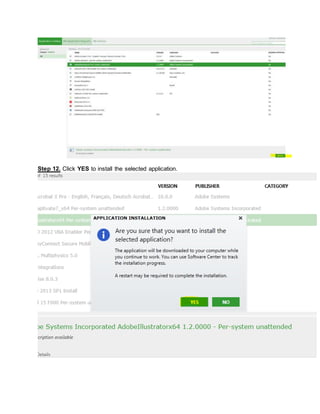
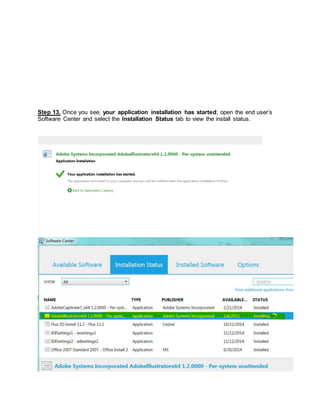
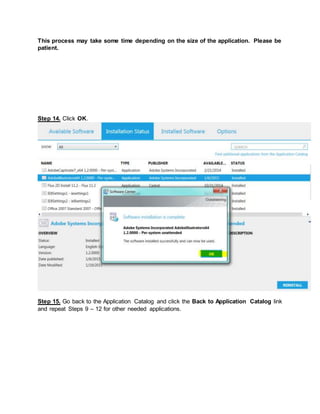
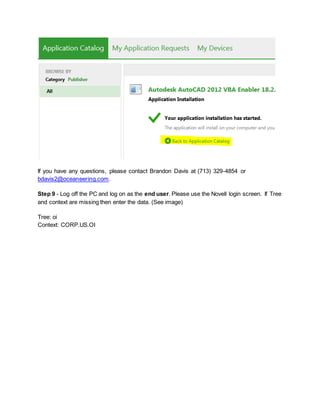
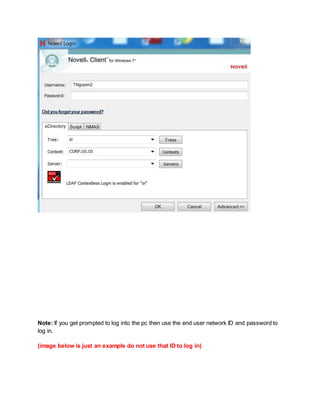
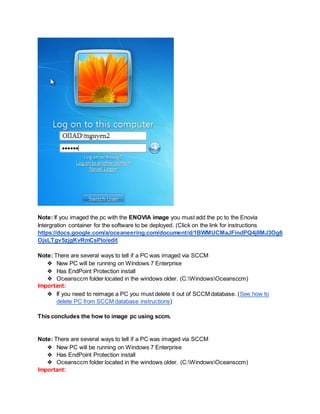
The document provides instructions for configuring a PC for an end user using SCCM. It describes downloading the SCCM imaging ISO, booting from it, selecting an image, completing the Windows setup, adding the user to the local Administrators group, and verifying the installation. Additional steps are outlined for deploying software to the PC using the Ericom console and SCCM once imaging is complete. The summary concludes by noting several ways to identify if a PC was imaged with SCCM and the importance of deleting the PC from the SCCM database before reimaging.
This document provides instructions for setting up Paper-Less Pro, a print management software, on a small peer-to-peer network with 10 or fewer users. It describes downloading and installing the primary and secondary components, adding users, configuring printers for authentication, and installing the desktop widget. Final steps include additional configuration options, instructions for users, and locations for additional documentation.
This document provides troubleshooting help for Document Marketing Robot software. It addresses issues with installing the required .NET framework, connection errors, posting errors, importing articles, email errors, license management, and other support issues. The document provides steps to check firewall and antivirus settings, proxy and VPN configurations, and ensures the latest software version is installed to resolve common problems.
1) The document provides troubleshooting guidance for common errors when using the Document Marketing Robot software, including installation, connection, and posting errors.
2) It outlines how to install and set up the required .NET framework, add exceptions to the firewall and antivirus, and ensure the correct system requirements.
3) The document provides tips for resolving specific errors messages related to proxies, email set up, license management, and provides links to tutorial videos and support resources.
The document provides 9 steps to fix Error Code 21 in Windows 10. It begins by describing common symptoms of the error such as program crashes and slow performance. Potential causes include corrupt software installations, registry issues, viruses, and outdated drivers. The 9 steps to resolve the error are: 1) use a registry cleaner, 2) conduct a malware scan, 3) clean temporary files, 4) update device drivers, 5) use System Restore, 6) uninstall/reinstall related programs, 7) use the System File Checker tool, 8) install Windows updates, and 9) perform a clean Windows reinstallation as a last resort. Contacting the provided toll-free number can also help get assistance from a certified Windows support professional
This document provides information about installing and using Adobe Dreamweaver CS5. It outlines the minimum system requirements, installation instructions, trial software details, known issues, and additional resources. The document is intended to provide late-breaking updates and troubleshooting tips not covered in the main Dreamweaver documentation.
This document provides a 3-step guide to getting started with Hyper-V:
1. Install the Hyper-V role in Windows Server 2008.
2. Create a virtual machine and allocate resources like memory and storage.
3. Install an operating system on the virtual machine and integration services to improve integration between the host and guest.
The document provides guidance on using limited remote access from non-EPA issued computers to access EPA network resources. It describes two methods - the preferred Limited Access VPN connection and the alternate Limited Access Proxy. It provides system requirements and step-by-step instructions for setting up and using each connection method to access the My Workplace portal and Outlook Web Access. Troubleshooting tips are also included.
Building an standard image for windows7AMMAR MANZAR
Windows7 imaging and cloning is a vastly used these days to avoid time consumption while doing numerous systems OS installation. It makes you feel more comfortable and relaxed with a handful or say buckets of save of time.
Hope this will help you.
Thanks.
The document provides instructions for a lesson on installing the Windows 7 operating system. It outlines the objectives, standards, and procedures to follow. The lesson will involve a PowerPoint presentation defining key terms, a video demonstration of the installation steps, and an evaluation where students create their own video explaining how to install Windows 7 and are rated on content, video quality, and procedure accuracy. Students are also assigned to research installing device drivers as homework.
How to enable admin account w10 pureinfotechDarnette A
The document describes three methods to enable the built-in Administrator account on Windows 10: using Command Prompt, PowerShell, or Computer Management. Each method involves running an application with elevated privileges and using a command or checking/unchecking options to activate the Administrator account. Once enabled, the Administrator account will be available for sign-in.
The Akamai NetSession Interface is a download manager that supports downloading files from a central source or between peers. It contains no malware and uses minimal system resources. The interface can be managed through the Windows Control Panel or Mac System Preferences, or via command line commands. The interface can also be uninstalled if desired.
This document provides guidance on using various features of Microsoft System Center 2012, including packaging, distributing, and deploying applications using SCCM (System Center Configuration Manager). It discusses creating applications in SCCM, distributing them to distribution points, and deploying them to device collections. The document uses deploying Autodesk 3DS Max 2015 as a case study and provides step-by-step instructions for packaging, distributing, and deploying this application with SCCM.
This document provides instructions for installing CloudReady, an operating system based on Chrome OS. It outlines the two step process of creating a CloudReady USB installer and then using that installer to boot computers and install CloudReady either as a standalone OS or alongside an existing Windows installation in a dual-boot configuration. Important information is provided about hardware compatibility, installation methods, and troubleshooting tips for the process.
Your Windows 7 testing is over and it’s time for rapid deployment! Yet while you’re excited about delivering Windows 7 to users, you might still remember your last upgrade. Deploying Ghost images might have been easy back then, but it wasn’t very flexible. What you want is deployment from a single image, where every computer starts from one golden master. You also want better naming, giving each computer the correct name automatically. Most importantly, you want the process automated so you’re not sitting around waiting to click buttons. You can have all this and more with Microsoft’s free Windows Deployment Services.
Microsoft MVP Greg Shields has been rapidly deploying Windows computers for over a decade. In this session full of tips and tricks, bring your laptop and get HANDS-ON with Windows Deployment Services. You’ll learn the secret tricks for creating that single image that installs everywhere. You’ll find WDS’ hidden solution for automatic naming. You’ll learn the tricks you absolutely must know to automate Windows installation. And you’ll leave with a functioning deployment solution you can take home to begin deploying immediately.
Are you’re ready for Windows deployment, but not ready for the learning curve? Save yourself weeks of time and join this must-see HANDS-ON session. You’ll walk away with exactly what you need to start rapidly deploying Windows 7 the moment you return home.
This document provides a 5-step tutorial for basic computer maintenance and troubleshooting using tools within Windows XP. Step 1 involves diagnosing issues by checking disk integrity and system file integrity. Step 2 looks for hardware problems using system information and device manager. Step 3 frees up computer memory using the system configuration utility. Step 4 cleans the system by using disk cleanup, removing malware, and uninstalling unused programs. Step 5 protects the system by updating, enabling security features, and repairing the firewall. The tutorial aims to help beginner and intermediate users solve common computer problems using built-in Windows tools.
This document discusses virtualization, including:
- Defining virtualization as using software to create virtual versions of hardware and operating systems.
- Describing common virtualization software like VirtualBox and VMware and how they allow multiple virtual machines to run on one physical computer.
- The benefits of virtualization include reducing hardware costs, improving flexibility and maintenance, and increasing efficiency of resource use.
The document provides installation instructions for CLARiSUITE software in 3 steps: insert the USB memory stick, run the setup files as administrator which will install the software and prompt for a license key, and insert the included USB dongle to fully activate the software.
1. The document provides installation instructions for the BeTwin VS software, noting that it requires Windows Vista or Windows 7 and additional hardware including a PCI/PCIe video card, monitor, mouse, and keyboard.
2. It outlines 10 steps for installing the software and configuring the additional hardware, noting the software takes approximately 90 seconds for stations to start up after installing.
3. The document also provides instructions for registering the BeTwin VS software online using Internet Explorer in Administrator mode and restarting Windows after successful registration.
Guide To Windows 7 - Installing Windows 7Gene Carboni
Chapter 2 illustrates how to install Windows 7. Viewers will learn about the deployment enhancements in Windows 7. In addition, Chapter 2 describes the use of Windows Easy Transfer. It explains how to use and manage Windows Imaging Format image files.
How to install sql server 2008 step by step on windows 7 (32 64 bit)Khaliq ur Rehman
This document provides step-by-step instructions for installing SQL Server 2008 on Windows 7. It explains how to copy installation files, run the setup program, select features and options, and complete the installation process. The document also describes how to open SQL Server after installation by accessing SQL Server Management Studio through the Windows Start menu.
The document provides an overview of installing Windows 2000/XP, including:
1) Planning installation by verifying hardware compatibility, partitioning drives, and deciding on clean install, upgrade or dual boot.
2) The installation process which involves booting from disc, partitioning drives, selecting components and creating user accounts.
3) Post-installation steps like configuring networks, installing updates and activating the software license.
2019 se installation_guide&knownissuestanveer578
The document provides installation instructions for the Abaqus Student Edition software. It outlines the system requirements, including needing Windows 10 64-bit with 6.3GB of disk space. The installation has 3 steps - installing the documentation, installing the Abaqus products, and verifying the installation. It describes 11 steps to complete the installation and provides troubleshooting tips for potential issues.
Selenium is a portable software testing framework for web applications. Selenium provides a record/playback tool for authoring tests without learning a test scripting language (Selenium IDE). It also provides a test domain-specific language (Selenese)[1] to write tests in a number of popular programming languages, including Java, C#, Groovy, Perl, PHP, Python and Ruby. The tests can then be run against most modern web browsers.
www.itelearn.com
This document provides information about installing and using Adobe Dreamweaver CS 5.5. It outlines the minimum system requirements, describes how to install the software from the DVD or download, and how to uninstall. It also discusses trial software, known issues, customer support resources, and other Dreamweaver features including AIR integration, BrowserLab integration, jQuery Mobile support, and mobile app development.
The document provides instructions for setting up and using a VIVOTEK network camera test lab. It includes chapters on preparation, installation, using the Installation Wizard 2 software, camera configuration, and using the ST7501 client/server software. Some key points:
- Chapter 1 discusses necessary lab components and how to connect the camera.
- Chapter 2 covers installing the Installation Wizard 2 and ST7501 software, including selecting installation directories and options.
- Chapter 3 describes the Installation Wizard 2 user interface and how it analyzes the network environment.
- Chapter 4 provides steps for configuring camera cropping through the viewing window page to define the region of interest and output frame size.
SysInfoTools OpenOffice Draw Recovery Software helps users repair their corrupt ODG files of OpenOffice Draw. It enables users to recover all types of graphics, images, logos and diagrams from corrupt ODG files. Users can see the preview of recovered data before saving them. The software is very easy-to-use since it contains a friendly and intuitive user interface. Any technical and non-technical users can use it.
The document provides installation instructions for the Abaqus Learning Edition. It outlines the system requirements, including having Windows 10 64-bit, 10.5 GB disk space, and specific versions of Java and web browsers. The installation is divided into three sections: documentation installation, Abaqus product installation, and verification. Detailed steps are provided for extracting the files, running the installer, selecting installation directories, and troubleshooting. The Learning Edition has limitations such as a maximum model size and lack of parallel execution or add-on products.
This document provides information about installing, using, and troubleshooting Adobe Dreamweaver CS5. It outlines the system requirements, installation instructions, known issues, and resources for help. Deprecated features are listed, and information is provided about extensions for Adobe AIR, Omniture Test&Target, BrowserLab, and Business Catalyst. Customer support options and additional online resources are also mentioned.
This document provides information about installing and using Adobe Dreamweaver CS5, including system requirements, installation instructions, trial software details, and known issues. It covers uninstalling the software, electronic licensing, registration, and extensions for migrating from GoLive and integrating with Adobe AIR and Omniture Test&Target.
1) The document describes the installation processes of Windows 10, Linux Ubuntu 15.04, antivirus software Kaspersky, and office software Microsoft Office 2010 on a computer system.
2) Details are provided on partitioning disks and setting up user accounts during the Linux installation. Network setup and installation of the Skype application are also documented.
3) Test plans are outlined to check the identification of distributions, device drivers, user account configuration, network connectivity, and software installation. Screenshots confirm the successful completion of tests.
4) Common faults identified on four PCs include non-working USB ports, faulty Wi-Fi connectivity, random restarting, and malfunctioning keyboard keys. Steps taken to diagnose
This document provides information about installing, uninstalling, and using the trial version of Adobe Flash Professional CS5. It outlines the system requirements, describes the installation and uninstallation processes, explains how to enter a serial number to use the full version of the software, and provides links to additional resources. It also lists some known issues that may occur during installation.
The document provides step-by-step instructions for importing drivers and creating task sequences in MDT (Microsoft Deployment Toolkit) to automate imaging computers. It describes downloading driver packs from manufacturer websites, extracting and importing the drivers into the correct folders on the MDT server. It also explains creating selection profiles to specify which drivers go to which task sequence, injecting drivers into task sequences, and creating task sequences for specific models. The document is a guide for setting up and customizing MDT to automate imaging computers with the appropriate drivers and applications.
This document provides a checklist for building an MS Windows Server 2008 machine. It outlines 14 high-level steps: 1) Prepare required paperwork; 2) Configure hardware or virtual machine; 3) Prepare the server environment; 4) Install Windows Server OS; 5) Customize the desktop and power settings; 6) Configure core server settings; 7) Install necessary agents and add-ons; and 8) Mark the build complete upon installing required VMware or hardware tools. It also provides additional pages of detailed instructions for each step.
Homework seriesandroidworkshop JUly 12thRishi Kumar
The document provides instructions for starting Android development by setting up the necessary software and creating a sample project. It explains how to install JDK 7, download Android Studio, use the SDK Manager to update tools, and generate a new Android project called "My First App" using a blank activity template that will run on phones and tablets with a minimum API level of 8. The tutorial is intended for the Saratoga Young Coders Club.
This document provides instructions for installing PROKON structural analysis software. It discusses both standalone and network installations. For standalone installation, the user runs the setup file to copy program files to their computer and then activates the programs. For network installation, the user copies files to a server, activates the programs on the server to allow simultaneous network use, and configures workstations by creating shortcuts. The document provides detailed steps for each part of the installation and activation processes.
This document provides information about Adobe Premiere Pro CS4, including a list of applications included in Creative Suite 4 Premiere Pro, minimum system requirements, installation instructions, uninstallation instructions, and known issues. It notes that the installer will install fonts and older font versions will be saved to a new directory. Workarounds are provided for some known issues during import, editing, and export. Customer support options and technical resources are also listed.
This document provides instructions for installing and uninstalling Adobe Creative Suite 6 products. It outlines the steps to install software from disc by inserting the application DVD, double clicking Setup.exe, and following on-screen instructions. When prompted, the user should enter their serial number. The document also provides instructions for uninstalling the software using the Add/Remove Programs option in Windows or the Uninstall alias in Mac OS. Support resources are also listed.
This document provides instructions for installing and uninstalling Adobe Creative Suite 6 products. It outlines the steps to install software from disc by inserting the application DVD, double clicking Setup.exe, and following on-screen instructions. When prompted, the user enters their serial number. To uninstall, the user closes all programs, opens Add/Remove Programs in Windows or Programs and Features, selects the product, and clicks Uninstall. Support information and release notes are also referenced.
The document provides instructions for setting up a peer-to-peer network between 4 computers by installing network cards, drivers, clients, protocols, and configuring file and printer sharing and unique computer names on each system. It also describes using the internet to research motherboard and BIOS information when manuals are unavailable.
Installing Process Oracle 10g Database Software on Windows 10Azharul Islam Shopon
Hello Dear, beautiful people Today presenting Step-By-Step Installing process Oracle 10g database software with Administrator Create, virtual memory create, database create, database user create, listener create, log in with example, user connected with example.
Start Guide for data based optimization techniquesShatvikMishra1
The document provides guidance for new Microsoft employees on setting up their corporate account and accessing key Microsoft resources and productivity tools whether working from a Microsoft location or remotely. It covers enabling the corporate account, setting up the work PC or Mac, connecting to VPN and virtual desktop, downloading apps like Teams and Outlook, and getting help when needed.
N-Tier Application with Windows Forms - Deployment and SecurityPeter Gfader
Part 1: Deployment of .NET Winforms apps
History
Deployment & Updates
Security
Issues & Warnings
Configuration and user settings
Part 2: Security
Role-based security
Authentication and Authorization
Impersonation
Code Access Security
Assembly Strong Naming
N-Tier Application with Windows Forms - Deployment and Security
SCCM HOw to
1. Summary: In this document you will be provided with the basic steps on configuring a PC for
the end user using SCCM.
**NOTE: If you do not have an SCCM Imaging ISO, please download it from the
following link and burn to a CD-R: SCCM Imaging ISO
✰✰✰ALWAYS DELETE THE DEVICE FROM CONFIG
MANAGER BEFORE RE-IMAGING!!!✰✰✰
DELETE PC Requirements:
● Must be given access to delete PC objects (contact Brandon Davis if your access
is denied).
● ERICOM (Must be installed on your PC)
https:ericom.oii.oceaneering.com/webconnect/applicationzone.html
Open Ericom and Launch the DeletePC batch file.
1. Give it a moment to run and you will prompt to enter the PC name you wish to delete.
2. 2. Enter the PC name and hit enter (on your keyboard). Let the process finish and the pc
will be deleted.
If you get the error below it means 1 of 2 things. Your pc is not connected to Active Directory or
you don’t have access to delete PC object. If you have any issues, please contact Brandon
Davis.
3. This concludes deleting objects out of the SCCM database.
Step 1 - Start up the PC using the SCCM boot disc. (Hit F12 to get to the boot options).
Note: Always use LEGACY BOOT to boot into SCCM
Wait for files to load and you will be prompted by a SCCM screen. Enter the password 0c3an!
Step 2 - Depending on the user, you will select from the following available images:
4. Enovia Image - Enovia applications (Additional steps will be needed after image has finished,
see notes at the bottom of this instructions)
Standard Image - Basic applications
SolidWorks 2012, EPDM 2014, ACAD 2012 (Enovia image) SWInstall from Zenworks
SolidWorks 2014, EPDM 2014, ACAD 2012 (PDMWorks Image) Netinstall from Zenworks
Step 3 - Once you have selected your image please wait for the process to finish.
Step 4 - Enter .Administrator. The password will be 0c3an!
5. Step 5 - Once log in you will need to go into user account settings. Hit the ribbon key (start)
and select Control Panel. Select User Accounts, Select Change account type
Step 6 - Once the User Accounts window open click on Add
6. Step 7 - Enter the end user Network acct ID and select OIIAD as your domain. Click Next.
Step 8 - Grant the user Administrator access by selecting Administrator and click Finish
7.
8. If you receive this error:
Problem:
Unable to add a new hire’s account to the local machine
9. Cause:
User account has not sync’d to Active Directory.
We currently use ConsoleOne to create new user accounts which sets a legacy password instead of a
universal password. A universal password is required for Identity Manager to sync the E-directory
account to Active Directory.
Resolution:
Until we replace E-directory it will be necessary to change the new user creation process for sites imaging
with SCCM:
Your options are:
Use Novell IManager to create new user accounts
Or
Use ConsoleOne to create new user accounts and set universal password after the account is
created
To set universal password in IManager do the following:
Log in to IManager server > Navigate to Passwords > Click Set Universal Passwords
11. Click OK
When prompted enter and Re-enter a password
Wait approximately 15 minutes for this account to sync to Active Directory. User Acct must be logged out
of everything completely (on PCs and phone). Best time to do this would be during lunch, or at end of
day.
Step 9 - Log off the PC and log on as the end user. Please use the Novell login screen. If Tree
and context are missing then enter the data. (See image)
Tree: oi
Context: CORP.US.OI
12. Note: If you get prompted to log into the pc then use the end user network ID and password to
log in.
(image below is just an example do not use that ID to log in)
13. Note: If you imaged the pc with the ENOVIA image you must add the pc to the Enovia
Intergration container for the software to be deployed. (Click on the link for instructions
https://docs.google.com/a/oceaneering.com/document/d/1BWMUCMaJFindPQ4j8MJ3Og6
OjsLTgv5zjgKvRmCsPIo/edit
Step 9 - Log off the PC and log on as the end user. Please use the Novell login screen. If Tree
and context are missing then enter the data. (See image)
Tree: oi
Context: CORP.US.OI
14. Note: If you get prompted to log into the pc then use the end user network ID and password to
log in. (Image below is just an example do not use that ID to log in)
Note: If you imaged the pc with the ENOVIA image you must add the pc to the Enovia
Intergration container for the software to be deployed. (Click on the link for instructions
https://docs.google.com/a/oceaneering.com/document/d/1BWMUCMaJFindPQ4j8MJ3Og6
OjsLTgv5zjgKvRmCsPIo/edit
15. How to deploy software to End user (Ericom)
Summary: In this document you will be provided with information on how to deploy software
to the end user’s PC using SCCM from the Ericom Console.
Before you begin, please verify the pc was imaged using SCCM. You can use any of
the methods below.
User has a Oceaneering Links - shortcut on their desktop
Verify there is a Oceansccm folder located in C:Windows
folder
Technicians, please ensure that your PC has Ericom installed. If you currently do not
have Ericom installed, please click the link below to access the software.
Ericom Install:
https://ericom.oii.oceaneering.com/WebConnect/ApplicationZone.html
Note: If you receive a Java popup, I recommend selecting Run this Time.
16. Instructions to add a user to a software collection(s) are listed
below.
Step 1. Locate and Launch the Ericom shortcut on the desktop .
Step 2. Login with your Novell username and password.
Step 3. Double Click on the Configuration Manager Console.
19. Step 6. Right click on the end user’s name and select Add Selected Items to Existing
User Collection.
Step 7. Browse through the Software sub-folder and select the application folder that you
would like to install for the end user. Select the application name to the right of the folder
selection and click OK.
20. Step 8. After the end user has been added to the Software collection(s), open the end
user’s Software Center. To open the Software center, browse to the Oceaneering Links
folder on the user’s desktop or locate it in Start Menu → All Programs → Microsoft
System Center 2012 R2 → Configuration Manager → Software Center.
Step 9. Click on Find additional applications from the Application Catalog or open the
Oceaneering Links folder on the desktop and launch the SCCM Application Catalog
shortcut.
Note: You will be prompted to login to AD. Please authenticate with the end user’s logon
credentials. Once we are fully migrated to AD, this step will be eliminated.
21. Step 10. Enter the end user’s logon credentials and click OK.
Step 11. Select the software that needs to be installed and click on Install.
Note: Please be patient if the software has yet to populate in the Application Catalog. The internet
browser may need to be refreshed again for the application(s) to populate. Hit F5 to refresh.
23. Step 13. Once you see, your application installation has started; open the end user’s
Software Center and select the Installation Status tab to view the install status.
24. This process may take some time depending on the size of the application. Please be
patient.
Step 14. Click OK.
Step 15. Go back to the Application Catalog and click the Back to Application Catalog link
and repeat Steps 9 – 12 for other needed applications.
25. If you have any questions, please contact Brandon Davis at (713) 329-4854 or
bdavis2@oceaneering.com.
Step 9 - Log off the PC and log on as the end user. Please use the Novell login screen. If Tree
and context are missing then enter the data. (See image)
Tree: oi
Context: CORP.US.OI
26. Note: If you get prompted to log into the pc then use the end user network ID and password to
log in.
(Image below is just an example do not use that ID to log in)
27. Note: If you imaged the pc with the ENOVIA image you must add the pc to the Enovia
Intergration container for the software to be deployed. (Click on the link for instructions
https://docs.google.com/a/oceaneering.com/document/d/1BWMUCMaJFindPQ4j8MJ3Og6
OjsLTgv5zjgKvRmCsPIo/edit
Step 9 - Log off the PC and log on as the end user. Please use the Novell login screen. If Tree
and context are missing then enter the data. (See image)
Tree: oi
Context: CORP.US.OI
28. Note: If you get prompted to log into the pc then use the end user network ID and password to
log in.
(image below is just an example do not use that ID to log in)
29. Note: If you imaged the pc with the ENOVIA image you must add the pc to the Enovia
Intergration container for the software to be deployed. (Click on the link for instructions
https://docs.google.com/a/oceaneering.com/document/d/1BWMUCMaJFindPQ4j8MJ3Og6
OjsLTgv5zjgKvRmCsPIo/edit
Note: There are several ways to tell if a PC was imaged via SCCM
❖ New PC will be running on Windows 7 Enterprise
❖ Has EndPoint Protection install
❖ Oceansccm folder located in the windows older. (C:WindowsOceansccm)
Important:
❖ If you need to reimage a PC you must delete it out of SCCM database. (See how to
delete PC from SCCM database instructions)
This concludes the how to image pc using sccm.
Note: There are several ways to tell if a PC was imaged via SCCM
❖ New PC will be running on Windows 7 Enterprise
❖ Has EndPoint Protection install
❖ Oceansccm folder located in the windows older. (C:WindowsOceansccm)
Important:
30. ❖ If you need to reimage a PC you must delete it out of SCCM database. (See how to
delete PC from SCCM database instructions)
This concludes the how to image pc using sccm.
Note: There are several ways to tell if a PC was imaged via SCCM
❖ New PC will be running on Windows 7 Enterprise
❖ Has EndPoint Protection install
❖ Oceansccm folder located in the windows older. (C:WindowsOceansccm)
Important:
❖ If you need to reimage a PC you must delete it out of SCCM database. (See how to
delete PC from SCCM database instructions)
This concludes the how to image pc using sccm.
Note: There are several ways to tell if a PC was imaged via SCCM
❖ New PC will be running on Windows 7 Enterprise
❖ Has EndPoint Protection install
❖ Oceansccm folder located in the windows older. (C:WindowsOceansccm)
Important:
❖ If you need to reimage a PC you must delete it out of SCCM database. (See how to
delete PC from SCCM database instructions)
This concludes the how to image pc using sccm.