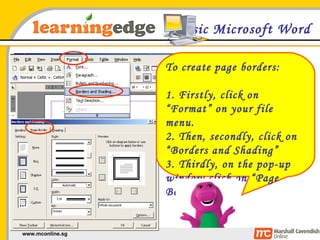
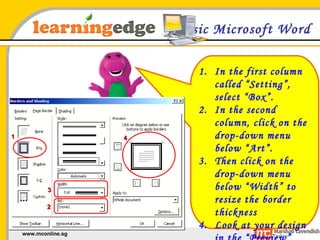
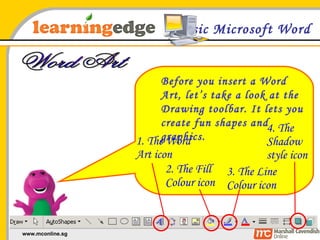
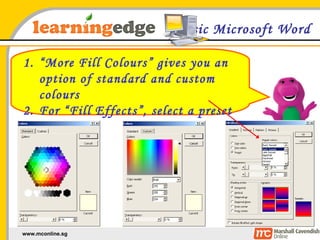
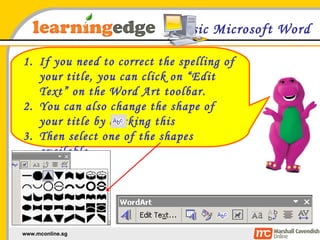
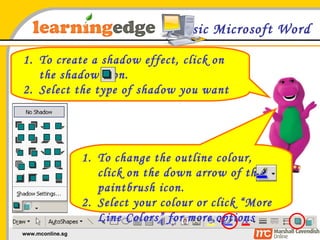
Basic Microsoft Word We will learn about: applying page borders inserting & formatting  Word Art
Basic Microsoft Word To open your saved work: On the desktop, click on “My Computer”. Then, double-click on “Data D:” Next, double-click on the folder named “Pri 2”. Lastly, double-click on your saved document. Data D: Pri 2
Basic Microsoft Word To create page borders: 1. Firstly, click on “Format” on your file menu. 2. Then, secondly, click on “Borders and Shading” 3. Thirdly, on the pop-up window click on “Page Border”
Basic Microsoft Word In the first column called “Setting”, select “Box”. In the second column, click on the drop-down menu below “Art”. Then click on the drop-down menu below “Width” to resize the border thickness Look at your design in the “Preview” column and then click “OK” 1 2 3 4
Basic Microsoft Word Before you insert a Word Art, let’s take a look at the Drawing toolbar. It lets you create fun shapes and graphics. 1. The Word Art icon 2. The Fill Colour icon 4. The Shadow style icon Word Art 3. The Line Colour icon
Basic Microsoft Word Click on the Insert WordArt icon on the Drawing toolbar Select a Word Art style and click OK. Type in your title and choose a font style. Then, click OK.
Basic Microsoft Word To change the size of your title, click on the corner points on the border and drag it bigger or smaller. To change the fill colour, click on the down arrow of the paint bucket icon. Select your colour or click “more fill colours” or “fill effects” for more options
Basic Microsoft Word “ More Fill Colours” gives you an option of standard and custom colours For “Fill Effects”, select a preset gradient
Basic Microsoft Word If you need to correct the spelling of your title, you can click on “Edit Text” on the Word Art toolbar.  You can also change the shape of your title by clicking this Then select one of the shapes available
Basic Microsoft Word To create a shadow effect, click on the shadow icon. Select the type of shadow you want To change the outline colour, click on the down arrow of the paintbrush icon. Select your colour or click “More Line Colors” for more options

BasicWord02

  • 1.
    Basic Microsoft WordWe will learn about: applying page borders inserting & formatting Word Art
  • 2.
    Basic Microsoft WordTo open your saved work: On the desktop, click on “My Computer”. Then, double-click on “Data D:” Next, double-click on the folder named “Pri 2”. Lastly, double-click on your saved document. Data D: Pri 2
  • 3.
    Basic Microsoft WordTo create page borders: 1. Firstly, click on “Format” on your file menu. 2. Then, secondly, click on “Borders and Shading” 3. Thirdly, on the pop-up window click on “Page Border”
  • 4.
    Basic Microsoft WordIn the first column called “Setting”, select “Box”. In the second column, click on the drop-down menu below “Art”. Then click on the drop-down menu below “Width” to resize the border thickness Look at your design in the “Preview” column and then click “OK” 1 2 3 4
  • 5.
    Basic Microsoft WordBefore you insert a Word Art, let’s take a look at the Drawing toolbar. It lets you create fun shapes and graphics. 1. The Word Art icon 2. The Fill Colour icon 4. The Shadow style icon Word Art 3. The Line Colour icon
  • 6.
    Basic Microsoft WordClick on the Insert WordArt icon on the Drawing toolbar Select a Word Art style and click OK. Type in your title and choose a font style. Then, click OK.
  • 7.
    Basic Microsoft WordTo change the size of your title, click on the corner points on the border and drag it bigger or smaller. To change the fill colour, click on the down arrow of the paint bucket icon. Select your colour or click “more fill colours” or “fill effects” for more options
  • 8.
    Basic Microsoft Word“ More Fill Colours” gives you an option of standard and custom colours For “Fill Effects”, select a preset gradient
  • 9.
    Basic Microsoft WordIf you need to correct the spelling of your title, you can click on “Edit Text” on the Word Art toolbar. You can also change the shape of your title by clicking this Then select one of the shapes available
  • 10.
    Basic Microsoft WordTo create a shadow effect, click on the shadow icon. Select the type of shadow you want To change the outline colour, click on the down arrow of the paintbrush icon. Select your colour or click “More Line Colors” for more options