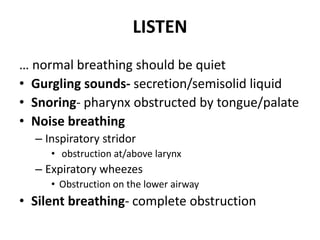
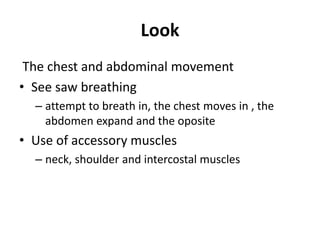
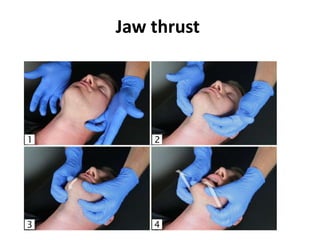
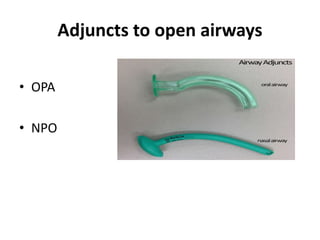
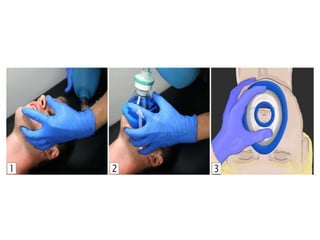
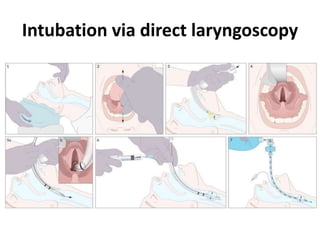
AIRWAY MANAGEMENT
Outline
• Airway anatomy
• Airway assessment
• Causes and risks of compromised airway
• Recognition of airway compromised
• Basic airway management
Airway anatomy
Overview
• Airway management is the practice of evaluating, planning,
and using a wide array of medical procedures and devices for
the purpose of maintaining or restoring a safe, effective
pathway for oxygenation and ventilation.
• Types of airway management
– Basic airway management
– Advanced airway management
Airway assessment
Patent/ compromised
• Patent airway
– Patient is talking in full sentence
• Compromised airway
– There is a specific cause
Causes and risks of compromised
airway
• Secretion, vomits or blood
• Foreign bodies
• Injured tissue in trauma
• Airway burn injury
• Neck mass/hematoma
• Facial trauma
• Laryngospasm
• Unconscious patient
Recognition of airway compromise
• Listen
• Look
• Feel
LISTEN
… normal breathing should be quiet
• Gurgling sounds- secretion/semisolid liquid
• Snoring- pharynx obstructed by tongue/palate
• Noise breathing
– Inspiratory stridor
• obstruction at/above larynx
– Expiratory wheezes
• Obstruction on the lower airway
• Silent breathing- complete obstruction
Look
The chest and abdominal movement
• See saw breathing
– attempt to breath in, the chest moves in , the
abdomen expand and the oposite
• Use of accessory muscles
– neck, shoulder and intercostal muscles
Feel
• Silent chest- complete obstruction
Basic intervention to open an airway
Open airway
• Head tilt and chin lift
Jaw thrust
Spontaneously breathing patients only:
the recovery position
• Description: positioning of the patient in a lateral
decubitus position with slight neck extension
• Aim
– Prevention of airway occlusion by the tongue and soft
tissues
– Reduction in the risk of aspiration if patients regurgitate
• Indications
– Pre-hospital settings
– Temporary airway compromise that can be managed by
positioning alone (e.g., procedural sedation, alcohol
intoxication)
The recovery position
Remove liquid-Suctioning
Foreign body removal- McGill's
forceps
Adjuncts to open airways
• OPA
• NPO
Oropharyngeal airway (OPA)
• Description: a rigid curved device placed in the mouth to prevent the tongue from
occluding the airway
• Indications
– Unconscious patients with a large tongue, obstructed nasal passages, or copious
nasal secretions
– Typically used as a bridge to intubation
• Contraindications: conscious patient with intact gag reflex
• Sizing rule: from the incisors to the angle of the mandible, or corner of the mouth
(oral commissure) to the earlobe
• Insertion technique
– Adults: Insert concave up or concave lateral until past the tongue and then
rotate until concave down.
– Children: Using a tongue depressor to move the tongue down, insert
carefully concave down.
– Ensure OPA has bypassed the tongue and is not pushing it backwards.
• Further management: Toleration of an oropharyngeal airway indicates an at-
risk airway; preparations should be made for intubation
Nasopharyngeal airway (NPA)
• Description: a long flexible tube inserted into the nostril and down into
the nasopharynx to prevent the tongue from occluding the airway
• Indications: conscious or unconscious patients with current or potential
oropharyngeal obstruction
• Contraindications: facial fractures, basilar skull fractures
• Sizing rule: nostril to the ipsilateral tragus
• Insertion technique
– Lubricate the tube.
– Select the wider nostril.
– Insert gently without forcing.
– Aim posteriorly, not superiorly.
– Twist the tube back and forth for ease of passage.
– If resistance is encountered, stop and attempt on the contralateral nostril.
Bag Mask Valve Ventilation
• Definition: delivery of oxygen and provider-
assisted breaths using a bag-valve-mask unit to
patients with inadequate ventilation
• Indications
– Bridge to intubation
• Patients with acute respiratory failure
• Preoxygenation prior to general anesthesia
– Rescue ventilation: Use after failed intubation attempt (e.g.,
(e.g., when safe apnea time has been exceeded) or
accidental oversedation
– CPR
Procedure
• Create mask seal
– EC Clamp technique
– Two-person bag-mask-ventilation technique
• Provide breaths
– Set minute ventilation
• Aim: Deliver 500–600 mL (6–7 mL/kg) volume at 10–12
breaths/minute.
• Procedure: Squeeze the bag slowly and gently over approx. 1
second before allowing it to fully reinflate. Repeat every 5
seconds.
• Adjust based on the clinical situation: E.g., follow compression-to-
breath ratio in patients undergoing CPR without an advanced
airway (e.g., 30:2).
Confirm adequacy of BMV
– Clinical
• No leaks around mask
• Bilateral chest rise
• Air entry on auscultation of bilateral lung fields
– Monitoring
• Oxygen saturations in target range (may be above
normal if preoxygenating)
• Normal capnometry
Intubation
• Placement of cuffed endotracheal via direct
laryngoscope
• Typically sedation and paralysis are required
to tolerate procedure and subsequent
mechanical ventilation.
Indications for endotracheal
intubation
• Inability (or anticipated inability) to maintain the airway: e.g.,
General anaesthesia, airway obstruction or reduced GCS
• Failure (or pending failure) of ventilation or oxygenation: e.g.,
in severe acute asthma or COPD
• Conditions in which there is a high risk of deterioration: e.g.,
multisystem trauma, anaphylaxis, severe septic shock
Preparation
• Pre-oxygenation
– Rationale: Lengthen safe apnea time to prevent
desaturation, which can cause organ dysfunction (e.g.,
hypoxic brain injury, cardiac dysrhythmia) and death
• Intubation medications
– Sedating agent: reduces airway reflexes and facilitate
intubation (e.g. propofol, ketamine)
– Neuromuscular blocking agent: Improves airway
visualization by relaxing the jaw muscles. (e.g.
succinylcholine, pancuronium)
Intubation via direct laryngoscopy
Confirmation of tube placement
• Auscultation of bilateral breath sounds over the lungs
• Consistent condensation visible in the tube upon
exhalation
• Capnometry
• Direct visualization of endotracheal tube markers
• Distal tube markers should be seen advancing past the vocal
cords.
• Proximal numbered tube markers should indicate approx.
21–23 cm at the patient's teeth.
• Imaging (e.g., CXR):
• CXR: The distal tip of the endotracheal or tracheal tube
should be 2–6 cm above the carina (reposition if necessary).
Thanks

Basic Airway management.pptx

  • 1.
  • 2.
    Outline • Airway anatomy •Airway assessment • Causes and risks of compromised airway • Recognition of airway compromised • Basic airway management
  • 3.
  • 4.
    Overview • Airway managementis the practice of evaluating, planning, and using a wide array of medical procedures and devices for the purpose of maintaining or restoring a safe, effective pathway for oxygenation and ventilation. • Types of airway management – Basic airway management – Advanced airway management
  • 5.
    Airway assessment Patent/ compromised •Patent airway – Patient is talking in full sentence • Compromised airway – There is a specific cause
  • 6.
    Causes and risksof compromised airway • Secretion, vomits or blood • Foreign bodies • Injured tissue in trauma • Airway burn injury • Neck mass/hematoma • Facial trauma • Laryngospasm • Unconscious patient
  • 7.
    Recognition of airwaycompromise • Listen • Look • Feel
  • 8.
    LISTEN … normal breathingshould be quiet • Gurgling sounds- secretion/semisolid liquid • Snoring- pharynx obstructed by tongue/palate • Noise breathing – Inspiratory stridor • obstruction at/above larynx – Expiratory wheezes • Obstruction on the lower airway • Silent breathing- complete obstruction
  • 9.
    Look The chest andabdominal movement • See saw breathing – attempt to breath in, the chest moves in , the abdomen expand and the oposite • Use of accessory muscles – neck, shoulder and intercostal muscles
  • 10.
    Feel • Silent chest-complete obstruction
  • 11.
    Basic intervention toopen an airway Open airway • Head tilt and chin lift
  • 12.
  • 13.
    Spontaneously breathing patientsonly: the recovery position • Description: positioning of the patient in a lateral decubitus position with slight neck extension • Aim – Prevention of airway occlusion by the tongue and soft tissues – Reduction in the risk of aspiration if patients regurgitate • Indications – Pre-hospital settings – Temporary airway compromise that can be managed by positioning alone (e.g., procedural sedation, alcohol intoxication)
  • 14.
  • 15.
  • 16.
    Foreign body removal-McGill's forceps
  • 17.
    Adjuncts to openairways • OPA • NPO
  • 18.
    Oropharyngeal airway (OPA) •Description: a rigid curved device placed in the mouth to prevent the tongue from occluding the airway • Indications – Unconscious patients with a large tongue, obstructed nasal passages, or copious nasal secretions – Typically used as a bridge to intubation • Contraindications: conscious patient with intact gag reflex • Sizing rule: from the incisors to the angle of the mandible, or corner of the mouth (oral commissure) to the earlobe • Insertion technique – Adults: Insert concave up or concave lateral until past the tongue and then rotate until concave down. – Children: Using a tongue depressor to move the tongue down, insert carefully concave down. – Ensure OPA has bypassed the tongue and is not pushing it backwards. • Further management: Toleration of an oropharyngeal airway indicates an at- risk airway; preparations should be made for intubation
  • 20.
    Nasopharyngeal airway (NPA) •Description: a long flexible tube inserted into the nostril and down into the nasopharynx to prevent the tongue from occluding the airway • Indications: conscious or unconscious patients with current or potential oropharyngeal obstruction • Contraindications: facial fractures, basilar skull fractures • Sizing rule: nostril to the ipsilateral tragus • Insertion technique – Lubricate the tube. – Select the wider nostril. – Insert gently without forcing. – Aim posteriorly, not superiorly. – Twist the tube back and forth for ease of passage. – If resistance is encountered, stop and attempt on the contralateral nostril.
  • 22.
    Bag Mask ValveVentilation • Definition: delivery of oxygen and provider- assisted breaths using a bag-valve-mask unit to patients with inadequate ventilation • Indications – Bridge to intubation • Patients with acute respiratory failure • Preoxygenation prior to general anesthesia – Rescue ventilation: Use after failed intubation attempt (e.g., (e.g., when safe apnea time has been exceeded) or accidental oversedation – CPR
  • 23.
    Procedure • Create maskseal – EC Clamp technique – Two-person bag-mask-ventilation technique • Provide breaths – Set minute ventilation • Aim: Deliver 500–600 mL (6–7 mL/kg) volume at 10–12 breaths/minute. • Procedure: Squeeze the bag slowly and gently over approx. 1 second before allowing it to fully reinflate. Repeat every 5 seconds. • Adjust based on the clinical situation: E.g., follow compression-to- breath ratio in patients undergoing CPR without an advanced airway (e.g., 30:2).
  • 25.
    Confirm adequacy ofBMV – Clinical • No leaks around mask • Bilateral chest rise • Air entry on auscultation of bilateral lung fields – Monitoring • Oxygen saturations in target range (may be above normal if preoxygenating) • Normal capnometry
  • 26.
    Intubation • Placement ofcuffed endotracheal via direct laryngoscope • Typically sedation and paralysis are required to tolerate procedure and subsequent mechanical ventilation.
  • 27.
    Indications for endotracheal intubation •Inability (or anticipated inability) to maintain the airway: e.g., General anaesthesia, airway obstruction or reduced GCS • Failure (or pending failure) of ventilation or oxygenation: e.g., in severe acute asthma or COPD • Conditions in which there is a high risk of deterioration: e.g., multisystem trauma, anaphylaxis, severe septic shock
  • 28.
    Preparation • Pre-oxygenation – Rationale:Lengthen safe apnea time to prevent desaturation, which can cause organ dysfunction (e.g., hypoxic brain injury, cardiac dysrhythmia) and death • Intubation medications – Sedating agent: reduces airway reflexes and facilitate intubation (e.g. propofol, ketamine) – Neuromuscular blocking agent: Improves airway visualization by relaxing the jaw muscles. (e.g. succinylcholine, pancuronium)
  • 29.
  • 30.
    Confirmation of tubeplacement • Auscultation of bilateral breath sounds over the lungs • Consistent condensation visible in the tube upon exhalation • Capnometry • Direct visualization of endotracheal tube markers • Distal tube markers should be seen advancing past the vocal cords. • Proximal numbered tube markers should indicate approx. 21–23 cm at the patient's teeth. • Imaging (e.g., CXR): • CXR: The distal tip of the endotracheal or tracheal tube should be 2–6 cm above the carina (reposition if necessary).
  • 31.

Editor's Notes

  • #12 Head tilt/chin lift maneuver The dominant hand is used to tilt the head back by applying pressure to the forehead, while the nondominant hand is used to lift the chin up. This technique opens the airway by bringing the oropharyngeal, nasopharyngeal, and laryngeal axes into alignment.
  • #13 Jaw-thrust maneuver In the jaw-thrust maneuver, the mandible is moved anteriorly to open the upper airway. This technique may be used alone in patients with suspected C-spine injury or together with the head-tilt/chin-lift maneuver if C-spine injury is not a concern. (1) The little fingers are placed behind the angle of the mandible bilaterally. (2) The ring, middle, and index fingers are placed underneath the mandible, with care taken not to apply pressure to the floor of the mouth. (3) The thumbs are placed on the chin and used to open the mouth slightly. (4) Both hands are used to lift the mandible anteriorly, thereby pulling the base of the tongue and soft tissues away from the airway.
  • #15 Recovery position 1. Place the unconscious individual's left arm at a right angle to their body. 2. Place the right hand on top of the left shoulder, with the right arm crossing the chest. Bend the right knee. 3. Use the bent knee as a lever to roll the individual onto their left side. 4. Tilt the head gently and tuck the right hand under the head to support the mouth in a slightly open position, so that it is the lowest point on the head. Keep checking respiration and blood circulation after the patient has been placed in the recovery position!
  • #20 Insertion of oropharyngeal airway (OPA) Correct sizing and placement: 1) The correct size of OPA should reach from the incisors to the angle of the mandible, or from the corner of the mouth to the earlobe (as shown here). 2) Open the mouth and insert the OPA concave upwards. 3) Once past the tongue, rotate the OPA 180 degrees while advancing, until concave down and the flange is resting against the lips. 4a) If correctly sized, the tip of the OPA will now sit in the oropharynx. Incorrect sizing: 4b) OPA too small: Tip is obstructed by the tongue. 4c) OPA too large: Tip reaches into hypopharynx, risking injury to laryngeal structures or laryngospasm.
  • #25 EC-clamp technique Using the EC-clamp technique, an effective mask seal can be maintained with one hand, enabling bag-mask ventilation when the provider is alone. (1) With the patient supine, the provider places the little finger of one hand behind the angle of the mandible and the ring and middle fingers underneath the mandible (forming an “E” shape). (2) The mask is pressed onto the face with the thumb and index finger of the same hand (which form a “C” shape), while the 3rd to 5th fingers are used to lift the jaw anteriorly towards the mask. This leaves the second hand free to deliver breaths. (3) Provider's view of the “C” shape formed by the index finger and thumb and the position of the mask on the patient's face
  • #30 Endotracheal intubation via direct laryngoscopy (illustration shows right-handed practitioner) The clinician stands behind the patient's head to perform the intubation. 1. The patient is placed in the “sniffing” position using the head-tilt/chin-lift maneuver. 2. The patient's mouth is opened with the dominant hand using the scissor technique. 3. The laryngoscope is inserted with the nondominant hand, using the groove to sweep the tongue to the left. It is advanced slowly until the tip is in the vallecula and the epiglottis is visible. The clinician lifts gently forward and upward to expose the arytenoid cartilages and vocal cords, taking care not to damage the teeth with the laryngoscope. 4. Practitioner's view at intubation: the difficulty of intubation can be graded based on this view using the modified Cormack and Lehane classification (here Cormack-Lehane Grade I) 5. Using the dominant hand, the endotracheal (ET) tube is inserted along the laryngoscope blade and through the cords under direct visualization (5a). The ET tube may have markings to indicate correct insertion depth (5b). 6. Once the ET tube is in the correct position (cuff below the cords), the cuff is inflated. 7. The patient is attached to ventilation equipment, correct ET tube placement is confirmed, and the ET tube is secured.