Downloaded 15 times


![22
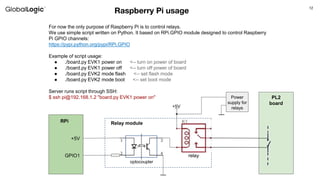
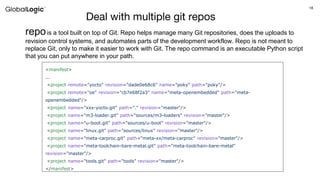
Automation of Flashing process
$ ./flashLoader-sqi.pl -f "USB DFU" -p "USB Fastboot" -l 0,1,2,3,4,5,6,7,8 $CONFIG_FILE
[-f] comport : first stage communication port name see list below
[-p] comport : flashing communication port name see list below
[-e] : Erase all before flashing
[-l] list: comma separated partition list numbers eg: 0,1,2,3,4
<file> : STA Config file (partitioning + other parameters)
board_ctl "EVK1 power off"
sleep 1
board_ctl "EVK1 mode flash nand"
sleep 1
board_ctl "EVK1 power on"
cd $FLASHER_DIR
./$FLASHER_NAME -e -f "USB DFU" -p "USB Fastboot" $CONFIG_FILE
RES="$?"
board_ctl "EVK1 power off"
if [ $RES -ne 0 ]; then echo "Flashing failed!"; exit -1; fi
echo "Flashing completed successfully!"
sleep 1
board_ctl "EVK1 mode boot nand"
sleep 1
board_ctl "EVK1 power on"
board_ctl - function which runs relay
control script on RPi through SSH
STA_Flashloader erases whole memory
(option -e) and flashes all partitions (-l
not specified), uses info from config file
Booting board after flashing
Fragment of script which is run on the Server](https://image.slidesharecdn.com/extautomatedtestingforembeddedsystems1-180618105222/85/Automation-Testing-for-Embedded-Systems-22-320.jpg)

![26
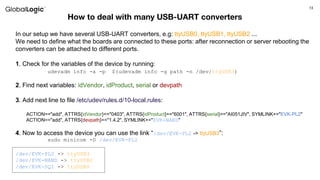
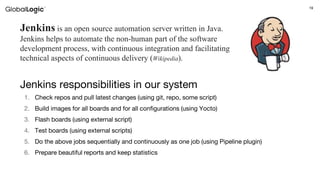
Board testing from Server
We write python scripts which use module “pexpect”, designed to automate interactive applications
#!/usr/bin/python
import pexpect
child = pexpect.spawn('minicom -D /dev/EVK-PL1') # open minicom
child.sendline('') # send empty line "Enter"
child.expect('root@board:.*# ') # wait for prompt
child.sendline('mount | grep ubi') # send command
child.expect('rn') # wait for Enter (scip our command)
child.expect('root@board:.*# ') # wait for prompt
ubis = child.before[:-2] # save output between our command and
prompt
child.sendline('echo $LD_LIBRARY_PATH') # send command
child.expect('rn') # wait for Enter (scip our command)
child.expect('root@board:.*# ') # wait for prompt
libp = child.before[:-2] # save output between our command and
prompt
print "LIB: %snUBI: %s" % (libp, ubis)
server:~$ sudo ./test_expect.py
LIB: /lib:/usr/lib:/home/root/ext-fs/lib:/home/root/ext-fs/usr/lib
UBI: ubi0_0 on /home/root/ext-fs type ubifs (rw,relatime)
Result of script execution:
Using this approach we can run any application on the board and
check its output.
The “expect” function can wait for some specific words which
denote that application runs successfully, otherwise the timeout
exception will be raised and script completed with failure.
Also in this way we can check exit status of applications.](https://image.slidesharecdn.com/extautomatedtestingforembeddedsystems1-180618105222/85/Automation-Testing-for-Embedded-Systems-26-320.jpg)
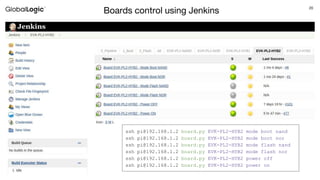
![27
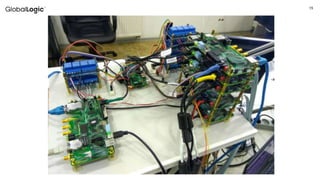
import pytest
import pexpect
@pytest.fixture(scope="module")
def minicom():
# Opening minicom
minicom = pexpect.spawn('minicom -D /dev/EVK-PL1')
minicom.sendline('')
minicom.expect('root@board:.*# ')
yield minicom
# Terminating minicom
minicom.terminate(force=True)
def test_ubi_mount(minicom):
minicom.sendline('mount | grep ubi')
minicom.expect('rn')
minicom.expect('root@board:.*# ')
ubi = minicom.before[:-2]
assert ubi == "ubi0_0 on /home/root/ext-fs type ubifs (rw,relatime)"
def test_ld_library_path(minicom):
minicom.sendline('echo $LD_LIBRARY_PATH')
minicom.expect('rn')
minicom.expect('root@board:.*# ')
libp = minicom.before[:-2]
assert libp == "/lib:/usr/lib:/home/root/ext-fs/lib:/home/root/ext-
server:~$ pytest -v -s test_evk_pl2.py
=================== test session starts ====================
platform linux2 -- Python 2.7.12, pytest-3.2.2, py-1.4.34,
pluggy-0.4.0 -- /usr/bin/python
cachedir: .cache
rootdir: /home/host_station/dev/misc/evkctl/tests, inifile:
collected 2 items
test_evk_pl2.py::test_ubi_mount PASSED
test_evk_pl2.py::test_ld_library_path PASSED
================ 2 passed in 1.57 seconds ==================
Result of executing the test:
Board testing with Pytest
With pytest framework we can easily write automated
tests and verify specific functionality.](https://image.slidesharecdn.com/extautomatedtestingforembeddedsystems1-180618105222/85/Automation-Testing-for-Embedded-Systems-27-320.jpg)


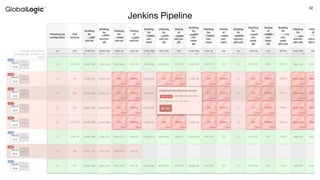


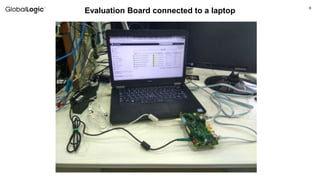
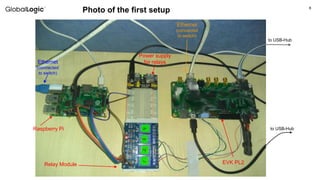
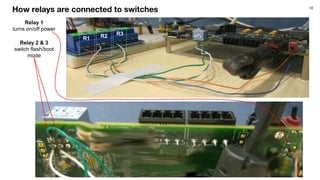
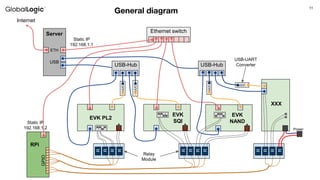
The document outlines the development of an Automated Testing System (ATS) for embedded systems, detailing the project components, creation process, and current state. It discusses the hardware setup involving a Raspberry Pi controlling relay modules, as well as software components like scripts for managing multiple repositories and integration with Jenkins for automation. Additionally, it describes the testing process using Python scripts and the pytest framework for validating system functionalities.


![[Outdated] Secrets of Performance Tuning Java on Kubernetes](https://cdn.slidesharecdn.com/ss_thumbnails/jvmoncontainersjuly2022-220718124816-cca24690-thumbnail.jpg?width=640&height=640&fit=bounds)