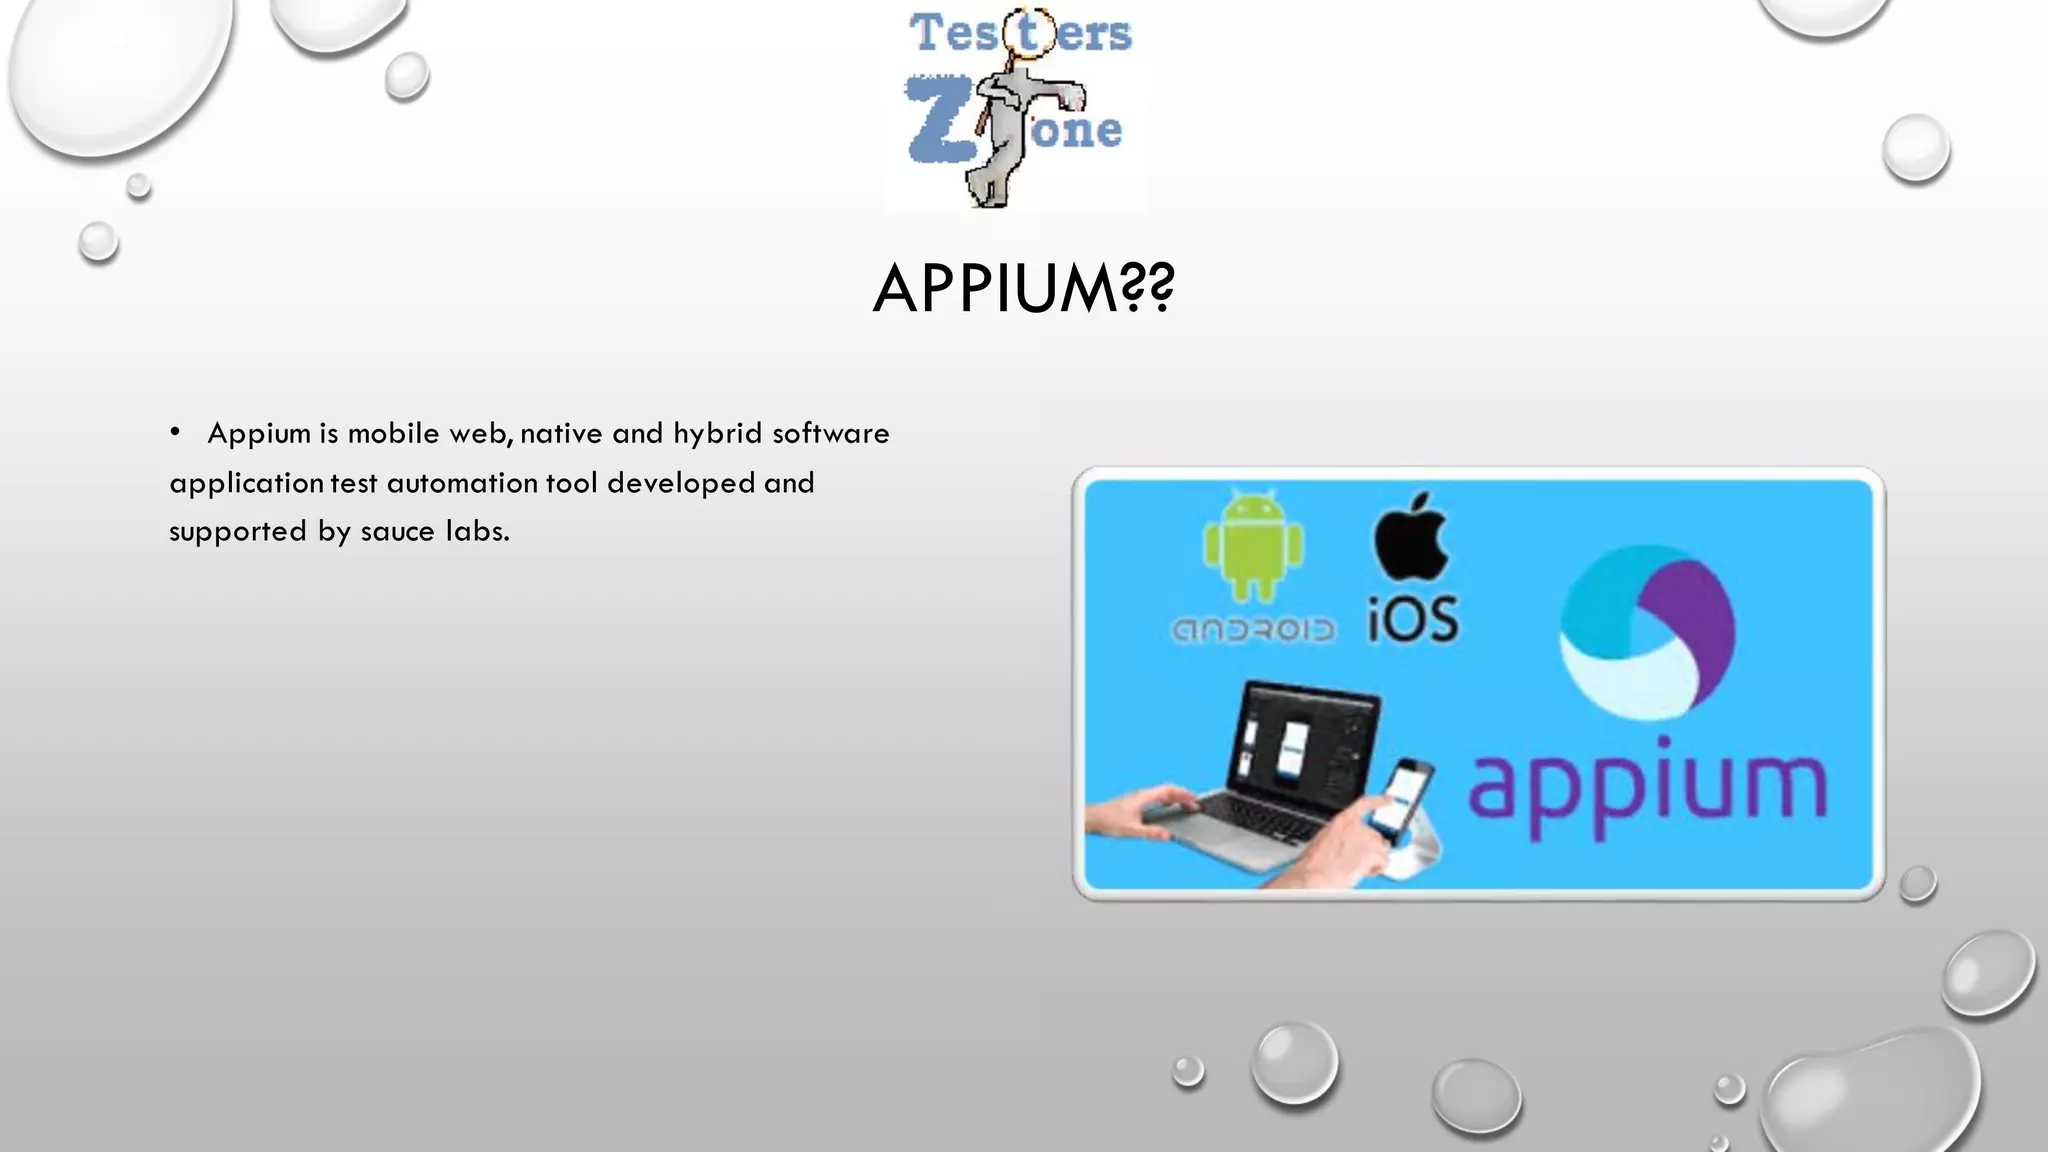
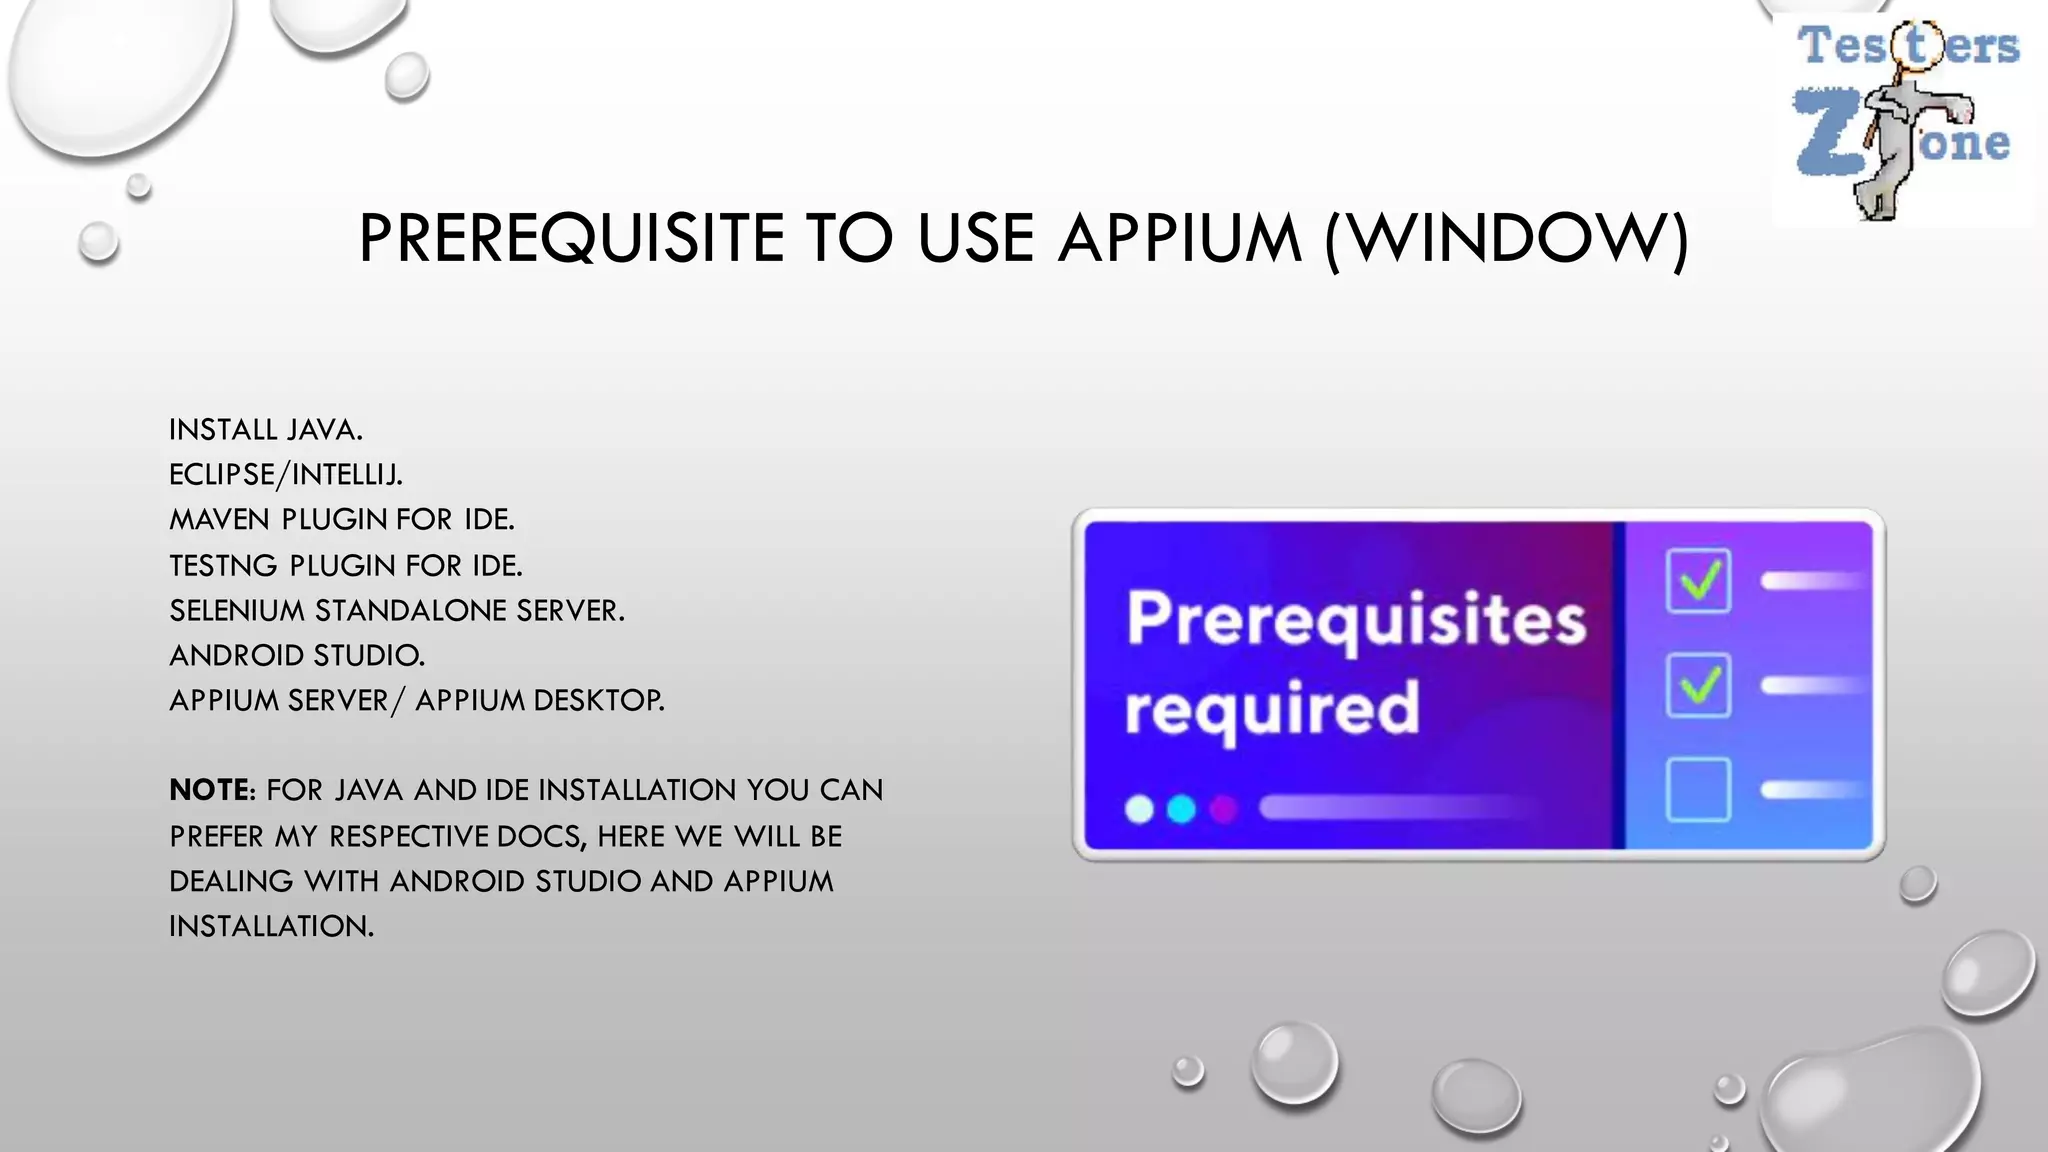
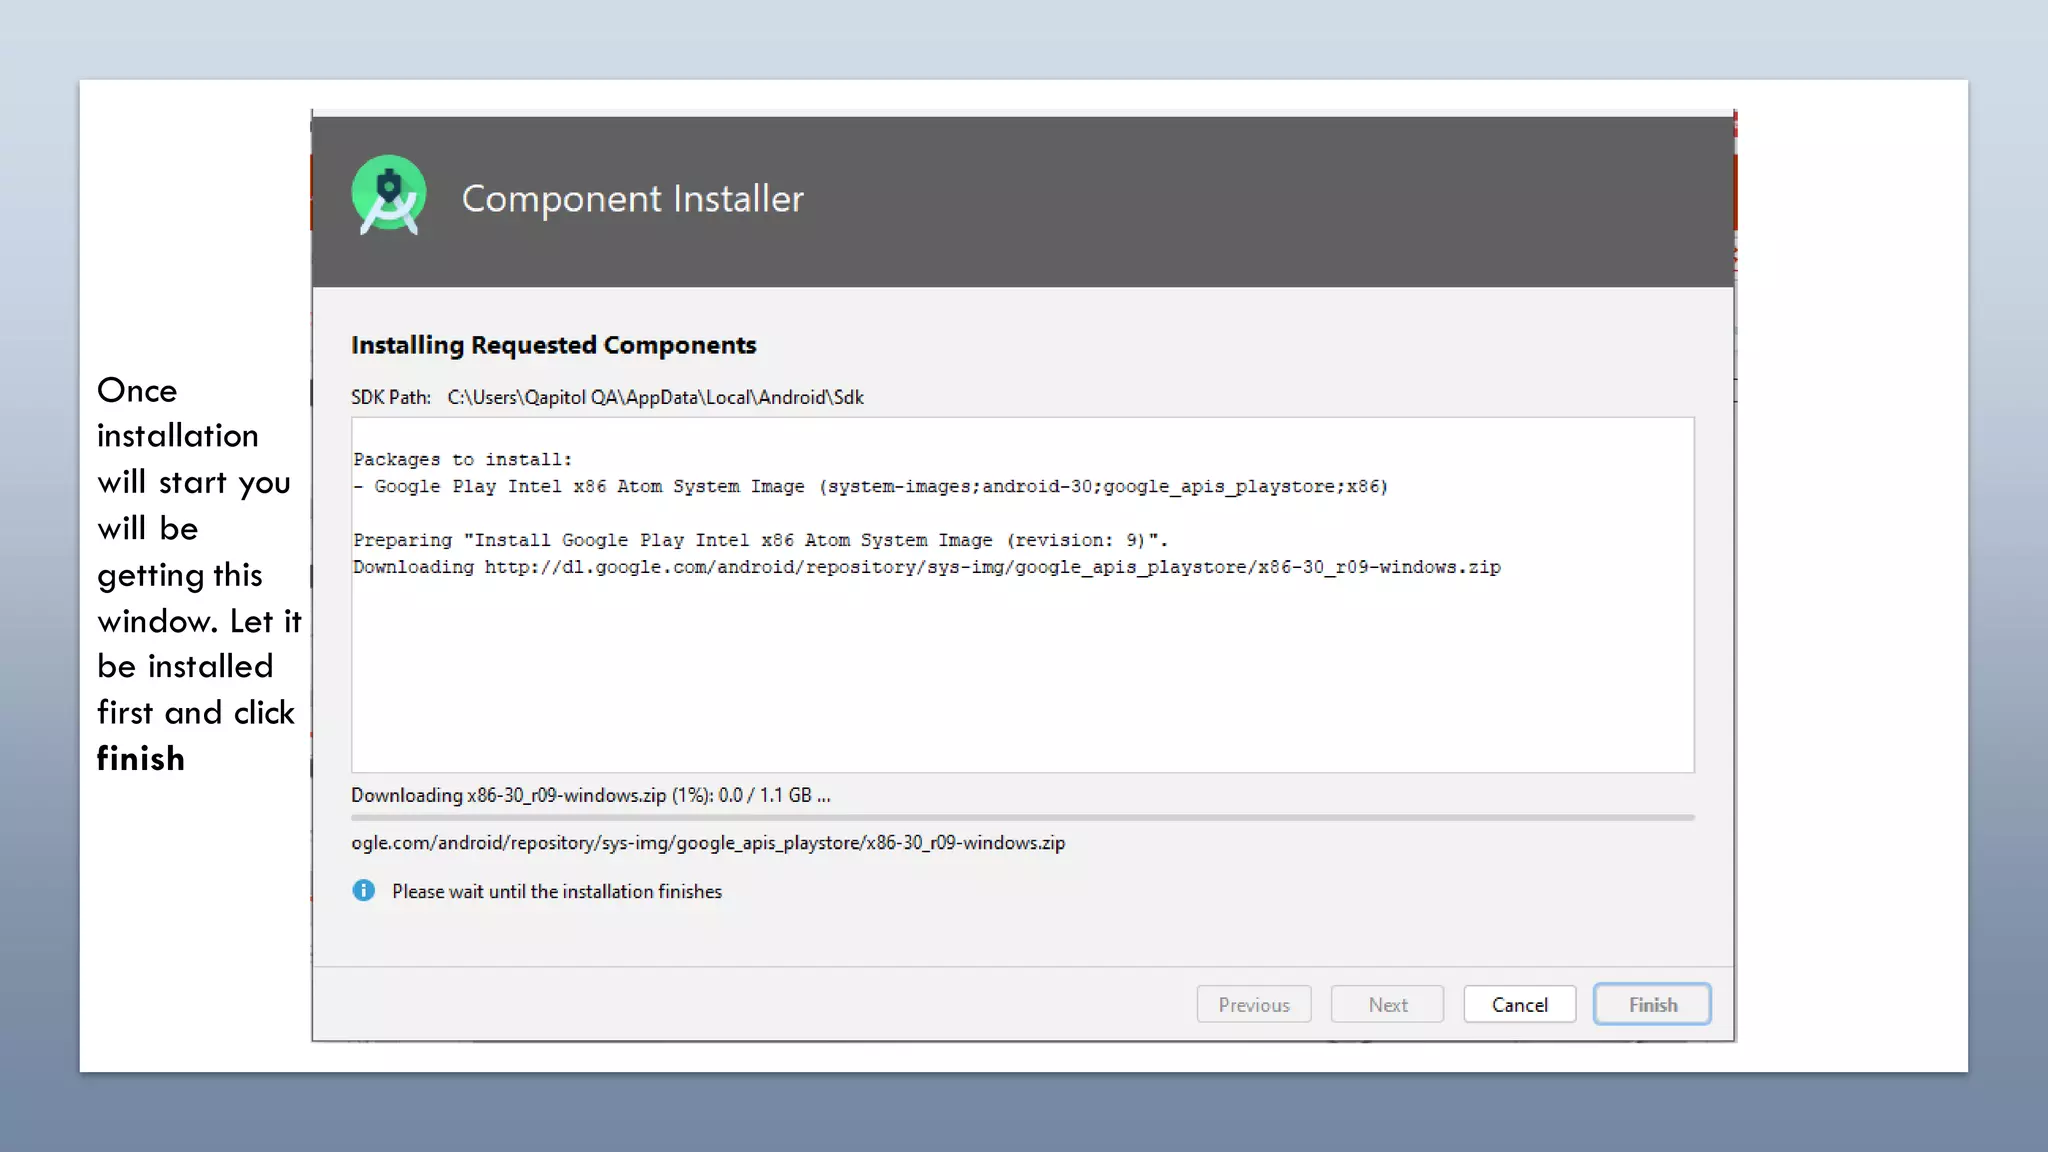
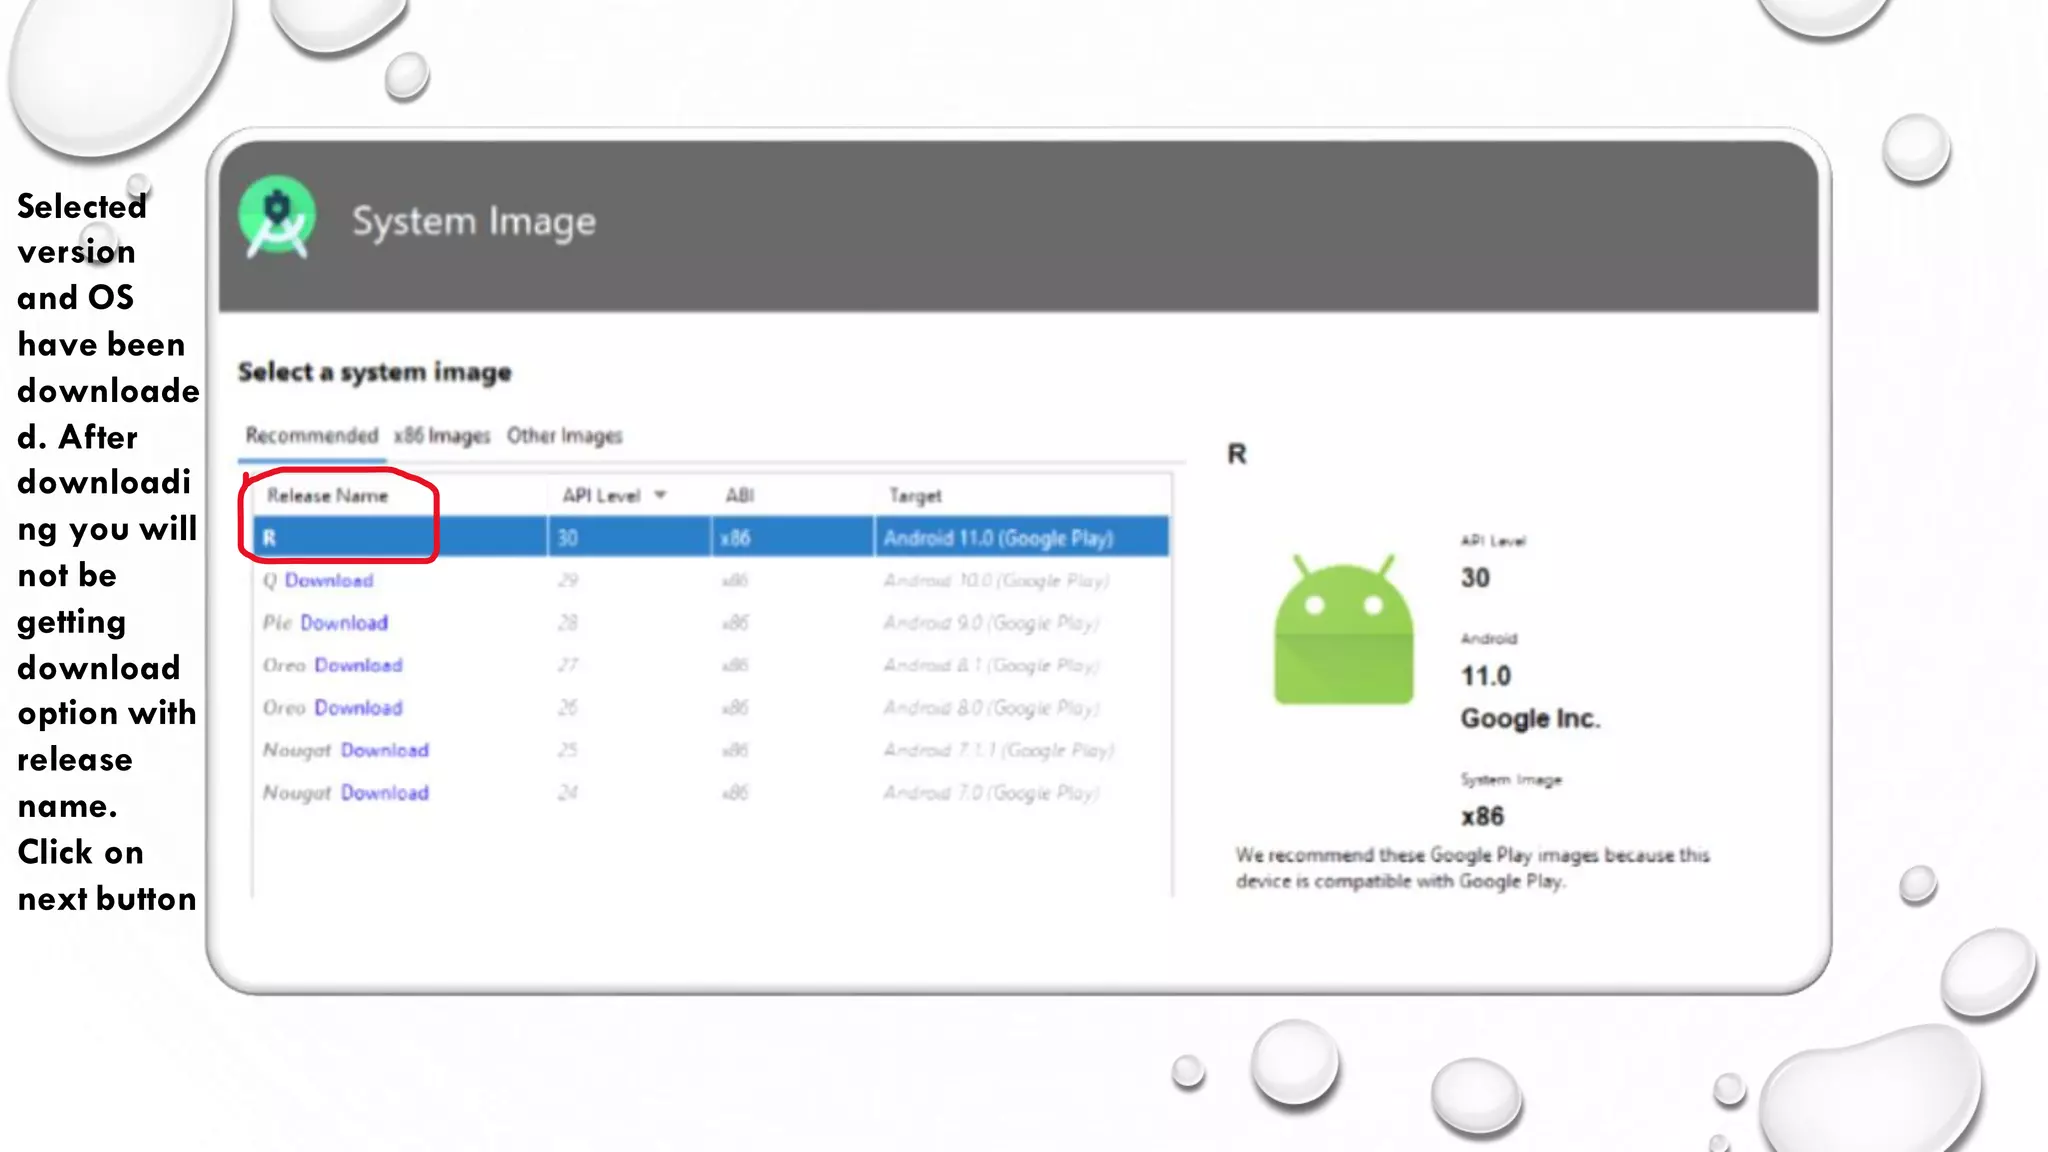
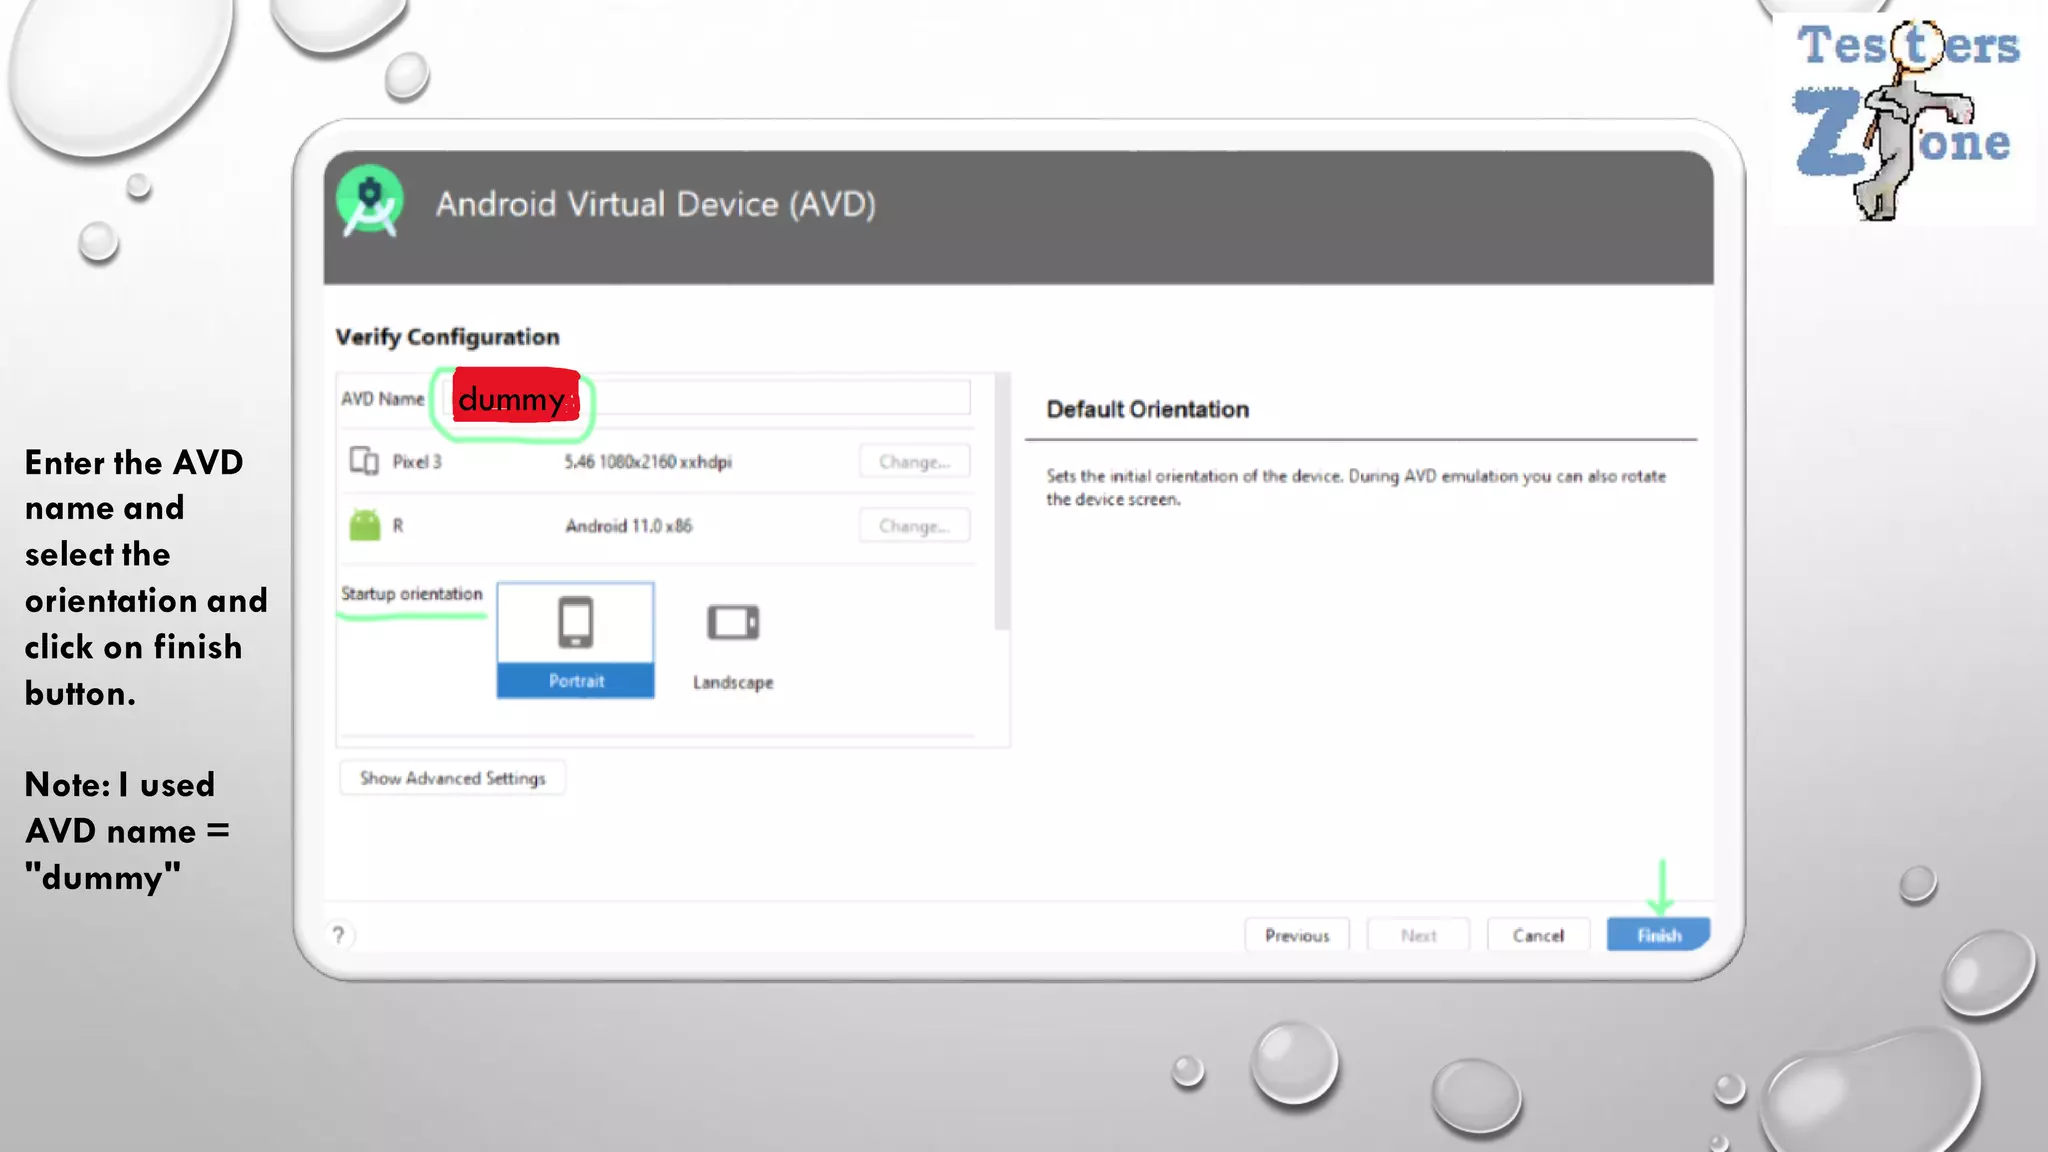
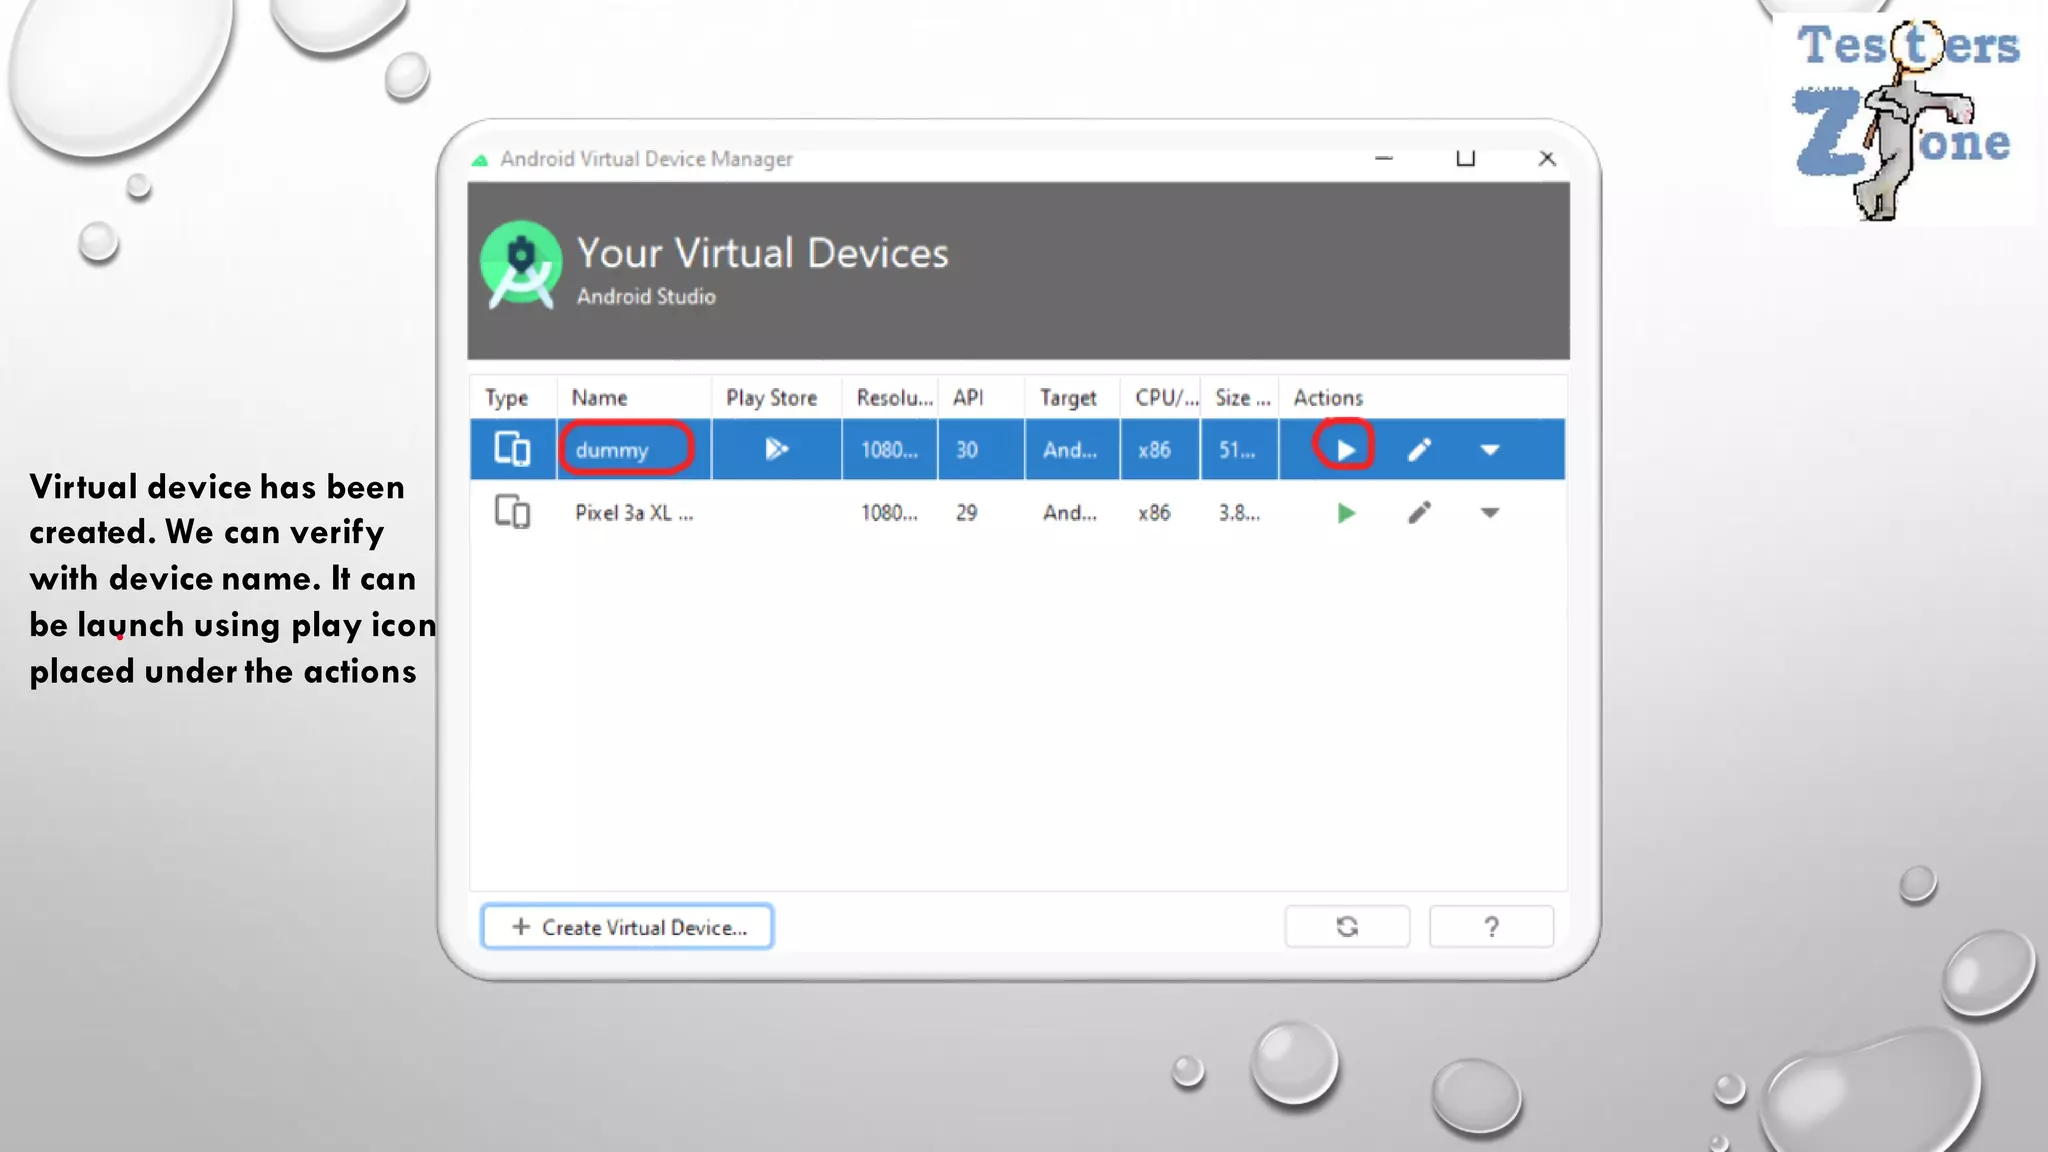
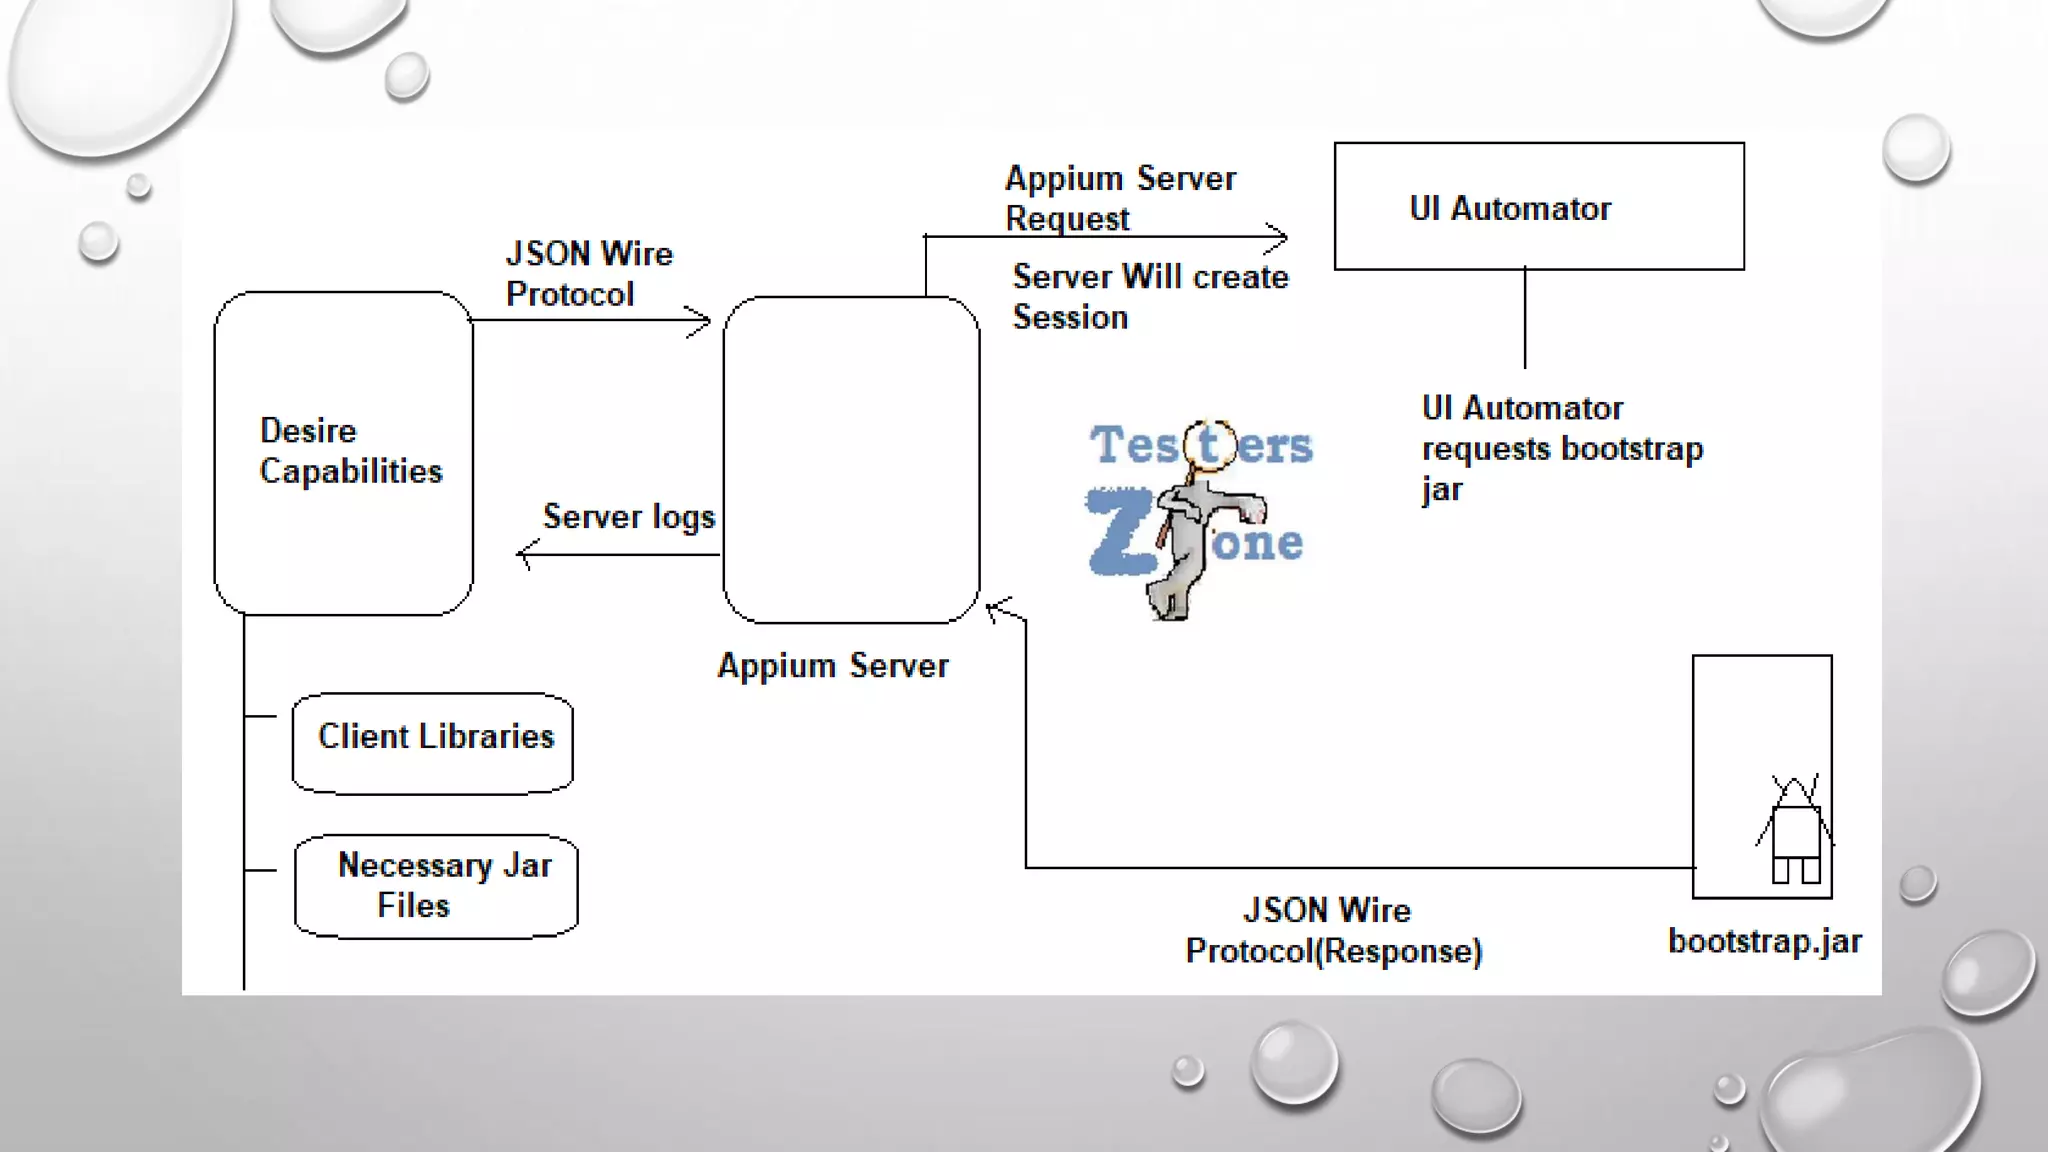
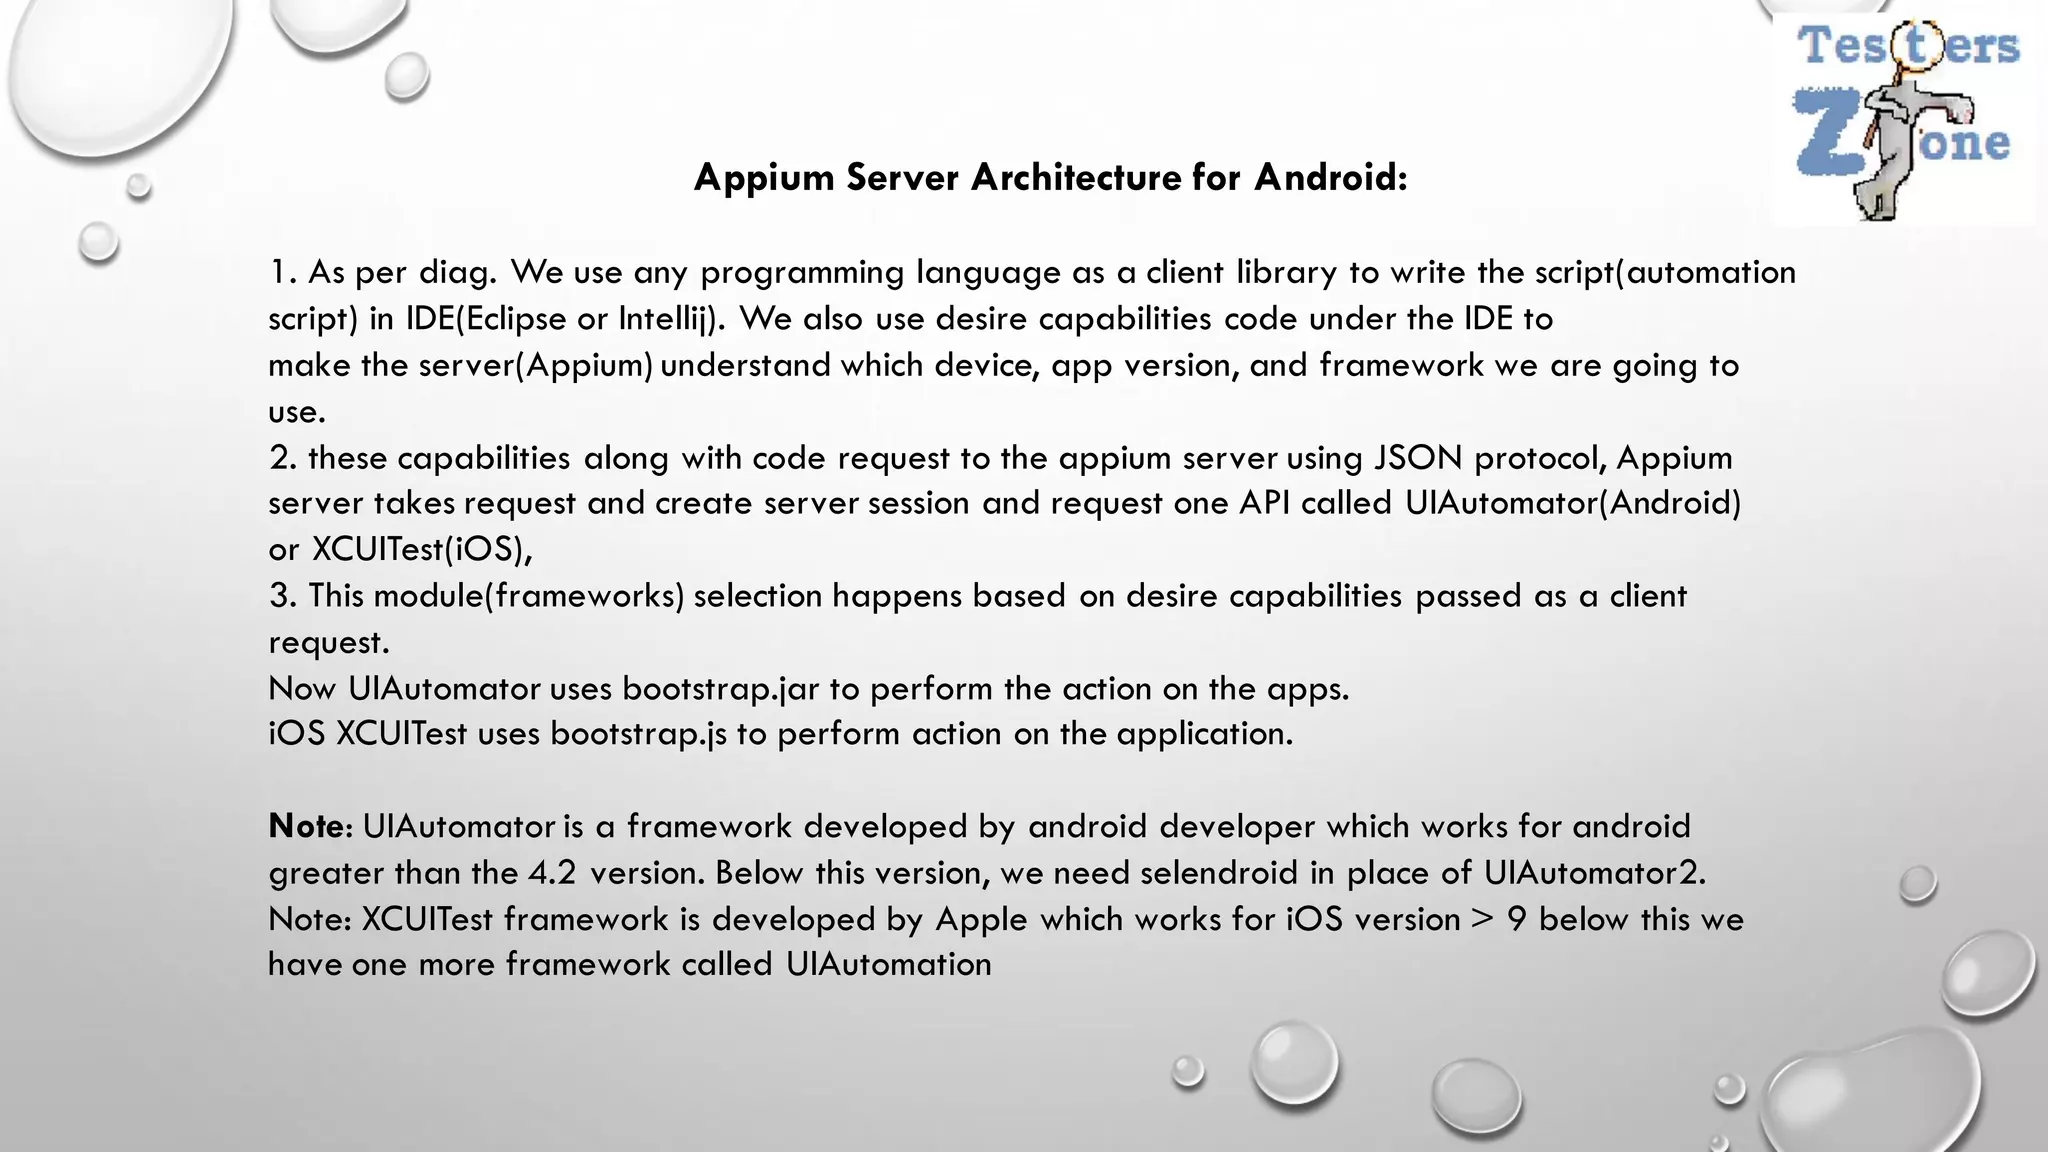
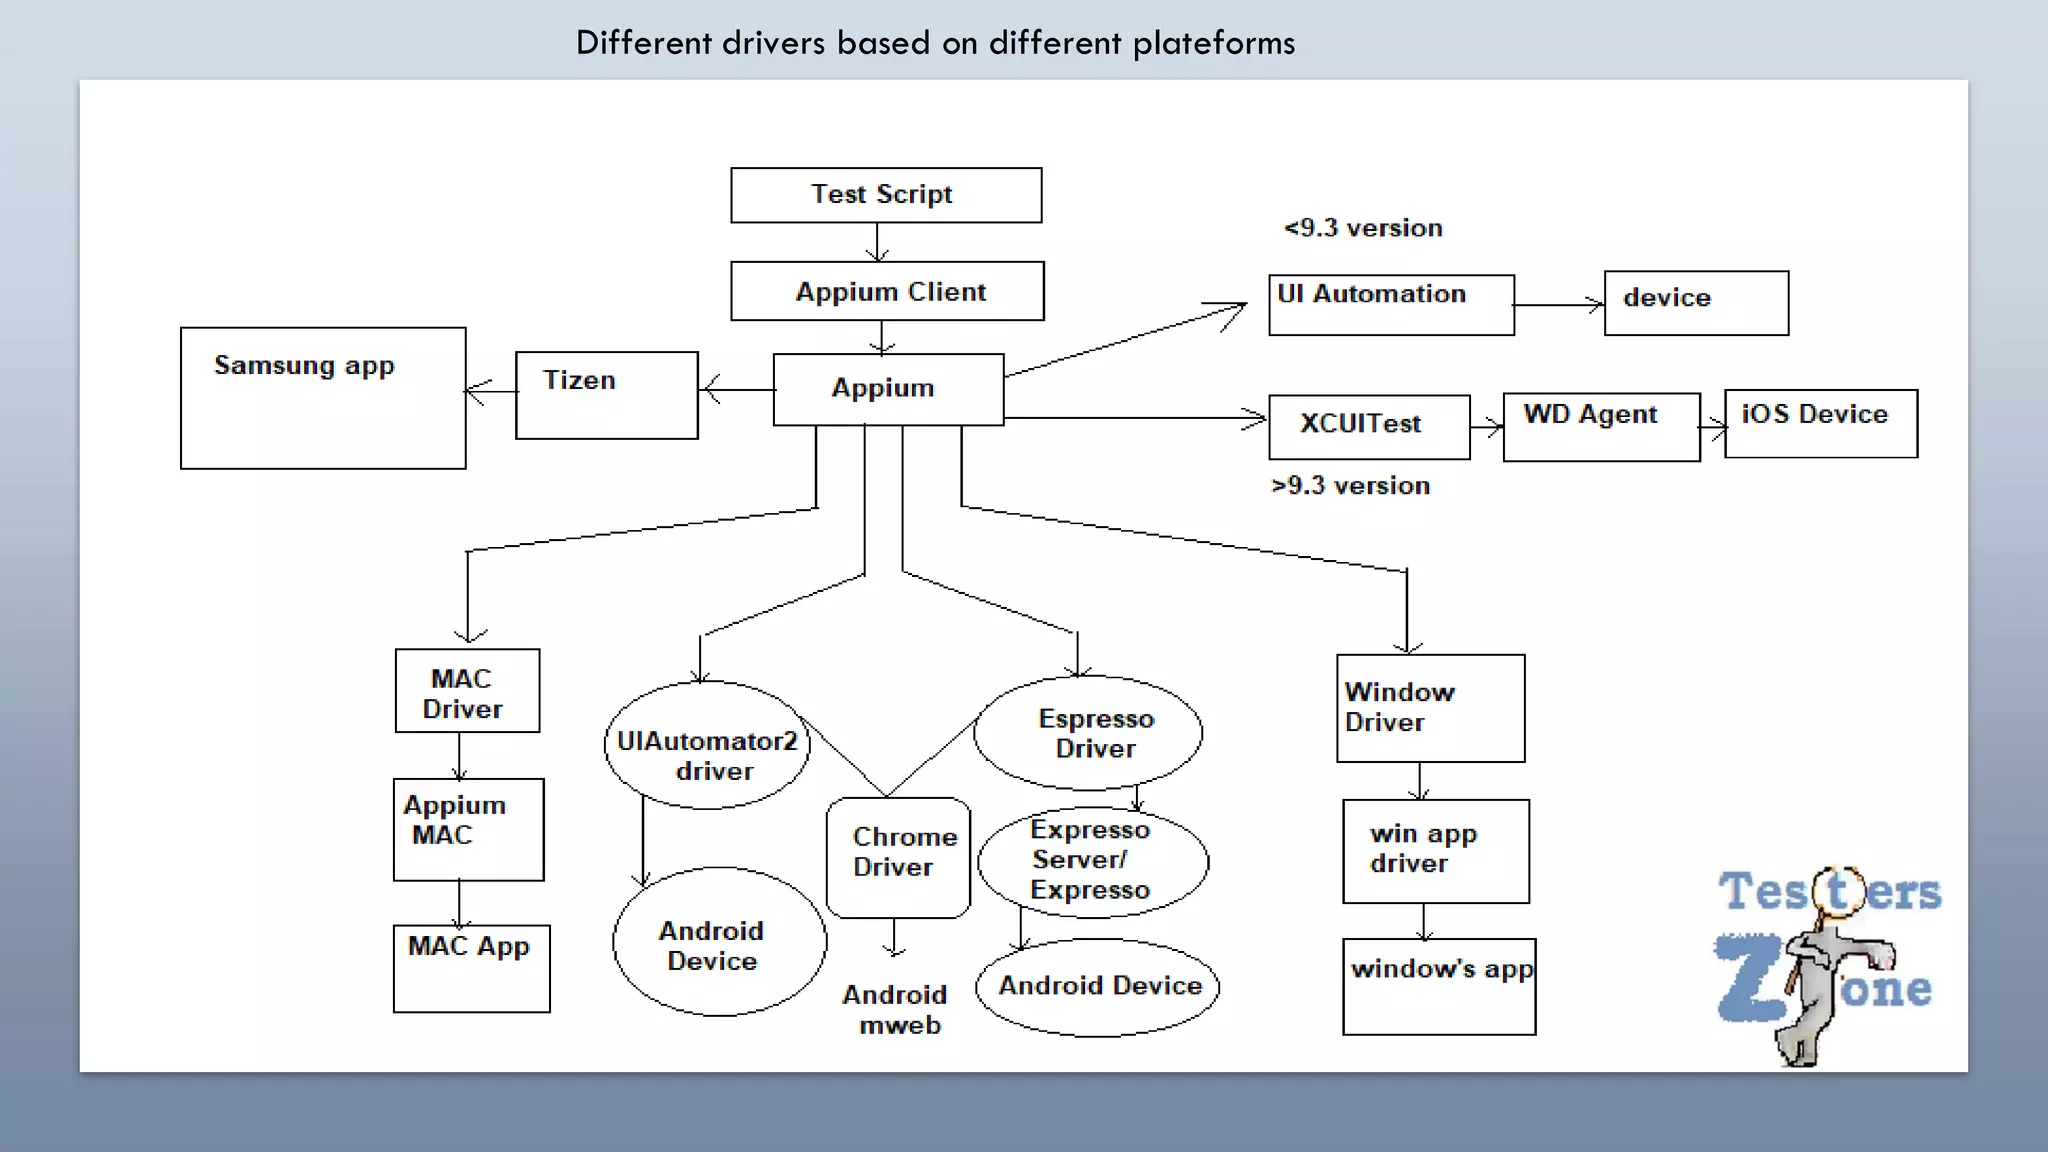
Appium Intro
&
Architecture
BY MITHILESH SINGH
APPIUM??
• Appium is mobile web, native and hybrid software
application test automation tool developed and
supported by sauce labs.
PREREQUISITE TO USE APPIUM (WINDOW)
INSTALL JAVA.
ECLIPSE/INTELLIJ.
MAVEN PLUGIN FOR IDE.
TESTNG PLUGIN FOR IDE.
SELENIUM STANDALONE SERVER.
ANDROID STUDIO.
APPIUM SERVER/ APPIUM DESKTOP.
NOTE: FOR JAVA AND IDE INSTALLATION YOU CAN
PREFER MY RESPECTIVE DOCS, HERE WE WILL BE
DEALING WITH ANDROID STUDIO AND APPIUM
INSTALLATION.
APPIUM
INSTALLATION
ON WINDOW
• Steps by step guideline to install Appium in the Window System.
• Download java and set Java_Home in environmentvariables.
• Download Android STUDIO from below link
• Https://developer.android.com/studio/index.html
• Check Android installation path in Machine
• Set Android_Home Environment variables path to SDK location and include bin folder
paths in PATH variable
• Open Android Studio and configure Virtual device/Emulator
• Open Emulator and check if it is working
• Download Node.js
• https://nodejs.org/en/download/
• Set Node_HomeEnvironmentvariables path
• Set npm Environment variables path
• Download Appium Serverfrom Node – command is available in the next slide
• Download Appium Java Client library--(https://appium.io/downloads.html)
• Install IDE( Eclipse or Intellij)—> Create project and configure Appium libraries
• Start Appium server
Points to be remembered:
1. Appium is a node module which can be installed using npm (command line installor). Npm comes
with node.js so once we install node.js we will get npm folder inside node.js folder structure. We have to
set the node.js path in the environment variable also. Then we can use npm(Node Package Manager) to
install the appium.
command: npm install –g appium
-g(global) indicates appium can be launched in your system without navigating to appium insttaled
location. Open the CMD and type appium and press enter appium will be launched.
Note: if we want to install specific appium version, we can use this command:
npm install –g appium@<version>
• 1. Android studio consists of android IDE. IDE helps to write and update the code and
SDK helps to develop and test the mobile application, and android virtual device(avd)--
>(emulator) to execute the automated test scenarios.
Note:: sdk folder path in window: path: c:usersadminappdatalocalandroidsdk
• 2. Android studio will be present at location: c:programe filesandroidandroid studio
• 3. Android studio consists 2 parts: 1. SDK and 2. Android virtual device. But SDK does
not present at the location where android studio folder exist. Both path is mentionedabove.
• 4. Tools folder will not be available under SDK folder, to get it first we need to launch
the android studio--> go to the SDK tools present next to the SDK platforms option -->
check for the option "android SDK tools" from the list--> uncheck the "hide obsolete
packages" option present bottom right corner--> click on apply and ok.
Note: observe the next slide to get the more clarity.
Key notes
DOWNLOAD APPIUM ON MAC
• Install java JDK latest version, or older version as per your need.
Link: https://www.oracle.com/technetwork/java/javase/downloads/index.html
• Install android studio from this link https://developer.android.com/studio/#mac-bundle
• Set java AND ANDROID home path using a terminal, type this command in the terminal:
Open -e .zshrc
we have to install zsh first: use below command to do this:
1. brew install zsh
2. sh -c "$(curl -fssl https://raw.githubusercontent.com/robbyrussell/oh-my-zsh/ Master/tools/install.Sh)"--> (This will install oh-my-zsh,
it is a framework which helps to maintain .zshrc configuration file)
note: if people want to know about .Bash or .Zshrc file, visit this link: https://linuxhint.com/differences_between_bash_zsh/
• It will open the .zshrc in edit mode. Now you can edit java_home, android _home
• Copy these commands and set your own username and JDK version:
export JAVA_HOME=/library/java/javavirtualmachines/jdk1.8.0_192.Jdk/contents/home
export ANDROID_HOME=/users/<username>/library/android/sdk
export PATH=$/library/java/javavirtualmachines/jdk1.8.0_192.Jdk/contents/home/
bin:$path
export PATH="/users/ <username> /library/android/sdk/platform-tools":$path
note: now, java and android home environmentvariable has been set.
• Download appium desktop and install it FROM BELOW link : https://github.Com/appium/appium-desktop/releases
Web application:
• Web app is real application, it is actually websites that open in your smartphone with help of a
web browser. Mobile websites have the broadest audience of all the primary types of
applications.
Native application:
• A native app is developed specifically for one platform. It can be installed through an application
store (such as google play store or apple app store)
Hybrid application:
• Hybrid apps are a way to expose content from existing websites in app format. It can well
described as a mixture of web app and native app.
Types of mobile application
What is an APK file?
• APK: android application package
• This is similar to .exe files which use to install
programs on windows. The only difference is that
.apk files are designed to be used exclusively on
android device and you may be required to
download additional files before you run the
application in the android.
Note:
there are various sites from where we can easily
download the .apk files for testing(learning)
purpose.
• - https://www.apk4fun.com/
• - https://apkpure.com/
• We are going to test mobile applications means
once after the application is developed, in android
it will be apk file only. So to automate that
application we need apk files. generally in real
time we can get this apk files from the developer
and for generic application we can download from
play store too.
• Emulator and simulator are virtual devices. A virtual
device is not real device but software which gives
same functionality as the real phone(except few
functionality like the camera).
• Android virtual device. : emulator
• Ios virtual device. : simulator
Emulator And Simulator
HOW TO CREATE VIRTUAL DEVICE(EMULATOR)
• Step: 1
open android studio from desktop icon. If you don't get icon then navigate to this location. C:program
filesandroidandroid studiobin and double click on studio64. This will help you to launch android
studio.
• Step: 2
Step: 3
Select the
device size
and
resolution
and click
on Next
Select any
android version
and OS, and click
on download
option
Once
installation
will start you
will be
getting this
window. Let it
be installed
first and click
finish
Selected
version
and OS
have been
downloade
d. After
downloadi
ng you will
not be
getting
download
option with
release
name.
Click on
next button
Enter the AVD
name and
select the
orientation and
click on finish
button.
Note: I used
AVD name =
"dummy"
dummy
Virtual device has been
created. We can verify
with device name. It can
be launch using play icon
placed under the actions
• Once you will click on the play button, the emulator/virtual
device will be turned on and appear on the screen as shown
in the image.
INSTALL APK FILE ON VIRTUAL DEVICE(EMULATOR)
USING APPIUM SERVER DESKTOP
• Step1: launch the android studio click on configure--> AVD manager --> launch the emulator.
• Step2: launch the appium desktop and click on start inspector session(search icon).
• To check the device which are all connected with appium server just use adb command "adb devices" in cmd you will
get device details
• To install the apk file in the emulator we need to add desire capabilities in the appium desktop specified below
note: app is the key which takes apk file path as value and install the app in emulator.
Click start session after saving the capabilities.
INSTALL APK FILE ON REAL DEVICE USING APPIUM
SERVER DESKTOP
• Connect the device with your laptop and to see the
mobile screen on the laptop screen use vysor app. It is
available as a extension in the chrome browser.
• Go to mobile setting --> about phone --> build
number. Tap on this build number 8-10 times then go
back to the setting page and observe developer options
will be available. It shows developer optionsis active
now.
In the latest android mobile device
we might not get build number
option so in this case we can go to
setting and search for developer
options and turn on the usb
debugging option shown in the
screen
note: once developer option is on
we can set the desire capabilities
same as we did earlier. Only
device name we need to change
with real device name.
INSTALL APK(MOBILE APP) ON REAL DEVICE USING ADB commands
HERE IS THE FOLLOWINGCOMMANDS WHICH WE USE TO INSTALL apk
Kill the server : adb kill-server
Start the server : adb start-server
To check connected devices : adb.devices
Navigate to the folder where apk file is present and use this command: adb install <apk
file name with .apk extension>
HOW
MANY
WAYS CAN
INSPECT
THE
ELEMENT
• There are two ways to inspect the element in the appium
1. Appium inspector
2. Uiautomator
Steps to use "Appium Inspector"
1. To Use appium inspector we need to launch
appium server.
Note: if appium is already installed we can
launch it using command "appium in
command line. Or we can open it using
Appium Inspector shown in the screen.
Click on
Steps to use "Appium Inspector"
2. Click on search icon(presenttop right corner).
Steps to use "Appium Inspector"
3. One new window will
appear where we need to fill device
details as desire capabilities--> then
click on Start Session. New screen
will appear
4. Click on search
icon present top middle place and
mouse over on the mobile elements t
o observe the locators.
Steps to use "UI Automator"
• Launch uiautomatorbatch file from the
location: c:users<xyz>appdatalocal
androidsdktoolsbin
Note: Click on Device screenshotoption
present top left corner on the screen. It will
capture the screen of added mobile device
on the UI Automator viewer screen. Now we
can select locators from this screen
Note: you will not be getting xpath on the
screen, other locators can be used.
Desired capabilities
• We can get detail explanation on desired capabilities for appium under appium official website:
appium.io/docs/en/about/intro/
Desire capabilities
• For android:
{
"deviceName": "Samsung",
"platformName": "Android",
"platformVersion": "6.0.1",
"appActivity": "com.movie.abc.splashscreen.SplashScreenActivity",
"appPackage": "com.bt.abc",
"noReset": true,
"fullReset": false
}
• For IOS:
{
"platformName": "iOS",
"udid": "00008030-0018255C3A92402E",
"automationName": "XCUITest",
"platformVersion": "14.4",
"autoAcceptAlerts": false,
"bundleId": "com.testerszone.testersZoneApp",
"deviceName": "TestersZone iPhone",
"app": /Users/mithilesh/Downloads/testerszone.ipa",
"noReset": true
}
Here is example of iOS and
android desired capabilities. To
get more information about
deviceName,PlateformName keys
you can visit appium official
website. Link mentioned in last
slide.
There are so many other keys
which we can explore based on
needs.
APPIUM ARCHITECTURE
Appium Server Architecture for Android:
1. As per diag. We use any programming language as a client library to write the script(automation
script) in IDE(Eclipse or Intellij). We also use desire capabilities code under the IDE to
make the server(Appium) understand which device, app version, and framework we are going to
use.
2. these capabilities along with code request to the appium server using JSON protocol, Appium
server takes request and create server session and request one API called UIAutomator(Android)
or XCUITest(iOS),
3. This module(frameworks) selection happens based on desire capabilities passed as a client
request.
Now UIAutomator uses bootstrap.jar to perform the action on the apps.
iOS XCUITest uses bootstrap.js to perform action on the application.
Note: UIAutomator is a framework developed by android developer which works for android
greater than the 4.2 version. Below this version, we need selendroid in place of UIAutomator2.
Note: XCUITest framework is developed by Apple which works for iOS version > 9 below this we
have one more framework called UIAutomation
Different drivers based on different plateforms
• It is free and open source.
• It supports both android and ios.
• Automation tests for ios and android can be written using same API.
• Appium tests can be written using any language.
• No need to install any extra software on mobile device to support appium.
Advantages of Appium
• Configuration and time needed to setup appium for ios and android is
complex.
• Automation support for android 4.1 or lower is not present.
• Appium inspector cannot be run on windows.
Limitations of Appium
By Mithilesh Singh

Appium- part 1

  • 1.
  • 2.
    APPIUM?? • Appium ismobile web, native and hybrid software application test automation tool developed and supported by sauce labs.
  • 3.
    PREREQUISITE TO USEAPPIUM (WINDOW) INSTALL JAVA. ECLIPSE/INTELLIJ. MAVEN PLUGIN FOR IDE. TESTNG PLUGIN FOR IDE. SELENIUM STANDALONE SERVER. ANDROID STUDIO. APPIUM SERVER/ APPIUM DESKTOP. NOTE: FOR JAVA AND IDE INSTALLATION YOU CAN PREFER MY RESPECTIVE DOCS, HERE WE WILL BE DEALING WITH ANDROID STUDIO AND APPIUM INSTALLATION.
  • 4.
    APPIUM INSTALLATION ON WINDOW • Stepsby step guideline to install Appium in the Window System. • Download java and set Java_Home in environmentvariables. • Download Android STUDIO from below link • Https://developer.android.com/studio/index.html • Check Android installation path in Machine • Set Android_Home Environment variables path to SDK location and include bin folder paths in PATH variable • Open Android Studio and configure Virtual device/Emulator • Open Emulator and check if it is working • Download Node.js • https://nodejs.org/en/download/ • Set Node_HomeEnvironmentvariables path • Set npm Environment variables path • Download Appium Serverfrom Node – command is available in the next slide • Download Appium Java Client library--(https://appium.io/downloads.html) • Install IDE( Eclipse or Intellij)—> Create project and configure Appium libraries • Start Appium server
  • 6.
    Points to beremembered: 1. Appium is a node module which can be installed using npm (command line installor). Npm comes with node.js so once we install node.js we will get npm folder inside node.js folder structure. We have to set the node.js path in the environment variable also. Then we can use npm(Node Package Manager) to install the appium. command: npm install –g appium -g(global) indicates appium can be launched in your system without navigating to appium insttaled location. Open the CMD and type appium and press enter appium will be launched. Note: if we want to install specific appium version, we can use this command: npm install –g appium@<version>
  • 7.
    • 1. Androidstudio consists of android IDE. IDE helps to write and update the code and SDK helps to develop and test the mobile application, and android virtual device(avd)-- >(emulator) to execute the automated test scenarios. Note:: sdk folder path in window: path: c:usersadminappdatalocalandroidsdk • 2. Android studio will be present at location: c:programe filesandroidandroid studio • 3. Android studio consists 2 parts: 1. SDK and 2. Android virtual device. But SDK does not present at the location where android studio folder exist. Both path is mentionedabove. • 4. Tools folder will not be available under SDK folder, to get it first we need to launch the android studio--> go to the SDK tools present next to the SDK platforms option --> check for the option "android SDK tools" from the list--> uncheck the "hide obsolete packages" option present bottom right corner--> click on apply and ok. Note: observe the next slide to get the more clarity. Key notes
  • 9.
    DOWNLOAD APPIUM ONMAC • Install java JDK latest version, or older version as per your need. Link: https://www.oracle.com/technetwork/java/javase/downloads/index.html • Install android studio from this link https://developer.android.com/studio/#mac-bundle • Set java AND ANDROID home path using a terminal, type this command in the terminal: Open -e .zshrc we have to install zsh first: use below command to do this: 1. brew install zsh 2. sh -c "$(curl -fssl https://raw.githubusercontent.com/robbyrussell/oh-my-zsh/ Master/tools/install.Sh)"--> (This will install oh-my-zsh, it is a framework which helps to maintain .zshrc configuration file) note: if people want to know about .Bash or .Zshrc file, visit this link: https://linuxhint.com/differences_between_bash_zsh/ • It will open the .zshrc in edit mode. Now you can edit java_home, android _home • Copy these commands and set your own username and JDK version: export JAVA_HOME=/library/java/javavirtualmachines/jdk1.8.0_192.Jdk/contents/home export ANDROID_HOME=/users/<username>/library/android/sdk export PATH=$/library/java/javavirtualmachines/jdk1.8.0_192.Jdk/contents/home/ bin:$path export PATH="/users/ <username> /library/android/sdk/platform-tools":$path note: now, java and android home environmentvariable has been set. • Download appium desktop and install it FROM BELOW link : https://github.Com/appium/appium-desktop/releases
  • 10.
    Web application: • Webapp is real application, it is actually websites that open in your smartphone with help of a web browser. Mobile websites have the broadest audience of all the primary types of applications. Native application: • A native app is developed specifically for one platform. It can be installed through an application store (such as google play store or apple app store) Hybrid application: • Hybrid apps are a way to expose content from existing websites in app format. It can well described as a mixture of web app and native app. Types of mobile application
  • 12.
    What is anAPK file? • APK: android application package • This is similar to .exe files which use to install programs on windows. The only difference is that .apk files are designed to be used exclusively on android device and you may be required to download additional files before you run the application in the android. Note: there are various sites from where we can easily download the .apk files for testing(learning) purpose. • - https://www.apk4fun.com/ • - https://apkpure.com/ • We are going to test mobile applications means once after the application is developed, in android it will be apk file only. So to automate that application we need apk files. generally in real time we can get this apk files from the developer and for generic application we can download from play store too.
  • 13.
    • Emulator andsimulator are virtual devices. A virtual device is not real device but software which gives same functionality as the real phone(except few functionality like the camera). • Android virtual device. : emulator • Ios virtual device. : simulator Emulator And Simulator
  • 14.
    HOW TO CREATEVIRTUAL DEVICE(EMULATOR) • Step: 1 open android studio from desktop icon. If you don't get icon then navigate to this location. C:program filesandroidandroid studiobin and double click on studio64. This will help you to launch android studio. • Step: 2
  • 15.
  • 16.
  • 17.
    Select any android version andOS, and click on download option
  • 18.
    Once installation will start you willbe getting this window. Let it be installed first and click finish
  • 19.
    Selected version and OS have been downloade d.After downloadi ng you will not be getting download option with release name. Click on next button
  • 20.
    Enter the AVD nameand select the orientation and click on finish button. Note: I used AVD name = "dummy" dummy
  • 21.
    Virtual device hasbeen created. We can verify with device name. It can be launch using play icon placed under the actions
  • 22.
    • Once youwill click on the play button, the emulator/virtual device will be turned on and appear on the screen as shown in the image.
  • 23.
    INSTALL APK FILEON VIRTUAL DEVICE(EMULATOR) USING APPIUM SERVER DESKTOP • Step1: launch the android studio click on configure--> AVD manager --> launch the emulator. • Step2: launch the appium desktop and click on start inspector session(search icon). • To check the device which are all connected with appium server just use adb command "adb devices" in cmd you will get device details
  • 24.
    • To installthe apk file in the emulator we need to add desire capabilities in the appium desktop specified below note: app is the key which takes apk file path as value and install the app in emulator. Click start session after saving the capabilities.
  • 25.
    INSTALL APK FILEON REAL DEVICE USING APPIUM SERVER DESKTOP • Connect the device with your laptop and to see the mobile screen on the laptop screen use vysor app. It is available as a extension in the chrome browser. • Go to mobile setting --> about phone --> build number. Tap on this build number 8-10 times then go back to the setting page and observe developer options will be available. It shows developer optionsis active now.
  • 26.
    In the latestandroid mobile device we might not get build number option so in this case we can go to setting and search for developer options and turn on the usb debugging option shown in the screen note: once developer option is on we can set the desire capabilities same as we did earlier. Only device name we need to change with real device name.
  • 27.
    INSTALL APK(MOBILE APP)ON REAL DEVICE USING ADB commands HERE IS THE FOLLOWINGCOMMANDS WHICH WE USE TO INSTALL apk Kill the server : adb kill-server Start the server : adb start-server To check connected devices : adb.devices Navigate to the folder where apk file is present and use this command: adb install <apk file name with .apk extension>
  • 28.
    HOW MANY WAYS CAN INSPECT THE ELEMENT • Thereare two ways to inspect the element in the appium 1. Appium inspector 2. Uiautomator
  • 29.
    Steps to use"Appium Inspector" 1. To Use appium inspector we need to launch appium server. Note: if appium is already installed we can launch it using command "appium in command line. Or we can open it using Appium Inspector shown in the screen. Click on
  • 30.
    Steps to use"Appium Inspector" 2. Click on search icon(presenttop right corner).
  • 31.
    Steps to use"Appium Inspector" 3. One new window will appear where we need to fill device details as desire capabilities--> then click on Start Session. New screen will appear 4. Click on search icon present top middle place and mouse over on the mobile elements t o observe the locators.
  • 32.
    Steps to use"UI Automator" • Launch uiautomatorbatch file from the location: c:users<xyz>appdatalocal androidsdktoolsbin Note: Click on Device screenshotoption present top left corner on the screen. It will capture the screen of added mobile device on the UI Automator viewer screen. Now we can select locators from this screen Note: you will not be getting xpath on the screen, other locators can be used.
  • 33.
    Desired capabilities • Wecan get detail explanation on desired capabilities for appium under appium official website: appium.io/docs/en/about/intro/
  • 34.
    Desire capabilities • Forandroid: { "deviceName": "Samsung", "platformName": "Android", "platformVersion": "6.0.1", "appActivity": "com.movie.abc.splashscreen.SplashScreenActivity", "appPackage": "com.bt.abc", "noReset": true, "fullReset": false } • For IOS: { "platformName": "iOS", "udid": "00008030-0018255C3A92402E", "automationName": "XCUITest", "platformVersion": "14.4", "autoAcceptAlerts": false, "bundleId": "com.testerszone.testersZoneApp", "deviceName": "TestersZone iPhone", "app": /Users/mithilesh/Downloads/testerszone.ipa", "noReset": true } Here is example of iOS and android desired capabilities. To get more information about deviceName,PlateformName keys you can visit appium official website. Link mentioned in last slide. There are so many other keys which we can explore based on needs.
  • 35.
  • 37.
    Appium Server Architecturefor Android: 1. As per diag. We use any programming language as a client library to write the script(automation script) in IDE(Eclipse or Intellij). We also use desire capabilities code under the IDE to make the server(Appium) understand which device, app version, and framework we are going to use. 2. these capabilities along with code request to the appium server using JSON protocol, Appium server takes request and create server session and request one API called UIAutomator(Android) or XCUITest(iOS), 3. This module(frameworks) selection happens based on desire capabilities passed as a client request. Now UIAutomator uses bootstrap.jar to perform the action on the apps. iOS XCUITest uses bootstrap.js to perform action on the application. Note: UIAutomator is a framework developed by android developer which works for android greater than the 4.2 version. Below this version, we need selendroid in place of UIAutomator2. Note: XCUITest framework is developed by Apple which works for iOS version > 9 below this we have one more framework called UIAutomation
  • 38.
    Different drivers basedon different plateforms
  • 39.
    • It isfree and open source. • It supports both android and ios. • Automation tests for ios and android can be written using same API. • Appium tests can be written using any language. • No need to install any extra software on mobile device to support appium. Advantages of Appium
  • 40.
    • Configuration andtime needed to setup appium for ios and android is complex. • Automation support for android 4.1 or lower is not present. • Appium inspector cannot be run on windows. Limitations of Appium
  • 41.