

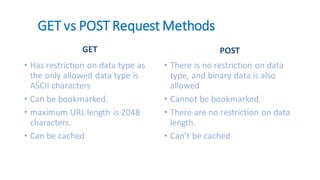


![How to
validate Get
Request
• We can write snippet of code to validate the GET request in
the postman tool.
• Steps:
Click on Tests(availablebelow to URL textbox in postman)
and add the code.
• 1. tests["Validating Status Code"] = responseCode.code
== 200;
2. tests["Validating response body"] =
responseBody.has("data");
3. var response = JSON.parse(responseBody);
4. tests["page no"] = response.page ==2;
• Note: line no.2 says "data" will be validated in response
body, where ever it is present.
Line no.4 represent the specific row where page no. Needs
to be presented for validation.](https://image.slidesharecdn.com/apitestingwithpostman-220620104918-28b78240/85/API_Testing_with_Postman-17-320.jpg)


![Execute collection
remotely- without
exporting it
For that we need to get the url of the collectiom
• 1. Click on three dot's available right side of the collection--> select
the collection
• 2. Click on shared the link--> get publiclink
• use this publiclinkto execute the collection.
• command: newman run <Url > -r html [it will generate report also].](https://image.slidesharecdn.com/apitestingwithpostman-220620104918-28b78240/85/API_Testing_with_Postman-33-320.jpg)


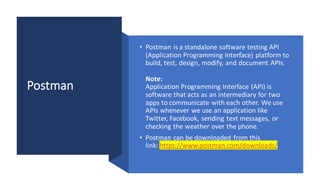
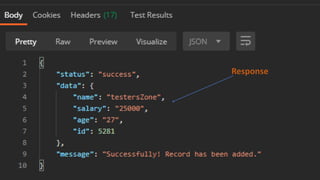
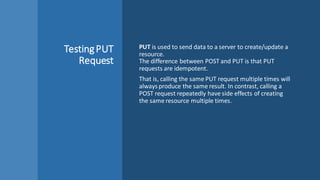
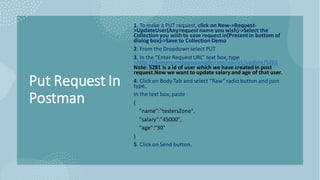
Postman is a software platform for testing APIs that supports building, modifying, and documenting APIs, utilizing HTTP requests for interaction. It provides various HTTP methods (GET, POST, PUT, DELETE) to perform actions on resources and allows for organize testing through workspaces and collections. The document covers how to create requests, validate responses, utilize authentication, test different types of requests, and use data-driven testing within Postman.


![[GDSC-ADYPU] APIs 101 with Postman](https://cdn.slidesharecdn.com/ss_thumbnails/gdsc-adypuapis101workshop-211016084635-thumbnail.jpg?width=640&height=640&fit=bounds)


![谷歌留痕技术教程[ 𝙩𝙤𝙥 𝟮𝟯𝟯. 𝙘 𝙤𝙢 ]](https://cdn.slidesharecdn.com/ss_thumbnails/top233-260130173900-2eb784f9-thumbnail.jpg?width=640&height=640&fit=bounds)


![20260201 [FOSDEM] gomodjail - library sandboxing for Go modules.pdf](https://cdn.slidesharecdn.com/ss_thumbnails/20260201fosdemgomodjail-librarysandboxingforgomodules-260201225659-76609ec4-thumbnail.jpg?width=640&height=640&fit=bounds)