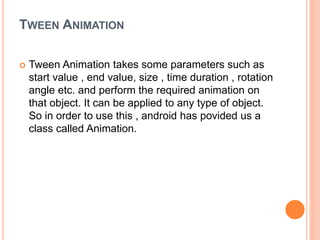
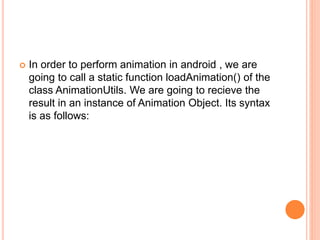
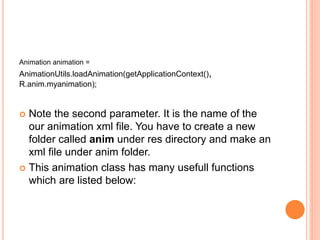
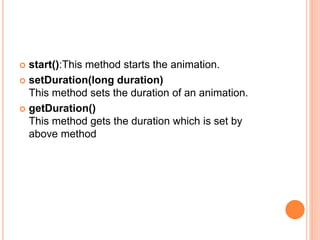
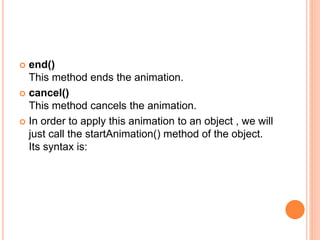
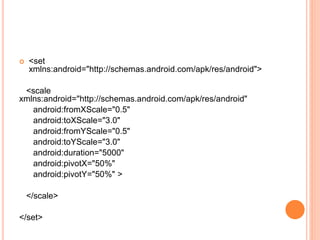
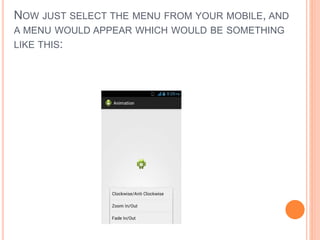
ANDROID ANIMATIONS
 Animation in android is possible from many ways.
In this chapter we will discuss one easy and widely
used way of making animation called tweened
animation.
TWEEN ANIMATION
 Tween Animation takes some parameters such as
start value , end value, size , time duration , rotation
angle etc. and perform the required animation on
that object. It can be applied to any type of object.
So in order to use this , android has povided us a
class called Animation.
 In order to perform animation in android , we are
going to call a static function loadAnimation() of the
class AnimationUtils. We are going to recieve the
result in an instance of Animation Object. Its syntax
is as follows:
Animation animation =
AnimationUtils.loadAnimation(getApplicationContext(),
R.anim.myanimation);
 Note the second parameter. It is the name of the
our animation xml file. You have to create a new
folder called anim under res directory and make an
xml file under anim folder.
 This animation class has many usefull functions
which are listed below:
 start():This method starts the animation.
 setDuration(long duration)
This method sets the duration of an animation.
 getDuration()
This method gets the duration which is set by
above method
 end()
This method ends the animation.
 cancel()
This method cancels the animation.
 In order to apply this animation to an object , we will
just call the startAnimation() method of the object.
Its syntax is:
 ImageView image1 =
(ImageView)findViewById(R.id.imageView1);
 image.startAnimation(animation);
ZOOM IN ANIMATION
 In order to perform a zoom in animation , create an
XML file under anim folder under res directory and
put this code in the file.
 <set
xmlns:android="http://schemas.android.com/apk/res/android">
<scale
xmlns:android="http://schemas.android.com/apk/res/android"
android:fromXScale="0.5"
android:toXScale="3.0"
android:fromYScale="0.5"
android:toYScale="3.0"
android:duration="5000"
android:pivotX="50%"
android:pivotY="50%" >
</scale>
</set>
 The parameter fromXScale and from Yscale define
 the start point .
 The parameters toXScale andtoYScale defines the end
point.
 The duration defines the time of animation and
the pivotX,pivotYdefines the center from where the
animation would start.
EXAMPLE
 The following example demonstrates the use of
Animation in android. You would be able to choose
different type of animation from the menu and the
selected animation will be applied on an imageView
on the screen.
 To experiment with this example , you need to run
this on an emulator or an actual device.
STEPS:
 You will use Eclipse IDE to create an Android
application and name it as Animation under a
package com.example.animation. While creating
this project, make sure you Target SDK and
Compile With at the latest version of Android SDK
to use higher levels of APIs.
 Modify src/MainActivity.java file to add animation
code .
 Modify layout XML file res/layout/activity_main.xml
add any GUI component if required.
 Create a new folder under res directory and call it
anim. Confirm it by visiting res/anim.
 Right click on anim and click on new and select
Android XML file You have to create three different
files that are listed below.
 Create file myanimation.xml,clockwise.xml and add
the XML code.
 Modify res/values/string.xml file and add necessary
string components.
 Modify res/menu/main.xml file and add necessary
menu components.
 Run the application and choose a running android
device and install the application on it and verify the
results.
 Here is the modified code
of src/com.example.animation/MainActivity.java.
package com.example.animation;
import com.example.animation.R;
import android.os.Bundle;
import android.app.Activity;
import android.view.Menu;
import android.view.MenuItem;
import android.view.animation.Animation;
import android.view.animation.AnimationUtils;
import android.widget.ImageView;
}
public class MainActivity extends Activity {
@Override
protected void onCreate(Bundle savedInstanceState) {
super.onCreate(savedInstanceState);
setContentView(R.layout.activity_main);
}
@Override
public boolean onCreateOptionsMenu(Menu menu) {
// Inflate the menu; this adds items to the action bar if it is present.
getMenuInflater().inflate(R.menu.main, menu);
return true;
}
public boolean onOptionsItemSelected(MenuItem item)
{
super.onOptionsItemSelected(item);
switch(item.getItemId())
{
case R.id.zoomInOut:
ImageView image =
(ImageView)findViewById(R.id.imageView1);
Animation animation =
AnimationUtils.loadAnimation(getApplicationContext(),
R.anim.myanimation);
image.startAnimation(animation);
return true;
case R.id.rotate360:
ImageView image1 =
(ImageView)findViewById(R.id.imageView1);
Animation animation1 =
AnimationUtils.loadAnimation(getApplicationContext()
, R.anim.clockwise);
image1.startAnimation(animation1);
return true;
case R.id.fadeInOut:
ImageView image2 =
(ImageView)findViewById(R.id.imageView1);
Animation animation2 =
AnimationUtils.loadAnimation(getApplicationContext()
, R.anim.fade);
image2.startAnimation(animation2);
return true;
}
return false;
}
HERE IS THE MODIFIED CODE
OF RES/LAYOUT/ACTIVITY_MAIN.XML.
<RelativeLayout
xmlns:android="http://schemas.android.com/apk/res/android"
xmlns:tools="http://schemas.android.com/tools"
android:layout_width="match_parent"
android:layout_height="match_parent"
android:gravity="top"
android:paddingBottom="@dimen/activity_vertical_margin"
android:paddingLeft="@dimen/activity_horizontal_margin"
android:paddingRight="@dimen/activity_horizontal_margin"
android:paddingTop="@dimen/activity_vertical_margin"
tools:context=".MainActivity" >
<ImageView
android:id="@+id/imageView1"
android:layout_width="wrap_content"
android:layout_height="wrap_content"
android:layout_alignParentTop="true"
android:layout_centerHorizontal="true"
android:layout_marginTop="179dp"
android:src="@drawable/ic_launcher" />
</RelativeLayout>
HERE IS THE CODE
OF RES/ANIM/MYANIMATION.XML.
<?xml version="1.0" encoding="utf-8"?>
<set xmlns:android="http://schemas.android.com/apk/res/android">
<scale xmlns:android="http://schemas.android.com/apk/res/android"
android:fromXScale="0.5"
android:toXScale="3.0"
android:fromYScale="0.5"
android:toYScale="3.0"
android:duration="5000"
android:pivotX="50%"
android:pivotY="50%" >
</scale>
<scale
xmlns:android="http://schemas.android.com/apk/res/android"
android:startOffset="5000"
android:fromXScale="3.0"
android:toXScale="0.5"
android:fromYScale="3.0"
android:toYScale="0.5"
android:duration="5000"
android:pivotX="50%"
android:pivotY="50%" >
</scale>
</set>
HERE IS THE CODE OF RES/ANIM/CLOCKWISE.XML.
 <?xml version="1.0" encoding="utf-8"?>
<set xmlns:android="http://schemas.android.com/apk/res/android">
<rotate
xmlns:android="http://schemas.android.com/apk/res/android"
android:fromDegrees="0"
android:toDegrees="360"
android:pivotX="50%"
android:pivotY="50%"
android:duration="5000" >
</rotate>
<rotate
xmlns:android="http://schemas.android.com/apk/res/android"
android:startOffset="5000"
android:fromDegrees="360"
android:toDegrees="0"
android:pivotX="50%"
android:pivotY="50%"
android:duration="5000" >
</rotate>
</set>

HERE IS THE CODE OF RES/ANIM/FADE.XML.
<?xml version="1.0" encoding="utf-8"?>
<set
xmlns:android="http://schemas.android.com/apk/res/android"
android:interpolator="@android:anim/accelerate_interpolator"
>
<alpha
android:fromAlpha="0"
android:toAlpha="1"
android:duration="2000" >
</alpha>
<alpha
android:startOffset="2000"
android:fromAlpha="1"
android:toAlpha="0"
android:duration="2000" >
</alpha>
</set>
HERE IS THE MODIFIED CODE
OF RES/MENU/MAIN.XML.
 <menu
xmlns:android="http://schemas.android.com/apk/re
s/android" >
<item
android:id="@+id/rotate360"
android:orderInCategory="100"
android:showAsAction="never"
android:title="@string/rotate_String"/>
<item
android:id="@+id/zoomInOut"
android:orderInCategory="100"
android:title="@string/zoom_In_Out"/>
<item
android:id="@+id/fadeInOut"
android:orderInCategory="100"
android:title="@string/fade_String"/>
</menu>
HERE IS THE MODIFIED CODE
OF RES/VALUES/STRING.XML.
<?xml version="1.0" encoding="utf-8"?>
<resources>
<string name="app_name">Animation</string>
<string name="action_settings">Settings</string>
<string name="hello_world">Hello world!</string>
<string name="zoom_In_Out">Zoom In/Out</string>
<string name="rotate_String">Clockwise/Anti
Clockwise</string>
<string name="fade_String">Fade In/Out</string>
</resources>
HERE IS THE DEFAULT CODE
OF ANDROIDMANIFEST.XML.
<?xml version="1.0" encoding="utf-8"?>
<manifest
xmlns:android="http://schemas.android.com/apk/res/a
ndroid"
package="com.example.animation"
android:versionCode="1"
android:versionName="1.0" >
<uses-sdk
android:minSdkVersion="8"
android:targetSdkVersion="17" />
<application
android:allowBackup="true"
android:icon="@drawable/ic_launcher"
android:label="@string/app_name"
android:theme="@style/AppTheme" >
<activity
android:name="com.example.animation.MainActivity"
android:label="@string/app_name" >
<intent-filter>
<action
android:name="android.intent.action.MAIN" />
<category
android:name="android.intent.category.LAUNCHER" />
</intent-filter>
</activity>
</application>
</manifest>
 Let's try to run your Animation application. I
assume you have connected your actual
Android Mobile device with your computer.
To run the app from Eclipse, open one of
your project's activity files and click
Run icon from the toolbar. Before starting
your application, Eclipse will display
following window to select an option where
you want to run your Android application.
NOW JUST SELECT THE MENU FROM YOUR MOBILE, AND
A MENU WOULD APPEAR WHICH WOULD BE SOMETHING
LIKE THIS:
NOW JUST SELECT THE ZOOM IN , ZOOM OUT OPTION
FROM MENU AND AN ANIMATION WOULD APPEAR WHICH
WOULD BE SOMETHING LIKE THIS:
NOW JUST SELECT THE CLOCKWISE OPTION FROM MENU AND
AN ANIMATION WOULD APPEAR WHICH WOULD BE SOMETHING
LIKE THIS:
NOW JUST SELECT THE FADE IN/OUT OPTION FROM MENU AND
AN ANIMATION WOULD APPEAR WHICH WOULD BE SOMETHING
LIKE THIS:
 Note: If you run it in emulator , you may not
experience smooth animation effect. You have to
run it in your android mobile in order to experience
the smooth animation.

Android animations