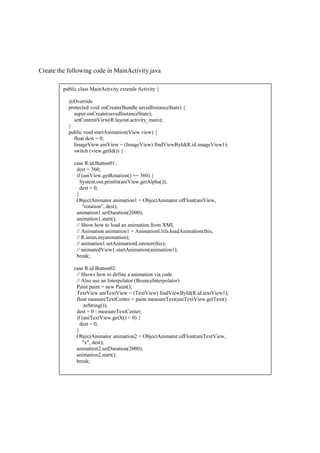
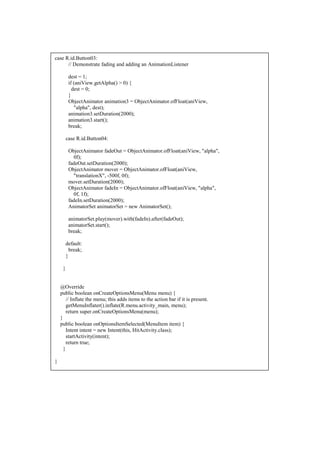
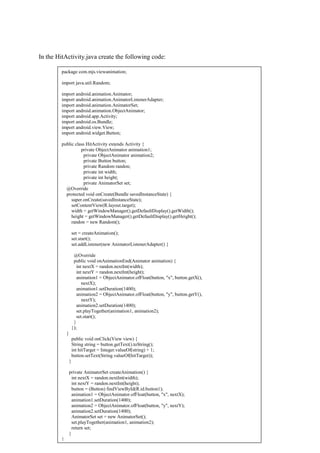
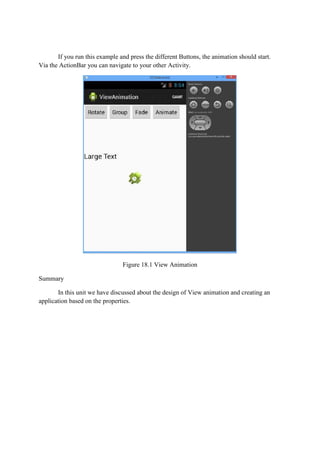
Chapter 18
View Animation in Android
By
Dr. Ramkumar Lakshminarayanan
Introduction
The view animation framework supports both tween and frame by frame animations,
which can both be declared in XML. The following sections describe how to use both
methods. In this unit we will discuss about the usage of View Animation and an example.
View Animation
There are two types of animations that you can do with the view animation framework:
 Tween animation: Creates an animation by performing a series of transformations on
a single image with an Animation.
 Frame animation: or creates an animation by showing a sequence of images in order
with an AnimationDrawable.
You can use the view animation system to perform tweened animation on Views.
Tween animation calculates the animation with information such as the start point, end point,
size, rotation, and other common aspects of an animation.
A tween animation can perform a series of simple transformations (position, size,
rotation, and transparency) on the contents of a View object. So, if you have a TextView
object, you can move, rotate, grow, or shrink the text. If it has a background image, the
background image will be transformed along with the text. The animation package provides
all the classes used in a tween animation.
A sequence of animation instructions defines the tween animation, defined by either
XML or Android code. As with defining a layout, an XML file is recommended because it's
more readable, reusable, and swappable than hard-coding the animation. In the example
below, we use XML.
The animation instructions define the transformations that you want to occur, when
they will occur, and how long they should take to apply. Transformations can be sequential or
simultaneous - for example, you can have the contents of a TextView move from left to right,
and then rotate 180 degrees, or you can have the text move and rotate simultaneously. Each
transformation takes a set of parameters specific for that transformation (starting size and
ending size for size change, starting angle and ending angle for rotation, and so on), and also
a set of common parameters (for instance, start time and duration). To make several
transformations happen simultaneously, give them the same start time; to make them
sequential, calculate the start time plus the duration of the preceding transformation.
The animation XML file belongs in the res/anim/ directory of your Android project.
The file must have a single root element: this will be either a single <alpha>, <scale>,
<translate>, <rotate>, interpolator element, or <set> element that holds groups of these
elements (which may include another <set>). By default, all animation instructions are
applied simultaneously. To make them occur sequentially, you must specify the startOffset
attribute, as shown in the example below.
Screen coordinates (not used in this example) are (0,0) at the upper left hand corner,
and increase as you go down and to the right.
Some values, such as pivotX, can be specified relative to the object itself or relative to
the parent. Be sure to use the proper format for what you want ("50" for 50% relative to the
parent, or "50%" for 50% relative to itself).
<set android:shareInterpolator="false">
<scale
android:interpolator="@android:anim/accelerate_decelerate_interpolator"
android:fromXScale="1.0"
android:toXScale="1.4"
android:fromYScale="1.0"
android:toYScale="0.6"
android:pivotX="50%"
android:pivotY="50%"
android:fillAfter="false"
android:duration="700" />
<set android:interpolator="@android:anim/decelerate_interpolator">
<scale
android:fromXScale="1.4"
android:toXScale="0.0"
android:fromYScale="0.6"
android:toYScale="0.0"
android:pivotX="50%"
android:pivotY="50%"
android:startOffset="700"
android:duration="400"
android:fillBefore="false" />
<rotate
android:fromDegrees="0"
android:toDegrees="-45"
android:toYScale="0.0"
android:pivotX="50%"
android:pivotY="50%"
android:startOffset="700"
android:duration="400" />
</set>
</set>
You can determine how a transformation is applied over time by assigning
an Interpolator. Android includes several Interpolator subclasses that specify various speed
curves: for instance, Accelerate Interpolator tells a transformation to start slow and speed up.
Each one has an attribute value that can be applied in the XML.
Example – View Animation
Create a Project with the name com.mjs.viewanimation and in the acivity_main.xml
create the following code
<?xml version="1.0" encoding="utf-8"?>
<RelativeLayout xmlns:android="http://schemas.android.com/apk/res/android"
android:id="@+id/layout"
android:layout_width="match_parent"
android:layout_height="match_parent"
android:orientation="vertical" >
<LinearLayout
android:id="@+id/test"
android:layout_width="wrap_content"
android:layout_height="wrap_content" >
<Button
android:id="@+id/Button01"
android:layout_width="wrap_content"
android:layout_height="wrap_content"
android:onClick="startAnimation"
android:text="Rotate" />
<Button
android:id="@+id/Button04"
android:layout_width="wrap_content"
android:layout_height="wrap_content"
android:onClick="startAnimation"
android:text="Group" >
</Button>
<Button
android:id="@+id/Button03"
android:layout_width="wrap_content"
android:layout_height="wrap_content"
android:onClick="startAnimation"
android:text="Fade" />
<Button
android:id="@+id/Button02"
android:layout_width="wrap_content"
android:layout_height="wrap_content"
android:onClick="startAnimation"
android:text="Animate" />
</LinearLayout>
<ImageView
android:id="@+id/imageView1"
android:layout_width="wrap_content"
android:layout_height="wrap_content"
android:layout_centerHorizontal="true"
android:layout_centerVertical="true"
android:src="@drawable/ic_launcher" />
<TextView
android:id="@+id/textView1"
android:layout_width="wrap_content"
android:layout_height="wrap_content"
android:layout_above="@+id/imageView1"
android:layout_alignRight="@+id/imageView1"
android:layout_marginBottom="30dp"
android:text="Large Text"
android:textAppearance="?android:attr/textAppearanceLarge" />
</RelativeLayout>
Create the following menu resource in reslayoutmenuactivity_menu.xml
Create the target.xml in reslayout with the following code:
Apart from MainActivity.java create HitActivity.java. Import the following package in
MainActivity.java
<menu xmlns:android="http://schemas.android.com/apk/res/android" >
<item
android:id="@+id/item1"
android:showAsAction="ifRoom"
android:title="Game">
</item>
</menu>
<?xml version="1.0" encoding="utf-8"?>
<FrameLayout
xmlns:android="http://schemas.android.com/apk/res/android"
android:layout_width="match_parent"
android:layout_height="match_parent" >
<Button
android:id="@+id/button1"
android:layout_width="wrap_content"
android:layout_height="wrap_content"
android:text="0"
android:onClick="onClick"
/>
</FrameLayout>
import android.animation.AnimatorSet;
import android.animation.ObjectAnimator;
import android.app.Activity;
import android.content.Intent;
import android.graphics.Paint;
import android.os.Bundle;
import android.view.Menu;
import android.view.MenuItem;
import android.view.View;
import android.widget.ImageView;
import android.widget.TextView;
Create the following code in MainActivity.java
public class MainActivity extends Activity {
@Override
protected void onCreate(Bundle savedInstanceState) {
super.onCreate(savedInstanceState);
setContentView(R.layout.activity_main);
}
public void startAnimation(View view) {
float dest = 0;
ImageView aniView = (ImageView) findViewById(R.id.imageView1);
switch (view.getId()) {
case R.id.Button01:
dest = 360;
if (aniView.getRotation() == 360) {
System.out.println(aniView.getAlpha());
dest = 0;
}
ObjectAnimator animation1 = ObjectAnimator.ofFloat(aniView,
"rotation", dest);
animation1.setDuration(2000);
animation1.start();
// Show how to load an animation from XML
// Animation animation1 = AnimationUtils.loadAnimation(this,
// R.anim.myanimation);
// animation1.setAnimationListener(this);
// animatedView1.startAnimation(animation1);
break;
case R.id.Button02:
// Shows how to define a animation via code
// Also use an Interpolator (BounceInterpolator)
Paint paint = new Paint();
TextView aniTextView = (TextView) findViewById(R.id.textView1);
float measureTextCenter = paint.measureText(aniTextView.getText()
.toString());
dest = 0 - measureTextCenter;
if (aniTextView.getX() < 0) {
dest = 0;
}
ObjectAnimator animation2 = ObjectAnimator.ofFloat(aniTextView,
"x", dest);
animation2.setDuration(2000);
animation2.start();
break;
case R.id.Button03:
// Demonstrate fading and adding an AnimationListener
dest = 1;
if (aniView.getAlpha() > 0) {
dest = 0;
}
ObjectAnimator animation3 = ObjectAnimator.ofFloat(aniView,
"alpha", dest);
animation3.setDuration(2000);
animation3.start();
break;
case R.id.Button04:
ObjectAnimator fadeOut = ObjectAnimator.ofFloat(aniView, "alpha",
0f);
fadeOut.setDuration(2000);
ObjectAnimator mover = ObjectAnimator.ofFloat(aniView,
"translationX", -500f, 0f);
mover.setDuration(2000);
ObjectAnimator fadeIn = ObjectAnimator.ofFloat(aniView, "alpha",
0f, 1f);
fadeIn.setDuration(2000);
AnimatorSet animatorSet = new AnimatorSet();
animatorSet.play(mover).with(fadeIn).after(fadeOut);
animatorSet.start();
break;
default:
break;
}
}
@Override
public boolean onCreateOptionsMenu(Menu menu) {
// Inflate the menu; this adds items to the action bar if it is present.
getMenuInflater().inflate(R.menu.activity_main, menu);
return super.onCreateOptionsMenu(menu);
}
public boolean onOptionsItemSelected(MenuItem item) {
Intent intent = new Intent(this, HitActivity.class);
startActivity(intent);
return true;
}
}
In the HitActivity.java create the following code:
package com.mjs.viewanimation;
import java.util.Random;
import android.animation.Animator;
import android.animation.AnimatorListenerAdapter;
import android.animation.AnimatorSet;
import android.animation.ObjectAnimator;
import android.app.Activity;
import android.os.Bundle;
import android.view.View;
import android.widget.Button;
public class HitActivity extends Activity {
private ObjectAnimator animation1;
private ObjectAnimator animation2;
private Button button;
private Random randon;
private int width;
private int height;
private AnimatorSet set;
@Override
protected void onCreate(Bundle savedInstanceState) {
super.onCreate(savedInstanceState);
setContentView(R.layout.target);
width = getWindowManager().getDefaultDisplay().getWidth();
height = getWindowManager().getDefaultDisplay().getHeight();
randon = new Random();
set = createAnimation();
set.start();
set.addListener(new AnimatorListenerAdapter() {
@Override
public void onAnimationEnd(Animator animation) {
int nextX = randon.nextInt(width);
int nextY = randon.nextInt(height);
animation1 = ObjectAnimator.ofFloat(button, "x", button.getX(),
nextX);
animation1.setDuration(1400);
animation2 = ObjectAnimator.ofFloat(button, "y", button.getY(),
nextY);
animation2.setDuration(1400);
set.playTogether(animation1, animation2);
set.start();
}
});
}
public void onClick(View view) {
String string = button.getText().toString();
int hitTarget = Integer.valueOf(string) + 1;
button.setText(String.valueOf(hitTarget));
}
private AnimatorSet createAnimation() {
int nextX = randon.nextInt(width);
int nextY = randon.nextInt(height);
button = (Button) findViewById(R.id.button1);
animation1 = ObjectAnimator.ofFloat(button, "x", nextX);
animation1.setDuration(1400);
animation2 = ObjectAnimator.ofFloat(button, "y", nextY);
animation2.setDuration(1400);
AnimatorSet set = new AnimatorSet();
set.playTogether(animation1, animation2);
return set;
}
}
If you run this example and press the different Buttons, the animation should start.
Via the ActionBar you can navigate to your other Activity.
Figure 18.1 View Animation
Summary
In this unit we have discussed about the design of View animation and creating an
application based on the properties.

Android view animation in android-chapter18

  • 1.
    Chapter 18 View Animationin Android By Dr. Ramkumar Lakshminarayanan Introduction The view animation framework supports both tween and frame by frame animations, which can both be declared in XML. The following sections describe how to use both methods. In this unit we will discuss about the usage of View Animation and an example. View Animation There are two types of animations that you can do with the view animation framework:  Tween animation: Creates an animation by performing a series of transformations on a single image with an Animation.  Frame animation: or creates an animation by showing a sequence of images in order with an AnimationDrawable. You can use the view animation system to perform tweened animation on Views. Tween animation calculates the animation with information such as the start point, end point, size, rotation, and other common aspects of an animation. A tween animation can perform a series of simple transformations (position, size, rotation, and transparency) on the contents of a View object. So, if you have a TextView object, you can move, rotate, grow, or shrink the text. If it has a background image, the background image will be transformed along with the text. The animation package provides all the classes used in a tween animation. A sequence of animation instructions defines the tween animation, defined by either XML or Android code. As with defining a layout, an XML file is recommended because it's more readable, reusable, and swappable than hard-coding the animation. In the example below, we use XML. The animation instructions define the transformations that you want to occur, when they will occur, and how long they should take to apply. Transformations can be sequential or simultaneous - for example, you can have the contents of a TextView move from left to right, and then rotate 180 degrees, or you can have the text move and rotate simultaneously. Each transformation takes a set of parameters specific for that transformation (starting size and ending size for size change, starting angle and ending angle for rotation, and so on), and also a set of common parameters (for instance, start time and duration). To make several transformations happen simultaneously, give them the same start time; to make them sequential, calculate the start time plus the duration of the preceding transformation.
  • 2.
    The animation XMLfile belongs in the res/anim/ directory of your Android project. The file must have a single root element: this will be either a single <alpha>, <scale>, <translate>, <rotate>, interpolator element, or <set> element that holds groups of these elements (which may include another <set>). By default, all animation instructions are applied simultaneously. To make them occur sequentially, you must specify the startOffset attribute, as shown in the example below. Screen coordinates (not used in this example) are (0,0) at the upper left hand corner, and increase as you go down and to the right. Some values, such as pivotX, can be specified relative to the object itself or relative to the parent. Be sure to use the proper format for what you want ("50" for 50% relative to the parent, or "50%" for 50% relative to itself). <set android:shareInterpolator="false"> <scale android:interpolator="@android:anim/accelerate_decelerate_interpolator" android:fromXScale="1.0" android:toXScale="1.4" android:fromYScale="1.0" android:toYScale="0.6" android:pivotX="50%" android:pivotY="50%" android:fillAfter="false" android:duration="700" /> <set android:interpolator="@android:anim/decelerate_interpolator"> <scale android:fromXScale="1.4" android:toXScale="0.0" android:fromYScale="0.6" android:toYScale="0.0" android:pivotX="50%" android:pivotY="50%" android:startOffset="700" android:duration="400" android:fillBefore="false" /> <rotate android:fromDegrees="0" android:toDegrees="-45" android:toYScale="0.0" android:pivotX="50%" android:pivotY="50%" android:startOffset="700" android:duration="400" /> </set> </set>
  • 3.
    You can determinehow a transformation is applied over time by assigning an Interpolator. Android includes several Interpolator subclasses that specify various speed curves: for instance, Accelerate Interpolator tells a transformation to start slow and speed up. Each one has an attribute value that can be applied in the XML. Example – View Animation Create a Project with the name com.mjs.viewanimation and in the acivity_main.xml create the following code <?xml version="1.0" encoding="utf-8"?> <RelativeLayout xmlns:android="http://schemas.android.com/apk/res/android" android:id="@+id/layout" android:layout_width="match_parent" android:layout_height="match_parent" android:orientation="vertical" > <LinearLayout android:id="@+id/test" android:layout_width="wrap_content" android:layout_height="wrap_content" > <Button android:id="@+id/Button01" android:layout_width="wrap_content" android:layout_height="wrap_content" android:onClick="startAnimation" android:text="Rotate" /> <Button android:id="@+id/Button04" android:layout_width="wrap_content" android:layout_height="wrap_content" android:onClick="startAnimation" android:text="Group" > </Button> <Button android:id="@+id/Button03" android:layout_width="wrap_content" android:layout_height="wrap_content" android:onClick="startAnimation" android:text="Fade" /> <Button android:id="@+id/Button02" android:layout_width="wrap_content" android:layout_height="wrap_content" android:onClick="startAnimation" android:text="Animate" /> </LinearLayout> <ImageView android:id="@+id/imageView1" android:layout_width="wrap_content" android:layout_height="wrap_content" android:layout_centerHorizontal="true" android:layout_centerVertical="true" android:src="@drawable/ic_launcher" /> <TextView android:id="@+id/textView1" android:layout_width="wrap_content" android:layout_height="wrap_content" android:layout_above="@+id/imageView1" android:layout_alignRight="@+id/imageView1" android:layout_marginBottom="30dp" android:text="Large Text" android:textAppearance="?android:attr/textAppearanceLarge" /> </RelativeLayout>
  • 4.
    Create the followingmenu resource in reslayoutmenuactivity_menu.xml Create the target.xml in reslayout with the following code: Apart from MainActivity.java create HitActivity.java. Import the following package in MainActivity.java <menu xmlns:android="http://schemas.android.com/apk/res/android" > <item android:id="@+id/item1" android:showAsAction="ifRoom" android:title="Game"> </item> </menu> <?xml version="1.0" encoding="utf-8"?> <FrameLayout xmlns:android="http://schemas.android.com/apk/res/android" android:layout_width="match_parent" android:layout_height="match_parent" > <Button android:id="@+id/button1" android:layout_width="wrap_content" android:layout_height="wrap_content" android:text="0" android:onClick="onClick" /> </FrameLayout> import android.animation.AnimatorSet; import android.animation.ObjectAnimator; import android.app.Activity; import android.content.Intent; import android.graphics.Paint; import android.os.Bundle; import android.view.Menu; import android.view.MenuItem; import android.view.View; import android.widget.ImageView; import android.widget.TextView;
  • 5.
    Create the followingcode in MainActivity.java public class MainActivity extends Activity { @Override protected void onCreate(Bundle savedInstanceState) { super.onCreate(savedInstanceState); setContentView(R.layout.activity_main); } public void startAnimation(View view) { float dest = 0; ImageView aniView = (ImageView) findViewById(R.id.imageView1); switch (view.getId()) { case R.id.Button01: dest = 360; if (aniView.getRotation() == 360) { System.out.println(aniView.getAlpha()); dest = 0; } ObjectAnimator animation1 = ObjectAnimator.ofFloat(aniView, "rotation", dest); animation1.setDuration(2000); animation1.start(); // Show how to load an animation from XML // Animation animation1 = AnimationUtils.loadAnimation(this, // R.anim.myanimation); // animation1.setAnimationListener(this); // animatedView1.startAnimation(animation1); break; case R.id.Button02: // Shows how to define a animation via code // Also use an Interpolator (BounceInterpolator) Paint paint = new Paint(); TextView aniTextView = (TextView) findViewById(R.id.textView1); float measureTextCenter = paint.measureText(aniTextView.getText() .toString()); dest = 0 - measureTextCenter; if (aniTextView.getX() < 0) { dest = 0; } ObjectAnimator animation2 = ObjectAnimator.ofFloat(aniTextView, "x", dest); animation2.setDuration(2000); animation2.start(); break;
  • 6.
    case R.id.Button03: // Demonstratefading and adding an AnimationListener dest = 1; if (aniView.getAlpha() > 0) { dest = 0; } ObjectAnimator animation3 = ObjectAnimator.ofFloat(aniView, "alpha", dest); animation3.setDuration(2000); animation3.start(); break; case R.id.Button04: ObjectAnimator fadeOut = ObjectAnimator.ofFloat(aniView, "alpha", 0f); fadeOut.setDuration(2000); ObjectAnimator mover = ObjectAnimator.ofFloat(aniView, "translationX", -500f, 0f); mover.setDuration(2000); ObjectAnimator fadeIn = ObjectAnimator.ofFloat(aniView, "alpha", 0f, 1f); fadeIn.setDuration(2000); AnimatorSet animatorSet = new AnimatorSet(); animatorSet.play(mover).with(fadeIn).after(fadeOut); animatorSet.start(); break; default: break; } } @Override public boolean onCreateOptionsMenu(Menu menu) { // Inflate the menu; this adds items to the action bar if it is present. getMenuInflater().inflate(R.menu.activity_main, menu); return super.onCreateOptionsMenu(menu); } public boolean onOptionsItemSelected(MenuItem item) { Intent intent = new Intent(this, HitActivity.class); startActivity(intent); return true; } }
  • 7.
    In the HitActivity.javacreate the following code: package com.mjs.viewanimation; import java.util.Random; import android.animation.Animator; import android.animation.AnimatorListenerAdapter; import android.animation.AnimatorSet; import android.animation.ObjectAnimator; import android.app.Activity; import android.os.Bundle; import android.view.View; import android.widget.Button; public class HitActivity extends Activity { private ObjectAnimator animation1; private ObjectAnimator animation2; private Button button; private Random randon; private int width; private int height; private AnimatorSet set; @Override protected void onCreate(Bundle savedInstanceState) { super.onCreate(savedInstanceState); setContentView(R.layout.target); width = getWindowManager().getDefaultDisplay().getWidth(); height = getWindowManager().getDefaultDisplay().getHeight(); randon = new Random(); set = createAnimation(); set.start(); set.addListener(new AnimatorListenerAdapter() { @Override public void onAnimationEnd(Animator animation) { int nextX = randon.nextInt(width); int nextY = randon.nextInt(height); animation1 = ObjectAnimator.ofFloat(button, "x", button.getX(), nextX); animation1.setDuration(1400); animation2 = ObjectAnimator.ofFloat(button, "y", button.getY(), nextY); animation2.setDuration(1400); set.playTogether(animation1, animation2); set.start(); } }); } public void onClick(View view) { String string = button.getText().toString(); int hitTarget = Integer.valueOf(string) + 1; button.setText(String.valueOf(hitTarget)); } private AnimatorSet createAnimation() { int nextX = randon.nextInt(width); int nextY = randon.nextInt(height); button = (Button) findViewById(R.id.button1); animation1 = ObjectAnimator.ofFloat(button, "x", nextX); animation1.setDuration(1400); animation2 = ObjectAnimator.ofFloat(button, "y", nextY); animation2.setDuration(1400); AnimatorSet set = new AnimatorSet(); set.playTogether(animation1, animation2); return set; } }
  • 8.
    If you runthis example and press the different Buttons, the animation should start. Via the ActionBar you can navigate to your other Activity. Figure 18.1 View Animation Summary In this unit we have discussed about the design of View animation and creating an application based on the properties.