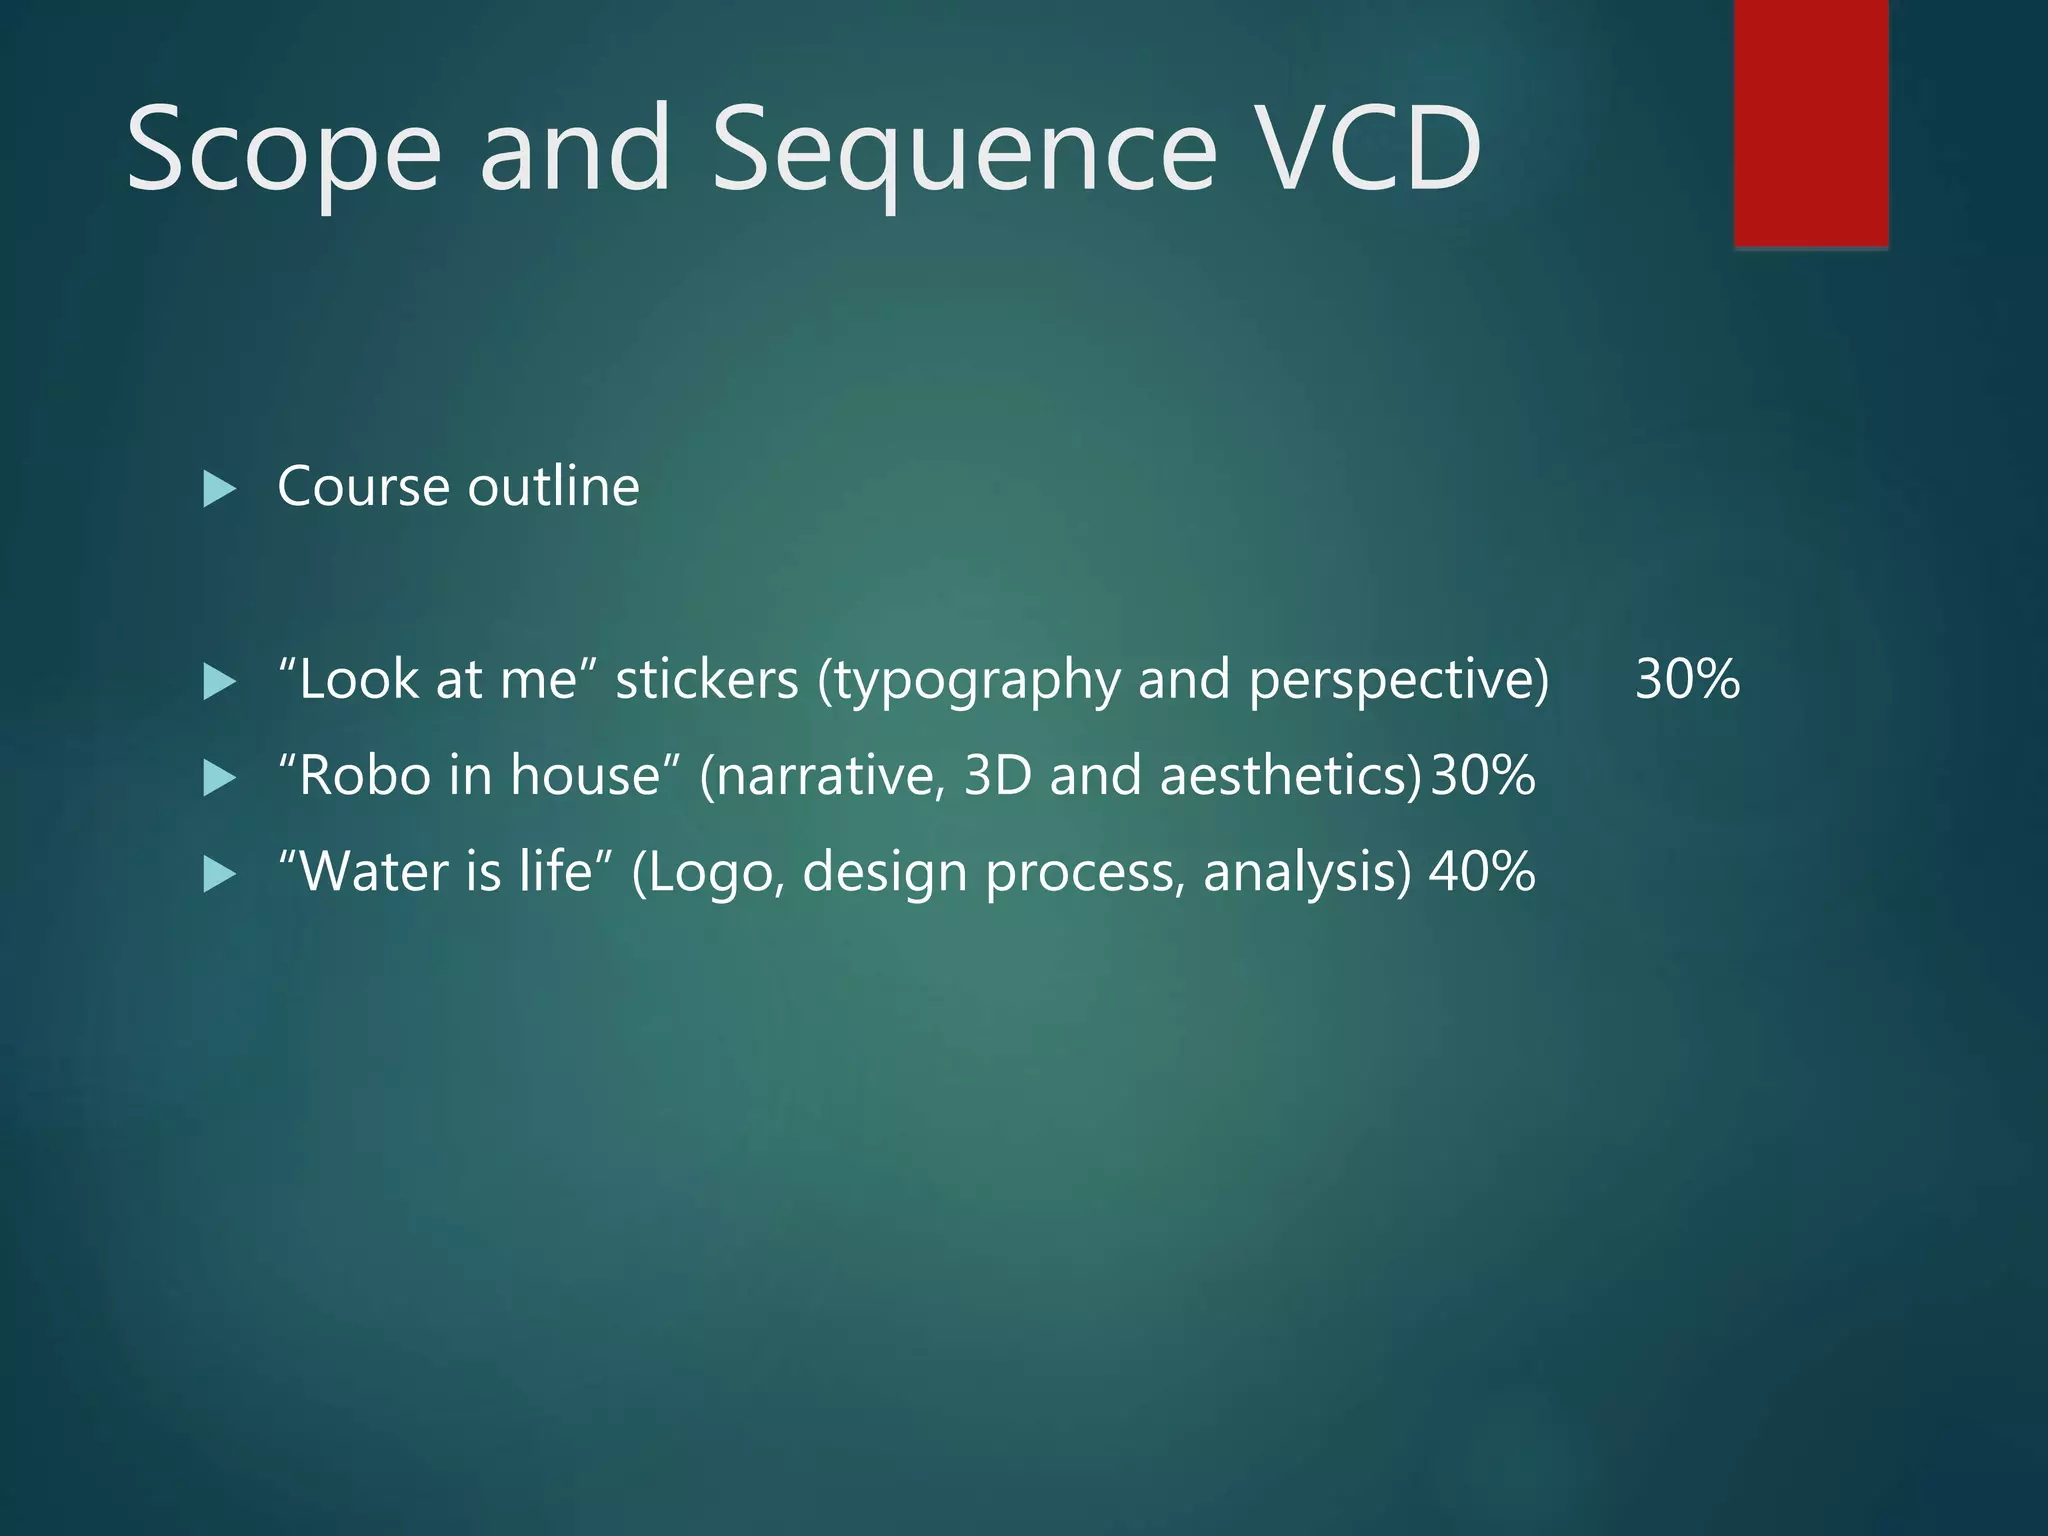
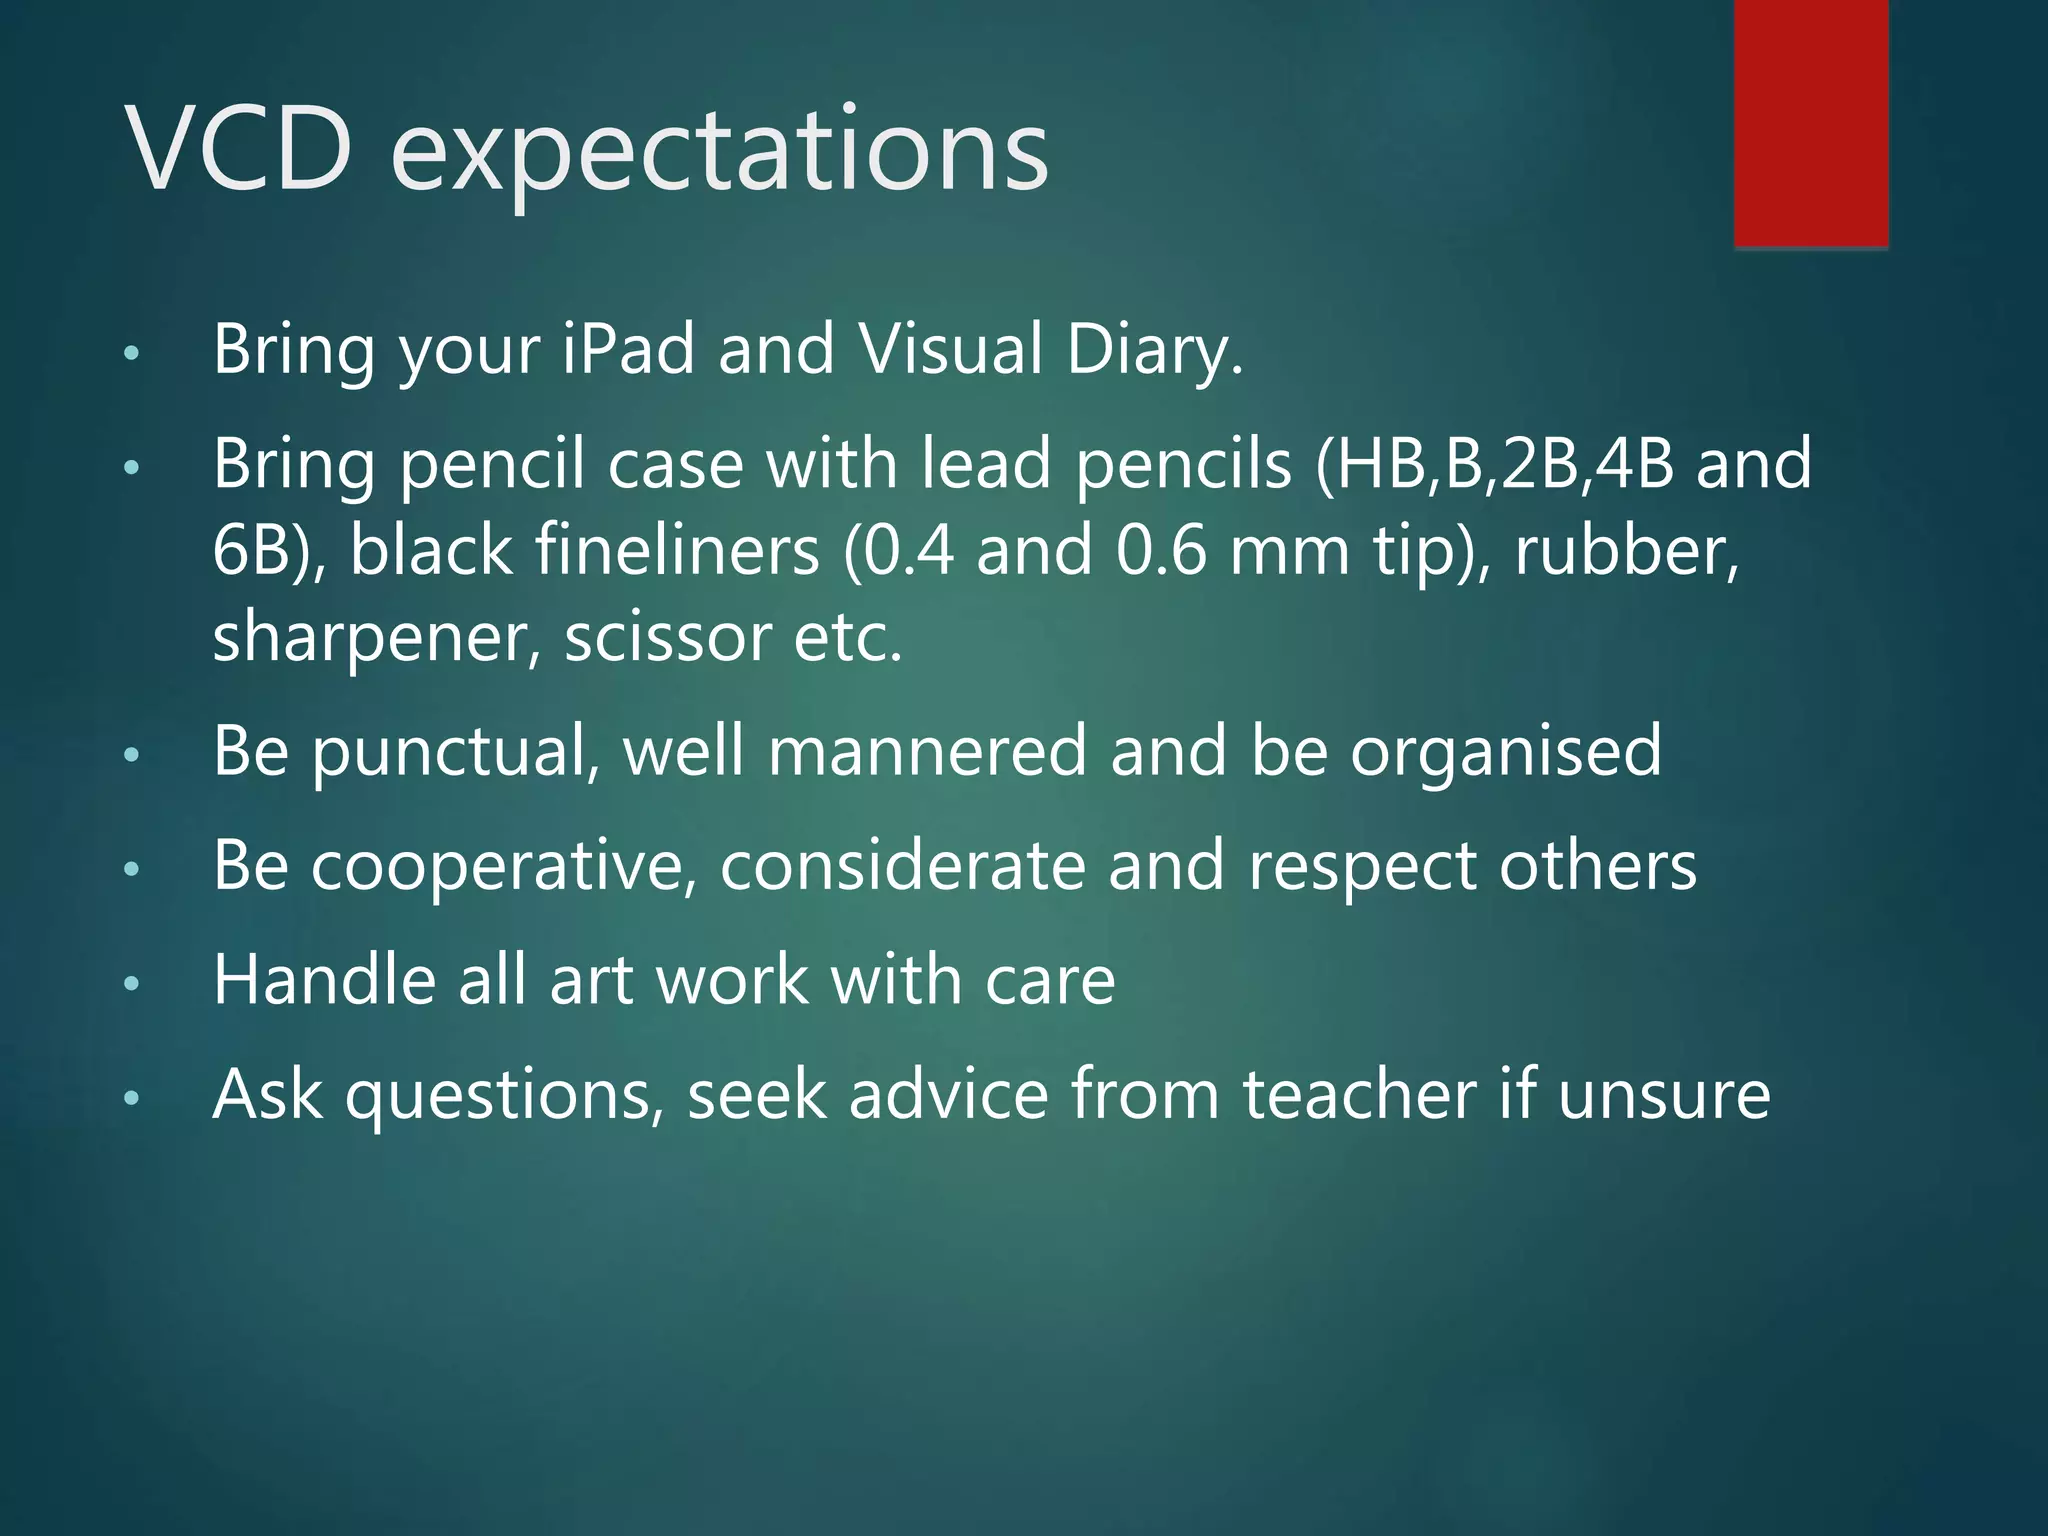
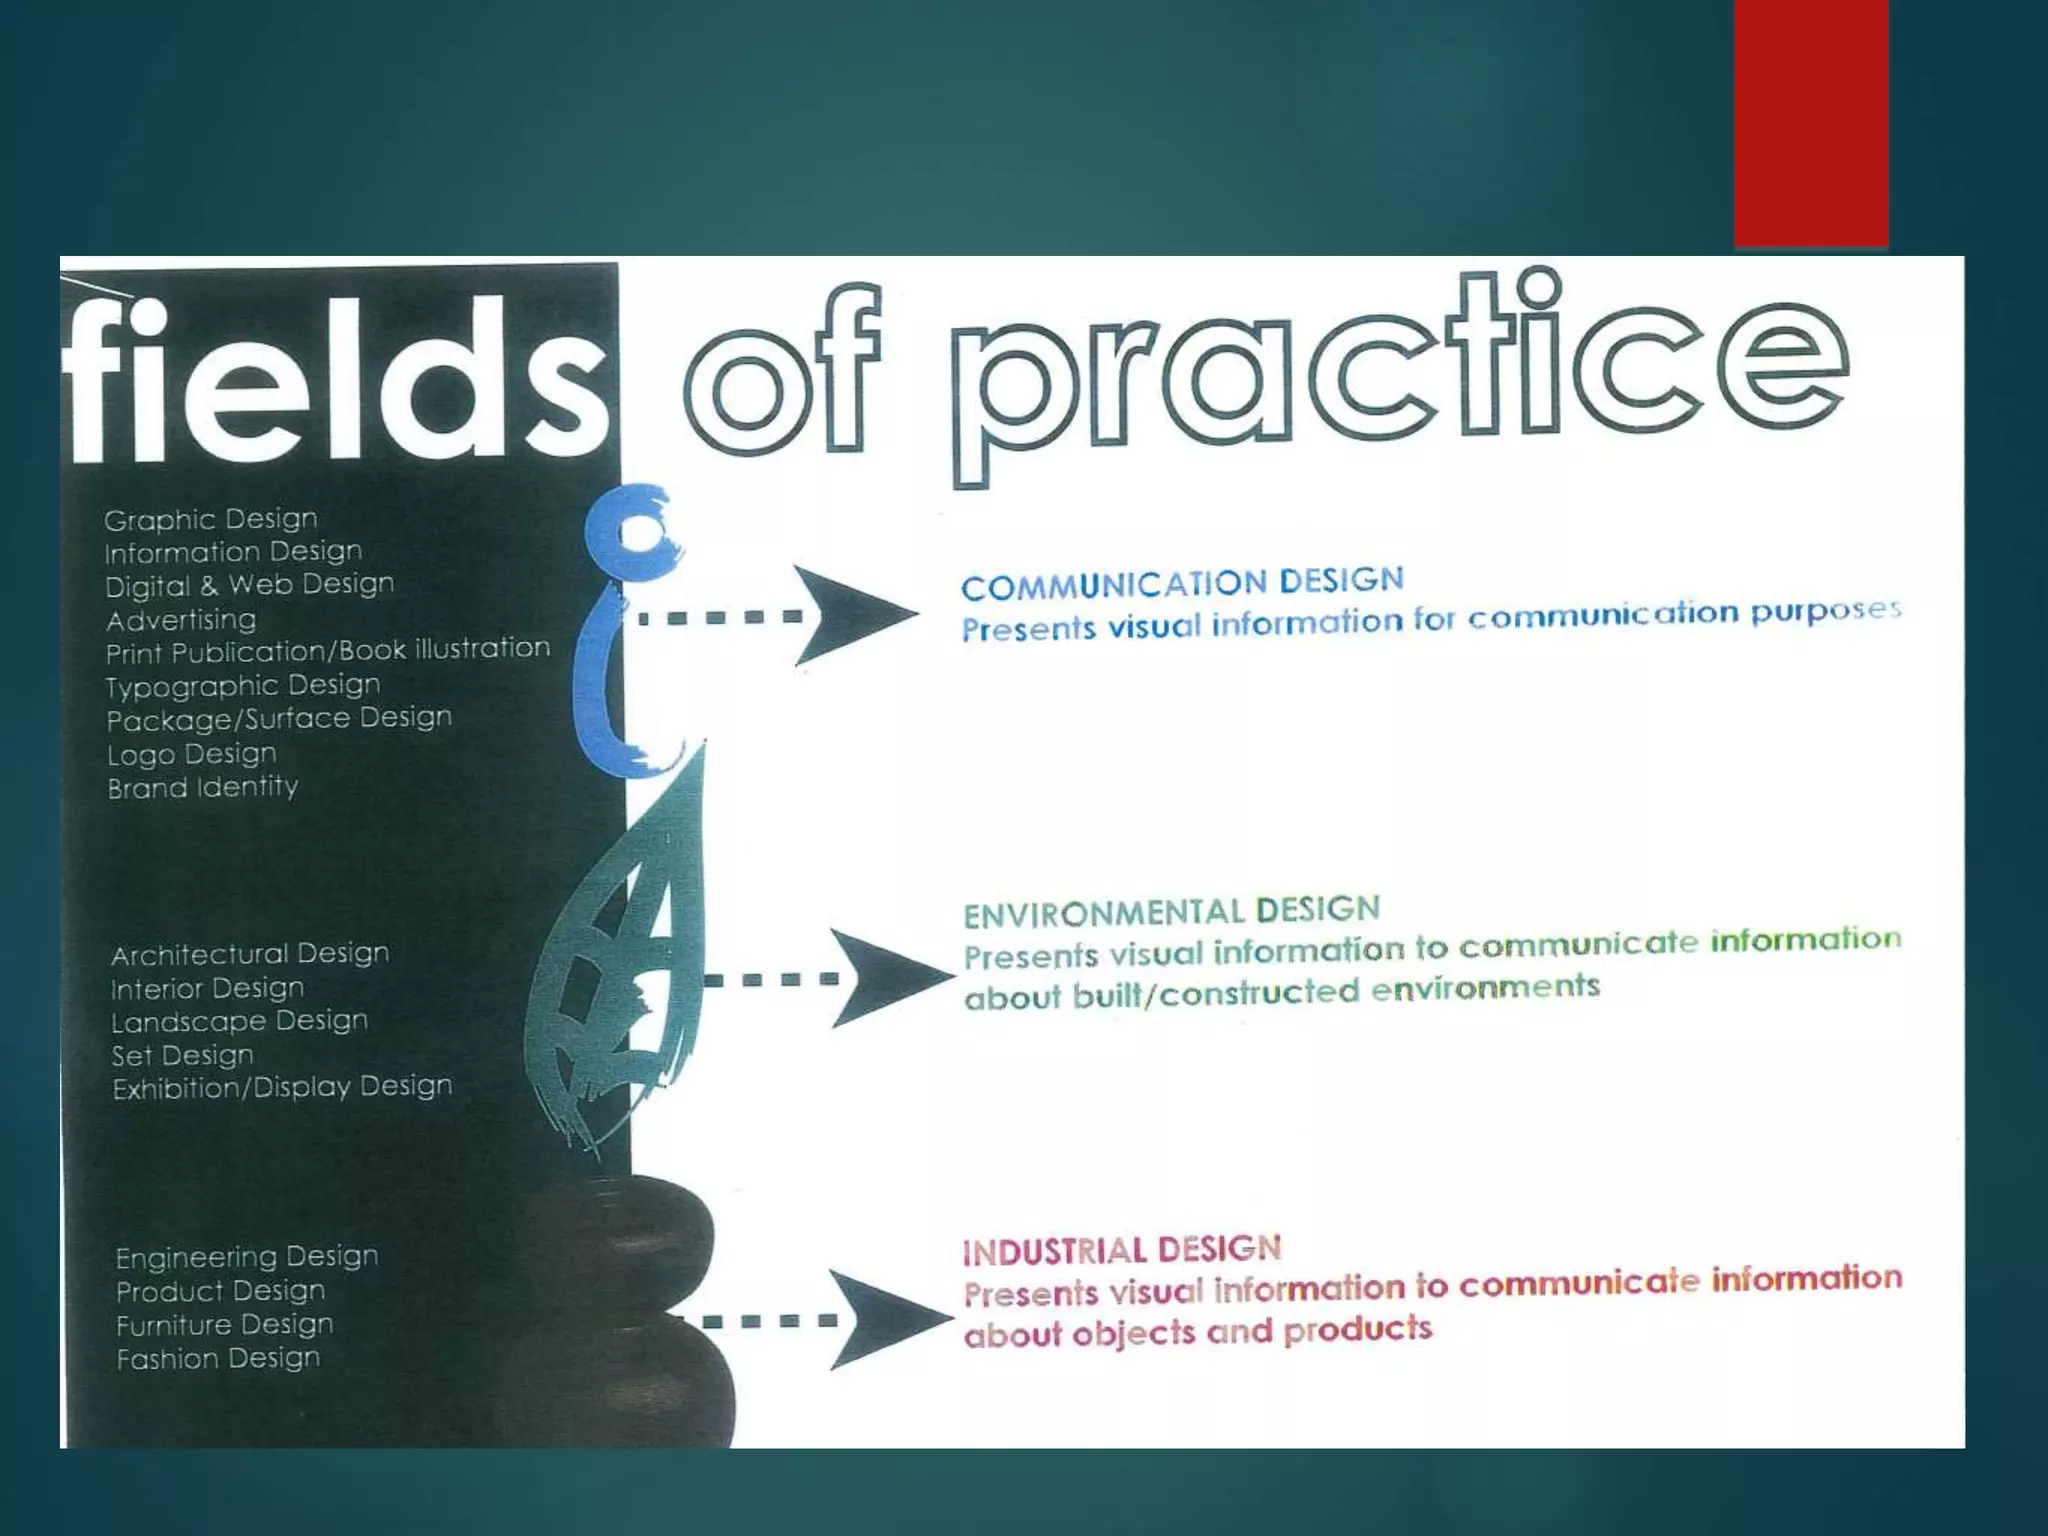
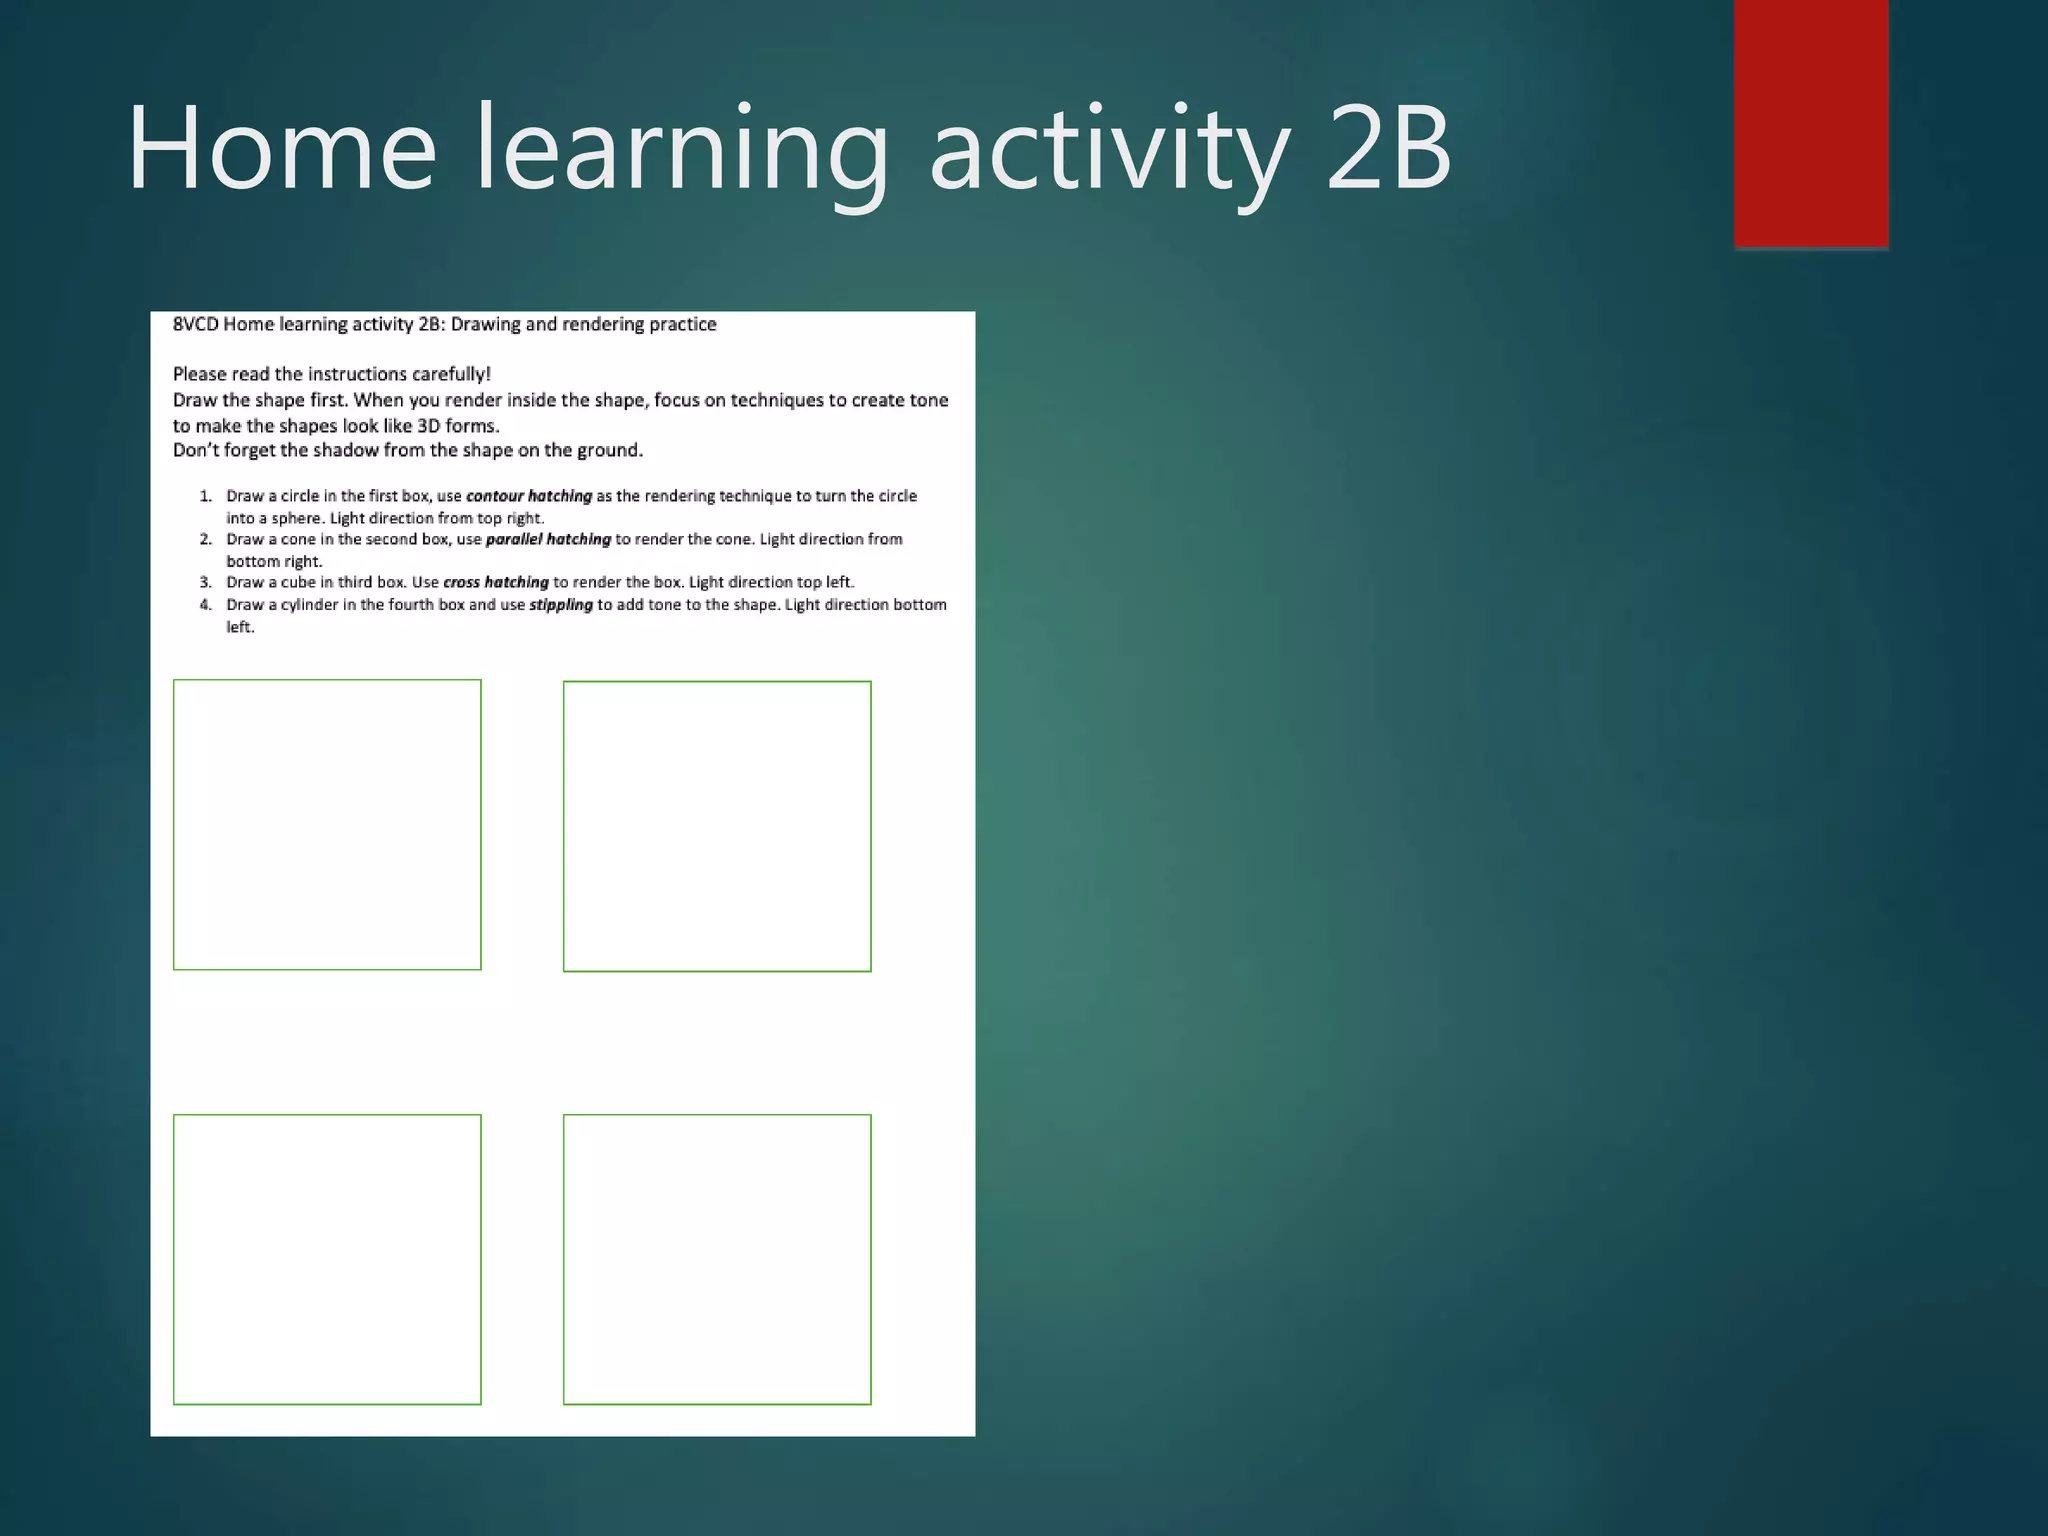
Introduction
Visual Communication
Design yr 8
Scope and Sequence VCD
 Course outline
 “Look at me” stickers (typography and perspective) 30%
 “Robo in house” (narrative, 3D and aesthetics)30%
 “Water is life” (Logo, design process, analysis) 40%
VCD expectations
• Bring your iPad and Visual Diary.
• Bring pencil case with lead pencils (HB,B,2B,4B and
6B), black fineliners (0.4 and 0.6 mm tip), rubber,
sharpener, scissor etc.
• Be punctual, well mannered and be organised
• Be cooperative, considerate and respect others
• Handle all art work with care
• Ask questions, seek advice from teacher if unsure
 What is Visual Communication & Design?
 Create a mindmap in your visual diary
 Which 3 main fields of practise can you think of? What
design areas are there, in which field do they belong?
Mindmap
Design Elements -
(Fat Cat Splat)
 Form…………….
 Tone…………………………….
 Colour………………………………………..
 Texture…………..
 Shape……………………………
 Point……………………………………………
 Line………….
 Type………………………….
 Design elements are components of visual communications.
Vocabulary
 Formcombining shape and value to create the illusion
of three dimensions on a flat surface
 Tone Properties to colour hue and intensity
 Colour light reflected on an object.
 Texture tactile quality of an object
 Shape lines combined to create an enclosed space
 Point mark or short line
 Line a point extended in both directions
 Type letter form
Drawing shapes
Warming up
exercise:
Stand behind desk. Use 2B
pencil and don’t lean on
paper. Draw half a page in
your visual diary filled with
circles and the rest filled with
ellipses.
Rendering: Gradient ladders
Use a ruler, 2H/H, B/2B pencil and 4B/6B pencil
Draw an outline of rectangle shape (15cm x 2 cm)
Go from light to dark using different pencils.
Aim for smooth tonal transitions
Don’t smudge the rendered areas!
Rendering techniques
Use rendering to make forms look 3D
Study terminology
complete HL task
Home learning activity 2B
Isometric drawing
Activity 3: Observational drawing of geometrical
objects and Isometric drawing
 Sketch a minimum of 3
geometrical forms from
observation and draw these forms
also in an isometric way.
 Analyse the form, its proportions
and structural lines.
 Sketch the form and define the
outline.
 Make another sketch of what the
object would look like in an
isometric way of drawing it.
 Annotation: Write down which
drawing is observational and
which one is isometric.
:The Design Process:
 The Brief (identify client, needs, purpose..)
 Research (collecting ideas, information, ..)
 Generation of ideas (exploring design ideas, use
imagination, visualisation)
 Development of concepts (select preferred idea and apply
range of methods, materials media..)
 Refinement of ideas (modify visual communications in
response to feedback and evaluation)
 Development of visual presentation (presenting final
outcome)
Drawing task: (30%)
“Robo in house”
Follow the steps of the design process.
Show all different stages of the creation of your illustration. From the brief to
presentation of the final artwork.
1. Brief: Create an illustration which communicates a story about a robot in
a house, using isometry and rendering techniques.
2. Research: Find inspirational images from artists (Pic Collage)
3. Generation of ideas: Use different rendering techniques, draw 2D and
3D shapes, make sketches first. Brain storm page
4. Development of concept: selection of 1 sketch and rendering technique
5. Refinement: focus on proportions of shapes in the house and rendering
technique. Take photos before and after you change things.
6. Resolution of presentation/ presentation of final illustration: mounted
in A4 mount.
7. Student evaluation: use evaluation questions
Due: week 4
Assessment criteria
 Design process:

 Literacy

 Final presentation
Inspiring artists: Jeffery Smart
The Melbourne gate 2002 The Observer II 1983 - 84
Quinces by the Sea 1998 -
2003
The Guiding Sphere’s
(Hommage to Cezanne) -
1979
Shaun Tan
Giorgio de Chirico
Imaginative interiors and robots
Student Artworks

8 vcd slideshow drawing techniques

  • 1.
  • 2.
    Scope and SequenceVCD  Course outline  “Look at me” stickers (typography and perspective) 30%  “Robo in house” (narrative, 3D and aesthetics)30%  “Water is life” (Logo, design process, analysis) 40%
  • 3.
    VCD expectations • Bringyour iPad and Visual Diary. • Bring pencil case with lead pencils (HB,B,2B,4B and 6B), black fineliners (0.4 and 0.6 mm tip), rubber, sharpener, scissor etc. • Be punctual, well mannered and be organised • Be cooperative, considerate and respect others • Handle all art work with care • Ask questions, seek advice from teacher if unsure
  • 4.
     What isVisual Communication & Design?  Create a mindmap in your visual diary  Which 3 main fields of practise can you think of? What design areas are there, in which field do they belong? Mindmap
  • 6.
    Design Elements - (FatCat Splat)  Form…………….  Tone…………………………….  Colour………………………………………..  Texture…………..  Shape……………………………  Point……………………………………………  Line………….  Type………………………….  Design elements are components of visual communications.
  • 7.
    Vocabulary  Formcombining shapeand value to create the illusion of three dimensions on a flat surface  Tone Properties to colour hue and intensity  Colour light reflected on an object.  Texture tactile quality of an object  Shape lines combined to create an enclosed space  Point mark or short line  Line a point extended in both directions  Type letter form
  • 9.
    Drawing shapes Warming up exercise: Standbehind desk. Use 2B pencil and don’t lean on paper. Draw half a page in your visual diary filled with circles and the rest filled with ellipses.
  • 11.
    Rendering: Gradient ladders Usea ruler, 2H/H, B/2B pencil and 4B/6B pencil Draw an outline of rectangle shape (15cm x 2 cm) Go from light to dark using different pencils. Aim for smooth tonal transitions Don’t smudge the rendered areas!
  • 12.
  • 14.
    Use rendering tomake forms look 3D Study terminology complete HL task
  • 15.
  • 16.
  • 17.
    Activity 3: Observationaldrawing of geometrical objects and Isometric drawing  Sketch a minimum of 3 geometrical forms from observation and draw these forms also in an isometric way.  Analyse the form, its proportions and structural lines.  Sketch the form and define the outline.  Make another sketch of what the object would look like in an isometric way of drawing it.  Annotation: Write down which drawing is observational and which one is isometric.
  • 18.
    :The Design Process: The Brief (identify client, needs, purpose..)  Research (collecting ideas, information, ..)  Generation of ideas (exploring design ideas, use imagination, visualisation)  Development of concepts (select preferred idea and apply range of methods, materials media..)  Refinement of ideas (modify visual communications in response to feedback and evaluation)  Development of visual presentation (presenting final outcome)
  • 19.
    Drawing task: (30%) “Roboin house” Follow the steps of the design process. Show all different stages of the creation of your illustration. From the brief to presentation of the final artwork. 1. Brief: Create an illustration which communicates a story about a robot in a house, using isometry and rendering techniques. 2. Research: Find inspirational images from artists (Pic Collage) 3. Generation of ideas: Use different rendering techniques, draw 2D and 3D shapes, make sketches first. Brain storm page 4. Development of concept: selection of 1 sketch and rendering technique 5. Refinement: focus on proportions of shapes in the house and rendering technique. Take photos before and after you change things. 6. Resolution of presentation/ presentation of final illustration: mounted in A4 mount. 7. Student evaluation: use evaluation questions Due: week 4
  • 20.
    Assessment criteria  Designprocess:   Literacy   Final presentation
  • 21.
    Inspiring artists: JefferySmart The Melbourne gate 2002 The Observer II 1983 - 84 Quinces by the Sea 1998 - 2003 The Guiding Sphere’s (Hommage to Cezanne) - 1979
  • 22.
  • 23.
  • 24.
  • 25.