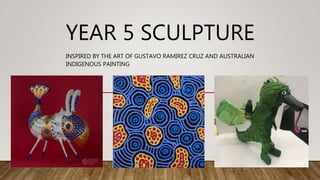
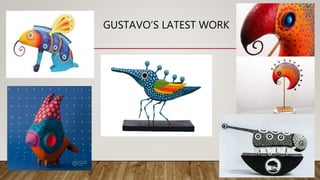
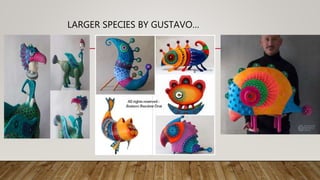
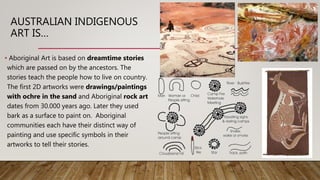
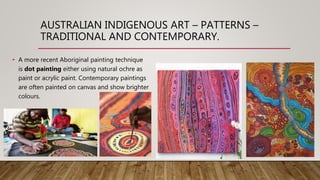
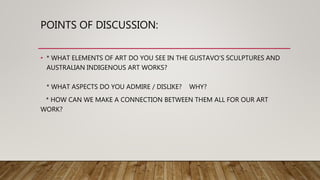
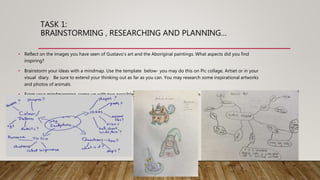
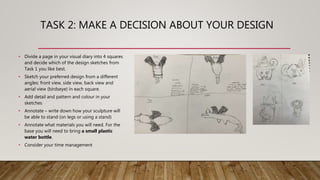
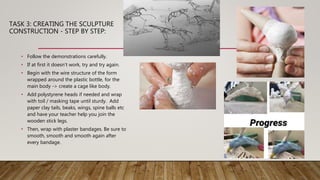
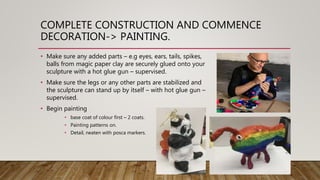
YEAR 5 SCULPTURE
INSPIRED BY THE ART OF GUSTAVO RAMIREZ CRUZ AND AUSTRALIAN
INDIGENOUS PAINTING
INQUIRY:
3D ART AND CONSTRUCTION IS AS IMPORTANT AS 2D ART YET THE SAME
DESIGN PROCESS IS FOLLOWED.
ARTIST’S USE DIFFERENT MATERIALS, TOOLS AND TECHNIQUES TO CREATE
ART WORKS.
• Look at these artworks. Write down what sources of
inspiration each artist has used to create their artwork.
Artwork A >
• Write down for each artwork if it is 2D or 3D and what
materials might have been used.
• 3D is 3 dimensional, write down which dimensions are
meant?
• Artwork B >
WHO IS GUSTAVO RAMIREZ CRUZ?
My love for art developed throughout the years in my various
studies of graphic design, photography and illustration for
children's books in my native country, Colombia.
My first experiences in the technique of paper-maché started
in Barcelona, where I moved in year 2000.
Throughout the years, I had the opportunity to continuously
improve and develop my skills by creating innovative and
distinctive pieces.
Since 2006, I am residing in Amsterdam and Berlin.
Question: What is paper maché? What materials are involved?
VIEW THE FOLLOWING SLIDES
THEN……………….LET’S TALK:
• Focus on what Elements of Art are visible in
the artworks.
• Are the artworks realistic/figurative or
abstract? Try to explain.
• What aspects do you admire or dislike and
why?
GUSTAVO’S LATEST WORK
LARGER SPECIES BY GUSTAVO…
AUSTRALIAN INDIGENOUS
ART IS…
• Aboriginal Art is based on dreamtime stories
which are passed on by the ancestors. The
stories teach the people how to live on country.
The first 2D artworks were drawings/paintings
with ochre in the sand and Aboriginal rock art
dates from 30.000 years ago. Later they used
bark as a surface to paint on. Aboriginal
communities each have their distinct way of
painting and use specific symbols in their
artworks to tell their stories.
AUSTRALIAN INDIGENOUS ART – PATTERNS –
TRADITIONAL AND CONTEMPORARY.
• A more recent Aboriginal painting technique
is dot painting either using natural ochre as
paint or acrylic paint. Contemporary paintings
are often painted on canvas and show brighter
colours.
POINTS OF DISCUSSION:
• * WHAT ELEMENTS OF ART DO YOU SEE IN THE GUSTAVO’S SCULPTURES AND
AUSTRALIAN INDIGENOUS ART WORKS?
* WHAT ASPECTS DO YOU ADMIRE / DISLIKE? WHY?
* HOW CAN WE MAKE A CONNECTION BETWEEN THEM ALL FOR OUR ART
WORK?
TASK 1:
BRAINSTORMING , RESEARCHING AND PLANNING…
• Reflect on the images you have seen of Gustavo’s art and the Aboriginal paintings. What aspects did you find
inspiring?
• Brainstorm your ideas with a mindmap. Use the template below- you may do this on Pic collage, Artset or in your
visual diary. Be sure to extend your thinking out as far as you can. You may research some inspirational artworks
and photos of animals.
• From your mindmapping, come up with two possible sculpture ideas and show this in two coloured in sketches,
presented in your visual diary.
TASK 2: MAKE A DECISION ABOUT YOUR DESIGN
• Divide a page in your visual diary into 4 squares
and decide which of the design sketches from
Task 1 you like best.
• Sketch your preferred design from a different
angles: front view, side view, back view and
aerial view (birdseye) in each square.
• Add detail and pattern and colour in your
sketches
• Annotate – write down how your sculpture will
be able to stand (on legs or using a stand)
• Annotate what materials you will need. For the
base you will need to bring a small plastic
water bottle.
• Consider your time management
TASK 3: CREATING THE SCULPTURE
CONSTRUCTION - STEP BY STEP:
• Follow the demonstrations carefully.
• If at first it doesn’t work, try and try again.
• Begin with the wire structure of the form
wrapped around the plastic bottle, for the
main body -> create a cage like body.
• Add polystyrene heads if needed and wrap
with toil / masking tape until sturdy. Add
paper clay tails, beaks, wings, spine balls etc
and have your teacher help you join the
wooden stick legs.
• Then, wrap with plaster bandages. Be sure to
smooth, smooth and smooth again after
every bandage.
COMPLETE CONSTRUCTION AND COMMENCE
DECORATION-> PAINTING.
• Make sure any added parts – e.g eyes, ears, tails, spikes,
balls from magic paper clay are securely glued onto your
sculpture with a hot glue gun – supervised.
• Make sure the legs or any other parts are stabilized and
the sculpture can stand up by itself – with hot glue gun –
supervised.
• Begin painting
• base coat of colour first – 2 coats.
• Painting patterns on.
• Detail, neaten with posca markers.
REFLECTION:
• Create a pic collage reflection page about the design process you went through to create your sculpture. Refer to
the design process template below.
• Include the challenges you went through and how you overcame them.
• Include photos of your art work at each stage. E.g. sketch, wire construction stage, completion.

Yr 5 sculpture unit pp final

  • 1.
    YEAR 5 SCULPTURE INSPIREDBY THE ART OF GUSTAVO RAMIREZ CRUZ AND AUSTRALIAN INDIGENOUS PAINTING
  • 2.
    INQUIRY: 3D ART ANDCONSTRUCTION IS AS IMPORTANT AS 2D ART YET THE SAME DESIGN PROCESS IS FOLLOWED. ARTIST’S USE DIFFERENT MATERIALS, TOOLS AND TECHNIQUES TO CREATE ART WORKS. • Look at these artworks. Write down what sources of inspiration each artist has used to create their artwork. Artwork A > • Write down for each artwork if it is 2D or 3D and what materials might have been used. • 3D is 3 dimensional, write down which dimensions are meant? • Artwork B >
  • 3.
    WHO IS GUSTAVORAMIREZ CRUZ? My love for art developed throughout the years in my various studies of graphic design, photography and illustration for children's books in my native country, Colombia. My first experiences in the technique of paper-maché started in Barcelona, where I moved in year 2000. Throughout the years, I had the opportunity to continuously improve and develop my skills by creating innovative and distinctive pieces. Since 2006, I am residing in Amsterdam and Berlin. Question: What is paper maché? What materials are involved?
  • 4.
    VIEW THE FOLLOWINGSLIDES THEN……………….LET’S TALK: • Focus on what Elements of Art are visible in the artworks. • Are the artworks realistic/figurative or abstract? Try to explain. • What aspects do you admire or dislike and why?
  • 5.
  • 6.
  • 7.
    AUSTRALIAN INDIGENOUS ART IS… •Aboriginal Art is based on dreamtime stories which are passed on by the ancestors. The stories teach the people how to live on country. The first 2D artworks were drawings/paintings with ochre in the sand and Aboriginal rock art dates from 30.000 years ago. Later they used bark as a surface to paint on. Aboriginal communities each have their distinct way of painting and use specific symbols in their artworks to tell their stories.
  • 8.
    AUSTRALIAN INDIGENOUS ART– PATTERNS – TRADITIONAL AND CONTEMPORARY. • A more recent Aboriginal painting technique is dot painting either using natural ochre as paint or acrylic paint. Contemporary paintings are often painted on canvas and show brighter colours.
  • 9.
    POINTS OF DISCUSSION: •* WHAT ELEMENTS OF ART DO YOU SEE IN THE GUSTAVO’S SCULPTURES AND AUSTRALIAN INDIGENOUS ART WORKS? * WHAT ASPECTS DO YOU ADMIRE / DISLIKE? WHY? * HOW CAN WE MAKE A CONNECTION BETWEEN THEM ALL FOR OUR ART WORK?
  • 10.
    TASK 1: BRAINSTORMING ,RESEARCHING AND PLANNING… • Reflect on the images you have seen of Gustavo’s art and the Aboriginal paintings. What aspects did you find inspiring? • Brainstorm your ideas with a mindmap. Use the template below- you may do this on Pic collage, Artset or in your visual diary. Be sure to extend your thinking out as far as you can. You may research some inspirational artworks and photos of animals. • From your mindmapping, come up with two possible sculpture ideas and show this in two coloured in sketches, presented in your visual diary.
  • 11.
    TASK 2: MAKEA DECISION ABOUT YOUR DESIGN • Divide a page in your visual diary into 4 squares and decide which of the design sketches from Task 1 you like best. • Sketch your preferred design from a different angles: front view, side view, back view and aerial view (birdseye) in each square. • Add detail and pattern and colour in your sketches • Annotate – write down how your sculpture will be able to stand (on legs or using a stand) • Annotate what materials you will need. For the base you will need to bring a small plastic water bottle. • Consider your time management
  • 12.
    TASK 3: CREATINGTHE SCULPTURE CONSTRUCTION - STEP BY STEP: • Follow the demonstrations carefully. • If at first it doesn’t work, try and try again. • Begin with the wire structure of the form wrapped around the plastic bottle, for the main body -> create a cage like body. • Add polystyrene heads if needed and wrap with toil / masking tape until sturdy. Add paper clay tails, beaks, wings, spine balls etc and have your teacher help you join the wooden stick legs. • Then, wrap with plaster bandages. Be sure to smooth, smooth and smooth again after every bandage.
  • 13.
    COMPLETE CONSTRUCTION ANDCOMMENCE DECORATION-> PAINTING. • Make sure any added parts – e.g eyes, ears, tails, spikes, balls from magic paper clay are securely glued onto your sculpture with a hot glue gun – supervised. • Make sure the legs or any other parts are stabilized and the sculpture can stand up by itself – with hot glue gun – supervised. • Begin painting • base coat of colour first – 2 coats. • Painting patterns on. • Detail, neaten with posca markers.
  • 14.
    REFLECTION: • Create apic collage reflection page about the design process you went through to create your sculpture. Refer to the design process template below. • Include the challenges you went through and how you overcame them. • Include photos of your art work at each stage. E.g. sketch, wire construction stage, completion.