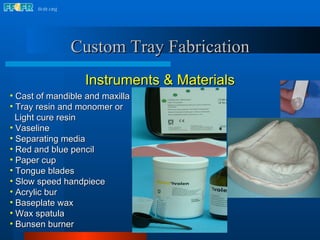
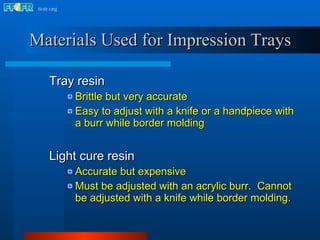
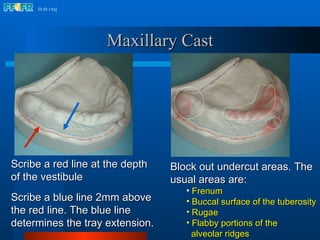
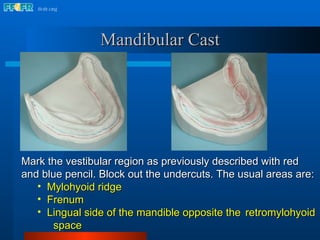
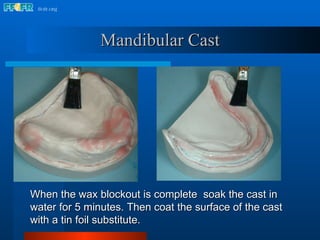
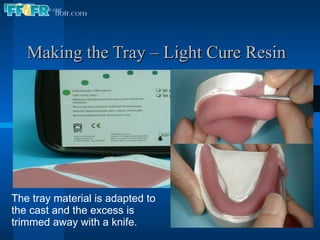
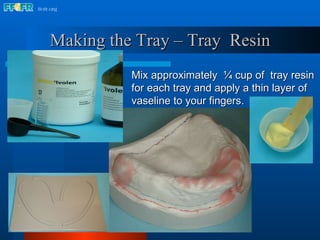
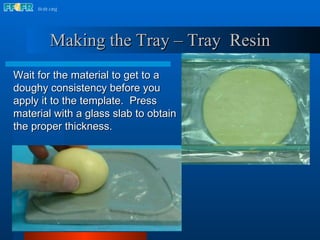
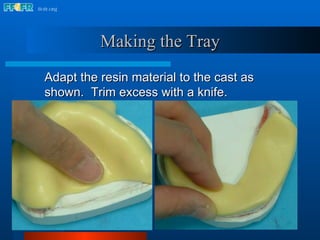
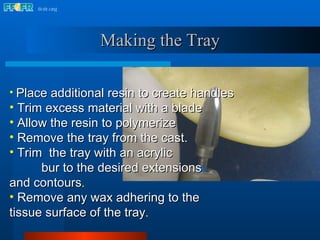
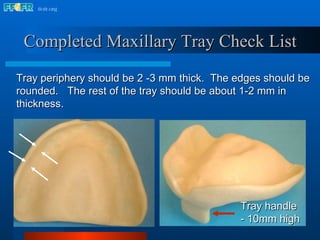
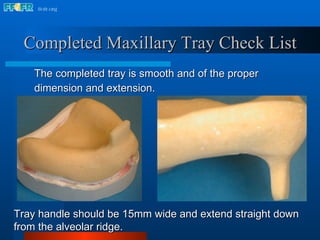
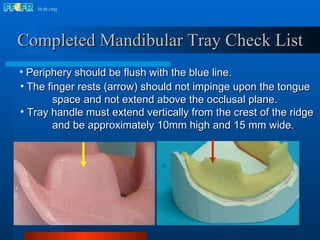
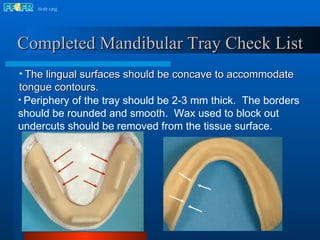
John Beumer III,  DDS, MS Division of Advanced Prosthodontics, Biomaterials and Hospital Dentistry UCLA  School of Dentistry 6. Impression Tray Fabrication This program of instruction is protected by copyright ©.  No portion of this program of instruction may be reproduced, recorded or transferred by any means electronic, digital, photographic, mechanical etc., or by any information storage or retrieval system, without prior permission.
Custom Tray Fabrication Instruments & Materials Cast of mandible and maxilla Tray resin and monomer or Light cure resin Vaseline Separating media Red and blue pencil Paper cup Tongue blades Slow speed handpiece Acrylic bur Baseplate wax Wax spatula Bunsen burner
Materials Used for Impression Trays Tray resin  Brittle but very accurate Easy to adjust with a knife or a handpiece with a burr while border molding Light cure resin  Accurate but expensive Must be adjusted with an acrylic burr.  Cannot be adjusted with a knife while border molding.
Scribe a red line at the depth of the vestibule Scribe a blue line 2mm above the red line. The blue line determines the tray extension. Block out undercut areas. The usual areas are: Frenum Buccal surface of the tuberosity Rugae Flabby portions of the  alveolar ridges Maxillary Cast
Mandibular Cast Mark the vestibular region as previously described with red and blue pencil. Block out the undercuts. The usual areas are: Mylohyoid ridge Frenum Lingual side of the mandible opposite the  retromylohyoid  space
Mandibular Cast When the wax blockout is complete  soak the cast in water for 5 minutes. Then coat the surface of the cast with a tin foil substitute.
Making the Tray – Light Cure Resin   The tray material is adapted to the cast and the excess is trimmed away with a knife.
Making the Tray – Light Cure Resin   The resin is cured and the edges of the trays are smoothed with an  acrylic burr.
Making the Tray – Light Cure Resin   Completed impression trays.
Mix approximately  ¼ cup of  tray resin for each tray and apply a thin layer of vaseline to your fingers. Making the Tray – Tray  Resin
Wait for the material to get to a doughy consistency before you apply it to the template.  Press material with a glass slab to obtain the proper thickness.  Making the Tray – Tray  Resin
Adapt the resin material to the cast as shown.  Trim excess with a knife. Making the Tray
Place additional resin to create handles Trim excess material with a blade Allow the resin to polymerize Remove the tray from the cast. Trim  the tray with an acrylic bur to the desired extensions  and contours . Remove any wax adhering to the  tissue surface of the tray . Making the Tray
Tray periphery should be 2 -3 mm thick.  The edges should be rounded.  The rest of the tray should be about 1-2 mm in thickness. Tray handle - 10mm high Completed Maxillary Tray Check List
Tray handle should be 15mm wide and extend straight down from the alveolar ridge. Completed Maxillary Tray Check List The completed tray is smooth and of the proper dimension and extension.
Finger rests Mandibular Tray Finger rests aid in holding the tray in position when making the wash impression.  Without finger rests it is likely that the wash material will be forced back into the vestibule distorting this portion of the impression.
Completed Mandibular Tray Check List The finger rests (arrow) should not impinge upon the tongue  space and not extend above the occlusal plane. Tray handle must extend vertically from the crest of the ridge  and be approximately 10mm high and 15 mm wide. Periphery should be flush with the blue line.
Completed Mandibular Tray Check List The lingual surfaces should be concave to accommodate  tongue contours. Periphery of the tray should be 2-3 mm thick.  The borders  should be rounded and smooth.  Wax used to block out  undercuts should be removed from the tissue surface.

6. impression tray fabrication

  • 1.
    John Beumer III, DDS, MS Division of Advanced Prosthodontics, Biomaterials and Hospital Dentistry UCLA School of Dentistry 6. Impression Tray Fabrication This program of instruction is protected by copyright ©. No portion of this program of instruction may be reproduced, recorded or transferred by any means electronic, digital, photographic, mechanical etc., or by any information storage or retrieval system, without prior permission.
  • 2.
    Custom Tray FabricationInstruments & Materials Cast of mandible and maxilla Tray resin and monomer or Light cure resin Vaseline Separating media Red and blue pencil Paper cup Tongue blades Slow speed handpiece Acrylic bur Baseplate wax Wax spatula Bunsen burner
  • 3.
    Materials Used forImpression Trays Tray resin Brittle but very accurate Easy to adjust with a knife or a handpiece with a burr while border molding Light cure resin Accurate but expensive Must be adjusted with an acrylic burr. Cannot be adjusted with a knife while border molding.
  • 4.
    Scribe a redline at the depth of the vestibule Scribe a blue line 2mm above the red line. The blue line determines the tray extension. Block out undercut areas. The usual areas are: Frenum Buccal surface of the tuberosity Rugae Flabby portions of the alveolar ridges Maxillary Cast
  • 5.
    Mandibular Cast Markthe vestibular region as previously described with red and blue pencil. Block out the undercuts. The usual areas are: Mylohyoid ridge Frenum Lingual side of the mandible opposite the retromylohyoid space
  • 6.
    Mandibular Cast Whenthe wax blockout is complete soak the cast in water for 5 minutes. Then coat the surface of the cast with a tin foil substitute.
  • 7.
    Making the Tray– Light Cure Resin The tray material is adapted to the cast and the excess is trimmed away with a knife.
  • 8.
    Making the Tray– Light Cure Resin The resin is cured and the edges of the trays are smoothed with an acrylic burr.
  • 9.
    Making the Tray– Light Cure Resin Completed impression trays.
  • 10.
    Mix approximately ¼ cup of tray resin for each tray and apply a thin layer of vaseline to your fingers. Making the Tray – Tray Resin
  • 11.
    Wait for thematerial to get to a doughy consistency before you apply it to the template. Press material with a glass slab to obtain the proper thickness. Making the Tray – Tray Resin
  • 12.
    Adapt the resinmaterial to the cast as shown. Trim excess with a knife. Making the Tray
  • 13.
    Place additional resinto create handles Trim excess material with a blade Allow the resin to polymerize Remove the tray from the cast. Trim the tray with an acrylic bur to the desired extensions and contours . Remove any wax adhering to the tissue surface of the tray . Making the Tray
  • 14.
    Tray periphery shouldbe 2 -3 mm thick. The edges should be rounded. The rest of the tray should be about 1-2 mm in thickness. Tray handle - 10mm high Completed Maxillary Tray Check List
  • 15.
    Tray handle shouldbe 15mm wide and extend straight down from the alveolar ridge. Completed Maxillary Tray Check List The completed tray is smooth and of the proper dimension and extension.
  • 16.
    Finger rests MandibularTray Finger rests aid in holding the tray in position when making the wash impression. Without finger rests it is likely that the wash material will be forced back into the vestibule distorting this portion of the impression.
  • 17.
    Completed Mandibular TrayCheck List The finger rests (arrow) should not impinge upon the tongue space and not extend above the occlusal plane. Tray handle must extend vertically from the crest of the ridge and be approximately 10mm high and 15 mm wide. Periphery should be flush with the blue line.
  • 18.
    Completed Mandibular TrayCheck List The lingual surfaces should be concave to accommodate tongue contours. Periphery of the tray should be 2-3 mm thick. The borders should be rounded and smooth. Wax used to block out undercuts should be removed from the tissue surface.