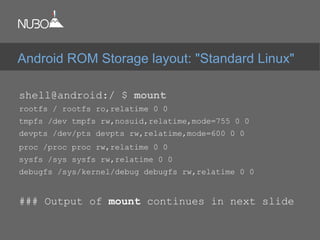
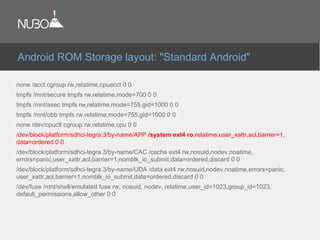
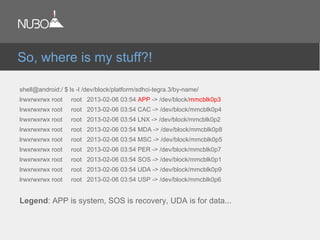
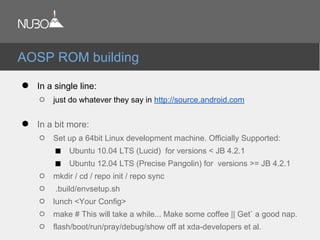
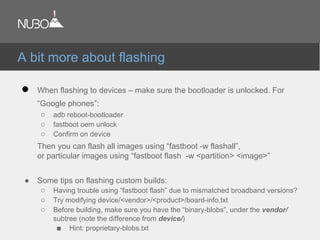
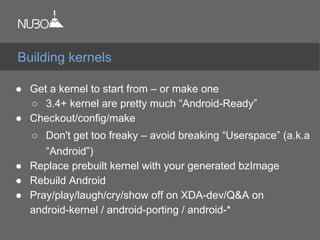
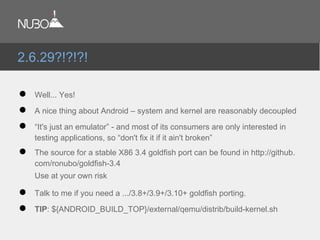
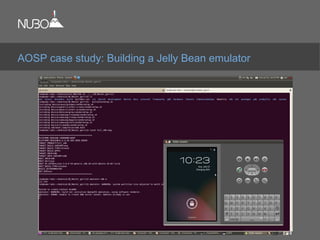
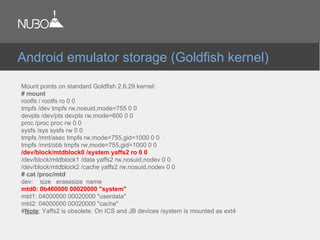
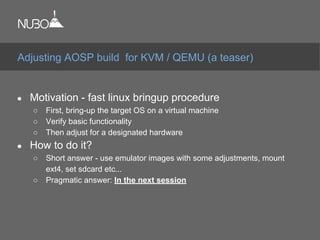
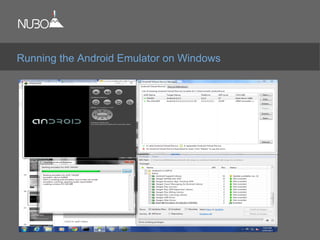
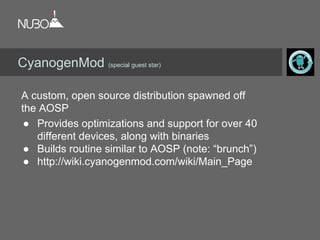
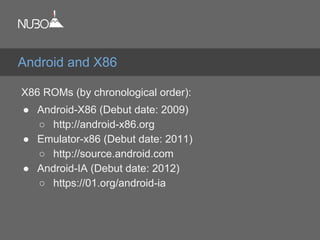
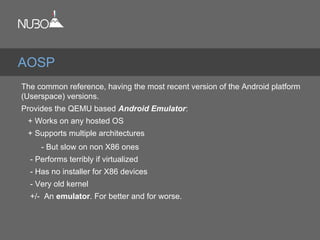
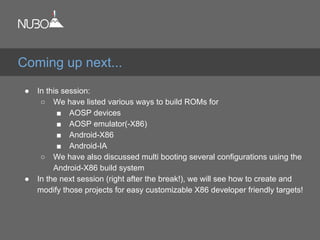
Bringing up Android on
your favorite X86
Workstation or VM
Ron Munitz
Founder & CTO
Nubo Software
ron@nubosoftware.com
ron@android-x86.org
AnDevCon
Boston
May 2013
This work is licensed under the Creative Commons
Attribution-ShareAlike 4.0 International License.
To view a copy of this license, visit http://creativecommons.org/licenses/by-
sa/4.0/
© Copyright Ron Munitz 2013
Agenda
● What is a "ROM"?
● Examples of Android ROMs
● ROMs in the Android developer world
● Building your first ROM out of the AOSP
● Android and X86
Introduction to ROM
Cooking
AnDevCon Boston
May 2013
From Wiktionary, the free Dictionary:
“ROM”:
● (electronics, computing) read-only memory
● (video games) A software image of read-only memory (as of a game
cartridge) used in emulation
● (medicine) Range of Motion
● (finance) Return on Margin
● (estimating and purchasing) Rough order of magnitude. An informal cost
or price estimate provided for planning and budgeting purposes only,
typically expected to be only 75% accurate
"ROM" - Definition
From Wikipedia, the free Encyclopedia:
ROM, Rom, or rom is an abbreviation and name that may refer to:
In computers and mathematics (that's us!):
● Read-only memory, a type of storage media that is used in computers
and other electronic devices
● ROM image, a computer file which contains a copy of the data from a
read-only memory chip
● ROM (MUD), a popular MUD codebase
● Random oracle model, a mathematical abstraction used in cryptographic
proofs
● ROM cartridge, a portable form of read-only memory
● RoM, Request of Maintainer (see Software maintainer)
● Rough order of magnitude estimate
"ROM" - Definition (cont)
As CyanogenMod educates us in their overview of Modding:
“You can flash a ROM onto the ROM,
which isn't really ROM”
http://wiki.cyanogenmod.com/wiki/Overview_of_Modding
Terminology check
Traditional terminology – whatever lies on the read-only partitions of the
device's internal flash memory:
● Recovery Mode:
○ Recovery Image (kernel + initrd)
● Operational Mode:
○ Boot Image (kernel + initrd)
○ System Image
● The magical link between the two:
○ Misc
What is not a part of the ROM?
● User data: /data, /cache, /mnt/sdcard/...
Android ROM components
Since Android is Linux at its core, we can examine its
storage layout via common Linux tools:
shell@android:/ $ df
Filesystem Size Used Free Blksize
/dev 487M 32K 487M 4096
/mnt/secure 487M 0K 487M 4096
/mnt/asec 487M 0K 487M 4096
/mnt/obb 487M 0K 487M 4096
/system 639M 464M 174M 4096
/cache 436M 7M 428M 4096
/data 5G 2G 3G 4096
/mnt/shell/emulated 5G 2G 3G 4096
Android ROM Storage Layout
shell@android:/ $ mount
rootfs / rootfs ro,relatime 0 0
tmpfs /dev tmpfs rw,nosuid,relatime,mode=755 0 0
devpts /dev/pts devpts rw,relatime,mode=600 0 0
proc /proc proc rw,relatime 0 0
sysfs /sys sysfs rw,relatime 0 0
debugfs /sys/kernel/debug debugfs rw,relatime 0 0
### Output of mount continues in next slide
Android ROM Storage layout: "Standard Linux"
none /acct cgroup rw,relatime,cpuacct 0 0
tmpfs /mnt/secure tmpfs rw,relatime,mode=700 0 0
tmpfs /mnt/asec tmpfs rw,relatime,mode=755,gid=1000 0 0
tmpfs /mnt/obb tmpfs rw,relatime,mode=755,gid=1000 0 0
none /dev/cpuctl cgroup rw,relatime,cpu 0 0
/dev/block/platform/sdhci-tegra.3/by-name/APP /system ext4 ro,relatime,user_xattr,acl,barrier=1,
data=ordered 0 0
/dev/block/platform/sdhci-tegra.3/by-name/CAC /cache ext4 rw,nosuid,nodev,noatime,
errors=panic,user_xattr,acl,barrier=1,nomblk_io_submit,data=ordered,discard 0 0
/dev/block/platform/sdhci-tegra.3/by-name/UDA /data ext4 rw,nosuid,nodev,noatime,errors=panic,
user_xattr,acl,barrier=1,nomblk_io_submit,data=ordered,discard 0 0
/dev/fuse /mnt/shell/emulated fuse rw, nosuid, nodev, relatime,user_id=1023,group_id=1023,
default_permissions,allow_other 0 0
Android ROM Storage layout: "Standard Android"
shell@android:/ $ cat /proc/partitions
major minor #blocks name
179 0 7467008 mmcblk0
179 1 12288 mmcblk0p1
179 2 8192 mmcblk0p2
179 3 665600 mmcblk0p3
179 4 453632 mmcblk0p4
179 5 512 mmcblk0p5
179 6 10240 mmcblk0p6
179 7 5120 mmcblk0p7
179 8 512 mmcblk0p8
179 9 6302720 mmcblk0p9
Android ROM Storage Layout
shell@android:/ $ ls -l /dev/block/platform/sdhci-tegra.3/by-name/
lrwxrwxrwx root root 2013-02-06 03:54 APP -> /dev/block/mmcblk0p3
lrwxrwxrwx root root 2013-02-06 03:54 CAC -> /dev/block/mmcblk0p4
lrwxrwxrwx root root 2013-02-06 03:54 LNX -> /dev/block/mmcblk0p2
lrwxrwxrwx root root 2013-02-06 03:54 MDA -> /dev/block/mmcblk0p8
lrwxrwxrwx root root 2013-02-06 03:54 MSC -> /dev/block/mmcblk0p5
lrwxrwxrwx root root 2013-02-06 03:54 PER -> /dev/block/mmcblk0p7
lrwxrwxrwx root root 2013-02-06 03:54 SOS -> /dev/block/mmcblk0p1
lrwxrwxrwx root root 2013-02-06 03:54 UDA -> /dev/block/mmcblk0p9
lrwxrwxrwx root root 2013-02-06 03:54 USP -> /dev/block/mmcblk0p6
Legend: APP is system, SOS is recovery, UDA is for data...
So, where is my stuff?!
For a couple of reasons:
● Backup
● Recovery
● Software updates
● Error checking
● Board design
● Curiosity
● ...
Why should we care about it?
● “Semi-Open source”
● Maintained by Google
● Contributions accepted using “gerrit”
● Mostly Apache licensed
● Provides templates for building an Android system, including
bootloaders etc.
● Vendors derive their products for their hardware layout (BSP,
binaries, etc.)
● Provides the complete source code (but usually missing proprietary
binaries) for a bunch of supported devices (e.g. Galaxy Nexus,
Nexus 4/7/10, Android Emulator)
Android Open Source Project
● In a single line:
○ just do whatever they say in http://source.android.com
● In a bit more:
○ Set up a 64bit Linux development machine. Officially Supported:
■ Ubuntu 10.04 LTS (Lucid) for versions < JB 4.2.1
■ Ubuntu 12.04 LTS (Precise Pangolin) for versions >= JB 4.2.1
○ mkdir / cd / repo init / repo sync
○ .build/envsetup.sh
○ lunch <Your Config>
○ make # This will take a while... Make some coffee || Get` a good nap.
○ flash/boot/run/pray/debug/show off at xda-developers et al.
AOSP ROM building
● When flashing to devices – make sure the bootloader is unlocked. For
“Google phones”:
○ adb reboot-bootloader
○ fastboot oem unlock
○ Confirm on device
Then you can flash all images using “fastboot -w flashall”,
or particular images using “fastboot flash -w <partition> <image>”
● Some tips on flashing custom builds:
○ Having trouble using “fastboot flash” due to mismatched broadband versions?
○ Try modifying device/<vendor>/<product>/board-info.txt
○ Before building, make sure you have the “binary-blobs”, under the vendor/
subtree (note the difference from device/)
■ Hint: proprietary-blobs.txt
A bit more about flashing
● Get a kernel to start from – or make one
○ 3.4+ kernel are pretty much “Android-Ready”
● Checkout/config/make
○ Don't get too freaky – avoid breaking “Userspace” (a.k.a
“Android”)
● Replace prebuilt kernel with your generated bzImage
● Rebuild Android
● Pray/play/laugh/cry/show off on XDA-dev/Q&A on
android-kernel / android-porting / android-*
Building kernels
$ git clone https://android.googlesource.com/kernel/<target>.git
Some kernel targets hosted by the AOSP:
● Common - common kernel tree. Based on Linux 3.4+
● msm – Qualcomm msm (HTC Nexus One, LG Nexus 4)
● Omap – TI's OMAP (Samsung Galaxy Nexus)
● Tegra – Nvidia's Tegra (Motorola Xoom, Asus Nexus 7)
● Exynos - Samsung Exynos (Samsung Nexus 10)
● Goldfish - Android emulator (2.6.29)
Getting Kernel Sources
● Well... Yes!
● A nice thing about Android – system and kernel are reasonably decoupled
● “It's just an emulator” - and most of its consumers are only interested in
testing applications, so “don't fix it if it ain't broken”
● The source for a stable X86 3.4 goldfish port can be found in http://github.
com/ronubo/goldfish-3.4
Use at your own risk
● Talk to me if you need a .../3.8+/3.9+/3.10+ goldfish porting.
● TIP: ${ANDROID_BUILD_TOP}/external/qemu/distrib/build-kernel.sh
2.6.29?!?!?!
AOSP case study: Building a Jelly Bean emulator
Mount points on standard Goldfish 2.6.29 kernel:
# mount
rootfs / rootfs ro 0 0
tmpfs /dev tmpfs rw,nosuid,mode=755 0 0
devpts /dev/pts devpts rw,mode=600 0 0
proc /proc proc rw 0 0
sysfs /sys sysfs rw 0 0
tmpfs /mnt/asec tmpfs rw,mode=755,gid=1000 0 0
tmpfs /mnt/obb tmpfs rw,mode=755,gid=1000 0 0
/dev/block/mtdblock0 /system yaffs2 ro 0 0
/dev/block/mtdblock1 /data yaffs2 rw,nosuid,nodev 0 0
/dev/block/mtdblock2 /cache yaffs2 rw,nosuid,nodev 0 0
# cat /proc/mtd
dev: size erasesize name
mtd0: 0b460000 00020000 "system"
mtd1: 04000000 00020000 "userdata"
mtd2: 04000000 00020000 "cache"
#Note: Yaffs2 is obsolete. On ICS and JB devices /system is mounted as ext4.
Android emulator storage (Goldfish kernel)
● First and foremost: Build for X86 and use KVM!
○ Check capability with “kvm-ok”
○ Feature must be enabled in your computer's bios
○ cat /proc/cpuinfo and search for vmx/avm(intel VT/AMD-V)
● Use hardware keyboard
● Much more comfortable then “touching” the soft keyboard
● Although there are uses for that
● Enable keyboard in external/qemu/android/avd/hardware-
properties.ini – and rebuild external/qemu
● Windows users: Use HAXM (Intel's HW Acceleration Manager)
Using the Android Emulator
● There are more emulation configurations which are supposed to be
supported by AOSP, but tend to be broken
○ Building for non Linux devices from Linux
■ lunch sdk-eng && make win_sdk
○ Building for VirtualBox and other virtual machines:
■ lunch vbox_x86-eng
■ make android_disk_vdi
■ Translate VDI image to your VM hard-drive format (e.g. qcow...)
● Motivation for using such configurations:
Development teams working with different Operating Systems,
but willing to use the same emulated platform
Additional X86 AOSP configurations
● Motivation - fast linux bringup procedure
○ First, bring-up the target OS on a virtual machine
○ Verify basic functionality
○ Then adjust for a designated hardware
● How to do it?
○ Short answer - use emulator images with some adjustments, mount
ext4, set sdcard etc...
○ Pragmatic answer: In the next session
Adjusting AOSP build for KVM / QEMU (a teaser)
The short answer would be – whenever you can.
○ Great for application development
■ when used with KVM/HAXM
○ Has no dependency on a particular hardware
○ Very easy to build
○ Integrates well with the AOSP tools
○ Relatively well documented
Overall – it is a good ROM.
Most used ROM for a reason.
When to use the emulator
Running the Android Emulator on Windows
Various forks to the Android Open Source Project:
● AOSP - (4.2.2+ OPENMASTER/JDQ39 upstream)
○ The root of all (good?)
● Android-X86 (JER09 upstream)
● Android-IA (JDQ39 upstream )
● Many other forks
○ CyanogenMod
○ Buildroid/AndroVM
○ And many others... Not all are known or Open-Sourced
Android Projects
A custom, open source distribution spawned off
the AOSP
● Provides optimizations and support for over 40
different devices, along with binaries
● Builds routine similar to AOSP (note: “brunch”)
● http://wiki.cyanogenmod.com/wiki/Main_Page
CyanogenMod (special guest star)
Android, X86, Google,
Intel and Android-X86
AnDevCon Boston
May 2013
X86 ROMs (by chronological order):
● Android-X86 (Debut date: 2009)
○ http://android-x86.org
● Emulator-x86 (Debut date: 2011)
○ http://source.android.com
● Android-IA (Debut date: 2012)
○ https://01.org/android-ia
Android and X86
The common reference, having the most recent version of the Android platform
(Userspace) versions.
Provides the QEMU based Android Emulator:
+ Works on any hosted OS
+ Supports multiple architectures
- But slow on non X86 ones
- Performs terribly if virtualized
- Has no installer for X86 devices
- Very old kernel
+/- An emulator. For better and for worse.
AOSP
+ Developed by the open source community
+ Developer/Linux user friendly
+ Multi-Boot friendly
+ Generally supports many Intel and AMD devices
+/- But of course requires specific work on specific HW
+ VM friendly
+ Mature, Recognized and stable
- Delays in new releases (You can help!)
- Current version (4.2.2) still needs some work on important features
such as Bluetooth, Camera etc.
+ The ICS 4.0.4 release is amazing - including running ARM apps
Android-X86
+ Installer to device
+ Relatively new versions of android and kernel
+ Works great on ivy-bridge devices
+ Integrated Ethernet Configuration Management
- Development for devices based on intel solutions only
- Very unfriendly to other OS's
- Not developer friendly – unless they make it such
- Community work can be better. But it is seems to be getting better
- Intel phones are not based on it (at the moment)
+ Made impressive progress in the last couple of months!
Android-IA
● Android is Linux
○ Therefore the required minimum to run it would be:
■ A Kernel
■ A filesystem
■ A ramdisk/initrd... Whatever makes you happy with your kernel's
init/main.c's run_init_process() calls.
See http://lxr.linux.no/linux+v3.6.9/init/main.c
○ This means that we can achieve full functionality with
■ A kernel (+ramdisk)
■ A rootfs where Android system/ will be mounted (ROM)
■ Some place to read/write data
Android is Linux
Android-IA is Android
Android-IA is, of course, Linux as well.
However, it was designed to conform to Android OEM's partition layout, and
has no less than 9 partitions:
○ boot - flashed boot.img (kernel+ramdisk.img)
○ recovery - Recovery image
○ misc - shared storage between boot and recovery
○ system - flashed system.img - contents of the System partition
○ cache - cache partition
○ data - data partition
○ install - Installation definition
○ bootloader - A vfat partition containing android syslinux bootloader (<4.2.2)
- A GPT partition containing gummiboot (Only option in 4.2.2)
○ fastboot - fastboot protocol (flashed droidboot.img)
Note: On android-ia-4.2.2-r1, the bootable live.img works with a single
● One partition with two directories
○ First directory – grub (bootloader)
○ Second directory – files of android (SRC)
■ kernel
■ initrd.img
■ ramdisk.img
○ system
○ data
● This simple structure makes it very easy to work and debug
Note: Also comes with a live CD/installer. Very convenient.
Android-X86 is Linux
● Start bootloader
● The bootloader starts the combined kernel + ramdisk
image (boot.img flashed to /boot)
● At the end of kernel initialization Android's
● /init runs from ramdisk
● File systems are mounted the Android way – using
fstab.common that is processed (mount_all command)
from in init.<target>.rc
Android-IA boot process
● Start bootloader (GRUB)
● bootloader starts kernel + initrd (minimal linux) + kernel
command line
● At the end of kernel initialization
○ run the /init script from initrd.img
○ load some modules, etc.
○ At the end change root to the Android file system
● Run the /init binary from ramdisk.img
○ Which parses init.rc, and starts talking “Android-ish”
Android-X86 boot process
It depends what you need:
○ Developer options?
○ Debugging the init process?
○ Support for Hardware?
○ Support for OTA?
○ Licensing?
○ Participating in project direction?
○ Upstream features?
○ ...
There is no Black and White.
Which one is better?
● Use Android-X86 installer system
● And put your desired android files (matching
kernel/ramdisk/system) in the same partition.
● Use the Android-X86 chroot mechanism
○ Critics: Does redundant stuff
○ But that's just a hack anyway – devise specific solutions for
specific problems
● This way, we can multiple boot various projects:
○ Android-IA
○ AOSP
○ Any other OS...
Note: You can also use chroot mechanism on any Linux Distribution,
from userspace! But this is significantly harder...
An hybrid approach
Repartition existing Linux partition (Don't do that...)
Install Android-X86
Add entries to GRUB
Reboot to Android-X86 debug mode
Copy Android-IA files from a pendrive or over SCP
For the former: cp /mnt/USB/A-IA/ /mnt && sync
/mnt is the root of Android-X86 installed partition
(e.g. (hd0,1)/...
Update GRUB entries and update GRUB
Voila :-)
Less simplified procedure: Debug GRUB... :-(
** Note: Replace Android-IA with AOSP to boot AOSP built files (system.img /
kernel / ramdisk.img) on your target device.
Multi-boot recipe with legacy GRUB (simplified)
● Repartition existing Linux partition (Don't do that...)
● Create a mount point for your multi-booting android
○ Can make a partition per distribution, it doesn't really matter.
○ For this example let's assume all Android distributions will co exist on
the same partition, and that it is mounted to /media/Android-x86
● Build your images
○ AOSP: Discussed before
○ Android-x86:
■ . build/envsetup.sh && lunch android_x86-<variant> 
&& make iso_img
○ Android-IA:
■ . build/envsetup.sh && lunch core_mesa-<variant> 
&& make allimages
■ . build/envsetup.sh && lunch bigcore-<variant> && make
allimages
Multi-boot recipe using GRUB2
● Create directories for your projects (e.g. jb-x86, A-IA, AOSP) under your
mount point (e.g. /media/Android-x86)
● From Android-X86's out/product/target: Copy initrd.img to all projects.
○ Can of course only copy ramdisk to one location.
● From all projects – copy kernel, ramdisk.img, system/ and data/ to to
the corresponding directory under your mount point.
● Add entries to GRUB and update grub.
● # e.g. sudo vi /etc/grub.d/40_custom && update-grub
Multi-boot recipe using GRUB2 (cont.)
$ df
Filesystem 1K-blocks Used Available Use% Mounted on
/dev/sda5 451656948 394848292 34199920 93% /
udev 1954628 4 1954624 1% /dev
tmpfs 785388 1072 784316 1% /run
none 5120 0 5120 0% /run/lock
none 1963460 2628 1960832 1% /run/shm
/dev/sda1 15481360 5165416 9529464 36% /media/Android-
x86
Multi-boot recipe with GRUB2 - A numerical example
#### JB-X86
menuentry 'jb-x86' --class ubuntu --class gnu-linux --class gnu --class os {
recordfail
insmod gzio
insmod part_msdos
insmod ext2
set root='(hd0,msdos1)'
echo 'Loading Android-X86'
linux /jb-x86/kernel quiet androidboot.hardware=android_x86 video=-16 SRC=/jb-x86
initrd /jb-x86/initrd.img
}
A numerical example (cont.)- /etc/grub.d/40_custom
### android-IA
menuentry 'Android-IA' --class ubuntu --class gnu-linux --class gnu --class os {
recordfail
insmod gzio
insmod part_msdos
insmod ext2
set root='(hd0,msdos1)'
echo 'Loading Android-IA'
linux /A-IA/kernel console=ttyS0 pci=noearly console=tty0 loglevel=8 androidboot.hardware=ivb
SRC=/A-IA
initrd /A-IA/initrd.img
}
A numerical example (cont.) - /etc/grub.d/40_custom
● In this session:
○ We have listed various ways to build ROMs for
■ AOSP devices
■ AOSP emulator(-X86)
■ Android-X86
■ Android-IA
○ We have also discussed multi booting several configurations using the
Android-X86 build system
● In the next session (right after the break!), we will see how to create and
modify those projects for easy customizable X86 developer friendly targets!
Coming up next...
● The AOSP is hosted at http://source.android.com
● The Android-x86.org project is hosted at http://Android-X86.org
● The Android-IA project is hosted at https://01.org/android-ia
● Device trees shown in the next session are available at
https://github.com/ronubo/AnDevCon_Boston
● You are welcome to contact me at:
○ ron@nubosoftware.com
○ ron@android-x86.org
○ Social media. LinkedIn/Google+/Twitter
■ I am the only Ron Munitz around!
■ But to be on the safe side…
● Android Internals training @thePSCG
References
Thank You AnDevCon Boston
May 2013

Bringing up Android on your favorite X86 Workstation or VM (AnDevCon Boston, 2013)

  • 1.
    Bringing up Androidon your favorite X86 Workstation or VM Ron Munitz Founder & CTO Nubo Software ron@nubosoftware.com ron@android-x86.org AnDevCon Boston May 2013
  • 2.
    This work islicensed under the Creative Commons Attribution-ShareAlike 4.0 International License. To view a copy of this license, visit http://creativecommons.org/licenses/by- sa/4.0/ © Copyright Ron Munitz 2013
  • 3.
    Agenda ● What isa "ROM"? ● Examples of Android ROMs ● ROMs in the Android developer world ● Building your first ROM out of the AOSP ● Android and X86
  • 4.
  • 5.
    From Wiktionary, thefree Dictionary: “ROM”: ● (electronics, computing) read-only memory ● (video games) A software image of read-only memory (as of a game cartridge) used in emulation ● (medicine) Range of Motion ● (finance) Return on Margin ● (estimating and purchasing) Rough order of magnitude. An informal cost or price estimate provided for planning and budgeting purposes only, typically expected to be only 75% accurate "ROM" - Definition
  • 6.
    From Wikipedia, thefree Encyclopedia: ROM, Rom, or rom is an abbreviation and name that may refer to: In computers and mathematics (that's us!): ● Read-only memory, a type of storage media that is used in computers and other electronic devices ● ROM image, a computer file which contains a copy of the data from a read-only memory chip ● ROM (MUD), a popular MUD codebase ● Random oracle model, a mathematical abstraction used in cryptographic proofs ● ROM cartridge, a portable form of read-only memory ● RoM, Request of Maintainer (see Software maintainer) ● Rough order of magnitude estimate "ROM" - Definition (cont)
  • 7.
    As CyanogenMod educatesus in their overview of Modding: “You can flash a ROM onto the ROM, which isn't really ROM” http://wiki.cyanogenmod.com/wiki/Overview_of_Modding Terminology check
  • 8.
    Traditional terminology –whatever lies on the read-only partitions of the device's internal flash memory: ● Recovery Mode: ○ Recovery Image (kernel + initrd) ● Operational Mode: ○ Boot Image (kernel + initrd) ○ System Image ● The magical link between the two: ○ Misc What is not a part of the ROM? ● User data: /data, /cache, /mnt/sdcard/... Android ROM components
  • 9.
    Since Android isLinux at its core, we can examine its storage layout via common Linux tools: shell@android:/ $ df Filesystem Size Used Free Blksize /dev 487M 32K 487M 4096 /mnt/secure 487M 0K 487M 4096 /mnt/asec 487M 0K 487M 4096 /mnt/obb 487M 0K 487M 4096 /system 639M 464M 174M 4096 /cache 436M 7M 428M 4096 /data 5G 2G 3G 4096 /mnt/shell/emulated 5G 2G 3G 4096 Android ROM Storage Layout
  • 10.
    shell@android:/ $ mount rootfs/ rootfs ro,relatime 0 0 tmpfs /dev tmpfs rw,nosuid,relatime,mode=755 0 0 devpts /dev/pts devpts rw,relatime,mode=600 0 0 proc /proc proc rw,relatime 0 0 sysfs /sys sysfs rw,relatime 0 0 debugfs /sys/kernel/debug debugfs rw,relatime 0 0 ### Output of mount continues in next slide Android ROM Storage layout: "Standard Linux"
  • 11.
    none /acct cgrouprw,relatime,cpuacct 0 0 tmpfs /mnt/secure tmpfs rw,relatime,mode=700 0 0 tmpfs /mnt/asec tmpfs rw,relatime,mode=755,gid=1000 0 0 tmpfs /mnt/obb tmpfs rw,relatime,mode=755,gid=1000 0 0 none /dev/cpuctl cgroup rw,relatime,cpu 0 0 /dev/block/platform/sdhci-tegra.3/by-name/APP /system ext4 ro,relatime,user_xattr,acl,barrier=1, data=ordered 0 0 /dev/block/platform/sdhci-tegra.3/by-name/CAC /cache ext4 rw,nosuid,nodev,noatime, errors=panic,user_xattr,acl,barrier=1,nomblk_io_submit,data=ordered,discard 0 0 /dev/block/platform/sdhci-tegra.3/by-name/UDA /data ext4 rw,nosuid,nodev,noatime,errors=panic, user_xattr,acl,barrier=1,nomblk_io_submit,data=ordered,discard 0 0 /dev/fuse /mnt/shell/emulated fuse rw, nosuid, nodev, relatime,user_id=1023,group_id=1023, default_permissions,allow_other 0 0 Android ROM Storage layout: "Standard Android"
  • 12.
    shell@android:/ $ cat/proc/partitions major minor #blocks name 179 0 7467008 mmcblk0 179 1 12288 mmcblk0p1 179 2 8192 mmcblk0p2 179 3 665600 mmcblk0p3 179 4 453632 mmcblk0p4 179 5 512 mmcblk0p5 179 6 10240 mmcblk0p6 179 7 5120 mmcblk0p7 179 8 512 mmcblk0p8 179 9 6302720 mmcblk0p9 Android ROM Storage Layout
  • 13.
    shell@android:/ $ ls-l /dev/block/platform/sdhci-tegra.3/by-name/ lrwxrwxrwx root root 2013-02-06 03:54 APP -> /dev/block/mmcblk0p3 lrwxrwxrwx root root 2013-02-06 03:54 CAC -> /dev/block/mmcblk0p4 lrwxrwxrwx root root 2013-02-06 03:54 LNX -> /dev/block/mmcblk0p2 lrwxrwxrwx root root 2013-02-06 03:54 MDA -> /dev/block/mmcblk0p8 lrwxrwxrwx root root 2013-02-06 03:54 MSC -> /dev/block/mmcblk0p5 lrwxrwxrwx root root 2013-02-06 03:54 PER -> /dev/block/mmcblk0p7 lrwxrwxrwx root root 2013-02-06 03:54 SOS -> /dev/block/mmcblk0p1 lrwxrwxrwx root root 2013-02-06 03:54 UDA -> /dev/block/mmcblk0p9 lrwxrwxrwx root root 2013-02-06 03:54 USP -> /dev/block/mmcblk0p6 Legend: APP is system, SOS is recovery, UDA is for data... So, where is my stuff?!
  • 14.
    For a coupleof reasons: ● Backup ● Recovery ● Software updates ● Error checking ● Board design ● Curiosity ● ... Why should we care about it?
  • 15.
    ● “Semi-Open source” ●Maintained by Google ● Contributions accepted using “gerrit” ● Mostly Apache licensed ● Provides templates for building an Android system, including bootloaders etc. ● Vendors derive their products for their hardware layout (BSP, binaries, etc.) ● Provides the complete source code (but usually missing proprietary binaries) for a bunch of supported devices (e.g. Galaxy Nexus, Nexus 4/7/10, Android Emulator) Android Open Source Project
  • 16.
    ● In asingle line: ○ just do whatever they say in http://source.android.com ● In a bit more: ○ Set up a 64bit Linux development machine. Officially Supported: ■ Ubuntu 10.04 LTS (Lucid) for versions < JB 4.2.1 ■ Ubuntu 12.04 LTS (Precise Pangolin) for versions >= JB 4.2.1 ○ mkdir / cd / repo init / repo sync ○ .build/envsetup.sh ○ lunch <Your Config> ○ make # This will take a while... Make some coffee || Get` a good nap. ○ flash/boot/run/pray/debug/show off at xda-developers et al. AOSP ROM building
  • 17.
    ● When flashingto devices – make sure the bootloader is unlocked. For “Google phones”: ○ adb reboot-bootloader ○ fastboot oem unlock ○ Confirm on device Then you can flash all images using “fastboot -w flashall”, or particular images using “fastboot flash -w <partition> <image>” ● Some tips on flashing custom builds: ○ Having trouble using “fastboot flash” due to mismatched broadband versions? ○ Try modifying device/<vendor>/<product>/board-info.txt ○ Before building, make sure you have the “binary-blobs”, under the vendor/ subtree (note the difference from device/) ■ Hint: proprietary-blobs.txt A bit more about flashing
  • 18.
    ● Get akernel to start from – or make one ○ 3.4+ kernel are pretty much “Android-Ready” ● Checkout/config/make ○ Don't get too freaky – avoid breaking “Userspace” (a.k.a “Android”) ● Replace prebuilt kernel with your generated bzImage ● Rebuild Android ● Pray/play/laugh/cry/show off on XDA-dev/Q&A on android-kernel / android-porting / android-* Building kernels
  • 19.
    $ git clonehttps://android.googlesource.com/kernel/<target>.git Some kernel targets hosted by the AOSP: ● Common - common kernel tree. Based on Linux 3.4+ ● msm – Qualcomm msm (HTC Nexus One, LG Nexus 4) ● Omap – TI's OMAP (Samsung Galaxy Nexus) ● Tegra – Nvidia's Tegra (Motorola Xoom, Asus Nexus 7) ● Exynos - Samsung Exynos (Samsung Nexus 10) ● Goldfish - Android emulator (2.6.29) Getting Kernel Sources
  • 20.
    ● Well... Yes! ●A nice thing about Android – system and kernel are reasonably decoupled ● “It's just an emulator” - and most of its consumers are only interested in testing applications, so “don't fix it if it ain't broken” ● The source for a stable X86 3.4 goldfish port can be found in http://github. com/ronubo/goldfish-3.4 Use at your own risk ● Talk to me if you need a .../3.8+/3.9+/3.10+ goldfish porting. ● TIP: ${ANDROID_BUILD_TOP}/external/qemu/distrib/build-kernel.sh 2.6.29?!?!?!
  • 21.
    AOSP case study:Building a Jelly Bean emulator
  • 22.
    Mount points onstandard Goldfish 2.6.29 kernel: # mount rootfs / rootfs ro 0 0 tmpfs /dev tmpfs rw,nosuid,mode=755 0 0 devpts /dev/pts devpts rw,mode=600 0 0 proc /proc proc rw 0 0 sysfs /sys sysfs rw 0 0 tmpfs /mnt/asec tmpfs rw,mode=755,gid=1000 0 0 tmpfs /mnt/obb tmpfs rw,mode=755,gid=1000 0 0 /dev/block/mtdblock0 /system yaffs2 ro 0 0 /dev/block/mtdblock1 /data yaffs2 rw,nosuid,nodev 0 0 /dev/block/mtdblock2 /cache yaffs2 rw,nosuid,nodev 0 0 # cat /proc/mtd dev: size erasesize name mtd0: 0b460000 00020000 "system" mtd1: 04000000 00020000 "userdata" mtd2: 04000000 00020000 "cache" #Note: Yaffs2 is obsolete. On ICS and JB devices /system is mounted as ext4. Android emulator storage (Goldfish kernel)
  • 23.
    ● First andforemost: Build for X86 and use KVM! ○ Check capability with “kvm-ok” ○ Feature must be enabled in your computer's bios ○ cat /proc/cpuinfo and search for vmx/avm(intel VT/AMD-V) ● Use hardware keyboard ● Much more comfortable then “touching” the soft keyboard ● Although there are uses for that ● Enable keyboard in external/qemu/android/avd/hardware- properties.ini – and rebuild external/qemu ● Windows users: Use HAXM (Intel's HW Acceleration Manager) Using the Android Emulator
  • 24.
    ● There aremore emulation configurations which are supposed to be supported by AOSP, but tend to be broken ○ Building for non Linux devices from Linux ■ lunch sdk-eng && make win_sdk ○ Building for VirtualBox and other virtual machines: ■ lunch vbox_x86-eng ■ make android_disk_vdi ■ Translate VDI image to your VM hard-drive format (e.g. qcow...) ● Motivation for using such configurations: Development teams working with different Operating Systems, but willing to use the same emulated platform Additional X86 AOSP configurations
  • 25.
    ● Motivation -fast linux bringup procedure ○ First, bring-up the target OS on a virtual machine ○ Verify basic functionality ○ Then adjust for a designated hardware ● How to do it? ○ Short answer - use emulator images with some adjustments, mount ext4, set sdcard etc... ○ Pragmatic answer: In the next session Adjusting AOSP build for KVM / QEMU (a teaser)
  • 26.
    The short answerwould be – whenever you can. ○ Great for application development ■ when used with KVM/HAXM ○ Has no dependency on a particular hardware ○ Very easy to build ○ Integrates well with the AOSP tools ○ Relatively well documented Overall – it is a good ROM. Most used ROM for a reason. When to use the emulator
  • 27.
    Running the AndroidEmulator on Windows
  • 28.
    Various forks tothe Android Open Source Project: ● AOSP - (4.2.2+ OPENMASTER/JDQ39 upstream) ○ The root of all (good?) ● Android-X86 (JER09 upstream) ● Android-IA (JDQ39 upstream ) ● Many other forks ○ CyanogenMod ○ Buildroid/AndroVM ○ And many others... Not all are known or Open-Sourced Android Projects
  • 29.
    A custom, opensource distribution spawned off the AOSP ● Provides optimizations and support for over 40 different devices, along with binaries ● Builds routine similar to AOSP (note: “brunch”) ● http://wiki.cyanogenmod.com/wiki/Main_Page CyanogenMod (special guest star)
  • 30.
    Android, X86, Google, Inteland Android-X86 AnDevCon Boston May 2013
  • 31.
    X86 ROMs (bychronological order): ● Android-X86 (Debut date: 2009) ○ http://android-x86.org ● Emulator-x86 (Debut date: 2011) ○ http://source.android.com ● Android-IA (Debut date: 2012) ○ https://01.org/android-ia Android and X86
  • 32.
    The common reference,having the most recent version of the Android platform (Userspace) versions. Provides the QEMU based Android Emulator: + Works on any hosted OS + Supports multiple architectures - But slow on non X86 ones - Performs terribly if virtualized - Has no installer for X86 devices - Very old kernel +/- An emulator. For better and for worse. AOSP
  • 33.
    + Developed bythe open source community + Developer/Linux user friendly + Multi-Boot friendly + Generally supports many Intel and AMD devices +/- But of course requires specific work on specific HW + VM friendly + Mature, Recognized and stable - Delays in new releases (You can help!) - Current version (4.2.2) still needs some work on important features such as Bluetooth, Camera etc. + The ICS 4.0.4 release is amazing - including running ARM apps Android-X86
  • 34.
    + Installer todevice + Relatively new versions of android and kernel + Works great on ivy-bridge devices + Integrated Ethernet Configuration Management - Development for devices based on intel solutions only - Very unfriendly to other OS's - Not developer friendly – unless they make it such - Community work can be better. But it is seems to be getting better - Intel phones are not based on it (at the moment) + Made impressive progress in the last couple of months! Android-IA
  • 35.
    ● Android isLinux ○ Therefore the required minimum to run it would be: ■ A Kernel ■ A filesystem ■ A ramdisk/initrd... Whatever makes you happy with your kernel's init/main.c's run_init_process() calls. See http://lxr.linux.no/linux+v3.6.9/init/main.c ○ This means that we can achieve full functionality with ■ A kernel (+ramdisk) ■ A rootfs where Android system/ will be mounted (ROM) ■ Some place to read/write data Android is Linux
  • 36.
    Android-IA is Android Android-IAis, of course, Linux as well. However, it was designed to conform to Android OEM's partition layout, and has no less than 9 partitions: ○ boot - flashed boot.img (kernel+ramdisk.img) ○ recovery - Recovery image ○ misc - shared storage between boot and recovery ○ system - flashed system.img - contents of the System partition ○ cache - cache partition ○ data - data partition ○ install - Installation definition ○ bootloader - A vfat partition containing android syslinux bootloader (<4.2.2) - A GPT partition containing gummiboot (Only option in 4.2.2) ○ fastboot - fastboot protocol (flashed droidboot.img) Note: On android-ia-4.2.2-r1, the bootable live.img works with a single
  • 37.
    ● One partitionwith two directories ○ First directory – grub (bootloader) ○ Second directory – files of android (SRC) ■ kernel ■ initrd.img ■ ramdisk.img ○ system ○ data ● This simple structure makes it very easy to work and debug Note: Also comes with a live CD/installer. Very convenient. Android-X86 is Linux
  • 38.
    ● Start bootloader ●The bootloader starts the combined kernel + ramdisk image (boot.img flashed to /boot) ● At the end of kernel initialization Android's ● /init runs from ramdisk ● File systems are mounted the Android way – using fstab.common that is processed (mount_all command) from in init.<target>.rc Android-IA boot process
  • 39.
    ● Start bootloader(GRUB) ● bootloader starts kernel + initrd (minimal linux) + kernel command line ● At the end of kernel initialization ○ run the /init script from initrd.img ○ load some modules, etc. ○ At the end change root to the Android file system ● Run the /init binary from ramdisk.img ○ Which parses init.rc, and starts talking “Android-ish” Android-X86 boot process
  • 40.
    It depends whatyou need: ○ Developer options? ○ Debugging the init process? ○ Support for Hardware? ○ Support for OTA? ○ Licensing? ○ Participating in project direction? ○ Upstream features? ○ ... There is no Black and White. Which one is better?
  • 41.
    ● Use Android-X86installer system ● And put your desired android files (matching kernel/ramdisk/system) in the same partition. ● Use the Android-X86 chroot mechanism ○ Critics: Does redundant stuff ○ But that's just a hack anyway – devise specific solutions for specific problems ● This way, we can multiple boot various projects: ○ Android-IA ○ AOSP ○ Any other OS... Note: You can also use chroot mechanism on any Linux Distribution, from userspace! But this is significantly harder... An hybrid approach
  • 42.
    Repartition existing Linuxpartition (Don't do that...) Install Android-X86 Add entries to GRUB Reboot to Android-X86 debug mode Copy Android-IA files from a pendrive or over SCP For the former: cp /mnt/USB/A-IA/ /mnt && sync /mnt is the root of Android-X86 installed partition (e.g. (hd0,1)/... Update GRUB entries and update GRUB Voila :-) Less simplified procedure: Debug GRUB... :-( ** Note: Replace Android-IA with AOSP to boot AOSP built files (system.img / kernel / ramdisk.img) on your target device. Multi-boot recipe with legacy GRUB (simplified)
  • 43.
    ● Repartition existingLinux partition (Don't do that...) ● Create a mount point for your multi-booting android ○ Can make a partition per distribution, it doesn't really matter. ○ For this example let's assume all Android distributions will co exist on the same partition, and that it is mounted to /media/Android-x86 ● Build your images ○ AOSP: Discussed before ○ Android-x86: ■ . build/envsetup.sh && lunch android_x86-<variant> && make iso_img ○ Android-IA: ■ . build/envsetup.sh && lunch core_mesa-<variant> && make allimages ■ . build/envsetup.sh && lunch bigcore-<variant> && make allimages Multi-boot recipe using GRUB2
  • 44.
    ● Create directoriesfor your projects (e.g. jb-x86, A-IA, AOSP) under your mount point (e.g. /media/Android-x86) ● From Android-X86's out/product/target: Copy initrd.img to all projects. ○ Can of course only copy ramdisk to one location. ● From all projects – copy kernel, ramdisk.img, system/ and data/ to to the corresponding directory under your mount point. ● Add entries to GRUB and update grub. ● # e.g. sudo vi /etc/grub.d/40_custom && update-grub Multi-boot recipe using GRUB2 (cont.)
  • 45.
    $ df Filesystem 1K-blocksUsed Available Use% Mounted on /dev/sda5 451656948 394848292 34199920 93% / udev 1954628 4 1954624 1% /dev tmpfs 785388 1072 784316 1% /run none 5120 0 5120 0% /run/lock none 1963460 2628 1960832 1% /run/shm /dev/sda1 15481360 5165416 9529464 36% /media/Android- x86 Multi-boot recipe with GRUB2 - A numerical example
  • 46.
    #### JB-X86 menuentry 'jb-x86'--class ubuntu --class gnu-linux --class gnu --class os { recordfail insmod gzio insmod part_msdos insmod ext2 set root='(hd0,msdos1)' echo 'Loading Android-X86' linux /jb-x86/kernel quiet androidboot.hardware=android_x86 video=-16 SRC=/jb-x86 initrd /jb-x86/initrd.img } A numerical example (cont.)- /etc/grub.d/40_custom
  • 47.
    ### android-IA menuentry 'Android-IA'--class ubuntu --class gnu-linux --class gnu --class os { recordfail insmod gzio insmod part_msdos insmod ext2 set root='(hd0,msdos1)' echo 'Loading Android-IA' linux /A-IA/kernel console=ttyS0 pci=noearly console=tty0 loglevel=8 androidboot.hardware=ivb SRC=/A-IA initrd /A-IA/initrd.img } A numerical example (cont.) - /etc/grub.d/40_custom
  • 48.
    ● In thissession: ○ We have listed various ways to build ROMs for ■ AOSP devices ■ AOSP emulator(-X86) ■ Android-X86 ■ Android-IA ○ We have also discussed multi booting several configurations using the Android-X86 build system ● In the next session (right after the break!), we will see how to create and modify those projects for easy customizable X86 developer friendly targets! Coming up next...
  • 49.
    ● The AOSPis hosted at http://source.android.com ● The Android-x86.org project is hosted at http://Android-X86.org ● The Android-IA project is hosted at https://01.org/android-ia ● Device trees shown in the next session are available at https://github.com/ronubo/AnDevCon_Boston ● You are welcome to contact me at: ○ ron@nubosoftware.com ○ ron@android-x86.org ○ Social media. LinkedIn/Google+/Twitter ■ I am the only Ron Munitz around! ■ But to be on the safe side… ● Android Internals training @thePSCG References
  • 50.
    Thank You AnDevConBoston May 2013