This document provides examples of how to mount and unmount filesystems and partitions in Linux using the mount and umount commands. It discusses:
1. Mounting partitions and filesystems using mount, including CD-ROMs, viewing all mounts, mounting all filesystems listed in /etc/fstab, mounting a specific filesystem from /etc/fstab, viewing mounts of a specific type like ext2, mounting a floppy disk, bind mounting, accessing contents from a new mount point, mounting without writing to /etc/mtab, and mounting with read-only or read-write access.
2. Unmounting partitions and filesystems using umount, including unmounting all filesystems
Writing flexible filesystems in FUSE-PythonAnurag Patel
Slides from a talk given at PythonPune meetup on 21st Feb, 2015, and later at PyConIndia on 04th Oct, 2015.
FUSE-Python is probably the quickest way to prototype new filesystem ideas and rapidly build a new filesystem from scratch. In these slides I cover the basic FUSE methods and data structures necessary for implementing a working filesystem.
Booting directly opensuse iso file by grub2 @ openSUSE Asia Summit2015Kentaro Hatori
If you use openSUSE without installing, you easily introduce its splendor in comparison others. Grub2 makes booting directly some Linux iso file on CD/DVD or USB flash memory. So many openSUSE users find its advantage and try to describe grub.cfg on /boot/grub, but successful case is not yet. I report current situation and some of troubule pattern. Additionally I am trying to describe grub.cfg for booting its iso file directly and introduce successful case if I can do it.
Advanced Level Training on Koha / TLS (ToT)Ata Rehman
Advanced Level Training on Koha / Total Library Solution - TLS - (ToT), December 4-8, 2017 – PASTIC, Islamabad
All training material provided during this training can be found at: https://drive.google.com/drive/folders/1hwWGHV1iHgcpjK_tw6-Xgf-ZVUPchIS_
This Slide was presented as an introduction to Linux . Students with little experience in free operating systems were encouraged to take up Linux based operating systems.
A Journey to Boot Linux on Raspberry PiJian-Hong Pan
Each processor/chip architecture has its own procedure to boot the kernel. It works with desgined partition layout and vendor specific firmwares/bootloaders in the boot partition. We can learn the related knowledge from the Raspbian image for Raspberry Pi, which is the board we can obtain easily. However, the diversity between the special booting procedures with specific firmwares/bootloaders increases the complexity for distribution maintainers. It will be great if there is a way to make it more generic that can be applied to most of the chip architectures/boards to boot up the system.
After referring to some Linux distributions, we learned U-Boot may play a role in the solution. It splits the booting procedure into hardware specific and generic system parts. This helps distribution maintainers deploy the generic system with OSTree, including device trees.
Let’s deep dive into this magic booting procedure!
افزونگی در مسیرهای اتصال داده سرورهای به SAN Storage و تشخصی این افزونگی و مدیریت fail شدن مسیرها به نام multipath شناخته میشود. انواع روشها برای این موضوع وجود دارد همچون، مسیرهای مختلف به یک کنترلر، مسیرهای مختلف به دو کنترلر. در این مستند نحوه راهاندازی multipath در PVM مورد بررسی قرار میگیرد.
Hadoop installation on windows using virtual box and also hadoop installation on ubuntu
http://logicallearn2.blogspot.in/2018/01/hadoop-installation-on-ubuntu.html
Similar to How to mount and unmount filesystem (20)
1. How to Mount and Unmount Filesystem / Partition in Linux
(Mount/Umount Command Examples)
Once you insert new hard disks into your system, you’ll typically use utilities like fdisk or partedto create
partitions. Once you create a partition, you’ll use mkfs command to create ext2, ext3, or ext4 partition.
Once you create a partition, you should use mount command to mount the partition into a mount point (a
directory), to start using the filesystem.
This tutorial explains everything you need to know about both mount and umount command with 15 practical
examples.
The general mount command syntax to mount a device:
mount -t type device destination_dir
1. Mount a CD-ROM
The device file for CD would exist under /dev directory. For example, a CD-ROM device will be mounted as
shown below.
# mount -t iso9660 -o ro /dev/cdrom /mnt
In the above example, the option “-o ro” indicates that the cdrom should be mounted with read-only access. Also,
make sure that the destination directory (in the above example, /mnt) exist before you execute the mount
command.
2. View All Mounts
After you execute mount a partition or filesystem, execute the mount command without any arguments to view all
the mounts.
In the example below, after mounting the USB drive on a system, the output of mount looks like the below. As
seen below, the USB device (i.e:/dev/sdb) is mounted on /media/myusb, which is displayed as the last line in the
mount command.
# mount
/dev/sda5 on / type ext4 (rw,errors=remount-ro)
proc on /proc type proc (rw,noexec,nosuid,nodev)
sysfs on /sys type sysfs (rw,noexec,nosuid,nodev)
none on /sys/fs/fuse/connections type fusectl (rw)
none on /sys/kernel/debug type debugfs (rw)
none on /sys/kernel/security type securityfs (rw)
udev on /dev type devtmpfs (rw,mode=0755)
devpts on /dev/pts type devpts (rw,noexec,nosuid,gid=5,mode=0620)
tmpfs on /run type tmpfs (rw,noexec,nosuid,size=10%,mode=0755)
none on /run/lock type tmpfs (rw,noexec,nosuid,nodev,size=5242880)
none on /run/shm type tmpfs (rw,nosuid,nodev)
/dev/sda6 on /mydata type ext2 (rw)
/dev/sda7 on /backup type vfat (rw)
gvfs-fuse-daemon on /home/bala/.gvfs type fuse.gvfs-fuse-daemon (rw,nosuid,nodev,user=bala)
/dev/sdb on /media/myusb type vfat
(rw,nosuid,nodev,uid=1000,gid=1000,shortname=mixed,dmask=0077,utf8=1,showexec,flush,uhelper=udisks)
You can also use df command to view all the mount points.
# df
Filesystem 1K-blocks Used Available Use% Mounted on
/dev/sda5 195069136 128345036 56958520 70% /
udev 2008336 4 2008332 1% /dev
tmpfs 806244 928 805316 1% /run
none 5120 0 5120 0% /run/lock
none 2015604 228 2015376 1% /run/shm
/dev/sda6 17729076 176200 16657596 2% /mydata
/dev/sda7 11707200 573312 11133888 5% /backup
/dev/sdb 3910656 2807160 1103496 72% /media/myusb
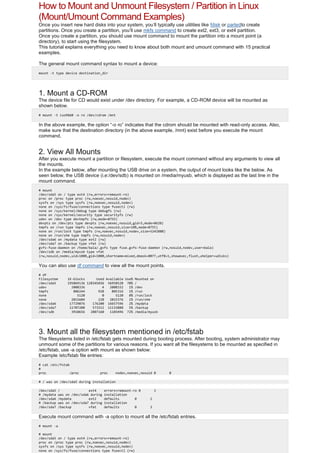
3. Mount all the filesystem mentioned in /etc/fstab
The filesystems listed in /etc/fstab gets mounted during booting process. After booting, system administrator may
unmount some of the partitions for various reasons. If you want all the filesystems to be mounted as specified in
/etc/fstab, use -a option with mount as shown below:
Example /etc/fstab file entries:
# cat /etc/fstab
#
proc /proc proc nodev,noexec,nosuid 0 0
# / was on /dev/sda5 during installation
/dev/sda5 / ext4 errors=remount-ro 0 1
# /mydata was on /dev/sda6 during installation
/dev/sda6 /mydata ext2 defaults 0 2
# /backup was on /dev/sda7 during installation
/dev/sda7 /backup vfat defaults 0 3
Execute mount command with -a option to mount all the /etc/fstab entries.
# mount -a
# mount
/dev/sda5 on / type ext4 (rw,errors=remount-ro)
proc on /proc type proc (rw,noexec,nosuid,nodev)
sysfs on /sys type sysfs (rw,noexec,nosuid,nodev)
none on /sys/fs/fuse/connections type fusectl (rw)
2. none on /sys/kernel/debug type debugfs (rw)
none on /sys/kernel/security type securityfs (rw)
udev on /dev type devtmpfs (rw,mode=0755)
devpts on /dev/pts type devpts (rw,noexec,nosuid,gid=5,mode=0620)
tmpfs on /run type tmpfs (rw,noexec,nosuid,size=10%,mode=0755)
none on /run/lock type tmpfs (rw,noexec,nosuid,nodev,size=5242880)
none on /run/shm type tmpfs (rw,nosuid,nodev)
/dev/sda6 on /mydata type ext2 (rw)
/dev/sda7 on /backup type vfat (rw)
gvfs-fuse-daemon on /home/bala/.gvfs type fuse.gvfs-fuse-daemon (rw,nosuid,nodev,user=bala)
The same -a option can be used with umount to unmount all the filesystems mentioned in /etc/mtab
# umount -a
umount: /run/shm: device is busy.
(In some cases useful info about processes that use
the device is found by lsof(8) or fuser(1))
umount: /run: device is busy.
(In some cases useful info about processes that use
the device is found by lsof(8) or fuser(1))
umount: /dev: device is busy.
(In some cases useful info about processes that use
the device is found by lsof(8) or fuser(1))
umount: /: device is busy.
(In some cases useful info about processes that use
the device is found by lsof(8) or fuser(1))
Some filesystem are not unmounted as its busy or currently in use. Note that the files /etc/mtab and /proc/mounts
contents would be similar.
4. Mount only a specific filesystem from /etc/fstab
When you pass only the directory name to mount, it looks for mount point entries, if not found, then search
continuous for a device in /etc/fstab and gets mounted.
# mount | grep /mydata
# cat /etc/fstab | grep mydata
##########/mydata was on /dev/sda6 during installation##########
/dev/sda6 /mydata ext2 defaults 0 2
As seen above, /mydata directory is not a mountpoint, but it is present in /etc/fstab.
# mount /mydata
# mount | grep /mydata
/dev/sda6 on /mydata type ext2 (rw)
If you execute the same again, you would get the error message as follows:
# mount /mydata
mount: /dev/sda6 already mounted or /mydata busy
mount: according to mtab, /dev/sda6 is already mounted on /mydata
Here you may also pass the device name instead of directory name (to be picked up from /etc/fstab file).
# mount /dev/sda6
Note that the files /etc/mtab and /proc/mounts contents would be similar.
5. View all mounted partitions of specific type
It is possible to list only the specific type of filesystem mounted using the option -l with -t as shown below:
# mount -l -t ext2
/dev/sda6 on /mydata type ext2 (rw)
# mount -l -t ext4
/dev/sda5 on / type ext4 (rw,errors=remount-ro)
As seen above, /dev/sda6 is the only ext2 partition and /dev/sda5 is the only ext4 partition accordingly.
6. Mount a Floppy Disk
The device file for floppy disk would exist under /dev directory. For example, a floppy disk will be mounted as
shown below.
# mount /dev/fd0 /mnt
# cd /mnt
After the successful mount, you would be able to access the contents of the floppy disk. Once you are done with
it, use umount before you physically remove the floppy disk from the system.
# umount /mnt
3. 7. Bind mount points to a new directory
The mountpoint can be binded to a new directory. So that you would be able to access the contents of a
filesystem via more than one mountpoints at the same time.
Use -B option with olddir and newdir to be binded as follows,
# mount -B /mydata /mnt
Now the bind is done and you might verify it as follows,
# mount | grep /mydata
/dev/sda6 on /mydata type ext2 (rw)
/mydata on /mnt type none (rw,bind)
As seen above the bind is done properly. So when you do modification in filesystem in one place, you can see
those reflection of it in other mount point as shown below:
# cd /mydata
# ls
test
# mkdir dir1
# mkdir dir2
# ls
test dir1 dir2
# cd /mnt
# ls
test dir1 dir2
8. Access contents from new mount point
Mount allows you to access the contents of a mount point from a new mount point. Its nothing but move a
mounted tree to another place.
In the example below, the mount point /mydata will be accessed from /mnt using the option -M as shown below:
# mount -M /mydata /mnt/
Once its done, you cant use the old mount point as its moved to a new mount point and this can be verified as
shown below:
# mount | grep /mydata
# mount | grep /mnt
/dev/sda6 on /mnt type ext2 (rw)
9. Mount without writing entry into /etc/mtab
During read only mount of /etc/, the /etc/mtab file entries cannot be modified by mount command. However,
mount can be done without writing into /etc/mtab by using the option -n as follows,
# mount -n /dev/sda6 /mydata
You cannot see any entry for this /mydata in mount command output and as well from /etc/mtab file as follows:
# mount | grep /mydata
# cat /etc/mtab | grep /mydata
Access the contents of a mounted directory /mydata:
# cd /mydata
# ls
dir1 dir2 test
10. Mount filesystem with read or read/write access
To mount partition as read only, use -r option which is synonym to -o ro.
# mount /dev/sda6 /mydata -r
# mount | grep /mydata
/dev/sda6 on /mydata type ext4 (ro)
ext3 and ext4 filesystem would still allow you to do write operation when the filesystem is dirty. So, you may have
to use “ro,noload” to prevent these kind of write operation.
# mount /dev/sda6 /mydata -t ext4 -o ro -o noload
# mount | grep /mydata
/dev/sda6 on /mydata type ext4 (ro,noload)
To mount a partition with read/write access, use -w option which is same as “-o rw” (i.e : default).
4. 11. Remount the mounted filesystem
In order to mount the already mounted filesystem, use remount option and its normally used to remount the
filesystem with read/write access when its previously mounted with read access.
The /mydata mount point is going to be remounted with read/write access from read access as shown below:
# mount | grep /mydata
/dev/sda6 on /mydata type ext4 (ro,noload)
# mount -o remount,rw /mydata
# mount | grep /mydata
/dev/sda6 on /mydata type ext4 (rw)
12. Mount an iso image into a directory
The iso image can be mounted as shown below:
# mount -t iso9660 -o loop pdf_collections.iso /mnt
# cd /mnt
# ls
perl/ php/ mysql/
13. Unmount more than one mount points
Umount allows you to unmount more than mount point in a single execution of umount of command as follows:
# umount /mydata /backup
# mount | grep /mydata
# mount | grep /backup
14. Lazy unmount of a filesystem
This is a special option in umount, in case you want to unmount a partition after disk operations are done. You
can issue command umount -l with that partition and the unmount will be done after the disk operations gets
finished.
For instance, consider a scenario that a task (i.e: script or any other command) is doing a copy operation on a
disk and at the same time you are allowed to issue a unmount with -l, so that unmount would be done once the
copy is over (i.e: the disk operation).
# umount /mydata -l
15. Forcefully unmount a filesystem
umount provides the option to forcefully unmount a filesystem with option -f when the device is busy as shown
below:
# umount -f /mnt
If this doesn’t work for you, then you can go for lazy unmount.
Meanwhile, you can also have a look at ps command output that which process is presently using the mountpoint
as shown below:
# ps ajx | grep /mydata
2540 3037 3037 2468 pts/2 3037 D+ 0 0:00 cp -r /home/geekstuff/ProjectData/ /mydata
You can also execute fuser command to find out which process is holding the directory for operations.
# fuser -cu /mydata
/mydata: 3087(root)
It gives you the process id with username (nothing but the owner of the process). If you know what that process
is, you may want to stop that process and then try the umount again.