1. Presenting Questionnaire Data (Robert Croker) Page 1
Presenting Data Effectively
It is important to present your data effectively. Here are two examples. The first one is a pie chart,
and the second one is a column chart.
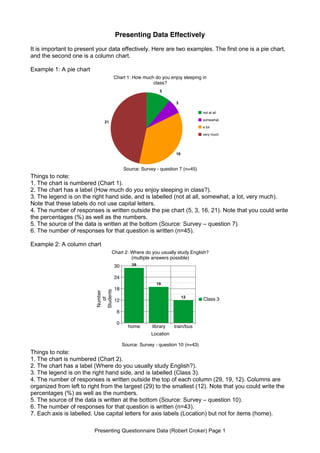
Example 1: A pie chart
Things to note:
1. The chart is numbered (Chart 1).
2. The chart has a label (How much do you enjoy sleeping in class?).
3. The legend is on the right hand side, and is labelled (not at all, somewhat, a lot, very much).
Note that these labels do not use capital letters.
4. The number of responses is written outside the pie chart (5, 3, 16, 21). Note that you could write
the percentages (%) as well as the numbers.
5. The source of the data is written at the bottom (Source: Survey – question 7).
6. The number of responses for that question is written (n=45).
Example 2: A column chart
Things to note:
1. The chart is numbered (Chart 2).
2. The chart has a label (Where do you usually study English?).
3. The legend is on the right hand side, and is labelled (Class 3).
4. The number of responses is written outside the top of each column (29, 19, 12). Columns are
organized from left to right from the largest (29) to the smallest (12). Note that you could write the
percentages (%) as well as the numbers.
5. The source of the data is written at the bottom (Source: Survey – question 10).
6. The number of responses for that question is written (n=43).
7. Each axis is labelled. Use capital letters for axis labels (Location) but not for items (home).
5
3
16
21
not at all
somewhat
a lot
very much
Chart 1: How much do you enjoy sleeping in
class?
Source: Survey - question 7 (n=45)
0
6
12
18
24
30
home library train/bus
29
19
12
Class 3
Chart 2: Where do you usually study English?
(multiple answers possible)
Location
Source: Survey - question 10 (n=43)
Number
of
Students
2. Presenting Data Effectively
Presenting Questionnaire Data (Robert Croker) Page 2
How do you create these charts?
You can produce charts easily using Excel or Word, or applications on tablet computers. Another
simple way is at this website: http://nces.ed.gov/nceskids/createagraph/
Creating graphs here is an easy step-by-step process. It’s very simple to use – you can learn to
use it by yourself without reading the following explanation. However, if you are the type of person
who likes to read the manual before you drive, then you might find this explanation useful.
If you get lost, there are explanations of terms in the left hand tabs and a ‘create a graph tutorial’.
To illustrate this site, this guide will walk you through making the column chart from Example 2.
This chart took just a few minutes to make.
1. Select your chart:
First, select the type of chart you want to create: bar, line, area, pie, or XY.
Simply click on the icon of chart that you want to make. But which chart should you use?
Bar charts: best for showing totals
a) Use a column chart if you want to clearly show the total number of responses to a question.
Note: If respondents can choose more than one response (e.g. Where do you usually study
English? multiple answers possible), use a column chart not a pie chart.
Note: A vertical bar chart is often called a column chart.
Line charts: best for showing changes over time
a) For example, for showing how population, income, or consumption changes over time. You can
show more than one line.
Pie charts: best for showing proportions
a) For questions where you want to show how many respondents chose an answer when they
could only choose one response (e.g. gender, age, hometown, yes-no).
b) For scale questions (e.g. strongly agree, agree, disagree, strongly disagree / love, like, dislike, hate).
Note: if you have more than five slices in a pie it becomes difficult to read, so use a bar chart instead.
XY charts: best for showing relationships between X values and Y values
a) For example, to show age/income or answers to scale questions/time spent in another country,
use a scatter or bubbles graph. This can illustrate whether these scores cluster together, and
where they do so.
Note that this website does not calculate the relationships, it only displays the data that you put in.
3. Presenting Data Effectively
Presenting Questionnaire Data (Robert Croker) Page 3
2. Design:
This tab automatically appears when you click on the chart you have chosen to create.
On this tab, you choose the basic design of your graph.
For a column chart, you can choose the direction of the columns, and whether to ‘stack’ them or
not.
You can also choose their shape and whether you would like them in a pattern (colour is the
default).
For other types of chart, there are different choices offered.
When you have finished, click on the ‘Data’ tab on the right hand side. You do not need to click on
‘Update’.
4. Presenting Data Effectively
Presenting Questionnaire Data (Robert Croker) Page 4
3. Data:
If you haven’t already done so, click on the ‘Data’ tab on the right hand side.
In the top panel, write the graph title. Remember to write a chart number (e.g. Chart 2). Capitalize
only the first word of the question or statement afterwards. For example:
Chart 2: Where do you usually study English?
Chart 2: Where students usually study English
If students could choose more than one answer, state that here (i.e. multiple answers possible).
Then, write the X Axis and Y Axis labels. Capitalize the first letter of each word (Number of
Students).
Then, state the source. Remember to write the survey question number (Source: Survey –
question 10) and the number of students who answered that question (n=43).
Next, specify the dimensions of your data set - the number of items (in this case, 3: home, library,
train/bus) and the number of groups (only one class, so 1). However, if you want to ‘stack your
columns’ and add more classes, you can increase the number of groups.
Then, write the names of the items (home, library, train/bus) and input the data (29, 19,12).
Note that you cannot input both numbers and percentage - choose one. You can calculate the
percentage using a calculator.
Finally, decide the minimum and maximum value for your Y axis. The maximum value must be
bigger than your highest data (i.e. greater than 29 in this case).
5. Presenting Data Effectively
Presenting Questionnaire Data (Robert Croker) Page 5
4. Labels:
Next, click on the ‘Labels’ tab on the right hand side.
This tab really only helps you decide what your labels will look like.
The best font size for numbers printed on the chart (29, 19, 12) is usually font size 18. Select that
in the top part in the ‘Data Labels’ section.
You can also choose the position of the numbers on the chart – in this case, on the outside at the
top is easiest to read.
The best font size for the other information in your chart is 22, and choose this in the bottom
section. This sets the font size for the chart title (Chart 2), the X and Y axes (Number of Students,
Location), the items (home, library, train/bus), the legend (Class 3) and the source (Source: Survey
– question 10).
6. Presenting Data Effectively
Presenting Questionnaire Data (Robert Croker) Page 6
5. Preview:
Click on the ‘Preview’ tab on the right hand side.
This tab helps you check to see what your chart looks like.
If you want to edit anything, click on the tab on the right hand side that you want to change. For
example, if you want to change the data you have input, click on ‘Data’; if you want to change the
location or the font size of the labels, click on ‘Labels’.
Remember that the labels you wrote are actually in ‘Data’; only the size and location of the labels
is in ‘Labels’.
7. Presenting Data Effectively
Presenting Questionnaire Data (Robert Croker) Page 7
6. Print / Save:
Click on the ‘Print/Save’ tab on the right hand side.
You can print out the chart directly – click on ‘Print’. From here, you could also save your chart as
a pdf on Macs.
Alternatively, you could download your chart as a pdf or png – click ‘Download’.
You can also email the graph to your email account – and then go back and edit it later, which is
very handy. In that case, write your email address in the box, and then press send.
If you would like to start creating a new chart, press on the ‘Start Over’ at the bottom of the page.
Final Words:
After you have done all the work of writing and editing your questionnaire and then analyzing your
data, it is worthwhile taking a few more minutes to present your data in a visual form. Simple, clear
charts will help readers understand your data more quickly and completely.
The website introduced here is run by the U.S. National Center for Education Statistics, and is one
of the easiest ways of creating charts. However, if you are not sure what to do, look at information
on the ‘Help’ tab on the left hand side.
Best of luck with your chart making! Robert Croker