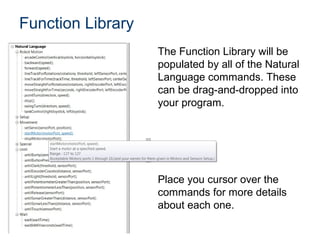
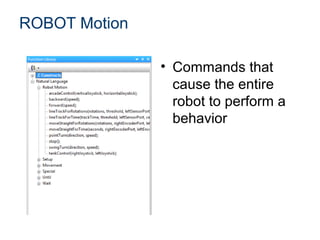
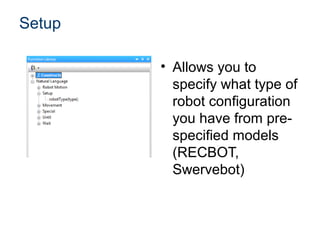
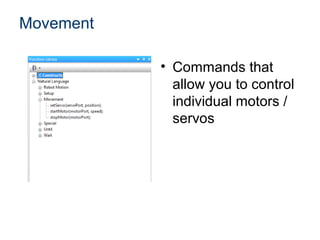
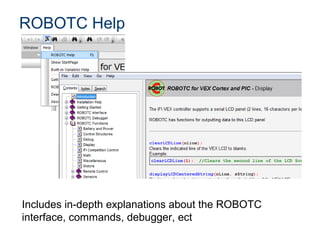
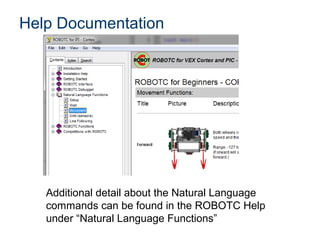
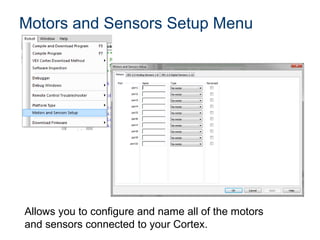
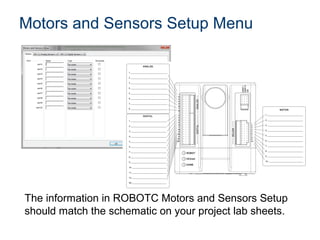
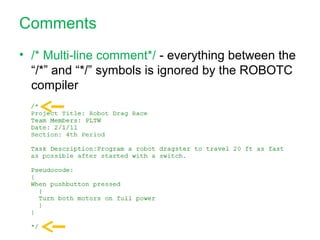
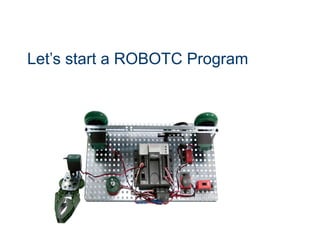
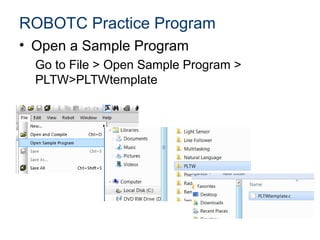
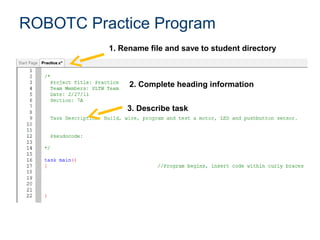
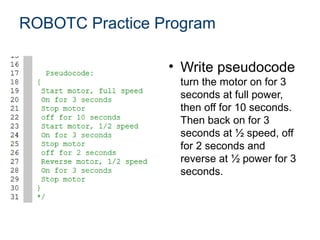
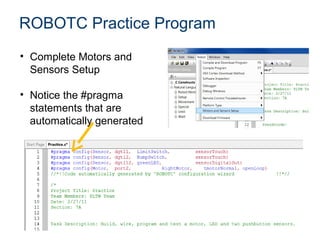
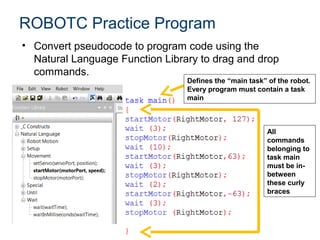
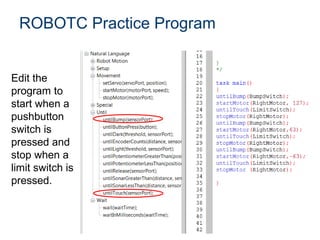
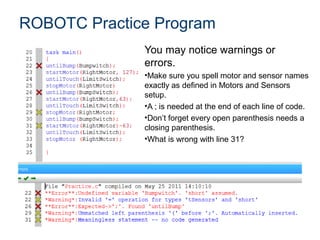
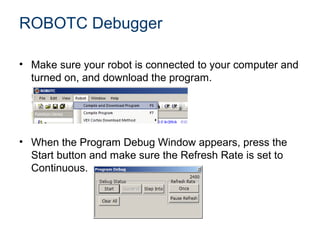
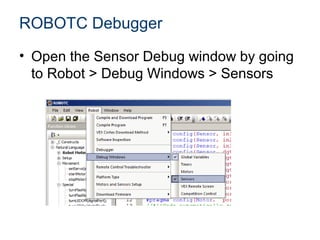
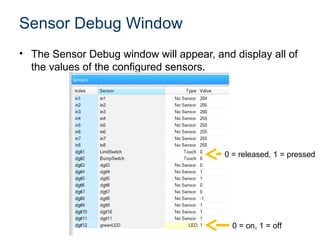
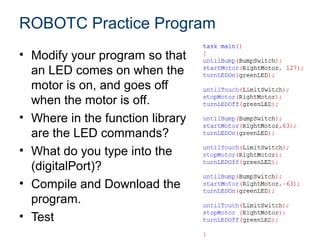
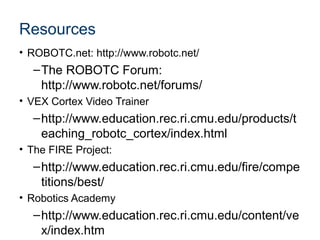
Introduction to Programming


                  Developed in collaboration with
ROBOTC Start Page


Displays the latest ROBOTC news, version of
ROBOTC, and ROBOTC Resources
Platform Type


                              Select Innovation First, then
                              Natural Language


Allows you to toggle ROBOTC’s programming mode
between the Natural Language (VEX Cortex), VEX Cortex,
and the VEX PIC; enables features and commands
specifically for the selected system
VEX Cortex Download Method


           Allows you to specify:
               1. How programs are downloaded
               2. Whether the Cortex looks for a
                  VEXnet connection when it
                  starts up
Sample Programs
•To generate the Natural Language Function
Library, go to File, Open Sample Programs,
PLTW, PLTWtemplate
Function Library
                   The Function Library will be
                   populated by all of the Natural
                   Language commands. These
                   can be drag-and-dropped into
                   your program.


                   Place you cursor over the
                   commands for more details
                   about each one.
ROBOT Motion

               • Commands that
                 cause the entire
                 robot to perform a
                 behavior
Setup

        • Allows you to
          specify what type of
          robot configuration
          you have from pre-
          specified models
          (RECBOT,
          Swervebot)
Movement

           • Commands that
             allow you to control
             individual motors /
             servos
Special

          • Commands that
            control the more
            unique VEX
            Hardware – LED’s
            and Flashlights
Until

        • Commands that
          allow you to create
          behaviors where
          the robot acts “until”
          a certain event. For
          example,
          – Button Press
          – Potentiometer Value
Wait

       • Commands that
         wait for an elapsed
         amount of time in
         seconds or
         milliseconds
ROBOTC Help


Includes in-depth explanations about the ROBOTC
interface, commands, debugger, ect
Help Documentation


   Additional detail about the Natural Language
   commands can be found in the ROBOTC Help
   under “Natural Language Functions”
Motors and Sensors Setup Menu


Allows you to configure and name all of the motors
and sensors connected to your Cortex.
Motors and Sensors Setup Menu


The information in ROBOTC Motors and Sensors Setup
should match the schematic on your project lab sheets.
Comments
• Comments are used to make notes for the
  human programmers
• // Single line comment – everything after “//” is
  ignored by the ROBOTC compiler
Comments
• /* Multi-line comment*/ - everything between the
  “/*” and “*/” symbols is ignored by the ROBOTC
  compiler
Let’s start a ROBOTC Program
ROBOTC Practice Program
• Open a Sample Program
  Go to File > Open Sample Program >
  PLTW>PLTWtemplate
ROBOTC Practice Program
          1. Rename file and save to student directory


               2. Complete heading information


              3. Describe task
Pseudocode
• Pseudocode is a shorthand notation for
  programming which uses
  – informal programming structures (if touch1 is pressed…)
  – verbal descriptions of code (move forward, stop)
• Emphasis is placed on expressing the behavior
  or outcome of each portion of code rather than
  on correct syntax (it should be reasonable,
  though).
• Your lines of Pseudocode should also be listed
  in the same order as they will appear in the
  ROBOTC Program
ROBOTC Practice Program

                 • Write pseudocode
                  turn the motor on for 3
                  seconds at full power,
                  then off for 10 seconds.
                  Then back on for 3
                  seconds at ½ speed, off
                  for 2 seconds and
                  reverse at ½ power for 3
                  seconds.
ROBOTC Practice Program
• Complete Motors and
  Sensors Setup

• Notice the #pragma
  statements that are
  automatically generated
ROBOTC Practice Program
• Convert pseudocode to program code using the
  Natural Language Function Library to drag and drop
  commands.
                                 Defines the “main task” of the robot.
                                 Every program must contain a task
                                 main


                                                         All
                                                         commands
                                                         belonging to
                                                         task main
                                                         must be in-
                                                         between
                                                         these curly
                                                         braces
ROBOTC Practice Program

1. Save Program
2.Connect the Cortex to the Computer (via
 USB)
3.Turn on the Cortex
4.Go to Robot > Compile and Download
 Program (f5)
5.Run the program – Observe the motor turn
 on and off and reverse.
ROBOTC Practice Program


Edit the
program to
start when a
pushbutton
switch is
pressed and
stop when a
limit switch is
pressed.
ROBOTC Practice Program
              You may notice warnings or
              errors.
              •Make sure you spell motor and sensor names
              exactly as defined in Motors and Sensors
              setup.
              •A ; is needed at the end of each line of code.
              •Don’t forget every open parenthesis needs a
              closing parenthesis.
              •What is wrong with line 31?
ROBOTC Debugger
• The ROBOTC Debugger allows you to
  view and manipulate all of the values of
  your motors, sensors, timers, and
  variables.
• Now that we’ve configured the motors
  and sensors, let’s view their values using
  the ROBOTC Debugger.
ROBOTC Debugger

• Make sure your robot is connected to your computer and
  turned on, and download the program.


• When the Program Debug Window appears, press the
  Start button and make sure the Refresh Rate is set to
  Continuous.
ROBOTC Debugger
• Open the Sensor Debug window by going
  to Robot > Debug Windows > Sensors
Sensor Debug Window
• The Sensor Debug window will appear, and display all of
  the values of the configured sensors.


                                          0 = released, 1 = pressed


                                            0 = on, 1 = off
ROBOTC Practice Program
• Modify your program so that
  an LED comes on when the
  motor is on, and goes off
  when the motor is off.
• Where in the function library
  are the LED commands?
• What do you type into the
  (digitalPort)?
• Compile and Download the
  program.
• Test
Resources
• ROBOTC.net: http://www.robotc.net/
  – The ROBOTC Forum:
    http://www.robotc.net/forums/
• VEX Cortex Video Trainer
  – http://www.education.rec.ri.cmu.edu/products/t
    eaching_robotc_cortex/index.html
• The FIRE Project:
  – http://www.education.rec.ri.cmu.edu/fire/compe
    titions/best/
• Robotics Academy
  – http://www.education.rec.ri.cmu.edu/content/ve
    x/index.htm
References
Carnegie Mellon Robotics Academy (2011). VEX Cortex
  Video Trainer. Retrieved from
  http://www.education.rec.ri.cmu.edu/products/teaching_r
  obotc_cortex/index.html

Intro to RobotC

  • 1.
    Introduction to Programming Developed in collaboration with
  • 2.
    ROBOTC Start Page Displaysthe latest ROBOTC news, version of ROBOTC, and ROBOTC Resources
  • 3.
    Platform Type Select Innovation First, then Natural Language Allows you to toggle ROBOTC’s programming mode between the Natural Language (VEX Cortex), VEX Cortex, and the VEX PIC; enables features and commands specifically for the selected system
  • 4.
    VEX Cortex DownloadMethod Allows you to specify: 1. How programs are downloaded 2. Whether the Cortex looks for a VEXnet connection when it starts up
  • 5.
    Sample Programs •To generatethe Natural Language Function Library, go to File, Open Sample Programs, PLTW, PLTWtemplate
  • 6.
    Function Library The Function Library will be populated by all of the Natural Language commands. These can be drag-and-dropped into your program. Place you cursor over the commands for more details about each one.
  • 7.
    ROBOT Motion • Commands that cause the entire robot to perform a behavior
  • 8.
    Setup • Allows you to specify what type of robot configuration you have from pre- specified models (RECBOT, Swervebot)
  • 9.
    Movement • Commands that allow you to control individual motors / servos
  • 10.
    Special • Commands that control the more unique VEX Hardware – LED’s and Flashlights
  • 11.
    Until • Commands that allow you to create behaviors where the robot acts “until” a certain event. For example, – Button Press – Potentiometer Value
  • 12.
    Wait • Commands that wait for an elapsed amount of time in seconds or milliseconds
  • 13.
    ROBOTC Help Includes in-depthexplanations about the ROBOTC interface, commands, debugger, ect
  • 14.
    Help Documentation Additional detail about the Natural Language commands can be found in the ROBOTC Help under “Natural Language Functions”
  • 15.
    Motors and SensorsSetup Menu Allows you to configure and name all of the motors and sensors connected to your Cortex.
  • 16.
    Motors and SensorsSetup Menu The information in ROBOTC Motors and Sensors Setup should match the schematic on your project lab sheets.
  • 17.
    Comments • Comments areused to make notes for the human programmers • // Single line comment – everything after “//” is ignored by the ROBOTC compiler
  • 18.
    Comments • /* Multi-linecomment*/ - everything between the “/*” and “*/” symbols is ignored by the ROBOTC compiler
  • 19.
    Let’s start aROBOTC Program
  • 20.
    ROBOTC Practice Program •Open a Sample Program Go to File > Open Sample Program > PLTW>PLTWtemplate
  • 21.
    ROBOTC Practice Program 1. Rename file and save to student directory 2. Complete heading information 3. Describe task
  • 22.
    Pseudocode • Pseudocode isa shorthand notation for programming which uses – informal programming structures (if touch1 is pressed…) – verbal descriptions of code (move forward, stop) • Emphasis is placed on expressing the behavior or outcome of each portion of code rather than on correct syntax (it should be reasonable, though). • Your lines of Pseudocode should also be listed in the same order as they will appear in the ROBOTC Program
  • 23.
    ROBOTC Practice Program • Write pseudocode turn the motor on for 3 seconds at full power, then off for 10 seconds. Then back on for 3 seconds at ½ speed, off for 2 seconds and reverse at ½ power for 3 seconds.
  • 24.
    ROBOTC Practice Program •Complete Motors and Sensors Setup • Notice the #pragma statements that are automatically generated
  • 25.
    ROBOTC Practice Program •Convert pseudocode to program code using the Natural Language Function Library to drag and drop commands. Defines the “main task” of the robot. Every program must contain a task main All commands belonging to task main must be in- between these curly braces
  • 26.
    ROBOTC Practice Program 1.Save Program 2.Connect the Cortex to the Computer (via USB) 3.Turn on the Cortex 4.Go to Robot > Compile and Download Program (f5) 5.Run the program – Observe the motor turn on and off and reverse.
  • 27.
    ROBOTC Practice Program Editthe program to start when a pushbutton switch is pressed and stop when a limit switch is pressed.
  • 28.
    ROBOTC Practice Program You may notice warnings or errors. •Make sure you spell motor and sensor names exactly as defined in Motors and Sensors setup. •A ; is needed at the end of each line of code. •Don’t forget every open parenthesis needs a closing parenthesis. •What is wrong with line 31?
  • 29.
    ROBOTC Debugger • TheROBOTC Debugger allows you to view and manipulate all of the values of your motors, sensors, timers, and variables. • Now that we’ve configured the motors and sensors, let’s view their values using the ROBOTC Debugger.
  • 30.
    ROBOTC Debugger • Makesure your robot is connected to your computer and turned on, and download the program. • When the Program Debug Window appears, press the Start button and make sure the Refresh Rate is set to Continuous.
  • 31.
    ROBOTC Debugger • Openthe Sensor Debug window by going to Robot > Debug Windows > Sensors
  • 32.
    Sensor Debug Window •The Sensor Debug window will appear, and display all of the values of the configured sensors. 0 = released, 1 = pressed 0 = on, 1 = off
  • 33.
    ROBOTC Practice Program •Modify your program so that an LED comes on when the motor is on, and goes off when the motor is off. • Where in the function library are the LED commands? • What do you type into the (digitalPort)? • Compile and Download the program. • Test
  • 34.
    Resources • ROBOTC.net: http://www.robotc.net/ – The ROBOTC Forum: http://www.robotc.net/forums/ • VEX Cortex Video Trainer – http://www.education.rec.ri.cmu.edu/products/t eaching_robotc_cortex/index.html • The FIRE Project: – http://www.education.rec.ri.cmu.edu/fire/compe titions/best/ • Robotics Academy – http://www.education.rec.ri.cmu.edu/content/ve x/index.htm
  • 35.
    References Carnegie Mellon RoboticsAcademy (2011). VEX Cortex Video Trainer. Retrieved from http://www.education.rec.ri.cmu.edu/products/teaching_r obotc_cortex/index.html

Editor's Notes

  • #4 We will use Natural Language for this class.
  • #5 “ Download Using VEXnet or USB” is always the safe choice, but the Cortex will look for a VEXnet connection for up to10 seconds before running code. Unless you upgrade your GTT kit you will always use the Download using USB only.
  • #6 Students must get used to using the PLTW template for all of their programs.
  • #8 We won’t use this in GTT class.
  • #9 Will not use in GTT curriculum.
  • #10 GTT kits do not include Servo motors – so make sure students do not use that option.
  • #11 Flashlights not in GTT kits.
  • #16 See additional slides in Connecting VEX to ROBOTC.ppt if necessary. Presentation Name Course Name Unit # – Lesson #.# – Lesson Name
  • #19 Single line and multi-line comments give important information to the programmer and others who read the program and need to understand the logic. The program, ROBOTC, totally ignores the comments as long as the symbols are present.
  • #20 Teacher should create a VEX test bed for demonstration purposes. Student teams may also have a VEX test bed to work with. Presentation Name Course Name Unit # – Lesson #.# – Lesson Name
  • #21 Teacher Notes: This slide is meant to be a class activity, for students to actually get some guided experience with the ROBOTC interface, ROBOTC Commands, Cortex system, etc. The steps should be: Open ROBOTC Verify the Platform Type is set to Natural Language and the Download using USB option is on Open the Sample Program, PLTW Folder, PLTWtemplate Demonstrate, then have students connect a motor to the Cortex (you may want to add an axle, gear and standoff to help see what’s happening) Remind students if they have a 2 wire motor they can connect to Ports 1 and 10 only.
  • #22 Explain the different pieces of the template. Students need to get in the habit of completing the template in this order: Save As and Rename to their own directory immediately with the name of the project. If necessary save to each individual students directory within the group in case the primary computer engineer is absent from class. Complete heading information – Teachers may alter this to meet their specifications. Students should describe the task in their own words. Presentation Name Course Name Unit # – Lesson #.# – Lesson Name
  • #23 Additional Details: Pseudocode is used to outline a program before translating it into proper syntax. Helps in the initial planning of a program, by creating the logical framework and sequence of the code. An additional benefit is that it can be translated into different programming languages and is therefore somewhat universal Introduction to ROBOTC GTT - AR Unit 2 – Lesson 2.3 – Automated Systems
  • #25 For this demonstration: RightMotor – port2 LimitSwitch – dgtl1 BumpSwitch – dgtl2 LED – dgtl12 Presentation Name Course Name Unit # – Lesson #.# – Lesson Name
  • #26 Connect the Cortex to the Computer (via USB) Turn on the Cortex Go to Robot > Compile and Download Program Run the program – Observe the motor turn on and off and reverse. Presentation Name Course Name Unit # – Lesson #.# – Lesson Name
  • #28 Edit the program to start when a pushbutton switch is pressed and stop when a limit switch is pressed. Compile and Download the Program Run the Program – observe the motor starting and stopping based on pressing the switches. Introduction to ROBOTC GTT - AR Unit 2 – Lesson 2.3 – Automated Systems
  • #29 Encourage students to read the error descriptions for suggestions on how to fix their program. Once errors are fixed. Compile, download and run the program again. Line 31 – closing parenthesis is in wrong place – goes after the -63) Presentation Name Course Name Unit # – Lesson #.# – Lesson Name
  • #34 Have students try to solve this without showing the sample solution first. Presentation Name Course Name Unit # – Lesson #.# – Lesson Name
  • #35 Trainer Notes: It’s recommended that you visit the different pages and show trainees the materials that are there.