

Recommended
More Related Content
What's hot
What's hot (20)
Viewers also liked
Similar to Ch5 v70 cfc_en
Similar to Ch5 v70 cfc_en (20)
More from confidencial
More from confidencial (11)
Recently uploaded
Recently uploaded (20)
Ch5 v70 cfc_en
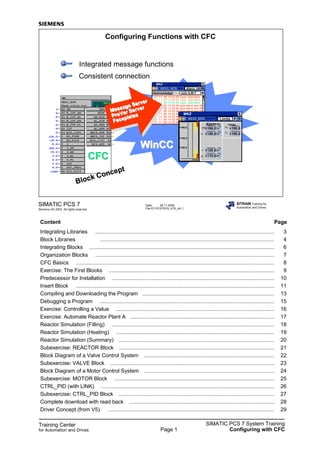
- 1. Training Center for Automation and Drives SIMATIC PCS 7 System Training Configuring with CFCPage 1 Date: 28.11.2006 File:ST-PCS7SYS_V70_cfc.1 SIMATIC PCS 7 Siemens AG 2003. All rights reserved. SITRAIN Training for Automation and Drives Configuring Functions with CFC CFCCFC WinCCWinCCWinCC Integrated message functions Consistent connection Alarm MKZ X 17. 11. 96 14:32:46 Type Alarmtext We 17. 11. 96 14:32:46 Type Alarmtext We 17. 11. 96 14:32:46 Type Alarmtext We 17. 11. 96 14:32:46 type alarm text We 17. 11. 96 14:32:46 type alarm text We 17. 11. 96 14:32:46 type alarm text We 17. 11. 96 14:32:46 type alarm text We 17. 11. 96 14:32:46 type alarm text We 17. 11. 96 14:32:46 type alarm text We 17. 11. 96 14:32:46 type alarm text We Acknowledge only A,W,T ASO Limits MKZ X MEAS_MON +160.0 +140.0 +120.0 Alarm Alarm A SO act. +165.0HH +150.0H +120.0L +110.0LL rangerange LL +180.0 +100.0 UL MEAS_MON Message Message Message Server Server Server ProVar ProVar ProVar Server Server Server Faceplates Faceplates Faceplates Block Block Concept Concept Content Page Integrating Libraries ......................................................................................................................... 3 Block Libraries ...................................................................................................................... 4 Integrating Blocks ............................................................................................................................. 6 Organization Blocks ......................................................................................................................... 7 CFC Basics ...................................................................................................................................... 8 Exercise: The First Blocks ................................................................................................................ 9 Predecessor for Installation .............................................................................................................. 10 Insert Block ...................................................................................................................................... 11 Compiling and Downloading the Program ......................................................................................... 13 Debugging a Program ...................................................................................................................... 15 Exercise: Controlling a Value ........................................................................................................... 16 Exercise: Automate Reactor Plant A ................................................................................................. 17 Reactor Simulation (Filling) .............................................................................................................. 18 Reactor Simulation (Heating) ........................................................................................................... 19 Reactor Simulation (Summary) ......................................................................................................... 20 Subexercise: REACTOR Block ......................................................................................................... 21 Block Diagram of a Valve Control System ........................................................................................ 22 Subexercise: VALVE Block ............................................................................................................... 23 Block Diagram of a Motor Control System ........................................................................................ 24 Subexercise: MOTOR Block ............................................................................................................ 25 CTRL_PID (with LINK) ..................................................................................................................... 26 Subexercise: CTRL_PID Block ......................................................................................................... 27 Complete download with read back .................................................................................................. 28 Driver Concept (from V5) ................................................................................................................ 29
- 2. Training Center for Automation and Drives SIMATIC PCS 7 System Training Configuring with CFCPage 2 Subexercise: Read In and Output an Analog Value ........................................................................... 31 Control loop ..................................................................................................................... 33 Subexercise: Control Loop for the Reactor .................................................................................... 34 Message Configuration ..................................................................................................................... 36 Notes................................................................................................................................................ 37 Program and Data ................................................................................................................... 38 Data Transport................................................................................................................................. 39 Run Sequence................................................................................................................................. 40 Runtime Properties of OBs and Runtime Groups.............................................................................. 41 Monitoring of runtime properties (1).................................................................................................. 42 Exercise: Optimize runtime sequence (1)......................................................................................... 44 Interconnecting Runtime Groups (1) ................................................................................................. 46 CFC Chart-in-Chart.......................................................................................................................... 48 Exercise: Chart-in-Chart Technique: Create Lower-Level Chart........................................................ 49 Exercise: Chart-in-Chart Technique: Create Higher-Level Chart....................................................... 51 Exercise: Program Block with CFC (1)............................................................................................. 53 Block Data Structure (Multiple Instance) ........................................................................................... 56 Block Change (1)............................................................................................................................. 57 Block Synchronization ...................................................................................................................... 60 Block Change with Library and Project Synchronization (1).............................................................. 61 Project Synchronization in the Multiproject (4).................................................................................. 64 Master Data Library......................................................................................................................... 65 Creating Process Tag Types ............................................................................................................ 66 Exercise: Create Process Tag Types and Import Them into the Project (1) ......................................67 Splitting Charts................................................................................................................................. 70 Creating Models............................................................................................................................... 72 Additional Exercise: Creating a Model ............................................................................................ 73 AS-to-AS Communication ................................................................................................................ 75 Communication Blocks for AS-to-AS Communication .......................................................................76 Textual Interconnections .................................................................................................................. 77 Additional Block Representations ..................................................................................................... 78 Compare Configuration Versions (Version Cross Manager) ........................................................... 79 VXM: Object Comparison ................................................................................................................. 80 VXM: Representation ....................................................................................................................... 81 Exercise: Display Changes before Downloading to the AS............................................................... 83
- 3. Training Center for Automation and Drives SIMATIC PCS 7 System Training Configuring with CFCPage 3 Date: 28.11.2006 File:ST-PCS7SYS_V70_cfc.3 SIMATIC PCS 7 Siemens AG 2003. All rights reserved. SITRAIN Training for Automation and Drives Integrating Libraries Block Chart template Working window OB32 (Start) (Master data) library in the multiproject (Standard) libraries with PCS 7 V7.0 Integrating Libraries When the PCS 7-ES is installed, libraries with prefabricated blocks and charts are automatically installed, too. The blocks required for software creation must be integrated in the project. The software itself is generated with the help of the CFC and SFC editors. The blocks provided in CFC usually originate in the libraries located in the S7 Manager under: File -> Open -> Libraries. Then activate File -> Manage -> Hide / Display to influence this list as required. Master Data Library With PCS 7 V7.0 you can also include libraries in the multiproject, in addition to projects. You can use one of them as master data library to store blocks or charts for uniform use in all projects. The master data library can only contain one S7 program. Use the menu command File Multiproject Define as Master Data Library to define a marked library as master data library.
- 4. Training Center for Automation and Drives SIMATIC PCS 7 System Training Configuring with CFCPage 4 Date: 28.11.2006 File:ST-PCS7SYS_V70_cfc.4 SIMATIC PCS 7 Siemens AG 2003. All rights reserved. SITRAIN Training for Automation and Drives Block Libraries, Part 1 AS OS SP= 12.3 AUTO 10% Trend Curves Alarms Operation Inputs Outputs Algorithm FB / FC Technological Blocks Elementary Blocks Driver Blocks Communication Blocks Elementary Blocks Represent the STEP 7 basic operations (BOP) for CFC application. These elementary blocks are provided with CFC (CMP_R, SQRT...) and are located in the "CFCLibrary". Technological Blocks These blocks provide basic functions for automation tasks: - Function blocks, such as AVER_P, INT_P, LIMITS_P - Operator control blocks (such as OP_A_LIM, OP_D) with the relevant faceplates - Message blocks (MESSAGE, MSG_CSF) These blocks process complex tasks with their relevant faceplates for OS operating and monitoring: - Controller block CTRL_PID, CTRL_S - Motor blocks MOTOR, MOT_REV, MOT_SPED - Valve blocks VALVE, VAL_MOT - Interlock display INTERLOCK - Dosage DOSE - Ratio controller RATIO_P - Monitoring blocks MEAS_MON, DIG_MON - Maintenance blocks ELAP_CNT, SWIT_CNT, OB1_TIME Driver Blocks Provide interfaces to the I/O modules: - CH_AI, CH_AO, CH_DI, CH_DO for the individual channel - MODxx, RACK, SUBNET, OB_xx, CPU_RT for module, chain and CPU diagnostics - PA_xx, PO_xx PROFIBUS PA drivers
- 5. Training Center for Automation and Drives SIMATIC PCS 7 System Training Configuring with CFCPage 5 Date: 28.11.2006 File:ST-PCS7SYS_V70_cfc.5 SIMATIC PCS 7 Siemens AG 2003. All rights reserved. SITRAIN Training for Automation and Drives Block Libraries, Part 2 Standard Library Inputs Outputs Algorithm SFB/SFC AS Communication Blocks The communication blocks are located in the "PCS7 Library V61". These are SEND_BO and REC_BO for 128 Boolean values each, and SEND_R and REC_R for transferring 32 Boolean values and 32 real values each. Both these block pairs are suitable for communication via the system bus. Standard Library The standard library was restructured since V5 of the STEP 7 basic package and contains the following, for example: System Functions:system functions (SFC) and system function blocks (SFB), integrated into the AS operating system and which the user blocks can invoke S5-S7 Convert: blocks for converting STEP 5 programs IEC Functions: like string operations (I_STRNG) and compare (MAX) Communication Blocks: functions (FC) for PROFIBUS DP communication PID Control: function blocks (FB) for PID control TI-S7 Convert: blocks for converting TI programs Note: The library "REDUNDANT IO (V1)" up to V6.1 and the library "REDUNDANT IO CGP" with V7.0 and higher is available for fault-tolerant H systems with redundant I/O.
- 6. Training Center for Automation and Drives SIMATIC PCS 7 System Training Configuring with CFCPage 6 Date: 28.11.2006 File:ST-PCS7SYS_V70_cfc.6 SIMATIC PCS 7 Siemens AG 2003. All rights reserved. SITRAIN Training for Automation and Drives Integrating Blocks LIBRARY1 LIBRARY2 BLOCK_X MASTER DATA Working window Libraries Block_X OB35 CFC(1) (Start) Predecessor for installation in the chart Charts Icons Block Integrating Blocks When CFC is open, activate View Catalog to open a window with the existing libraries. Look for "your" block in these libraries. Use "drag and drop" to drag your block to the chart in the project window. The first time you insert a block type, its data is entered in the block folder, chart folder and symbol table. There is a "hidden import." This block is integrated into the OB (see following pages) that is preset as the "predecessor for installation" at the bottom right position of the CFC (in the slide: OB35, runtime group CFC(1), at beginning).
- 7. Training Center for Automation and Drives SIMATIC PCS 7 System Training Configuring with CFCPage 7 Date: 28.11.2006 File:ST-PCS7SYS_V70_cfc.7 SIMATIC PCS 7 Siemens AG 2003. All rights reserved. SITRAIN Training for Automation and Drives Organization Blocks OB1 OB10 to 17 OB20 to 23 OB30 to 38 OB40 to 47 OB80 to 87 OB100, 101 OB121,122 OB Start event Priority 1 Free cycle 1 10...17 Time-of-day interrupt 2 20...23 Time-delay interrupt 3...6 30...38 Cyclic interrupt 7...15 40...47 Process interrupt 16...23 55...57 DPV1 interrupts 2 60 Multicomputing 25 70...73 Red. error (H-CPU) 25 80...87 Async. error interrupt 26,28 100,101 Restart 27 121,122 Sync. error interrupt like error- generating OB (see system software for S7-300/400, System and Standard Functions) S7 OS * * **** * User-/process-specific start event ** CFC-specific/block-specific start event Organization Blocks When predefined events occur, the OS of the CPU invokes the organization blocks (OBs) associated with these events. In turn, an OB will invoke the blocks the operator has programmed in the OB. Which OBs are available depends on the CPU used; the blocks have different priority classes (1 = lowest, 28 = highest priority). If certain events cause the system to call up an OB not loaded in the AS, OB85 (program sequence error OB) is invoked. If OB85 is not present, the CPU goes to STOP! Local Data When running, every OB occupies memory in the local data area (approx. 20 bytes). In addition, the block invoked by the OB will also take up local memory resources (only during the block's runtime - after the block has been processed, this local memory is available again.) The local memory provided must be sufficient for both the block and the OB, or the CPU will go to STOP! Interrogate Set Local Memory All of the local memory is limited depending on the CPU. The local memory is divided according to priority classes. The query can be initiated from the CFC via Options Chart Reference Data View Local Data where settings that are not sufficient are also marked in red. Setting Local Memory Make sure that the priority level for every OB where you want to include blocks has sufficient local memory assigned. The setting is carried out in the station configuration (HW Config) for the CPU as follows: - Select the station - Edit -> Open Object -> Highlight CPU. - Edit -> Object Properties -> Local data and then set as required. The default setting is sufficient for PCS 7 blocks in V5 and higher. Should this not be the case, the CFC will issue a message.
- 8. Training Center for Automation and Drives SIMATIC PCS 7 System Training Configuring with CFCPage 8 Date: 28.11.2006 File:ST-PCS7SYS_V70_cfc.8 SIMATIC PCS 7 Siemens AG 2003. All rights reserved. SITRAIN Training for Automation and Drives CFC Basics Header 2 Header 1 I11 O11 I21 O21 I22 Menu bar Sheetbar Sheetbar Modules Interconnection Configuration 123 Window with available libraries, charts and blocks BIB1 BIB2 BSTX BSTY BL CH LIB OB35 CFC(1) (Start) Blocks A basic principle of effective engineering is "Don't reinvent the wheel". The block libraries contain solutions you can use again. The block documentation (can be opened online by selecting the block and pressing the F1 key) describes the data that must be provided to the block on the input side in order to obtain the desired results on the output side. Charts (Templates) Predefined control solutions are provided which only need to be adapted to your purposes. Import The blocks must be located in and imported from block containers. They are then interconnected with CFC and can then be used for programming. Inserting in ChartYou can insert blocks by using drag and drop. You select the block you want from the list of available blocks/libraries and position the block in the project window (see above). Block Header The block header contains information so you can identify the block. By double-clicking the block header (or right-click and select: Object Properties) you can view additional information and configuration possibilities in the boxes that are then displayed. Set Parameters The inputs have fixed values (double-click on the input name or right-click and select: Object Properties). Connect If results from other blocks are to be processed further, the supplier of the value (block output) is connected to the input importing the value (first click on the output, second click on the input, or alternatively with Drag & Drop). Sheet Bars You can also establish connections to blocks that are not positioned on the same sheet by opening a new window in CFC. The two sheets are displayed in different windows. The interconnection is carried out in the usual way. The interconnection is interrupted at the sheet bar for each sheet, and the destination of the other sheet is displayed.
- 9. Training Center for Automation and Drives SIMATIC PCS 7 System Training Configuring with CFCPage 9 Date: 28.11.2006 File:ST-PCS7SYS_V70_cfc.9 SIMATIC PCS 7 Siemens AG 2003. All rights reserved. SITRAIN Training for Automation and Drives Exercise: The First Blocks • Configuration • Compile and download objects • Test 0 50 100 t U V 0 50 100 t V U2 30 Exercise In the plant view, you want to insert an "Attempti" CFC chart with the above function in new folder "Reactorsi/Testi". Both blocks are to run in OB32. The first block type is PT1_P (time-delay element of the 1st order) and the second block type is ADD4_P (adder). Create, compile, download and test the chart. ------------------------------------------------------------------------------------------------------- Steps 1. Call the project in plant view. Create folder. 2. Insert new CFC chart in the corresponding hierarchy container. 3. Define predecessor for installation. 4. Enter blocks from the library into the chart and name them. 5. Set parameters for blocks on the sheet and interconnect them. 6. Compile, download and test program. ------------------------------------------------------------------------------------------------------- Procedure In the block names, "i" stands for your group number. Add PH 1. Select the plant hierarchy view in the SIMATIC Manager via menu command View Plant View Select the "REACTORSi" folder in the project PRO_ASi. Then right-click and select New Object... Hierarchy Folder to insert a new folder. Rename the folder "TESTi" Create a chart 2. Select the "TESTi" folder, right-click and select New Object... CFC to insert a chart. Name your chart "ATTEMPTi" Open Chart Select the "ATTEMPTi" chart. To open the chart, right-click and select Open Object (or double-click)
- 10. Training Center for Automation and Drives SIMATIC PCS 7 System Training Configuring with CFCPage 10 Date: 28.11.2006 File:ST-PCS7SYS_V70_cfc.10 SIMATIC PCS 7 Siemens AG 2003. All rights reserved. SITRAIN Training for Automation and Drives Predecessor for Installation Run Sequence 3. Click the Run Sequence icon (circled in the slide). A CFC window is opened which lists all the organization blocks of the CPU (OB). When a project is created, OB 35 is the "Predecessor for installation" meaning that when a new chart is created, a runtime group is automatically created in OB 35 (in first position, i.e. at the start). The runtime group has the same name as the new CFC chart (circled folder symbol). While blocks are added to the chart, they are automatically grouped in the runtime group. Moving the Runtime Group Grab the folder symbol for the runtime group with the mouse and drag it to another OB(OB32) which is being processed in the CPU with different repeat times (see lower part of the slide). If you move OB35, it remains "Predecessor for the Installation". In order to automatically assign charts that were created later to the new OB, you need to define a new "Predecessor for installation". Predecessor for Installation Select the runtime group Attempt from OB32, then right-click and select Predecessor for installation position. The new position becomes effective (after acknowledging an information dialog). The runtime group is highlighted in green and the new "Predecessor... OB32 Attempt" is displayed in the lower right-hand corner (see slide above). You can now exit the window with the run sequence.
- 11. Training Center for Automation and Drives SIMATIC PCS 7 System Training Configuring with CFCPage 11 Date: 28.11.2006 File:ST-PCS7SYS_V70_cfc.11 SIMATIC PCS 7 Siemens AG 2003. All rights reserved. SITRAIN Training for Automation and Drives Insert Block 2 1 Libraries Catalog If you open the CFC chart and do not see a window with libraries on the right, activate the following menu command to open the window: View Catalog. Insert Block 4. In the CFC select the Libraries tab on the lower right-hand side (arrow 1 on the slide). Go to the pane shown on the right above and look for the library "PCS 7 Library V70". It contains a subdirectory called CONTROL with a block called PT1_P. Drag the block to the working window of the CFC. The block is displayed in the chart and is inserted in the runtime group associated with its chart. The runtime information highlighted in green (arrow 2) shows, for example, that the block was inserted in OB32, in the 1st runtime group, as first block. The green background indicates the block in the chart which is defined as predecessor for the next block in this chart. After insertion, the latter becomes the predecessor for the third block, and so forth. Define Predecessor If you insert new blocks later and want to use a different block as predecessor rather than the block last inserted, select the required block in the chart, right-click and select Predecessor for Installation Position This block is now the new predecessor. The next new block is then inserted after this block, and becomes the predecessor itself. Each chart has its own predecessor block! Rename Block Select the block you want to rename. Right-click and select Object Properties You can now enter the new name "FIRSTi" in the Name field. Repeat the procedure for the block of type ADD4_P.
- 12. Training Center for Automation and Drives SIMATIC PCS 7 System Training Configuring with CFCPage 12 Chart Overview First use the following command to switch to the chart "Overview" display: View Overview This makes it easier to find an available location for the new block. Chart Sheet View Change chart to "sheet view" via View Sheet View You can now read and select the parameter names. Setting Parameters 5. Enter fixed values for the required function. Select the parameter name (here, for example, "Firsti" block and "TM_LAG" input). Right-click and select Object properties (or double-click). Fill out the input box. Interconnection 1. Select source output (here "Firsti" block, output "V") 2. Select the destination input ("Secondi" block, "U2" input) Result: One line connects both parameters. Since V6.1, the selection sequence Output Input is no longer mandatory. Note: Accustom yourself to using the online help as it provides important information whenever you need it. You can quickly and directly look up information without having to search through manuals. For context-sensitive help select the object or the active window for which you need help and press F1. You can also select "Help" in the menu bar at any time and search for information on a specific topic.
- 13. Training Center for Automation and Drives SIMATIC PCS 7 System Training Configuring with CFCPage 13 Date: 28.11.2006 File:ST-PCS7SYS_V70_cfc.13 SIMATIC PCS 7 Siemens AG 2003. All rights reserved. SITRAIN Training for Automation and Drives Compiling and Downloading the Program Settings for compile 5. Charts must be converted from the graphic form to machine language and downloaded to the AS. To initiate the conversion from a CFC chart, select Chart Compile Charts as Program (or click the circled C Compile icon). The entire software is compiled for the CPU which is associated with this CFC chart. A dialog box is displayed for the compilation settings (see slide). Only "Entire Program" is possible under "Scope" the first time you compile. You can select "Changes only" for any subsequent compilations (after changes/additions). Important Option "Generate module drivers" (only meaningful if there is a minimum of one channel driver in the chart). This results in the CFC creating additional charts with the required drivers for data transfer with the I/O modules and diagnostics capability. A chart "@CPU_RT" is created in addition. The "CPU_RT" block inserted there monitors the CPU performance in order to avoid a CPU stop (for details on the block functions, please refer to its online help) Downloading The compiled charts must now be downloaded to the CPU. Activate the following menu command to start this process: PLC Download or click on the Download icon (circled on the slide). The first time the chart is downloaded, it is only possible to download the entire program (in combination with CPU Stop and automatic deletion of the program still residing in the CPU).
- 14. Training Center for Automation and Drives SIMATIC PCS 7 System Training Configuring with CFCPage 14 Activate the Entire Program option. This ensures all the software from this CPU is downloaded. You can select "Changes only" for any subsequent downloads (after changes/additions). Changes option This means that a consistency check is performed for the accessible AS before download. If feasible (usually), the software changes made since the last download to the AS are delta-loaded without stopping the CPU. All software changes are made for the entire software of the CPU associated with this CFC chart. Download to Test CPU option (dealt with later) Note 1 If you trigger the download directly and have not yet compiled, a CFC dialog box will prompt you whether you want to compile first. The Options screen is opened as a combination box (one screen with two tabs, for compile and download) Check both tabs! Regardless in which screen you select the options - with individual compile/download or with direct download - they are always retained until they are changed. Note 2 If the CFC option "Options Settings Compile/Download "Generate image of downloaded program for comparison" has been activated, an XML export of the charts is automatically triggered after each successful download. The result is saved in an internal project directory. During the next download, the "Display changes" button is provided in the displayed download screen. Internal calling of the VXM is started when this is clicked. This provides a display of the changes which would be downloaded to the AS following positive acknowledgment of the download screen (nothing has happened yet!). If undesired changes are displayed, you can exit the download screen using "Cancel". You can subsequently undo the "undesired" changes by changing the configuration, and start a new Compile/Download process. The VXM topic and the evaluation of information associated with it will be treated later.
- 15. Training Center for Automation and Drives SIMATIC PCS 7 System Training Configuring with CFCPage 15 Date: 28.11.2006 File:ST-PCS7SYS_V70_cfc.15 SIMATIC PCS 7 Siemens AG 2003. All rights reserved. SITRAIN Training for Automation and Drives Debugging a Program Dynamic display Test Mode You must activate "test mode" to test the function downloaded to the AS. First activate Debug Process Mode Or Debug Laboratory Mode to select/check the appropriate test environment. Use the following command to activate/deactivate test mode: Debug Test Mode With laboratory operation, monitoring is automatically activated for the parameters specified "for test". During process operation, you must select the required block each time and identify it for monitoring by right-click and selecting Watch On Test 1 If the test mode is active and the parameters to be tested have a yellow background (default setting for updated values), you can set parameters for the input parameter. The new value is written to the AS and to the project. Change the value on the "First" block, "U" input. Monitor the result on the "Second" block, "V" output. Test 2 Dynamic Display offers an additional test procedure. You can open a display window in CFC: View Dynamic Display Use "drag and drop" in this window to drag the block parameters you want to monitor (from any of the projects - even from different CPUs). One line in the table is reserved for each parameter. Upon activation of test mode, you can monitor or edit (if permissible) these selected parameters. You can delete several parameters you no longer need by selecting the relevant line, right-clicking and selecting Delete. You can use the New , Rename or Delete buttons in the table window to create, rename or delete new dynamic displays.
- 16. Training Center for Automation and Drives SIMATIC PCS 7 System Training Configuring with CFCPage 16 Date: 28.11.2006 File:ST-PCS7SYS_V70_cfc.16 SIMATIC PCS 7 Siemens AG 2003. All rights reserved. SITRAIN Training for Automation and Drives Exercise: Controlling a Value Interconnectable input for U Operator input analog Operator- Control Enable Limits Exercise The analog value "U4" of the adder "secondi" is to be operated via operator block OP_A_LIM (operation analog limited). Limit values can be set both for the upper and lower limit thus limiting the value that can be entered. ------------------------------------------------------------------------------------------------------- Steps 1. Insert and interconnect operator block for analog values OP_A_LIM (Name: Oper_Second_U_i) (i is your group number) 2. Compile and download 3. Operator functions when using OP_A_LIM 4. OP_EN input function 5. Upper and lower operating limits 6. Function of the LINK_U- and LINK_ON input 7. Tracking function (BTRACK) Note Use the online help for the OP_A_LIM block. If there are parameters you cannot find for the block, right-click and select Properties Connections tab to search for them and make them visible.
- 17. Training Center for Automation and Drives SIMATIC PCS 7 System Training Configuring with CFCPage 17 Date: 28.11.2006 File:ST-PCS7SYS_V70_cfc.17 SIMATIC PCS 7 Siemens AG 2003. All rights reserved. SITRAIN Training for Automation and Drives Exercise: Automate Reactor Plant A M MOTOR VALVE CTRL_PID VALVE VALVE Heating Exercise Reactor plant A is to be automated. The following blocks and functions are to be used: Plant simulation: REACTOR (Library: COURSEBS60) Actuate valves: VALVE (Library: PCS 7 Library V70) Actuate mixers: MOTOR (Library: PCS 7 Library V70) Temperature controller: CTRL_PID (Library: PCS 7 Library V70) Create a new CFC chart called "Exer_Reaci" in the PH folder "Reactors". As separate steps, insert the above blocks and familiarize yourself with each one (by compiling, downloading and testing). Work through the steps outlined on the following pages where the block types are described. The sequential control is dealt with in the SFC chapter. ------------------------------------------------------------------------------------------------------
- 18. Training Center for Automation and Drives SIMATIC PCS 7 System Training Configuring with CFCPage 18 Date: 28.11.2006 File:ST-PCS7SYS_V70_cfc.18 SIMATIC PCS 7 Siemens AG 2003. All rights reserved. SITRAIN Training for Automation and Drives Reactor Simulation (Filling) Reactor (Filling + Mixing) BO V1_OP_CL BO V2_OP_CL BO V3_OP_CL BO M1_ON_OF R V1_FLOW R V2_FLOW R V3_FLOW R CFV OVERFLOW BO LEVEL R UV 2U102 UV 2U101 UV 2U103 EI 2E101 LAH 2L101 LI 2L104 FB_V1_OP BO FB_V1_CL BO FB_V2_OP BO FB_V2_CL BO FB_V3_OP BO FB_V3_CL BO FB_M1_ON BOBO V1_FAULT BO V2_FAULT BO V3_FAULT BO M1_FAULT BO V_RESET Example: REACTOR Block The system in the configuration example is implemented as a user function block (FB600, "REACTOR"). Filling Component This part of the algorithm simulates using three valves for the filling and draining of the components. The parameters have the follo wing meaning: Inputs Vn_OP_CL (n=1 to 3) 1=open / 0=close the valve 2U101 to 2U103 M1_ON_OF 1=switch on / 0= switch off the mixer 2E101 Vn_FLOW (n=1 to 3) 0 to 100 Flow of valves 2U101 to 2U103 in %Fmax CFV Correction factor to Fmax of the valves in Lmax / s V_RESET 1=resets control inputs for valves and motor, then this input is reset Vn_FAULT (n=1 to 3) 1=valve error, no additional position change M1_FAULT 1=motor error, no additional position change Outputs OVERFLOW 1=reactor overflows (in the overflow basin) LEVEL 0 to 100 level (in % Lmax) FB_Vn_OP (n=1 to 3) Feedback: valve position open FB_Vn_CL (n=1 to 3) Feedback: valve position closed FB_M1_ON Feedback: mixer active
- 19. Training Center for Automation and Drives SIMATIC PCS 7 System Training Configuring with CFCPage 19 Date: 28.11.2006 File:ST-PCS7SYS_V70_cfc.19 SIMATIC PCS 7 Siemens AG 2003. All rights reserved. SITRAIN Training for Automation and Drives Reactor Simulation (Heating) Reactor (Heating + General) R V_HOT_FL R TMP_ENV R TMP_HOT R T_LAG_SH R T_LAG_IN R SAMPLE_T BO RS_COOL BO SET_HOT TMP_SHEL R TMP_INT R TICA 2T102 TI 2T101Heating Heating Component This section simulates reactor heating through a heating medium by means of the reactor shell. A PT1/VZ1 element simulates the shell temperature. A PT2/V22 element simulates the interior temperature. This section includes the following parameters: Inputs V_HOT_FL Flow in % Fmax for the heating valve in the 2T101 control loop TMP_ENV Ambient temperature in °C TMP_HOT Heating medium temperature when it enters in °C T_LAG_SH PT1 delay time (for the shell temperature) T_LAG_IN PT2 delay time (for the internal temperature) Outputs TMP_SHEL Shell temperature in °C, process tag 2T101 TMP_IN Internal temperature to be controlled in °C, control loop 2T102 General Component Converts the time constants and brings the reactor to its initial state Inputs SAMPLE_T Sampling time for the REACTOR block (OB-dependent and runtime group- dependent) RS_COOL 1= sets the reactor to "empty and cold" state. The input is reset automatically. SET_HOT 1= sets the reactor to "full and hot" state. The input is reset automatically.
- 20. Training Center for Automation and Drives SIMATIC PCS 7 System Training Configuring with CFCPage 20 Date: 28.11.2006 File:ST-PCS7SYS_V70_cfc.20 SIMATIC PCS 7 Siemens AG 2003. All rights reserved. SITRAIN Training for Automation and Drives R V_HOT_FL 0...100 Reactor Simulation (Summary) M Heating V1_OP_CL V2_OP_CL V3_OP_CL M1_ON_OF TMP_SHEL TMP_INT LEVEL 0....100 FB_V2_OPEN FB_V2_CLOSE FB_V1_OPEN FB_V1_CLOSE FB_V3_OPEN FB_V3_CLOSE MOTOR_ON The above slide shows the block parameters (input/outputs) of the REACTOR block for controlling the valves and mixers and detecting feedback messages.
- 21. Training Center for Automation and Drives SIMATIC PCS 7 System Training Configuring with CFCPage 21 Date: 28.11.2006 File:ST-PCS7SYS_V70_cfc.21 SIMATIC PCS 7 Siemens AG 2003. All rights reserved. SITRAIN Training for Automation and Drives Subexercise: REACTOR Block Switch views Subexercise 1 In the hierarchy folder "ReactorsUnitAi" of the PRO_AS project, insert a new CFC chart called "Exer_Reaci". Insert the REACTOR block in this chart and call it "ReacAi". Compile, download and test the behavior of the simulation. ------------------------------------------------------------------------------------------------------ Steps i is your group number 1. Open the multiproject in plant view. 2. Insert the CFC chart and rename it "Exer_Reaci". 3. Open the chart and select overview view (circled icon on the left on slide) 4. Drag the REACTOR block to the sheet. Switch to sheet view (circled icon on the right on slide). 5. Select the block and rename it to "ReacAi" via the Properties. 6. Compile and download the changes to the AS. 7. Switch to test mode and test the behavior of the block by setting parameters at the appropriate inputs. Refer to the parameter description on the preceding pages.
- 22. Training Center for Automation and Drives SIMATIC PCS 7 System Training Configuring with CFCPage 22 Date: 28.11.2006 File:ST-PCS7SYS_V70_cfc.22 SIMATIC PCS 7 Siemens AG 2003. All rights reserved. SITRAIN Training for Automation and Drives Block Diagram of a Valve Control System Valve block VALVE AUT_L AUT_ON_OP MONITOR FB_OPEN Time monitoring QCLOSED Q_MON_ERR RESET Control logic Operating screen LIOP_SEL QCONTROL CH_DOCH_DIvalve DI DO Feed- backs Switching command AUTO_OC MAN_OC 0 1 0 1 FB_CLOSE CH_DI QOPEND Example of Valve Control via VALVE Block The above example represents a template for a simple valve control (open/close valves) with a control signal (open/close). The VALVE is the central block, block type: VALVE, from the CONTROL family The valve can either be switched via a control logic (AUTO operating mode) or via an operating screen (HAND operating mode). The operating modes can be changed over either by "gating" (parameter AUT_L) or via "operation" (parameter AUT_ON_OP). Input LIOP_SEL can be interconnected and makes this decision. Then VALVE issues a switching command to the valve via QCONTROL. Depending on the command direction (Open/Closed) a timer monitors whether feedback signal FB_OPEN or FB_CLOSE are received from the valve within a configurable time; otherwise monitoring error Q_MON_ERR is issued and the valve remains in the same position. Output QCONTROL and the feedback signals FB_OPEN and FB_CLOSE are connected to special driver blocks which return channel-specific information to output and input signals on the hardwire side.
- 23. Training Center for Automation and Drives SIMATIC PCS 7 System Training Configuring with CFCPage 23 Date: 28.11.2006 File:ST-PCS7SYS_V70_cfc.23 SIMATIC PCS 7 Siemens AG 2003. All rights reserved. SITRAIN Training for Automation and Drives Subexercise: VALVE Block Subexercise 2 Insert a VALVE block in the CFC chart "Exer_Reaci". Connect the block with the parameters of the REACTOR block as shown in the slide above. Compile, download and test the behavior in interaction with the simulation. Take into account the diagram on the previous page. After testing the first VALVE block, add additional VALVE blocks for reactor valves V2 and V3 to the chart. ------------------------------------------------------------------------------------------------------ Note We will not use any driver blocks yet for this example. We shall initially collect all blocks from the reactor environment in a common chart. We shall then split this chart into new CFCs, and name these according to their process tag type. We will connect the hardware once we have carried out the entire exercise. Notes on the Test Make the VALVE block parameters framed in red on the slide visible (they can be operated from the OS via picture blocks and are therefore not visible in the default setting). Now include these in the test too. In manual mode (AUT_ON_OP = Manual) you can influence the control output via MAN_OC by selecting Open or Close. The simulated feedback signals FB_V1_OP and FB_V1_CL from the reactor simulator will only switch over after 4 seconds. This results in the VALVE block being terminated and locked against further actuation. Set the TIME_MON parameter higher, reset the lock via the RESET input and try again.
- 24. Training Center for Automation and Drives SIMATIC PCS 7 System Training Configuring with CFCPage 24 Date: 28.11.2006 File:ST-PCS7SYS_V70_cfc.24 SIMATIC PCS 7 Siemens AG 2003. All rights reserved. SITRAIN Training for Automation and Drives Block Diagram of a Motor Control System Motor block AUT_ON_OP AUT_L MONITOR FB_ON Time monitoring QRUN Q_MON_ERR RESET Control logic Operating screen LIOP_SEL QSTART CH_DOCH_DI M DI DO Feedback Switching command AUTO_ON MAN_ON 0 1 1 0 AS OS QSTOP Example of Motor Control System via MOTOR Block The above diagram is an example of a simple motor control system (single direction, single speed). The MOTOR is the central block, block type: MOTOR, from the CONTROL family The drive can either be activated via a control logic (AUTO operating mode) or via an operating screen (HAND operating mode). The operating modes can be changed over either by "gating" (parameter AUT_L) or via "operation" (parameter AUT_ON_OP). Input LIOP_SEL can be interconnected and makes this decision. The drive issues a start command via "QSTART" to a auxiliary contactor that activates the motor's power contactor. A time watchdog is used to monitor whether the feedback signal "FB_ON" from the power contactor arrives within a definable time; if it doesn't, monitoring error "Q_MON_ERR" is output. Output "QSTART" and feedback signal "FB_ON" are connected to special driver blocks that supply channel-specific information for the output and input signals of the hardware connected.
- 25. Training Center for Automation and Drives SIMATIC PCS 7 System Training Configuring with CFCPage 25 Date: 28.11.2006 File:ST-PCS7SYS_V70_cfc.25 SIMATIC PCS 7 Siemens AG 2003. All rights reserved. SITRAIN Training for Automation and Drives Subexercise: MOTOR Block Subexercise 3 Insert a MOTOR block in the CFC chart "Exer_Reaci". Connect the block with the parameters of the REACTOR block as shown in the slide above. Compile, download and test the behavior in interaction with the simulation. Take into account the diagram on the previous page. ------------------------------------------------------------------------------------------------------- Notes on the Test The same notes apply as for the VALVE block. Therefore, take into account the diagram on the previous page here, too.
- 26. Training Center for Automation and Drives SIMATIC PCS 7 System Training Configuring with CFCPage 26 Date: 28.11.2006 File:ST-PCS7SYS_V70_cfc.26 SIMATIC PCS 7 Siemens AG 2003. All rights reserved. SITRAIN Training for Automation and Drives CTRL_PID (with LINK) PID LMN SPEXTSEL_OP 0 SP_OP SP_EXT PV_IN MAN_OP AUT_ON_OP 0 INT 0 EXT 1 AUT 1 MAN 0 + - SPEXT_EN SP_OP_ON LMNOP_ON AUTOP_EN SPINT_EN MANOP_EN Enable Parameter: DEADB_W GAIN TN TV TM_LAG AUT_L 1 LIOP_MAN_SEL SPEXON_L 1 LIOP_INT_SEL LMN_TRK LMN_SEL Must be activated (=1)! 0 1 Operating Modes of the Controller Block CTRL_PID The slide above shows the CTRL_PID block (closed-loop control) in manual operation mode. The MAN_OP manual value that can be operated by the OS is passed through to the LMN controller output. The SP_OP internal setpoint can be operated through the OS, but is not effective. After every CPU restart, the closed-loop controller is set in this operating mode combination (internal setpoint and manual operation). Internal/External SP The setpoint (SetPoint) is selected by means of the SPEXTSEL_OP switch that can be operated by the OS: "0 = Internal" from SP_OP / "1 = External" from SP_EXT. Manual/Automatic The LMN manipulated variable is taken in manual mode from the operable input MAN_OP. During automatic mode, this manipulated variable is calculated by means of the PID algorithm. AUT_ON_OP input operation can be used to select the operating mode ("0 = Manual" / "1 = Automatic"). Operator Enables The change of operating mode is possible only if the responsible enable input for the operating mode to be set is at "1" (such as switching to "automatic" through the AUT_ON_OP input only if AUTOP_EN = 1). Removing an operating enable when the closed-loop controller is running does not change the running operating mode. Analog value operation is possible only if the enable input for this value is at "1" (for example, SP_OP can be changed in automatic operation only if SP_OP_ON=1). Note If you are working in the CFC chart in the test mode with updated values (yellow background), and there is no enable to operate the input, the value is first entered in the block input after OK. During the next cyclic block processing (by the OB), the input value is replaced by the old value.
- 27. Training Center for Automation and Drives SIMATIC PCS 7 System Training Configuring with CFCPage 27 Date: 28.11.2006 File:ST-PCS7SYS_V70_cfc.27 SIMATIC PCS 7 Siemens AG 2003. All rights reserved. SITRAIN Training for Automation and Drives Subexercise: CTRL_PID Block Subexercise 4 Insert a CTRL_PID block in the CFC chart "Exer_Reaci". Connect the block with the parameters of the REACTOR block as shown in the slide above. Compile, download and test the behavior in interaction with the simulation. Take into account the diagram on the previous page. ----------------------------------------------------------------------------------------------------- Notes on the Test Here too, make the operable inputs visible (framed in the slide). Set the controller to manual mode (AUT_ON_OP = Manual) and set the manual value MAN_OP. Output LMN must pass on the value and the simulated temperature must respond. Set the controller to automatic mode and set the internal setpoint SP_OP. The controller shall kick in to adapt the simulated temperature to the setpoint. Remark In a later exercise we shall add driver blocks to this temperature control so that we can test the hardware connection.
- 28. Training Center for Automation and Drives SIMATIC PCS 7 System Training Configuring with CFCPage 28 Date: 28.11.2006 File:ST-PCS7SYS_V70_cfc.28 SIMATIC PCS 7 Siemens AG 2003. All rights reserved. SITRAIN Training for Automation and Drives Complete download with read back Subexercise 5 Carry out a complete download of the AS. Pay attention to the displayed consequences. --------------------------------------------------------------------------------------------------- Procedure 1. After starting the download process, select download mode "Complete program". 2. Acknowledge the notice that the CPU will be stopped and all blocks deleted. Important 3. Select read back before complete download. Operations which have been carried out by the OS (without the "knowledge" of the ES) and only saved in the AS are then initially imported into the project. The result is compiled automatically, and transferred to the AS by the complete download. Remark Reading back is only possible if no block interfaces have been modified in the project. The note following the exclamation mark that downloading of changes would also be possible (third screen) only applies if the read back process has been intentionally started for the purpose of synchronizing the project data with the online data. In our case, triggering of this display was caused by the request for "complete download", i.e. this is also carried out!
- 29. Training Center for Automation and Drives SIMATIC PCS 7 System Training Configuring with CFCPage 29 Date: 28.11.2006 File:ST-PCS7SYS_V70_cfc.29 SIMATIC PCS 7 Siemens AG 2003. All rights reserved. SITRAIN Training for Automation and Drives Driver Concept (from V5) CH_DOCH_AI VALUE VHRANGE VLRANGE QC V 200 0 PV_IN QCONTROL Digital output 0 / 24 V Channel 1 (Signame_Y) Analog input T I 4 to 20mA 0 to 200°C VALUE I Channel 0 (Signame_X) Signame_X Signame_Y HW Config Symbol table Signame_X Signame_Y SUBNET RACKMOD MOD CFC charts with module drivers CFC chart with application PPI=n PPI=n MODE MODE CPU_RT Driver Concept The recording of process signals is part of the input/process/output principle applicable in data processing. Control engineering additionally includes a statement on the quality of the recorded signal and the associated diagnostics information. Such diagnostics information makes fast elimination of a problem possible. In order to offload such repeated tasks from the planning engineer, PCS 7 provides the driver blocks. The planning engineer must insert the matching signal/channel driver for the process tag in the chart, and connect this to the symbolic signal name. The driver supplies the measured value (in the case of analog signals, the transmitter's measuring range is taken into consideration) as well as the associated quality code. The driver provides a selectable response toward faults (redundant recording of values, substitute value) as well as an automatic I&C system message to the OS. The concept assumes that the S7 CPU supports partial process images (starting end of 1998)! HW Config In addition to the typical channel-related settings (current and voltage), a partial process image (PPI) is assigned to the object properties of each I/O module. A symbolic name (see Signalname_X on the slide above) is also assigned to every channel that is used. This symbolic name is listed in the symbol table of the CPU. In the CPU properties, the PPIs are assigned to the OBs they are to update. User Chart A channel-specific driver is inserted (CH_AI, CH_AO, CH_DI, CH_DO) per signal in the user CFC chart. The driver's "VALUE" parameter is connected by right-clicking and selecting Interconnection to Address -> Browse to the signal's symbolic name (the displayed symbol table is filtered for I/O signal names). This specifies the I/O word or bit in the PPI where the driver reads or writes its raw value. With analog values, the value is converted based on the measuring range (VHRANGE, VLRANGE).
- 30. Training Center for Automation and Drives SIMATIC PCS 7 System Training Configuring with CFCPage 30 These drivers are not dependent on the type of ET200M I/O module used; therefore, they can be configured in the chart before the HW Config is complete (as long as the process tag name is already known). Note With V 5.2 and higher, the above-mentioned drivers are supplemented by the "universal" drivers (CH_U_AI, CH_U_AO, CH_U_DI, CH_U_DO). They can also be used for PA field devices (PA profile 3.0). This allows you to configure as much as possible in a hardware-neutral way. Module Drivers After all channel drivers have been inserted as needed, you must prompt the CFC to generate the other necessary drivers. When you start the compilation, the screen displayed offers the option "Generate module drivers" (if at least one channel driver was inserted in the chart). Then automatically - before compiling - charts @1, @2 etc. are created with the necessary module and diagnostics drivers. When a delta compile is performed, if the appropriate option is set, the drivers/HW Config are checked and updated if necessary. The @CPU_RT chart is created in addition with a block which monitors the CPU load, displays it on the OS, and permits so- called emergency operation in the event of an overload. Compile and Download The functions Compile and Download seen earlier on are used to trigger the compile and/or download procedure. If the settings for compile and download still show "Entire program", set "Changes only" now. Note You can also perform the compile and download procedure in one go. With this function (which we shall look at in the chapter on Multiprojects) you can merge the modified data from various components consistently in one single step (e.g. networks, hardware, blocks, charts, OS servers, OS clients). Previously you had to carry out several different steps in different applications to achieve this merge - now a centrally controlled process ensures these steps are carried out in the correct sequence.
- 31. Training Center for Automation and Drives SIMATIC PCS 7 System Training Configuring with CFCPage 31 Date: 28.11.2006 File:ST-PCS7SYS_V70_cfc.31 SIMATIC PCS 7 Siemens AG 2003. All rights reserved. SITRAIN Training for Automation and Drives Subexercise: Read In and Output an Analog Value In the test installation: Analog output and analog input are connected to one another via the hardware AO module AI module CFC The value to be output is connected hereThe read value is retrieved here Subexercise Analog input 0 of the AI module (4 to 20 mA) is to be read in. A value is to be returned on analog output 0 (4 to 20 mA) of the AO module. Configure and test this function. "Play around" with the driver blocks. ------------------------------------------------------------------------------------------------------- Steps 1. In the CFC chart "Exer_Reaci", insert a CH_AI (driver block for analog input) and CH_AO (driver block for analog output) each on a separate free sheet. 2. On the two blocks, interconnect the parameter VALUE with the (symbolic) address of the respective input and output channel. The analog input value is received from IW 512 (input channel 0) . The output value is returned on the analog output QW 512 (output channel 0). 3. Test the interconnection ------------------------------------------------------------------------------------------------------- Procedure 1. Select the CH_AI and CH_AO blocks from the DRIVER family in the PCS 7 library and position them on a free sheet of the "Exer_Reaci" chart. . 2. Then select the VALUE input on the CH_AI block. By right-clicking and selecting Interconnection to Address you open an extract of the symbol table showing the addresses of the suitable data type. Select the row with the address of channel 0 of the input module (e.g. symbolic name AI_CH0). In the CH_AO block, select the VALUE output and interconnect it in the same way with the symbolic name AO_CH0.
- 32. Training Center for Automation and Drives SIMATIC PCS 7 System Training Configuring with CFCPage 32 Date: 28.11.2006 File:ST-PCS7SYS_V70_cfc.32 SIMATIC PCS 7 Siemens AG 2003. All rights reserved. SITRAIN Training for Automation and Drives Compile the charts using the option "Generate module drivers". If everything was performed correctly, additional interconnections for your two drivers should be displayed (see slide) and additional charts called @1, @2 etc. should appear in the chart folder of the CPU. If there are any problems, select Options Logs Module Drivers tab to check. Download the CPU. 3. As the analog output 0 and analog input 0 are wired together in the hardware in the test installation, the following applies for this test: What you send out via the output driver and output module (4 to 20mA) must come back via the input module and the input driver. You can test this as follows: Set parameter U in the "Analog_Output" block to a value within the limits UHRANGE and ULRANGE. It is digitized (within the limits) and sent to the output module. It is converted to current there (4 to 20mA) and applied via the link connections to input 0 of the input module. The input module then generates the digital value which is converted by the "Analog_Input" block within the VHRANGE and VLRANGE limits and output to parameter V. Also test a wire break (if possible in the training room). How does driver output QBAD react? Activate SUBS_ON, set the parameters for SUBS_V and test the wire break again. What happens with output V? First test a simulation at the input driver then at the output driver (SIM_ON and SIM_V, SIM_ON and SIM_U) For more information on the drivers, please refer to the online help (select the driver and press the F1 function key).
- 33. Training Center for Automation and Drives SIMATIC PCS 7 System Training Configuring with CFCPage 33 Date: 28.11.2006 File:ST-PCS7SYS_V70_cfc.33 SIMATIC PCS 7 Siemens AG 2003. All rights reserved. SITRAIN Training for Automation and Drives Control loop CTRL_PID CH_AI CH_AO Reactor system AI AO AS software Plant I/O Modules Technical control loop CTRL_PID CH_AI CH_AO AI AO AS software Plant I/O Modules Simulated control loop Reactor block Manipulated variable Temperature Manip. var. Temp. Reactor system Manip. var. PV_IN LMN Technical control loop In this control loop, the manipulated value of the closed-loop controller (CTRL_PID.LMN) is passed on to the AO output module by means of the CH_AO output driver. The current/voltage signal affects the control valve for the heating. The AI input module and its relevant CH_AI driver read in the reactor temperature. This temperature is supplied to the closed-loop controller as a process value (CTRL_PID.PV_IN). Simulated control loop In our system, the hardware outputs for the AO output module are wired directly to the hardware inputs for the AI input module. In other words: the current for channel x of the AO flows through the same channel x for AI. The REACTOR block simulates the reactor system. There are similar time characteristics between the block's heating input (REACTOR.V_HOT_FL) and the simulated temperature output (REACTOR.TMP_INT) as for the technical reactor. Inserting the REACTOR block in the loop, between the closed-loop controller and driver on the one side and linking the technical reactor on the other side, the time characteristics of the simulated control loop do not change in comparison to the technical control loop.
- 34. Training Center for Automation and Drives SIMATIC PCS 7 System Training Configuring with CFCPage 34 Date: 28.11.2006 File:ST-PCS7SYS_V70_cfc.34 SIMATIC PCS 7 Siemens AG 2003. All rights reserved. SITRAIN Training for Automation and Drives Subexercise: Control Loop for the Reactor CTRL_PID CH_AI CH_AO Reactor block Manip . var. TMP_INT Manip. var. V AI AOI/O Modules LMN PV_IN V_HOT_FL U Manip. var. 4 to 20 mA Subexercise The "simulated control loop" (described on a previous page) is to be configured and the hardware and drivers integrated. The figure above provides a proposed solution. After you have created the chart, compile and download the program. Test the function. ------------------------------------------------------------------------------------------------------- Steps 1. Position the blocks belonging to the control on one sheet in the chart. 2. Change the interconnections (see slide) 3. Compile and download chart 4. Test the function ------------------------------------------------------------------------------------------------------- Procedure Position Blocks 1. Open the CFC chart "Exer_Reaci", select overview display, lasso the blocks (REACTOR and CTRL_PID) and drag them to the sheet where the drivers are. Switch to sheet view. Tip You can double-click in the CFC in the white space between 2 blocks to switch between overview and sheet view. The block you double-click next to is opened in sheet view in the middle of the monitor.
- 35. Training Center for Automation and Drives SIMATIC PCS 7 System Training Configuring with CFCPage 35 Changing Interconnections 2. You can easily change interconnections by selecting the end point (parameter) you want to move, keeping the mouse button depressed and dragging it to the new end point (parameter). If origin and destination are not located in the same sheet or chart, open both charts in CFC and arrange the windows side by side. Then drag the end point from one window to the new position in the other window. Exception: An "Interconnection to address" must be called and selected again. Compile Chart and Download Target System 3. From the CFC chart, click the Compile icon (set correct options). In the Options, choose "Changes only" and "Generate block drivers". Download to the AS (download changes only) by clicking the Download icon. Before the Test 4. Before the test, check whether you can view all the required parameters of the blocks. If not, select the block, right-click and select Object Properties -> "Connections" tab -> "Invisible" column to change the selection. Set the operable inputs of the CTRL_PID block so they are visible (SP_OP, MAN_OP, SPEXTSEL_OP, AUT_ON_OP) if this has not yet been done. In the "For test" column, preset the parameters. Test Activate/deactivate test mode via Test -> (Check Process Mode or Laboratory Mode!) -> Test Mode Set parameters for the inputs and monitor the results. If changes are necessary, turn off the test mode. Change the chart, update the module driver if necessary, compile and download again. Perform a new test.
- 36. Training Center for Automation and Drives SIMATIC PCS 7 System Training Configuring with CFCPage 36 Date: 28.11.2006 File:ST-PCS7SYS_V70_cfc.36 SIMATIC PCS 7 Siemens AG 2003. All rights reserved. SITRAIN Training for Automation and Drives Message Configuration Priority Message Class Message Text Info Text Automatically assigned/updated during OS compilation in PCS 7. Message Configuration Messages are configured either in the object properties of the block issuing the message or centrally in the process object view. Here we shall only show the first possibility. After opening the object properties, click the Messages key. A screen appears (see slide) where you can adapt the event texts or assign priorities in the OS display. The main components of a message are the following: Message Class Message classes differ with regard to their acknowledgement requirements. Messages with the same acknowledgement requirements can be combined into a single message class. The following message classes are preconfigured in Alarm Logging (on the OS): "Fault", "System messages requiring acknowledgement" and "System messages not requiring acknowledgement". In WinCC you can define up to 16 different message classes. With "prefabricated" PCS 7 blocks (e.g. CTRL_PID) the message classes are preset. Priority In this field, select which messages need to be acknowledged with which priority. The higher the value, the higher the priority. In the PCS7 environment, value 16 represents the highest priority. Event Here you can add any text you want to display for the event on the OS. Info Text You can enter additional information here. The operator can selectively display this information on the OS, if required. Note As on the OS the origin (HID) is displayed in the message line and the block comment is displayed in the event, generally there is no need to change the text. Origin, OS Area, Batch Identifier In PCS 7, these are automatically updated with the project data during the OS compilation procedure.
- 37. Training Center for Automation and Drives SIMATIC PCS 7 System Training Configuring with CFCPage 37 Date: 28.11.2006 File:ST-PCS7SYS_V70_cfc.37 SIMATIC PCS 7 Siemens AG 2003. All rights reserved. SITRAIN Training for Automation and Drives Notes
- 38. Training Center for Automation and Drives SIMATIC PCS 7 System Training Configuring with CFCPage 38 Date: 28.11.2006 File:ST-PCS7SYS_V70_cfc.38 SIMATIC PCS 7 Siemens AG 2003. All rights reserved. SITRAIN Training for Automation and Drives Program and Data OBm FBy,DBy1 FBy,DBy2 FCz FBy DBy1 DBy2OB...? (OBm) (OBn) (Instance DB for FBy declaration) Code Declaration (Instance DB for FBy declaration) m,n,y,y1,y2,z = numbers m n Function Block A function block (FBy) consists of the program (program code) and a description of the variables used (variable declaration). Insert When you insert (instantiate) a function block in CFC, an instance DB (such as DBy1) is automatically created, based on the declaration section. This instance DB forms the I/O bar for setting parameters and connecting. Run Properties One or more invoking OBs are assigned to the block instance via the run properties. This means that for a block the relevant code sections are processed for various events (various OB calls), whereby the required data is located in the same DB. SFC 6 (RD_SINFO) is called in the code. Among other things, SFC 6 specifies the number of the OB number that just called the block. Thus event-specific reactions are possible in the block. Examples Blocks with "startup characteristics" are installed not only in the "normal" runtime OB but also in OB100 (cold restart OB), so they can be set in a defined mode when the AS has completed a cold restart. - Driver blocks are also installed in other OBs such that various diagnostics/tests can be executed. - Blocks with time properties (such as PID controller blocks) whose algorithms use parameters, are useful only when running under time interrupt OBs. Functions Functions (FCs) are similar to the FBs, but functions do not have their own data block assigned to them and therefore have no memory. To handle functions in CFC like FBs, CFC provides the parameters with so-called pool DB cells as temporary storage.
- 39. Training Center for Automation and Drives SIMATIC PCS 7 System Training Configuring with CFCPage 39 Date: 28.11.2006 File:ST-PCS7SYS_V70_cfc.39 SIMATIC PCS 7 Siemens AG 2003. All rights reserved. SITRAIN Training for Automation and Drives Data Transport X Y OBx Block 1 X Y Block 2 X Y Block n OS Operation Time (run sequence) Connection (fetch principle) f f f Data Transport The blocks exchange data with one another and with the OS. The time sequence of the data transport plays a role. Interconnections For blocks structured with CFC, data exchange takes place by means of connections (interconnections). The exchange takes place according to the "fetch principle". The interconnections are compiled into transport commands that run in the OB before the block whose input is interconnected, or after the block whose output is further interconnected. This means that the input does not "fetch" (update) the interconnected value until it is invoked in the OB. Operator Actions The OS sends operator values (asynchronous to AS block processing) and enters them in the block input. Because time passes between the OS operating procedure and AS processing of the input value, reliability tests are conducted both on the OS and also later on the AS side when the block is invoked. The purpose of these tests is to ensure that operations considered to be okay by the OS, but which are no longer permissible due to time-deferred execution in the AS, can be intercepted. Operating Blocks These blocks are contained in the PCS 7 library for analog and digital values. These blocks are represented in pairs, by an OS faceplate, displayed as a block representative in the OS, and a corresponding AS function block, which passes on the value the OS handled through interconnection in the AS to blocks that continue processing.
- 40. Training Center for Automation and Drives SIMATIC PCS 7 System Training Configuring with CFCPage 40 Date: 28.11.2006 File:ST-PCS7SYS_V70_cfc.40 SIMATIC PCS 7 Siemens AG 2003. All rights reserved. SITRAIN Training for Automation and Drives Run Sequence OB32 (time interrupt) 1 sec Runtime group 1 Runtime group 2 Block 1 Block n - Scan rate - Phase offset Runtime group Runtime group 3 Run Sequence The information flow a task requires determines the sequence in which the blocks are called up during runtime. The information flow sequence is: “Read in -> Process -> Output" Each block must have all necessary information before processing begins. This means that the blocks providing the information must be processed before that particular block is processed. Generate Runtime Group When a chart is created, a new runtime group is automatically created and integrated in the run sequence in accordance with the built-in pointer. The name of the runtime group corresponds to the chart name. The automatically generated runtime group and chart are relatively interdependent, as long as you have not made any manual changes to the runtime group, e.g.: changed the name and/or later added another block to this runtime group. Optimizing the Run Sequence This function optimizes the run sequence of a program according to the data flow to reduce the dead times in the CPU during execution. Optimization takes place separately for the OBs/execution levels (tasks) and runtime groups (see following pages).
- 41. Training Center for Automation and Drives SIMATIC PCS 7 System Training Configuring with CFCPage 41 Date: 28.11.2006 File:ST-PCS7SYS_V70_cfc.41 SIMATIC PCS 7 Siemens AG 2003. All rights reserved. SITRAIN Training for Automation and Drives Runtime Properties of OBs and Runtime Groups t (s) 100100 100 100 200 200 100 100 400 300300 200200 400 100100 0,5 OB33 (0.5 s) 100 ms OB32 (1s) 300 ms OB31 (2s) 600 ms OB1 0 1,5 21 Runtimes of the OBs (PCS 7) Program loading OB1 Free cycle 400 ms OB31 2 s 600 ms OB32 1 s 300 ms OB33 0.5 s 100 ms Scan Rate To use the AS computing capacity optimally, each runtime group should be processed only as fast as the time change for the process data requires ("characteristic change speed/process-typical time constants"). There are circumstances where the runtime group does not have to be called up for every cycle of the calling OB. Phase Offset Runtime groups with the same scan rate would all load the AS simultaneously, because they would all be either processed or not processed at the same time. To divide processing equally, you can also specify a phase offset that makes it possible to have a time-deferred startup of the various runtime groups. Activating/Deactivating Runtime Groups You can activate and deactivate runtime groups in the window of the runtime editor by checking/unchecking the "Active" checkbox in the object properties of the associated runtime group (see following pages). Example (see slide) Initial state In the above timing diagram, the numbers in the white rectangle. Loading by programs in the respective OBs: OB33 (100 ms), OB32 (300 ms), OB31 (600 ms) and OB1 (400 ms) which have to be repeated corresponding to the runtimes of the OBs and their priority. Modified state In the above timing diagram, the numbers in the light gray or dark gray rectangle. This is achieved in that the original OB31 program (600 ms) is deleted there and divided into two runtime groups. These are inserted in the OB32 with down-scaling of "2" and a phase offset of "0" and "1" respectively. One of the runtime groups (light gray) is executed within the first second, and the second group (dark gray) in the second second. Execution of the OB1 program (with the lowest priority) is also distributed over the two seconds. Result: More uniform loading of the CPU.
- 42. Training Center for Automation and Drives SIMATIC PCS 7 System Training Configuring with CFCPage 42 Date: 28.11.2006 File:ST-PCS7SYS_V70_cfc.42 SIMATIC PCS 7 Siemens AG 2003. All rights reserved. SITRAIN Training for Automation and Drives Monitoring of runtime properties (1) OB1 OB100 OB3x OB8x CPU_RT OB_BEGIN AS OS ASSET MANAGEMENT CPU_RT When compiling CFCs, a chart with the name @CPU_RT is created automatically. The CPU_RT block is already present in this chart. The CPU_RT block is installed by the CFC in the OB100, OB1, in all OB3x and OB8x provided these are used by the user program. The CPU_RT determines the runtime of the individual OBs and their contribution to the cycle time (only with FW version 5 and higher of the CPU). It carries out appropriate actions which can be set by the user within certain limits to prevent a stop in the case of a CPU overload (OB 80, cycle time exceeded) and to guarantee continued operation of the AS. It disregards cycles/time interrupts in order to process the remainder of the overload. The blocks are therefore executed less often than planned, but the AS continues to run and the plant can still be operated! This situation is referred to as emergency operation, and is made clearly visible by an I&C system message. (Submission of the message is carried out by the OB_BEGIN block; refer also to the origin information in the message window.) Buffered start events (OB 3x still being processed) are additionally determined and displayed. The loss of start events is signaled as an error. Remark Using the CPU_RT block, the configuring engineer can specify which particularly important time interrupts are not to be down-scaled (parameter OB3x_ATTN). The dynamic response changes for the other blocks which continue to run in a down-scaled OB. The realtime response is now slower than the configured realtime response.
- 43. Training Center for Automation and Drives SIMATIC PCS 7 System Training Configuring with CFCPage 43 Date: 28.11.2006 File:ST-PCS7SYS_V70_cfc.43 SIMATIC PCS 7 Siemens AG 2003. All rights reserved. SITRAIN Training for Automation and Drives Monitoring of runtime properties (2) Display on the OS as online trend Additional exercise (option) Try to recognize the consequences of an OB32 overload. Use the LOAD block from the KURSBS60 library for this purpose (see slide). Supplement the CFC "Attempti" chart as suggested above. ----------------------------------------------------------------------------------------------------- Procedure 1. LOAD block: Switch the load on using "ON"=1. Increase the OB32 load by increasing the parameter "CYCL". 2. INT block: With the parameters "TI"=1 and "U"=1, the block will increment the output "ACTUAL" each time OB32 is called. If Test Test settings Monitoring cycle = 1 second is set in the CFC, the value of the output will be incremented by 1 every second in test mode. This applies to normal operation. Increase the CYCL input of the LOAD block, and observe the output "V" of the INT block. Also check the diagnostics buffer of your CPU using the CFC menu PLC Module information "Diagnostics buffer" tab and the (OB1) cycle time in the tab with this name. 3. Connect the output "V" of the INT block to the input "U" of the MEAS_MON block. In the latter, select "Long-term archiving" in the properties of the input "U" under "Archive". 4. Compile and download the AS 5. Compile the OS. The parameter "U" of the MEAS_MOS is created there in Tag Logging, in the "System archives" archive. 6. Activate the OS, and create an online trend for this variable. Carry out the same increase to the load in the AS, and check the reaction on the OS.
- 44. Training Center for Automation and Drives SIMATIC PCS 7 System Training Configuring with CFCPage 44 Date: 28.11.2006 File:ST-PCS7SYS_V70_cfc.44 SIMATIC PCS 7 Siemens AG 2003. All rights reserved. SITRAIN Training for Automation and Drives Exercise: Optimize runtime sequence (1) Exercise 1 In this exercise you only need to optimize the runtime sequence for runtime group "Exer_Reaci". The runtime group "Attempti" is not to be optimized, and the runtime groups should not to be shifted around in OB32. ----------------------------------------------------------------------------------------------------- Procedure Open the runtime sequence in the CFC (circled icon). Select OB32 and open the properties. Set "Runtime groups only" for the optimization. Select the runtime group "Attempt", open the properties and deactivate the optimization. You do not need to do anything for the runtime group "Exer_Reaci" as optimization is active in the default setting. Remember the sequence of the blocks in runtime group "Exer_Reaci" for comparison after optimization. Remark If you have another look at the runtime sequence, you will see the symbol "Ø" next to the OB or runtime group symbol (see slide above, top right). This means "no optimization". It can be necessary to deactivate optimization if feedback signals in a block sequence may only be evaluated in the manner you have defined. The optimization procedure attempts to arrange the blocks so that the block whose input is connected is called after the block which returns the value. If blocks are interconnected from different runtime groups, the option "Optimize OB and runtime groups" would also move the sequence of the runtime groups in the OB. Start optimization from the CFC via Options Optimize Runtime and check the result.
- 45. Training Center for Automation and Drives SIMATIC PCS 7 System Training Configuring with CFCPage 45 Date: 28.11.2006 File:ST-PCS7SYS_V70_cfc.45 SIMATIC PCS 7 Siemens AG 2003. All rights reserved. SITRAIN Training for Automation and Drives Exercise: Optimize runtime sequence (2) Right-click Right-click Optimize individual task (OB) Optimize individual runtime group Alternatives If individual OBs or individual runtime groups are to be optimized, the OB or the runtime group can be selected using the mouse and executed using the context menu by right-clicking and selecting Groups/Optimize Tasks
- 46. Training Center for Automation and Drives SIMATIC PCS 7 System Training Configuring with CFCPage 46 Date: 28.11.2006 File:ST-PCS7SYS_V70_cfc.46 SIMATIC PCS 7 Siemens AG 2003. All rights reserved. SITRAIN Training for Automation and Drives Interconnecting Runtime Groups (1) Interconnecting Runtime Group Statically If you select a runtime group in the runtime sequence and open its properties, the Active option is set. This means that all blocks from this group are taken into account for each OB pass. If you deactivate this option, none of the blocks in the group are taken into account/processed. In the associated CFC chart all blocks display a red exclamation mark in the rectangle showing the execution data. This indicates to the configuring engineer that the block is not active! Alternative Select the runtime group in the runtime sequence and execute the process using the context menu by right-clicking and selecting Activate Runtime Group or right-clicking and selecting Deactivate runtime group
- 47. Training Center for Automation and Drives SIMATIC PCS 7 System Training Configuring with CFCPage 47 Date: 28.11.2006 File:ST-PCS7SYS_V70_cfc.47 SIMATIC PCS 7 Siemens AG 2003. All rights reserved. SITRAIN Training for Automation and Drives Interconnecting Runtime Groups (2) Interconnecting Runtime Group Dynamically To interconnect a block's Boolean output in CFC right-click and select Interconnection to Runtime Group - it can be interconnected with any selectable runtime group within a selectable OB. All blocks within the runtime group are marked with a question mark in the CFC chart. In the above example, this means: If output QVHL of block "Oper_second_U4" returns 1, the connected runtime group "Exer_Reac" is active. If output QVHL of the same block returns 0, the connected runtime group "Exer_Reac" is not active and the lower-level blocks are not being processed! This means that the "?" indicates blocks in a chart/runtime group which is only conditionally active. Note 1 It a block interconnects its own runtime group via an output, it can disable the group! These connected runtime groups are not visibly marked, but they are listed in the chart reference data. You can display them via Options View Cross-References Chart Element -> Runtime group. Note 2 The connection procedure only affects the interconnected runtime groups. If a block is incorporated in several different OBs, it behaves according to the associated runtime group! The "?" symbol is dynamically updated during runtime.
- 48. Training Center for Automation and Drives SIMATIC PCS 7 System Training Configuring with CFCPage 48 Date: 28.11.2006 File:ST-PCS7SYS_V70_cfc.48 SIMATIC PCS 7 Siemens AG 2003. All rights reserved. SITRAIN Training for Automation and Drives CFC Chart-in-Chart Chart "A" (higher-level chart) "X" Chart "X" (lower-level chart) Chart interconnections Chart in Chart Purpose of this technique: To design clear, well-structured charts. Chart sections that are repeatedly used with the same structure can be combined to look like one chart with a predefined sheet bar - and thus like a block with I/O. Procedure 1. The lower-level chart is created and given interconnections (this can also be carried out in a (master data) library). 2. The previously created chart is inserted in the higher-level chart. There it its displayed like a block; its sheet bar (I/O) was defined in step 1. 3. If the lower-level chart was created in a library and was dragged into the top chart, it will not be shown in the project's chart folder (as you can only see the top chart there). The associated blocks are inserted in the runtime sequence. You can change their sequence in there if required. Alternative: If you obtain the "New chart" from the Catalog tab "Blocks" and place it as an empty chart in the CFC chart, then you can implement a top-down approach - i.e. reverse the sequence in points 1 and 2 in the above described procedure: 1. In the higher-level chart, first place "only" empty charts as wildcards for specific functions; the function is documented first "only" as name of the respective empty "black box". The result is a function overview chart consisting of the various individual charts. In the second step, the details are added to these individual charts as lower- level charts, i.e. "filled" with block functionality and provided with chart interconnections. 3. Now you can interconnect the individual charts in the higher-level chart.
- 49. Training Center for Automation and Drives SIMATIC PCS 7 System Training Configuring with CFCPage 49 Date: 28.11.2006 File:ST-PCS7SYS_V70_cfc.49 SIMATIC PCS 7 Siemens AG 2003. All rights reserved. SITRAIN Training for Automation and Drives Exercise: Chart-in-Chart Technique: Create Lower-Level Chart Chartinterconnections Lower-level chart "Chart_x" Exercise In the library COLOR_LIB, create a simulation process for a valve actuator. This process shall be controlled via "Start/Stop" and "Open/Close" signals. The Open/Close runtime (entire runtime) shall be configurable. The simulation shall return the position in % as well as supply the end position signals. ----------------------------------------------------------------------------------------------------- Steps 1. Create a new chart "Valve_Simui" in the library (i is your group number). 2. Configure a chart as described above. 3. Define the chart interconnections for this chart. 4. Compile the chart without errors. ----------------------------------------------------------------------------------------------------- Procedure In the Component view of the multiproject, insert a new "Valve_Simu" chart in the "COLOR_LIB" library by right-clicking and selecting Insert New Object -> CFC. If the S7 program "S7_LIB" does not yet have a chart folder, the folder is automatically created together with the CFC chart it contains. Create the chart as illustrated in the above diagram. Chart Interconnections Open the window for the chart interconnections (via symbol or menu View Chart Interconnections) and structure the CFC work sheet so that you can see both the chart interconnections and the blocks (see above). In the top left pane, select the symbol for inputs (IN), drag the block inputs that are later going to be the inputs in this lower-level chart to the top and enter unambiguous names for them. You can insert additional lines in the right pane by right-clicking and selecting New Declaration Line....
- 50. Training Center for Automation and Drives SIMATIC PCS 7 System Training Configuring with CFCPage 50 Repeat the procedure for the outputs (OUT) and if necessary for the input and output parameters (INOUT) too. Compile Chart Compile the chart. If this is completed without errors, the chart is ready for further processing and can be integrated in your project.
- 51. Training Center for Automation and Drives SIMATIC PCS 7 System Training Configuring with CFCPage 51 Date: 28.11.2006 File:ST-PCS7SYS_V70_cfc.51 SIMATIC PCS 7 Siemens AG 2003. All rights reserved. SITRAIN Training for Automation and Drives Exercise: Chart-in-Chart Technique: Create Higher-Level Chart Manual valve operation Runtime sequence: Exercise Test block VAL_MOT from the "PCS 7 Library V70". Use the previously created simulation chart as chart-in-chart. ----------------------------------------------------------------------------------------------------- Steps 1. Position/check the pointer for chart insertion on OB 32. 2. Insert a new CFC chart "Valve_Testi" in the "Plant2ReactorsTesti"hierarchy folder. 3. Place the block VAL_MOT and the previously created chart "Valve_Simu" on the new chart. 4. Interconnect the components as illustrated in the above diagram. 5. Optimize runtime sequence. 6. Compile, download and test the example. ----------------------------------------------------------------------------------------------------- Procedure In plant view, insert a CFC chart called "Valve_Test" in "Plant2ReactorsTest". To create the new CFC chart in OB32 together with the runtime group, right-click and select Predecessor for Installation Position and position the pointer on OB32. Insert block VAL_MOT in your chart. (You can also enter VAL_, for example, in the search box, click the binoculars symbol, and use the located VAL_MOT block). Set the operable inputs in your block so they are visible, i.e. OPEN_VAL, CLOSE_VAL, STOP_VAL and AUT_ON_OP. Click the library symbol, search for the chart "Valve_Simu" in the COLOR_LIBS7_LibCharts folder and drag it to the working area. Interconnect the components as illustrated in the above diagram.
- 52. Training Center for Automation and Drives SIMATIC PCS 7 System Training Configuring with CFCPage 52 Optimize the runtime sequence of the blocks (in OB32) in the runtime editor via Options > Optimize run sequence. Compile and download the program (the blocks). Activate test mode. To test the lower-level chart, position the mouse pointer on the "Valve_Simu" chart, then right-click and select Open a chart Now you can check the signals in this chart, too. Remark With chart-in-chart (nested charts), if you drag a new lower-level chart from the library and drop it in a higher-level chart on an already existing chart of the same type, you are prompted whether you want to replace the existing chart. This allows you to update changes made to the original individually in the already existing copies. However, when the chart is replaced, the inputs are reset with default values (if they are not interconnected). This means that if you have previously set parameters for individual connections in the copy, you may have to repeat these.
- 53. Training Center for Automation and Drives SIMATIC PCS 7 System Training Configuring with CFCPage 53 Date: 28.11.2006 File:ST-PCS7SYS_V70_cfc.53 SIMATIC PCS 7 Siemens AG 2003. All rights reserved. SITRAIN Training for Automation and Drives Exercise: Program Block with CFC (1) CFC chart "Chart_x" Exercise Modify the "Valve_Simu" chart from the "Color_Lib" library and compile it as block FB 602. The chart interconnections are to be the inputs/outputs of this block. Further conditions: - The interconnection "integrator time" is to be renamed "operating time" and parameterized with the entire runtime of the valve (in seconds), - The SAMPLE_T parameter of the integrator is to be moved to the sheet bar and assigned the attributes "S7_sampletime = true" and "S7_visible = false", - All other inputs/outputs are to be operated and monitored from the OS (attribute "S7_m_c = true") ------------------------------------------------------------------------------------------------------- Steps 1. Copy the "Valve" chart to another chart. 2. Make any changes/additions to the chart. 3. Test chart/program. 4. Define chart interconnections. 5. Compile chart as block type. 6. Insert symbol for block in the symbol table. ------------------------------------------------------------------------------------------------------- Procedure Copy Chart - Copy the "Valve" chart within the library under the name "V_SIM_SB" and open the copy. Make the parameter "SAMPLE_T" visible for the INT_P block. Add/Change - Open the window for chart interconnections (via menu View -> Chart Interconnections or symbol). Select the line "StartStop" in the table, right-click and select New Declaration Line
- 54. Training Center for Automation and Drives SIMATIC PCS 7 System Training Configuring with CFCPage 54 Date: 28.11.2006 File:ST-PCS7SYS_V70_cfc.54 SIMATIC PCS 7 Siemens AG 2003. All rights reserved. SITRAIN Training for Automation and Drives Exercise: Program Block with CFC (2) Comment must be added manually Insert a new parameter line in front of it. Fill out this line. Right-click and select Object Properties to change the attributes (the defaults) for this line's parameter as described. Test Before testing in the project, the original chart is to be tested as CFC, i.e. by compiling it as a program and downloading it to the test CPU (if you have one). Only generate the block (see description above) and include it in the project if this test worked. Compilation - Activate the menu command Chart -> Compile -> Chart as Block Type to initiate the compilation. Fill out the screens (see above). Click "OK" to start the SCL compiler. If no errors occurred, FB602 is stored in the library's block folder. Symbolic Name - Call the symbol table for your library, e.g. from the CFC, via Options -> Symbol Table Supplement the last line as shown in the above screenshot and save.
- 55. Training Center for Automation and Drives SIMATIC PCS 7 System Training Configuring with CFCPage 55 Note: It is advantageous to activate the option "Download changes in RUN" for the PCS 7, i.e. if you do not change the sheet bar of the future block, the compiler will try to use local data for the intermediate results. This in turn makes it more likely that the FB can be downloaded later online, as well, after changes were made. Disadvantage: The local data requirements increase (must be determined by block developer and should be below the default values for the CPU - see also Project structure Local data requirements). Additional Exercise Which of the blocks integrated in the FB602 has "Startup characteristics" and how can you tell? Check whether FB602 has also inherited this behavior or needs to be modified to reflect that it too has startup characteristics! ( Index "S7_tasklist")
- 56. Training Center for Automation and Drives SIMATIC PCS 7 System Training Configuring with CFCPage 56 Date: 28.11.2006 File:ST-PCS7SYS_V70_cfc.56 SIMATIC PCS 7 Siemens AG 2003. All rights reserved. SITRAIN Training for Automation and Drives Block Data Structure (Multiple Instance) Symbolic Name of FB40 Place for instance of an INT_P block Inputs, outputs, input and output parameters for the sheet bar Multiple Instance The FB602 is structured so that another, already existing FB40 can be called within it. This FB is detected as static variable with the data type FB and allows to achieve nesting of variables and concentration of all instance data in one instance data block (multiple instance). Structure If you want to look at the structure of your new block, proceed as follows: - In the block folder of your library, select FB40 (INT_P), then right-click and select Open Object. LAD/STL/FBD is opened. - Close the block only via File -> Close (Do not save, if you are prompted to save!) - In this editor open your block FB602 (V_SIM_FB) via right-click and select Object -> Open Now you can see the above structure on your screen. Attributes - Position the mouse pointer in a line (with green marking), then right-click and select Object properties -> Attributes to display the table with attributes (properties) of the parameter. Changes If you change/supplement attributes here, and then save the block, it will be given an STL identification. The changes must be made known to the CFC (if the block has already been used). Further consequences arise from the type of modified attributes.
- 57. Training Center for Automation and Drives SIMATIC PCS 7 System Training Configuring with CFCPage 57 Date: 28.11.2006 File:ST-PCS7SYS_V70_cfc.57 SIMATIC PCS 7 Siemens AG 2003. All rights reserved. SITRAIN Training for Automation and Drives Block Change (1) Result B Result A Locate Change To detect possible changes between e.g. already instantiated blocks in the project and the associated library substitute before any further use, you can compare blocks - as shown above: Right-click on selected blocks or blocks to be checked (here FBs from the library --> Compare blocks... --> Specify comparison path/objects (here select block container for the project). Result A: No deviations identified in compared objects Result B: List of objects with deviation + specific description Note This is only a "fast comparison" without additional options (where are any differences?). From the PCS 7 viewpoint, the VXM option (Version Cross Manager) offers more efficient information (also for non-programmers). This application will be discussed later. However, the VXM does not evaluate the consequences for the S7 program if the change were carried out. A further possibility is shown on the next pages. This indicates the consequences of a possible synchronization with the option for aborting the commenced synchronization if the change does not appear to be appropriate (e.g. downloading only possible with CPU stop).
- 58. Training Center for Automation and Drives SIMATIC PCS 7 System Training Configuring with CFCPage 58 Date: 28.11.2006 File:ST-PCS7SYS_V70_cfc.58 SIMATIC PCS 7 Siemens AG 2003. All rights reserved. SITRAIN Training for Automation and Drives Block Change (1.1) Test the Effect If instances of a block are already "successfully" in use in a project, but changes need to be made to this block, it is advisable to proceed as follows: 1.Do not touch the original library(master data library)! 2. Make a first copy of this library to Test_lib S7_Program_Copy1 and make the changes to the block. By starting the synchronization (commencing with the modified block), display the consequences of synchronization (if necessary, cancel before finishing!). If you are not performing the function test for the modified block on a dedicated test CPU, this method provides protection from the "unwelcome surprises" of how a modification could affect a project. Note As each change is immediately validated in the program and there is no UNDO function, if it advisable to make two backup copies of the original library. Save the modified block in the first copy; in the second copy the block may change when being tested.
- 59. Training Center for Automation and Drives SIMATIC PCS 7 System Training Configuring with CFCPage 59 Date: 28.11.2006 File:ST-PCS7SYS_V70_cfc.59 SIMATIC PCS 7 Siemens AG 2003. All rights reserved. SITRAIN Training for Automation and Drives Block Change (1.2) Options Charts Update Block Types Desired updating from S7-Lib(1) to S7-Lib ? Cancel (and nothing takes place) or Finish (with the displayed consequences) Test Place the block in its original form (in this example V1.0 from the original library) in a CFC test chart (chart container of the master data library - see previous page!); also place the modified version there (in this example V1.1 from "modified library" S7-Lib(1)): Procedure 1. Select the modified block in the program of the source library (in this example S7-Lib(1), block V_SIM_FB). 2. Menu Options Charts Update Block Types 3. Select the program of the target library or target project, and highlight the target block. Highlighting is useful if several blocks have been selected in the source, and if updating is not to be carried out in the target for the "Problem" block on completion. 4. Analyze the consequences. 5. Cancel or finish. The subsequent effect of the reimport is displayed in the "Consequences" column as a decision aid for selection or deselection: All associated instances are adapted (no further consequences!). The OS must be recompiled. All associated instances are adapted. You must subsequently compile the OS. Download the complete program in the STOP state. Following compilation, downloading of changes in the RUN state is no longer possible. All associated instances are adapted. Check the selection, and exclude objects if necessary which you do not wish to update because of the consequences. Therefore: The test takes place on the library level "working with a double safety net" before you decide whether to import the modified block into the project or not.
- 60. Training Center for Automation and Drives SIMATIC PCS 7 System Training Configuring with CFCPage 60 Date: 28.11.2006 File:ST-PCS7SYS_V70_cfc.60 SIMATIC PCS 7 Siemens AG 2003. All rights reserved. SITRAIN Training for Automation and Drives Block Synchronization Source Source blocks Target Result Log Once you have determined the possible effects the block change can have on the project, you can synchronize the blocks in the project itself, i.e. definitively replace the version that has been used up till now in the charts with the new one for all instances! - via "Type import" in the project: By clicking the "Finish" button, the selected blocks are transmitted to all selected programs, and imported into the charts. Further processing with the new block versions is then possible there. A log is output following completion of the procedure, and this can also be printed.