SlideShare a Scribd company logo
1 of 117
Download to read offline
basic_en.md 2024-04-19
1 / 117
User manual (basic edition)
This user manual was created based on the Windows OS environment. Please note that some functions
may not be available on Mac OS or Linux OS.
1. Login and initialization
1.1. First login (initialization)
To use Cloud Studio, you must first log in to Cloud Studio website.
1. Open the URL that we sent you in your web browser.
2. Enter your username and password (included in the above message) and click 「Login」.
3. On your first login, you will need to confirm and agree to the terms of service, and finalize your billing
information and usage plan (payment of fees).
4. The terms of service will be displayed. Please read them carefully and click 「Accept」.
5. Fill out the 「Edit Billing Information」 form and click 「Save」 (→Edit billing information).
6. Fill out the 「Select Subscription Plan」 form and click 「Checkout」(→Set Subscription Plan)
7. In 「Pay with Card」, enter your credit card information and click 「Pay」.
8. Once your payment is confirmed, you will be able to open the 「Studio set」.
9. Immediately after payment, your instance will be initialized. Once the initialization is complete and it
becomes 「Stopped」, the instance can be started.
10. From then on, the steps in (3.) above will no longer be necessary.
basic_en.md 2024-04-19
2 / 117
basic_en.md 2024-04-19
3 / 117
1.2. Enabling Multi-Factor Authentication
We recommend enabling multi-factor authentication to properly protect your account. Multi-factor
authentication can be used by installing an Authenticator app (e.g. Google Authenticator) on your
smartphone.
basic_en.md 2024-04-19
4 / 117
Multi-factor authentication can only be registered on one smartphone at a time. You cannot register
on multiple smartphones at the same time.
To enable multi-factor authentication, follow the steps below.
1. Install the Authenticator app from your smartphone's app store.
2. Log in to the Cloud Studio website in your web browser.
3. Click Change Password at the bottom of the site.
4. Click 「Enable」 for Multi-Factor Authentication.
5. Scan the QR code displayed on the 「Set up multi-factor authentication」 form with the Authenticator
app installed on your smartphone.
※For Google Authenticator: Tap + at the bottom right of the screen → tap Scan QR code
6. A 6-digit verification code will be displayed on your registered account.
7. Return to your web browser and enter your 6-digit authentication code in the 「One-time password」
field on the 「Set up multi-factor authentication」 form and click Continue.
8. If the verification code is correct, multi-factor authentication will be enabled.
9. From your next login, you will be required to enter the 6-digit verification code displayed on the
Authenticator app.
basic_en.md 2024-04-19
5 / 117
basic_en.md 2024-04-19
6 / 117
Conversely, if you want to disable the multi-factor authentication that has already been set, click
「Disable」 under 「Multi-factor authentication」.
basic_en.md 2024-04-19
7 / 117
If you have lost your password, you can reset it by following the steps below. However, to reset your
password, you will need to receive an email from Cloud Studio (noreply@cloudstudio.jp) using your
registered email address.
1. Open Cloud Studio website in your web browser.
2. Click on Password Reminder.
3. Enter your username in 「Username」 and click Submit.
4. An email with instructions to reset your password will be sent to your registered email address. (If you
don't see it in your inbox, please check if it's in your spam folder)
5. Follow the steps to open the 「Password Reset」 form in your web browser.
6. Decide on a new password to use for login, enter it in 「New Password」 and click Save. (Important: To
maintain good account security, please make your password at least 10 characters long and
include at least one uppercase letter, one lowercase letter, and one number)
7. Your password will be reset with a new one and you will be logged in. You can use your new password
the next time you log in.
1.3. If you forget your password
basic_en.md 2024-04-19
8 / 117
basic_en.md 2024-04-19
9 / 117
If multi-factor authentication was enabled, password reset will also disable multi-factor authentication.
1.4. If multi-factor authentication is no longer possible due to changes in smartphone
models, etc.
Along with password reset, you can also reset multi-factor authentication (→If you have forgotten your
password)
2. Basic terminology
2.1. What is a Studio Set?
A studio set is a virtual broadcast studio that is built on the cloud. Multiple instances are connected within the
studio set, and video and audio transmission (NDI communication) can be performed between them within
the studio set.
2.2. What is an Instance?
An instance is a virtual PC (VM) that is launched on the cloud. Multiple types (instance types) are available,
and each type is created from a preset image, so the setup environment will automatically start up. Therefore,
you can quickly start using pre-installed apps after booting.
※Licenses for various paid applications are not included and must be purchased separately.
Instance Size
Instance size refers to the performance metrics of an instance. As the size increases from 2x to 3x, etc.,
the number of CPUs (referred to as vCPUs since it is a virtual PC on the cloud) and the memory capacity
increase. The specific specifications for each size vary depending on the instance type.
Storage Size
Instances have a storage size set apart from the instance type and instance size. Storage here refers to
the disk drive where the OS is installed.
basic_en.md 2024-04-19
10 / 117
2.3. What is an (instance) group?
This feature allows you to manage instances by dividing them into groups (colors). For example, it can be
used to add colors to suit the purpose. (Example: Input is aqua, composition is green, encoder is yellow, etc.)
2.4. What is credit (remaining time, data-transfer capacity)?
Cloud Studio requires credits to run instances and cloud file storage. Credits are expressed in terms of
「remaining time」 and 「data transfer capacity 」, 1 minute of credit residual time to run for 1 minute , 1GB of
data transfer space is consumed to transfer 1GB of data to the Internet.
Credits are replenished periodically (e.g., every month for a monthly subscription) based on your subscription.
Additionally, you can purchase credit add-on packs to replenish them instantly.
The instance and cloud file storage will automatically stop when the credits are empty. There will be a grace
period of about one hour before the shutdown, but the overage will be deducted as soon as the credits are
replenished, since the overage will also be charged to your credit.
Cloud Studio has a 「credit alert」 function that notifies you when your credits are running low. Please utilize
this function (→ Configuring Credit Alert Rules).
2.5. What is Nice DCV?
Cloud Studio's remote desktop connection uses a product called Nice DCV.
Nice DCV has the advantage of being able to operate at high frame rates and low latency, and can take
advantage of hardware support (GPU support).
You can also connect speakers, microphones, and USB devices from your local PC to a remote PC (instance).
It is also easy to connect to the 「web client」 from a web browser. You can also download and install a
dedicated client for a higher-quality experience.
For practical purposes, the dedicated client is more recommended.(→Download the dedicated client
(external site))
3. Starting and Stopping Studio Sets and Instances
3.1. Launching an entire studio set
You can launch all instances of a studio set at once.
1. Open studio set.
2. Click Launch in the upper right corner of the site.
3. All instances will be launched.
basic_en.md 2024-04-19
11 / 117
3.2. Launching Instances Individually
You can launch instances individually.
1. Open studio set.
2. Click on the instance you want to launch to open it.
3. Click Launch in the upper right corner of the site.
4. The status of the currently open instance will be Launching.
5. After a few moments, the status of the instance will be Up.
When an instance performs an entire 「launch」 of an individually launched Studio Set, the remaining
instances that have not yet been launched are launched.
3.3. Forced suspension of the entire studio set
In order to shut down safely, you should usually stop the OS individually.(→Stop Instance Individually)
You can force stop all instances of a Studio Set at once from the Cloud Studio website.
1. Open studio set.
2. Click Stop in the upper right corner of the site.
3. All instances will be stopped.
basic_en.md 2024-04-19
12 / 117
3.4. Stopping an Instance Individually
In order to shut down safely, you should usually stop it from the OS by following the steps below.
For Windows OS Instances
1. Access your instance's desktop in some way.(→Instance access)
2. Click on the power symbol from the 「Start Menu」.
3. Click Shut Down.
4. 「Select the item that best describes the reason for shutting down this PC」 will be displayed. Leave
Other (unplanned) selected and click Continue.
5. The instance is shut down and the client is disconnected. The status of the instance will be Stopped.
6. After a few moments, the status of the instance becomes Stopped.
basic_en.md 2024-04-19
13 / 117
For Linux OS Instances
1. Access your instance's desktop in some way.(→Instance access)
2. Click on the power symbol from the 「menu」.
3. Click Shut Down.
4. The instance is shut down and the client is disconnected. The status of the instance will be Stopped.
5. After a few moments, the status of the instance becomes Stopped.
basic_en.md 2024-04-19
14 / 117
basic_en.md 2024-04-19
15 / 117
For Linux OS instances, you can also log in with SSH to stop it. This is useful in case you lose access to your
desktop.
1. Access the instance with SSH.(→SSH access)
2. At the command line prompt, enter sudo shutdown -h now and press ENTER key.
3. The instance is shut down and SSH is also disconnected. The status of the instance will be Stopped.
4. After a few moments, the status of the instance becomes Stopped.
Forced Stop
You can force stop individual instances from the Cloud Studio website.
1. Open studio set.
2. Click on the instance you want to stop and open it.
3. Click Stop in the upper right corner of the site.
4. The status of the currently open instance will be Stopped.
5. After a few moments, the status of the instance becomes Stopped.
basic_en.md 2024-04-19
16 / 117
If you perform an entire 「stop」 of a studio set that has been individually stopped, the remaining
instances that have not yet been stopped will be forcibly stopped.
3.5. Rebooting an Instance
In order to restart safely, you should usually reboot from the OS by following the steps below.
For Windows OS Instances
1. Access your instance's desktop in some way.(→Instance access)
2. Click on the power symbol from the 「Start Menu」.
3. Click Restart.
4. "Select the item that best describes the reason for shutting down this PC" will be displayed. Leave
「Other (unplanned)」 selected and click Continue.
5. The instance is rebooted and the client is disconnected. The status of the instance will be Rebooting.
6. When the status of the instance returns to "Running", the reboot is complete.
basic_en.md 2024-04-19
17 / 117
For Linux OS Instances
1. Access your instance`s desktop in some way.(→Instance access)
2. Click on the power symbol from the 「menu」.
3. Click Restart.
4. The instance is rebooted and the client is disconnected. The status of the instance will be Rebooting.
5. When the status of the instance returns to 「Up」, the reboot is complete.。
basic_en.md 2024-04-19
18 / 117
basic_en.md 2024-04-19
19 / 117
For Linux OS instances, you can also log in with SSH and reboot. This is useful in case you lose access to your
desktop.
1. Access the instance with SSH.(→SSH access)
2. At the command line prompt, enter sudo reboot and press ENTER.
3. The instance is rebooted and SSH is disconnected. The status of the instance will be Rebooting.
4. When the status of the instance returns to 「Running」, the reboot is complete.
Force Restart
You can force a reboot of an instance from the Cloud Studio website. (This is equivalent to pressing the reset
button on your PC.)
1. Open studio set.
2. Click on the instance you want to reboot to open it.
3. Click Restart in the upper right corner of the site.
4. The status of the currently open instance will be Rebooting.
5. When the status of the instance returns to "Up", the reboot is complete.
basic_en.md 2024-04-19
20 / 117
4. Accessing Your Instance
The instance is a virtual PC launched in the cloud , so you need to access it with a remote desktop to use it.
You can access it in several ways
4.1. Using the web client
The easiest way to access it is from a web browser using a web client. You can use the web client to access it
without having to install anything on your PC.
1. Open Cloud Studio website in a web browser and log in.
2. Open the studio set and click on the instance you wish to access.
3. Make sure your instance is 「running」(→Launch Instance)
4. Click on Open Remote Desktop.
5. You will see 「Nice DCV」 sign-in. Username and Password are listed in the 「Login Info」 section of the
instance details. Please copy and paste the Login Username and Password respectively.
(Important: The password is automatically generated each time you launch the instance)
6. After connecting, you should see the desktop of the instance after a few moments.
basic_en.md 2024-04-19
21 / 117
4.2. Use a dedicated client
It takes a little time, but the most stable access method is to install a dedicated client on your PC and access
it.
For full-fledged use, we recommend that you install a dedicated client.
1. Download and install the Nice DCV client. Compatible with Windows, MacOS, and Linux. You can
download it from here(external site).
2. Open Cloud Studio website in a web browser and log in.
3. Open the studio set and click on the instance you wish to access.
4. Make sure your instance is 「Running」.(→Launch Instance)
5. Click on DCV Client URL from Login Info.
6. From your web browser, you will be asked if you want to open DCV Client, so click Open DCV Client.
7. Nice DCV will then display a login form. Return to your web browser and copy and paste the 「Login
User Name」 and 「Password」 displayed in 「Login Info」. Enter the Username and Password respectively
and click on Login.
(Important: The password is automatically generated each time you launch the instance)
8. After connecting, you should see the desktop of your instance after a few moments.
basic_en.md 2024-04-19
22 / 117
4.3. Use an RDP client *Windows OS instance only, emergency use
Instances with a Windows OS can be accessed with a standard Windows RDP client (Remote Desktop
Connection). However, keep in mind some limitations and recommend that you use it for recovery in the
event that you lose access using the above two methods.
RDP Client Limitations
Hardware (GPU) assistance may be disabled
Poor operation response
Video display stutters
1. Open the 「Start Menu」 of your local PC and click Remote Desktop Connection from Windows
Accessories to launch it.
2. Open Cloud Studio website in a web browser and log in.
3. Open the studio set and click on the instance you wish to access.
4. Make sure your instance is 「Running」.(→Launch Instance)
5. Copy and paste the 「Host Address」 displayed in 「Login Info」 and enter it into the Computer field of
the Remote Desktop Connection. Click on Connect.
6. When you are prompted to 「Trust this remote connection?」, click Connect.
7. The Enter Credentials form is displayed. Return to your web browser and copy and paste the 「Login
User Name」 and 「Password」 displayed in 「Login Info」. Enter the Username and Password respectively
and click OK.(Important: The password is automatically generated each time you launch the
instance)
8. 「Unable to identify the identity of this remote computer, do you want to connect?」 You will be warned,
but please click Yes to proceed. If you check Do not ask me to connect to this computer again
before clicking Yes, you can skip this step next time.
9. After connecting, you should see the desktop of your instance after a few moments.
basic_en.md 2024-04-19
23 / 117
basic_en.md 2024-04-19
24 / 117
4.4. SSH access * Linux OS instances only, emergency use
Instances with a Linux OS (e.g., Ubuntu) can be accessed with an SSH client. To access with an SSH client, you
will use the command line interface. In addition to mouse operation, you cannot do any graphical work such
as video playback. It should only be used for emergency tasks such as file copying in situations where desktop
access is not available. Also, be sure to have a system administrator who has experience using a Linux
command shell.
1. Start the SSH client. (Here, we take TeraTerm for Windows OS as an example)
2. Open Cloud Studio website in a web browser and log in.
3. Open the studio set from the 「Dashboard」 and click on the instance you want to access. Or click
directly on the instance you wish to access from the 「Dashboard」 to open its details.
4. Make sure your instance is 「unning」.(→Launch Instance)
5. Copy and paste the 「Host Address」 displayed in 「Login Info」 and click Fill in the Host field in the
TeraTerm 「New Connection」 form and click OK.
6. You may see Security Warning and a warning, click Continue.
7. Go back to your web browser and copy and paste the 「Login Username」 and 「Password」 displayed in
「Login Info」. Enter the Username and Password in the TeraTerm 「SSH Authentication」 form,
respectively, and select Use Plain Password. Click OK.
8. After connecting, a command line prompt will appear.
4.5. File upload and file download to the instance
Use cloud file storage
Upload files quickly and easily via cloud file storage (if you have an active plan)
Cloud file storage is a common network storage for Cloud Studio that is automatically mounted on all
instances. The uploaded file can be accessed directly from within the instance with a file manager such as
Explorer (in the case of Windows OS). It can also be opened directly from applications such as vMix or OBS
Studio.
You can also save files directly from your instance to cloud file storage, and the saved files can be stored on
Cloud Studio website or in the It can be downloaded with a WebDAV client or an SFTP client.
See Access to cloud file storage .
basic_en.md 2024-04-19
25 / 117
Use Nice DCV Client
You can use Nice DCV client (web client, dedicated client) to upload files to your instance, or use the You can
download files from your instance.
【Upload】
1. In the web client or dedicated client, click on Storage or Filestorage in the upper left corner of the
screen.
2. Click Upload file and select the file you want to upload.
3. (It may take some time depending on the file size) When the file is uploaded, it will be added to the file
list.
4. The uploaded file is stored in a specific folder in the instance.
For Windows OS instances: C:UsersAdministratorDCVStorage
For Linux OS instances: /home/ubuntu/DCVStorage
basic_en.md 2024-04-19
26 / 117
If you are using a dedicated client, you can select multiple files and upload them at once. It also
supports drag and drop.
【Download】
1. You need to move or copy the file you want to download to a specific folder in your instance in
advance.
For Windows OS instances: C:UsersAdministratorDCVStorage
For Linux OS instances: /home/ubuntu/DCVStorage
2. In the web client or dedicated client, click on Storage or Filestorage in the upper left corner of the
screen.
3. Click on the name of the file you want to download from the file list.
4. (This may take some time depending on the file size) Once the file has been downloaded, It is saved to
the download folder on your local PC (for web clients) or on your desktop (for dedicated clients).
basic_en.md 2024-04-19
27 / 117
Use RDP client *Windows OS instances only
You can use the standard Windows RDP client (Remote Desktop Connection) to upload files to your instance,
You can download files from your instance.
Connect the drive of the selected local PC to the instance to exchange files.
1. Start the RDP client.(→Use RDP client)
2. When the Remote Desktop Connection opens, click Show Options.
3. Click on Local Resources.
4. Click on Details under 「Local Devices and Resources」.
5. Find 「Drives」 in the tree, check the drive you want to connect to the instance and click OK.
6. Click General and enter the 「Host Address」 of the instance in Computer, then click Connect to
connect to the instance. (→Use RDP Client)
7. Once connected to the instance, open the explorer and click on Network from the tree on the left side
of the window.
8. Click on tsclient.
9. The connected drive will be displayed as tsclientC, click on it to open it.
10. The contents of the drive of the local PC will be displayed. You can copy(upload) the file to the folder
of your instance here, You can copy (download) from the folder of the instance to the folder of the
local PC.
basic_en.md 2024-04-19
28 / 117
The RDP client must remain connected during the upload and download.
4.6. Editing Studio Sets
The 「name」 of the studio set is the one that Cloud Studio automatically named by default (e.g., Entry set) You
can change the name to anything you like.
1. Open Cloud Studio website in a web browser and log in.
2. Open studio set.
3. Click Edit in the upper right corner of the site.
basic_en.md 2024-04-19
29 / 117
4. In the 「Edit Studio Set」 form that opens, enter your preferred studio set name in the Name field and
click Save.
5. The name of the studio set will be changed to the one entered.
4.7. Editing an Instance
The 「name」 of the instance is the one that Cloud Studio automatically named by the initial state (e.g., vmix1,
obs1, miniserver1) You can change the name to anything you like. However, the name of the instance can
only contain single-byte alphanumeric characters and 「-」 (hyphen), and cannot contain spaces. It must also
be at least 4 characters and no more than 15 characters.
The 「group」 of the instance is automatically set according to the instance type in the initial state (e.g. vMix is
green, OBS is orange, MiniServer is aqua) You can change this group to whatever you want.
1. Open Cloud Studio website in a web browser and log in.
2. Open the Studio Set, click on the instance you want to edit, and click Edit in the upper right corner of
the site. Alternatively, you can click on Edit on the instance directly from the Studio Set.
3. In the 「Edit Instance」 form, enter (1) the name of the instance and (2) the group and click Save.
4. The name and group of the instance will be changed to the ones you entered. The computer name will
also be changed the next time the instance is launched.
basic_en.md 2024-04-19
30 / 117
5. Access to cloud file storage
Cloud Studio has plans that come with dedicated cloud file storage.
Cloud file storage is network storage that is located within a studio set and can be accessed directly from the
instance. Files stored in cloud file storage can be opened directly from applications such as vMix and OBS
Studio. Similarly, the opposite allows you to save files directly from the application.
basic_en.md 2024-04-19
31 / 117
You can also upload and download to cloud file storage from your web browser. In addition to uploading files
by dragging and dropping them into Cloud Studio website, You can download multiple selected files at once.
You can also use an SFTP or WebDAV client to upload and download files directly from your local PC to
CloudStudio.
About file names
The file name can contain double-byte characters and Japanese. However, emojis are not allowed. If
special characters or machine-dependent characters are used, the file name may be garbled (??? etc.).
Technically, on cloud file storage, To ensure compatibility between Windows and Linux OS, the file
name is stored as EUC-JP instead of utf-8.
About the amount transferred
Your subscription plan determines the maximum amount of data transfer (sending data from Cloud
Studio to the internet).
In addition to sending data from the instance, previewing and downloading files in file storage
consumes data transfer space.
If you run out of data transfer capacity, you will temporarily lose access to your file storage, so if you
have a low amount, you will need to replenish it with a credit pack.
5.1. Access from the instance
If you have cloud file storage in your studio set, it will be mounted automatically when you launch the
instance.
The mounting location depends on the OS of the instance .
Windows OS Instances
E: is mounted on the drive.
Open 「This PC」 in File Explorer and click on 「fsx (E:)」 displayed in 「Network Locations」.
basic_en.md 2024-04-19
32 / 117
Linux OS Instances
Mounted on /mnt/shared.
Click on the shortcut (symbolic link) that says「shared」 on your desktop.
basic_en.md 2024-04-19
33 / 117
5.2. SFTP client access
SFTP client can be SFTP Drive, WinSCP, or the standard OS sftp command (command line interface).
1. On Cloud Studio website, go to the 「Studio Sets」 → 「File Storage」 tabs.
2. Check the 「Network Info」 at the bottom of the page. 「SFT host」, 「SFTP port」, and 「SFTP root path」
are the information required for connection.
3. Log in with the same username and password that you use to log in to Cloud Studio website.
5.3. Access with a WebDAV client
WebDAV clients such as CarotDAV and WinSCP can be used. In addition, although it is only downloadable, it is
accessible on a web browser.
Standard Windows WebDAV client is deprecated
Standard Windows WebDAV client (can be connected by 「Add a network location」 in File Explorer) has
a limited file size that can be transferred, and it freezes when transferring huge files in GB. Even if you
use it, we recommend that you limit it to small text files and images, and avoid using it as much as
possible.
Note that WebDAV has also been deprecated by Microsoft
1. On the Cloud Studio website, go to the 「Studio Sets」 → 「File Storage」 tabs.
2. Check the 「Network Info」 at the bottom of the page. 「WebDAV URL」 is the information required for
connection (* 「WebDAV URL」 can also be opened with a web browser)
3. Both WebDAV clients and web browsers To log in, use the same username and password that you use
to log in to the Cloud Studio website.
basic_en.md 2024-04-19
34 / 117
5.4. Access via web browser
Even if you don‘t install any software, You can upload and download files directly from your web browser and
Cloud Studio website.
Log in to Cloud Studio website and open the 「File Storage」 tab → 「Studio Set」.
If it is the first access, the 「Top」 folder will be displayed empty.
If any files are already stored, a list of files in the 「Top」 folder will be displayed.
basic_en.md 2024-04-19
35 / 117
Upload
There are two ways to upload a file.
1) Drag and Drop
1. Go to 「File Storage」 on Cloud Studio website.
2. Open the upload folder.
3. Drag the file you want to upload from the explorer and drop it into the file storage. Drag-and-drop
allows you to include multiple files and folders.
4. Drop a file or folder and it will immediately start uploading to the cloud file storage.
You can check the progress of the upload in the task list at the bottom right of the screen.
If you want to stop the upload in the middle, click the 「×」 button from the task list.
basic_en.md 2024-04-19
36 / 117
2) 「Upload File」 button
In an environment where drag-and-drop is not available (e.g., smartphones, etc.), you can upload by using the
「Upload File」 button.
1. Go to 「File Storage」 on Cloud Studio website.
2. Open the upload folder.
3. Click the 「Upload File」 button at the top of the file list.
4. The OS standard file selection dialog will open, so select the file you want to upload. Again, it is
possible to select multiple files. Folders cannot be selected (entire folders cannot be uploaded)
basic_en.md 2024-04-19
37 / 117
5. Click the 「Open」 button in the file selection dialog to start uploading.
You can check the progress of the upload in the task list at the bottom right of the Cloud Studio
website.
If you want to stop the upload in the middle, click the 「×」 button from the task list.
If there is a file or folder with the same name in the destination folder, it will be overwritten.
basic_en.md 2024-04-19
38 / 117
Download (file only)
Click on the file name to download it. Alternatively, you can click on the 「Download Button」 as well.
basic_en.md 2024-04-19
39 / 117
Download (multiple files and folders)
1. Select the file or folder you want to download with the checkbox to the left of the list (files and folders
can be mixed)
2. After that, click the 「Download Selected」 button displayed at the top of the list to download all the files
selected by the checkbox.
If you click the 「Download」 button on the folder, you will download all the files in the folder.
Batch download compresses multiple files into ZIP format (ZIP64).
About the file size of ZIP compression
Since we are using ZIP64 for ZIP compression here, there is no particular file size limit.
About ZIP file names and download locations
The ZIP file is automatically named download-[number].zip. It is also automatically stored in
your web browser's Downloads folder.
3. You can check the progress of the download in the task list at the bottom right of the Cloud Studio
website.
Since the transmission is done while compressing, you cannot check the progress in the 「Download
History」 of the web browser.
If you want to stop the download in the middle, you can cancel it from the 「Download History」 of your
web browser, or Click the 「×」 button from the task list on the Cloud Studio website.
basic_en.md 2024-04-19
40 / 117
Create a subfolder
1. First, open the folder where you want to create a subfolder.
2. Click the 「Create Subfolder」 button at the top of the list.
3. When the folder name input dialog box appears, decide on a name, enter it, and click the 「Create」
button.
basic_en.md 2024-04-19
41 / 117
If you check the 「Open folder」 checkbox, the created folder will be open.
If there are subfolders or files with the same name in the folder, an error occurs.
Delete (File or Folder)
1. Click the 「Delete」 button on the file or folder.
2. A deletion confirmation dialog will be displayed, so click the 「OK」 button if you are satisfied with the
deletion.
Any files or subfolders left in the folder will be deleted with it.
Once the deletion is executed, it cannot be canceled, so please be careful when clicking the 「OK」
button. Also, as a general rule, deleted files cannot be recovered.
basic_en.md 2024-04-19
42 / 117
It is also possible to select multiple files and folders and delete them at once.
1. Select the file or folder you want to delete from the checkbox on the left side of the file/folder list.
2. Click the 「Remove Selected」 button at the top of the list.
3. A confirmation dialog will be displayed, so click the "OK" button if you want to delete it as it is.
Copy (file or folder)
1. Click the Copy button for the file or folder.
2. When the name setting dialog box appears, enter the name of the copy destination and click the 「OK」
button.
basic_en.md 2024-04-19
43 / 117
By default, the name of the destination is the source name followed by (number). If you are satisfied
with this as it is, you can click the 「OK」 button without editing.
You can change the file folder name later.
3. A copy of the file is created in the same folder.
You can check the progress of the copy in the task list at the bottom right of Cloud Studio website.
If you want to stop copying, click the 「×」 button from the task list.
An error occurs if a file or subfolder with the same name exists in the folder.
Copying files is done server-side (no download-upload occurs)
basic_en.md 2024-04-19
44 / 117
Move (file or folder)
1. Click the 「Move」 button for the file or folder.
2. When the destination folder selection dialog is displayed, select the destination folder (check box on
the left side of the list), and click Click on the 「OK」 button.
When you move a folder, you can‘t select the folder itself and its underlying folders.
If there is a file subfolder with the same name in the destination folder, an error will occur (no
overwriting will be performed)
basic_en.md 2024-04-19
45 / 117
It is also possible to select multiple files and folders and move them at once.
1. Select the file or folder you want to move with the checkbox on the left side of the file/folder list.
2. Click the 「Move Selection」 button at the top of the list.
3. When the destination folder selection dialog is displayed, select the destination folder and click the
「OK」 button.
basic_en.md 2024-04-19
46 / 117
If there is a folder in the selected list, you cannot move the folder itself and its descendants.
If there is a file or folder with the same name directly under the destination folder, the corresponding
file or folder will be an error (it will not be overwritten)
Rename (file or folder)
1. Click the 「Rename」 button for the file or folder.
2. When the name setting dialog box appears, enter the name of the target and click the 「OK」 button.
basic_en.md 2024-04-19
47 / 117
If the name of the target already exists in the same folder, an error will occur.
File sharing
Cloud File Storage allows you to share files with third parties (guests) other than Cloud Studio users.
With the file sharing feature, you create a shared URL with a password, and you send the URL and password
to the guest yourself.
1. Click the 「Share」 button of the file you want to share from the file list.
2. When the file sharing dialog box appears, enter a 「password」, select 「expiration date」, and click the
「Create」 button.
3. Send the displayed share URL and password to the guest via any method (e.g., email).
basic_en.md 2024-04-19
48 / 117
Since it is not possible to check the password once set, please make a note of the entered
password. Check the 「Save share URL and password to file」 checkbox to create a shared URL
and save the downloaded file to your local PC. If you lose your password, you won`t be able to
use the share URL.
4. When guests access the shared URL, they will be prompted to enter their password.
5. If you enter the password correctly, you will be able to access (view and download) the file (Click the
「Download」 button)
If you delete the shared URL or it expires, guests won`t be able to access the file.
basic_en.md 2024-04-19
49 / 117
basic_en.md 2024-04-19
50 / 117
basic_en.md 2024-04-19
51 / 117
basic_en.md 2024-04-19
52 / 117
Folder sharing function (read-only mode) With cloud file storage, you can share not only individual files
but also individual folders.
There are two types of folder sharing features: read-only mode and writable (upload) mode. In this
section, you will share the folder in read-only mode.
1. Open the folder you want to share on Cloud Studio website and click the 「Share Folder」 menu from the
「Folder Actions」 pull-down menu. Alternatively, you can click the Share button on a folder from the list.
2. When the folder sharing dialog is displayed, enter the 「Password」 and select 「Expiration Date」.
3. Next, if you want to include subfolders of the folder (and subsequent buy folders) in the share, check
「Include subfolders」. If you do not check the box, only the files directly under the target folder will be
shared.
4. Check 「Read-only」.
5. Click the 「Create」 button.
6. Send the displayed share URL and password to the guest via any method (e.g., email).
Since it is not possible to check the password once set, please make a note of the entered
password. Check the 「Save share URL and password to fil」 checkbox to create a shared URL and
save the downloaded file to your local PC.
You also can‘t change your password, so you won’t be able to use the shared URL if you lose the
password (you‘ll need to delete and recreate it).
7. When guests access the shared URL, they will be prompted to enter their password.
8. If you enter the password correctly, you will be able to access the folder (view and download files).
The shared URL author can access it without entering a password.
basic_en.md 2024-04-19
53 / 117
basic_en.md 2024-04-19
54 / 117
basic_en.md 2024-04-19
55 / 117
The file browser is operated in the same way as the screen for Cloud Studio users. In read-only mode, you
can:
Folder sharing function (read/write mode)
Folder sharing has a read-write mode that accepts file uploads from guests.
In read/write mode, guests can upload files and perform other actions that would normally be performed by
Cloud Studio users, such as deleting, copying, and moving files.
List of files
List of subfolders (if 「 Include subfolders」 )
Image thumbnails, video previews
Download individual files
Batch file download
Batch folder download (in the case of 「 Include subfolders」 )
basic_en.md 2024-04-19
56 / 117
1. Open the folder you want to share on the Cloud Studio website and click the 「Share Folder」 menu from
the 「Folder Actions」 pull-down menu. Alternatively, you can click the Share button on a folder from the
list.
2. When the folder sharing dialog is displayed, enter a 「password」 and select 「expiration date」.
3. Next, if you want to include subfolders of the folder (and subsequent buy folders) in the share, check
「Include subfolders」. If you do not check the box, only the files directly under the target folder will be
shared.
4. Uncheck 「Read-only」.
5. Set the amount of storage that guests can use in the 「Space Allocation」 field. If it is not filled, the
capacity limit will not be applied.
6. Click the 「Create」 button.
7. Send the displayed share URL and password to the guest via any method (e.g., email).
Since it is not possible to check the password once set, please make a note of the entered
password. Check the 「Save share URL and password to file」 checkbox to create a shared URL
and save the downloaded file to your local PC.
You also can‘t change your password, so you won’t be able to use the share URL if you lose your
password.
8. When guests access the shared URL, they will be prompted to enter their password.
9. If you enter the password correctly, you will be able to access the folder (upload, download, etc.).
The shared URL author can access it without entering a password.
basic_en.md 2024-04-19
57 / 117
basic_en.md 2024-04-19
58 / 117
basic_en.md 2024-04-19
59 / 117
The file browser is operated in the same way as the screen for Cloud Studio users. In read-write mode, you
can:
⚫ Full functionality in read-only mode
⚫ File upload (also drag-and-drop)
⚫ Copying files
⚫ Copying a folder (if you want to include subfolders)
⚫ Rename files
⚫ Rename a folder (if you want to include subfolders)
⚫ Moving files and folders (in the case of "Include subfolders")
⚫ Deleting files
⚫ Deleting a folder (if you want to include subfolders)
Create a folder (if you want to include subfolders)
Note: Guests will not be able to create shared URLs.
About Capacity Allocation
File uploads and file copies that require more space than the quota will fail.
The allocated space is consumed by the size of the file when the guest uploads the file. Files
uploaded by non-guests are not consumed (the quota is not the capacity limit of the folder itself)
If a guest-uploaded file is deleted, the remaining space will be restored.
If a file uploaded by a guest is moved out of the shared folder, the remaining space will also be
restored.
The remaining capacity does not change just because the name is changed. However, if the
name is changed outside of Cloud Studio website, it will be treated as if it had been deleted, and
the remaining capacity will be restored.
basic_en.md 2024-04-19
60 / 117
If subfolder sharing is enabled, the remaining capacity will not change if you move to a subfolder. If
the move is made outside of Cloud Studio website, even if it is in a shared folder, it will be treated as
if it had been deleted, and the remaining space will be restored.
Access logs for shared URLs
When a guest accesses a shared URL, an access log is recorded for each shared URL.
The following describes how to view the site.
1. Open a shared folder on Cloud Studio website and click Click the 「Share Folder」 menu from the
「Folder Operations」 pull-down menu (in the case of folder sharing) Alternatively, you can click the
Share button on a file or folder from the list.
2. Click the 「Access log」 switch in the share URL to turn it on.
3. The last 10 access logs are displayed. If you want to go back to a previous log, click 「Load More」.
basic_en.md 2024-04-19
61 / 117
basic_en.md 2024-04-19
62 / 117
6. How to read each screen
6.1. dashboard
If you only have one Studio Set, the dashboard will be skipped and you will be redirected to Studio
Sets.
(1)Studio Sets - If you have more than one Studio Set in your account, they will be listed here. Click to
open 「Studio Set」.
(2)Studio Set Instances - Lists the instances installed in the Studio Set.
(3)Studio Set Status - Displays the status of the Studio Set. If it says 「Available」, it is normal. Immediately
after logging in for the first time, 「Initializing」 will be displayed, and when initialization is completed, it
will change to 「Available」.
(4)Show/Hide Switching - Shows or hides the Studio Set. The state of the show and hide is only saved
locally on the PC (web browser).
(5)Change display order - If you have multiple studio sets in your account, you can change the display
order of studio sets by dragging and dropping the bar up and down. The state of the display order is
saved only locally on the PC (web browser).
The following are common parts throughout the site:
(6)Site Logo - Return to the dashboard
(7)Subscription Plan - The subscription plan you are currently using. Click to display 「Billing」 in
「Account Profile」.
(8)Remaining credit time and residual data transfer capacity - The remaining credit time and data
transfer capacity that are currently available are displayed in real time. Click to view 「Credits」 in 「Account
Profile」.
basic_en.md 2024-04-19
63 / 117
6.2. Studio Sets
(1)Studio Set Name - Displays the name of the studio set.
(2)Studio Set Status - Displays the status of the Studio Set. If it says 「Available」, it is normal.
Immediately after the first login, it will be displayed as 「Creating」 and will change to 「Available」 when
completed.
⚫ Creating - The creation of the studio set is in progress.
⚫ Available - The studio set is available.
⚫ Deleting - The deletion of the studio set is in progress.
⚫ Deleted - The studio set has been permanently deleted.
⚫ Failed - The creation of the Studio Set failed.
⚫ To be deleted - The deletion of all instances in the Studio Set is in progress and is waiting
for the Studio Set to be deleted.
(3)Start - Puts all instances installed in the studio set Running. If it is already running, it cannot be clicked.
(4)Stop - Stops all instances in the studio set. If it is already stopped, it cannot be clicked.
(5) Edit - Edit the name of the studio set (→Edit Studio Set)
(9)Username - Displays the user name that is currently logged in. Click to display 「 User Profile」 .
(10)Account Name - Displays the registered account name. Click to display 「 Account Profile」 .
(11)Display Language - You can select either 「 Japanese」 or 「 English」 as the display language.
(12)Change Password - You can change your login password, change your user profile, and set up
multi-factor authentication.
(13) Log out - Log out of the Cloud Studio website.
basic_en.md 2024-04-19
64 / 117
(6)Instance Filter - Filter instances by group (color). Only instances of the checked group (color) are
displayed. If you check the white box, all instances will be displayed. The filter state is only stored locally on
your PC (web browser).
(7)Instances - Lists the instances installed in the Studio Set. Click to open 「Instances」. You can also drag and
drop instances to change the display order of the instances. The state of the display order is saved only locally
on the PC (web browser).
(8)Instance Status - Displays the status of the instance. If there is at least one 「live」 instance, the Consumes
the remaining time of the credit.
(9)Instance Uptime - Displays the cumulative value of the amount of time that the instance was up.
(10)Launch Instance - Bring the instance running individually. If it is running, 「Stopped」 will be displayed.
(11)Stop Instance - Stops individual instances. A confirmation dialog is displayed before the stop, preventing
it from being stopped due to accidental operation. If it is in a stopped state, 「Start」 is displayed.
(12)Edit Instance - You can edit the name and group (color) of the instance.
(13)Remote Desktop for Instance - Opens Remote Desktop for the instance in the web client. You can‘t click
it unless it's running.
(14)Studio Set Statistics - You can view the instance usage of a studio set by specifying a date range (→
Statistics) It is hidden by default and expands when you click on the title bar.
(15) File Storage - Opens cloud file storage (only appears if enabled)
basic_en.md 2024-04-19
65 / 117
6.3. File storage
Appears only when cloud file storage is enabled
You can drag and drop files or folders to upload them to the open folder.
(1)Folder Name - Displays the name and hierarchy of the open folder. In the case of the top-level
folder, only 「Top」 is displayed.
(2)Parent Folder - Opens the parent folder of the open folder (hidden if it is at the top).
(3)Reload - Refresh the display of open folders.
(4)File Upload - Upload a file (multiple selections are possible) to the open folder.
(5)Create subfolder - Creates a subfolder in the open folder.
(6)Folder actions - Opens the action menu for the open folder.
(6)-a Download Folder - Downloads the entire open folder in ZIP archive format.
(6)-b Share Folder - Create a sharing URL to share the open folder with guests.
(6)-c Rename Folder - Rename the open folder.
(6)-d Copy Folder - Copies the open folder, including files and subfolders.
(6)-Move folder - Move an open folder directly under another folder.
(6)-f Remove folder - Deletes the open folder, including files and subfolders.
(7)Select - Select a file or subfolder. You can select or deselect them all at once with the checkbox at
the top. You can download, move, or delete selected files or subfolders.
(7)-g Deselect - Displays the number of selected items. Click to clear all selections.
(7)-h Delete Selected - Deletes the selected file or subfolder (and the files and folders under it).
(7)-i Move Selection - Moves the selected file or subfolder directly under another folder.
(7)-j Download Selected - Downloads the selected file or subfolder in ZIP format.
(8)Sort by name - Sort by file or subfolder name. Each click toggles between ascending and
descending order.
(9)Sort by modification date - Sort by file or subfolder modification time. Each click toggles between
ascending and descending order.
(10)Sort by size - Sort by file size (excluding folders). Each click toggles between ascending and
descending order.
(11)Folder name - Click to open a subfolder.
(12)File name - Click to download the file (similar to the download button).
(13)Rename - Rename a file or subfolder.
(14)Download - Download a single file. If the target is a subfolder, it will be downloaded in ZIP format.
(15)Share - Create a sharing URL to share the file or folder with guests.
(16)Copy - Copy a file or subfolder.
(17)Move - Move a file or subfolder directly under another folder.
(18)Delete - Deletes a file or subfolder.
(19)Preview - When you flip a row in the list, a preview is displayed on the right.
(19)-k image/video preview - Image files (JPEG, PNG, GIF, SVG, WEBP, etc.) If it is a video file
(MP4, WEBM, OGG, MPEG, etc.), a preview will be displayed. Click the preview to enlarge the
basic_en.md 2024-04-19
66 / 117
image and preview the video.
(19)-l size - Displays the file size in bytes (file only)
(19)-m Type - Displays the MIME Type of the file (file only)
(19)-n Uploaded at - Displays the modification date and time of the file or subfolder.
(19)-o Download - Download the file.
(19)-p Close Preview - Closes the preview screen.
(20)Storage Capacity Gauge - The remaining amount of file storage is displayed as "Free Space/Full
Capacity". The gauge displays the percentage of use as a bar.
(21)WebDAV Network Information - Displays the connection information used by the WebDAV client.
(22)SFTP Network Information - Displays the connection information used by the SFTP client.
basic_en.md 2024-04-19
67 / 117
6.4. Moving Files and Folders
(1)Folder Name and Hierarchy Displays the folder name and folder hierarchy. Click the name to open
the appropriate hierarchy folder directly.
(2)Parent Folder - Opens the parent folder of the open folder.
(3)Reload - Refresh the display of the folder.
(4)Create subfolder - Creates a subfolder within the open folder.
(4)-a Open a folder - Opens the folder that was created after it was created.
basic_en.md 2024-04-19
68 / 117
(5)Open Folder - Select an open folder as the destination. Click the folder name to navigate to the
parent folder of the open folder. If the checkbox is grayed out, it cannot be selected as a destination.
(6)Subfolder - Select a subfolder as the destination. Click the folder name to open the subfolder. If the
checkbox is grayed out, it cannot be selected as a destination.
(7)OK button - You can click it when you select the destination. Perform a move of files or folders and
close the dialog box.
(8)Cancel button - Closes the dialog box without performing the move.
basic_en.md 2024-04-19
69 / 117
6.5. File storage sharing
File Sharing 2
(1)Password - Set a password to access the shared URL.
(2)Number of expiration days - Set the number of days until the shared URL expires.
(3)Save the share URL and password to a file - Download a text file containing the share URL and
password. (The password cannot be found on the Cloud Studio website, so please keep the downloaded
file on your local PC.)
basic_en.md 2024-04-19
70 / 117
Folder Sharing
(1)Password - Set a password to access the shared URL.
(2)Number of expiration days - Set the number of days until the shared URL expires.
(3)Include subfolders - Share subfolders as well. If there is no check, only the files directly under the
folder will be accessible.
basic_en.md 2024-04-19
71 / 117
(4)Read-only - If checked, the shared URL will be in read-only mode (download only). Read-only mode
does not allow uploading, but also renaming, moving, copying, and deleting.
(5)Capacity allocation - Set the amount of storage allocated to the guest in MB. If it is blank, the
capacity will be unlimited.
(6)Save the share URL and password to a file - Download a text file containing the share URL and
password. (The password cannot be found on the Cloud Studio website, so please keep the downloaded
file on your local PC.)
basic_en.md 2024-04-19
72 / 117
List of shared URLs
You can create any number of share URLs for a single file/folder.
(1)Delete - Delete the share URL. You will no longer be able to access the deleted URL.
(2)Share URL - Allow access to shared files/folders by disclosing the shared URL and password to guests.
(3)Creator - Displays the name of the user who created the share URL.
(4)Expiration date - Displays the expiration date and time when the share URL can be accessed.
(5)Read-only - Displays whether the share URL is in read-only mode or not (folder sharing only).
(6)Include subfolders - Displays whether the share URL has enabled subfolder sharing (writable folder
sharing only).
(7)Quota Capacity - Displays the total capacity allocated to the share URL (only for folder shares with
capacity allocation enabled).
(8)Capacity used - Displays the amount of space consumed by the uploaded file at the share URL
(writable folder sharing only).
(9)Access logs - When the switch is turned on, the shared URL access logs are listed in chronological
order from the most recent to the most recent.
(9)-a Access date and time - Displays the date and time when the access log occurred.
(9)-b Actions - Displays the actions taken by the guest on the shared URL.
⚫ Login successful - Successful login to the shared URL
⚫ Login failed - Login failed due to incorrect password
⚫ List - opened a folder and displayed a list of files
⚫ Get Info - Get information about the file (name, date, size, etc.)
⚫ Download - Preview or download the file
⚫ Create Folder - Create a subfolder
⚫ Delete - Deleted a folder or file
⚫ Rename - You renamed a folder or file
⚫ Move - Moved a folder or file
⚫ Copy - Copied folder or file
(9)-c Access source address - Displays the IP address of the guest
(9)-d folder or file name For folder shares, the name of the file subfolder that was accessed is
displayed.
basic_en.md 2024-04-19
73 / 117
Guest Login
When guests access the shared URL, they are presented with a password entry form.
Content information such as file names, folder names, and thumbnails is not displayed.
basic_en.md 2024-04-19
74 / 117
For file sharing
①Image/Video Preview - For image files (JPEG, PNG, GIF, SVG, WEBP, etc.) and video files (MP4, WEBM,
OGG, MPEG, etc.), a preview will be displayed. Clicking on the preview will enlarge the image for
images or preview playback for videos.
②Size - File size is displayed in bytes.
③Type - Displays the file type (MIME Type).
④Uploaded at - Displays the date and time the file was modified.
⑤Download - Downloads the file.
basic_en.md 2024-04-19
75 / 117
For folder sharing
The screen will be similar to File Storage.
If the share URL is in read-only mode, only downloads can be operated.
(1)Guest Allocated Capacity Gauge - Displayed when in read/write mode. The amount of space
allocated to the guest is displayed as 「Free Space/Full Capacity」. The gauge displays the percentage of
use as a bar. If the quota is unlimited, the amount of file storage is displayed.
Note: Guests will not be able to create shared URLs.
basic_en.md 2024-04-19
76 / 117
6.6. instance
(1)Group and Studio Set Name - Displays the name of the group (color) and studio set in which the
instance is installed. Click to return to 「Studio Set」.
(2)Instance Name - Displays the name of the instance.
(3)Instance Type - Displays the type and size of the instance, as well as the storage capacity.
(4)Instance Status - Displays the status of the instance. If there is at least one 「live」 instance, the
consumes the remaining time of the credit.
⚫ Initializing - The instance creation and initialization is in progress.
⚫ Stopped - The instance is in a stopped state.
⚫ Launching - The instance launch is in progress.
⚫ Running - The instance has finished launching and is accessible.
⚫ Rebooting - The instance is in the process of rebooting.
⚫ Stopped - The instance is in the process of shutting down.
⚫ Terminating - The instance deletion is in progress.
⚫ Terminated - The instance is in a state where it has been permanently deleted.
⚫ Failed - The initialization of the instance failed.
(5)Instance Uptime - Displays the cumulative value of the time that the instance was running.
(6)Start - Brings the instance running. If it is already running, it cannot be clicked.
(7)Restart - Forces a reboot of the instance. If it is not running, it cannot be clicked. A confirmation
dialog is displayed before restarting to prevent accidental restarting.
(8)Stop - Puts the instance in a stopped state. A confirmation dialog is displayed before the stop,
preventing it from being stopped due to accidental operation.
(9)Edit - You can edit the name and group (color) of the instance (→ [Edit Instance] (#4.7.-editing-
aninstance))
(10)Open Remote Desktop - Opens the remote desktop of the instance in the web client. You can‘t
click it unless it’s running.
(11)Login Info - Contains information required for instance access (→[Instance Login Information]
(##instance-login-information))
(12)Network Info - Instance network information (address, port, etc.) is summarized (→[Instance
Network Information] (#instance-login-information))
(13)Instance Metrics - Real-time metrics for running instances are displayed graphically. Both
horizontal axes are measured in 1-minute time.
(13)-a CPU load - The average value (per minute) of the CPU usage (in percentage).
(13)-b Network Transfers - Internet to Instance (Inbound), Or it is the accumulated value (per
minute) of the amount (bytes) transferred from the instance to the Internet (outbound).
(13)-c Disk Access Count - The number of disk accesses (reads, writes) is accumulated (per
minute).
(14)Internet Traffic Statistics - Displays the statistics of Internet communication (transmission volume
and reception volume) performed by the instance by port and external address.
basic_en.md 2024-04-19
77 / 117
Internet Traffic Statistics
(1)Egress Connection - Displays statistics of communications in which the instance is a client and
connects to a remote server.
⚫ (1)-a Foreign Address - Displays the address of the server.
⚫ (1)-b Port - Displays the port of the server.
⚫ (1)-c Outbound - Displays the amount of data sent to the server in gigabytes.
⚫ (1)-d Inbound - Displays the amount of data received from the server in gigabytes.
(2)Ingress Connections - The instance is the server, and the statistics of the communication received
from the remote client are displayed.
(2)-e Foreign Address - Displays the address of the client.
(2)-f port - Displays the listening port of the instance.
(2)-g Outbound - Displays the amount of data sent to the client in gigabytes.
(2)-h Inbound - Displays the amount of data received from the client in gigabytes.
basic_en.md 2024-04-19
78 / 117
Instance login information
(1)Login user name - The user name used to log in to the OS.
(2)Password - The password used to log in to the OS. The password is randomly generated for each
boot. It can only be displayed when the instance is running.
(3)Host address - The host address for instance access. If you want to use a Nice DCV dedicated client,
RDP, or SSH connection, you can use the please copy and paste this address as the connection
destination.
(4)Web Client URL - The URL to connect to the Nice DCV web client. Click or copy and paste into your
browser’s address bar allows you to access the instance with a web client connection.
(5)DCV client URL - This is the URL to connect to the Nice DCV dedicated client. Click to launch a
dedicated client and access the instance.
The following information is displayed differently for each instance type.
For vMix instances
(6)Web Controller Username - The username used to access the vMix Web Controller.
(7)Web Controller Password - The password used to access the vMix Web Controller.
(8)Web Controller Access URL - The access URL of the Web Controller for vMIx. Appears only when the
instance is running.
basic_en.md 2024-04-19
79 / 117
For SRT/RTMP MiniServer Instances
(9)SRT MiniServer Web Controller Password - The password used to access the SRT MiniServer
Web Controller.
(10)SRT MiniServer Web Controller Access URL - The access URL for the SRT MiniServer Web
Controller. Appears only when the instance is running.
(11)RTMP MiniServer Web Controller Password - The password used to access the RTMP
MiniServer Web Controller.
(12)RTMP MiniServer Web Controller Access URL - The access URL for the RTMP MiniServer
Web Controller. Appears only when the instance is running.
For OBS Studio instances
No additional information
basic_en.md 2024-04-19
80 / 117
Instance network information
(1)Host name - The name of the instance is the host name. The hostname is also set to the 「computer
name」 of the OS.
(2)Static IP address - Displays whether the instance is using a static IP address. Normally, the answer is
no.
(3)Public DNS Name - The public DNS name assigned to the instance. A fixed address is generated for
each instance. It does not change even if it is started and stopped repeatedly. This is the address used to
access the Internet over.
(4)Public IP address - The public IP address assigned to the instance. If the static IP address is No, you
can use the it will be variable for each startup. However, it does not change with a restart. It is also
displayed only when the instance is running.
(5)Private DNS Name - The private DNS name assigned to the instance. A fixed address is generated for
each instance. It does not change even if it is started and stopped repeatedly. This is the address used
to access it from other instances of the same studio set.
(6)Private IP address - The private IP address assigned to the instance. Each instance is assigned a fixed
address. It does not change even if it is started and stopped repeatedly.
basic_en.md 2024-04-19
81 / 117
The following information is displayed differently for each instance type.
vMix, for OBS Studio instances
(7)Available SRT connection ports (range) - Displays the range of empty ports that can be
used when making SRT connections. The instance is designed to accept connections only on the
ports that are required. Therefore, only the ports that are displayed are allowed.
connection.
6.7. Account Profile
a. Billing tab
Access billing and billing information.
(1)Settings - (Common to all tabs) You can update your account profile (→[Update Account Profile]
(#8.1.-update-your-account-profile))
(2)Unpaid invoices - Lists invoices that have not yet been paid. Click 「Payment」 to open the payment
form. You can make a payment. In addition, you can view or download invoices.
(3)Receipt for payment request - Displays a list of receipts that have already been paid. Click
「Receipts」 to view or download receipts.
(4)Payment - Displays payment information.
(4)-A Subscription - Displays the subscription plan you are currently enrolled in. Click
「Settings」 to display the plan change form (→ [Subscription Plan Settings] (#8.2.-setting-up-
asubscription-plan))
(4)-b credits - Displays the current credit remaining time. Click on 「Buy Credits」 to display the
Credit Purchase Form (→ [Buy Credits] (#8.3.-buy-credits-(additional-packs))
(4)-c Billing Information - Displays the currently selected billing method.
(4)-d Customer Portal - Opens the Customer Portal. In the Customer Portal, you can change or
delete the payment method (credit card information).
For SRT/RTMP MiniServer Instances
(8)SRT Passphrase - Displays the passphrase to be used when making the SRT connection.
(9)SRT Incoming Address - Displays the address specified when making an SRT connection.
(10)RTMP Incoming Address - Displays the address specified when making an RTMP
basic_en.md 2024-04-19
82 / 117
(5)Billing information - The registered billing information is displayed. Click 「Settings」 to open the
form for editing billing information(→Edit billing information)
basic_en.md 2024-04-19
83 / 117
b. Credits tab
Access information about how much time you have left.
(1)Amount of Internet transfer for the account - Amount of data transferred from Cloud Studio to
the Internet (a), remaining data transfer capacity (b), Displays the total capacity (C). The gauge (d)
shows the used capacity as a gray bar.
(2) Account Remaining Credits - Displays the number of credits remaining in the account. Click on
「Buy Credits」 to display the Credit Purchase Form (→ Buy Credits). Credits are displayed in units of
issuance (bundles). For example, if you purchase two additional credit packs, two additional credit
bundles will be added to the list in addition to the subscription credits.
(3)Credit Alert - This function issues an alarm when the remaining credit time or residual data transfer
capacity falls below the specified value. You can send an email alert, block an instance from starting,
and purchase additional credit packs.
(3)-e Create New Rule - Opens the Create Credit Alert Rule form and creates one new rule (→
Configure Credit Alert Rule)
(3)-f Edit Rule - Opens the Edit Credit Alert Rule form and edits the rule (→ Set Credit Alert
Rule)
(3)-g Delete Rule - Deletes the rule. A confirmation dialog is displayed before deletion to prevent
accidental operation.
basic_en.md 2024-04-19
84 / 117
c. Statistics tab
You can access your account‘s statistics (screen time) information.(→Statistics)
d. Users tab
You can access the list of logged-in users for your account.
(1)Create User - (Primary user only) Create a new secondary user (→Create/Edit Secondary User)
(2)User's name - The display name of the user. Click to open 「User Profile」.
(3)Login Name - The name used to log in.
(4)User Groups - The primary user has access to various configuration forms in the account profile.
Secondary users can work with Studio Sets and Instances, but they do not have access to the account
profile setup form.
(5)Studio Sets - Displays the number of studio sets.
(6)Instances - Displays the number of instances.
(7)Usage time - Displays the user‘s usage time in minutes. The usage time is added to the user who
launched the instance.
(8)Last login date and time - Displays the date and time when the user last logged in.
(9)Edit User Information - (Primary user only) Opens the Edit User Information form (→ Secondary User
Create/Edit)
basic_en.md 2024-04-19
85 / 117
6.8. User Profile
6.9. User Preferences
In user settings, you can edit your user profile, change your login password, and set up multi-factor
authentication.
(1)Update User Profile - (1)-a Username, (1)-b Display Name, and (1)-c Update Email Address. Your
username and email address must not be used by anyone else (throughout Cloud Studio).
(2)Change Login Password - (2)-a You can change your password by entering your old password and
(2)-b your new password. You cannot change your password unless the old password matches. In
addition, we will not be able to reply to your password even if you contact us. If you don‘t know your old
password, use the password reminder (→ If you don’t know your password)
(3)Multi-Factor Authentication - (3)-a Multi-Factor Authentication status and (3)-b Enable or disable
(→Enable Multi-Factor Authentication)
You can access the user‘s stats (→ Stats)
(1)Edit - (Primary user only) Edit the secondary user (→Secondary User Create/Edit)
(2)Delete - (Primary user only) Deletes a secondary user.
basic_en.md 2024-04-19
86 / 117
6.10. Statistics
You can check the statistics (operating hours) for each instance type by specifying a time.
(1)Start Date - Specify the start date of the range for which you want to view statistics.
(2)End Date - Specify the end date of the range for which you want to view statistics. Including the full
end date.
(3)Current subscription period, previous subscription period, this month, last month, today,
yesterday... - This is a shortcut that calls up a specific range with one click. The range you click is set to
the start and end dates.
(4)Group by user - The aggregate results are grouped by user and displayed. Essentially, the uptime is
recorded by the user who launched the instance.
(5)Reload - Refresh the aggregation results.
basic_en.md 2024-04-19
87 / 117
6.11. Create and edit secondary users
This is a form for creating and editing secondary users. Only the primary user can manage secondary users.
(6)Summary results - The summary results of the specified range are displayed in a tabular format.
The total uptime is expressed in minutes, rounded to the nearest second.
(7)Export in CSV format - You can download the summary results in CSV format.
(8)Export log - You can download the operation log itself, including the specified range (used for
aggregation), in CSV format.
(9)Call Connection Statistics - Displays the statistics of the communication between the instance as
the client and the remote server.
(10)Export in CSV format - You can download the call connection statistics in CSV format.
(11)Accepted Connection Statistics - The instance is the server, and the statistics of the
communication received from the remote client are displayed.
(12)Export in CSV format - You can download the acceptance connection statistics in CSV format.
basic_en.md 2024-04-19
88 / 117
(1)Login Username - Enter the name you want to use to log in. It must not be used by another user.
(2)Display name - Enter the name that will be displayed in Cloud Studio.
(3)E-mail address - Enter the user‘s email address. It must not be used by another user for registration.
(4)New Password - (Required only when creating) Enter the password you use to log in.
When editing, enter it only if you want to change the password. Leave it blank and do not change the
password.
7.1. Web Client
(1)Filestorage - Allows you to upload files to or download files to your instance (→File Upload and
Download to Instance) -(2)Clipboard - Allows you to send text to the instance‘s clipboard (usually
synced automatically, but can be used if for some reason it is not synced)
(3)Microphone - Stops (mutes) the transmission of microphone input audio from the local PC to the
instance.
(4)Audio - Adjusts or stops (mutes) the volume of the speaker output audio from the instance to the
local PC.
(5)Camera - Enables or disables webcam input to the instance. (Only Windows OS instances are
supported.) →Local Device Connection )
(6)Multiple screens - Enables or disables multiple screens. In the case of the web client, it can be
extended to up to two screens (only for Windows OS instances). When multiscreen is enabled, the
extension appears in a separate window and is disabled when the window is closed.
(7)Fullscreen - Displays the web client in full screen.
(8)Notifications - If an error occurs, it will be listed in the notification.
(9)More - The instance name (computer name) is displayed, and the menu expands when clicked.
7. Nice DCV Client
basic_en.md 2024-04-19
89 / 117
(9)-a Use relative mouse - Mouse cursor movement is restricted to the instance screen. Use the
ESC key to clear this state.
(9)-b Send Ctrl+Alt+Del - Sends simultaneous CTRL+ALT+DEL presses to the instance.
(9)-c Save Screenshot - Take a screenshot of the instance and save it to your local PC.
(9)-d Preferences - Opens the web client preference form (→ web client preferences)
(9)-e About NICE DCV - You can check various version information.
(9)-f Disconnect - Disconnect from the instance. Even if you disconnect the web client, the instance
will not be logged out and will continue to run. You can also disconnect by closing the window.
7.2. Dedicated Clients
(1)Storage - Upload files to the instance or download files. (→File Upload and Download to Instance)
(2)Settings - Opens the settings menu of the dedicated client.
(2)-a Display Resolution - Allows you to select the display resolution for the instance. The default
is 「Adapt automatically」.
(2)-b Streaming Mode - Allows you to configure how to communicate with the instance (→
Dedicated Client Settings)
(2)-c Removable Devices - You can connect a USB device (such as a USB memory) from a local PC
to the instance. Open the connected device selection form (Only Windows OS instances are
supported). (→Local Device Connection)
(2)-d Camera - Allows you to connect a webcam connected to your local PC to your instance.
Open the connected device selection form (Only Windows OS instances are supported). (→Local
Device Connection)
(2)-e Relative Mouse Position - Mouse cursor movement is restricted to the instance screen.
CTRL+SHIFT+F8 TO EXIT THIS STATE.
(2)-f Accurate Audio/Video Synchronization Disabled/Enabled - (vMix, OBS Studio instances
only) Enable audio and video synchronization, or disable it. If Disabled is displayed, it is disabled,
and if it is Enabled, it is enabled. If disabled, the response will take precedence instead of
synchronization.
(3)Microphone - Stops (mutes) the transmission of microphone input audio from the local PC to the
instance.
(4)Audio - Adjusts the volume of the speaker output audio from the instance to the local PC.
(5)(Camera)Available/Attached - Enables or disables webcam input to the instance.
(6)Enter/Exit fullscreen - Displays the dedicated client in full screen. If it's already full-screen, change it
back.
(6)-a Across a single monitor - Displays full screen for one of the currently displayed monitors.
(6)-b Across all monitors Adapt Display Size - (Multi-monitor environment only) Displays full
screen on all monitors, It also changes the resolution according to the display size.
basic_en.md 2024-04-19
90 / 117
(7)Notifications - If an error occurs, it will be listed in the notification.
(8)Instance name - The instance name (computer name) is displayed, and when clicked, the
menu expands.
(8)-a Save Connections As - Saves the connection settings to a .dcv file.
(8)-b Save a Screenshot - Take a screenshot of your instance and save it to your local PC.
(8)-c Ctrl+Alt+Del - Sends simultaneous CTRL+ALT+DEL keys to the instance.
(8)-d About DCV - You can check various version information.
(8)-e Disconnect - Disconnect from the instance. Even if you disconnect the dedicated client, the
instance will not be logged out and will continue to run. You can also disconnect by closing the
window.
8. Account settings
Account settings are only available when logged in as the 「Primary User」. Settings are not available for
「Secondary User」.
8.1. Update your account profile
You can update your registered personal information (name, company name, address, telephone number,
etc.).
1. Open the Cloud Studio website in a web browser and log in.
2. Click on your account name in the upper right corner of the site from the 「Dashboard」.
3. Click on Settings in the upper right corner of the site.
4. The Update Account Profile form opens.
(1)Individual/corporation name - Please enter your name if you are an individual, or your
company name if you are a corporation.
(2)Name of the person in charge - (Optional) If you are a corporation and have a name in charge,
please enter the name.
basic_en.md 2024-04-19
91 / 117
(3)E-mail address - Please enter your e-mail address correctly.
(4)Country - Please enter your nationality.
(5)Postal code - Please enter your zip code. If you click 「Search Address」 after entering, the
corresponding prefecture / city will be automatically entered (only in Japan)
(6)State - Please enter your state. If you are outside of Japan, please enter the State (name of the
state or municipality).
(7)City - Please enter the city.
(8)Address (line 1) - Please enter the first line of the address part below the city.
(9)Address (2nd line) - (Optional) Please enter the address part below the city, if there is a second
line.
(10)Phone number - Please enter your phone number. For international calls, you can enter the
international code (+2 digits).
5. Click Save.
basic_en.md 2024-04-19
92 / 117
8.2. Setting up a subscription plan
This is the procedure to change your current subscription plan.
1. Open Cloud Studio website in a web browser and log in.
2. Click on your account name in the upper right corner of the site or your subscription plan name in the
upper left corner of the site.
3. Go to Payments and click on Settings under Subscription Plans.
4. The Subscription Plan Settings form opens.
basic_en.md 2024-04-19
93 / 117
(1)Payment Period - Set the period for which the payment will be made (e.g., monthly, every 3
months, semi-annually, yearly)
(2)Subscription Plan - Select a subscription plan.
(3)End Subscription - Select if you want to terminate the subscription.
5. Click Save.
basic_en.md 2024-04-19
94 / 117
Selectable Plans
You can only select the plan specified at the time of application. If you would like to use a plan other
than the one shown, Contact Us
Timing of subscription changes
As a general rule, subscription changes will take effect at the end of the current subscription period. If
you need to make changes before then, please contact us
8.3. Buy Credits (Additional Packs)
If you run out of credits, the instance will be auto-stopped. To prevent this from happening, you need to have
enough credit.
You can increase the amount of time you have left on your credits by purchasing additional credit packs.
1. Open Cloud Studio website in a web browser and log in.
2. Click on your account name in the upper right corner of the site from the 「Dashboard」. Alternatively,
you can click on the remaining credit time in the upper left corner of the site.
basic_en.md 2024-04-19
95 / 117
3. Click on Buy Credits.
4. The Buy Credits form opens.
(1)Credit Extra Pack Plan - Select the Credit Extra Pack plan you want to purchase.
(2)Quantity - Select the number you want to purchase.
(3)Payment method - You can select the payment method you want to use for the purchase.
(3)-a Automatic payment by registered payment information - Pay with the default
payment information (credit card) used automatic subscription renewal.
(3)-b Pay with one-time payment information - Pay with payment method information
that is different from the default for your subscription.
(3)-c Pay by invoice - Receive the invoice that will be issued and then make the payment
manually. Credit will not be replenished until payment to the invoice is confirmed (not
postpaid)
5. Click Checkout.
6. Click checkout to complete the purchase (in the case of 「Automatic payment with registered payment
information」).
Enter your credit card details under 「Pay by card」 and click Pay.
An invoice will be issued shortly after (in the case of 「Pay by invoice」), so please open the 「Billing」 tab
to check.
7. Return to Cloud Studio website, and shortly afterwards your credit remaining time or remaining data
transfer capacity will increase.
basic_en.md 2024-04-19
96 / 117
basic_en.md 2024-04-19
97 / 117
basic_en.md 2024-04-19
98 / 117
8.4. Edit billing information
You can set billing information (personal name, corporate name, address, telephone number, proviso, etc.).
1. Open Cloud Studio website in a web browser and log in.
2. Click on your account name in the upper right corner of the site.
3. Go to Payments and click Settings under Billing Information.
4. The Edit Billing Information form opens.
(1)Proviso - Enter the proviso to be included in the invoice or receipt issued by Cloud Studio.
(2)Use the same information as your account information - If you check the box, you can omit
the following input fields, and you can use personal information that has already been entered in
the account information. Use it as billing information. If you uncheck the box, the input field after
(3) will be available.
(3)Individual/Corporate Name - Please enter your name if you are an individual, or your company
name if you are a corporation.
(4)Name of Person in Charge - (Optional) If you are a corporation and have a name in charge,
please enter your name.
(5)E-mail address - Please enter the correct e-mail address to receive invoices.
(6)Country - Please enter your nationality.
(7)Postal code - Please enter your zip code. If you click 「Search Address」 after entering, the
corresponding prefecture / city will be automatically entered (only in Japan)
basic_en.md 2024-04-19
99 / 117
(8)State - Please enter your state. If you are outside of Japan, please enter the State (name of the
state or municipality).
(9)City - Please enter the city.
(10)Address (line 1) - Please enter the first line of the address part below the city.
(11)Address (2nd line) - (Optional) Please enter the address part below the city, if there is one.
(12)Phone number - Please enter your phone number. For international calls, you can enter the
international code (+2 digits).
5. Click Save.
basic_en.md 2024-04-19
100 / 117
8.5. Configuring Credit Alert Rules
A credit alert is a feature that sends an alert by email when the remaining credit time falls below a
predetermined number of hours.
Take advantage of it to prevent unforeseen credit shortages.
basic_en.md 2024-04-19
101 / 117
Create a new rule
1. Open Cloud Studio website in a web browser and log in.
2. Click on the credits in the upper left corner of the site.
3. Go to Credit Alerts and click Create New Rule.
4. The Create Credit Alert Rule form opens.
(1)Active - Tick the Active checkbox for the credit alert rule to work.
(2)Number of hours remaining - Enter the number of hours remaining in credits. Do not use the
remaining time condition in the blank field.
(3)Residual data transfer capacity - Enter the residual data transfer capacity in GB. Leave blank to
do not use the residual data transfer capacity condition. You need to set either the number of hours
remaining or the amount of data transferred.
(4)Action - Select what action you want to take when the remaining time is less.
Notify by email - Sends a notification email to the email address set in your account
profile.
Block instance starting - Prevents further instances from being stopped. Instances that
are still running will continue to run.
Auto-purchase additional credit packs - Automatically purchase additional credit packs.
(Please note that it can take up to 1 hour for the actual purchase to occur.)
When selected, an additional configuration form appears.
(4)-a Purchase Credit Extra Pack - Select the credit additional pack and quantity
that you want the rule to automatically purchase.
(4)-b Payment Method - The payment method to use for automated purchases.
「Automatic payment with registered payment information」 Select the default payment
method that you‘re using to renew your subscription. If you pay by invoice, you will
not receive an automatic payment, but your credit will not be replenished (not
postpaid) until payment to the invoice is confirmed.
5. Click Create.
basic_en.md 2024-04-19
102 / 117
basic_en.md 2024-04-19
103 / 117
If the remaining credit time is less than the 「Remaining Time」 and 「Remaining Data Transfer Capacity」
at the time of creation, an alert email will not be sent. Credit add-on pack purchases are also not
performed.
Editing an Existing Rule
1. Open Cloud Studio website in a web browser and log in.
2. Click on the remaining credit time in the upper left corner of the site.
3. Click Edit from the list of rules in the Credit Alert section.
4. The Update Credit Alert Rule form opens→Create new rule)
5. Click Save.
If the number of hours remaining in credits falls below the 「Hours Remaining」 as a result of editing, an
alert email will be sent. In addition, the purchase of additional credit packs is also carried out.
If you uncheck 「Active」, you can temporarily disable the alarm rule.
Deleting a Rule
1. Open Cloud Studio website in a web browser and log in.
2. Click on your account name in the upper right corner of the site from the 「Dashboard」.
3. Click on Credits.
4. Click Remove from the list of rules in the 「Credit Alert」 section.
5. The Delete Credit Alert Rule confirmation dialog is displayed.
6. Click OK.
basic_en.md 2024-04-19
104 / 117
9. Configuring the Nice DCV Client
9.1. Configuring the Web Client
To open the configuration form, click the instance name at the far right of the toolbar to open a menu. Click
on Preferences.
General
(1)Appearance - Sets the color tone of the user interface.
(1)-a System default - Use the default settings of the OS.
(1)-b Light mode - Use a light-toned user interface.
(1)-c Dark mode - Use a darker user interface.
(2)Toolbar behavior - Set the behavior of the toolbar.
(2)-a Auto-hide toolbar - Automatically hides the toolbar.
(2)-b Auto-hide toolbar only in fullscreen - Automatically hides the toolbar only in full-screen mode.
(2)-c Always display the toolbar - Always display the toolbar.
basic_en.md 2024-04-19
105 / 117
Display (Display Settings)
(1)Streaming mode - Set the streaming mode.
(1)-a Best responsiveness - Emphasis on responsiveness at the expense of image quality.
(1)-b Best quality - Sets the image quality at the expense of some response.
(2)High color accuracy (YUV 4:4:4) - Improves color reproduction at the expense of performance.
(3)Streaming metrics in the toolbar - Displays streaming metric values (frame rate, fps, latency, ms)
on the toolbar.
(4)Display resolution - Sets the resolution of the display.
(4)-a Adapt automatically - Variable to fit the client‘s window size.
(4)-b Specified Resolution - Fixes to the specified resolution.
basic_en.md 2024-04-19
106 / 117
Camera (Webcam Settings)
(1)Allow detection - Allow webcam detection from the web client. When you click on it, a
confirmation dialog will be displayed on the web browser side that says 「... is asking for the following
permission.
"Use the camera"」. Click Allow to enable the use of your webcam.
(2)Camera - Select the camera device that you want to connect to your instance in the web client.
To open the settings, click on Settings from the toolbar to bring up the menu.
9.2. Configuring a Dedicated Client
basic_en.md 2024-04-19
107 / 117
Streaming Mode
(1)Best responsiveness - Emphasis on responsiveness at the expense of image quality.
(2)Best quality - Emphasis on image quality at the expense of some response.
(3)High color accuracy (YUV 4:4:4) - Improves color reproduction at the expense of some performance.
(4)Streaming index value - Streaming index value (frame rate/fps, latency/ms, bitrate/bps) is displayed.
Display Resolution
(1)Adapt automatically - Varies to fit the client‘s window size.
(2)Specified resolution - Fixes to the specified resolution.
basic_en.md 2024-04-19
108 / 117
basic_en.md 2024-04-19
109 / 117
Removable Devices(USB device settings) Removable Devices can only be used with Windows OS
instances and Windows OS dedicated clients.
Lists the USB devices connected to the local PC that can be connected to the instance. The connection is
enabled by turning on the switch on the right .
For more information →Connect a USB device
Camera (Webcam Settings)
Camera is only available for Windows OS instances.
You can select a webcam device to connect to your instance(→Connect webcam)
9.3. Local Device Connection (Advanced Usage)
You can use Nice DCV to connect devices connected to your local PC to your instance.
Connect your speakers
Without any special operation, the web client or dedicated client automatically connects the local PC`s
speakers to the instance‘s audio output device. Audio played on the instance will now be played on the
default device of the local PC.
Click Audio in the toolbar to mute or adjust the volume.
Since voice prioritizes low latency, noise may be added depending on the Internet communication conditions.
This is especially true for web clients. Dedicated clients have relatively good playback results.
basic_en.md 2024-04-19
110 / 117
Connecting a Microphone
You can connect a microphone connected to your local PC to your instance‘s audio input device.
[For Web Client]
1. Click on Microphone in the toolbar to enable the microphone.
2. When you click on it, a confirmation dialog will be displayed on the web browser side that says 「... is
asking for the following permission. "Use microphone"」. Click Allow to allow the use of the
microphone.
3. By default, the 「default」 microphone is used. If you want to change the device, change the
「Microphone」 in the 「Settings」 of your web browser.
Chrome example: In Settings, click Privacy & Security → Site Settings → Microphone and
select your device from the list.
4. In your streaming software (vMix or OBS Studio), select a microphone as the input device. (In the device
list, it will be displayed as Microphone (DCV Microphone Device) or DCV_Microphone)
5. Please note that disconnecting the client will stop ingestion. To continue ingestion, the client must
remain connected.
basic_en.md 2024-04-19
111 / 117
basic_en.md 2024-04-19
112 / 117
[For dedicated clients]
1. Click on Microphone in the toolbar to enable the microphone.
2. The 「default」 microphone is always used. If you want to change the device, go to 「Settings」 of
Windows OS, click System → Sound → Apps, volume and device settings in that order. Select
your device in Input Devices.
3. In your streaming software (vMix or OBS Studio), select a microphone as the input device. (In the device
list, it will be displayed as Microphone (DCV Microphone Device) or DCV_Microphone)
4. Please note that disconnecting the client will stop ingestion. To continue ingestion, the client must
remain connected.
basic_en.md 2024-04-19
113 / 117
Connect your webcam
Only for Windows OS instances
This function has a fixed resolution of 640x480 and a frame rate of 30fps, so please consider it as a last
resort when it is unavoidable.
Whether it‘s a web client or a dedicated client, you can connect a webcam connected to your local PC to your
instance.
1. Access your instance with the web client or a dedicated client (→ Access Instance)
2. First, make sure that the webcam is working properly (video can be imported) on the local PC. Device
drivers are fine if they are installed on the local PC (they do not need to be installed on the instance).
3. Select the webcam you want to connect to in the Camera settings.
→ Web Client Camera Settings
→ Camera Settings for Dedicated Clients
4. Enable the webcam connection in the toolbar. In the case of a web client, a confirmation will be
displayed from the web browser that 「... is asking for the following permission "Use the camera"」.
Click Allow.
5. In your streaming software (vMix or OBS Studio), select a webcam as the input device (In the device list,
it will be displayed as AVSCamera RFC).
6. Video can be captured in the same way as a capture device (audio is not captured).
7. Please note that disconnecting the client will stop ingestion. To continue ingestion, the client must
remain connected.
basic_en.md 2024-04-19
114 / 117
Because the webcam capture method is different between the web client and the dedicated client,
please note that the picture will not always be the same.
Connect a USB device
Only supported for Windows OS instances and Windows OS dedicated clients.
Not all USB devices will work. I think that connecting via Nice DCV is a connection method that most
USB devices do not expect. If it doesn‘t recognize, doesn’t work at all, or behaves erratically, you may
not get satisfactory performance.
Some USB devices require drivers to be installed on the instance. Typical USB sticks work with the OS
standard driver, but special USB controllers require the driver to be installed in advance.
First, to use a USB device connection, you must access your instance with a dedicated client.
In the case of a typical USB stick, it is likely that it is already recognized by a dedicated client. In that case, you
can connect by following the steps below.
1. When installing the dedicated client, enable USB device remotization in 「Drivers Selection」.
2. Use a dedicated client to access your instance (→ Use a dedicated client)
3. Connect the USB flash drive to your local PC.
4. From the toolbar of the dedicated client, click Settings → Removable Devices, in that order.
5. A list of USB devices that can be connected to Removable Devices will be displayed. Find the USB stick
you just connected and click the switch on the right to turn it on.
6. The USB stick is disconnected from the local PC and connected to the instance.
7. The drive will be added to the instance‘s File Explorer and you will be able to access the USB stick. Read
and write files on this drive. In addition, the dedicated client must remain connected during access.
8. Turning the switch off in Removable Devices will disconnect from the instance and restore the
connection to the local PC.
basic_en.md 2024-04-19
115 / 117
basic_en.md 2024-04-19
116 / 117
If the USB device is not listed in Removable Devices
You must edit the Nice DCV config file and add it manually.
1. When installing the dedicated client, enable USB device remotization in 「Drivers Selection」.
2. Make sure you have the driver for the USB device installed on your local PC. If not, install it and make
sure that your USB device is working properly.
3. Open C:Program Files (x86)NICEDCVClientbin in Explorer and run dcvusblist.exe.
4. When the USB device is listed, find the desired device, right-click on it and click Copy filter
setting. The selections are copied.
5. Start a text editor such as Notepad and paste the one you copied in step (4). Keep Notepad open.
6. Access the instance with a dedicated client (→use a dedicated client)
7. Install the driver for the USB device on the instance side (if a driver is required)
8. Start Notepad on the instance side and click Open under File from the menu. Enter C:Program
FilesNICEDCVServerconfusb-devices.conf in File name and click Open.
9. Copy and paste the notes you made in step (5) into a new line at the end of the usb-devices.conf
file.
10. Save and close Notepad.
11. Reboot the instance (→ Reboot Instance)
12. Access the instance again with a dedicated client, go to 「Settings」 and click on Removable Devices.
If the added USB device appears in the list, you can connect it by following the same procedure.
basic_en.md 2024-04-19
117 / 117

More Related Content

Similar to CloudStudio User manual (basic edition):

Blockchain - Hyperledger Fabric v1.0 Running on LinuxONE, see it in action!
Blockchain - Hyperledger Fabric v1.0 Running on LinuxONE, see it in action!Blockchain - Hyperledger Fabric v1.0 Running on LinuxONE, see it in action!
Blockchain - Hyperledger Fabric v1.0 Running on LinuxONE, see it in action!Anderson Bassani
 
Creating mass users using e_catt
Creating mass users using e_cattCreating mass users using e_catt
Creating mass users using e_cattsparten369
 
GigaSpaces Cloud Computing Framework 4 XAP - Quick Tour - v2
GigaSpaces Cloud Computing Framework 4 XAP - Quick Tour - v2GigaSpaces Cloud Computing Framework 4 XAP - Quick Tour - v2
GigaSpaces Cloud Computing Framework 4 XAP - Quick Tour - v2Shay Hassidim
 
Microsoft Azure,AWS Cloud services and it's use
Microsoft Azure,AWS Cloud services and it's useMicrosoft Azure,AWS Cloud services and it's use
Microsoft Azure,AWS Cloud services and it's useAslam Diwan
 
Create and Configure Windows Server 2016 VM in the Azure Step by Step
Create and Configure Windows Server 2016 VM in the Azure Step by StepCreate and Configure Windows Server 2016 VM in the Azure Step by Step
Create and Configure Windows Server 2016 VM in the Azure Step by StepAhmed Abdelwahed
 
Support article1224
Support article1224Support article1224
Support article1224Breanna.org
 
Cloud-Aided Yocto Build Speedup
Cloud-Aided Yocto Build SpeedupCloud-Aided Yocto Build Speedup
Cloud-Aided Yocto Build SpeedupToradex
 
manual vvtk camera_st7501
manual vvtk camera_st7501manual vvtk camera_st7501
manual vvtk camera_st7501TSOLUTIONS
 
Current Events Crisis Analysis Essay This paper should be writte.docx
Current Events Crisis Analysis Essay This paper should be writte.docxCurrent Events Crisis Analysis Essay This paper should be writte.docx
Current Events Crisis Analysis Essay This paper should be writte.docxdorishigh
 
Paper less-pro-sb-quick-start-guide
Paper less-pro-sb-quick-start-guidePaper less-pro-sb-quick-start-guide
Paper less-pro-sb-quick-start-guiderb pn
 
Pangolin User Guide
Pangolin User GuidePangolin User Guide
Pangolin User Guidemattotamhe
 
Dreamweaver cs5.5 read me
Dreamweaver cs5.5 read meDreamweaver cs5.5 read me
Dreamweaver cs5.5 read mejosephegojocruz
 
Creating peer to peer network nadia perandos bisnar
Creating peer to peer network nadia perandos bisnarCreating peer to peer network nadia perandos bisnar
Creating peer to peer network nadia perandos bisnarPerla Pelicano Corpez
 
Raspberry pi and Azure
Raspberry pi and AzureRaspberry pi and Azure
Raspberry pi and AzureFaisal Mehmood
 
StoreGrid Installation
StoreGrid InstallationStoreGrid Installation
StoreGrid InstallationRevolucion
 
SafePeak Installation guide
SafePeak Installation guideSafePeak Installation guide
SafePeak Installation guideVladi Vexler
 

Similar to CloudStudio User manual (basic edition): (20)

Blockchain - Hyperledger Fabric v1.0 Running on LinuxONE, see it in action!
Blockchain - Hyperledger Fabric v1.0 Running on LinuxONE, see it in action!Blockchain - Hyperledger Fabric v1.0 Running on LinuxONE, see it in action!
Blockchain - Hyperledger Fabric v1.0 Running on LinuxONE, see it in action!
 
Creating mass users using e_catt
Creating mass users using e_cattCreating mass users using e_catt
Creating mass users using e_catt
 
AltiGen Max In Sight Manual
AltiGen Max In Sight  ManualAltiGen Max In Sight  Manual
AltiGen Max In Sight Manual
 
SCCM2012-UserGuide
SCCM2012-UserGuideSCCM2012-UserGuide
SCCM2012-UserGuide
 
GigaSpaces Cloud Computing Framework 4 XAP - Quick Tour - v2
GigaSpaces Cloud Computing Framework 4 XAP - Quick Tour - v2GigaSpaces Cloud Computing Framework 4 XAP - Quick Tour - v2
GigaSpaces Cloud Computing Framework 4 XAP - Quick Tour - v2
 
Microsoft Azure,AWS Cloud services and it's use
Microsoft Azure,AWS Cloud services and it's useMicrosoft Azure,AWS Cloud services and it's use
Microsoft Azure,AWS Cloud services and it's use
 
Create and Configure Windows Server 2016 VM in the Azure Step by Step
Create and Configure Windows Server 2016 VM in the Azure Step by StepCreate and Configure Windows Server 2016 VM in the Azure Step by Step
Create and Configure Windows Server 2016 VM in the Azure Step by Step
 
Support article1224
Support article1224Support article1224
Support article1224
 
Examen
ExamenExamen
Examen
 
Cloud-Aided Yocto Build Speedup
Cloud-Aided Yocto Build SpeedupCloud-Aided Yocto Build Speedup
Cloud-Aided Yocto Build Speedup
 
manual vvtk camera_st7501
manual vvtk camera_st7501manual vvtk camera_st7501
manual vvtk camera_st7501
 
Current Events Crisis Analysis Essay This paper should be writte.docx
Current Events Crisis Analysis Essay This paper should be writte.docxCurrent Events Crisis Analysis Essay This paper should be writte.docx
Current Events Crisis Analysis Essay This paper should be writte.docx
 
Paper less-pro-sb-quick-start-guide
Paper less-pro-sb-quick-start-guidePaper less-pro-sb-quick-start-guide
Paper less-pro-sb-quick-start-guide
 
Pangolin User Guide
Pangolin User GuidePangolin User Guide
Pangolin User Guide
 
Dreamweaver cs5.5 read me
Dreamweaver cs5.5 read meDreamweaver cs5.5 read me
Dreamweaver cs5.5 read me
 
Creating peer to peer network nadia perandos bisnar
Creating peer to peer network nadia perandos bisnarCreating peer to peer network nadia perandos bisnar
Creating peer to peer network nadia perandos bisnar
 
Raspberry pi and Azure
Raspberry pi and AzureRaspberry pi and Azure
Raspberry pi and Azure
 
HDP on Google Cloud
HDP on Google CloudHDP on Google Cloud
HDP on Google Cloud
 
StoreGrid Installation
StoreGrid InstallationStoreGrid Installation
StoreGrid Installation
 
SafePeak Installation guide
SafePeak Installation guideSafePeak Installation guide
SafePeak Installation guide
 

More from comworks

cloudstudioアプローチ別営業資料202403_en (1) (2).pptx
cloudstudioアプローチ別営業資料202403_en (1) (2).pptxcloudstudioアプローチ別営業資料202403_en (1) (2).pptx
cloudstudioアプローチ別営業資料202403_en (1) (2).pptxcomworks
 
EF-45NC虹彩認証のご紹介パンフレットになります。システム構成などが記載されております。
EF-45NC虹彩認証のご紹介パンフレットになります。システム構成などが記載されております。EF-45NC虹彩認証のご紹介パンフレットになります。システム構成などが記載されております。
EF-45NC虹彩認証のご紹介パンフレットになります。システム構成などが記載されております。comworks
 
EF45NC虹彩認証入退室管理システムのご利用例の紹介とご案内(comworks)
EF45NC虹彩認証入退室管理システムのご利用例の紹介とご案内(comworks)EF45NC虹彩認証入退室管理システムのご利用例の紹介とご案内(comworks)
EF45NC虹彩認証入退室管理システムのご利用例の紹介とご案内(comworks)comworks
 
紹介EF-45NC・設置方法について 虹彩迷彩を使い個人を特定し様々な使い方をする事が出来ます。
紹介EF-45NC・設置方法について  虹彩迷彩を使い個人を特定し様々な使い方をする事が出来ます。紹介EF-45NC・設置方法について  虹彩迷彩を使い個人を特定し様々な使い方をする事が出来ます。
紹介EF-45NC・設置方法について 虹彩迷彩を使い個人を特定し様々な使い方をする事が出来ます。comworks
 
cloudstudio_syarakuko_manualxxxxxxxxxxxxx
cloudstudio_syarakuko_manualxxxxxxxxxxxxxcloudstudio_syarakuko_manualxxxxxxxxxxxxx
cloudstudio_syarakuko_manualxxxxxxxxxxxxxcomworks
 
Zoom でライブ配信
Zoom でライブ配信Zoom でライブ配信
Zoom でライブ配信comworks
 
Youtubeでライブ配信
Youtubeでライブ配信Youtubeでライブ配信
Youtubeでライブ配信comworks
 
Aws でライブ配信
Aws でライブ配信Aws でライブ配信
Aws でライブ配信comworks
 
Gyogankunpp
GyogankunppGyogankunpp
Gyogankunppcomworks
 
CAMERA STATION
CAMERA STATION CAMERA STATION
CAMERA STATION comworks
 
Dahua blackbody
Dahua blackbodyDahua blackbody
Dahua blackbodycomworks
 
Callcenter
CallcenterCallcenter
Callcentercomworks
 

More from comworks (20)

cloudstudioアプローチ別営業資料202403_en (1) (2).pptx
cloudstudioアプローチ別営業資料202403_en (1) (2).pptxcloudstudioアプローチ別営業資料202403_en (1) (2).pptx
cloudstudioアプローチ別営業資料202403_en (1) (2).pptx
 
EF-45NC虹彩認証のご紹介パンフレットになります。システム構成などが記載されております。
EF-45NC虹彩認証のご紹介パンフレットになります。システム構成などが記載されております。EF-45NC虹彩認証のご紹介パンフレットになります。システム構成などが記載されております。
EF-45NC虹彩認証のご紹介パンフレットになります。システム構成などが記載されております。
 
EF45NC虹彩認証入退室管理システムのご利用例の紹介とご案内(comworks)
EF45NC虹彩認証入退室管理システムのご利用例の紹介とご案内(comworks)EF45NC虹彩認証入退室管理システムのご利用例の紹介とご案内(comworks)
EF45NC虹彩認証入退室管理システムのご利用例の紹介とご案内(comworks)
 
紹介EF-45NC・設置方法について 虹彩迷彩を使い個人を特定し様々な使い方をする事が出来ます。
紹介EF-45NC・設置方法について  虹彩迷彩を使い個人を特定し様々な使い方をする事が出来ます。紹介EF-45NC・設置方法について  虹彩迷彩を使い個人を特定し様々な使い方をする事が出来ます。
紹介EF-45NC・設置方法について 虹彩迷彩を使い個人を特定し様々な使い方をする事が出来ます。
 
cloudstudio_syarakuko_manualxxxxxxxxxxxxx
cloudstudio_syarakuko_manualxxxxxxxxxxxxxcloudstudio_syarakuko_manualxxxxxxxxxxxxx
cloudstudio_syarakuko_manualxxxxxxxxxxxxx
 
Cloud
CloudCloud
Cloud
 
Zoom でライブ配信
Zoom でライブ配信Zoom でライブ配信
Zoom でライブ配信
 
Youtubeでライブ配信
Youtubeでライブ配信Youtubeでライブ配信
Youtubeでライブ配信
 
Aws でライブ配信
Aws でライブ配信Aws でライブ配信
Aws でライブ配信
 
Webinar
WebinarWebinar
Webinar
 
Gyogankunpp
GyogankunppGyogankunpp
Gyogankunpp
 
CAMERA STATION
CAMERA STATION CAMERA STATION
CAMERA STATION
 
Dahua blackbody
Dahua blackbodyDahua blackbody
Dahua blackbody
 
Handy
HandyHandy
Handy
 
Handy
HandyHandy
Handy
 
Camera
CameraCamera
Camera
 
Tcb
TcbTcb
Tcb
 
Comworks2
Comworks2Comworks2
Comworks2
 
Gyobankun
GyobankunGyobankun
Gyobankun
 
Callcenter
CallcenterCallcenter
Callcenter
 

Recently uploaded

08448380779 Call Girls In Civil Lines Women Seeking Men
08448380779 Call Girls In Civil Lines Women Seeking Men08448380779 Call Girls In Civil Lines Women Seeking Men
08448380779 Call Girls In Civil Lines Women Seeking MenDelhi Call girls
 
IAC 2024 - IA Fast Track to Search Focused AI Solutions
IAC 2024 - IA Fast Track to Search Focused AI SolutionsIAC 2024 - IA Fast Track to Search Focused AI Solutions
IAC 2024 - IA Fast Track to Search Focused AI SolutionsEnterprise Knowledge
 
[2024]Digital Global Overview Report 2024 Meltwater.pdf
[2024]Digital Global Overview Report 2024 Meltwater.pdf[2024]Digital Global Overview Report 2024 Meltwater.pdf
[2024]Digital Global Overview Report 2024 Meltwater.pdfhans926745
 
Strategies for Unlocking Knowledge Management in Microsoft 365 in the Copilot...
Strategies for Unlocking Knowledge Management in Microsoft 365 in the Copilot...Strategies for Unlocking Knowledge Management in Microsoft 365 in the Copilot...
Strategies for Unlocking Knowledge Management in Microsoft 365 in the Copilot...Drew Madelung
 
FULL ENJOY 🔝 8264348440 🔝 Call Girls in Diplomatic Enclave | Delhi
FULL ENJOY 🔝 8264348440 🔝 Call Girls in Diplomatic Enclave | DelhiFULL ENJOY 🔝 8264348440 🔝 Call Girls in Diplomatic Enclave | Delhi
FULL ENJOY 🔝 8264348440 🔝 Call Girls in Diplomatic Enclave | Delhisoniya singh
 
Slack Application Development 101 Slides
Slack Application Development 101 SlidesSlack Application Development 101 Slides
Slack Application Development 101 Slidespraypatel2
 
The Role of Taxonomy and Ontology in Semantic Layers - Heather Hedden.pdf
The Role of Taxonomy and Ontology in Semantic Layers - Heather Hedden.pdfThe Role of Taxonomy and Ontology in Semantic Layers - Heather Hedden.pdf
The Role of Taxonomy and Ontology in Semantic Layers - Heather Hedden.pdfEnterprise Knowledge
 
SQL Database Design For Developers at php[tek] 2024
SQL Database Design For Developers at php[tek] 2024SQL Database Design For Developers at php[tek] 2024
SQL Database Design For Developers at php[tek] 2024Scott Keck-Warren
 
CNv6 Instructor Chapter 6 Quality of Service
CNv6 Instructor Chapter 6 Quality of ServiceCNv6 Instructor Chapter 6 Quality of Service
CNv6 Instructor Chapter 6 Quality of Servicegiselly40
 
GenCyber Cyber Security Day Presentation
GenCyber Cyber Security Day PresentationGenCyber Cyber Security Day Presentation
GenCyber Cyber Security Day PresentationMichael W. Hawkins
 
My Hashitalk Indonesia April 2024 Presentation
My Hashitalk Indonesia April 2024 PresentationMy Hashitalk Indonesia April 2024 Presentation
My Hashitalk Indonesia April 2024 PresentationRidwan Fadjar
 
Automating Business Process via MuleSoft Composer | Bangalore MuleSoft Meetup...
Automating Business Process via MuleSoft Composer | Bangalore MuleSoft Meetup...Automating Business Process via MuleSoft Composer | Bangalore MuleSoft Meetup...
Automating Business Process via MuleSoft Composer | Bangalore MuleSoft Meetup...shyamraj55
 
Transforming Data Streams with Kafka Connect: An Introduction to Single Messa...
Transforming Data Streams with Kafka Connect: An Introduction to Single Messa...Transforming Data Streams with Kafka Connect: An Introduction to Single Messa...
Transforming Data Streams with Kafka Connect: An Introduction to Single Messa...HostedbyConfluent
 
Data Cloud, More than a CDP by Matt Robison
Data Cloud, More than a CDP by Matt RobisonData Cloud, More than a CDP by Matt Robison
Data Cloud, More than a CDP by Matt RobisonAnna Loughnan Colquhoun
 
Google AI Hackathon: LLM based Evaluator for RAG
Google AI Hackathon: LLM based Evaluator for RAGGoogle AI Hackathon: LLM based Evaluator for RAG
Google AI Hackathon: LLM based Evaluator for RAGSujit Pal
 
Neo4j - How KGs are shaping the future of Generative AI at AWS Summit London ...
Neo4j - How KGs are shaping the future of Generative AI at AWS Summit London ...Neo4j - How KGs are shaping the future of Generative AI at AWS Summit London ...
Neo4j - How KGs are shaping the future of Generative AI at AWS Summit London ...Neo4j
 
Boost PC performance: How more available memory can improve productivity
Boost PC performance: How more available memory can improve productivityBoost PC performance: How more available memory can improve productivity
Boost PC performance: How more available memory can improve productivityPrincipled Technologies
 
Transcript: #StandardsGoals for 2024: What’s new for BISAC - Tech Forum 2024
Transcript: #StandardsGoals for 2024: What’s new for BISAC - Tech Forum 2024Transcript: #StandardsGoals for 2024: What’s new for BISAC - Tech Forum 2024
Transcript: #StandardsGoals for 2024: What’s new for BISAC - Tech Forum 2024BookNet Canada
 
WhatsApp 9892124323 ✓Call Girls In Kalyan ( Mumbai ) secure service
WhatsApp 9892124323 ✓Call Girls In Kalyan ( Mumbai ) secure serviceWhatsApp 9892124323 ✓Call Girls In Kalyan ( Mumbai ) secure service
WhatsApp 9892124323 ✓Call Girls In Kalyan ( Mumbai ) secure servicePooja Nehwal
 
Salesforce Community Group Quito, Salesforce 101
Salesforce Community Group Quito, Salesforce 101Salesforce Community Group Quito, Salesforce 101
Salesforce Community Group Quito, Salesforce 101Paola De la Torre
 

Recently uploaded (20)

08448380779 Call Girls In Civil Lines Women Seeking Men
08448380779 Call Girls In Civil Lines Women Seeking Men08448380779 Call Girls In Civil Lines Women Seeking Men
08448380779 Call Girls In Civil Lines Women Seeking Men
 
IAC 2024 - IA Fast Track to Search Focused AI Solutions
IAC 2024 - IA Fast Track to Search Focused AI SolutionsIAC 2024 - IA Fast Track to Search Focused AI Solutions
IAC 2024 - IA Fast Track to Search Focused AI Solutions
 
[2024]Digital Global Overview Report 2024 Meltwater.pdf
[2024]Digital Global Overview Report 2024 Meltwater.pdf[2024]Digital Global Overview Report 2024 Meltwater.pdf
[2024]Digital Global Overview Report 2024 Meltwater.pdf
 
Strategies for Unlocking Knowledge Management in Microsoft 365 in the Copilot...
Strategies for Unlocking Knowledge Management in Microsoft 365 in the Copilot...Strategies for Unlocking Knowledge Management in Microsoft 365 in the Copilot...
Strategies for Unlocking Knowledge Management in Microsoft 365 in the Copilot...
 
FULL ENJOY 🔝 8264348440 🔝 Call Girls in Diplomatic Enclave | Delhi
FULL ENJOY 🔝 8264348440 🔝 Call Girls in Diplomatic Enclave | DelhiFULL ENJOY 🔝 8264348440 🔝 Call Girls in Diplomatic Enclave | Delhi
FULL ENJOY 🔝 8264348440 🔝 Call Girls in Diplomatic Enclave | Delhi
 
Slack Application Development 101 Slides
Slack Application Development 101 SlidesSlack Application Development 101 Slides
Slack Application Development 101 Slides
 
The Role of Taxonomy and Ontology in Semantic Layers - Heather Hedden.pdf
The Role of Taxonomy and Ontology in Semantic Layers - Heather Hedden.pdfThe Role of Taxonomy and Ontology in Semantic Layers - Heather Hedden.pdf
The Role of Taxonomy and Ontology in Semantic Layers - Heather Hedden.pdf
 
SQL Database Design For Developers at php[tek] 2024
SQL Database Design For Developers at php[tek] 2024SQL Database Design For Developers at php[tek] 2024
SQL Database Design For Developers at php[tek] 2024
 
CNv6 Instructor Chapter 6 Quality of Service
CNv6 Instructor Chapter 6 Quality of ServiceCNv6 Instructor Chapter 6 Quality of Service
CNv6 Instructor Chapter 6 Quality of Service
 
GenCyber Cyber Security Day Presentation
GenCyber Cyber Security Day PresentationGenCyber Cyber Security Day Presentation
GenCyber Cyber Security Day Presentation
 
My Hashitalk Indonesia April 2024 Presentation
My Hashitalk Indonesia April 2024 PresentationMy Hashitalk Indonesia April 2024 Presentation
My Hashitalk Indonesia April 2024 Presentation
 
Automating Business Process via MuleSoft Composer | Bangalore MuleSoft Meetup...
Automating Business Process via MuleSoft Composer | Bangalore MuleSoft Meetup...Automating Business Process via MuleSoft Composer | Bangalore MuleSoft Meetup...
Automating Business Process via MuleSoft Composer | Bangalore MuleSoft Meetup...
 
Transforming Data Streams with Kafka Connect: An Introduction to Single Messa...
Transforming Data Streams with Kafka Connect: An Introduction to Single Messa...Transforming Data Streams with Kafka Connect: An Introduction to Single Messa...
Transforming Data Streams with Kafka Connect: An Introduction to Single Messa...
 
Data Cloud, More than a CDP by Matt Robison
Data Cloud, More than a CDP by Matt RobisonData Cloud, More than a CDP by Matt Robison
Data Cloud, More than a CDP by Matt Robison
 
Google AI Hackathon: LLM based Evaluator for RAG
Google AI Hackathon: LLM based Evaluator for RAGGoogle AI Hackathon: LLM based Evaluator for RAG
Google AI Hackathon: LLM based Evaluator for RAG
 
Neo4j - How KGs are shaping the future of Generative AI at AWS Summit London ...
Neo4j - How KGs are shaping the future of Generative AI at AWS Summit London ...Neo4j - How KGs are shaping the future of Generative AI at AWS Summit London ...
Neo4j - How KGs are shaping the future of Generative AI at AWS Summit London ...
 
Boost PC performance: How more available memory can improve productivity
Boost PC performance: How more available memory can improve productivityBoost PC performance: How more available memory can improve productivity
Boost PC performance: How more available memory can improve productivity
 
Transcript: #StandardsGoals for 2024: What’s new for BISAC - Tech Forum 2024
Transcript: #StandardsGoals for 2024: What’s new for BISAC - Tech Forum 2024Transcript: #StandardsGoals for 2024: What’s new for BISAC - Tech Forum 2024
Transcript: #StandardsGoals for 2024: What’s new for BISAC - Tech Forum 2024
 
WhatsApp 9892124323 ✓Call Girls In Kalyan ( Mumbai ) secure service
WhatsApp 9892124323 ✓Call Girls In Kalyan ( Mumbai ) secure serviceWhatsApp 9892124323 ✓Call Girls In Kalyan ( Mumbai ) secure service
WhatsApp 9892124323 ✓Call Girls In Kalyan ( Mumbai ) secure service
 
Salesforce Community Group Quito, Salesforce 101
Salesforce Community Group Quito, Salesforce 101Salesforce Community Group Quito, Salesforce 101
Salesforce Community Group Quito, Salesforce 101
 

CloudStudio User manual (basic edition):

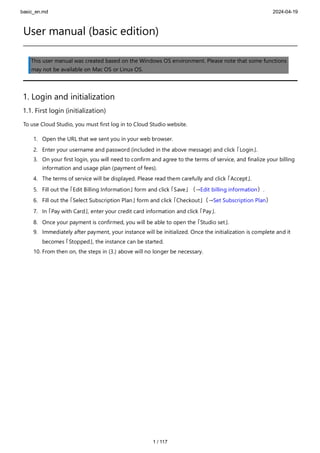
  • 1. basic_en.md 2024-04-19 1 / 117 User manual (basic edition) This user manual was created based on the Windows OS environment. Please note that some functions may not be available on Mac OS or Linux OS. 1. Login and initialization 1.1. First login (initialization) To use Cloud Studio, you must first log in to Cloud Studio website. 1. Open the URL that we sent you in your web browser. 2. Enter your username and password (included in the above message) and click 「Login」. 3. On your first login, you will need to confirm and agree to the terms of service, and finalize your billing information and usage plan (payment of fees). 4. The terms of service will be displayed. Please read them carefully and click 「Accept」. 5. Fill out the 「Edit Billing Information」 form and click 「Save」 (→Edit billing information). 6. Fill out the 「Select Subscription Plan」 form and click 「Checkout」(→Set Subscription Plan) 7. In 「Pay with Card」, enter your credit card information and click 「Pay」. 8. Once your payment is confirmed, you will be able to open the 「Studio set」. 9. Immediately after payment, your instance will be initialized. Once the initialization is complete and it becomes 「Stopped」, the instance can be started. 10. From then on, the steps in (3.) above will no longer be necessary.
  • 3. basic_en.md 2024-04-19 3 / 117 1.2. Enabling Multi-Factor Authentication We recommend enabling multi-factor authentication to properly protect your account. Multi-factor authentication can be used by installing an Authenticator app (e.g. Google Authenticator) on your smartphone.
  • 4. basic_en.md 2024-04-19 4 / 117 Multi-factor authentication can only be registered on one smartphone at a time. You cannot register on multiple smartphones at the same time. To enable multi-factor authentication, follow the steps below. 1. Install the Authenticator app from your smartphone's app store. 2. Log in to the Cloud Studio website in your web browser. 3. Click Change Password at the bottom of the site. 4. Click 「Enable」 for Multi-Factor Authentication. 5. Scan the QR code displayed on the 「Set up multi-factor authentication」 form with the Authenticator app installed on your smartphone. ※For Google Authenticator: Tap + at the bottom right of the screen → tap Scan QR code 6. A 6-digit verification code will be displayed on your registered account. 7. Return to your web browser and enter your 6-digit authentication code in the 「One-time password」 field on the 「Set up multi-factor authentication」 form and click Continue. 8. If the verification code is correct, multi-factor authentication will be enabled. 9. From your next login, you will be required to enter the 6-digit verification code displayed on the Authenticator app.
  • 6. basic_en.md 2024-04-19 6 / 117 Conversely, if you want to disable the multi-factor authentication that has already been set, click 「Disable」 under 「Multi-factor authentication」.
  • 7. basic_en.md 2024-04-19 7 / 117 If you have lost your password, you can reset it by following the steps below. However, to reset your password, you will need to receive an email from Cloud Studio (noreply@cloudstudio.jp) using your registered email address. 1. Open Cloud Studio website in your web browser. 2. Click on Password Reminder. 3. Enter your username in 「Username」 and click Submit. 4. An email with instructions to reset your password will be sent to your registered email address. (If you don't see it in your inbox, please check if it's in your spam folder) 5. Follow the steps to open the 「Password Reset」 form in your web browser. 6. Decide on a new password to use for login, enter it in 「New Password」 and click Save. (Important: To maintain good account security, please make your password at least 10 characters long and include at least one uppercase letter, one lowercase letter, and one number) 7. Your password will be reset with a new one and you will be logged in. You can use your new password the next time you log in. 1.3. If you forget your password
  • 9. basic_en.md 2024-04-19 9 / 117 If multi-factor authentication was enabled, password reset will also disable multi-factor authentication. 1.4. If multi-factor authentication is no longer possible due to changes in smartphone models, etc. Along with password reset, you can also reset multi-factor authentication (→If you have forgotten your password) 2. Basic terminology 2.1. What is a Studio Set? A studio set is a virtual broadcast studio that is built on the cloud. Multiple instances are connected within the studio set, and video and audio transmission (NDI communication) can be performed between them within the studio set. 2.2. What is an Instance? An instance is a virtual PC (VM) that is launched on the cloud. Multiple types (instance types) are available, and each type is created from a preset image, so the setup environment will automatically start up. Therefore, you can quickly start using pre-installed apps after booting. ※Licenses for various paid applications are not included and must be purchased separately. Instance Size Instance size refers to the performance metrics of an instance. As the size increases from 2x to 3x, etc., the number of CPUs (referred to as vCPUs since it is a virtual PC on the cloud) and the memory capacity increase. The specific specifications for each size vary depending on the instance type. Storage Size Instances have a storage size set apart from the instance type and instance size. Storage here refers to the disk drive where the OS is installed.
  • 10. basic_en.md 2024-04-19 10 / 117 2.3. What is an (instance) group? This feature allows you to manage instances by dividing them into groups (colors). For example, it can be used to add colors to suit the purpose. (Example: Input is aqua, composition is green, encoder is yellow, etc.) 2.4. What is credit (remaining time, data-transfer capacity)? Cloud Studio requires credits to run instances and cloud file storage. Credits are expressed in terms of 「remaining time」 and 「data transfer capacity 」, 1 minute of credit residual time to run for 1 minute , 1GB of data transfer space is consumed to transfer 1GB of data to the Internet. Credits are replenished periodically (e.g., every month for a monthly subscription) based on your subscription. Additionally, you can purchase credit add-on packs to replenish them instantly. The instance and cloud file storage will automatically stop when the credits are empty. There will be a grace period of about one hour before the shutdown, but the overage will be deducted as soon as the credits are replenished, since the overage will also be charged to your credit. Cloud Studio has a 「credit alert」 function that notifies you when your credits are running low. Please utilize this function (→ Configuring Credit Alert Rules). 2.5. What is Nice DCV? Cloud Studio's remote desktop connection uses a product called Nice DCV. Nice DCV has the advantage of being able to operate at high frame rates and low latency, and can take advantage of hardware support (GPU support). You can also connect speakers, microphones, and USB devices from your local PC to a remote PC (instance). It is also easy to connect to the 「web client」 from a web browser. You can also download and install a dedicated client for a higher-quality experience. For practical purposes, the dedicated client is more recommended.(→Download the dedicated client (external site)) 3. Starting and Stopping Studio Sets and Instances 3.1. Launching an entire studio set You can launch all instances of a studio set at once. 1. Open studio set. 2. Click Launch in the upper right corner of the site. 3. All instances will be launched.
  • 11. basic_en.md 2024-04-19 11 / 117 3.2. Launching Instances Individually You can launch instances individually. 1. Open studio set. 2. Click on the instance you want to launch to open it. 3. Click Launch in the upper right corner of the site. 4. The status of the currently open instance will be Launching. 5. After a few moments, the status of the instance will be Up. When an instance performs an entire 「launch」 of an individually launched Studio Set, the remaining instances that have not yet been launched are launched. 3.3. Forced suspension of the entire studio set In order to shut down safely, you should usually stop the OS individually.(→Stop Instance Individually) You can force stop all instances of a Studio Set at once from the Cloud Studio website. 1. Open studio set. 2. Click Stop in the upper right corner of the site. 3. All instances will be stopped.
  • 12. basic_en.md 2024-04-19 12 / 117 3.4. Stopping an Instance Individually In order to shut down safely, you should usually stop it from the OS by following the steps below. For Windows OS Instances 1. Access your instance's desktop in some way.(→Instance access) 2. Click on the power symbol from the 「Start Menu」. 3. Click Shut Down. 4. 「Select the item that best describes the reason for shutting down this PC」 will be displayed. Leave Other (unplanned) selected and click Continue. 5. The instance is shut down and the client is disconnected. The status of the instance will be Stopped. 6. After a few moments, the status of the instance becomes Stopped.
  • 13. basic_en.md 2024-04-19 13 / 117 For Linux OS Instances 1. Access your instance's desktop in some way.(→Instance access) 2. Click on the power symbol from the 「menu」. 3. Click Shut Down. 4. The instance is shut down and the client is disconnected. The status of the instance will be Stopped. 5. After a few moments, the status of the instance becomes Stopped.
  • 15. basic_en.md 2024-04-19 15 / 117 For Linux OS instances, you can also log in with SSH to stop it. This is useful in case you lose access to your desktop. 1. Access the instance with SSH.(→SSH access) 2. At the command line prompt, enter sudo shutdown -h now and press ENTER key. 3. The instance is shut down and SSH is also disconnected. The status of the instance will be Stopped. 4. After a few moments, the status of the instance becomes Stopped. Forced Stop You can force stop individual instances from the Cloud Studio website. 1. Open studio set. 2. Click on the instance you want to stop and open it. 3. Click Stop in the upper right corner of the site. 4. The status of the currently open instance will be Stopped. 5. After a few moments, the status of the instance becomes Stopped.
  • 16. basic_en.md 2024-04-19 16 / 117 If you perform an entire 「stop」 of a studio set that has been individually stopped, the remaining instances that have not yet been stopped will be forcibly stopped. 3.5. Rebooting an Instance In order to restart safely, you should usually reboot from the OS by following the steps below. For Windows OS Instances 1. Access your instance's desktop in some way.(→Instance access) 2. Click on the power symbol from the 「Start Menu」. 3. Click Restart. 4. "Select the item that best describes the reason for shutting down this PC" will be displayed. Leave 「Other (unplanned)」 selected and click Continue. 5. The instance is rebooted and the client is disconnected. The status of the instance will be Rebooting. 6. When the status of the instance returns to "Running", the reboot is complete.
  • 17. basic_en.md 2024-04-19 17 / 117 For Linux OS Instances 1. Access your instance`s desktop in some way.(→Instance access) 2. Click on the power symbol from the 「menu」. 3. Click Restart. 4. The instance is rebooted and the client is disconnected. The status of the instance will be Rebooting. 5. When the status of the instance returns to 「Up」, the reboot is complete.。
  • 19. basic_en.md 2024-04-19 19 / 117 For Linux OS instances, you can also log in with SSH and reboot. This is useful in case you lose access to your desktop. 1. Access the instance with SSH.(→SSH access) 2. At the command line prompt, enter sudo reboot and press ENTER. 3. The instance is rebooted and SSH is disconnected. The status of the instance will be Rebooting. 4. When the status of the instance returns to 「Running」, the reboot is complete. Force Restart You can force a reboot of an instance from the Cloud Studio website. (This is equivalent to pressing the reset button on your PC.) 1. Open studio set. 2. Click on the instance you want to reboot to open it. 3. Click Restart in the upper right corner of the site. 4. The status of the currently open instance will be Rebooting. 5. When the status of the instance returns to "Up", the reboot is complete.
  • 20. basic_en.md 2024-04-19 20 / 117 4. Accessing Your Instance The instance is a virtual PC launched in the cloud , so you need to access it with a remote desktop to use it. You can access it in several ways 4.1. Using the web client The easiest way to access it is from a web browser using a web client. You can use the web client to access it without having to install anything on your PC. 1. Open Cloud Studio website in a web browser and log in. 2. Open the studio set and click on the instance you wish to access. 3. Make sure your instance is 「running」(→Launch Instance) 4. Click on Open Remote Desktop. 5. You will see 「Nice DCV」 sign-in. Username and Password are listed in the 「Login Info」 section of the instance details. Please copy and paste the Login Username and Password respectively. (Important: The password is automatically generated each time you launch the instance) 6. After connecting, you should see the desktop of the instance after a few moments.
  • 21. basic_en.md 2024-04-19 21 / 117 4.2. Use a dedicated client It takes a little time, but the most stable access method is to install a dedicated client on your PC and access it. For full-fledged use, we recommend that you install a dedicated client. 1. Download and install the Nice DCV client. Compatible with Windows, MacOS, and Linux. You can download it from here(external site). 2. Open Cloud Studio website in a web browser and log in. 3. Open the studio set and click on the instance you wish to access. 4. Make sure your instance is 「Running」.(→Launch Instance) 5. Click on DCV Client URL from Login Info. 6. From your web browser, you will be asked if you want to open DCV Client, so click Open DCV Client. 7. Nice DCV will then display a login form. Return to your web browser and copy and paste the 「Login User Name」 and 「Password」 displayed in 「Login Info」. Enter the Username and Password respectively and click on Login. (Important: The password is automatically generated each time you launch the instance) 8. After connecting, you should see the desktop of your instance after a few moments.
  • 22. basic_en.md 2024-04-19 22 / 117 4.3. Use an RDP client *Windows OS instance only, emergency use Instances with a Windows OS can be accessed with a standard Windows RDP client (Remote Desktop Connection). However, keep in mind some limitations and recommend that you use it for recovery in the event that you lose access using the above two methods. RDP Client Limitations Hardware (GPU) assistance may be disabled Poor operation response Video display stutters 1. Open the 「Start Menu」 of your local PC and click Remote Desktop Connection from Windows Accessories to launch it. 2. Open Cloud Studio website in a web browser and log in. 3. Open the studio set and click on the instance you wish to access. 4. Make sure your instance is 「Running」.(→Launch Instance) 5. Copy and paste the 「Host Address」 displayed in 「Login Info」 and enter it into the Computer field of the Remote Desktop Connection. Click on Connect. 6. When you are prompted to 「Trust this remote connection?」, click Connect. 7. The Enter Credentials form is displayed. Return to your web browser and copy and paste the 「Login User Name」 and 「Password」 displayed in 「Login Info」. Enter the Username and Password respectively and click OK.(Important: The password is automatically generated each time you launch the instance) 8. 「Unable to identify the identity of this remote computer, do you want to connect?」 You will be warned, but please click Yes to proceed. If you check Do not ask me to connect to this computer again before clicking Yes, you can skip this step next time. 9. After connecting, you should see the desktop of your instance after a few moments.
  • 24. basic_en.md 2024-04-19 24 / 117 4.4. SSH access * Linux OS instances only, emergency use Instances with a Linux OS (e.g., Ubuntu) can be accessed with an SSH client. To access with an SSH client, you will use the command line interface. In addition to mouse operation, you cannot do any graphical work such as video playback. It should only be used for emergency tasks such as file copying in situations where desktop access is not available. Also, be sure to have a system administrator who has experience using a Linux command shell. 1. Start the SSH client. (Here, we take TeraTerm for Windows OS as an example) 2. Open Cloud Studio website in a web browser and log in. 3. Open the studio set from the 「Dashboard」 and click on the instance you want to access. Or click directly on the instance you wish to access from the 「Dashboard」 to open its details. 4. Make sure your instance is 「unning」.(→Launch Instance) 5. Copy and paste the 「Host Address」 displayed in 「Login Info」 and click Fill in the Host field in the TeraTerm 「New Connection」 form and click OK. 6. You may see Security Warning and a warning, click Continue. 7. Go back to your web browser and copy and paste the 「Login Username」 and 「Password」 displayed in 「Login Info」. Enter the Username and Password in the TeraTerm 「SSH Authentication」 form, respectively, and select Use Plain Password. Click OK. 8. After connecting, a command line prompt will appear. 4.5. File upload and file download to the instance Use cloud file storage Upload files quickly and easily via cloud file storage (if you have an active plan) Cloud file storage is a common network storage for Cloud Studio that is automatically mounted on all instances. The uploaded file can be accessed directly from within the instance with a file manager such as Explorer (in the case of Windows OS). It can also be opened directly from applications such as vMix or OBS Studio. You can also save files directly from your instance to cloud file storage, and the saved files can be stored on Cloud Studio website or in the It can be downloaded with a WebDAV client or an SFTP client. See Access to cloud file storage .
  • 25. basic_en.md 2024-04-19 25 / 117 Use Nice DCV Client You can use Nice DCV client (web client, dedicated client) to upload files to your instance, or use the You can download files from your instance. 【Upload】 1. In the web client or dedicated client, click on Storage or Filestorage in the upper left corner of the screen. 2. Click Upload file and select the file you want to upload. 3. (It may take some time depending on the file size) When the file is uploaded, it will be added to the file list. 4. The uploaded file is stored in a specific folder in the instance. For Windows OS instances: C:UsersAdministratorDCVStorage For Linux OS instances: /home/ubuntu/DCVStorage
  • 26. basic_en.md 2024-04-19 26 / 117 If you are using a dedicated client, you can select multiple files and upload them at once. It also supports drag and drop. 【Download】 1. You need to move or copy the file you want to download to a specific folder in your instance in advance. For Windows OS instances: C:UsersAdministratorDCVStorage For Linux OS instances: /home/ubuntu/DCVStorage 2. In the web client or dedicated client, click on Storage or Filestorage in the upper left corner of the screen. 3. Click on the name of the file you want to download from the file list. 4. (This may take some time depending on the file size) Once the file has been downloaded, It is saved to the download folder on your local PC (for web clients) or on your desktop (for dedicated clients).
  • 27. basic_en.md 2024-04-19 27 / 117 Use RDP client *Windows OS instances only You can use the standard Windows RDP client (Remote Desktop Connection) to upload files to your instance, You can download files from your instance. Connect the drive of the selected local PC to the instance to exchange files. 1. Start the RDP client.(→Use RDP client) 2. When the Remote Desktop Connection opens, click Show Options. 3. Click on Local Resources. 4. Click on Details under 「Local Devices and Resources」. 5. Find 「Drives」 in the tree, check the drive you want to connect to the instance and click OK. 6. Click General and enter the 「Host Address」 of the instance in Computer, then click Connect to connect to the instance. (→Use RDP Client) 7. Once connected to the instance, open the explorer and click on Network from the tree on the left side of the window. 8. Click on tsclient. 9. The connected drive will be displayed as tsclientC, click on it to open it. 10. The contents of the drive of the local PC will be displayed. You can copy(upload) the file to the folder of your instance here, You can copy (download) from the folder of the instance to the folder of the local PC.
  • 28. basic_en.md 2024-04-19 28 / 117 The RDP client must remain connected during the upload and download. 4.6. Editing Studio Sets The 「name」 of the studio set is the one that Cloud Studio automatically named by default (e.g., Entry set) You can change the name to anything you like. 1. Open Cloud Studio website in a web browser and log in. 2. Open studio set. 3. Click Edit in the upper right corner of the site.
  • 29. basic_en.md 2024-04-19 29 / 117 4. In the 「Edit Studio Set」 form that opens, enter your preferred studio set name in the Name field and click Save. 5. The name of the studio set will be changed to the one entered. 4.7. Editing an Instance The 「name」 of the instance is the one that Cloud Studio automatically named by the initial state (e.g., vmix1, obs1, miniserver1) You can change the name to anything you like. However, the name of the instance can only contain single-byte alphanumeric characters and 「-」 (hyphen), and cannot contain spaces. It must also be at least 4 characters and no more than 15 characters. The 「group」 of the instance is automatically set according to the instance type in the initial state (e.g. vMix is green, OBS is orange, MiniServer is aqua) You can change this group to whatever you want. 1. Open Cloud Studio website in a web browser and log in. 2. Open the Studio Set, click on the instance you want to edit, and click Edit in the upper right corner of the site. Alternatively, you can click on Edit on the instance directly from the Studio Set. 3. In the 「Edit Instance」 form, enter (1) the name of the instance and (2) the group and click Save. 4. The name and group of the instance will be changed to the ones you entered. The computer name will also be changed the next time the instance is launched.
  • 30. basic_en.md 2024-04-19 30 / 117 5. Access to cloud file storage Cloud Studio has plans that come with dedicated cloud file storage. Cloud file storage is network storage that is located within a studio set and can be accessed directly from the instance. Files stored in cloud file storage can be opened directly from applications such as vMix and OBS Studio. Similarly, the opposite allows you to save files directly from the application.
  • 31. basic_en.md 2024-04-19 31 / 117 You can also upload and download to cloud file storage from your web browser. In addition to uploading files by dragging and dropping them into Cloud Studio website, You can download multiple selected files at once. You can also use an SFTP or WebDAV client to upload and download files directly from your local PC to CloudStudio. About file names The file name can contain double-byte characters and Japanese. However, emojis are not allowed. If special characters or machine-dependent characters are used, the file name may be garbled (??? etc.). Technically, on cloud file storage, To ensure compatibility between Windows and Linux OS, the file name is stored as EUC-JP instead of utf-8. About the amount transferred Your subscription plan determines the maximum amount of data transfer (sending data from Cloud Studio to the internet). In addition to sending data from the instance, previewing and downloading files in file storage consumes data transfer space. If you run out of data transfer capacity, you will temporarily lose access to your file storage, so if you have a low amount, you will need to replenish it with a credit pack. 5.1. Access from the instance If you have cloud file storage in your studio set, it will be mounted automatically when you launch the instance. The mounting location depends on the OS of the instance . Windows OS Instances E: is mounted on the drive. Open 「This PC」 in File Explorer and click on 「fsx (E:)」 displayed in 「Network Locations」.
  • 32. basic_en.md 2024-04-19 32 / 117 Linux OS Instances Mounted on /mnt/shared. Click on the shortcut (symbolic link) that says「shared」 on your desktop.
  • 33. basic_en.md 2024-04-19 33 / 117 5.2. SFTP client access SFTP client can be SFTP Drive, WinSCP, or the standard OS sftp command (command line interface). 1. On Cloud Studio website, go to the 「Studio Sets」 → 「File Storage」 tabs. 2. Check the 「Network Info」 at the bottom of the page. 「SFT host」, 「SFTP port」, and 「SFTP root path」 are the information required for connection. 3. Log in with the same username and password that you use to log in to Cloud Studio website. 5.3. Access with a WebDAV client WebDAV clients such as CarotDAV and WinSCP can be used. In addition, although it is only downloadable, it is accessible on a web browser. Standard Windows WebDAV client is deprecated Standard Windows WebDAV client (can be connected by 「Add a network location」 in File Explorer) has a limited file size that can be transferred, and it freezes when transferring huge files in GB. Even if you use it, we recommend that you limit it to small text files and images, and avoid using it as much as possible. Note that WebDAV has also been deprecated by Microsoft 1. On the Cloud Studio website, go to the 「Studio Sets」 → 「File Storage」 tabs. 2. Check the 「Network Info」 at the bottom of the page. 「WebDAV URL」 is the information required for connection (* 「WebDAV URL」 can also be opened with a web browser) 3. Both WebDAV clients and web browsers To log in, use the same username and password that you use to log in to the Cloud Studio website.
  • 34. basic_en.md 2024-04-19 34 / 117 5.4. Access via web browser Even if you don‘t install any software, You can upload and download files directly from your web browser and Cloud Studio website. Log in to Cloud Studio website and open the 「File Storage」 tab → 「Studio Set」. If it is the first access, the 「Top」 folder will be displayed empty. If any files are already stored, a list of files in the 「Top」 folder will be displayed.
  • 35. basic_en.md 2024-04-19 35 / 117 Upload There are two ways to upload a file. 1) Drag and Drop 1. Go to 「File Storage」 on Cloud Studio website. 2. Open the upload folder. 3. Drag the file you want to upload from the explorer and drop it into the file storage. Drag-and-drop allows you to include multiple files and folders. 4. Drop a file or folder and it will immediately start uploading to the cloud file storage. You can check the progress of the upload in the task list at the bottom right of the screen. If you want to stop the upload in the middle, click the 「×」 button from the task list.
  • 36. basic_en.md 2024-04-19 36 / 117 2) 「Upload File」 button In an environment where drag-and-drop is not available (e.g., smartphones, etc.), you can upload by using the 「Upload File」 button. 1. Go to 「File Storage」 on Cloud Studio website. 2. Open the upload folder. 3. Click the 「Upload File」 button at the top of the file list. 4. The OS standard file selection dialog will open, so select the file you want to upload. Again, it is possible to select multiple files. Folders cannot be selected (entire folders cannot be uploaded)
  • 37. basic_en.md 2024-04-19 37 / 117 5. Click the 「Open」 button in the file selection dialog to start uploading. You can check the progress of the upload in the task list at the bottom right of the Cloud Studio website. If you want to stop the upload in the middle, click the 「×」 button from the task list. If there is a file or folder with the same name in the destination folder, it will be overwritten.
  • 38. basic_en.md 2024-04-19 38 / 117 Download (file only) Click on the file name to download it. Alternatively, you can click on the 「Download Button」 as well.
  • 39. basic_en.md 2024-04-19 39 / 117 Download (multiple files and folders) 1. Select the file or folder you want to download with the checkbox to the left of the list (files and folders can be mixed) 2. After that, click the 「Download Selected」 button displayed at the top of the list to download all the files selected by the checkbox. If you click the 「Download」 button on the folder, you will download all the files in the folder. Batch download compresses multiple files into ZIP format (ZIP64). About the file size of ZIP compression Since we are using ZIP64 for ZIP compression here, there is no particular file size limit. About ZIP file names and download locations The ZIP file is automatically named download-[number].zip. It is also automatically stored in your web browser's Downloads folder. 3. You can check the progress of the download in the task list at the bottom right of the Cloud Studio website. Since the transmission is done while compressing, you cannot check the progress in the 「Download History」 of the web browser. If you want to stop the download in the middle, you can cancel it from the 「Download History」 of your web browser, or Click the 「×」 button from the task list on the Cloud Studio website.
  • 40. basic_en.md 2024-04-19 40 / 117 Create a subfolder 1. First, open the folder where you want to create a subfolder. 2. Click the 「Create Subfolder」 button at the top of the list. 3. When the folder name input dialog box appears, decide on a name, enter it, and click the 「Create」 button.
  • 41. basic_en.md 2024-04-19 41 / 117 If you check the 「Open folder」 checkbox, the created folder will be open. If there are subfolders or files with the same name in the folder, an error occurs. Delete (File or Folder) 1. Click the 「Delete」 button on the file or folder. 2. A deletion confirmation dialog will be displayed, so click the 「OK」 button if you are satisfied with the deletion. Any files or subfolders left in the folder will be deleted with it. Once the deletion is executed, it cannot be canceled, so please be careful when clicking the 「OK」 button. Also, as a general rule, deleted files cannot be recovered.
  • 42. basic_en.md 2024-04-19 42 / 117 It is also possible to select multiple files and folders and delete them at once. 1. Select the file or folder you want to delete from the checkbox on the left side of the file/folder list. 2. Click the 「Remove Selected」 button at the top of the list. 3. A confirmation dialog will be displayed, so click the "OK" button if you want to delete it as it is. Copy (file or folder) 1. Click the Copy button for the file or folder. 2. When the name setting dialog box appears, enter the name of the copy destination and click the 「OK」 button.
  • 43. basic_en.md 2024-04-19 43 / 117 By default, the name of the destination is the source name followed by (number). If you are satisfied with this as it is, you can click the 「OK」 button without editing. You can change the file folder name later. 3. A copy of the file is created in the same folder. You can check the progress of the copy in the task list at the bottom right of Cloud Studio website. If you want to stop copying, click the 「×」 button from the task list. An error occurs if a file or subfolder with the same name exists in the folder. Copying files is done server-side (no download-upload occurs)
  • 44. basic_en.md 2024-04-19 44 / 117 Move (file or folder) 1. Click the 「Move」 button for the file or folder. 2. When the destination folder selection dialog is displayed, select the destination folder (check box on the left side of the list), and click Click on the 「OK」 button. When you move a folder, you can‘t select the folder itself and its underlying folders. If there is a file subfolder with the same name in the destination folder, an error will occur (no overwriting will be performed)
  • 45. basic_en.md 2024-04-19 45 / 117 It is also possible to select multiple files and folders and move them at once. 1. Select the file or folder you want to move with the checkbox on the left side of the file/folder list. 2. Click the 「Move Selection」 button at the top of the list. 3. When the destination folder selection dialog is displayed, select the destination folder and click the 「OK」 button.
  • 46. basic_en.md 2024-04-19 46 / 117 If there is a folder in the selected list, you cannot move the folder itself and its descendants. If there is a file or folder with the same name directly under the destination folder, the corresponding file or folder will be an error (it will not be overwritten) Rename (file or folder) 1. Click the 「Rename」 button for the file or folder. 2. When the name setting dialog box appears, enter the name of the target and click the 「OK」 button.
  • 47. basic_en.md 2024-04-19 47 / 117 If the name of the target already exists in the same folder, an error will occur. File sharing Cloud File Storage allows you to share files with third parties (guests) other than Cloud Studio users. With the file sharing feature, you create a shared URL with a password, and you send the URL and password to the guest yourself. 1. Click the 「Share」 button of the file you want to share from the file list. 2. When the file sharing dialog box appears, enter a 「password」, select 「expiration date」, and click the 「Create」 button. 3. Send the displayed share URL and password to the guest via any method (e.g., email).
  • 48. basic_en.md 2024-04-19 48 / 117 Since it is not possible to check the password once set, please make a note of the entered password. Check the 「Save share URL and password to file」 checkbox to create a shared URL and save the downloaded file to your local PC. If you lose your password, you won`t be able to use the share URL. 4. When guests access the shared URL, they will be prompted to enter their password. 5. If you enter the password correctly, you will be able to access (view and download) the file (Click the 「Download」 button) If you delete the shared URL or it expires, guests won`t be able to access the file.
  • 52. basic_en.md 2024-04-19 52 / 117 Folder sharing function (read-only mode) With cloud file storage, you can share not only individual files but also individual folders. There are two types of folder sharing features: read-only mode and writable (upload) mode. In this section, you will share the folder in read-only mode. 1. Open the folder you want to share on Cloud Studio website and click the 「Share Folder」 menu from the 「Folder Actions」 pull-down menu. Alternatively, you can click the Share button on a folder from the list. 2. When the folder sharing dialog is displayed, enter the 「Password」 and select 「Expiration Date」. 3. Next, if you want to include subfolders of the folder (and subsequent buy folders) in the share, check 「Include subfolders」. If you do not check the box, only the files directly under the target folder will be shared. 4. Check 「Read-only」. 5. Click the 「Create」 button. 6. Send the displayed share URL and password to the guest via any method (e.g., email). Since it is not possible to check the password once set, please make a note of the entered password. Check the 「Save share URL and password to fil」 checkbox to create a shared URL and save the downloaded file to your local PC. You also can‘t change your password, so you won’t be able to use the shared URL if you lose the password (you‘ll need to delete and recreate it). 7. When guests access the shared URL, they will be prompted to enter their password. 8. If you enter the password correctly, you will be able to access the folder (view and download files). The shared URL author can access it without entering a password.
  • 55. basic_en.md 2024-04-19 55 / 117 The file browser is operated in the same way as the screen for Cloud Studio users. In read-only mode, you can: Folder sharing function (read/write mode) Folder sharing has a read-write mode that accepts file uploads from guests. In read/write mode, guests can upload files and perform other actions that would normally be performed by Cloud Studio users, such as deleting, copying, and moving files. List of files List of subfolders (if 「 Include subfolders」 ) Image thumbnails, video previews Download individual files Batch file download Batch folder download (in the case of 「 Include subfolders」 )
  • 56. basic_en.md 2024-04-19 56 / 117 1. Open the folder you want to share on the Cloud Studio website and click the 「Share Folder」 menu from the 「Folder Actions」 pull-down menu. Alternatively, you can click the Share button on a folder from the list. 2. When the folder sharing dialog is displayed, enter a 「password」 and select 「expiration date」. 3. Next, if you want to include subfolders of the folder (and subsequent buy folders) in the share, check 「Include subfolders」. If you do not check the box, only the files directly under the target folder will be shared. 4. Uncheck 「Read-only」. 5. Set the amount of storage that guests can use in the 「Space Allocation」 field. If it is not filled, the capacity limit will not be applied. 6. Click the 「Create」 button. 7. Send the displayed share URL and password to the guest via any method (e.g., email). Since it is not possible to check the password once set, please make a note of the entered password. Check the 「Save share URL and password to file」 checkbox to create a shared URL and save the downloaded file to your local PC. You also can‘t change your password, so you won’t be able to use the share URL if you lose your password. 8. When guests access the shared URL, they will be prompted to enter their password. 9. If you enter the password correctly, you will be able to access the folder (upload, download, etc.). The shared URL author can access it without entering a password.
  • 59. basic_en.md 2024-04-19 59 / 117 The file browser is operated in the same way as the screen for Cloud Studio users. In read-write mode, you can: ⚫ Full functionality in read-only mode ⚫ File upload (also drag-and-drop) ⚫ Copying files ⚫ Copying a folder (if you want to include subfolders) ⚫ Rename files ⚫ Rename a folder (if you want to include subfolders) ⚫ Moving files and folders (in the case of "Include subfolders") ⚫ Deleting files ⚫ Deleting a folder (if you want to include subfolders) Create a folder (if you want to include subfolders) Note: Guests will not be able to create shared URLs. About Capacity Allocation File uploads and file copies that require more space than the quota will fail. The allocated space is consumed by the size of the file when the guest uploads the file. Files uploaded by non-guests are not consumed (the quota is not the capacity limit of the folder itself) If a guest-uploaded file is deleted, the remaining space will be restored. If a file uploaded by a guest is moved out of the shared folder, the remaining space will also be restored. The remaining capacity does not change just because the name is changed. However, if the name is changed outside of Cloud Studio website, it will be treated as if it had been deleted, and the remaining capacity will be restored.
  • 60. basic_en.md 2024-04-19 60 / 117 If subfolder sharing is enabled, the remaining capacity will not change if you move to a subfolder. If the move is made outside of Cloud Studio website, even if it is in a shared folder, it will be treated as if it had been deleted, and the remaining space will be restored. Access logs for shared URLs When a guest accesses a shared URL, an access log is recorded for each shared URL. The following describes how to view the site. 1. Open a shared folder on Cloud Studio website and click Click the 「Share Folder」 menu from the 「Folder Operations」 pull-down menu (in the case of folder sharing) Alternatively, you can click the Share button on a file or folder from the list. 2. Click the 「Access log」 switch in the share URL to turn it on. 3. The last 10 access logs are displayed. If you want to go back to a previous log, click 「Load More」.
  • 62. basic_en.md 2024-04-19 62 / 117 6. How to read each screen 6.1. dashboard If you only have one Studio Set, the dashboard will be skipped and you will be redirected to Studio Sets. (1)Studio Sets - If you have more than one Studio Set in your account, they will be listed here. Click to open 「Studio Set」. (2)Studio Set Instances - Lists the instances installed in the Studio Set. (3)Studio Set Status - Displays the status of the Studio Set. If it says 「Available」, it is normal. Immediately after logging in for the first time, 「Initializing」 will be displayed, and when initialization is completed, it will change to 「Available」. (4)Show/Hide Switching - Shows or hides the Studio Set. The state of the show and hide is only saved locally on the PC (web browser). (5)Change display order - If you have multiple studio sets in your account, you can change the display order of studio sets by dragging and dropping the bar up and down. The state of the display order is saved only locally on the PC (web browser). The following are common parts throughout the site: (6)Site Logo - Return to the dashboard (7)Subscription Plan - The subscription plan you are currently using. Click to display 「Billing」 in 「Account Profile」. (8)Remaining credit time and residual data transfer capacity - The remaining credit time and data transfer capacity that are currently available are displayed in real time. Click to view 「Credits」 in 「Account Profile」.
  • 63. basic_en.md 2024-04-19 63 / 117 6.2. Studio Sets (1)Studio Set Name - Displays the name of the studio set. (2)Studio Set Status - Displays the status of the Studio Set. If it says 「Available」, it is normal. Immediately after the first login, it will be displayed as 「Creating」 and will change to 「Available」 when completed. ⚫ Creating - The creation of the studio set is in progress. ⚫ Available - The studio set is available. ⚫ Deleting - The deletion of the studio set is in progress. ⚫ Deleted - The studio set has been permanently deleted. ⚫ Failed - The creation of the Studio Set failed. ⚫ To be deleted - The deletion of all instances in the Studio Set is in progress and is waiting for the Studio Set to be deleted. (3)Start - Puts all instances installed in the studio set Running. If it is already running, it cannot be clicked. (4)Stop - Stops all instances in the studio set. If it is already stopped, it cannot be clicked. (5) Edit - Edit the name of the studio set (→Edit Studio Set) (9)Username - Displays the user name that is currently logged in. Click to display 「 User Profile」 . (10)Account Name - Displays the registered account name. Click to display 「 Account Profile」 . (11)Display Language - You can select either 「 Japanese」 or 「 English」 as the display language. (12)Change Password - You can change your login password, change your user profile, and set up multi-factor authentication. (13) Log out - Log out of the Cloud Studio website.
  • 64. basic_en.md 2024-04-19 64 / 117 (6)Instance Filter - Filter instances by group (color). Only instances of the checked group (color) are displayed. If you check the white box, all instances will be displayed. The filter state is only stored locally on your PC (web browser). (7)Instances - Lists the instances installed in the Studio Set. Click to open 「Instances」. You can also drag and drop instances to change the display order of the instances. The state of the display order is saved only locally on the PC (web browser). (8)Instance Status - Displays the status of the instance. If there is at least one 「live」 instance, the Consumes the remaining time of the credit. (9)Instance Uptime - Displays the cumulative value of the amount of time that the instance was up. (10)Launch Instance - Bring the instance running individually. If it is running, 「Stopped」 will be displayed. (11)Stop Instance - Stops individual instances. A confirmation dialog is displayed before the stop, preventing it from being stopped due to accidental operation. If it is in a stopped state, 「Start」 is displayed. (12)Edit Instance - You can edit the name and group (color) of the instance. (13)Remote Desktop for Instance - Opens Remote Desktop for the instance in the web client. You can‘t click it unless it's running. (14)Studio Set Statistics - You can view the instance usage of a studio set by specifying a date range (→ Statistics) It is hidden by default and expands when you click on the title bar. (15) File Storage - Opens cloud file storage (only appears if enabled)
  • 65. basic_en.md 2024-04-19 65 / 117 6.3. File storage Appears only when cloud file storage is enabled You can drag and drop files or folders to upload them to the open folder. (1)Folder Name - Displays the name and hierarchy of the open folder. In the case of the top-level folder, only 「Top」 is displayed. (2)Parent Folder - Opens the parent folder of the open folder (hidden if it is at the top). (3)Reload - Refresh the display of open folders. (4)File Upload - Upload a file (multiple selections are possible) to the open folder. (5)Create subfolder - Creates a subfolder in the open folder. (6)Folder actions - Opens the action menu for the open folder. (6)-a Download Folder - Downloads the entire open folder in ZIP archive format. (6)-b Share Folder - Create a sharing URL to share the open folder with guests. (6)-c Rename Folder - Rename the open folder. (6)-d Copy Folder - Copies the open folder, including files and subfolders. (6)-Move folder - Move an open folder directly under another folder. (6)-f Remove folder - Deletes the open folder, including files and subfolders. (7)Select - Select a file or subfolder. You can select or deselect them all at once with the checkbox at the top. You can download, move, or delete selected files or subfolders. (7)-g Deselect - Displays the number of selected items. Click to clear all selections. (7)-h Delete Selected - Deletes the selected file or subfolder (and the files and folders under it). (7)-i Move Selection - Moves the selected file or subfolder directly under another folder. (7)-j Download Selected - Downloads the selected file or subfolder in ZIP format. (8)Sort by name - Sort by file or subfolder name. Each click toggles between ascending and descending order. (9)Sort by modification date - Sort by file or subfolder modification time. Each click toggles between ascending and descending order. (10)Sort by size - Sort by file size (excluding folders). Each click toggles between ascending and descending order. (11)Folder name - Click to open a subfolder. (12)File name - Click to download the file (similar to the download button). (13)Rename - Rename a file or subfolder. (14)Download - Download a single file. If the target is a subfolder, it will be downloaded in ZIP format. (15)Share - Create a sharing URL to share the file or folder with guests. (16)Copy - Copy a file or subfolder. (17)Move - Move a file or subfolder directly under another folder. (18)Delete - Deletes a file or subfolder. (19)Preview - When you flip a row in the list, a preview is displayed on the right. (19)-k image/video preview - Image files (JPEG, PNG, GIF, SVG, WEBP, etc.) If it is a video file (MP4, WEBM, OGG, MPEG, etc.), a preview will be displayed. Click the preview to enlarge the
  • 66. basic_en.md 2024-04-19 66 / 117 image and preview the video. (19)-l size - Displays the file size in bytes (file only) (19)-m Type - Displays the MIME Type of the file (file only) (19)-n Uploaded at - Displays the modification date and time of the file or subfolder. (19)-o Download - Download the file. (19)-p Close Preview - Closes the preview screen. (20)Storage Capacity Gauge - The remaining amount of file storage is displayed as "Free Space/Full Capacity". The gauge displays the percentage of use as a bar. (21)WebDAV Network Information - Displays the connection information used by the WebDAV client. (22)SFTP Network Information - Displays the connection information used by the SFTP client.
  • 67. basic_en.md 2024-04-19 67 / 117 6.4. Moving Files and Folders (1)Folder Name and Hierarchy Displays the folder name and folder hierarchy. Click the name to open the appropriate hierarchy folder directly. (2)Parent Folder - Opens the parent folder of the open folder. (3)Reload - Refresh the display of the folder. (4)Create subfolder - Creates a subfolder within the open folder. (4)-a Open a folder - Opens the folder that was created after it was created.
  • 68. basic_en.md 2024-04-19 68 / 117 (5)Open Folder - Select an open folder as the destination. Click the folder name to navigate to the parent folder of the open folder. If the checkbox is grayed out, it cannot be selected as a destination. (6)Subfolder - Select a subfolder as the destination. Click the folder name to open the subfolder. If the checkbox is grayed out, it cannot be selected as a destination. (7)OK button - You can click it when you select the destination. Perform a move of files or folders and close the dialog box. (8)Cancel button - Closes the dialog box without performing the move.
  • 69. basic_en.md 2024-04-19 69 / 117 6.5. File storage sharing File Sharing 2 (1)Password - Set a password to access the shared URL. (2)Number of expiration days - Set the number of days until the shared URL expires. (3)Save the share URL and password to a file - Download a text file containing the share URL and password. (The password cannot be found on the Cloud Studio website, so please keep the downloaded file on your local PC.)
  • 70. basic_en.md 2024-04-19 70 / 117 Folder Sharing (1)Password - Set a password to access the shared URL. (2)Number of expiration days - Set the number of days until the shared URL expires. (3)Include subfolders - Share subfolders as well. If there is no check, only the files directly under the folder will be accessible.
  • 71. basic_en.md 2024-04-19 71 / 117 (4)Read-only - If checked, the shared URL will be in read-only mode (download only). Read-only mode does not allow uploading, but also renaming, moving, copying, and deleting. (5)Capacity allocation - Set the amount of storage allocated to the guest in MB. If it is blank, the capacity will be unlimited. (6)Save the share URL and password to a file - Download a text file containing the share URL and password. (The password cannot be found on the Cloud Studio website, so please keep the downloaded file on your local PC.)
  • 72. basic_en.md 2024-04-19 72 / 117 List of shared URLs You can create any number of share URLs for a single file/folder. (1)Delete - Delete the share URL. You will no longer be able to access the deleted URL. (2)Share URL - Allow access to shared files/folders by disclosing the shared URL and password to guests. (3)Creator - Displays the name of the user who created the share URL. (4)Expiration date - Displays the expiration date and time when the share URL can be accessed. (5)Read-only - Displays whether the share URL is in read-only mode or not (folder sharing only). (6)Include subfolders - Displays whether the share URL has enabled subfolder sharing (writable folder sharing only). (7)Quota Capacity - Displays the total capacity allocated to the share URL (only for folder shares with capacity allocation enabled). (8)Capacity used - Displays the amount of space consumed by the uploaded file at the share URL (writable folder sharing only). (9)Access logs - When the switch is turned on, the shared URL access logs are listed in chronological order from the most recent to the most recent. (9)-a Access date and time - Displays the date and time when the access log occurred. (9)-b Actions - Displays the actions taken by the guest on the shared URL. ⚫ Login successful - Successful login to the shared URL ⚫ Login failed - Login failed due to incorrect password ⚫ List - opened a folder and displayed a list of files ⚫ Get Info - Get information about the file (name, date, size, etc.) ⚫ Download - Preview or download the file ⚫ Create Folder - Create a subfolder ⚫ Delete - Deleted a folder or file ⚫ Rename - You renamed a folder or file ⚫ Move - Moved a folder or file ⚫ Copy - Copied folder or file (9)-c Access source address - Displays the IP address of the guest (9)-d folder or file name For folder shares, the name of the file subfolder that was accessed is displayed.
  • 73. basic_en.md 2024-04-19 73 / 117 Guest Login When guests access the shared URL, they are presented with a password entry form. Content information such as file names, folder names, and thumbnails is not displayed.
  • 74. basic_en.md 2024-04-19 74 / 117 For file sharing ①Image/Video Preview - For image files (JPEG, PNG, GIF, SVG, WEBP, etc.) and video files (MP4, WEBM, OGG, MPEG, etc.), a preview will be displayed. Clicking on the preview will enlarge the image for images or preview playback for videos. ②Size - File size is displayed in bytes. ③Type - Displays the file type (MIME Type). ④Uploaded at - Displays the date and time the file was modified. ⑤Download - Downloads the file.
  • 75. basic_en.md 2024-04-19 75 / 117 For folder sharing The screen will be similar to File Storage. If the share URL is in read-only mode, only downloads can be operated. (1)Guest Allocated Capacity Gauge - Displayed when in read/write mode. The amount of space allocated to the guest is displayed as 「Free Space/Full Capacity」. The gauge displays the percentage of use as a bar. If the quota is unlimited, the amount of file storage is displayed. Note: Guests will not be able to create shared URLs.
  • 76. basic_en.md 2024-04-19 76 / 117 6.6. instance (1)Group and Studio Set Name - Displays the name of the group (color) and studio set in which the instance is installed. Click to return to 「Studio Set」. (2)Instance Name - Displays the name of the instance. (3)Instance Type - Displays the type and size of the instance, as well as the storage capacity. (4)Instance Status - Displays the status of the instance. If there is at least one 「live」 instance, the consumes the remaining time of the credit. ⚫ Initializing - The instance creation and initialization is in progress. ⚫ Stopped - The instance is in a stopped state. ⚫ Launching - The instance launch is in progress. ⚫ Running - The instance has finished launching and is accessible. ⚫ Rebooting - The instance is in the process of rebooting. ⚫ Stopped - The instance is in the process of shutting down. ⚫ Terminating - The instance deletion is in progress. ⚫ Terminated - The instance is in a state where it has been permanently deleted. ⚫ Failed - The initialization of the instance failed. (5)Instance Uptime - Displays the cumulative value of the time that the instance was running. (6)Start - Brings the instance running. If it is already running, it cannot be clicked. (7)Restart - Forces a reboot of the instance. If it is not running, it cannot be clicked. A confirmation dialog is displayed before restarting to prevent accidental restarting. (8)Stop - Puts the instance in a stopped state. A confirmation dialog is displayed before the stop, preventing it from being stopped due to accidental operation. (9)Edit - You can edit the name and group (color) of the instance (→ [Edit Instance] (#4.7.-editing- aninstance)) (10)Open Remote Desktop - Opens the remote desktop of the instance in the web client. You can‘t click it unless it’s running. (11)Login Info - Contains information required for instance access (→[Instance Login Information] (##instance-login-information)) (12)Network Info - Instance network information (address, port, etc.) is summarized (→[Instance Network Information] (#instance-login-information)) (13)Instance Metrics - Real-time metrics for running instances are displayed graphically. Both horizontal axes are measured in 1-minute time. (13)-a CPU load - The average value (per minute) of the CPU usage (in percentage). (13)-b Network Transfers - Internet to Instance (Inbound), Or it is the accumulated value (per minute) of the amount (bytes) transferred from the instance to the Internet (outbound). (13)-c Disk Access Count - The number of disk accesses (reads, writes) is accumulated (per minute). (14)Internet Traffic Statistics - Displays the statistics of Internet communication (transmission volume and reception volume) performed by the instance by port and external address.
  • 77. basic_en.md 2024-04-19 77 / 117 Internet Traffic Statistics (1)Egress Connection - Displays statistics of communications in which the instance is a client and connects to a remote server. ⚫ (1)-a Foreign Address - Displays the address of the server. ⚫ (1)-b Port - Displays the port of the server. ⚫ (1)-c Outbound - Displays the amount of data sent to the server in gigabytes. ⚫ (1)-d Inbound - Displays the amount of data received from the server in gigabytes. (2)Ingress Connections - The instance is the server, and the statistics of the communication received from the remote client are displayed. (2)-e Foreign Address - Displays the address of the client. (2)-f port - Displays the listening port of the instance. (2)-g Outbound - Displays the amount of data sent to the client in gigabytes. (2)-h Inbound - Displays the amount of data received from the client in gigabytes.
  • 78. basic_en.md 2024-04-19 78 / 117 Instance login information (1)Login user name - The user name used to log in to the OS. (2)Password - The password used to log in to the OS. The password is randomly generated for each boot. It can only be displayed when the instance is running. (3)Host address - The host address for instance access. If you want to use a Nice DCV dedicated client, RDP, or SSH connection, you can use the please copy and paste this address as the connection destination. (4)Web Client URL - The URL to connect to the Nice DCV web client. Click or copy and paste into your browser’s address bar allows you to access the instance with a web client connection. (5)DCV client URL - This is the URL to connect to the Nice DCV dedicated client. Click to launch a dedicated client and access the instance. The following information is displayed differently for each instance type. For vMix instances (6)Web Controller Username - The username used to access the vMix Web Controller. (7)Web Controller Password - The password used to access the vMix Web Controller. (8)Web Controller Access URL - The access URL of the Web Controller for vMIx. Appears only when the instance is running.
  • 79. basic_en.md 2024-04-19 79 / 117 For SRT/RTMP MiniServer Instances (9)SRT MiniServer Web Controller Password - The password used to access the SRT MiniServer Web Controller. (10)SRT MiniServer Web Controller Access URL - The access URL for the SRT MiniServer Web Controller. Appears only when the instance is running. (11)RTMP MiniServer Web Controller Password - The password used to access the RTMP MiniServer Web Controller. (12)RTMP MiniServer Web Controller Access URL - The access URL for the RTMP MiniServer Web Controller. Appears only when the instance is running. For OBS Studio instances No additional information
  • 80. basic_en.md 2024-04-19 80 / 117 Instance network information (1)Host name - The name of the instance is the host name. The hostname is also set to the 「computer name」 of the OS. (2)Static IP address - Displays whether the instance is using a static IP address. Normally, the answer is no. (3)Public DNS Name - The public DNS name assigned to the instance. A fixed address is generated for each instance. It does not change even if it is started and stopped repeatedly. This is the address used to access the Internet over. (4)Public IP address - The public IP address assigned to the instance. If the static IP address is No, you can use the it will be variable for each startup. However, it does not change with a restart. It is also displayed only when the instance is running. (5)Private DNS Name - The private DNS name assigned to the instance. A fixed address is generated for each instance. It does not change even if it is started and stopped repeatedly. This is the address used to access it from other instances of the same studio set. (6)Private IP address - The private IP address assigned to the instance. Each instance is assigned a fixed address. It does not change even if it is started and stopped repeatedly.
  • 81. basic_en.md 2024-04-19 81 / 117 The following information is displayed differently for each instance type. vMix, for OBS Studio instances (7)Available SRT connection ports (range) - Displays the range of empty ports that can be used when making SRT connections. The instance is designed to accept connections only on the ports that are required. Therefore, only the ports that are displayed are allowed. connection. 6.7. Account Profile a. Billing tab Access billing and billing information. (1)Settings - (Common to all tabs) You can update your account profile (→[Update Account Profile] (#8.1.-update-your-account-profile)) (2)Unpaid invoices - Lists invoices that have not yet been paid. Click 「Payment」 to open the payment form. You can make a payment. In addition, you can view or download invoices. (3)Receipt for payment request - Displays a list of receipts that have already been paid. Click 「Receipts」 to view or download receipts. (4)Payment - Displays payment information. (4)-A Subscription - Displays the subscription plan you are currently enrolled in. Click 「Settings」 to display the plan change form (→ [Subscription Plan Settings] (#8.2.-setting-up- asubscription-plan)) (4)-b credits - Displays the current credit remaining time. Click on 「Buy Credits」 to display the Credit Purchase Form (→ [Buy Credits] (#8.3.-buy-credits-(additional-packs)) (4)-c Billing Information - Displays the currently selected billing method. (4)-d Customer Portal - Opens the Customer Portal. In the Customer Portal, you can change or delete the payment method (credit card information). For SRT/RTMP MiniServer Instances (8)SRT Passphrase - Displays the passphrase to be used when making the SRT connection. (9)SRT Incoming Address - Displays the address specified when making an SRT connection. (10)RTMP Incoming Address - Displays the address specified when making an RTMP
  • 82. basic_en.md 2024-04-19 82 / 117 (5)Billing information - The registered billing information is displayed. Click 「Settings」 to open the form for editing billing information(→Edit billing information)
  • 83. basic_en.md 2024-04-19 83 / 117 b. Credits tab Access information about how much time you have left. (1)Amount of Internet transfer for the account - Amount of data transferred from Cloud Studio to the Internet (a), remaining data transfer capacity (b), Displays the total capacity (C). The gauge (d) shows the used capacity as a gray bar. (2) Account Remaining Credits - Displays the number of credits remaining in the account. Click on 「Buy Credits」 to display the Credit Purchase Form (→ Buy Credits). Credits are displayed in units of issuance (bundles). For example, if you purchase two additional credit packs, two additional credit bundles will be added to the list in addition to the subscription credits. (3)Credit Alert - This function issues an alarm when the remaining credit time or residual data transfer capacity falls below the specified value. You can send an email alert, block an instance from starting, and purchase additional credit packs. (3)-e Create New Rule - Opens the Create Credit Alert Rule form and creates one new rule (→ Configure Credit Alert Rule) (3)-f Edit Rule - Opens the Edit Credit Alert Rule form and edits the rule (→ Set Credit Alert Rule) (3)-g Delete Rule - Deletes the rule. A confirmation dialog is displayed before deletion to prevent accidental operation.
  • 84. basic_en.md 2024-04-19 84 / 117 c. Statistics tab You can access your account‘s statistics (screen time) information.(→Statistics) d. Users tab You can access the list of logged-in users for your account. (1)Create User - (Primary user only) Create a new secondary user (→Create/Edit Secondary User) (2)User's name - The display name of the user. Click to open 「User Profile」. (3)Login Name - The name used to log in. (4)User Groups - The primary user has access to various configuration forms in the account profile. Secondary users can work with Studio Sets and Instances, but they do not have access to the account profile setup form. (5)Studio Sets - Displays the number of studio sets. (6)Instances - Displays the number of instances. (7)Usage time - Displays the user‘s usage time in minutes. The usage time is added to the user who launched the instance. (8)Last login date and time - Displays the date and time when the user last logged in. (9)Edit User Information - (Primary user only) Opens the Edit User Information form (→ Secondary User Create/Edit)
  • 85. basic_en.md 2024-04-19 85 / 117 6.8. User Profile 6.9. User Preferences In user settings, you can edit your user profile, change your login password, and set up multi-factor authentication. (1)Update User Profile - (1)-a Username, (1)-b Display Name, and (1)-c Update Email Address. Your username and email address must not be used by anyone else (throughout Cloud Studio). (2)Change Login Password - (2)-a You can change your password by entering your old password and (2)-b your new password. You cannot change your password unless the old password matches. In addition, we will not be able to reply to your password even if you contact us. If you don‘t know your old password, use the password reminder (→ If you don’t know your password) (3)Multi-Factor Authentication - (3)-a Multi-Factor Authentication status and (3)-b Enable or disable (→Enable Multi-Factor Authentication) You can access the user‘s stats (→ Stats) (1)Edit - (Primary user only) Edit the secondary user (→Secondary User Create/Edit) (2)Delete - (Primary user only) Deletes a secondary user.
  • 86. basic_en.md 2024-04-19 86 / 117 6.10. Statistics You can check the statistics (operating hours) for each instance type by specifying a time. (1)Start Date - Specify the start date of the range for which you want to view statistics. (2)End Date - Specify the end date of the range for which you want to view statistics. Including the full end date. (3)Current subscription period, previous subscription period, this month, last month, today, yesterday... - This is a shortcut that calls up a specific range with one click. The range you click is set to the start and end dates. (4)Group by user - The aggregate results are grouped by user and displayed. Essentially, the uptime is recorded by the user who launched the instance. (5)Reload - Refresh the aggregation results.
  • 87. basic_en.md 2024-04-19 87 / 117 6.11. Create and edit secondary users This is a form for creating and editing secondary users. Only the primary user can manage secondary users. (6)Summary results - The summary results of the specified range are displayed in a tabular format. The total uptime is expressed in minutes, rounded to the nearest second. (7)Export in CSV format - You can download the summary results in CSV format. (8)Export log - You can download the operation log itself, including the specified range (used for aggregation), in CSV format. (9)Call Connection Statistics - Displays the statistics of the communication between the instance as the client and the remote server. (10)Export in CSV format - You can download the call connection statistics in CSV format. (11)Accepted Connection Statistics - The instance is the server, and the statistics of the communication received from the remote client are displayed. (12)Export in CSV format - You can download the acceptance connection statistics in CSV format.
  • 88. basic_en.md 2024-04-19 88 / 117 (1)Login Username - Enter the name you want to use to log in. It must not be used by another user. (2)Display name - Enter the name that will be displayed in Cloud Studio. (3)E-mail address - Enter the user‘s email address. It must not be used by another user for registration. (4)New Password - (Required only when creating) Enter the password you use to log in. When editing, enter it only if you want to change the password. Leave it blank and do not change the password. 7.1. Web Client (1)Filestorage - Allows you to upload files to or download files to your instance (→File Upload and Download to Instance) -(2)Clipboard - Allows you to send text to the instance‘s clipboard (usually synced automatically, but can be used if for some reason it is not synced) (3)Microphone - Stops (mutes) the transmission of microphone input audio from the local PC to the instance. (4)Audio - Adjusts or stops (mutes) the volume of the speaker output audio from the instance to the local PC. (5)Camera - Enables or disables webcam input to the instance. (Only Windows OS instances are supported.) →Local Device Connection ) (6)Multiple screens - Enables or disables multiple screens. In the case of the web client, it can be extended to up to two screens (only for Windows OS instances). When multiscreen is enabled, the extension appears in a separate window and is disabled when the window is closed. (7)Fullscreen - Displays the web client in full screen. (8)Notifications - If an error occurs, it will be listed in the notification. (9)More - The instance name (computer name) is displayed, and the menu expands when clicked. 7. Nice DCV Client
  • 89. basic_en.md 2024-04-19 89 / 117 (9)-a Use relative mouse - Mouse cursor movement is restricted to the instance screen. Use the ESC key to clear this state. (9)-b Send Ctrl+Alt+Del - Sends simultaneous CTRL+ALT+DEL presses to the instance. (9)-c Save Screenshot - Take a screenshot of the instance and save it to your local PC. (9)-d Preferences - Opens the web client preference form (→ web client preferences) (9)-e About NICE DCV - You can check various version information. (9)-f Disconnect - Disconnect from the instance. Even if you disconnect the web client, the instance will not be logged out and will continue to run. You can also disconnect by closing the window. 7.2. Dedicated Clients (1)Storage - Upload files to the instance or download files. (→File Upload and Download to Instance) (2)Settings - Opens the settings menu of the dedicated client. (2)-a Display Resolution - Allows you to select the display resolution for the instance. The default is 「Adapt automatically」. (2)-b Streaming Mode - Allows you to configure how to communicate with the instance (→ Dedicated Client Settings) (2)-c Removable Devices - You can connect a USB device (such as a USB memory) from a local PC to the instance. Open the connected device selection form (Only Windows OS instances are supported). (→Local Device Connection) (2)-d Camera - Allows you to connect a webcam connected to your local PC to your instance. Open the connected device selection form (Only Windows OS instances are supported). (→Local Device Connection) (2)-e Relative Mouse Position - Mouse cursor movement is restricted to the instance screen. CTRL+SHIFT+F8 TO EXIT THIS STATE. (2)-f Accurate Audio/Video Synchronization Disabled/Enabled - (vMix, OBS Studio instances only) Enable audio and video synchronization, or disable it. If Disabled is displayed, it is disabled, and if it is Enabled, it is enabled. If disabled, the response will take precedence instead of synchronization. (3)Microphone - Stops (mutes) the transmission of microphone input audio from the local PC to the instance. (4)Audio - Adjusts the volume of the speaker output audio from the instance to the local PC. (5)(Camera)Available/Attached - Enables or disables webcam input to the instance. (6)Enter/Exit fullscreen - Displays the dedicated client in full screen. If it's already full-screen, change it back. (6)-a Across a single monitor - Displays full screen for one of the currently displayed monitors. (6)-b Across all monitors Adapt Display Size - (Multi-monitor environment only) Displays full screen on all monitors, It also changes the resolution according to the display size.
  • 90. basic_en.md 2024-04-19 90 / 117 (7)Notifications - If an error occurs, it will be listed in the notification. (8)Instance name - The instance name (computer name) is displayed, and when clicked, the menu expands. (8)-a Save Connections As - Saves the connection settings to a .dcv file. (8)-b Save a Screenshot - Take a screenshot of your instance and save it to your local PC. (8)-c Ctrl+Alt+Del - Sends simultaneous CTRL+ALT+DEL keys to the instance. (8)-d About DCV - You can check various version information. (8)-e Disconnect - Disconnect from the instance. Even if you disconnect the dedicated client, the instance will not be logged out and will continue to run. You can also disconnect by closing the window. 8. Account settings Account settings are only available when logged in as the 「Primary User」. Settings are not available for 「Secondary User」. 8.1. Update your account profile You can update your registered personal information (name, company name, address, telephone number, etc.). 1. Open the Cloud Studio website in a web browser and log in. 2. Click on your account name in the upper right corner of the site from the 「Dashboard」. 3. Click on Settings in the upper right corner of the site. 4. The Update Account Profile form opens. (1)Individual/corporation name - Please enter your name if you are an individual, or your company name if you are a corporation. (2)Name of the person in charge - (Optional) If you are a corporation and have a name in charge, please enter the name.
  • 91. basic_en.md 2024-04-19 91 / 117 (3)E-mail address - Please enter your e-mail address correctly. (4)Country - Please enter your nationality. (5)Postal code - Please enter your zip code. If you click 「Search Address」 after entering, the corresponding prefecture / city will be automatically entered (only in Japan) (6)State - Please enter your state. If you are outside of Japan, please enter the State (name of the state or municipality). (7)City - Please enter the city. (8)Address (line 1) - Please enter the first line of the address part below the city. (9)Address (2nd line) - (Optional) Please enter the address part below the city, if there is a second line. (10)Phone number - Please enter your phone number. For international calls, you can enter the international code (+2 digits). 5. Click Save.
  • 92. basic_en.md 2024-04-19 92 / 117 8.2. Setting up a subscription plan This is the procedure to change your current subscription plan. 1. Open Cloud Studio website in a web browser and log in. 2. Click on your account name in the upper right corner of the site or your subscription plan name in the upper left corner of the site. 3. Go to Payments and click on Settings under Subscription Plans. 4. The Subscription Plan Settings form opens.
  • 93. basic_en.md 2024-04-19 93 / 117 (1)Payment Period - Set the period for which the payment will be made (e.g., monthly, every 3 months, semi-annually, yearly) (2)Subscription Plan - Select a subscription plan. (3)End Subscription - Select if you want to terminate the subscription. 5. Click Save.
  • 94. basic_en.md 2024-04-19 94 / 117 Selectable Plans You can only select the plan specified at the time of application. If you would like to use a plan other than the one shown, Contact Us Timing of subscription changes As a general rule, subscription changes will take effect at the end of the current subscription period. If you need to make changes before then, please contact us 8.3. Buy Credits (Additional Packs) If you run out of credits, the instance will be auto-stopped. To prevent this from happening, you need to have enough credit. You can increase the amount of time you have left on your credits by purchasing additional credit packs. 1. Open Cloud Studio website in a web browser and log in. 2. Click on your account name in the upper right corner of the site from the 「Dashboard」. Alternatively, you can click on the remaining credit time in the upper left corner of the site.
  • 95. basic_en.md 2024-04-19 95 / 117 3. Click on Buy Credits. 4. The Buy Credits form opens. (1)Credit Extra Pack Plan - Select the Credit Extra Pack plan you want to purchase. (2)Quantity - Select the number you want to purchase. (3)Payment method - You can select the payment method you want to use for the purchase. (3)-a Automatic payment by registered payment information - Pay with the default payment information (credit card) used automatic subscription renewal. (3)-b Pay with one-time payment information - Pay with payment method information that is different from the default for your subscription. (3)-c Pay by invoice - Receive the invoice that will be issued and then make the payment manually. Credit will not be replenished until payment to the invoice is confirmed (not postpaid) 5. Click Checkout. 6. Click checkout to complete the purchase (in the case of 「Automatic payment with registered payment information」). Enter your credit card details under 「Pay by card」 and click Pay. An invoice will be issued shortly after (in the case of 「Pay by invoice」), so please open the 「Billing」 tab to check. 7. Return to Cloud Studio website, and shortly afterwards your credit remaining time or remaining data transfer capacity will increase.
  • 98. basic_en.md 2024-04-19 98 / 117 8.4. Edit billing information You can set billing information (personal name, corporate name, address, telephone number, proviso, etc.). 1. Open Cloud Studio website in a web browser and log in. 2. Click on your account name in the upper right corner of the site. 3. Go to Payments and click Settings under Billing Information. 4. The Edit Billing Information form opens. (1)Proviso - Enter the proviso to be included in the invoice or receipt issued by Cloud Studio. (2)Use the same information as your account information - If you check the box, you can omit the following input fields, and you can use personal information that has already been entered in the account information. Use it as billing information. If you uncheck the box, the input field after (3) will be available. (3)Individual/Corporate Name - Please enter your name if you are an individual, or your company name if you are a corporation. (4)Name of Person in Charge - (Optional) If you are a corporation and have a name in charge, please enter your name. (5)E-mail address - Please enter the correct e-mail address to receive invoices. (6)Country - Please enter your nationality. (7)Postal code - Please enter your zip code. If you click 「Search Address」 after entering, the corresponding prefecture / city will be automatically entered (only in Japan)
  • 99. basic_en.md 2024-04-19 99 / 117 (8)State - Please enter your state. If you are outside of Japan, please enter the State (name of the state or municipality). (9)City - Please enter the city. (10)Address (line 1) - Please enter the first line of the address part below the city. (11)Address (2nd line) - (Optional) Please enter the address part below the city, if there is one. (12)Phone number - Please enter your phone number. For international calls, you can enter the international code (+2 digits). 5. Click Save.
  • 100. basic_en.md 2024-04-19 100 / 117 8.5. Configuring Credit Alert Rules A credit alert is a feature that sends an alert by email when the remaining credit time falls below a predetermined number of hours. Take advantage of it to prevent unforeseen credit shortages.
  • 101. basic_en.md 2024-04-19 101 / 117 Create a new rule 1. Open Cloud Studio website in a web browser and log in. 2. Click on the credits in the upper left corner of the site. 3. Go to Credit Alerts and click Create New Rule. 4. The Create Credit Alert Rule form opens. (1)Active - Tick the Active checkbox for the credit alert rule to work. (2)Number of hours remaining - Enter the number of hours remaining in credits. Do not use the remaining time condition in the blank field. (3)Residual data transfer capacity - Enter the residual data transfer capacity in GB. Leave blank to do not use the residual data transfer capacity condition. You need to set either the number of hours remaining or the amount of data transferred. (4)Action - Select what action you want to take when the remaining time is less. Notify by email - Sends a notification email to the email address set in your account profile. Block instance starting - Prevents further instances from being stopped. Instances that are still running will continue to run. Auto-purchase additional credit packs - Automatically purchase additional credit packs. (Please note that it can take up to 1 hour for the actual purchase to occur.) When selected, an additional configuration form appears. (4)-a Purchase Credit Extra Pack - Select the credit additional pack and quantity that you want the rule to automatically purchase. (4)-b Payment Method - The payment method to use for automated purchases. 「Automatic payment with registered payment information」 Select the default payment method that you‘re using to renew your subscription. If you pay by invoice, you will not receive an automatic payment, but your credit will not be replenished (not postpaid) until payment to the invoice is confirmed. 5. Click Create.
  • 103. basic_en.md 2024-04-19 103 / 117 If the remaining credit time is less than the 「Remaining Time」 and 「Remaining Data Transfer Capacity」 at the time of creation, an alert email will not be sent. Credit add-on pack purchases are also not performed. Editing an Existing Rule 1. Open Cloud Studio website in a web browser and log in. 2. Click on the remaining credit time in the upper left corner of the site. 3. Click Edit from the list of rules in the Credit Alert section. 4. The Update Credit Alert Rule form opens→Create new rule) 5. Click Save. If the number of hours remaining in credits falls below the 「Hours Remaining」 as a result of editing, an alert email will be sent. In addition, the purchase of additional credit packs is also carried out. If you uncheck 「Active」, you can temporarily disable the alarm rule. Deleting a Rule 1. Open Cloud Studio website in a web browser and log in. 2. Click on your account name in the upper right corner of the site from the 「Dashboard」. 3. Click on Credits. 4. Click Remove from the list of rules in the 「Credit Alert」 section. 5. The Delete Credit Alert Rule confirmation dialog is displayed. 6. Click OK.
  • 104. basic_en.md 2024-04-19 104 / 117 9. Configuring the Nice DCV Client 9.1. Configuring the Web Client To open the configuration form, click the instance name at the far right of the toolbar to open a menu. Click on Preferences. General (1)Appearance - Sets the color tone of the user interface. (1)-a System default - Use the default settings of the OS. (1)-b Light mode - Use a light-toned user interface. (1)-c Dark mode - Use a darker user interface. (2)Toolbar behavior - Set the behavior of the toolbar. (2)-a Auto-hide toolbar - Automatically hides the toolbar. (2)-b Auto-hide toolbar only in fullscreen - Automatically hides the toolbar only in full-screen mode. (2)-c Always display the toolbar - Always display the toolbar.
  • 105. basic_en.md 2024-04-19 105 / 117 Display (Display Settings) (1)Streaming mode - Set the streaming mode. (1)-a Best responsiveness - Emphasis on responsiveness at the expense of image quality. (1)-b Best quality - Sets the image quality at the expense of some response. (2)High color accuracy (YUV 4:4:4) - Improves color reproduction at the expense of performance. (3)Streaming metrics in the toolbar - Displays streaming metric values (frame rate, fps, latency, ms) on the toolbar. (4)Display resolution - Sets the resolution of the display. (4)-a Adapt automatically - Variable to fit the client‘s window size. (4)-b Specified Resolution - Fixes to the specified resolution.
  • 106. basic_en.md 2024-04-19 106 / 117 Camera (Webcam Settings) (1)Allow detection - Allow webcam detection from the web client. When you click on it, a confirmation dialog will be displayed on the web browser side that says 「... is asking for the following permission. "Use the camera"」. Click Allow to enable the use of your webcam. (2)Camera - Select the camera device that you want to connect to your instance in the web client. To open the settings, click on Settings from the toolbar to bring up the menu. 9.2. Configuring a Dedicated Client
  • 107. basic_en.md 2024-04-19 107 / 117 Streaming Mode (1)Best responsiveness - Emphasis on responsiveness at the expense of image quality. (2)Best quality - Emphasis on image quality at the expense of some response. (3)High color accuracy (YUV 4:4:4) - Improves color reproduction at the expense of some performance. (4)Streaming index value - Streaming index value (frame rate/fps, latency/ms, bitrate/bps) is displayed. Display Resolution (1)Adapt automatically - Varies to fit the client‘s window size. (2)Specified resolution - Fixes to the specified resolution.
  • 109. basic_en.md 2024-04-19 109 / 117 Removable Devices(USB device settings) Removable Devices can only be used with Windows OS instances and Windows OS dedicated clients. Lists the USB devices connected to the local PC that can be connected to the instance. The connection is enabled by turning on the switch on the right . For more information →Connect a USB device Camera (Webcam Settings) Camera is only available for Windows OS instances. You can select a webcam device to connect to your instance(→Connect webcam) 9.3. Local Device Connection (Advanced Usage) You can use Nice DCV to connect devices connected to your local PC to your instance. Connect your speakers Without any special operation, the web client or dedicated client automatically connects the local PC`s speakers to the instance‘s audio output device. Audio played on the instance will now be played on the default device of the local PC. Click Audio in the toolbar to mute or adjust the volume. Since voice prioritizes low latency, noise may be added depending on the Internet communication conditions. This is especially true for web clients. Dedicated clients have relatively good playback results.
  • 110. basic_en.md 2024-04-19 110 / 117 Connecting a Microphone You can connect a microphone connected to your local PC to your instance‘s audio input device. [For Web Client] 1. Click on Microphone in the toolbar to enable the microphone. 2. When you click on it, a confirmation dialog will be displayed on the web browser side that says 「... is asking for the following permission. "Use microphone"」. Click Allow to allow the use of the microphone. 3. By default, the 「default」 microphone is used. If you want to change the device, change the 「Microphone」 in the 「Settings」 of your web browser. Chrome example: In Settings, click Privacy & Security → Site Settings → Microphone and select your device from the list. 4. In your streaming software (vMix or OBS Studio), select a microphone as the input device. (In the device list, it will be displayed as Microphone (DCV Microphone Device) or DCV_Microphone) 5. Please note that disconnecting the client will stop ingestion. To continue ingestion, the client must remain connected.
  • 112. basic_en.md 2024-04-19 112 / 117 [For dedicated clients] 1. Click on Microphone in the toolbar to enable the microphone. 2. The 「default」 microphone is always used. If you want to change the device, go to 「Settings」 of Windows OS, click System → Sound → Apps, volume and device settings in that order. Select your device in Input Devices. 3. In your streaming software (vMix or OBS Studio), select a microphone as the input device. (In the device list, it will be displayed as Microphone (DCV Microphone Device) or DCV_Microphone) 4. Please note that disconnecting the client will stop ingestion. To continue ingestion, the client must remain connected.
  • 113. basic_en.md 2024-04-19 113 / 117 Connect your webcam Only for Windows OS instances This function has a fixed resolution of 640x480 and a frame rate of 30fps, so please consider it as a last resort when it is unavoidable. Whether it‘s a web client or a dedicated client, you can connect a webcam connected to your local PC to your instance. 1. Access your instance with the web client or a dedicated client (→ Access Instance) 2. First, make sure that the webcam is working properly (video can be imported) on the local PC. Device drivers are fine if they are installed on the local PC (they do not need to be installed on the instance). 3. Select the webcam you want to connect to in the Camera settings. → Web Client Camera Settings → Camera Settings for Dedicated Clients 4. Enable the webcam connection in the toolbar. In the case of a web client, a confirmation will be displayed from the web browser that 「... is asking for the following permission "Use the camera"」. Click Allow. 5. In your streaming software (vMix or OBS Studio), select a webcam as the input device (In the device list, it will be displayed as AVSCamera RFC). 6. Video can be captured in the same way as a capture device (audio is not captured). 7. Please note that disconnecting the client will stop ingestion. To continue ingestion, the client must remain connected.
  • 114. basic_en.md 2024-04-19 114 / 117 Because the webcam capture method is different between the web client and the dedicated client, please note that the picture will not always be the same. Connect a USB device Only supported for Windows OS instances and Windows OS dedicated clients. Not all USB devices will work. I think that connecting via Nice DCV is a connection method that most USB devices do not expect. If it doesn‘t recognize, doesn’t work at all, or behaves erratically, you may not get satisfactory performance. Some USB devices require drivers to be installed on the instance. Typical USB sticks work with the OS standard driver, but special USB controllers require the driver to be installed in advance. First, to use a USB device connection, you must access your instance with a dedicated client. In the case of a typical USB stick, it is likely that it is already recognized by a dedicated client. In that case, you can connect by following the steps below. 1. When installing the dedicated client, enable USB device remotization in 「Drivers Selection」. 2. Use a dedicated client to access your instance (→ Use a dedicated client) 3. Connect the USB flash drive to your local PC. 4. From the toolbar of the dedicated client, click Settings → Removable Devices, in that order. 5. A list of USB devices that can be connected to Removable Devices will be displayed. Find the USB stick you just connected and click the switch on the right to turn it on. 6. The USB stick is disconnected from the local PC and connected to the instance. 7. The drive will be added to the instance‘s File Explorer and you will be able to access the USB stick. Read and write files on this drive. In addition, the dedicated client must remain connected during access. 8. Turning the switch off in Removable Devices will disconnect from the instance and restore the connection to the local PC.
  • 116. basic_en.md 2024-04-19 116 / 117 If the USB device is not listed in Removable Devices You must edit the Nice DCV config file and add it manually. 1. When installing the dedicated client, enable USB device remotization in 「Drivers Selection」. 2. Make sure you have the driver for the USB device installed on your local PC. If not, install it and make sure that your USB device is working properly. 3. Open C:Program Files (x86)NICEDCVClientbin in Explorer and run dcvusblist.exe. 4. When the USB device is listed, find the desired device, right-click on it and click Copy filter setting. The selections are copied. 5. Start a text editor such as Notepad and paste the one you copied in step (4). Keep Notepad open. 6. Access the instance with a dedicated client (→use a dedicated client) 7. Install the driver for the USB device on the instance side (if a driver is required) 8. Start Notepad on the instance side and click Open under File from the menu. Enter C:Program FilesNICEDCVServerconfusb-devices.conf in File name and click Open. 9. Copy and paste the notes you made in step (5) into a new line at the end of the usb-devices.conf file. 10. Save and close Notepad. 11. Reboot the instance (→ Reboot Instance) 12. Access the instance again with a dedicated client, go to 「Settings」 and click on Removable Devices. If the added USB device appears in the list, you can connect it by following the same procedure.