Ch3 v70 project_structure_en
•Download as PPT, PDF•
4 likes•1,248 views

TREINAMENTO EM AUTOMAÇÃO INDUSTRIAL SIEMENS PCS7

Recommended
More Related Content
What's hot
What's hot (20)
Viewers also liked
Viewers also liked (20)
Similar to Ch3 v70 project_structure_en
Similar to Ch3 v70 project_structure_en (20)
More from confidencial
More from confidencial (11)
Recently uploaded
Recently uploaded (20)
Ch3 v70 project_structure_en
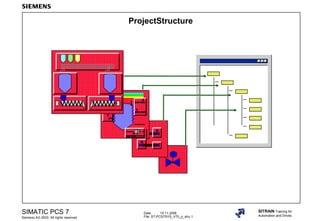
- 1. Date: 15.11.2006 File: ST-PCS7SYS_V70_p_stru.1 SIMATIC PCS 7 Siemens AG 2003. All rights reserved. SITRAIN Training for Automation and Drives ProjectStructure
- 2. Date: 15.11.2006 File: ST-PCS7SYS_V70_p_stru.2 SIMATIC PCS 7 Siemens AG 2003. All rights reserved. SITRAIN Training for Automation and Drives Project Environment Factory 1 Basic materials Factory 2 Dyes
- 3. Date: 15.11.2006 File: ST-PCS7SYS_V70_p_stru.3 SIMATIC PCS 7 Siemens AG 2003. All rights reserved. SITRAIN Training for Automation and Drives Our Plant (Factory 2) Tank Farm North Group1 Tank Farm East Shipping Control building Group 4 Group 3 Group 7 Group 2 Group 1 incl. - Unit A - Unit B - Unit C - Unit D. Group 5 Group 6 Mixed plant Tank farm Shipping AS8 AS7 AS6 AS5 AS4 AS3 AS2 AS1 Tank Farm South Factory 1 Factory 2 Group2 Group3 Group4 Group5 Group6 Group7
- 4. Date: 15.11.2006 File: ST-PCS7SYS_V70_p_stru.4 SIMATIC PCS 7 Siemens AG 2003. All rights reserved. SITRAIN Training for Automation and Drives Creating a Multiproject (MP) Multiproject symbol Tooltip shows storage location
- 5. Date: 15.11.2006 File: ST-PCS7SYS_V70_p_stru.5 SIMATIC PCS 7 Siemens AG 2003. All rights reserved. SITRAIN Training for Automation and Drives Creating Projects in the MP Project symbols Multiproject symbol
- 6. Date: 15.11.2006 File: ST-PCS7SYS_V70_p_stru.6 SIMATIC PCS 7 Siemens AG 2003. All rights reserved. SITRAIN Training for Automation and Drives Setting the Language for Display Devices Project language
- 7. Date: 15.11.2006 File: ST-PCS7SYS_V70_p_stru.7 SIMATIC PCS 7 Siemens AG 2003. All rights reserved. SITRAIN Training for Automation and Drives Assigning the Plant Hierarchy In the exercise, you will assign your AS instead of the AS03 or AS07. Use your PC as the OS/ES Picture Picture CFC AS01 AS02 AS03 AS04 AS05 AS06 AS07 AS08 Picture Picture Picture Level 1 Level 2 Level 4 Level 3 SFC
- 8. Date: 15.11.2006 File: ST-PCS7SYS_V70_p_stru.8 SIMATIC PCS 7 Siemens AG 2003. All rights reserved. SITRAIN Training for Automation and Drives
- 9. Date: 15.11.2006 File: ST-PCS7SYS_V70_p_stru.9 SIMATIC PCS 7 Siemens AG 2003. All rights reserved. SITRAIN Training for Automation and Drives PH Settings (1)
- 10. Date: 15.11.2006 File: ST-PCS7SYS_V70_p_stru.10 SIMATIC PCS 7 Siemens AG 2003. All rights reserved. SITRAIN Training for Automation and Drives PH Settings (2) Result
- 11. Date: 15.11.2006 File: ST-PCS7SYS_V70_p_stru.11 SIMATIC PCS 7 Siemens AG 2003. All rights reserved. SITRAIN Training for Automation and Drives Updating the Plant Hierarchy Result: both projects PRO_AS and PRO_OS have the same plant hierarchy Right-click and select Plant Hierarchy Update in Multiproject
- 12. Date: 15.11.2006 File: ST-PCS7SYS_V70_p_stru.12 SIMATIC PCS 7 Siemens AG 2003. All rights reserved. SITRAIN Training for Automation and Drives Plant View - Settings/Properties 1 3
- 13. Date: 15.11.2006 File: ST-PCS7SYS_V70_p_stru.13 SIMATIC PCS 7 Siemens AG 2003. All rights reserved. SITRAIN Training for Automation and Drives PH Assignment
- 14. Date: 15.11.2006 File: ST-PCS7SYS_V70_p_stru.14 SIMATIC PCS 7 Siemens AG 2003. All rights reserved. SITRAIN Training for Automation and Drives HID Generation 1 2 3 4 5 7 HID on ES = 111222333444555666 6 HID on OS = 111/222/333/444/555/666 Selectable combination Process tag on OS = 111/222/333/444/555/666.777777 Tooltip for QMAN_AUT 7
- 15. Date: 15.11.2006 File: ST-PCS7SYS_V70_p_stru.15 SIMATIC PCS 7 Siemens AG 2003. All rights reserved. SITRAIN Training for Automation and Drives OS Hierarchy (AS/OS) WinCC CS WinCC RTSIMATIC Manager
- 16. Date: 15.11.2006 File: ST-PCS7SYS_V70_p_stru.16 SIMATIC PCS 7 Siemens AG 2003. All rights reserved. SITRAIN Training for Automation and Drives OS Hierarchy (Picture Structure) Tank farm Reactors1 Reactors2 Overview of the reactors (REACTORS1.PDL) Details (if necessary) Reactors3 M M M Reactors1 Unit A1,B1,C1,D1 (UnitA1.PDL...) A SGroup display Shipping Com.Plant Reactors4
- 17. Date: 15.11.2006 File: ST-PCS7SYS_V70_p_stru.17 SIMATIC PCS 7 Siemens AG 2003. All rights reserved. SITRAIN Training for Automation and Drives Names in the Component View AS Name The S7 program name is displayed in WinCC as a substitute for the AS Computer name (from Windows) OS name S7 program name for the library Project name
Editor's Notes
- ContentPage Project Environment.........................................................................................................................2 Our Plant (Factory 2)........................................................................................................................3 Creating a Multiproject (MP).............................................................................................................4 Creating Projects in the MP..............................................................................................................5 Setting the Language for Display Devices.........................................................................................6 Assigning the Plant Hierarchy...........................................................................................................7 PH Settings ................................................................................................................................9 Updating the Plant Hierarchy............................................................................................................11 Plant View - Settings/Properties.......................................................................................................12 PH Assignment................................................................................................................................13 HID Generation................................................................................................................................14 OS Hierarchy (AS/OS).....................................................................................................................15 OS Hierarchy (Picture Structure)......................................................................................................16 Names in the Component View........................................................................................................17
- RepeatWe shall repeat the project environment as in the previous chapter in order to create a suitable project structure for it. We will take into account the plant structure for this, while also considering the specific AS and PC equipment available in the training room. Project environmentOur project is part of a dye manufacturing plant. The basic materials are manufactured in Factory 1 and are transported from there to Factory 2. In Factory 2, the basic materials are stored in dedicated storage tanks. After undergoing the manufacturing process, the end product is stored in a different section of the tank farm for transport purposes.
- Plant overviewThe plant to be automated is part of Factory 2 and is broken down into several different zones (see above): Tank Farms North, South and East Shipping Control building Groups 1, 2, 3, 4, 5, 6, 7Each of which is configured with the following reactor units: Unit A, Unit B, Unit C, Unit D You can specify this breakdown in the plant view (on additional pages) and retrieve it again later. Automation systems Eight automation systems are used to carry out the automation tasks. The task assignment is displayed in the picture at the top right. Only part of this plant will be automated in our exercise, using one AS and one OS. NoteTasks that were originally assigned to an AS or OS can be reallocated over the plant hierarchy in a later project phase with minor configuration effort.Each participant takes on/configures a group in accordance with the training station number..
- ObjectiveA project containing an AS and OS is to be created in such a way that it can be simultaneously edited on different ES systems at a later time. The "multiproject" is the project type of choice for this application. ExerciseCreate a PCS 7 multiproject in which one project is created for the AS side and one for the OS side. In each project, configure the hardware for the devices used (AS or PC) and download the configuration to the devices. --------------------------------------------------------------------------------------------------------- Steps1. Create the multiproject using the SIMATIC Manager. 2. Create the two projects in the multiproject (one project for the AS, the other project for the OS). 3. Set the language for the display devices(in which language the plant operator will read his textual information). 4. Configure the hardware used in each of the projects. 5. Compile and download the configurations to the devices. RemarkSteps 4 and 5 can also be performed after the entire configuration has been completed, at the latest before debugging and startup. As we want to test online as soon as possible, we will carry out these steps even before creating the software. --------------------------------------------------------------------------------------------------------- Procedure1.1 Start the SIMATIC Manager by clicking the icon on the desktop or by selecting the following in the task bar: START -> SIMATIC -> SIMATIC Manager 1.2 Select File -> New In the "Multiprojects" tab, specify the storage location and enter a name for the multiproject (e.g., storage location = "PCS7courses_V61" directory on the data drive, and name = "DYE").
- NoteAlways use a directory on a drive other than the installation drive of Windows and PCS 7. If the Windows and PCS 7 hard disk partition is restored or reinstalled, the previously implemented projects will be retained! 2.1 Select the multiproject icon, then right-click and select Multiproject -> Create in Multiproject... Then, go to the User Projects tab and specify the storage location and the name for the AS project (the path of the multiproject is already preset for the storage location, the name can be "PRO_AS", for example). 2.2 Now carry out the same procedure for the OS project. Name it "PRO_OS", for example
- 3.1First, select the AS project, and then select Options -> Language for Display Devices If you have not already specified the message number concept in the SIMATIC Manager, you will be prompted to do so. Select the default setting (for V6). This query is necessary as the subsequent language selection will affect the message texts offered during configuration. 3.2 Provided you only want to use German, all you have to do is set it as the default language. If you want the project to be available in multiple languages, it is advisable to set the default language to English (USA). Provision is also made for French, Italian and Spanish in PCS 7 libraries and in WinCC. You can easily add these languages to the "installed languages". If you want to use the project in a different language (other than German, English, French, Italian, or Spanish), we recommend setting English as the default language (i.e., do not enter any additional languages in the "Installed Languages in Project" box) and installing the required language in WinCC later (this is explained in detail for the OS project). The English texts found there (in WinCC) can be exported, translated and reimported. RemarkThe language setting must be made for each project within the multiproject! The project language displayed in the properties of the project corresponds to the Windows language when the project was created, and cannot be subsequently changed. For steps 4 and 5 mentioned at the beginning, please refer to Chapter 4 "System Configuration". As these steps do not have to be performed but, rather, can be performed later, they have been included elsewhere, as indicated. Now we will return to configuring the system.
- ObjectiveYou have carried out the system configuration. The automation and HMI stations are in the foreground. The plant presented at the beginning of the chapter is to be reflected in the project in a so-called "Plant view" (also known as Plant Hierarchy). The AS ("ASxx") you configured a little while ago will be used to automate the two structurally identical "A" and "B" reactors, the OS ("OSxx)" you configured will be used for operator control and monitoring. --------------------------------------------------------------------------------------------------------- Plant hierarchy You can call a plant-related view (through PCS7) in the project (in the SIMATIC Manager). View Plant View This view is initially empty. Select the project name, then right-click and select New Object -> Hierarchy Folder You can then rename the new folders. After selecting a hierarchy folder, you can structure the secondary plant hierarchy in the same manner. Result: The plant view mirrors the structure of the plant. In our exercise we will create a PH with 4 levels. We will use Level 1 as the factory designation. This level is present for overview purposes only as the plant is large; it is not used in the AS and/or OS (nor is it part of the Higher Level Item Designation - HID) It is included in a printout of documentation.
- We will use Level 2 to divide the factory into plants, such as reactors, tank farms, etc. We will use Level 3 for the units (e.g. as Unit A, Unit C or Reactor A, Reactor C) Level 4 will describe the function (e.g., temperature control or inflow) AS/OS assignmentThe plant folders must each be assigned to one AS and/or one OS so that the automation task runs in the correct AS (the one that is "wired directly" to the plant) and the monitoring objects (pictures) are created in the correct OS. Select a hierarchy folder, then right-click and select Object Properties - AS-OS Assignment. If you select the "Lower-level objects..." check box, the lower-level directories will also inherit the assignment. ASWhen the AS is assigned, its chart folder is recorded (containing all CFC and SFC charts that run on the assigned AS). Select the AS ("ASxx") Note 1:The reason for assignment to the chart container and not to the CPU is as follows: If you have not yet specified the hardware, you can insert an S7 program (software only) into the project. You can assign the program's chart folder to the Plant View. After you specify the hardware, you can cut and paste this S7 program into the CPU, which is now known. It replaces the (still empty) S7 program of this CPU configured using HW-Config. The already configured plant hierarchy and software also migrate. OSSelect the OS ("OSxx"). The pictures configured later in the hierarchy folder are kept in this OS. Name the tasksSelect a hierarchy folder, then right-click and select New Object -> (CFC, SFC, pictures, etc. ) to insert and name the relevant objects. These objects are implicitly inserted in the assigned AS (chart folder) or OS, where the objects are also loaded and must be executed. Note 2:PH assignments can only refer to devices (AS/OS) that are located in the same project. However, identical names of the PH in different projects of a multiproject refer to the same plant component to be configured within the multiproject.
- ExerciseFor the entire multiproject, set the plant hierarchy so that level 2 is defined as the OS area, levels 2, 3 and 4 are part of the higher-order item designation, and the picture hierarchy and diagnostics screens are derived from the plant hierarchy. NoteFor instructional purposes, we will deactivate the "Diagnostics screens..." option again after checking the automatically generated structure. At the end of the second week of training, when we have completed the automation and HMI exercises, we will activate this option again and take a look at the end result. --------------------------------------------------------------------------------------------------------- Steps1.Select the multiproject and open the settings screen. 2.Select the project that is to serve as the template for the PH. 3.Define the OS that is to be used as a maintenance station (MS), i.e., your ES/OS. 4.Check the changes that have been made. --------------------------------------------------------------------------------------------------------- Procedure1.In the SIMATIC Manager open the plant view of the multiproject and select the name of the multiproject. To open the screen form, right-click and selectPlant Hierarchy Settings Then set the options according to the requirements for the exercise. 2.In the next screen, select the AS project as the template. (The goal is to avoid having to create the PH again for each project if the selected project already contains a PH.)
- 3.Define your OS (ES) as a maintenance station. 4.After confirming prompts, an operation is triggered, which performs the following actions: A first hierarchy folder is created in all projects included in the multiproject (e.g. "Plant(1)") which you can expand or adapt for each project as required. A second hierarchy folder is created in all projects included in the multiproject for diagnostic purposes (e.g. "Diagnostics"). It is later automatically adapted after the software is used to access the hardware. RemarkIn the slide above you can see the different breakdown of the diagnostic hierarchy in the two projects. While in the AS project only AS objects contribute to the diagnostics, the OS project contains folders for the AS, network and PC objects (full instrumentation and control setup). The maintenance station that is running on the OS must provide the entire instrumentation and control diagnostics. Whereas CFC charts with diagnostics drivers are created in the diagnostics folder of the AS project (the hardware-related software must run in the AS), pictures are created in the OS project and are displayed with graphic symbols when appropriate. The user accesses the OS diagnostics information for the status of the device via these symbols. The symbols are generated by the PCS 7 MS software.
- ExerciseCreate the hierarchy tree from the above slide in the PRO_AS project in the plant view. Update the PH in the multiproject to avoid having to make the entries again in the OS project. ---------------------------------------------------------------------------------------------------------- ActionIn the plant view, click the multiproject, right-click and select Plant Hierarchy Update in Multiproject to open the update screen. The option selected in the above slide will create the PH folders with identical names in all projects A identically-named PH folder in the projects represents the (identically named) assigned plant section. The second option enables limited updating of selected projects. This is necessary, for example, if different plant sections are to be monitored on OSs in different projects. Different plant hierarchies are required in that case. RemarkIf you would like to rename the PH folder later, do this in the template project. Folders that were generated through an update will be automatically renamed.
- PH settingsThe settings are taken from screen "1" for each hierarchy level of the current project. You can set the naming conventions for your project (number of levels, name length per level, whether the name of the level is added to the hierarchy identification and whether the screen hierarchy in the OS or the diagnostic pictures are derived fromthis plant view). With the OS area, you specify which hierarchy level is applicable as the OS area level. You have set level 2 (see circular mark). Note: When you assign a name, note that the process tag name on the OS must not exceed 128 characters. The name is a combination of the names of the folders in the hierarchy path, the chart name, the block name, the separator, and the connection name (parameter name of the block). Hierarchy folder - Properties After selecting a plant hierarchy (usually in level 1), right-click and select Object Properties to set the properties.
- AS/OS AssignmentSelect the following in the AS/OS Assignment tab (see above): The AS (its CPU chart folder) in which the CFC and SFC charts are stored. The OS in which the pictures and reports are stored. This assignment can be passed on to the lower level hierarchy folders, unless other assignments are necessary in lower levels. Remark You can only assign those ASs or OSs that are located in the same project as the PH folder that is currently being assigned. HMI Attributes The OS area ID for the hierarchy folder of the level selected as the OS area is displayed in the Control and Monitoring Attributes tab. The ID is preset with the name of the PH folder for this level. The area ID is passed on to (i.e. inherited by) all of the lower level hierarchy folders, OS pictures, OS reports and messages. This means that all lower-level hierarchy folders with their pictures belong to one plant area in the OS. This affects the area-specific authorizations for operating personnel. If the picture hierarchy is to be based on the plant hierarchy, the "Order..." button and the "Picture name for OS" field are active ("Picture name for OS" only if the OS area ID is not active). The name of the hierarchy folder is entered as the default setting for the picture name. The operator sees this name displayed in the WinCC picture hierarchy. Remark All of the settings are associated with the AS/OS that you have assigned.
- HID formationThe Higher-level ItemDesignation (HID) is formed from the following components: a. Path name from the plant hierarchy b. Chart name c. Block name Whereas the string the plant view contributes to the HID is the result of linking selectable combinations of the hierarchy folder names (components 1 to 4 in the slide), the chart name (5) and block name (6) are always present in the HID. Process tagIf individual parameters of the module are to be visualized in WinCC, the parameter name (7) is appended behind the previously described components, separated by a period. Examples In CFCIn the chart reference data of CFC, block 2U301 is displayed as part of Factory2ReactorsUnitCDrain\Dr301. The chart name is separated from the hierarchy path by "\". In WinCC (HID)The name of the block is displayed as Factory2/Reactors/UnitC/Drain/Dr301/2U301 (if all PH levels contribute to the HID). In our example, "Do not include in HID" was selected for Level 1 in the PH settings. Therefore, the resulting HID for the same block: Reactors/UnitC/Drain/Dr301/2U301 In WinCC (process tag) If a parameter of the above block is addressed, it is identified as a process tag and displayed in WinCC as follows: Reactors/UnitC/Drain/Dr301/2U301.QCONTROL
- RelationshipIf you have derived the picture hierarchy from the plant view (preceding slide, screen "1") the above slide shows the relationships. To start the OS compilation from the SIMATIC Manager, select the OS, then right-click and select Compile The picture hierarchy is automatically provided to the "Picture Tree Manager" in WinCC CS (Configuration System). During runtime, in WinCC RT (Run Time) the plant operator can select an area, launch the graphic display of the picture hierarchy, and look at the desired sub-area.
- You can derive this OS picture hierarchy from the plant view. You must use the plant view to insert the pictures for the relevant plant component in the hierarchy folders and provide them with meaningful names . You can then use OS (Graphics Designer) tools to configure these pictures. Tip:The following method is more efficient: - Start by inserting and renaming only one picture in the PH. - Open this picture in the Graphics Designer (WinCC) and change to the desired dimensions (height, width) there using its properties. - Copy this modified picture (which is still empty) in the PH, and then insert it into the various PH folders.
- Project nameWas entered via the SIMATIC Manager. Can still be changed (especially if the projects are to be subsequently combined in a multiproject). The storage location on the hard disk remains the same. AS nameThe SIMATIC 400 station should be renamed so it can be found again at the location of installation. Select the station, then right-click and select Renameand enter a new name (ASxx, where xx is your station number). S7 program nameThe name of the directory where the software is stored; this directory is displayed as a substitute for the AS name in the process control messages of this AS in WinCC. It should be similar or identical to the AS name e.g. S7_AS03. Computer nameA PC station is identified via the computer's Windows name. The name is assigned by the computer administrator. To determine the name, select the My Computer icon on the PC desktop, then right-click and select Properties -> Computer Name Then, copy the indicated name. When renaming the PC station in the SIMATIC Manager, you can then insert this name there (do not use special characters in the name!). OS nameThis name can be freely assigned, but should allow the OS function to be identified (SERV2, ARSRV, CL12 etc.). S7 program nameThe S7 program directory can also be renamed for the library.