
Recommended
More Related Content
What's hot
Similar to Digital Editing Process
Similar to Digital Editing Process (20)
Recently uploaded
Recently uploaded (20)
Digital Editing Process
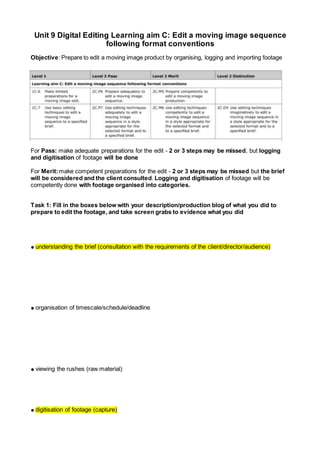
- 1. Unit 9 Digital Editing Learning aim C: Edit a moving image sequence following format conventions Objective: Prepare to edit a moving image product by organising, logging and importing footage For Pass: make adequate preparations for the edit - 2 or 3 steps may be missed, but logging and digitisation of footage will be done For Merit:make competent preparations for the edit - 2 or 3 steps may be missed but the brief will be considered and the client consulted. Logging and digitisation of footage will be competently done with footage organised into categories. Task 1: Fill in the boxes below with your description/production blog of what you did to prepare to edit the footage, and take screen grabs to evidence what you did ● understanding the brief (consultation with the requirements of the client/director/audience) ● organisation of timescale/schedule/deadline ● viewing the rushes (raw material) ● digitisation of footage (capture)
- 2. ● logging of scenes/shots/takes (e.g. clapperboard (scene/shots) on screen) ● storing and filing ● labelling original and master material
- 3. Unit 9 Digital Editing Learning aim C: Edit a moving image sequence following format conventions Objective: To follow editing processes to assemble the continuity edit Pass: be able to edit the sequence so the continuity style is apparent but the external editing dominates internal editing. There will be many ‘one shot’ scenes and not a lot of variation of techniques Merit: be able to edit the sequence so the continuity style is easy to interpret and the external editing has equal competency with internal editing. There will be some variation in the use of editing techniques Task 2: The editing process (must follow all steps) Make notes for your blog diary and take screen captures or photos to document how you have worked through the process ● rough cut, e.g. rough edit of entire product/narrative to ensure all scenes are working and no omissions ● external cutting (cutting or moving scenes around in narrative order) ● internal cutting (cutting or changing shots within scenes) ● pick-ups (extra footage needed to make the edit work - flashbacks from Shutterstock) ● fine cut (attention to detail, trimming shots to complete the edit)
- 4. ● visual effects (colour grading, visual techniques) ● sound (addition of sound beyond that recorded at source) ● titles/captions (addition of any text to the shots) ● playout (final render, levels check and export to media platform, e.g. DVD, MP4).
- 5. Unit 9 Digital Editing Learning aim D: Review own moving image sequence Objective: to collect feedback on the finished edit and review own work Task 4: Feedback - collect blog comments from your peer editors (including tutor) on each other's edits a) intended purpose of the edited material b) use of continuity style & use of editing techniques c) ability to follow narrative or create atmosphere Task 5: identify key points in the feedback below a) specific 3 examples from the edit based on your feedback b) identify and address 3 areas for development from feedback Task 6: present your self-assessment as a audio commentary or blog post a) areas for improvement (continuity, pace, narrative)
- 6. b) what worked well (continuity techniques, pace, narrative, sound, colour grading) c) choices made during production o justification of style for format