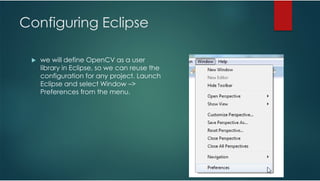
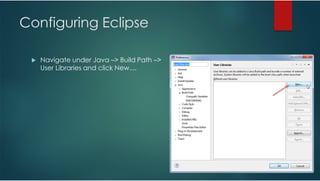
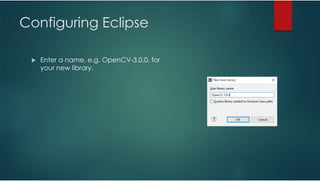
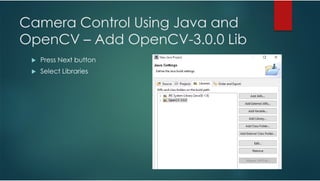
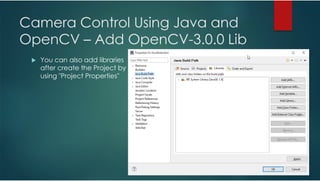
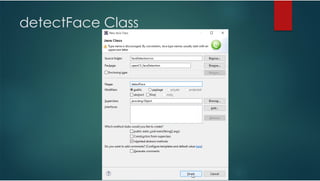
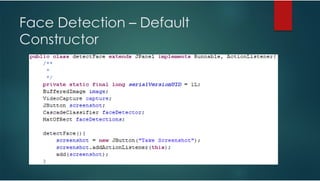
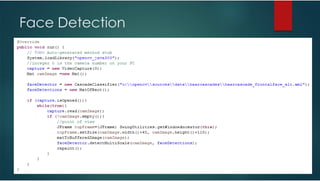
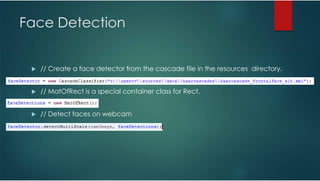
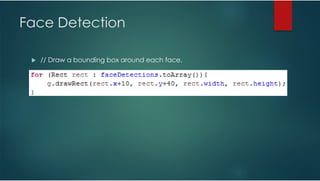
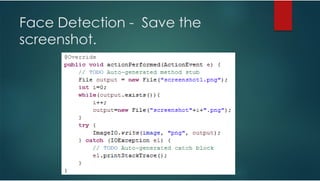
OpenCV and Java
YRD.DOÇ.DR. CELAL MURAT KANDEMİR
ESKİŞEHİR OSMANGAZİ ÜNİVERSİTESİ EĞİTİM FAKÜLTESİ
BİLGİSAYAR VE ÖĞRETİM TEKNOLOJİLERİ EĞİTİMİ
Contents
Install OpenCV
Test OpenCV Lib
Face Detection App.
mainGUI Class
detectFace Class
Download and install – Building
From Source
OpenCV SourceForge repository.
http://sourceforge.net/projects/opencvl
ibrary/files/opencv-win/
Download and install – Binary Install
http://opencv.org/downloads.html
Windows users can find the prebuilt files needed for Java
development in the opencv/build/java/ folder inside the package.
For other OSes it’s required to build OpenCV from sources.
Download and Install – Binary Install
Tutorials and Documentation
http://opencv-java-tutorials.readthedocs.org/en/latest/02-first-java-application-with-opencv.html
http://docs.opencv.org/2.4/doc/tutorials/introduction/desktop_java/java_dev_intro.html
http://docs.opencv.org/2.4/doc/tutorials/introduction/java_eclipse/java_eclipse.html#java-eclipse
Configuring Eclipse
we will define OpenCV as a user
library in Eclipse, so we can reuse the
configuration for any project. Launch
Eclipse and select Window –>
Preferences from the menu.
Configuring Eclipse
Navigate under Java –> Build Path –>
User Libraries and click New....
Configuring Eclipse
Enter a name, e.g. OpenCV-3.0.0, for
your new library.
Configuring Eclipse
Now select your new user library and
click Add External JARs....
Configuring Eclipse
Browse through C:opencvbuildjava and select opencv-246.jar. After adding
the jar, extend the opencv-300.jar and select Native library location and press
Edit....
Configuring Eclipse
After adding the jar, extend the
opencv-300.jar and select Native
library location and press Edit....
Configuring Eclipse
Select External Folder... and browse to select the folder C:OpenCV-
2.4.6buildjavax64. If you have a 32-bit system you need to select the x86 folder
instead of x64.
Configuring Eclipse
Your user library configuration
should look like this:
Done ☺
Testing the configuration on a new
Java project
Now start creating a new Java
project.
Testing the configuration on a new
Java project
Write the Project name
Testing the configuration on a new
Java project
On the Java Settings step, under Libraries tab, select Add Library->User Library...
and select OpenCV-3.0.0, then click Finish.
Testing the configuration on a new
Java project
Libraries should look like this:
Testing the configuration on a new
Java project
Now you have created and
configured a new Java project it is
time to test it. Create a new java file.
Testing the configuration on a new
Java project
Here is a starter code for your
convenience:
Testing the configuration on a new
Java project
When you run the code you should see
3x3 identity matrix as output.
That is it, whenever you start a new
project just add the OpenCV user library
that you have defined to your project
and you are good to go. Enjoy your
powerful, less painful development
environment :)
Updated version of
http://docs.opencv.org/2.4/doc/tutorial
s/introduction/java_eclipse/java_eclipse
.html#java-eclipse
Author: Barış Evrim Demiröz
A tutorial on how to use OpenCV Java
with Eclipse.
Camera Control Using Java and
OpenCV
Camera Control Using Java and
OpenCV – Add OpenCV-3.0.0 Lib
Press Next button
Select Libraries
Camera Control Using Java and
OpenCV – Add OpenCV-3.0.0 Lib
You can also add libraries
after create the Project by
using "Project Properties"
mainGUI Class
mainGUI Class
detectFace Class
Face Detection
Face Detection – Default
Constructor
Face Detection
Face Detection
// Create a face detector from the cascade file in the resources directory.
// MatOfRect is a special container class for Rect.
// Detect faces on webcam
Face Detection
Face Detection
// Draw a bounding box around each face.
Face Detection – Convert openCV
MAT file to BufferedImage
Face Detection - Save the
screenshot.
Face Detection
Questions

openCV and Java - Face Detection