More Related Content
Similar to Excel Basics (20)
More from Bertotools Limited
More from Bertotools Limited (20)
Excel Basics
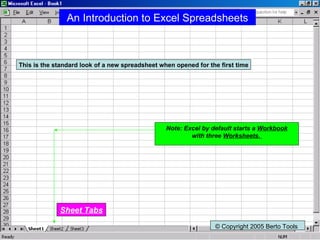
- 1. An Introduction to Excel Spreadsheets This is the standard look of a new spreadsheet when opened for the first time © Copyright 2005 Berto Tools Note: Excel by default starts a Workbook with three Worksheets. Sheet Tabs
- 2. Two Vertical Lines make a Column which is denoted by letters of the alphabet © Copyright 2005 Berto Tools
- 4. A Column & a Row together make a Cell. The Cell Address is Column then Row e.g. D12 Note: Another name for Cell Address is Cell Reference © Copyright 2005 Berto Tools
- 5. To add the contents of cells B8 and C8, we use a Formula as shown in cell D12. Note: A formula is always started with the “ =“ sign and typed where the result is required © Copyright 2005 Berto Tools
- 6. When enter is depressed, the result of the Addition appears in the Active Cell Note: The Formula Bar has been made visible To show the formula which is still in the Active Cell © Copyright 2005 Berto Tools
- 7. You can use the Fill Handle to create or extend a Series such as the Days of the Week. © Copyright 2005 Berto Tools
- 8. As well as the Months of the Year. © Copyright 2005 Berto Tools
- 9. As well as the 10 x 10 timetable © Copyright 2005 Berto Tools
- 10. We can also use the Fill Handle to copy formulae – here we find the Sum for each column. Fill Handle © Copyright 2005 Berto Tools
- 11. And again we use the Average Function for each column. © Copyright 2005 Berto Tools
- 12. Click on Row 17 to highlight the entire row. Right click & click Delete. The Blank Row is gone! © Copyright 2005 Berto Tools
- 13. Highlight the range A16 to J17 using the mouse. Click on the Chart Wizard. Chart Wizard © Copyright 2005 Berto Tools
- 14. For Steps 1-3 click on Next. At Step 4, select “As new sheet” as shown. Select Finish. © Copyright 2005 Berto Tools
- 16. Click on Sheet 1. Highlight all numerical data. Click on View, Toolbars and Formatting. © Copyright 2005 Berto Tools
- 18. Format Days of the week to blue and Months of the year to Red. Also auto adjust Column widths. © Copyright 2005 Berto Tools
- 19. Highlight cells A! through L17. Set print area as shown using the File Print Area option. © Copyright 2005 Berto Tools
- 20. Use File Page Set up as the option to Fit to One page. © Copyright 2005 Berto Tools
- 21. Use View Header & Footer to insert a custom header – your Name. You should now be able to print & submit work to your teacher. © Copyright 2005 Berto Tools