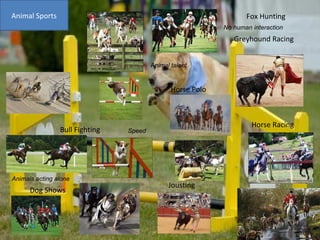
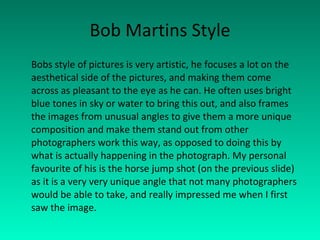
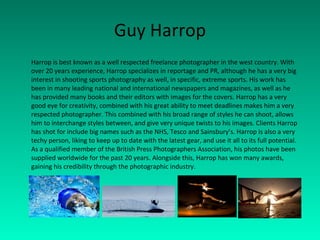
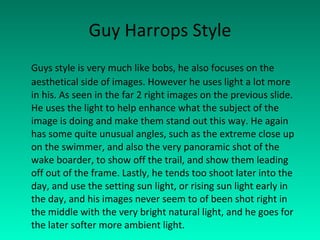
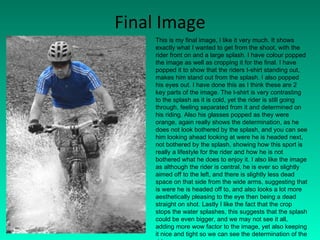
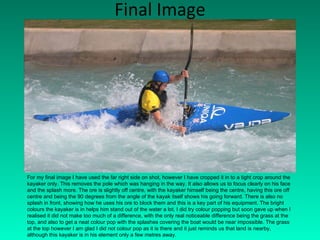
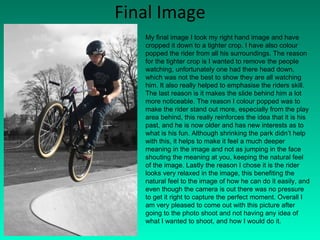
Sport and Action Adam Banner
Sport and Action Extreme Sport Common Sports Water Sport Animal Sports Action
Action Gun Shots Liquid Sculptures Explosions Smoke Trails Fire Glass Smashing Natural Disasters Lightning Snow War Exciting  Thrilling Electrifying Movement Thrilling Exhilarating
Water Sport Jet-Skiing Surfing Speed-Boating Rafting Wakeboarding Waterskiing Canoeing Kayaking Splashes Speed Fast paced Action Achievement
Extreme Sport Parkour Base Jumping Rock Climbing Sky-Dive Motocross Mountain -Boarding BMX Mountain-Bike Skill Achievement Accomplishment Thrilling Ability Talent Expertise
Common Sports Basketball Netball Running Golf Tennis Rugby Cricket Football Exciting  Exercise Hobby Accessible Fun with friends Common Televised
Animal Sports Jousting Fox Hunting Horse Polo Dog Shows Horse Racing Greyhound Racing Bull Fighting Animals acting alone Speed No human interaction Animal talent
Bob Martin Bob Martin is a multi-award winning photographer. Although shooting all styles, he specializes mainly in sport and action style shots. He shoots for editorial and corporate clients as well as for advertisement. Martin ahs been a photographer for over 20 years, and has shot many sporting events. He has covered events such as 10 years worth of The Olympics, both summer and winter, and also a special one off event called ‘horse racing on ice’. This has enabled him to travel all around the world taking photos, and also have his work published in numerous magazines and national papers. These include the Sunday times, the New York times, life magazine and Newsweek. Bob martin is considered to be the only sports illustrated photographer based outside the USA. Over his career Martin has picked up over 53 national and international awards, including his 3 wins of the highly prestigious British Sports Photographer of The Year award. In the year of 2005 alone, Martin picked up 23 awards, showing how much of a highly respected photographer he is.
Bob Martins Style Bobs style of pictures is very artistic, he focuses a lot on the aesthetical side of the pictures, and making them come across as pleasant to the eye as he can. He often uses bright blue tones in sky or water to bring this out, and also frames the images from unusual angles to give them a more unique composition and make them stand out from other photographers work this way, as opposed to doing this by what is actually happening in the photograph. My personal favourite of his is the horse jump shot (on the previous slide) as it is a very very unique angle that not many photographers would be able to take, and really impressed me when I first saw the image.
Guy Harrop Harrop is best known as a well respected freelance photographer in the west country. With over 20 years experience, Harrop specializes in reportage and PR, although he has a very big interest in shooting sports photography as well, in specific, extreme sports. His work has been in many leading national and international newspapers and magazines, as well as he has provided many books and their editors with images for the covers. Harrop has a very good eye for creativity, combined with his great ability to meet deadlines makes him a very respected photographer. This combined with his broad range of styles he can shoot, allows him to interchange styles between, and give very unique twists to his images. Clients Harrop has shot for include big names such as the NHS, Tesco and Sainsbury’s. Harrop is also a very techy person, liking to keep up to date with the latest gear, and use it all to its full potential. As a qualified member of the British Press Photographers Association, his photos have been supplied worldwide for the past 20 years. Alongside this, Harrop has won many awards, gaining his credibility through the photographic industry.
Guy Harrops Style Guys style is very much like bobs, he also focuses on the aesthetical side of images. However he uses light a lot more in his. As seen in the far 2 right images on the previous slide. He uses the light to help enhance what the subject of the image is doing and make them stand out this way. He again has some quite unusual angles, such as the extreme close up on the swimmer, and also the very panoramic shot of the wake boarder, to show off the trail, and show them leading off out of the frame. Lastly, he tends too shoot later into the day, and use the setting sun light, or rising sun light early in the day, and his images never seem to of been shot right in the middle with the very bright natural light, and he goes for the later softer more ambient light.
Craig Tull Tull is a 24 year old photographer from Maidenhead in the UK. He has been taking photos for around 4-5 years. He was first influenced into photography by his passion for BMX. He wanted to be able to take pictures of what him and his friends got up to on and off the bike, so got his first camera, a 4 megapixel typical point and shoot. His real passion for photography began when other photographers turned up at his local riding spot with an SLR hooked up to a slave flash. Tull was so impressed by the results they got he went out the next day himself and bought himself a SLR with a slave flash and his love for photography began here. Coming from his BMX roots, majority of his photography is BMX based, and when he does go to try out other styles, he try’s to still get BMX into it somehow. Tull is completely self taught having never had a lesson in it, if Tull wants to work out a shot, he will go out and experiment, or resort to searching on Google until he knows every last little detail about it. Although Tull himself is only really interested in BMX photography, he is inspired by all ranges of photography, and sums up what inspires him as ‘any photographer that makes me take a second look at their photo is definitely an inspiring one to me’.
Craig Tulls Style Craig's style is different to Bob and Guys, he focus’s a lot more on what the subject is doing and capturing the moment a lot more, as opposed to giving his images optimal aesthetical looks to them. This is not too say he does not take shots that are very pleasing to the eye, however his images come across more based on the riding of the riders he shoots, this is largely down to the nature of the sport he shoots how the rider may only land the trick once, so there is not always time to set up the shot. It seems to be the easier the trick in the photo, the more the shot looks like it has been setup with the background selected and lighting. This can be seen on the last slide going from left to right, with the far left being easier tricks, and the photos having more thought out backgrounds, and using rules such as the rule of thirds, until getting to the right hand side were the rider is just in the middle, and  the lighting nowhere near as thought out
Photograph Analysis This photo by Craig Tull is very inspiring. The image is about showing off the riding, however the slightly dramatic dull lighting gives it a feel of dullness. With the rider being in the clear gap of the sky, it suggests him escaping the dullness of normality by being on his bike. This could also ask the question, why does he want to escape this? although not asking the viewer to respond to it. Another way of looking at it is that the rider is rather small, and there are also a lot of railings in the shot, could be suggesting the feeling that he is trapped in the dullness, and how people have to find there own ways to deal with it. The work was made very recently and in a skate park in the UK. The image was taken to be added to the riders portfolio who is looking for sponsorship. The photo can be related to by a lot of people as BMX is a very big sport now in the UK, and a lot of younger riders look up to the older better riders and there work, this meaning the role of photographers in the sport is much more in-need, and being taken on by a lot more people due to the feeling of wow when you capture the moment. When I first see the work my reaction was as previously said, wow, being a bike rider myself I understand the skill needed to pull off the stunt he is pulling, and from the photographer side of me, how he would have had to pull the trick several times whilst the  the photographer tries out many ways to capture the image. Although the image means all of this to me, to others not interested in photography or BMX, they do not see as much that has gone into it, and just see it as someone has taken a picture of there friend doing a ‘cool stunt’ on there bike. I feel the low angle shot of the image helps to emphasise the size of the trick, and the lighting gives it a different feel to the standard pick a fast shutter speed and snap a shot stood next to the ramp. The lighting really brings out all the tones in the image, and gives it a HDR feel to it. All the decisions that have been put into the image such as lighting and angles I feel really help to make the image, and give it a very different feel to the usual BMX shot.
Photo Shoot Plan From my Photo Shoot I want to get a very similar image to the image I analysed of Tulls. To achieve this I first need to find myself a rider and a skate park with a similar ramp to that which Tull used. I will not need many props for the image other then the rider, ramp and the riders bike. For the shoot I will firstly need to take with me my DSLR camera, external flash, and most likely ND filters. A tripod could also be handy so I can adjust the shot position very slightly each time if needed, although not necessary. I will stage the photo by asking the rider to pull the same trick on the similar ramp, and getting myself at a similar angle to that which Tull used, I will set the camera up so that I am using a shutter speed of around 1/200 th  of a second, synced with the external flash at 1/200 th  so that I can capture the moment perfectly. I will also try to use quite a large F number to avoid getting a shallow depth of field, to allow me to have the whole image in focus. I will keep the ISO down to avoid getting noise in the image and keep it as clear as possible, to match the clarity of Tulls. After taking the image, I will turn it into HDR using Photoshop to try and match the depth of colours within Tulls work.
Favourite Images From Photo Shoot I was lucky enough to come across a local BMX event that was happening, which sorted out my problem of finding a rider to use in the photos. On arrival I found luckily they had a similar ramp to what Tull had in his photo. Unfortunately however, I was unable to use an external flash, so instead shot with a shutter speed of 1/400 th  and an aperture of 8.0 and an ISO speed of 100. This allowed me to get a clear image and capture the action well. The images are all very similar to Tulls. Above I have selected the 10 closest images to Tulls, were the riders did the same or similar tricks in the same sort of direction and angle. Out of all the images, I feel the top right is the best, as the viewpoint is very similar angle, although the rider is not jumping quite as high, he is in a similar position and moving the bike in a similar way, so really represents Tulls image. Next I will Photoshop the image as HDR so try and match the colours of it to close to what Tull used. The photo shoot went very well, and I feel the outcomes have been very good, and once the image is cropped and been through HDR, I should have a very good representation of the inspiring work of Tull. Not quite Same trick Stuff in background Too zoomed in Not high Enough to Clear  background Big plain  background No distractions And big background Image could Be easily  Cropped to Area as has Big empty Background, Distractions Would also Be cropped  out
Photo Shopping Selected Image The first step of photo shopping I cropped the image using the crop tool to get the selection of  the image as similar to Tulls as I could. Next I used the exposure adjust tool to adjust the exposure of the image by roughly 1.5 at  a time I saved the images with corresponding file names to there exposure level to allow for an easier workflow as to not get confused later on in the process
Photo Shopping Continued I then opened the 5 images using Photoshop's HDR creation option Once I had loaded the images in the HDR editor, I then adjusted the settings so that the radius was 43 pixels, bumped the strength up to nearly full, increased gamma to give a glow around the rider, and upped the exposure to counter the addition of shadow and detail darkening the image. Lastly I also increased the saturation and vibrancy of the image by 20% and 34%, finally adjusting the curve of the image to slightly even out the tones from the brighter bottom right corner.
Photo Shopping Continued Next I selected the entire area of the sky and opened the hue/saturation adjust tool, selected the colorize option, and increased the hue of the image by 200, this brang the blue tones out a lot more in the sky. Lastly, I had duplicated the layer before colourising, and cut the rider only and the slight bit that made him stand out from the background out of the image, and placed it on top of were he had been colourized on the underneath layer, so that he remained clear and in his little bubble. I also feather the edges so that it would not stand out too much on top.
Final Image I feel my final image has came out very well. Although the colours do not perfectly match the original of Tulls due to not being able to set up lighting at the display, I feel the HDR has worked as a very good substitute to adjust the lighting. The sky is not completely clear and bright like Tulls, and using a graduated blue filter on the camera would have solved this, although the colourising in Photoshop has really helped it. With the HDR I made the area around the rider be brighter, to still show the side that they are escaping the duller underneath of them, and here I feel that side of the image may be more obvious. Overall I feel the photo shoot went very well, and am happy I got a successful image out of it, that does show a representation of the shot by Tull.
Normal Sports Action Extreme Sports Water Sports Animal Sports Visual Elements Shallow D.O.F to isolate the person or the focus. Very sharp image and captures right in the action. Wider shots to show how extreme a location it is. Lots of water splashes, usually outdoors with natural light and a low angle to avoid reflections. Shallow D.O.F to show isolation. Tight crop to avoid showing human control. Devices Freezing time. Stopping time and capturing the action. Capturing the moment and to show off the skill. Freezing motion and capturing 2 movements. Capturing motion and separating animals from humans. Techniques Small F number and longer focal length with quick shutter speed. Flashes, small F number, quick shutter speed. Wide angle lens, fast shutter speed, and a fisheye in urban places. Fast shutter speed, low angle, off shoe flash to avoid direct reflections. Long focal length, small F number, quick shutter. Context Showing the separation from other stuff whilst doing sport. Capturing impressive and unusual moments to show severity and stuningness of it. To show off the skill and show how sport can be pushed and human skill pushed. Showing human and nature can become one. Suggesting animal intelligence. Ideas Football in focus, foot about to kick it is out of focus, and motion blur on the foot. Water bomb dropping and exploding. Possible sequence shot, each bomb  different colour. Free runner jumping off something, possible graffiti in the background. Kayaker in white water. A lot of splashes. Greyhound race, 2 dogs very c lose, possible pan shot, dogs colour popped and what they chasing.
Statement of Intentions My intention is to focus on extreme sports. Specifically mountain biking due to it being one of the most accessible extreme sports. Extreme sport is the term used for sports being perceived as having a high danger level. They usually include speed, height and a lot of physical exertion, with specialized gear usually being required, along with safety pads. I have a interest in this as I take part in extreme sports myself, so already enjoy participating in and watching these sports. The reason I have chosen it is because of the excitement evolved around the sport. Even if not taking part, watching is exciting. This means that being a photographer, you are definitely included right up close in the action, and get the thrill of something often zooming by quickly really close to you, and having to capture the moment right at the point when there is something exciting happening. Because of the high speeds and pinpoint accuracy, it is a challenge to capture the great photos, which is why I want to research different images and how they have managed to capture the moment and then interpret the concept into my own way. To communicate my concept I could possibly use a storyboard, to create a collage like style photo, showcasing all of the participants skill. I could further this by trying to create the images into something relating for the sport, for example, photos of someone on there motorbike put into the shape of a motorbike. Another alternative would be by using animation for computer images, so that I can capture several moments, and put them together into a little sequence, like a stop motion video. To capture this, I will be having to use a DSLR, it is not impossible on other cameras, but results won't be as clear and precise as if I use one. I will also be having to use fast shutter speeds, to do this I may need the use of high ISO's, small f numbers and flash if lighting is not good enough. When shooting photo’s I could use a continuous shutter speed, this would be good if it was a very fast fps speed, however if not then it may miss the moment and only capture before and after, so I will have to develop my own style as to how I shoot. I hope my ideas develop into a wide selection of images. In extreme sports I do not want to focus down to one sport, and would prefer to try out a range to give myself a good view into the subject and see how it can vary on how an image is composed, or how the camera is set up, depending on the speed, height and location of were the sport is, however, due to the nature of the sport, they are not always accessible so I may not be able to shoot as many as I would like. The visual elements I will need to use will be light, shape and form. Light will be key as this will be what lights the image and allows me the use of a quick shutter. Shape will be key as I wont want boring shots, and having the subject in a unusual shape such as pulling a trick or pose will add a lot more to the image then if they were still. Lastly form will be important because it will be the form the image takes, and the overall image will be based off this, and it will be what makes or breaks the shot. All of these combined will be what allows me or doesn’t allow me to get the ‘wow factor’ images. With the rise of extreme sports popularity, there are a lot more extreme sport photographers around now, with some who produce very inspiring work. I will use there work as a platform to work from, and have a look more into these artists, and see if there have been any theories come up with to do with the sport.
Photo Shoot Plan 1 For my photo shoot I am proposing to use an idea of a mountain biker going through a big puddle or other source of water in a forest location, and creating a big splash coming up from his wheels. To do this, I will need to find room in a forest were I can setup the camera, yet also have a source of water big enough to create a splash, and also allow the rider to get speed to create as big a splash as possible. I will also need props such as a bike helmet and riding gear, which the rider will have, so that they look very professional, and not just any normal person got onto a bike and ridden through. I will need to take with me myself a camera, tripod and possibly an external flash and triggers. The tripod is not to hold the camera steady and reduce blur as I will be using a fast shutter speed, but instead so that I can when I look back at the last shot, adjust the camera very slightly from the position to get it perfect, rather then handheld struggling to get it back into the same position. I will stage the photography by having the image portrait, and a very tight crop on the rider so that the water spraying out will fill right up to the edges of the image. I will take the photos front on with the rider central in the image. I will have quite a deep depth of field keeping everything in the image in focus except from possibly any very far away trees, although hopefully these wont be seen due to the size of the flash. Lastly, I may try and light it so that it is just the rider and splash lit by using an off shoe flash nearby, but this will depend on the location and how it allows me to set up the flash. The visual qualities I plan to explore and capture in the image is the ‘capturing the moment’ style of image. Not only capturing the moment of the rider being in the right place, but also capturing the movement of the water in the image as well. I am proposing to shoot with a shutter speed of around 1/500 th  second, and aperture of around f8.0 and an ISO of no more then 400 to keep noise down. These will change depending on how bright a day it is and how I can  get lighting setup in the woods, but the shutter speed I will not let go beneath 1/200 th  and any changes will be made in the ISO or aperture.
Photo Shoot Pictures These are the images from my photo shoot. I was unable to take as many photos as I would have liked to due to the weather being cold and the rider not being able to continue riding through for me. I feel the images I took however are very good and am very pleased with them. I feel I achieved what I wanted too from the shoot, and will next select my favourite images, and then manipulate them to get them finally exactly as I want them.
Favourite 3 Images These are my favourite 3 images from my photo shoot. I feel they are best because they all have a very good splash. Although I tried from other angles, the splash of water was not as emphasised as a front on near front on angle. All 3 images however from front on have in the background a wooden pillar in the woods. I am not too concerned by this because I can Photoshop this out at a later stage in the images. Out of these 3 images, I am not so keen on the middle image. The rider is looking down and not as much of the face can be seen, also the splash in front of the wheel takes away from the feel of the riders movement. The image also doesn’t have much space at the bottom, and doesn’t give the feel the rider is heading anywhere. Lastly, taken from a higher angle then the other 2 makes the splash look smaller, so the image does not have the feel. The left ad right images I like both a lot. The right image I like because you can see the path and a tyre mark along it, showing that this is were the rider has came from, also the pillar is out the way so would be easier or not necessary to be  taken out. The left image however gives more of a feel from the splash. The rider also has more of a determined look on there face, and in a much more ‘attack’ stance. The pillar however is right behind there head, so would need more care in the removal. Overall, I feel I prefer the left hand image due to it showing my idea the best, both the movement of the water and the rider. In editing of the image, I plan to crop it first so it is tighter in the rider and splash, and may also colour pop the rider so they stand out a lot more from the surroundings. Pillar
Final Image This is my final image, I like it very much. It shows exactly what I wanted to get from the shoot, with the rider front on and a large splash. I have colour popped the image as well as cropping it for the final. I have popped it to show that the riders t-shirt standing out, makes him stand out from the splash. I also popped his eyes out. I have done this as I think these are 2 key parts of the image. The t-shirt is very contrasting to the splash as it is cold, yet the rider is still going through, feeling separated from it and determined on his riding. Also his glasses popped as they were orange, again really shows the determination, as he does not look bothered by the splash, and you can see him looking ahead looking at were he is headed next, not bothered by the splash, showing how this sport is really a lifestyle for the rider and how he is not bothered what he does to enjoy it. I also like the image as although the rider is central, he is ever so slightly aimed off to the left, and there is slightly less dead space on that side from the wide arms, suggesting that is were he is headed off to, and also looks a lot more aesthetically pleasing to the eye then being a dead straight on shot. Lastly I like the fact that the crop stops the water splashes, this suggests that the splash could be even bigger, and we may not see it all, adding more wow factor to the image, yet also keeping it nice and tight so we can see the determination of the rider.
Photo Shoot Plan 2 (Controlled Lighting) For my next photo shoot I have decided I will try using controlled lighting to do it. To benefit the use of the lighting the most I have came up with the idea to create a photo with an unusual look. My proposed idea is to have somebody on a bike going along some woodwork towards a seesaw, them going along the woodwork they will be more of a blur. This blur will go straight into a clear image of them half way down on a see saw. The trail will hopefully show the curve they go in as the see-saw goes down. To achieve this I will need the wooden structure with see-saw which I know were I have access to one. The props I will need is the bike, the rider in full gear and a forest background. The photographic equipment I will need to use will first be a DSLR camera as it will offer me allot more control of my settings, a off shoe flash with wireless triggers, a light to light the rider on there entrance in to the seesaw so I can get the ghost like blur effect, I will need 3 tripods. 1 for the light, 1for the camera and the last for the flash. I will stage the photo by having it side on, with the light from the constant light I will take facing the part of the woodwork before the seesaw to light the rider and give the ghost like effect light trail. I will then have the flash facing away from the direction of the other light, so it does not light there as well and cause over exposure on that part of the image, and only lights the area were the rider is. I will do the photo shoot in dark, so I can make full use of the light, and the dark forest background will really make the rider stand out in the image. I aim to capture in the shoot the visual qualities of lighting, to show how it can be used to show more in an image then if it is not used. I will also be exploring capturing the moment I used in my other photos, but developing it further to capture more then just the moment the action happens, and show the build up of the rider coming in and feeling ghost-like to show the nerves of what they are about to do, to contrast the them in action part showing the confidence while they are doing it and being successful.
Photo Shoot Pictures These are the first test photos from my photo shoot, unfortunately due to the moon lighting the sky a lot and it being quite bright, and me only being able to shoot from a low angle as there was nowhere higher I could get the camera on a tripod, it meant that during the exposure, the sky was brighter then when the rider was lit so the ghost like trail could not be achieved. It also meant that when I fired the flash, the rider was only ghost like then, as the sky behind had exposed more then id of liked. I did mange to achieve the image slightly in a few by the use of a graduated ND filter, however although this darkened the sky area, it also meant the rider did not expose as well as I would have liked so I decided to give up on this idea due to the sky in the area not being as dark at night as I wanted, and I improvised the idea by attaching a light to the riders handlebars, to create a light painting style line instead of the ghost like trail, this still showed were the rider had been, and I also developed the idea to show were he would be heading by allowing the exposure to carry on after firing the off shoe flash manually, to carry on the light trail were he has gone, these pictures are on the next slide.
Improvised Pictures For an improvised idea whilst out on the photo shoot I am very pleased with the images, the original see-saw idea with the light allowed me to use a larger f number as I only had to capture the light on the bars which was brighter then the lit rider for the ghost trail. This meant that when I fired the flash the rider was a lot more exposed and how I envisaged in my plan. I also decided to shoot some on some built up corners called berms as well. These allowed me to get the rider fully exposed as I could  get an angle were I was aimed to the floor which was very dark unlike the sky being lit by the moon. A few of the images I misfired the flash, which can be seen were there is no rider. Overall I am very pleased with the images and happy how they came out.
Favourite 3 Images I have chosen these as my favourite 3 images all for different reasons. The first I like as I shook the tripod to begin with as the rider was coming in, this made a wavy line, and the sky is also were the trees are silhouetted has some blur which adds the feel of movement to the image. The rider is also only half exposed, which has my ghost effect, it is not were I want, however it still gives the same feeling that the rider is moving and feels unconnected and only focusing on the riding. The middle image I chose as it is a nice shot, the light trail is very long, also the flash was positioned so that as well as exposing the rider, it would expose the plants in the bottom right, this adds a arty feel. Lastly the background being completely black . The only part I do not like is the trail does not go completely to the far right hand side of the image. This was because it being pitch black when taking, through the viewfinder it was very hard to see were the rider was, this is easily fixed in Photoshop however by either lengthening the trail, or cropping the image tighter to allow this. I would prefer the first however as by cropping you would lose the plants in the bottom right hand corner. Lastly I like the far right image due to it being very close, you can see the expression on the riders face. It also fits the rule of thirds very nicely, and the more empty space in the direction they are heading really gives the feel they are headed there. The light trail also gets brighter as it gets closer to the camera, due to the camera picking up more light. This really reinforces the feel of were the rider has came from, and were they are heading, and with the trail in front being longer then from behind, suggests how he is thinking more about were he is heading then were he has just came from.
Final Image I decided for my final image I would take the middle image and Photoshop it. The 2 changes I made is I continued the light trail to go right to the edge of the frame. The 2 nd  was I cropped out all the empty space to the right as this was not adding anything to the image. It also means the rider has now been positioned right on the rule of thirds line, and his head on the top left join of it. This giving a very nice aesthetical feel to the image. Although I cropped the black space which was a nice touch to the image as it showed the darkness and how the rider is only focused on the ride in front of them, I feel the path being lit were there eye sight is and also the light trail naturally leading the eye there, gives this feel enough, that the remaining black along the top is enough to show the night time and how he is disconnected from everything else around.
Photo Shoot Plan 3 I have decided after my first photo shoot were I captured 2 movements and enjoyed doing this I will expand this idea further. From this shoot I want to again capture 2 movements, however this time I will focus a lot more with the water. I plan to take a photo of a kayaker in a white water setting. To do this I will visit the white water centre for the 2012 Olympics. The props for this I will need is a kayaker in there kayak, wearing a wetsuit and other gear such as helmet. I have checked and the day that I plan to go there will be activities going on so will be kayakers and rafts fitting what I want to shoot. I will need to take with me just camera, I will be shooting a fast shutter speed so no tripod is needed. I will need a telephoto lens however as the viewing areas are quite far away I have been told so I will take this with. I plan to stage the photograph by getting a side on close up shot of the kayaker or raft in the water, and have a lot of splashing from the water surrounding them. I plan to have a deep depth of field and keep it all in focus, to do this I will need a larger aperture number. To combine this with the fast shutter speed it is likely I will have to use a high ISO to achieve an image correctly exposed, however this may cause noise depending how high the ISO is, so I hope I get a day with a lot of sun. I plan to explore the visual quality of capturing the moment, of both the water and the kayaker/rafter at the same time. This relates to my theme as kayaking is regarded often as an extreme sport and especially rafting. It also draws back in the action side of my project to this by incorporating liquid sculptures into the work. I plan to use the camera in a manual setting, with an aperture of f8.0, and a shutter speed of around 1/500 of a second. Depending on weather I will need to adjust the ISO to achieve this, and if it goes too high and I get too much noise, I may have to close the aperture and have a deeper depth of field then I wanted to have less noise.
Photo shoot Pictures This photo shoot was a lot harder then I had envisaged. Due to the uncontrollable nature of the kayaks and rafts in the water, it was very hard to judge were to stand to capture a side on shot. The reflective nature of water and being a sunny day did not help either as the ‘white’ water were it moved a lot often became very over exposed, this meant I could not quickly run if I saw an opportunity of a side on shot as by the time I was there and had adjusted the camera to not over expose the water or have bad reflections of the sun in it, the subject would have moved away by then. I eventually did manage to speak to the kayaker who was there and ask if he could try and control it to be side on as he passed me, which luckily he did a few times so I could aim for the shot I was originally planning.
Favourite 3 Images I have chosen these 3 as my favourite images from the shoot. Although at the time I was not sure on the images as they were not side on, when seeing them larger on pc screen when got home, I found I liked them a lot more. The left image I like due to it having a huge water splash going up and headed for the people, and there faces can be seen screaming and all have there ores up as though they are waiting for it. This really captures the moment. A tighter crop would be nice on this image so that you can really see the faces of the people onboard the raft. The middle image I like again because of the big splash. It really surrounds the kayaker a lot. I also like how leading off to the left you can see the trail he has came down, to improve this I would have liked to turn the camera slightly more left so that the left hand side of the trail he has come down is not cut off and can be seen clearly all the way up. This would also have benefited the image by it could have cut the pole hanging down out, and had the kayaker just about to leave the frame, suggesting he had came down the trail really fast. It also would have the grass in at the bottom made meat at the corner instead of slightly up in the bottom right. This grass here really adds to the image as with the concrete separating the grass and water in the image, it really contrasts well showing land and water. The right image I like is because it does fit my photo shoot plan, and after arriving there and seeing how tricky it was to shoot, I was surprised I did manage to get a shot like this. I also like it because there is a decent amount of splashing, but not excessive amounts to block the face of the kayaker, so we can see his determination on it. His ore is also at a 90 degree angle to him, which looks very aesthetically pleasing and really adds to his determination, and could also due to being side on look like he is blocking what is coming ahead and will defeat it with ease.
Final Image For my final image I have used the far right side on shot, however I have cropped it in to a tight crop around the kayaker only. This removes the pole which was hanging in the way. It also allows us to focus clearly on his face and the splash more. The ore is slightly off centre, with the kayaker himself being the centre, having this ore off centre and being the 90 degrees from the angle of the kayak itself shows his going forward. There is also no splash in front, showing how he uses his ore to block them and this is a key part of his equipment. The bright colours the kayaker is in helps him stand out of the water a lot. I did try colour popping but soon gave up when I realised it did not make too much of a difference, with the only real noticeable difference being the grass at the top, and also to get a neat colour pop with the splashes covering the boat would be near impossible. The grass at the top however I am glad I did not colour pop as it is there and it just reminds us that land is nearby, although this kayaker is in his element only a few metres away.
Photo shoot Plan 4 This photo shoot I am not going to go to with a set image in my mind of what I want to shoot. I will be going for a much more informal style and meeting up with a rider with a big tricky bag, and just shooting to get ‘the shot’ I know he is good and vaguely how the lighting is at the skate park, however when I am there I will adapt to try and get ‘the shot’ that captures the moment and really shows his talent. To get this I will be shooting with him at Hertford skate park. It is quite a small skate park however it is outdoors and has quite a nice grassy backdrop behind it so that could really help the images. It is also made of concrete, so the ramps are a dull grey sort of colour so will not distract the attention from the rider. The props I will use will again be the rider on bike. I have asked him to wear casual clothes that he would normally wear, just so I can capture the moment looking very naturally, rather then images which are usually clear that they have been staged or had a lot of setting up. I will not take very much equipment with either, I shall take a DSLR with a 17-50mm lens and that is it. The DSLR adjustments will allow me fast shutter speed, and the lens is a decent focal length to allow me a variety of shots around the skate park. I only want to take minimal equipment as this will make the shoot feel a lot more natural and informal, and allow me to capture the natural type image I want to capture, rather then setting up off-shoe flashes and making the rider do the same thing over and over again until getting everything set up as wanted. Due to this I am not sure on how I will communicate the photograph. The angle and lighting could vary very much from picture to picture, also the focal point and depth of field also will vary a lot from shot to shot, as I try out ideas I have on the day. The main visual quality I will be exploring is shape, as this rider will be pulling a lot of tricks, so here he will be making a lot of different shapes. As well as this, like my other shoots, I will again be exploring capturing the moment which is very common throughout action sports. I will most likely be using the TV (shutter priority) function on my camera with a shutter speed of around 1/500 of a second. The reason I will use TV is because this will allow me to quickly change position, however not have to worry about lighting and adjusting iso’s and apertures to get the correct exposure, and the camera will do this for me whilst keeping the shutter speed the same. This will benefit me a lot as when I am changing position looking for the shot I want to get, I will not have to worry about changing camera settings myself and missing the moment I wanted to capture.
Photo Shoot Pictures This photo shoot went extremely well. It was very relaxed and did not feel like I was there trying to get the picture and was a lot more natural. There was a very relaxed atmosphere and no feeling of rushing to set things up. It also meant there was no heavy gear lugging around and having to keep and eye on. This meant the rider could just ride like normal, and not being told what to do, putting pressure on him to get things right, which often causes it not to, and meant capturing moments was a lot easier and worked better. Above are my favourite images from the shoot, I like them all for different reasons. The silhouettes are very eye pleasing, the big trick ones are impressive and really show frozen time. And the rest with the other riders at the park and the rider I was there to shoot doing smaller tricks and smiles on there faces along with people in the background laughing and joking really shows the laid back nature of the shoot.
Favourite 3 Images I have picked these as my favourite 3 images, which I like all for different reasons. The left hand side I like due to it being 1 of the very first images I took, and already captured the moment well. The rider is mid trick making a very unusual shape, already hitting my goals from the shoot within a few minutes of being there. I also like how in the background there is another rider watching, and the 2 people on the bench as well, helping the feel of how it is not staged and the background hasn’t been cleared for the shoot, and showing the natural feel of this goes on and is normal for the rider to be doing it, and not something he just does for the camera. The middle image I like for similar reasons, here was later in the day and a lot more people around, by now the rider was pulling larger tricks. With the bigger tricks and more people, there are a lot more people watching, again like last time showing it is a normal thing, however this time it is clearer and more exaggerated in the image. I also like due to the image being shot from the other direction, you can see were he has came from, headed for and also there is a very nice backdrop of the trees and the sky. The 1 improvement that would make this picture even better would have been if I could have gotten a little lower so the rider was fully in front of the clouds and not overlapping the trees so that it helped to emphasise the size and height of the trick he was doing. Lastly the right hand image was towards the end of the day. This image again has people watching and captures the moment well, but that is not the reason I like it, I like it a lot as there is the play area in the background, this starts to draw parallels of that being his past were he used to have fun, and how he now has fun by using his bike.
Final Image My final image I took my right hand image and have cropped it down to a tighter crop. I have also colour popped the rider from all his surroundings. The reason for the tighter crop is I wanted to remove the people watching, unfortunately one had there head down, which was not the best to show they are all watching him. It also really helped to emphasise the riders skill. The last reason is it makes the slide behind him a lot more noticeable. The reason I colour popped was to make the rider stand out more, especially from the play area behind, this really reinforces the idea that it is his past, and he is now older and has new interests as to what is his fun. Although shrinking the park didn’t help with this, it helps to make it feel a much deeper meaning in the image and not as jumping in the face shouting the meaning at you, keeping the natural feel of the image. Lastly the reason I chose it is the rider looks very relaxed in the image, this benefiting the natural feel to the image of how he can do it easily, and even though the camera is out there was no pressure to get it right to capture the perfect moment. Overall I am very pleased to come out with this picture after going to the photo shoot and not having any idea of what I wanted to shoot, and how I would do it.
 

Photography Coursework

  • 1.
    Sport and ActionAdam Banner
  • 2.
    Sport and ActionExtreme Sport Common Sports Water Sport Animal Sports Action
  • 3.
    Action Gun ShotsLiquid Sculptures Explosions Smoke Trails Fire Glass Smashing Natural Disasters Lightning Snow War Exciting Thrilling Electrifying Movement Thrilling Exhilarating
  • 4.
    Water Sport Jet-SkiingSurfing Speed-Boating Rafting Wakeboarding Waterskiing Canoeing Kayaking Splashes Speed Fast paced Action Achievement
  • 5.
    Extreme Sport ParkourBase Jumping Rock Climbing Sky-Dive Motocross Mountain -Boarding BMX Mountain-Bike Skill Achievement Accomplishment Thrilling Ability Talent Expertise
  • 6.
    Common Sports BasketballNetball Running Golf Tennis Rugby Cricket Football Exciting Exercise Hobby Accessible Fun with friends Common Televised
  • 7.
    Animal Sports JoustingFox Hunting Horse Polo Dog Shows Horse Racing Greyhound Racing Bull Fighting Animals acting alone Speed No human interaction Animal talent
  • 8.
    Bob Martin BobMartin is a multi-award winning photographer. Although shooting all styles, he specializes mainly in sport and action style shots. He shoots for editorial and corporate clients as well as for advertisement. Martin ahs been a photographer for over 20 years, and has shot many sporting events. He has covered events such as 10 years worth of The Olympics, both summer and winter, and also a special one off event called ‘horse racing on ice’. This has enabled him to travel all around the world taking photos, and also have his work published in numerous magazines and national papers. These include the Sunday times, the New York times, life magazine and Newsweek. Bob martin is considered to be the only sports illustrated photographer based outside the USA. Over his career Martin has picked up over 53 national and international awards, including his 3 wins of the highly prestigious British Sports Photographer of The Year award. In the year of 2005 alone, Martin picked up 23 awards, showing how much of a highly respected photographer he is.
  • 9.
    Bob Martins StyleBobs style of pictures is very artistic, he focuses a lot on the aesthetical side of the pictures, and making them come across as pleasant to the eye as he can. He often uses bright blue tones in sky or water to bring this out, and also frames the images from unusual angles to give them a more unique composition and make them stand out from other photographers work this way, as opposed to doing this by what is actually happening in the photograph. My personal favourite of his is the horse jump shot (on the previous slide) as it is a very very unique angle that not many photographers would be able to take, and really impressed me when I first saw the image.
  • 10.
    Guy Harrop Harropis best known as a well respected freelance photographer in the west country. With over 20 years experience, Harrop specializes in reportage and PR, although he has a very big interest in shooting sports photography as well, in specific, extreme sports. His work has been in many leading national and international newspapers and magazines, as well as he has provided many books and their editors with images for the covers. Harrop has a very good eye for creativity, combined with his great ability to meet deadlines makes him a very respected photographer. This combined with his broad range of styles he can shoot, allows him to interchange styles between, and give very unique twists to his images. Clients Harrop has shot for include big names such as the NHS, Tesco and Sainsbury’s. Harrop is also a very techy person, liking to keep up to date with the latest gear, and use it all to its full potential. As a qualified member of the British Press Photographers Association, his photos have been supplied worldwide for the past 20 years. Alongside this, Harrop has won many awards, gaining his credibility through the photographic industry.
  • 11.
    Guy Harrops StyleGuys style is very much like bobs, he also focuses on the aesthetical side of images. However he uses light a lot more in his. As seen in the far 2 right images on the previous slide. He uses the light to help enhance what the subject of the image is doing and make them stand out this way. He again has some quite unusual angles, such as the extreme close up on the swimmer, and also the very panoramic shot of the wake boarder, to show off the trail, and show them leading off out of the frame. Lastly, he tends too shoot later into the day, and use the setting sun light, or rising sun light early in the day, and his images never seem to of been shot right in the middle with the very bright natural light, and he goes for the later softer more ambient light.
  • 12.
    Craig Tull Tullis a 24 year old photographer from Maidenhead in the UK. He has been taking photos for around 4-5 years. He was first influenced into photography by his passion for BMX. He wanted to be able to take pictures of what him and his friends got up to on and off the bike, so got his first camera, a 4 megapixel typical point and shoot. His real passion for photography began when other photographers turned up at his local riding spot with an SLR hooked up to a slave flash. Tull was so impressed by the results they got he went out the next day himself and bought himself a SLR with a slave flash and his love for photography began here. Coming from his BMX roots, majority of his photography is BMX based, and when he does go to try out other styles, he try’s to still get BMX into it somehow. Tull is completely self taught having never had a lesson in it, if Tull wants to work out a shot, he will go out and experiment, or resort to searching on Google until he knows every last little detail about it. Although Tull himself is only really interested in BMX photography, he is inspired by all ranges of photography, and sums up what inspires him as ‘any photographer that makes me take a second look at their photo is definitely an inspiring one to me’.
  • 13.
    Craig Tulls StyleCraig's style is different to Bob and Guys, he focus’s a lot more on what the subject is doing and capturing the moment a lot more, as opposed to giving his images optimal aesthetical looks to them. This is not too say he does not take shots that are very pleasing to the eye, however his images come across more based on the riding of the riders he shoots, this is largely down to the nature of the sport he shoots how the rider may only land the trick once, so there is not always time to set up the shot. It seems to be the easier the trick in the photo, the more the shot looks like it has been setup with the background selected and lighting. This can be seen on the last slide going from left to right, with the far left being easier tricks, and the photos having more thought out backgrounds, and using rules such as the rule of thirds, until getting to the right hand side were the rider is just in the middle, and the lighting nowhere near as thought out
  • 14.
    Photograph Analysis Thisphoto by Craig Tull is very inspiring. The image is about showing off the riding, however the slightly dramatic dull lighting gives it a feel of dullness. With the rider being in the clear gap of the sky, it suggests him escaping the dullness of normality by being on his bike. This could also ask the question, why does he want to escape this? although not asking the viewer to respond to it. Another way of looking at it is that the rider is rather small, and there are also a lot of railings in the shot, could be suggesting the feeling that he is trapped in the dullness, and how people have to find there own ways to deal with it. The work was made very recently and in a skate park in the UK. The image was taken to be added to the riders portfolio who is looking for sponsorship. The photo can be related to by a lot of people as BMX is a very big sport now in the UK, and a lot of younger riders look up to the older better riders and there work, this meaning the role of photographers in the sport is much more in-need, and being taken on by a lot more people due to the feeling of wow when you capture the moment. When I first see the work my reaction was as previously said, wow, being a bike rider myself I understand the skill needed to pull off the stunt he is pulling, and from the photographer side of me, how he would have had to pull the trick several times whilst the the photographer tries out many ways to capture the image. Although the image means all of this to me, to others not interested in photography or BMX, they do not see as much that has gone into it, and just see it as someone has taken a picture of there friend doing a ‘cool stunt’ on there bike. I feel the low angle shot of the image helps to emphasise the size of the trick, and the lighting gives it a different feel to the standard pick a fast shutter speed and snap a shot stood next to the ramp. The lighting really brings out all the tones in the image, and gives it a HDR feel to it. All the decisions that have been put into the image such as lighting and angles I feel really help to make the image, and give it a very different feel to the usual BMX shot.
  • 15.
    Photo Shoot PlanFrom my Photo Shoot I want to get a very similar image to the image I analysed of Tulls. To achieve this I first need to find myself a rider and a skate park with a similar ramp to that which Tull used. I will not need many props for the image other then the rider, ramp and the riders bike. For the shoot I will firstly need to take with me my DSLR camera, external flash, and most likely ND filters. A tripod could also be handy so I can adjust the shot position very slightly each time if needed, although not necessary. I will stage the photo by asking the rider to pull the same trick on the similar ramp, and getting myself at a similar angle to that which Tull used, I will set the camera up so that I am using a shutter speed of around 1/200 th of a second, synced with the external flash at 1/200 th so that I can capture the moment perfectly. I will also try to use quite a large F number to avoid getting a shallow depth of field, to allow me to have the whole image in focus. I will keep the ISO down to avoid getting noise in the image and keep it as clear as possible, to match the clarity of Tulls. After taking the image, I will turn it into HDR using Photoshop to try and match the depth of colours within Tulls work.
  • 16.
    Favourite Images FromPhoto Shoot I was lucky enough to come across a local BMX event that was happening, which sorted out my problem of finding a rider to use in the photos. On arrival I found luckily they had a similar ramp to what Tull had in his photo. Unfortunately however, I was unable to use an external flash, so instead shot with a shutter speed of 1/400 th and an aperture of 8.0 and an ISO speed of 100. This allowed me to get a clear image and capture the action well. The images are all very similar to Tulls. Above I have selected the 10 closest images to Tulls, were the riders did the same or similar tricks in the same sort of direction and angle. Out of all the images, I feel the top right is the best, as the viewpoint is very similar angle, although the rider is not jumping quite as high, he is in a similar position and moving the bike in a similar way, so really represents Tulls image. Next I will Photoshop the image as HDR so try and match the colours of it to close to what Tull used. The photo shoot went very well, and I feel the outcomes have been very good, and once the image is cropped and been through HDR, I should have a very good representation of the inspiring work of Tull. Not quite Same trick Stuff in background Too zoomed in Not high Enough to Clear background Big plain background No distractions And big background Image could Be easily Cropped to Area as has Big empty Background, Distractions Would also Be cropped out
  • 17.
    Photo Shopping SelectedImage The first step of photo shopping I cropped the image using the crop tool to get the selection of the image as similar to Tulls as I could. Next I used the exposure adjust tool to adjust the exposure of the image by roughly 1.5 at a time I saved the images with corresponding file names to there exposure level to allow for an easier workflow as to not get confused later on in the process
  • 18.
    Photo Shopping ContinuedI then opened the 5 images using Photoshop's HDR creation option Once I had loaded the images in the HDR editor, I then adjusted the settings so that the radius was 43 pixels, bumped the strength up to nearly full, increased gamma to give a glow around the rider, and upped the exposure to counter the addition of shadow and detail darkening the image. Lastly I also increased the saturation and vibrancy of the image by 20% and 34%, finally adjusting the curve of the image to slightly even out the tones from the brighter bottom right corner.
  • 19.
    Photo Shopping ContinuedNext I selected the entire area of the sky and opened the hue/saturation adjust tool, selected the colorize option, and increased the hue of the image by 200, this brang the blue tones out a lot more in the sky. Lastly, I had duplicated the layer before colourising, and cut the rider only and the slight bit that made him stand out from the background out of the image, and placed it on top of were he had been colourized on the underneath layer, so that he remained clear and in his little bubble. I also feather the edges so that it would not stand out too much on top.
  • 20.
    Final Image Ifeel my final image has came out very well. Although the colours do not perfectly match the original of Tulls due to not being able to set up lighting at the display, I feel the HDR has worked as a very good substitute to adjust the lighting. The sky is not completely clear and bright like Tulls, and using a graduated blue filter on the camera would have solved this, although the colourising in Photoshop has really helped it. With the HDR I made the area around the rider be brighter, to still show the side that they are escaping the duller underneath of them, and here I feel that side of the image may be more obvious. Overall I feel the photo shoot went very well, and am happy I got a successful image out of it, that does show a representation of the shot by Tull.
  • 21.
    Normal Sports ActionExtreme Sports Water Sports Animal Sports Visual Elements Shallow D.O.F to isolate the person or the focus. Very sharp image and captures right in the action. Wider shots to show how extreme a location it is. Lots of water splashes, usually outdoors with natural light and a low angle to avoid reflections. Shallow D.O.F to show isolation. Tight crop to avoid showing human control. Devices Freezing time. Stopping time and capturing the action. Capturing the moment and to show off the skill. Freezing motion and capturing 2 movements. Capturing motion and separating animals from humans. Techniques Small F number and longer focal length with quick shutter speed. Flashes, small F number, quick shutter speed. Wide angle lens, fast shutter speed, and a fisheye in urban places. Fast shutter speed, low angle, off shoe flash to avoid direct reflections. Long focal length, small F number, quick shutter. Context Showing the separation from other stuff whilst doing sport. Capturing impressive and unusual moments to show severity and stuningness of it. To show off the skill and show how sport can be pushed and human skill pushed. Showing human and nature can become one. Suggesting animal intelligence. Ideas Football in focus, foot about to kick it is out of focus, and motion blur on the foot. Water bomb dropping and exploding. Possible sequence shot, each bomb different colour. Free runner jumping off something, possible graffiti in the background. Kayaker in white water. A lot of splashes. Greyhound race, 2 dogs very c lose, possible pan shot, dogs colour popped and what they chasing.
  • 22.
    Statement of IntentionsMy intention is to focus on extreme sports. Specifically mountain biking due to it being one of the most accessible extreme sports. Extreme sport is the term used for sports being perceived as having a high danger level. They usually include speed, height and a lot of physical exertion, with specialized gear usually being required, along with safety pads. I have a interest in this as I take part in extreme sports myself, so already enjoy participating in and watching these sports. The reason I have chosen it is because of the excitement evolved around the sport. Even if not taking part, watching is exciting. This means that being a photographer, you are definitely included right up close in the action, and get the thrill of something often zooming by quickly really close to you, and having to capture the moment right at the point when there is something exciting happening. Because of the high speeds and pinpoint accuracy, it is a challenge to capture the great photos, which is why I want to research different images and how they have managed to capture the moment and then interpret the concept into my own way. To communicate my concept I could possibly use a storyboard, to create a collage like style photo, showcasing all of the participants skill. I could further this by trying to create the images into something relating for the sport, for example, photos of someone on there motorbike put into the shape of a motorbike. Another alternative would be by using animation for computer images, so that I can capture several moments, and put them together into a little sequence, like a stop motion video. To capture this, I will be having to use a DSLR, it is not impossible on other cameras, but results won't be as clear and precise as if I use one. I will also be having to use fast shutter speeds, to do this I may need the use of high ISO's, small f numbers and flash if lighting is not good enough. When shooting photo’s I could use a continuous shutter speed, this would be good if it was a very fast fps speed, however if not then it may miss the moment and only capture before and after, so I will have to develop my own style as to how I shoot. I hope my ideas develop into a wide selection of images. In extreme sports I do not want to focus down to one sport, and would prefer to try out a range to give myself a good view into the subject and see how it can vary on how an image is composed, or how the camera is set up, depending on the speed, height and location of were the sport is, however, due to the nature of the sport, they are not always accessible so I may not be able to shoot as many as I would like. The visual elements I will need to use will be light, shape and form. Light will be key as this will be what lights the image and allows me the use of a quick shutter. Shape will be key as I wont want boring shots, and having the subject in a unusual shape such as pulling a trick or pose will add a lot more to the image then if they were still. Lastly form will be important because it will be the form the image takes, and the overall image will be based off this, and it will be what makes or breaks the shot. All of these combined will be what allows me or doesn’t allow me to get the ‘wow factor’ images. With the rise of extreme sports popularity, there are a lot more extreme sport photographers around now, with some who produce very inspiring work. I will use there work as a platform to work from, and have a look more into these artists, and see if there have been any theories come up with to do with the sport.
  • 23.
    Photo Shoot Plan1 For my photo shoot I am proposing to use an idea of a mountain biker going through a big puddle or other source of water in a forest location, and creating a big splash coming up from his wheels. To do this, I will need to find room in a forest were I can setup the camera, yet also have a source of water big enough to create a splash, and also allow the rider to get speed to create as big a splash as possible. I will also need props such as a bike helmet and riding gear, which the rider will have, so that they look very professional, and not just any normal person got onto a bike and ridden through. I will need to take with me myself a camera, tripod and possibly an external flash and triggers. The tripod is not to hold the camera steady and reduce blur as I will be using a fast shutter speed, but instead so that I can when I look back at the last shot, adjust the camera very slightly from the position to get it perfect, rather then handheld struggling to get it back into the same position. I will stage the photography by having the image portrait, and a very tight crop on the rider so that the water spraying out will fill right up to the edges of the image. I will take the photos front on with the rider central in the image. I will have quite a deep depth of field keeping everything in the image in focus except from possibly any very far away trees, although hopefully these wont be seen due to the size of the flash. Lastly, I may try and light it so that it is just the rider and splash lit by using an off shoe flash nearby, but this will depend on the location and how it allows me to set up the flash. The visual qualities I plan to explore and capture in the image is the ‘capturing the moment’ style of image. Not only capturing the moment of the rider being in the right place, but also capturing the movement of the water in the image as well. I am proposing to shoot with a shutter speed of around 1/500 th second, and aperture of around f8.0 and an ISO of no more then 400 to keep noise down. These will change depending on how bright a day it is and how I can get lighting setup in the woods, but the shutter speed I will not let go beneath 1/200 th and any changes will be made in the ISO or aperture.
  • 24.
    Photo Shoot PicturesThese are the images from my photo shoot. I was unable to take as many photos as I would have liked to due to the weather being cold and the rider not being able to continue riding through for me. I feel the images I took however are very good and am very pleased with them. I feel I achieved what I wanted too from the shoot, and will next select my favourite images, and then manipulate them to get them finally exactly as I want them.
  • 25.
    Favourite 3 ImagesThese are my favourite 3 images from my photo shoot. I feel they are best because they all have a very good splash. Although I tried from other angles, the splash of water was not as emphasised as a front on near front on angle. All 3 images however from front on have in the background a wooden pillar in the woods. I am not too concerned by this because I can Photoshop this out at a later stage in the images. Out of these 3 images, I am not so keen on the middle image. The rider is looking down and not as much of the face can be seen, also the splash in front of the wheel takes away from the feel of the riders movement. The image also doesn’t have much space at the bottom, and doesn’t give the feel the rider is heading anywhere. Lastly, taken from a higher angle then the other 2 makes the splash look smaller, so the image does not have the feel. The left ad right images I like both a lot. The right image I like because you can see the path and a tyre mark along it, showing that this is were the rider has came from, also the pillar is out the way so would be easier or not necessary to be taken out. The left image however gives more of a feel from the splash. The rider also has more of a determined look on there face, and in a much more ‘attack’ stance. The pillar however is right behind there head, so would need more care in the removal. Overall, I feel I prefer the left hand image due to it showing my idea the best, both the movement of the water and the rider. In editing of the image, I plan to crop it first so it is tighter in the rider and splash, and may also colour pop the rider so they stand out a lot more from the surroundings. Pillar
  • 26.
    Final Image Thisis my final image, I like it very much. It shows exactly what I wanted to get from the shoot, with the rider front on and a large splash. I have colour popped the image as well as cropping it for the final. I have popped it to show that the riders t-shirt standing out, makes him stand out from the splash. I also popped his eyes out. I have done this as I think these are 2 key parts of the image. The t-shirt is very contrasting to the splash as it is cold, yet the rider is still going through, feeling separated from it and determined on his riding. Also his glasses popped as they were orange, again really shows the determination, as he does not look bothered by the splash, and you can see him looking ahead looking at were he is headed next, not bothered by the splash, showing how this sport is really a lifestyle for the rider and how he is not bothered what he does to enjoy it. I also like the image as although the rider is central, he is ever so slightly aimed off to the left, and there is slightly less dead space on that side from the wide arms, suggesting that is were he is headed off to, and also looks a lot more aesthetically pleasing to the eye then being a dead straight on shot. Lastly I like the fact that the crop stops the water splashes, this suggests that the splash could be even bigger, and we may not see it all, adding more wow factor to the image, yet also keeping it nice and tight so we can see the determination of the rider.
  • 27.
    Photo Shoot Plan2 (Controlled Lighting) For my next photo shoot I have decided I will try using controlled lighting to do it. To benefit the use of the lighting the most I have came up with the idea to create a photo with an unusual look. My proposed idea is to have somebody on a bike going along some woodwork towards a seesaw, them going along the woodwork they will be more of a blur. This blur will go straight into a clear image of them half way down on a see saw. The trail will hopefully show the curve they go in as the see-saw goes down. To achieve this I will need the wooden structure with see-saw which I know were I have access to one. The props I will need is the bike, the rider in full gear and a forest background. The photographic equipment I will need to use will first be a DSLR camera as it will offer me allot more control of my settings, a off shoe flash with wireless triggers, a light to light the rider on there entrance in to the seesaw so I can get the ghost like blur effect, I will need 3 tripods. 1 for the light, 1for the camera and the last for the flash. I will stage the photo by having it side on, with the light from the constant light I will take facing the part of the woodwork before the seesaw to light the rider and give the ghost like effect light trail. I will then have the flash facing away from the direction of the other light, so it does not light there as well and cause over exposure on that part of the image, and only lights the area were the rider is. I will do the photo shoot in dark, so I can make full use of the light, and the dark forest background will really make the rider stand out in the image. I aim to capture in the shoot the visual qualities of lighting, to show how it can be used to show more in an image then if it is not used. I will also be exploring capturing the moment I used in my other photos, but developing it further to capture more then just the moment the action happens, and show the build up of the rider coming in and feeling ghost-like to show the nerves of what they are about to do, to contrast the them in action part showing the confidence while they are doing it and being successful.
  • 28.
    Photo Shoot PicturesThese are the first test photos from my photo shoot, unfortunately due to the moon lighting the sky a lot and it being quite bright, and me only being able to shoot from a low angle as there was nowhere higher I could get the camera on a tripod, it meant that during the exposure, the sky was brighter then when the rider was lit so the ghost like trail could not be achieved. It also meant that when I fired the flash, the rider was only ghost like then, as the sky behind had exposed more then id of liked. I did mange to achieve the image slightly in a few by the use of a graduated ND filter, however although this darkened the sky area, it also meant the rider did not expose as well as I would have liked so I decided to give up on this idea due to the sky in the area not being as dark at night as I wanted, and I improvised the idea by attaching a light to the riders handlebars, to create a light painting style line instead of the ghost like trail, this still showed were the rider had been, and I also developed the idea to show were he would be heading by allowing the exposure to carry on after firing the off shoe flash manually, to carry on the light trail were he has gone, these pictures are on the next slide.
  • 29.
    Improvised Pictures Foran improvised idea whilst out on the photo shoot I am very pleased with the images, the original see-saw idea with the light allowed me to use a larger f number as I only had to capture the light on the bars which was brighter then the lit rider for the ghost trail. This meant that when I fired the flash the rider was a lot more exposed and how I envisaged in my plan. I also decided to shoot some on some built up corners called berms as well. These allowed me to get the rider fully exposed as I could get an angle were I was aimed to the floor which was very dark unlike the sky being lit by the moon. A few of the images I misfired the flash, which can be seen were there is no rider. Overall I am very pleased with the images and happy how they came out.
  • 30.
    Favourite 3 ImagesI have chosen these as my favourite 3 images all for different reasons. The first I like as I shook the tripod to begin with as the rider was coming in, this made a wavy line, and the sky is also were the trees are silhouetted has some blur which adds the feel of movement to the image. The rider is also only half exposed, which has my ghost effect, it is not were I want, however it still gives the same feeling that the rider is moving and feels unconnected and only focusing on the riding. The middle image I chose as it is a nice shot, the light trail is very long, also the flash was positioned so that as well as exposing the rider, it would expose the plants in the bottom right, this adds a arty feel. Lastly the background being completely black . The only part I do not like is the trail does not go completely to the far right hand side of the image. This was because it being pitch black when taking, through the viewfinder it was very hard to see were the rider was, this is easily fixed in Photoshop however by either lengthening the trail, or cropping the image tighter to allow this. I would prefer the first however as by cropping you would lose the plants in the bottom right hand corner. Lastly I like the far right image due to it being very close, you can see the expression on the riders face. It also fits the rule of thirds very nicely, and the more empty space in the direction they are heading really gives the feel they are headed there. The light trail also gets brighter as it gets closer to the camera, due to the camera picking up more light. This really reinforces the feel of were the rider has came from, and were they are heading, and with the trail in front being longer then from behind, suggests how he is thinking more about were he is heading then were he has just came from.
  • 31.
    Final Image Idecided for my final image I would take the middle image and Photoshop it. The 2 changes I made is I continued the light trail to go right to the edge of the frame. The 2 nd was I cropped out all the empty space to the right as this was not adding anything to the image. It also means the rider has now been positioned right on the rule of thirds line, and his head on the top left join of it. This giving a very nice aesthetical feel to the image. Although I cropped the black space which was a nice touch to the image as it showed the darkness and how the rider is only focused on the ride in front of them, I feel the path being lit were there eye sight is and also the light trail naturally leading the eye there, gives this feel enough, that the remaining black along the top is enough to show the night time and how he is disconnected from everything else around.
  • 32.
    Photo Shoot Plan3 I have decided after my first photo shoot were I captured 2 movements and enjoyed doing this I will expand this idea further. From this shoot I want to again capture 2 movements, however this time I will focus a lot more with the water. I plan to take a photo of a kayaker in a white water setting. To do this I will visit the white water centre for the 2012 Olympics. The props for this I will need is a kayaker in there kayak, wearing a wetsuit and other gear such as helmet. I have checked and the day that I plan to go there will be activities going on so will be kayakers and rafts fitting what I want to shoot. I will need to take with me just camera, I will be shooting a fast shutter speed so no tripod is needed. I will need a telephoto lens however as the viewing areas are quite far away I have been told so I will take this with. I plan to stage the photograph by getting a side on close up shot of the kayaker or raft in the water, and have a lot of splashing from the water surrounding them. I plan to have a deep depth of field and keep it all in focus, to do this I will need a larger aperture number. To combine this with the fast shutter speed it is likely I will have to use a high ISO to achieve an image correctly exposed, however this may cause noise depending how high the ISO is, so I hope I get a day with a lot of sun. I plan to explore the visual quality of capturing the moment, of both the water and the kayaker/rafter at the same time. This relates to my theme as kayaking is regarded often as an extreme sport and especially rafting. It also draws back in the action side of my project to this by incorporating liquid sculptures into the work. I plan to use the camera in a manual setting, with an aperture of f8.0, and a shutter speed of around 1/500 of a second. Depending on weather I will need to adjust the ISO to achieve this, and if it goes too high and I get too much noise, I may have to close the aperture and have a deeper depth of field then I wanted to have less noise.
  • 33.
    Photo shoot PicturesThis photo shoot was a lot harder then I had envisaged. Due to the uncontrollable nature of the kayaks and rafts in the water, it was very hard to judge were to stand to capture a side on shot. The reflective nature of water and being a sunny day did not help either as the ‘white’ water were it moved a lot often became very over exposed, this meant I could not quickly run if I saw an opportunity of a side on shot as by the time I was there and had adjusted the camera to not over expose the water or have bad reflections of the sun in it, the subject would have moved away by then. I eventually did manage to speak to the kayaker who was there and ask if he could try and control it to be side on as he passed me, which luckily he did a few times so I could aim for the shot I was originally planning.
  • 34.
    Favourite 3 ImagesI have chosen these 3 as my favourite images from the shoot. Although at the time I was not sure on the images as they were not side on, when seeing them larger on pc screen when got home, I found I liked them a lot more. The left image I like due to it having a huge water splash going up and headed for the people, and there faces can be seen screaming and all have there ores up as though they are waiting for it. This really captures the moment. A tighter crop would be nice on this image so that you can really see the faces of the people onboard the raft. The middle image I like again because of the big splash. It really surrounds the kayaker a lot. I also like how leading off to the left you can see the trail he has came down, to improve this I would have liked to turn the camera slightly more left so that the left hand side of the trail he has come down is not cut off and can be seen clearly all the way up. This would also have benefited the image by it could have cut the pole hanging down out, and had the kayaker just about to leave the frame, suggesting he had came down the trail really fast. It also would have the grass in at the bottom made meat at the corner instead of slightly up in the bottom right. This grass here really adds to the image as with the concrete separating the grass and water in the image, it really contrasts well showing land and water. The right image I like is because it does fit my photo shoot plan, and after arriving there and seeing how tricky it was to shoot, I was surprised I did manage to get a shot like this. I also like it because there is a decent amount of splashing, but not excessive amounts to block the face of the kayaker, so we can see his determination on it. His ore is also at a 90 degree angle to him, which looks very aesthetically pleasing and really adds to his determination, and could also due to being side on look like he is blocking what is coming ahead and will defeat it with ease.
  • 35.
    Final Image Formy final image I have used the far right side on shot, however I have cropped it in to a tight crop around the kayaker only. This removes the pole which was hanging in the way. It also allows us to focus clearly on his face and the splash more. The ore is slightly off centre, with the kayaker himself being the centre, having this ore off centre and being the 90 degrees from the angle of the kayak itself shows his going forward. There is also no splash in front, showing how he uses his ore to block them and this is a key part of his equipment. The bright colours the kayaker is in helps him stand out of the water a lot. I did try colour popping but soon gave up when I realised it did not make too much of a difference, with the only real noticeable difference being the grass at the top, and also to get a neat colour pop with the splashes covering the boat would be near impossible. The grass at the top however I am glad I did not colour pop as it is there and it just reminds us that land is nearby, although this kayaker is in his element only a few metres away.
  • 36.
    Photo shoot Plan4 This photo shoot I am not going to go to with a set image in my mind of what I want to shoot. I will be going for a much more informal style and meeting up with a rider with a big tricky bag, and just shooting to get ‘the shot’ I know he is good and vaguely how the lighting is at the skate park, however when I am there I will adapt to try and get ‘the shot’ that captures the moment and really shows his talent. To get this I will be shooting with him at Hertford skate park. It is quite a small skate park however it is outdoors and has quite a nice grassy backdrop behind it so that could really help the images. It is also made of concrete, so the ramps are a dull grey sort of colour so will not distract the attention from the rider. The props I will use will again be the rider on bike. I have asked him to wear casual clothes that he would normally wear, just so I can capture the moment looking very naturally, rather then images which are usually clear that they have been staged or had a lot of setting up. I will not take very much equipment with either, I shall take a DSLR with a 17-50mm lens and that is it. The DSLR adjustments will allow me fast shutter speed, and the lens is a decent focal length to allow me a variety of shots around the skate park. I only want to take minimal equipment as this will make the shoot feel a lot more natural and informal, and allow me to capture the natural type image I want to capture, rather then setting up off-shoe flashes and making the rider do the same thing over and over again until getting everything set up as wanted. Due to this I am not sure on how I will communicate the photograph. The angle and lighting could vary very much from picture to picture, also the focal point and depth of field also will vary a lot from shot to shot, as I try out ideas I have on the day. The main visual quality I will be exploring is shape, as this rider will be pulling a lot of tricks, so here he will be making a lot of different shapes. As well as this, like my other shoots, I will again be exploring capturing the moment which is very common throughout action sports. I will most likely be using the TV (shutter priority) function on my camera with a shutter speed of around 1/500 of a second. The reason I will use TV is because this will allow me to quickly change position, however not have to worry about lighting and adjusting iso’s and apertures to get the correct exposure, and the camera will do this for me whilst keeping the shutter speed the same. This will benefit me a lot as when I am changing position looking for the shot I want to get, I will not have to worry about changing camera settings myself and missing the moment I wanted to capture.
  • 37.
    Photo Shoot PicturesThis photo shoot went extremely well. It was very relaxed and did not feel like I was there trying to get the picture and was a lot more natural. There was a very relaxed atmosphere and no feeling of rushing to set things up. It also meant there was no heavy gear lugging around and having to keep and eye on. This meant the rider could just ride like normal, and not being told what to do, putting pressure on him to get things right, which often causes it not to, and meant capturing moments was a lot easier and worked better. Above are my favourite images from the shoot, I like them all for different reasons. The silhouettes are very eye pleasing, the big trick ones are impressive and really show frozen time. And the rest with the other riders at the park and the rider I was there to shoot doing smaller tricks and smiles on there faces along with people in the background laughing and joking really shows the laid back nature of the shoot.
  • 38.
    Favourite 3 ImagesI have picked these as my favourite 3 images, which I like all for different reasons. The left hand side I like due to it being 1 of the very first images I took, and already captured the moment well. The rider is mid trick making a very unusual shape, already hitting my goals from the shoot within a few minutes of being there. I also like how in the background there is another rider watching, and the 2 people on the bench as well, helping the feel of how it is not staged and the background hasn’t been cleared for the shoot, and showing the natural feel of this goes on and is normal for the rider to be doing it, and not something he just does for the camera. The middle image I like for similar reasons, here was later in the day and a lot more people around, by now the rider was pulling larger tricks. With the bigger tricks and more people, there are a lot more people watching, again like last time showing it is a normal thing, however this time it is clearer and more exaggerated in the image. I also like due to the image being shot from the other direction, you can see were he has came from, headed for and also there is a very nice backdrop of the trees and the sky. The 1 improvement that would make this picture even better would have been if I could have gotten a little lower so the rider was fully in front of the clouds and not overlapping the trees so that it helped to emphasise the size and height of the trick he was doing. Lastly the right hand image was towards the end of the day. This image again has people watching and captures the moment well, but that is not the reason I like it, I like it a lot as there is the play area in the background, this starts to draw parallels of that being his past were he used to have fun, and how he now has fun by using his bike.
  • 39.
    Final Image Myfinal image I took my right hand image and have cropped it down to a tighter crop. I have also colour popped the rider from all his surroundings. The reason for the tighter crop is I wanted to remove the people watching, unfortunately one had there head down, which was not the best to show they are all watching him. It also really helped to emphasise the riders skill. The last reason is it makes the slide behind him a lot more noticeable. The reason I colour popped was to make the rider stand out more, especially from the play area behind, this really reinforces the idea that it is his past, and he is now older and has new interests as to what is his fun. Although shrinking the park didn’t help with this, it helps to make it feel a much deeper meaning in the image and not as jumping in the face shouting the meaning at you, keeping the natural feel of the image. Lastly the reason I chose it is the rider looks very relaxed in the image, this benefiting the natural feel to the image of how he can do it easily, and even though the camera is out there was no pressure to get it right to capture the perfect moment. Overall I am very pleased to come out with this picture after going to the photo shoot and not having any idea of what I wanted to shoot, and how I would do it.
  • 40.