
Recommended
More Related Content
What's hot
What's hot (16)
Viewers also liked
Similar to Using Goobric and Doctopus to Grade Writing Assignments
Similar to Using Goobric and Doctopus to Grade Writing Assignments (20)
More from Meagan Harrelson
More from Meagan Harrelson (8)
Recently uploaded
Recently uploaded (20)
Using Goobric and Doctopus to Grade Writing Assignments
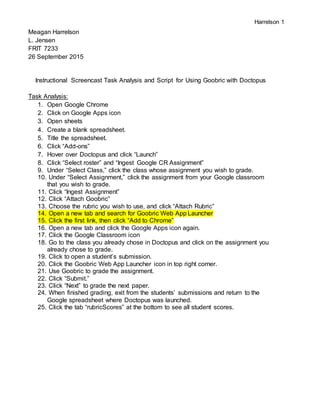
- 1. Harrelson 1 Meagan Harrelson L. Jensen FRIT 7233 26 September 2015 Instructional Screencast Task Analysis and Script for Using Goobric with Doctopus Task Analysis: 1. Open Google Chrome 2. Click on Google Apps icon 3. Open sheets 4. Create a blank spreadsheet. 5. Title the spreadsheet. 6. Click “Add-ons” 7. Hover over Doctopus and click “Launch” 8. Click “Select roster” and “Ingest Google CR Assignment” 9. Under “Select Class,” click the class whose assignment you wish to grade. 10. Under “Select Assignment,” click the assignment from your Google classroom that you wish to grade. 11. Click “Ingest Assignment” 12. Click “Attach Goobric” 13. Choose the rubric you wish to use, and click “Attach Rubric” 14. Open a new tab and search for Goobric Web App Launcher 15. Click the first link, then click “Add to Chrome” 16. Open a new tab and click the Google Apps icon again. 17. Click the Google Classroom icon 18. Go to the class you already chose in Doctopus and click on the assignment you already chose to grade. 19. Click to open a student’s submission. 20. Click the Goobric Web App Launcher icon in top right corner. 21. Use Goobric to grade the assignment. 22. Click “Submit.” 23. Click “Next” to grade the next paper. 24. When finished grading, exit from the students’ submissions and return to the Google spreadsheet where Doctopus was launched. 25. Click the tab “rubricScores” at the bottom to see all student scores.
- 2. Harrelson 2 Script: Using Goobric with Doctopus *All of the following steps must be performed using Google Chrome. Step Action on Screen Narration 1 Title slide: “Using Goobric with Doctopus” Hi, and welcome to the tutorial on how to use Goobric with Doctopus to grade assignments in Google classroom. 2 Slide with picture of “the problem” (stack of paper essays with red pen and rubric). If you’re like most teachers, giving a writing assignment to your students also comes with the dread of having to grade them. Not only do we struggle with reading the illegible writing, but we have a huge stack of papers to lug around, not to mention the rubrics we must attach to them and the comments we have to write on each of them. Now, there is an answer. It’s called Goobric, and it pairs with the Doctopus Add-On to quickly and easily grade writing assignments on Google classroom without the mess! 3 Click Google Chrome In order to use this tool, you must follow the following steps using Google Chrome, and you must be signed in to your Google account. 4 Google Apps icon, or “waffle” Once signed in, click the Google Apps icon, or “waffle,” on any Google page. 5 “Sheets” Then click on “Sheets.” You might be thinking, “How does this have anything to do with an writing assignment on Google classroom?” But in order to use Goobric, there is some setting up you must do first. 6 “Blank” Under “Start a New Spreadsheet,” Click “Blank.” 7 Title the spreadsheet The first thing you’ll want to do to your new spreadsheet is title it. I normally associate my title with the assignment I’m planning to grade, so that I can find it easily later. 8 “Add-ons” When you’re ready to begin, click “Add-ons” in your top banner. You’ll be needing the add-on called Doctopus. 9 Hover over “Doctopus” and click Hover over “Doctopus” and click “Launch.”
- 3. Harrelson 3 “Launch” You will see the Doctopus window appear on the right side of your screen shortly. 10 Click “Select roster” and “Ingest Google CR Assignment” As prompted, click “Select roster” and “Ingest Google CR Assignment.” 11 Under “Select Class,” click the class whose assignment you wish to grade. Under “Select Class,” click the class whose assignment you wish to grade. 12 Under “Select Assignment,” click the assignment from your Google classroom that you wish to grade. Under “Select Assignment,” click the assignment from your Google classroom that you wish to grade. These steps allow Doctopus to pull all of your students and their submissions straight from Google classroom so that it can place the data into this spreadsheet later on. 13 Click “Ingest Assignment” Click “Ingest Assignment” 14 Click “Attach Goobric” Then, click “Attach Goobric” 15 Choose the rubric you wish to use, and click “Attach Rubric” This window gives you the option to either create a rubric or use one that you already have. For this assignment, I have already created a rubric using Google Sheets that I plan to use to grade this assignment. 16 Open a new tab and search for Goobric Web App Launcher You are almost set to grade, but before you can use Goobric, you must add a free extension to your Google Chrome. To do this, open a new tab in your browser and search “Goobric Web App Launcher.” 17 Click the first link, then click “Add to Chrome” When the results appear, click the first link, then click “Add to Chrome.” This extension will show up later as a tiny gray eyeball, as I call it, in the top right corner of your screen. 18 Open a new tab and click the Google Apps icon again. Now that you have added the Goobric extension, click on the Google Apps icon again and open your Google Classroom. 19 Click the Google Classroom icon If you are using a Chromebook, you may already have a Classroom icon on your desktop banner. 20 Go to the class you already chose in Doctopus and click on the assignment you already chose to Once you’re in Google classroom, go to the class you already chose in Doctopus and click on the assignment you already chose to
- 4. Harrelson 4 grade. grade. 21 Click to open a student’s submission. Click on any student’s submission to open it. I like to use this list on the left side of my screen because it already has the submissions in alphabetical order. 22 Click the Goobric Web App Launcher icon in top right corner. Here’s where you will use the Goobric extension. Here is the gray icon in the top right corner. Click it in order to activate Goobric for grading. 23 Demonstrate how to click through the rubric tabs and type comments. Notice that my chosen rubric is now at the top of the student’s assignment. I can click through the tabs for each category of my rubric, and select the box for where the student scores on the rubric. I can also type any extra comments in this box to the right. 24 Click “Submit.” Once I’m finished grading with my rubric and typing my comments, I click “Submit.” This attaches the graded rubric as well as my comments to the bottom of the student’s assignment. 25 Scroll down to show that the rubric and comments have been added to student’s paper. Notice that the student’s scores in each category of the rubric are highlighted, and my comments appear at the bottom. 26 Click “Next” to grade the next student’s submission. I am now finished grading this student’s submission, and I can click “Next” to grade the next student’s submission. 27 When finished grading, exit from the students’ submissions and return to the Google sheet where Doctopus was launched. When finished grading, exit from the students’ submissions and return to the Google sheet where Doctopus was launched. 28 Click the tab “rubricScores” at the bottom to see all student scores. Click the tab “rubricScores” at the bottom to see all student scores. Notice that the students and their results appear in alphabetical order all on one sheet. From here, I can simply add their points horizontally for their total score. 29 End slide. As you can see, using Goobric with Doctopus saves paper and time when grading writing assignments. I hope you’ll try it out soon!